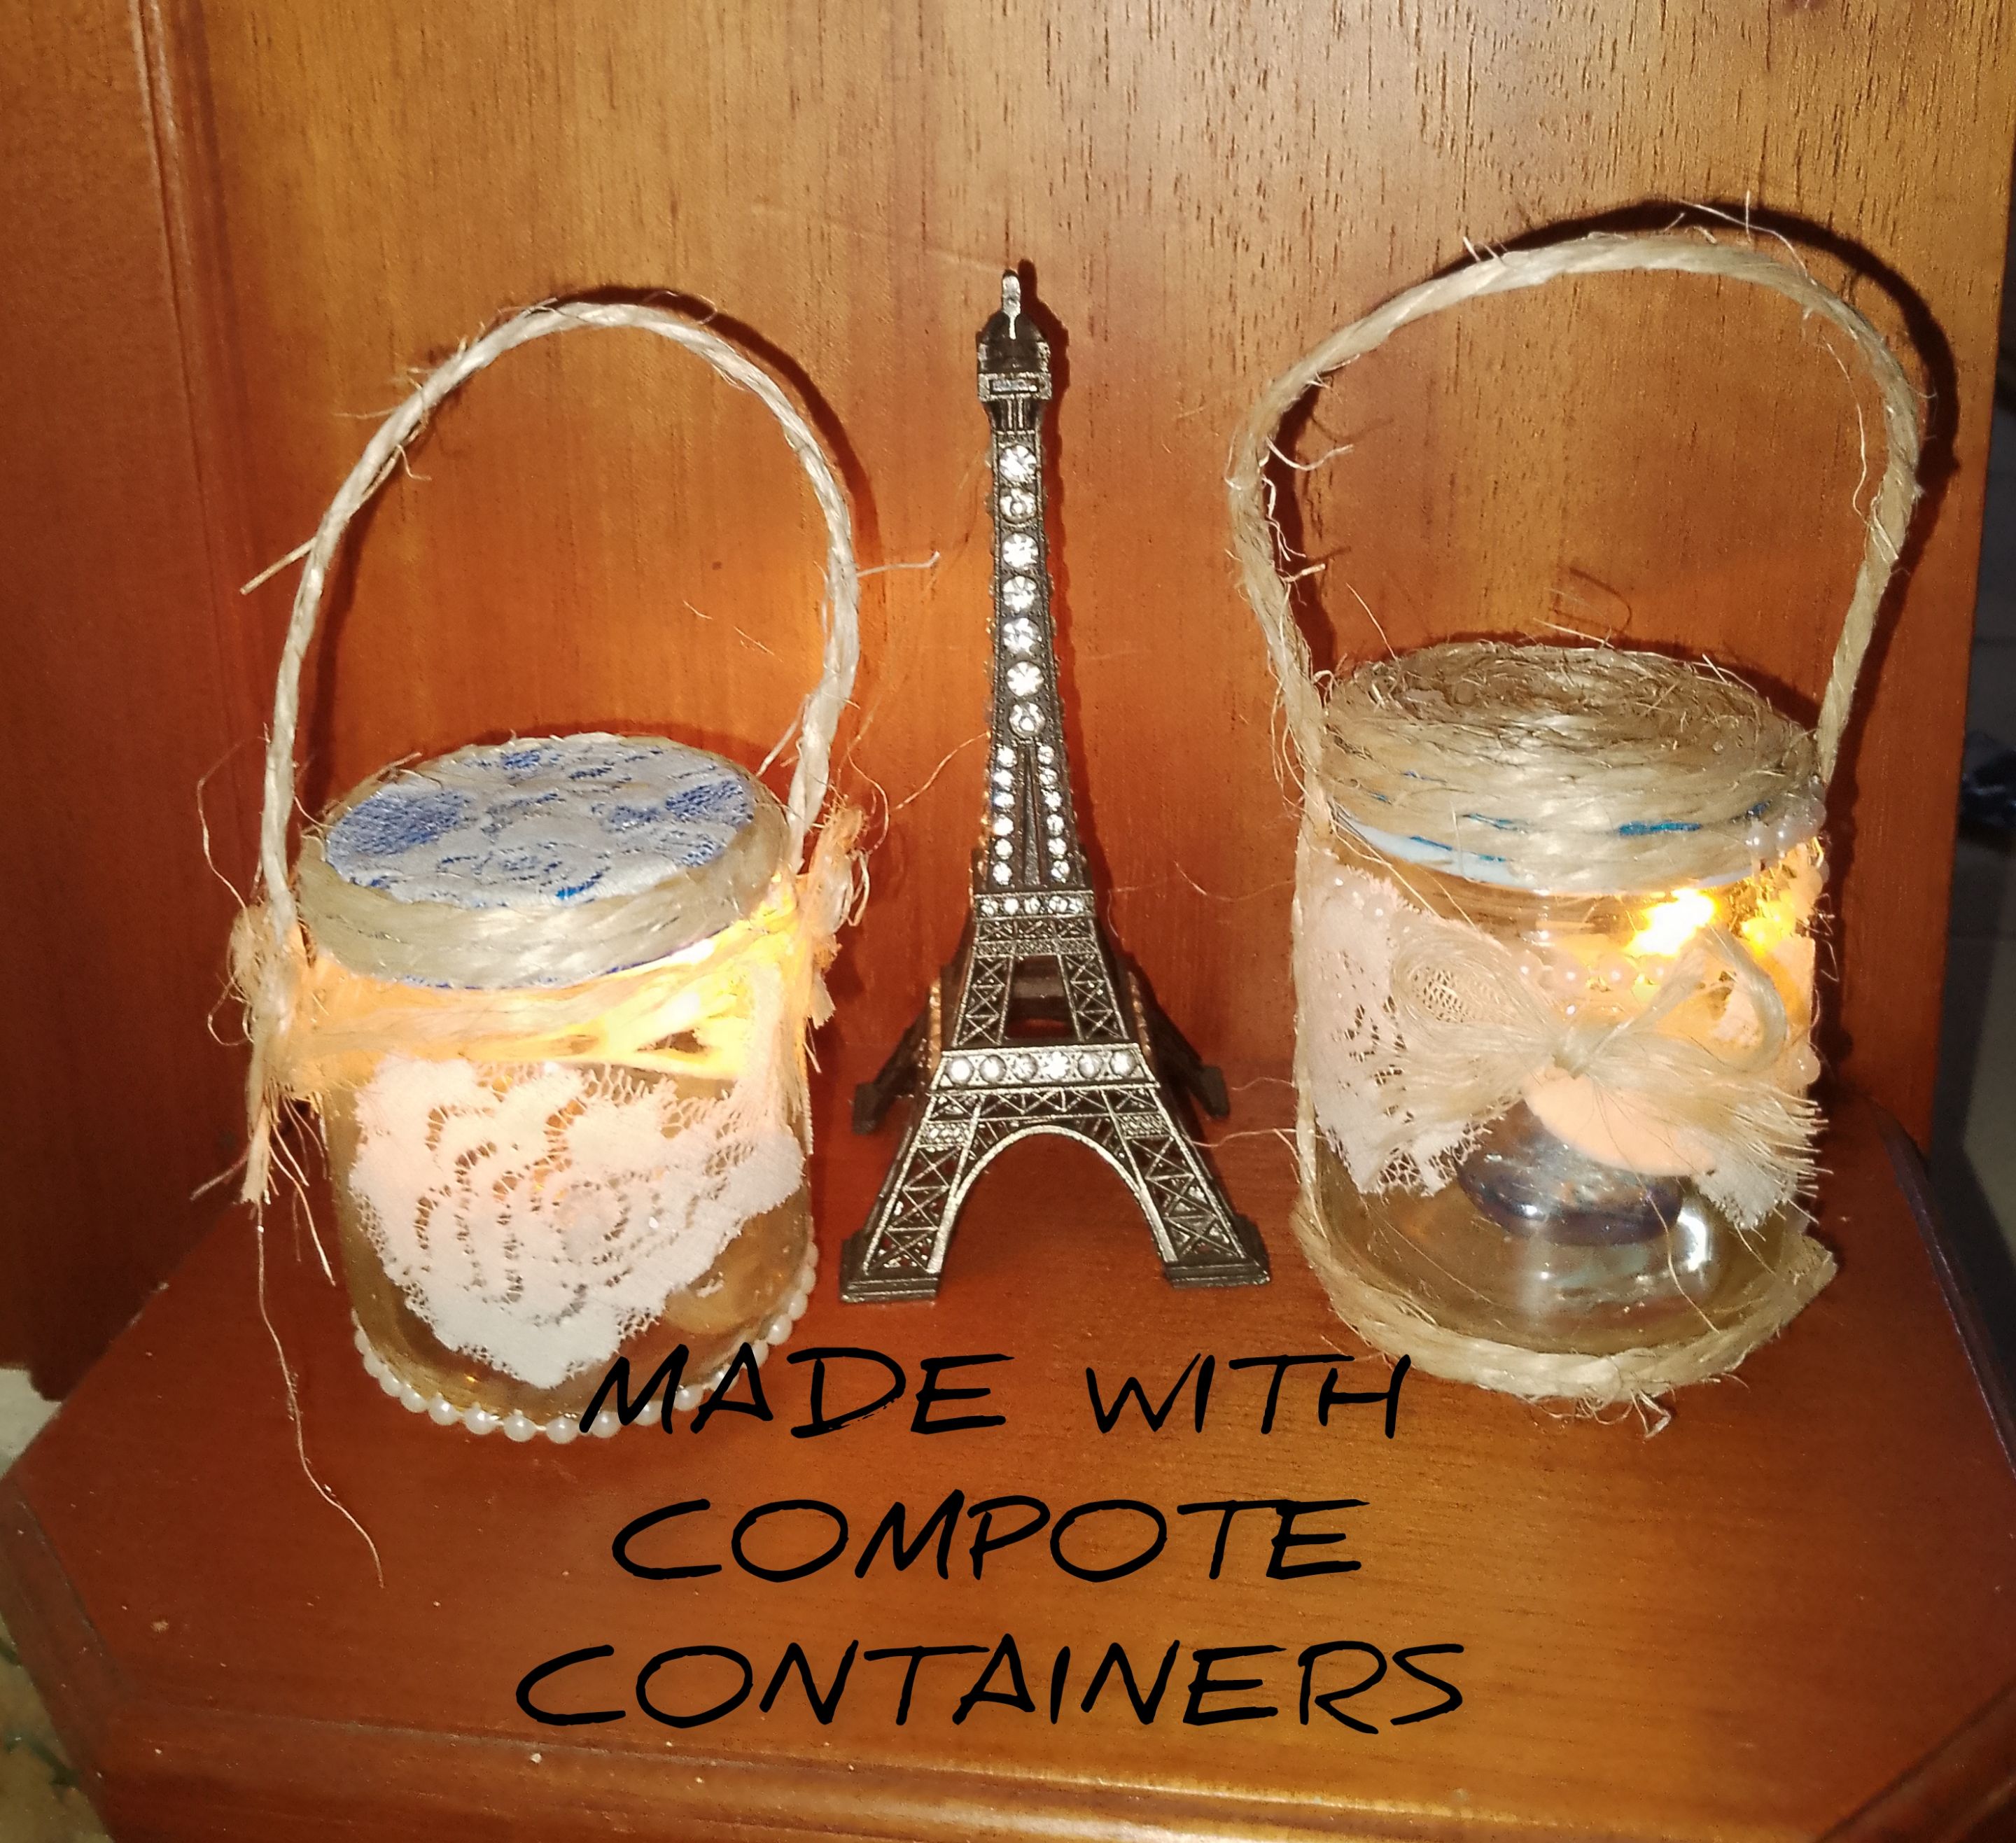
(ENG)
Hello everyone, I wish you a great week, full of many successes, many new things to create and show. I am pleased, as always, to be with you at @hivediy, step by step to show a very beautiful and delicate step by step, on how to make some beautiful candlesticks, using the glass containers of compotes, these are very useful, as a consequence of the constant blackouts in this area of the world, and minimizes the danger represented by lighting matches inside our homes, these chandeliers can illuminate us in these situations without us running any risk. So, I invite you to my blog, and see how I did it.
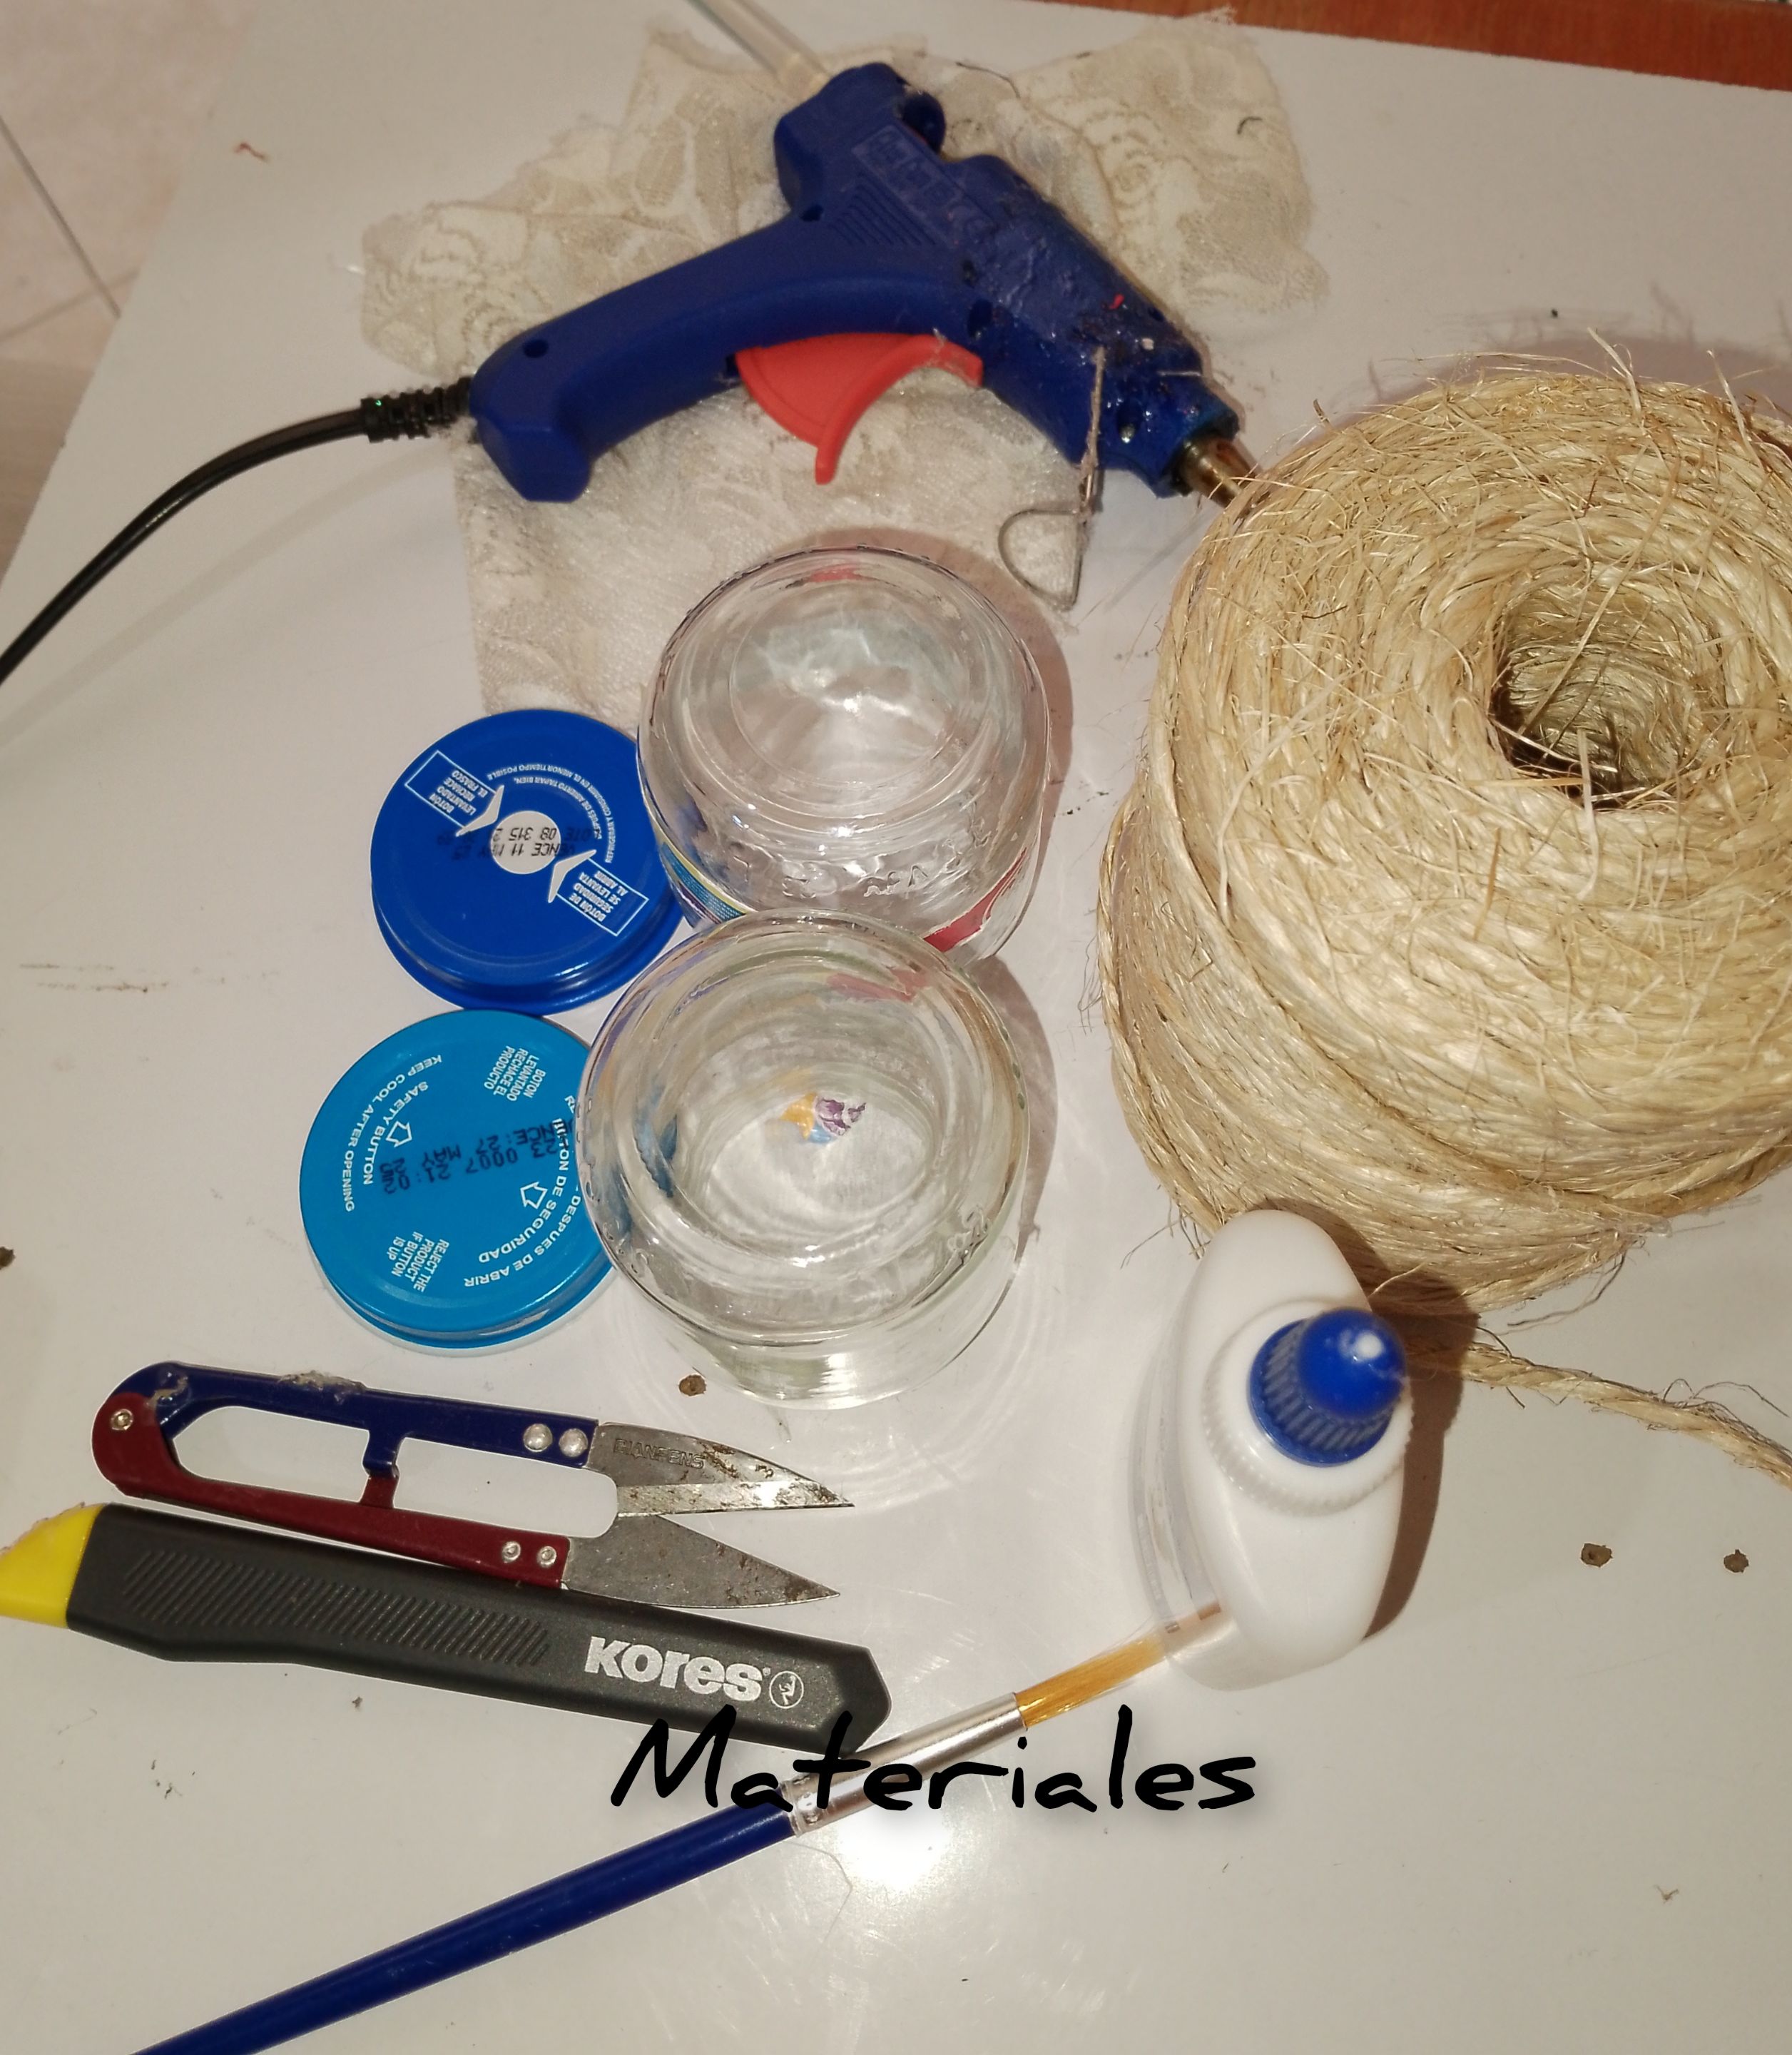
Materials:
. Two small containers of compotes with their lids.
. White glue and hot silicone.
. Exact.
. Scissors.
. Rope.
. White flower doily.
. Brush.
. Half pearls running.
. Small, battery-powered wicks.
Steps:
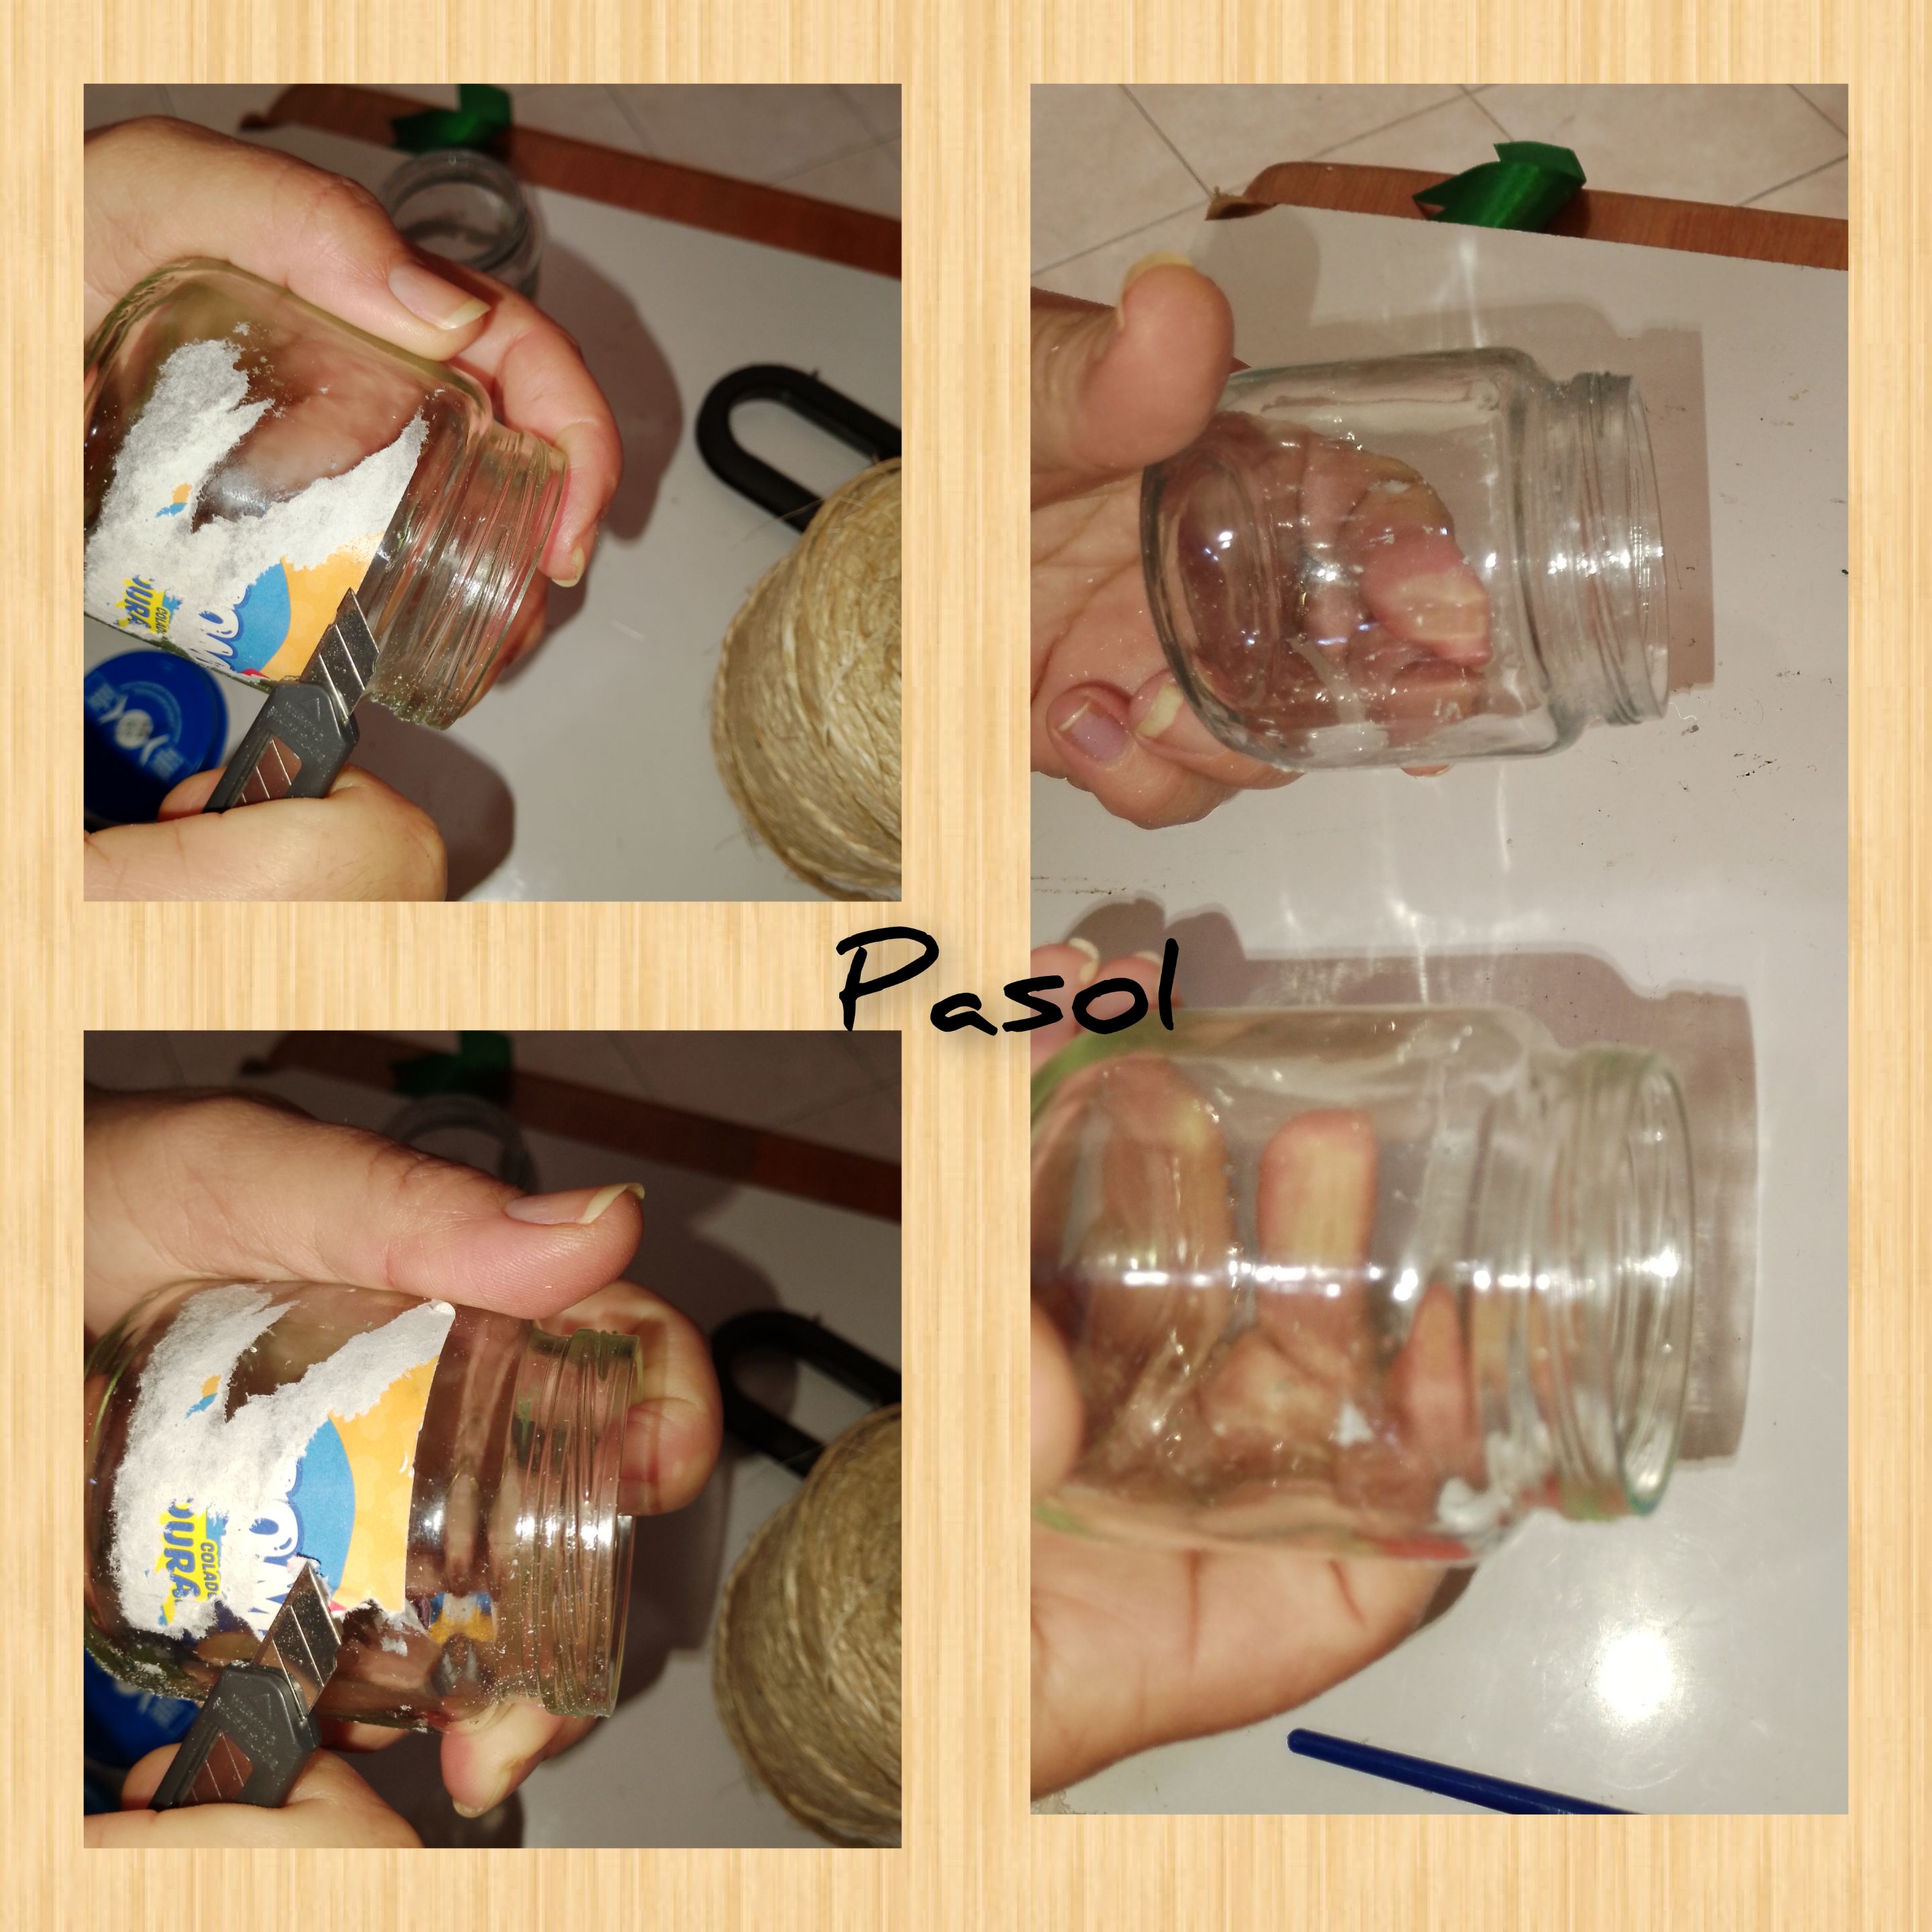
1.) Start, conditioning the glass containers, remove the commercial label, wash and dry very well.
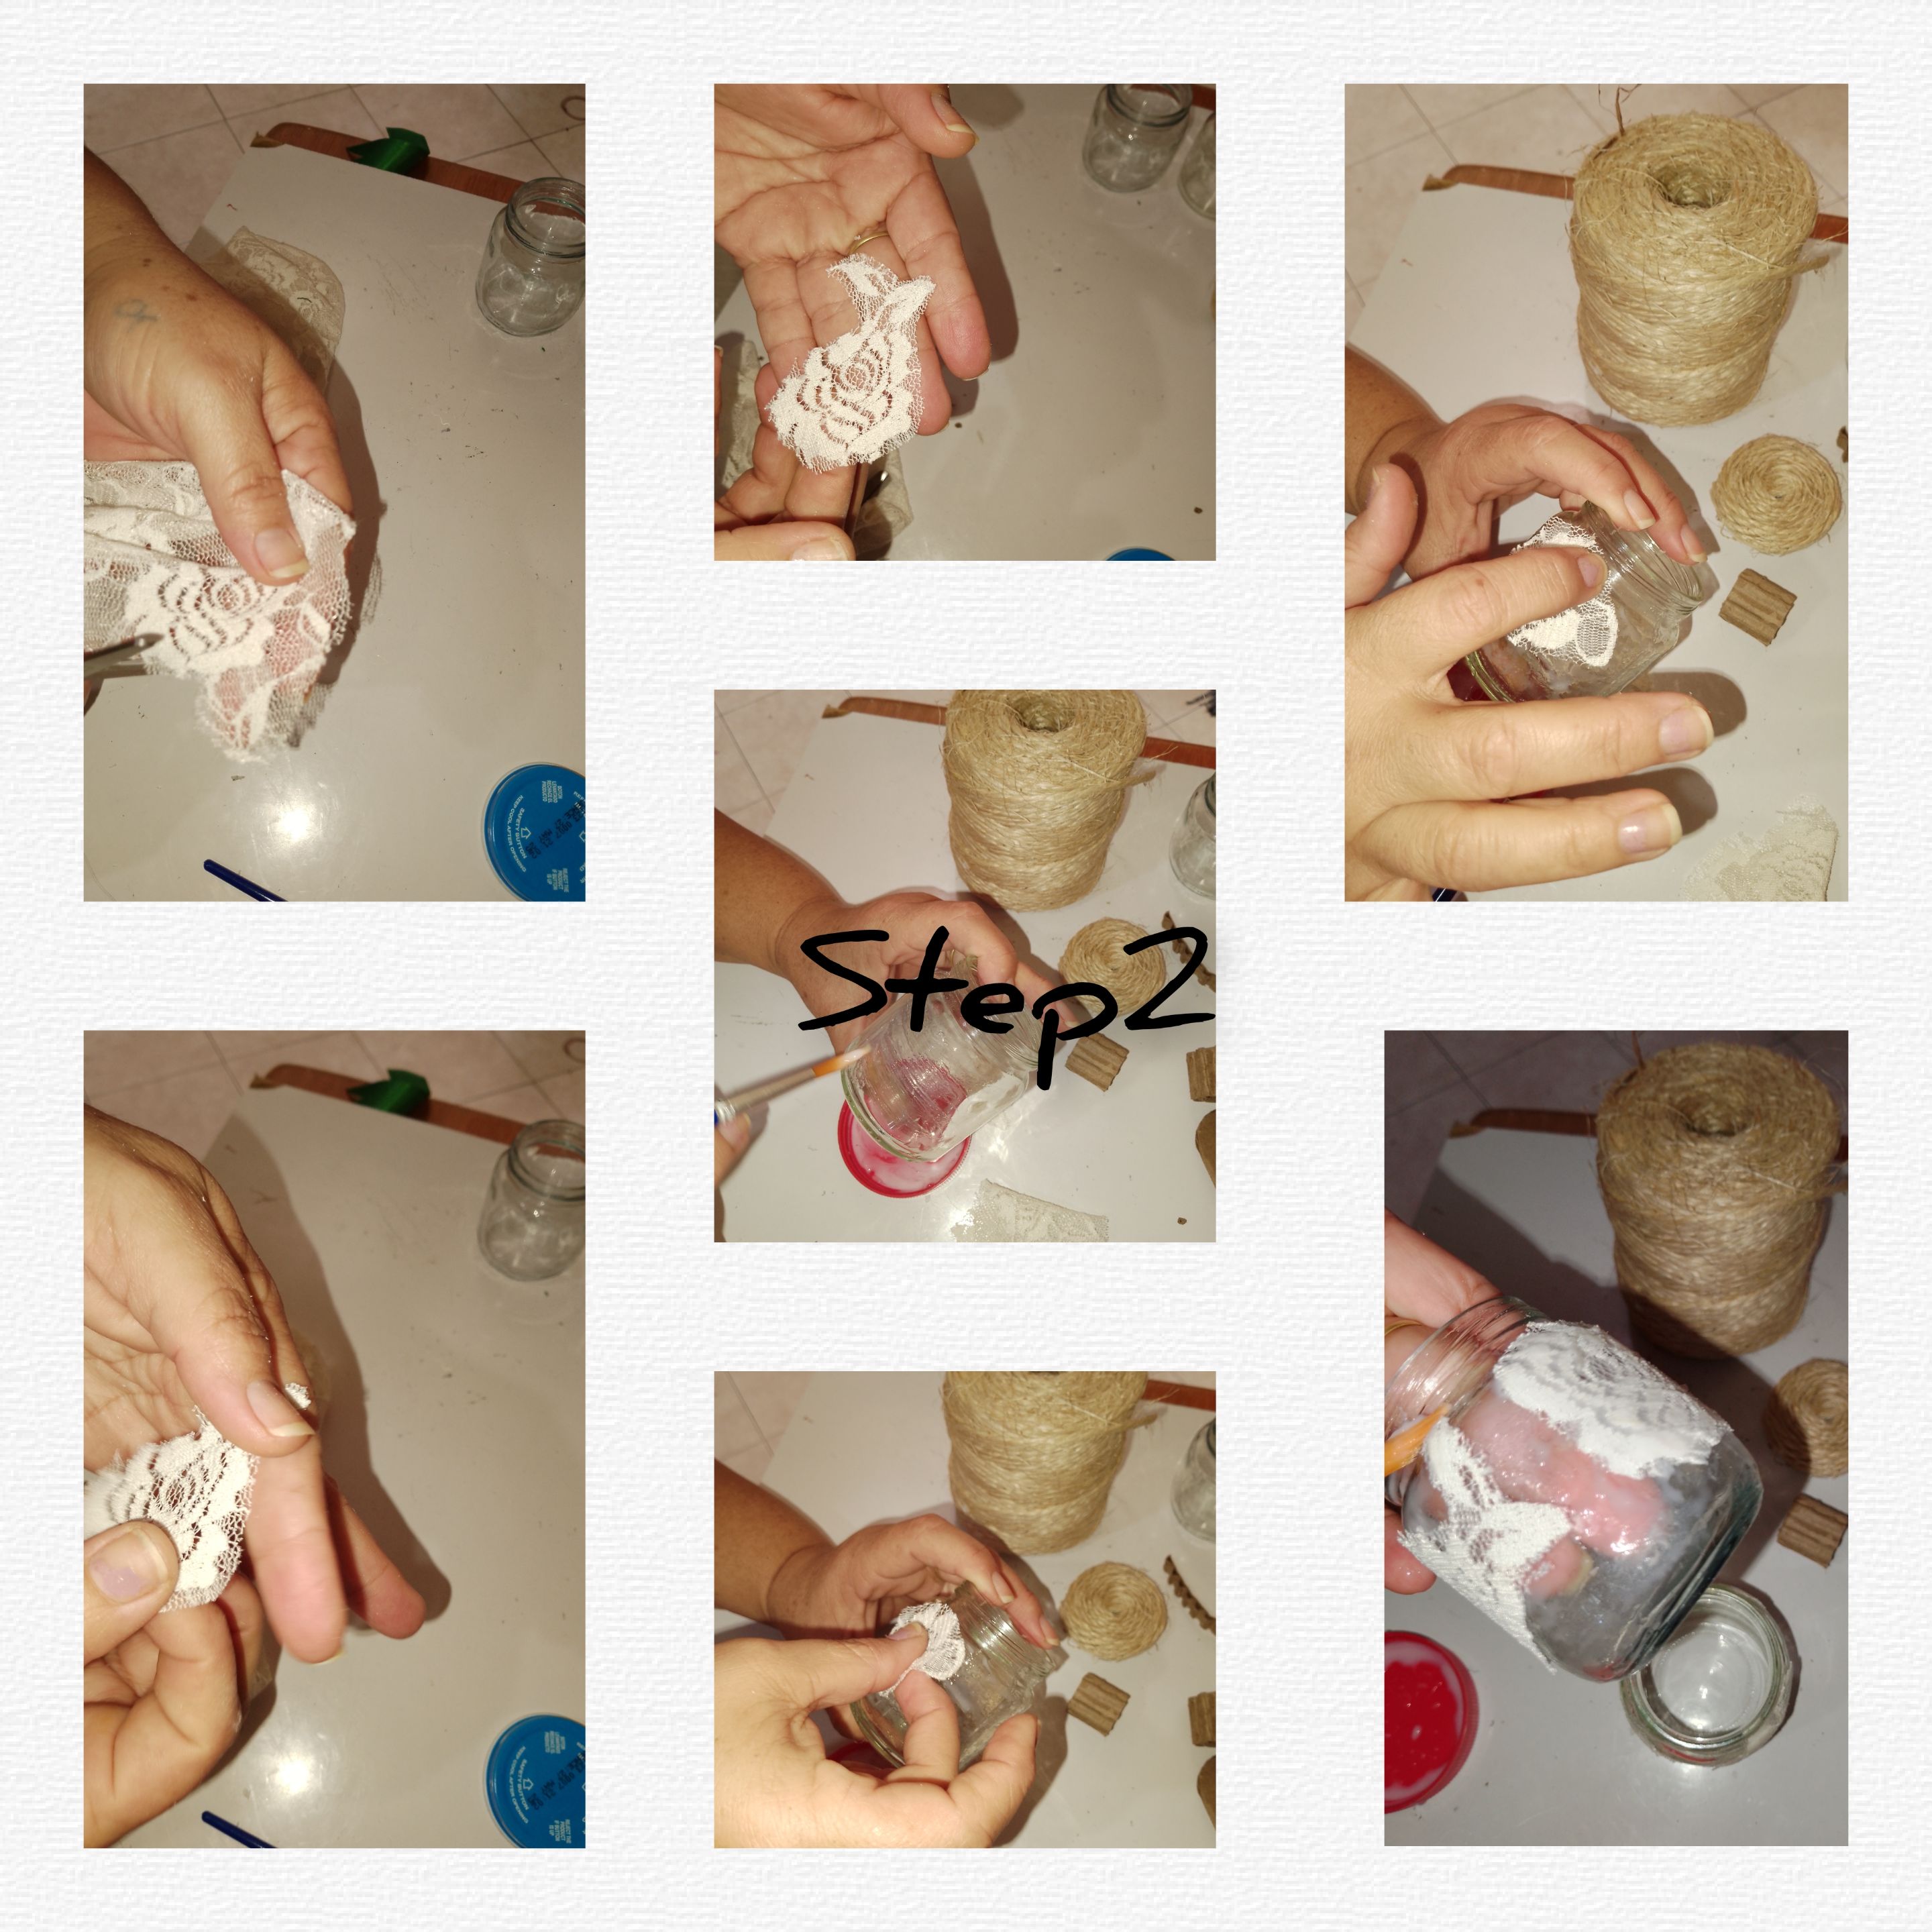
2.) cut out of the fabric, six applications or flowers, it is not necessary that they are perfectly cut, although that is what it is. Your preference. After having the applications, with the brush he applied plenty of glue to the glass container and glued about three flowers to each. I pass the brush with glue again, but this time over the applications, I remove it and let it dry for a reasonable amount of time.
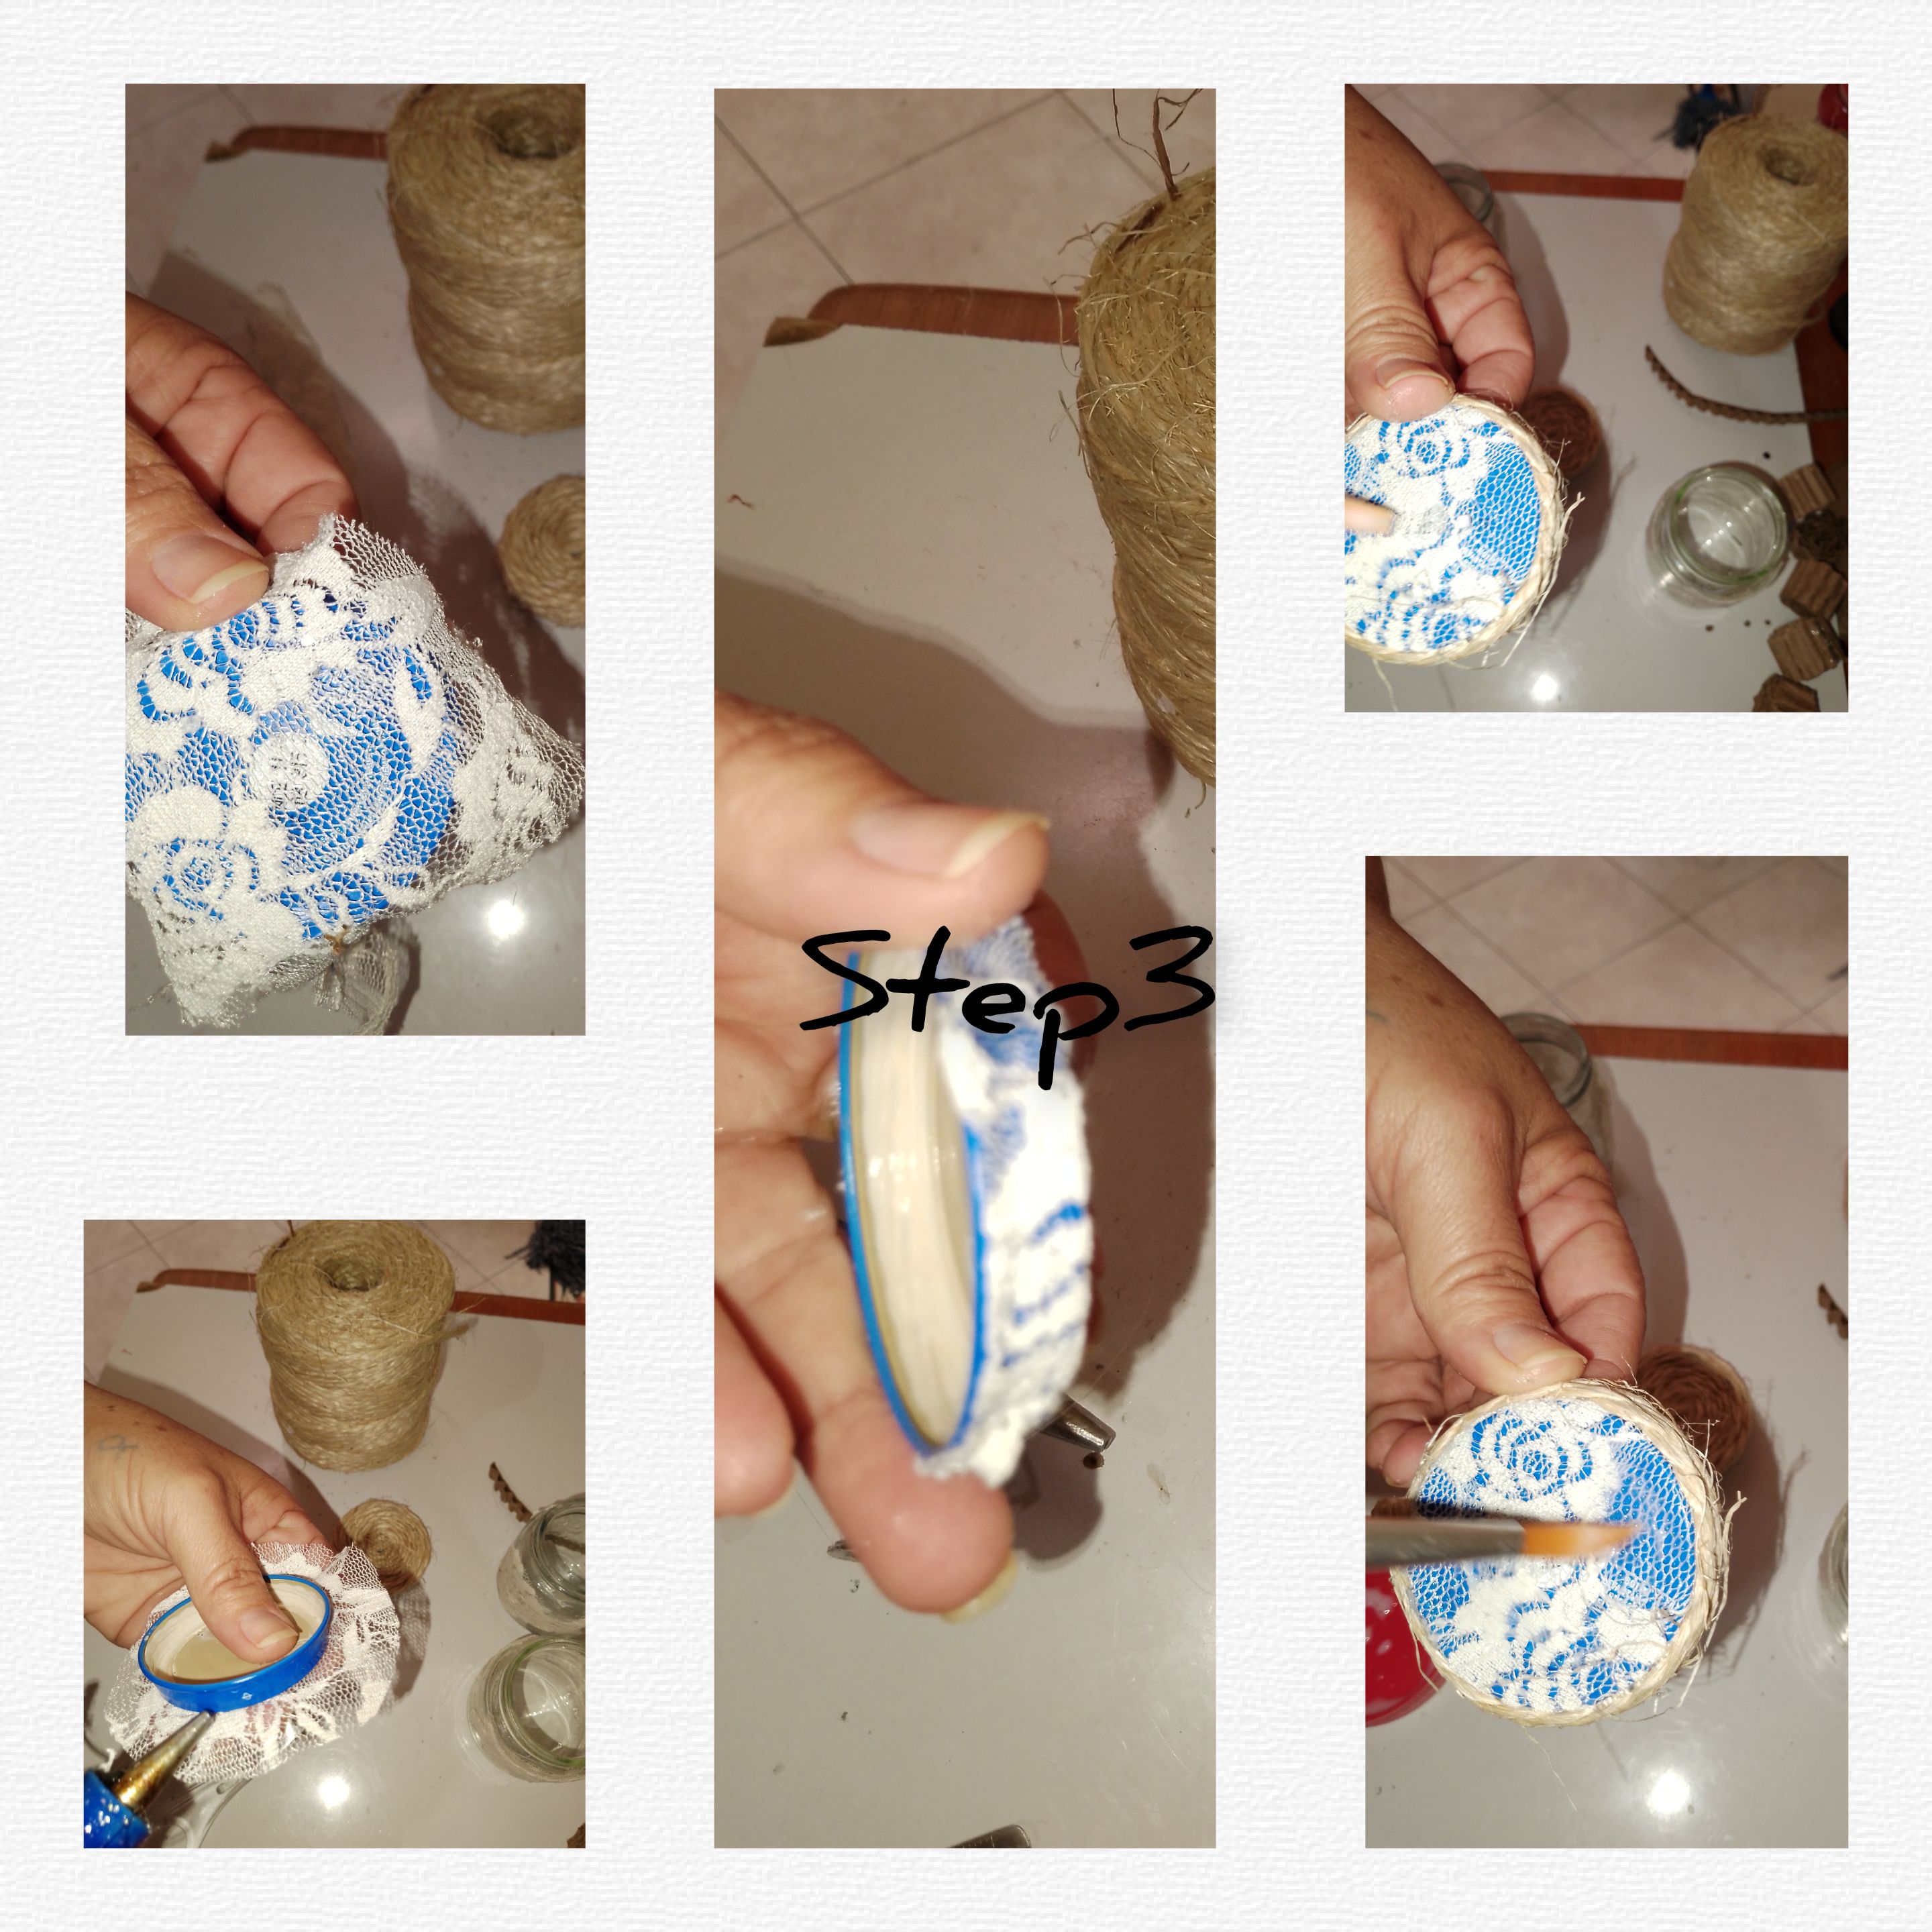
3.) To a first container lid, I applied hot silicone to the top and glued a piece of cloth, and covered the lid, cutting off the residue. Then, applying hot glue, I go around the edge of the lid three times. Once this is done, I put a little white glue on the fabric with the brush.
4.) After taking out the containers, I took out running pearls and glued them in the center of the flowers, this for both containers. Continuous, covering the bottom of a first container, with mecatillo.
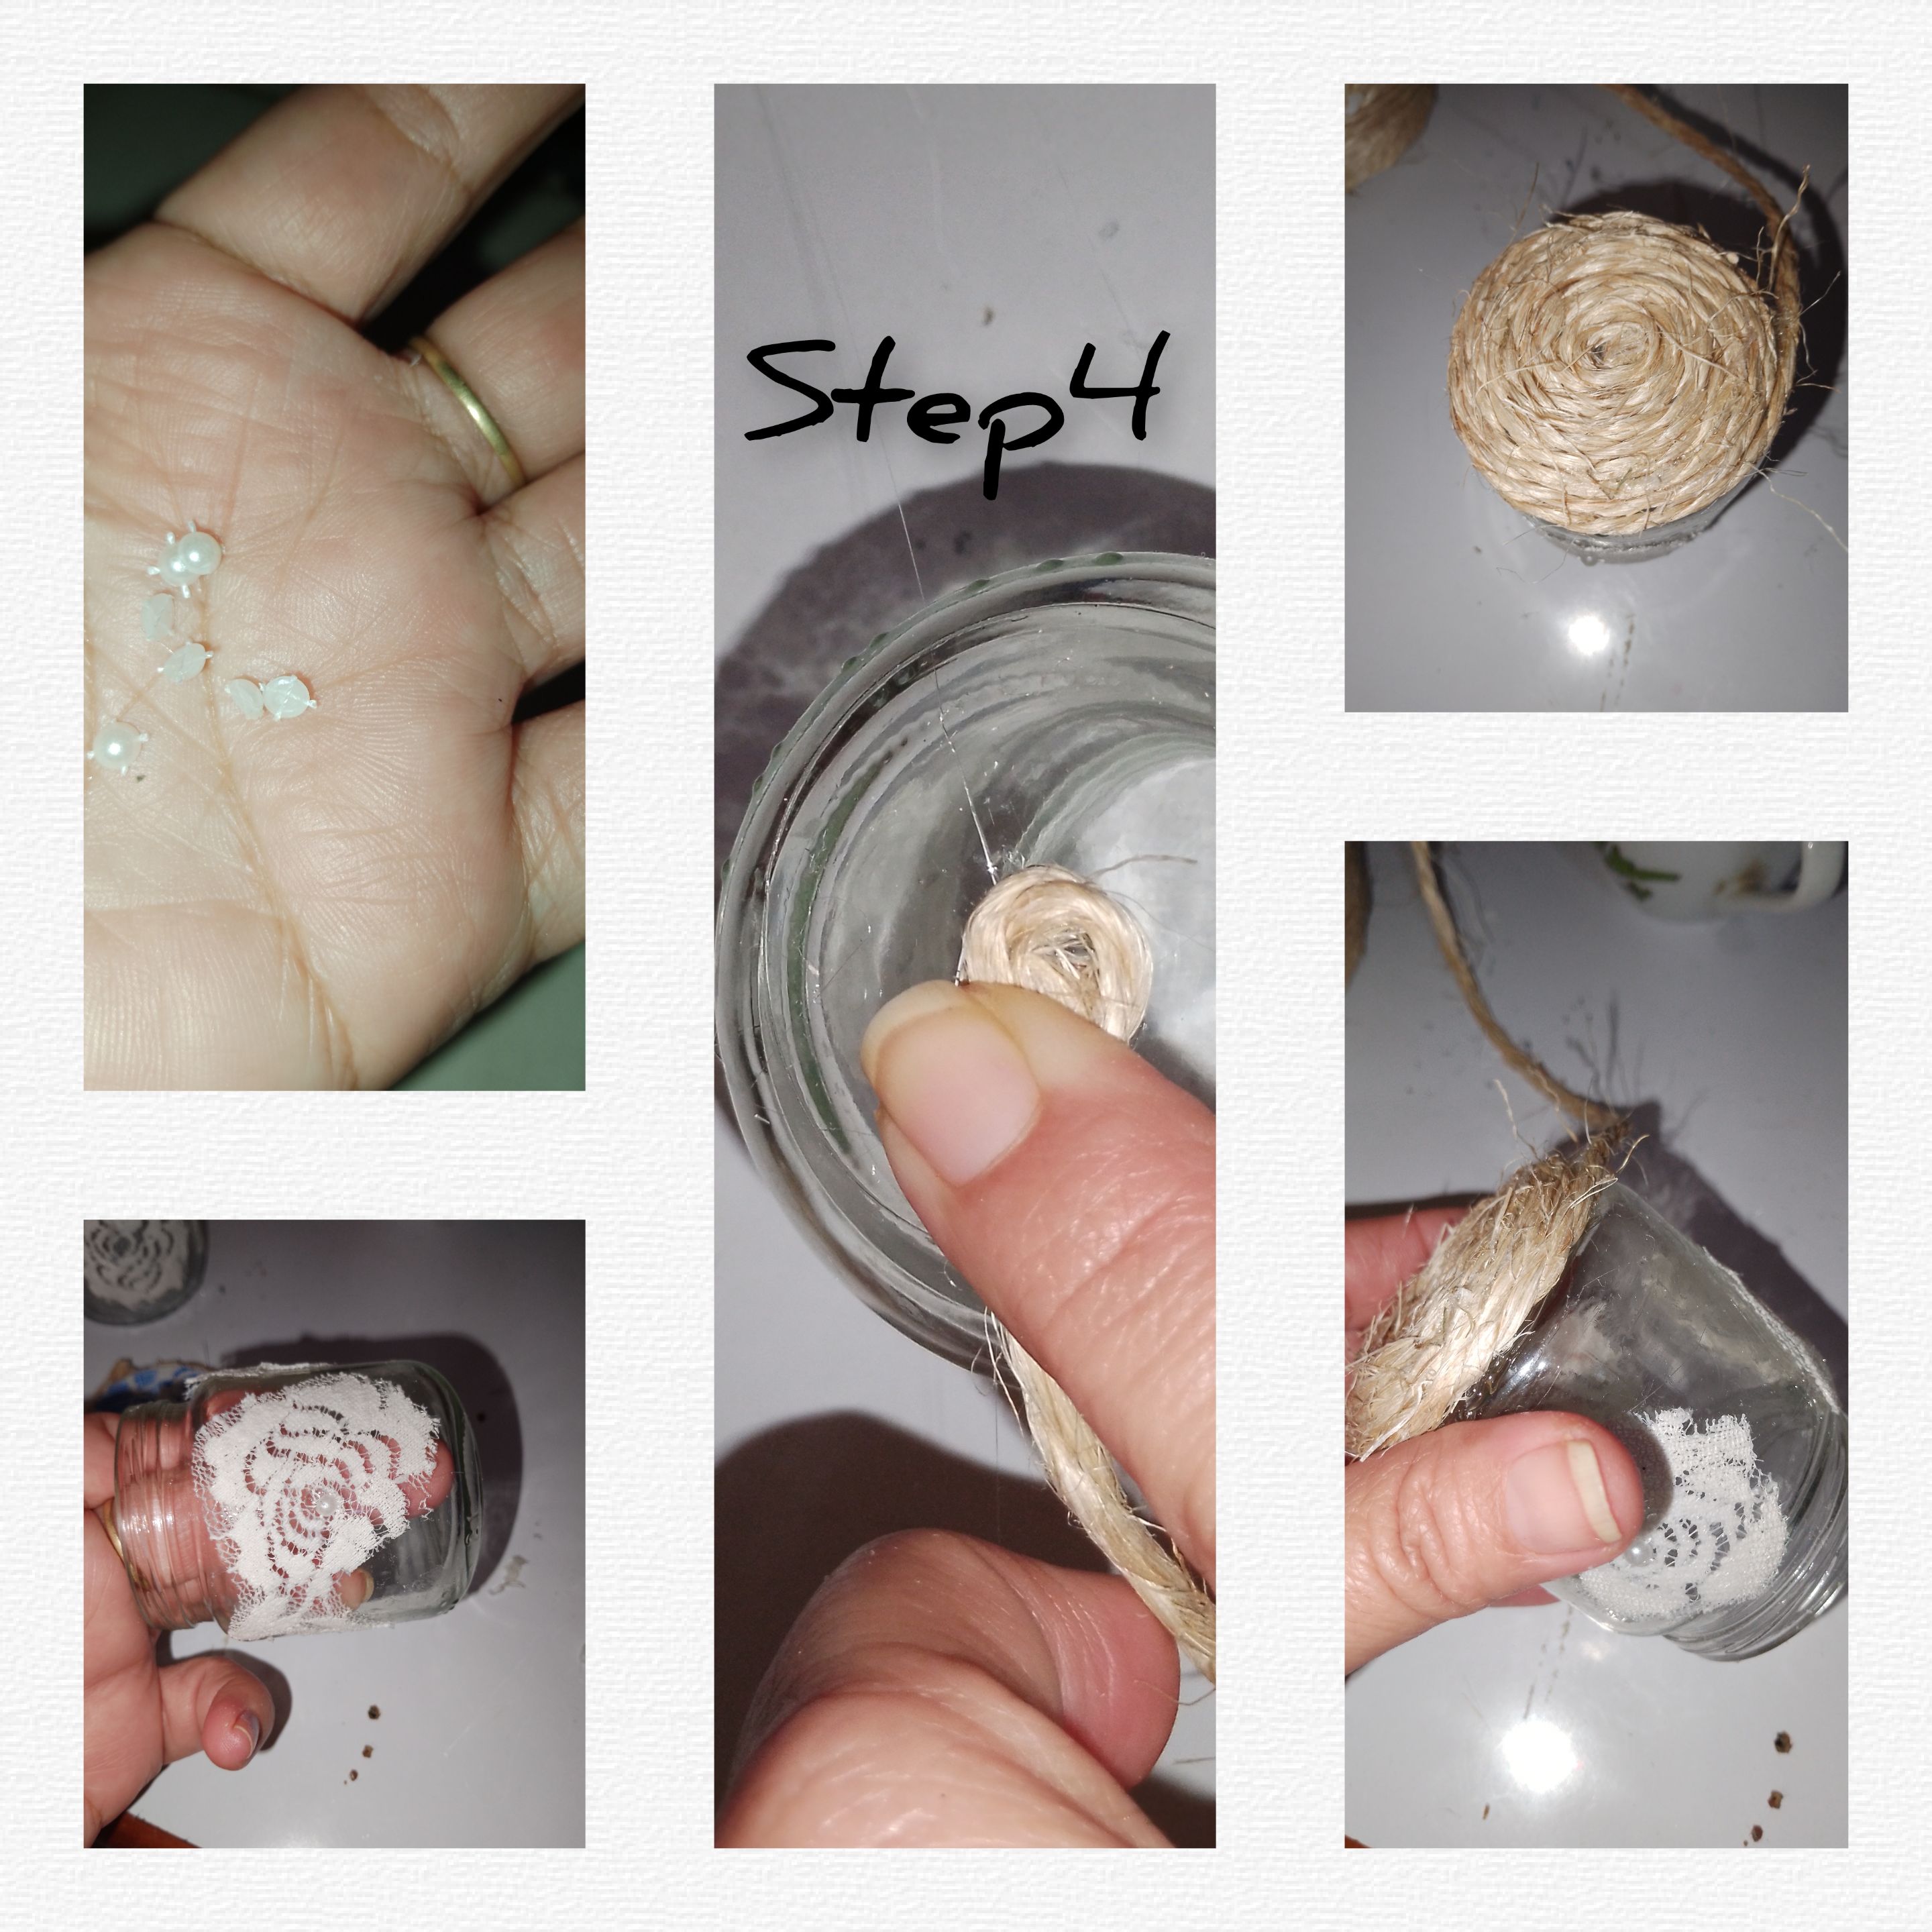
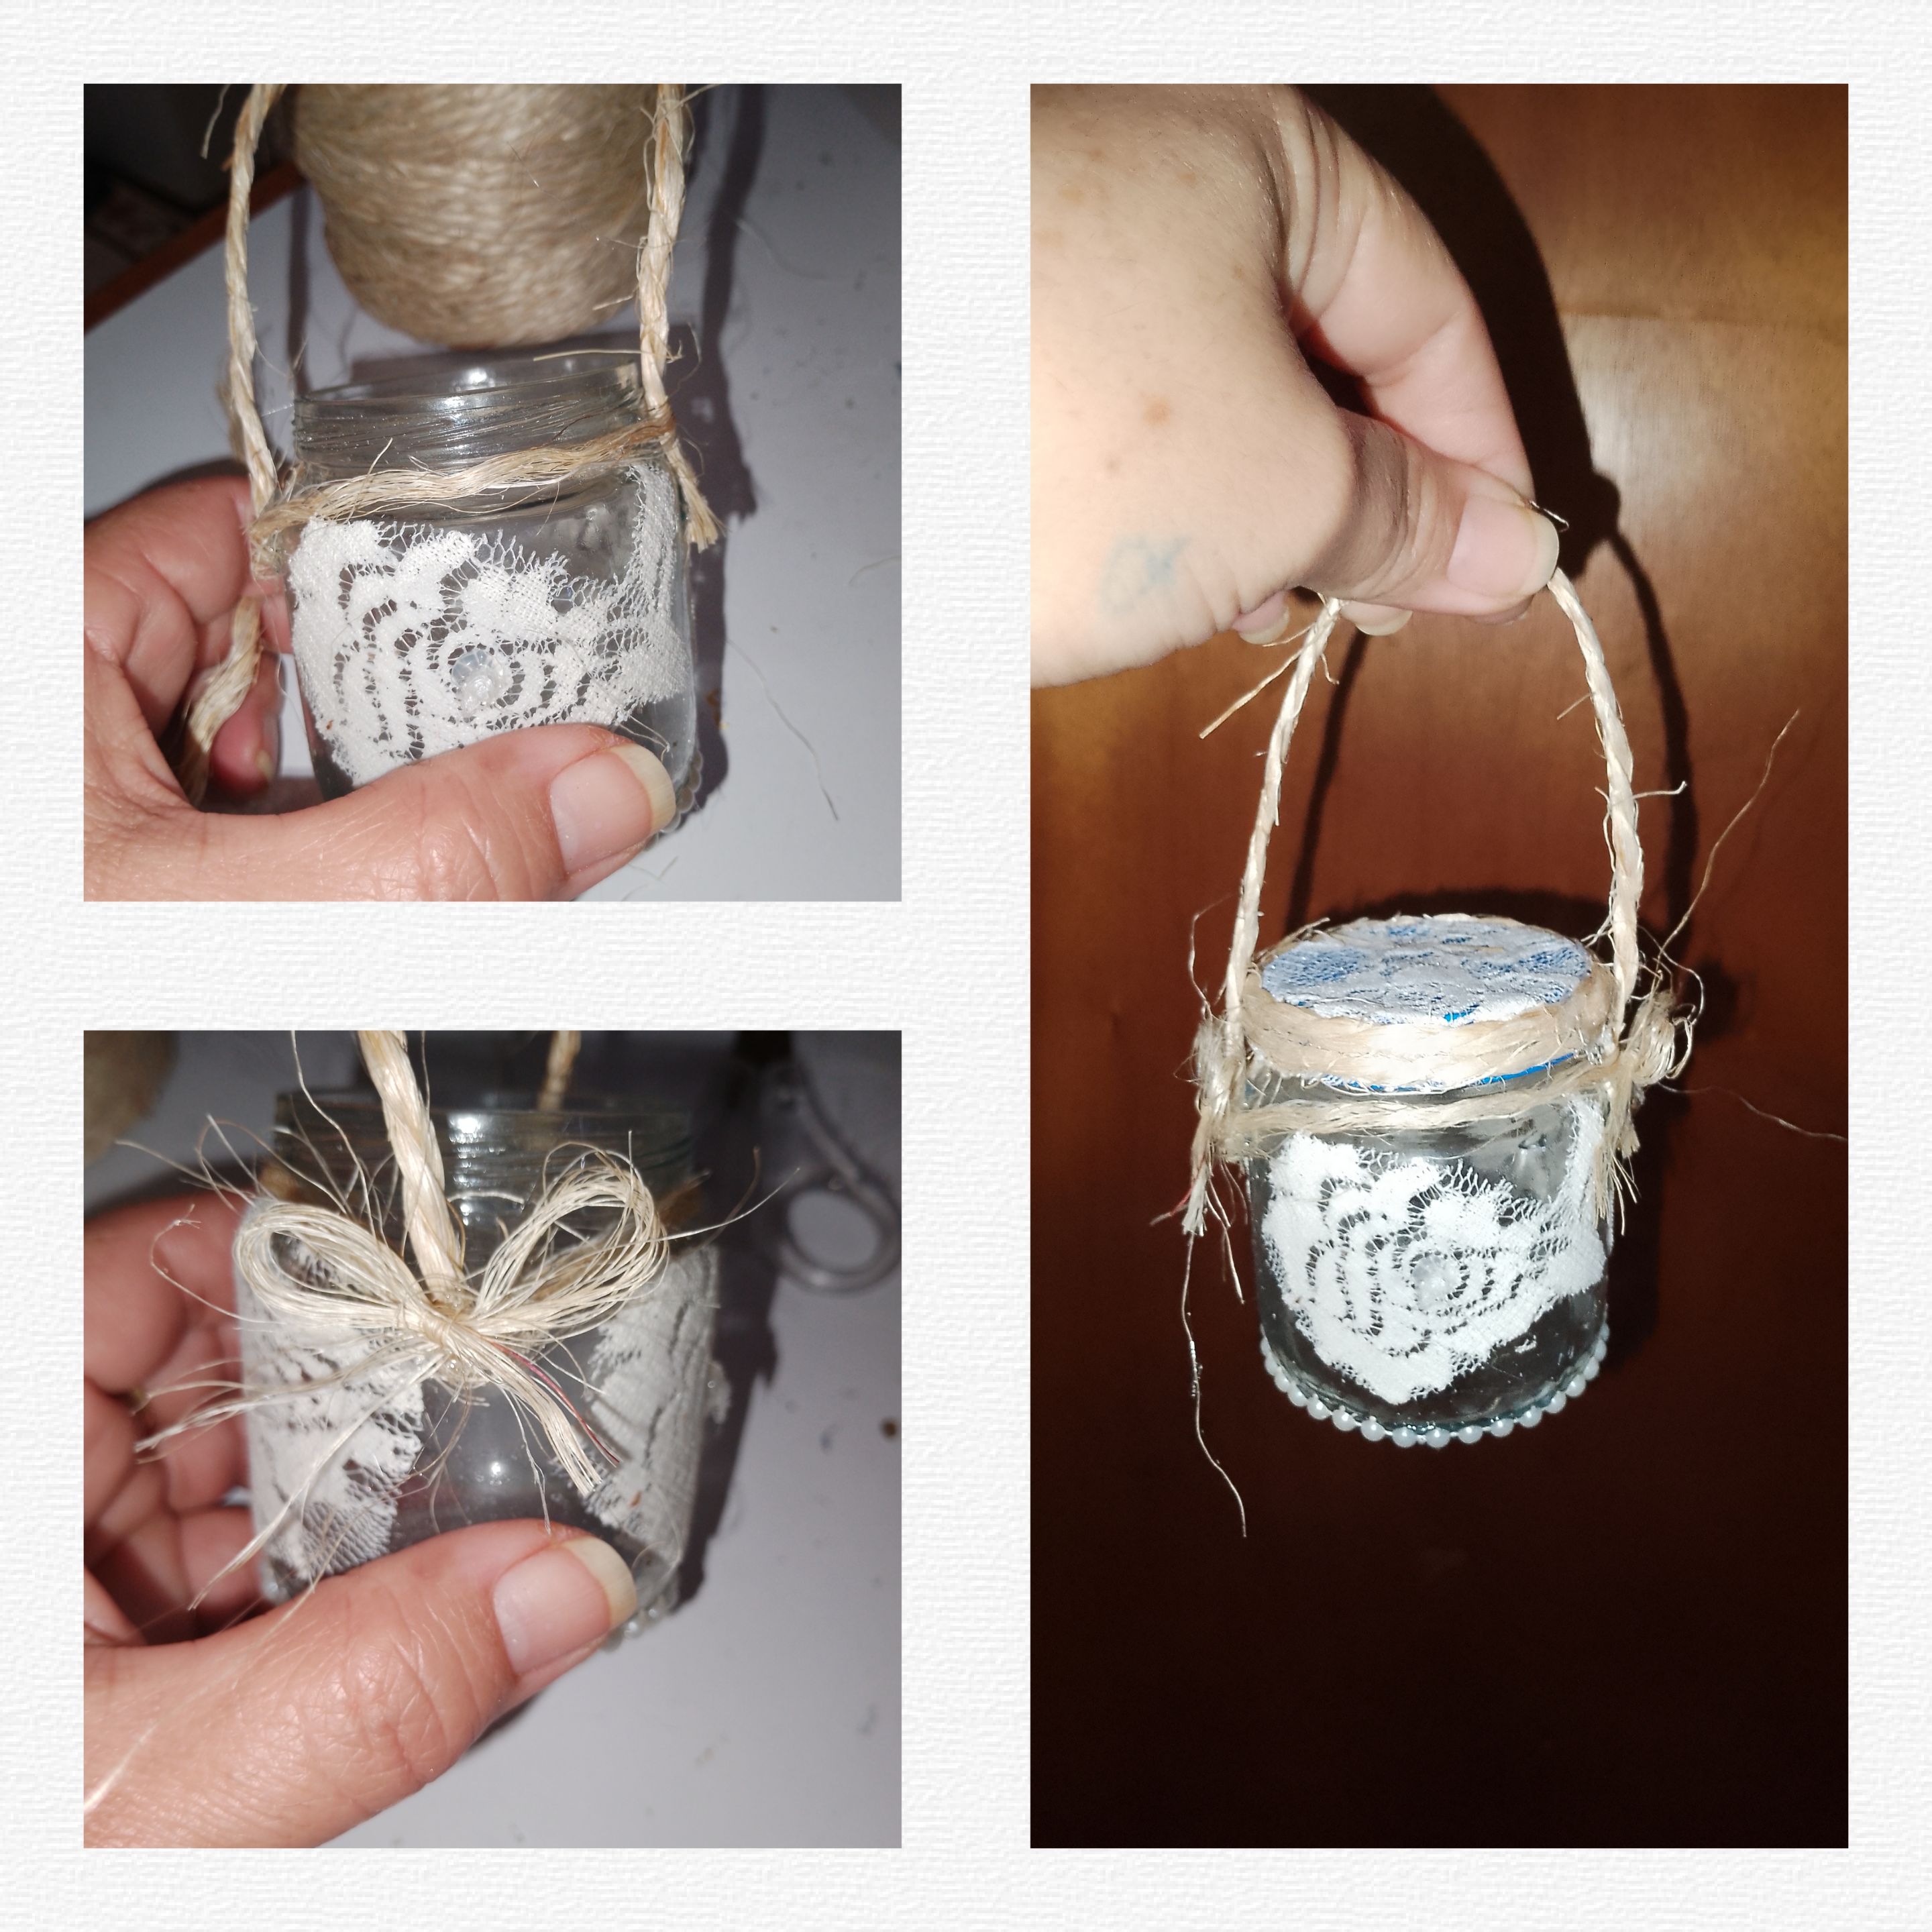
5.), completely covered, the where of the container, applied silicone and went up with the measuring stick, and reached the next end and bottom. Now I'm short. Thus leaving a pendant to the chandelier. Then, I glue pearls running along the entire edge at the top, and I make a small bow with rope, which I will glue on the front part, thus completing the first candelabra.
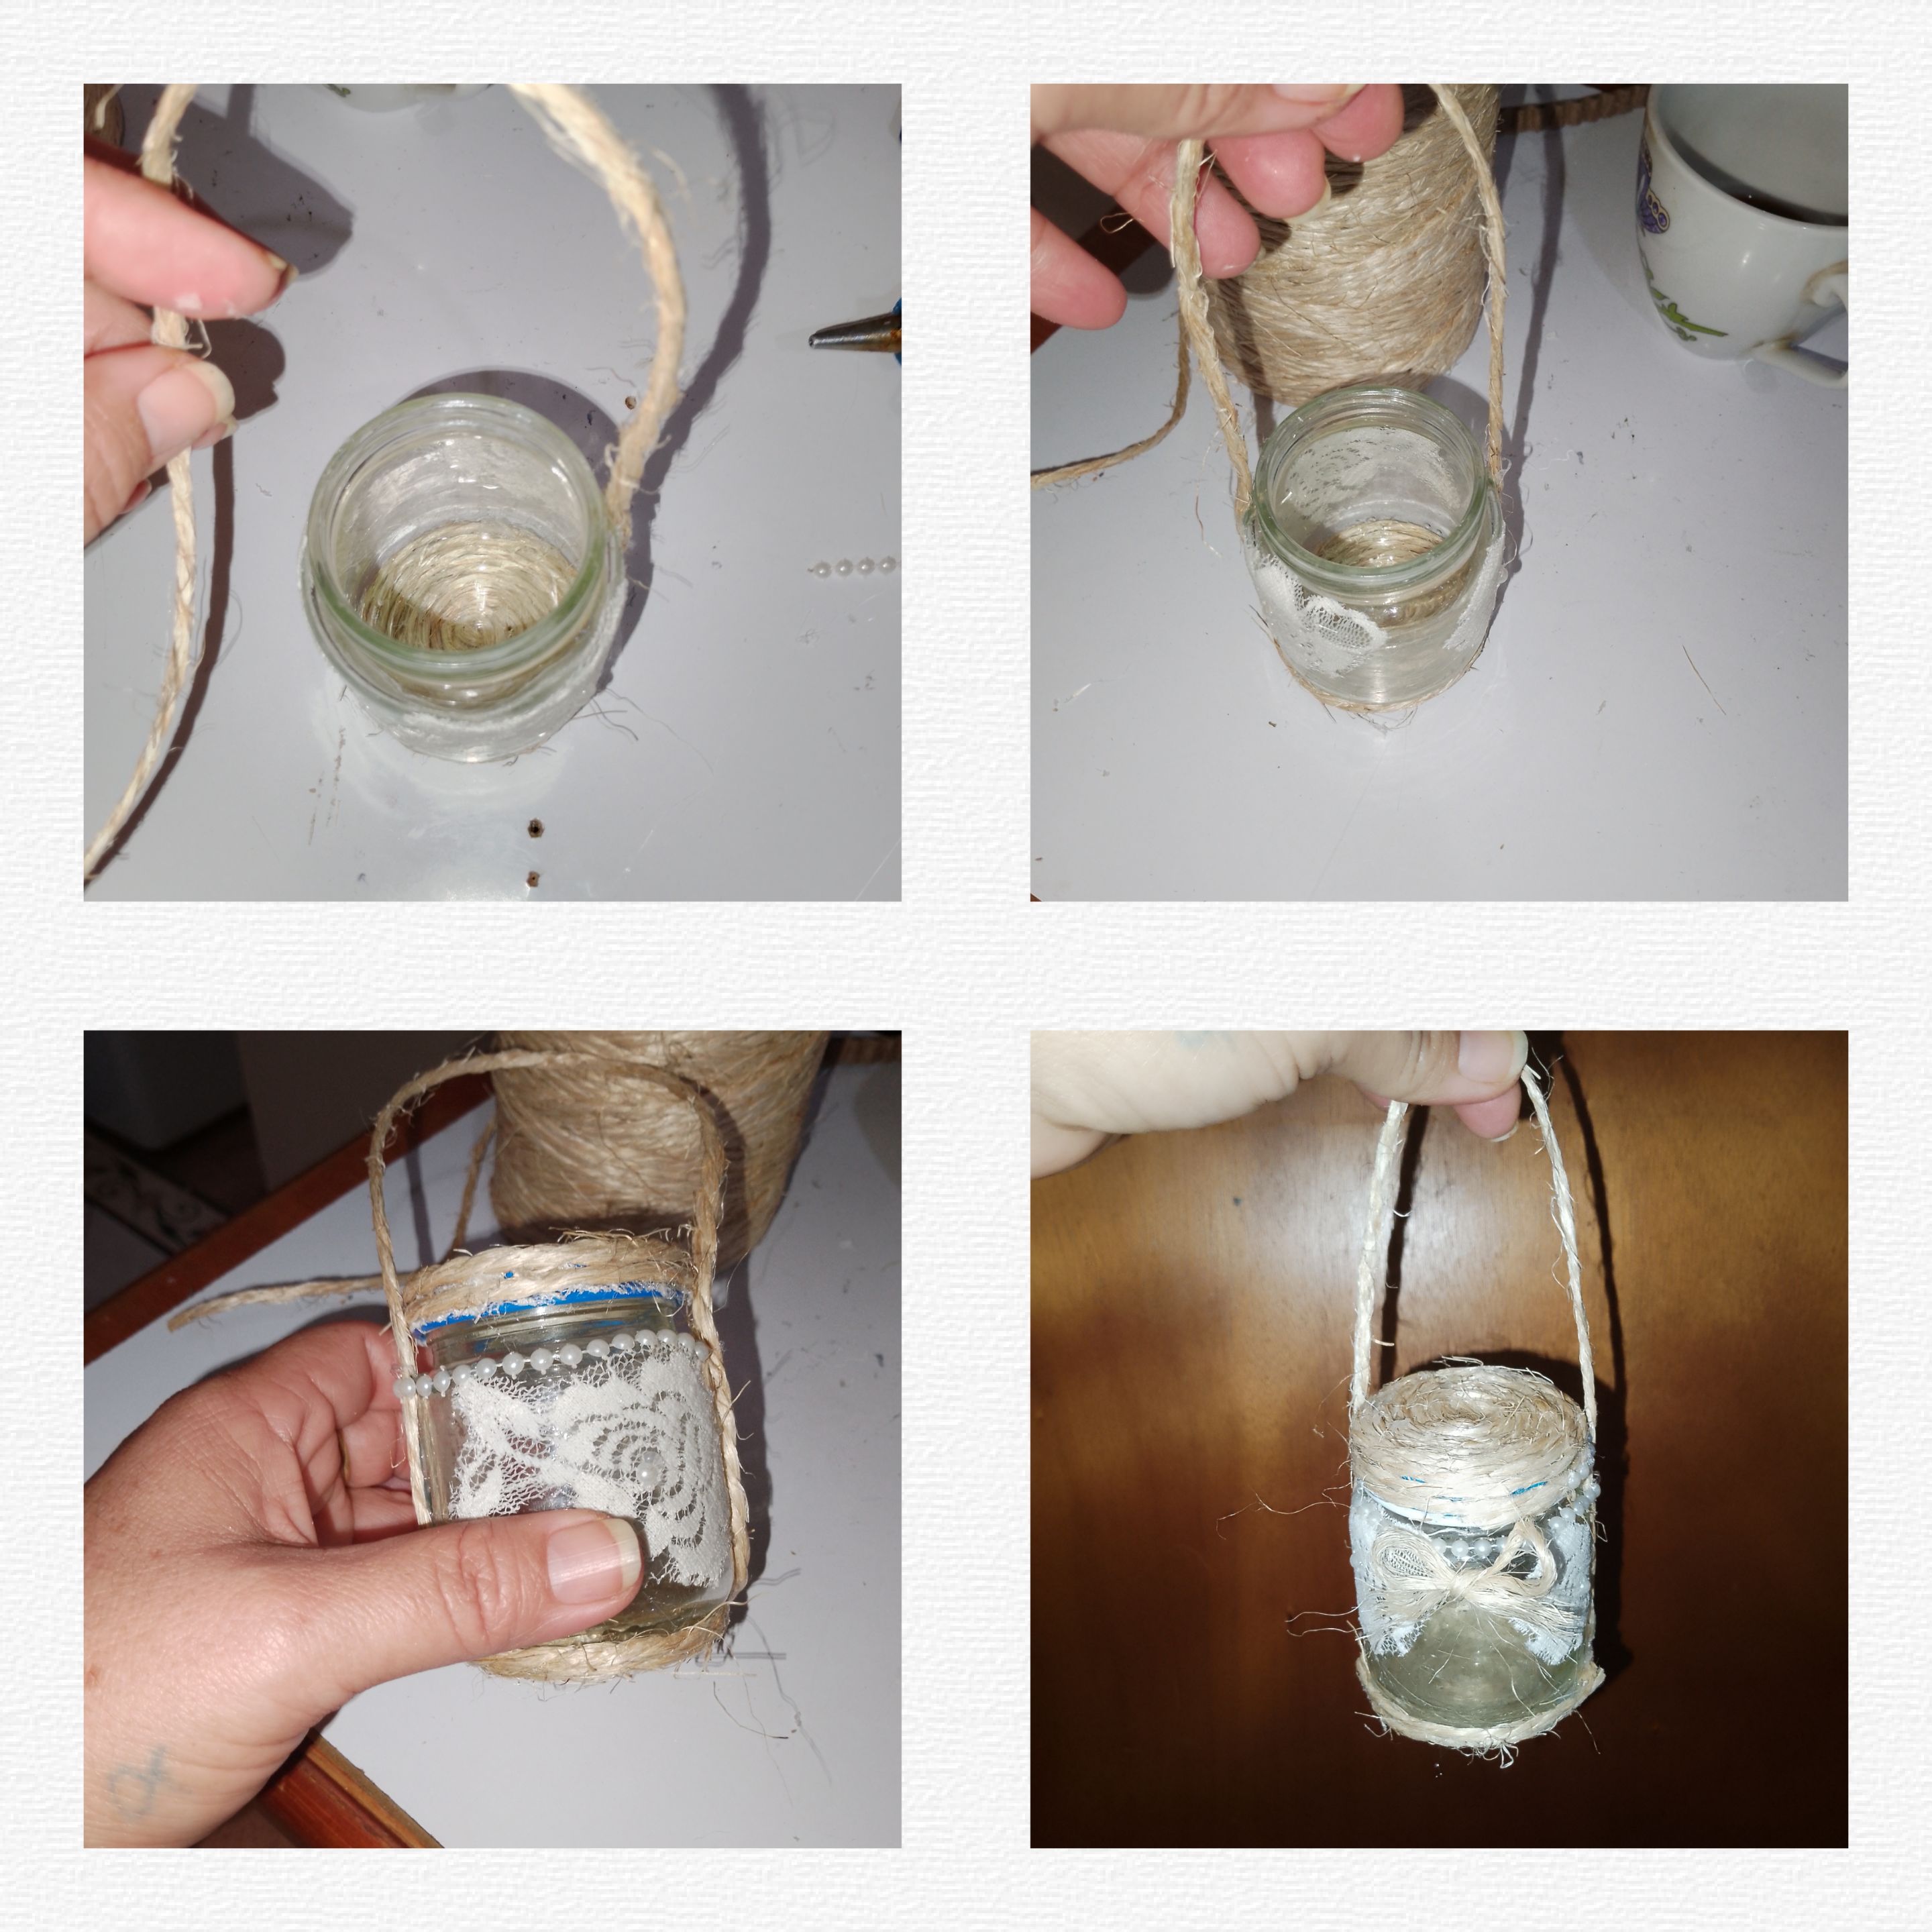
6.) The second lid, I will cover it, with glue and thread, up to the edge, cut a piece of thread and glue it from end to end to make a pendant. I glue running pearls to the bottom of the container.
7.) To finish, I make two, small bows and glue on both sides just above thecord.
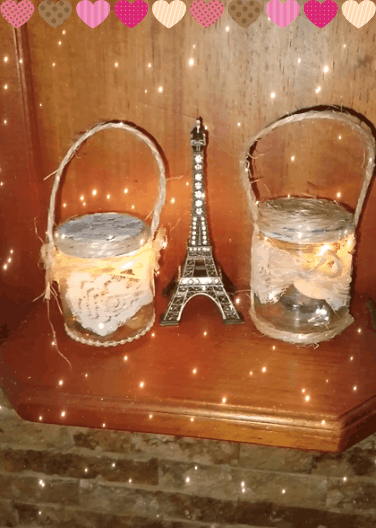
In this way, I conclude today's project, very happy with the final result.
. All photos are my property, taken with my smartphone.
. Use incollage
. Use language translator
Thank you for visiting my blog, it is always a pleasure to have you here.
(ESP)
Hola a todos, deseo está sea, una gran semana, llena de muchos éxitos muchas cosas nuevas por crear y mostrar. Me complace como siempre, estar con ustedes en @hivediy, paso para mostrar un muy bonito y delicado paso a paso, de como hacer unos lindos candelabros,usando los envases de vidrio de compotas, estos son de muchísima utilidad, como consecuencia de los constantes apagones en esta zona de el mundo, y minimiza el peligro, que representa prender cerillos dentro de nuestros hogares, estos candelabros, nos pueden iluminar, en estas situación sin que corramos ningún riesgo. De manera, que les invito a mí blog, y vean como lo hice
Materiales:
. Dos envases pequeños de compotas con sus tapas.
. Pegamento blanco y silicón caliente.
. Exacto.
. Tijeras.
. Mecate.
. Blonda de flores de color blanco.
. Pincel.
. Medias perlas corridas.
. Mechas pequeñas, de pilas.
Pasos:
1.) Inicio, acondicionando los envases de vidrio, desprendió la etiqueta comercial, lavo y seco muy bien.
2.) recortó de la tela, seis aplicaciones o flores, no es necesario estás quedan perfectamente cortadas, aunque ya eso es. Su preferencia. Luego de tener las aplicaciones, con el pincel aplicó abundante pegamento a el envase de vidrio y pego a cada unos tres flores. Paso nuevamente el pincel con pegamento, pero esta vez sobre las aplicaciones, alejo y dejo secar, un tiempo prudente.
3.) a una primera tapa de envase, aplicó en la parte superior silicón caliente y pego un trozo de tela, y cubro la tapa, cortando el residuo. Luego aplicando pegamento caliente, doy tres vueltas a la orilla de la tapa. Hecho esto, pongo sobre la tela un poco de pegamento blanco con el pincel.
4.) luego de sacar los envases, desprendió perlas corridas y pego en el centro de las flores, esto para ambos envases. Continuo, cubriendo el fondo de un primer envase, con mecatillo.
5.), cubierto en su totalidad, el dónde de el envase, aplicó silicón y subo con el mecatillo, y alcanzó a el siguiente extremo y bajo. Ahora sí corto. Dejando así un colgante a el candelabro. Luego, pego en la parte superior, perlitas corridas en todo el borde, y hago un pequeño lazo con mecate, que pegare en lab parte frontal dando así por culminado el primer candelabro.
6.) la segunda tapa, la cubrire, con pegamento y mecatillo, hasta el borde, corto un pedazo de mecatillo y pego de extremo a extremo para hcaer un colgante. Pego en la parte inferior de el envase, perlas corridas.
7.) para culminar, hago dos, pequeños lazos y pego en ambos lados justo sobre el cordón.
De esta manera, doy por concluido, el proyecto de el día de hoy, muy contenta con el resultado final.
. Todas las fotos son de mí propiedad, tomadas con mí teléfono inteligente.
. Use incollage
. Use traductor lenguaje
Agradecida hayas visitado mi blog, siempre es un gusto tenerlos por acá