(ENG)
Hello everyone, full of enthusiasm and color today, to join you and this great community @jewelry, to create about these carnivals and join this Great Initiative "Carnival Accessories Contest". To do this, I have created a beautiful, and very striking Earrings and necklace, where I used the Wire and Jewelry technique, inspired by an accessory that is very common to use at these parties, such as the Mask, it will surely make you look very beautiful and stand out among costumed queens and troupes. The mask is very symbolic at this time, as well as the masks and costumes, which, according to each person's taste, you could merge them and give a great festive touch, and to this are added the jewelry and different garments, which would make it look good. Before starting, I want to extend the invitation to some great creators within the community, who surely already have something in mind and will surprise us, they are @nhaydu, @leidys01 and @creacioneslelys. Without further ado, I invite you to follow me. I hope you like it.

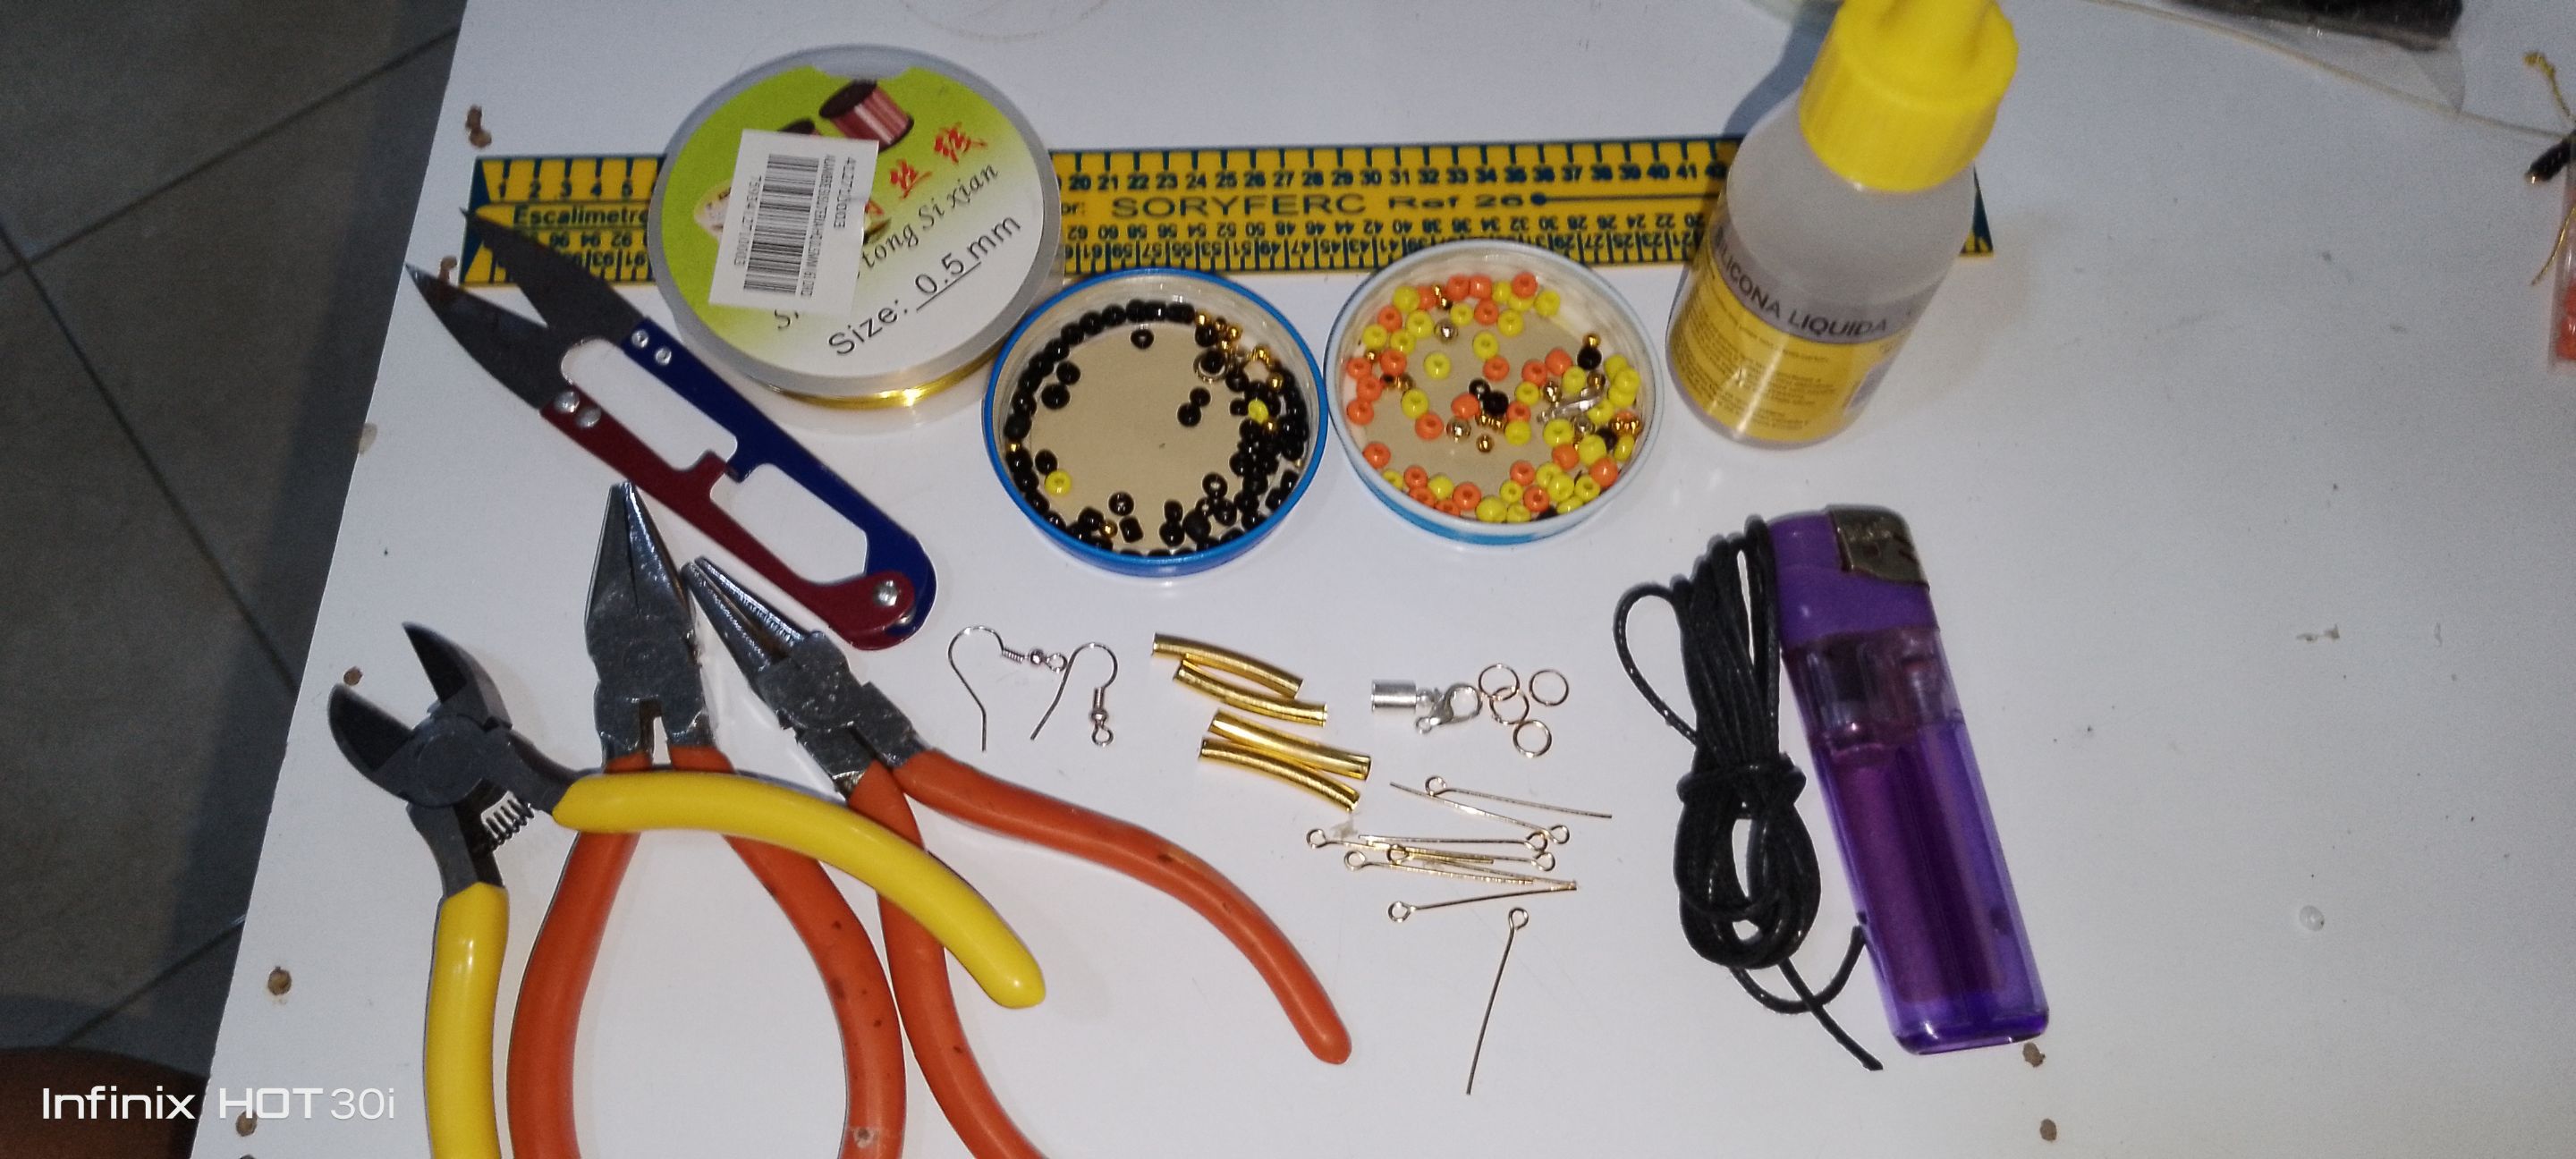
Materials used for the process:
. Colored beads (yellow, orange and black.
. Golden pearls.
. Golden wire n0.5
. Jewelry earrings.
. Round black leather.
. Golden perforated tubes.
. Small round knot tops.
. Necklace pin.
. Jewelry tweezers.
.Liquid glue.
. Jewelry pins.
. Jewelry tweezers.
. Scissors.
. Yeskero.
. Marking rule.
Process:
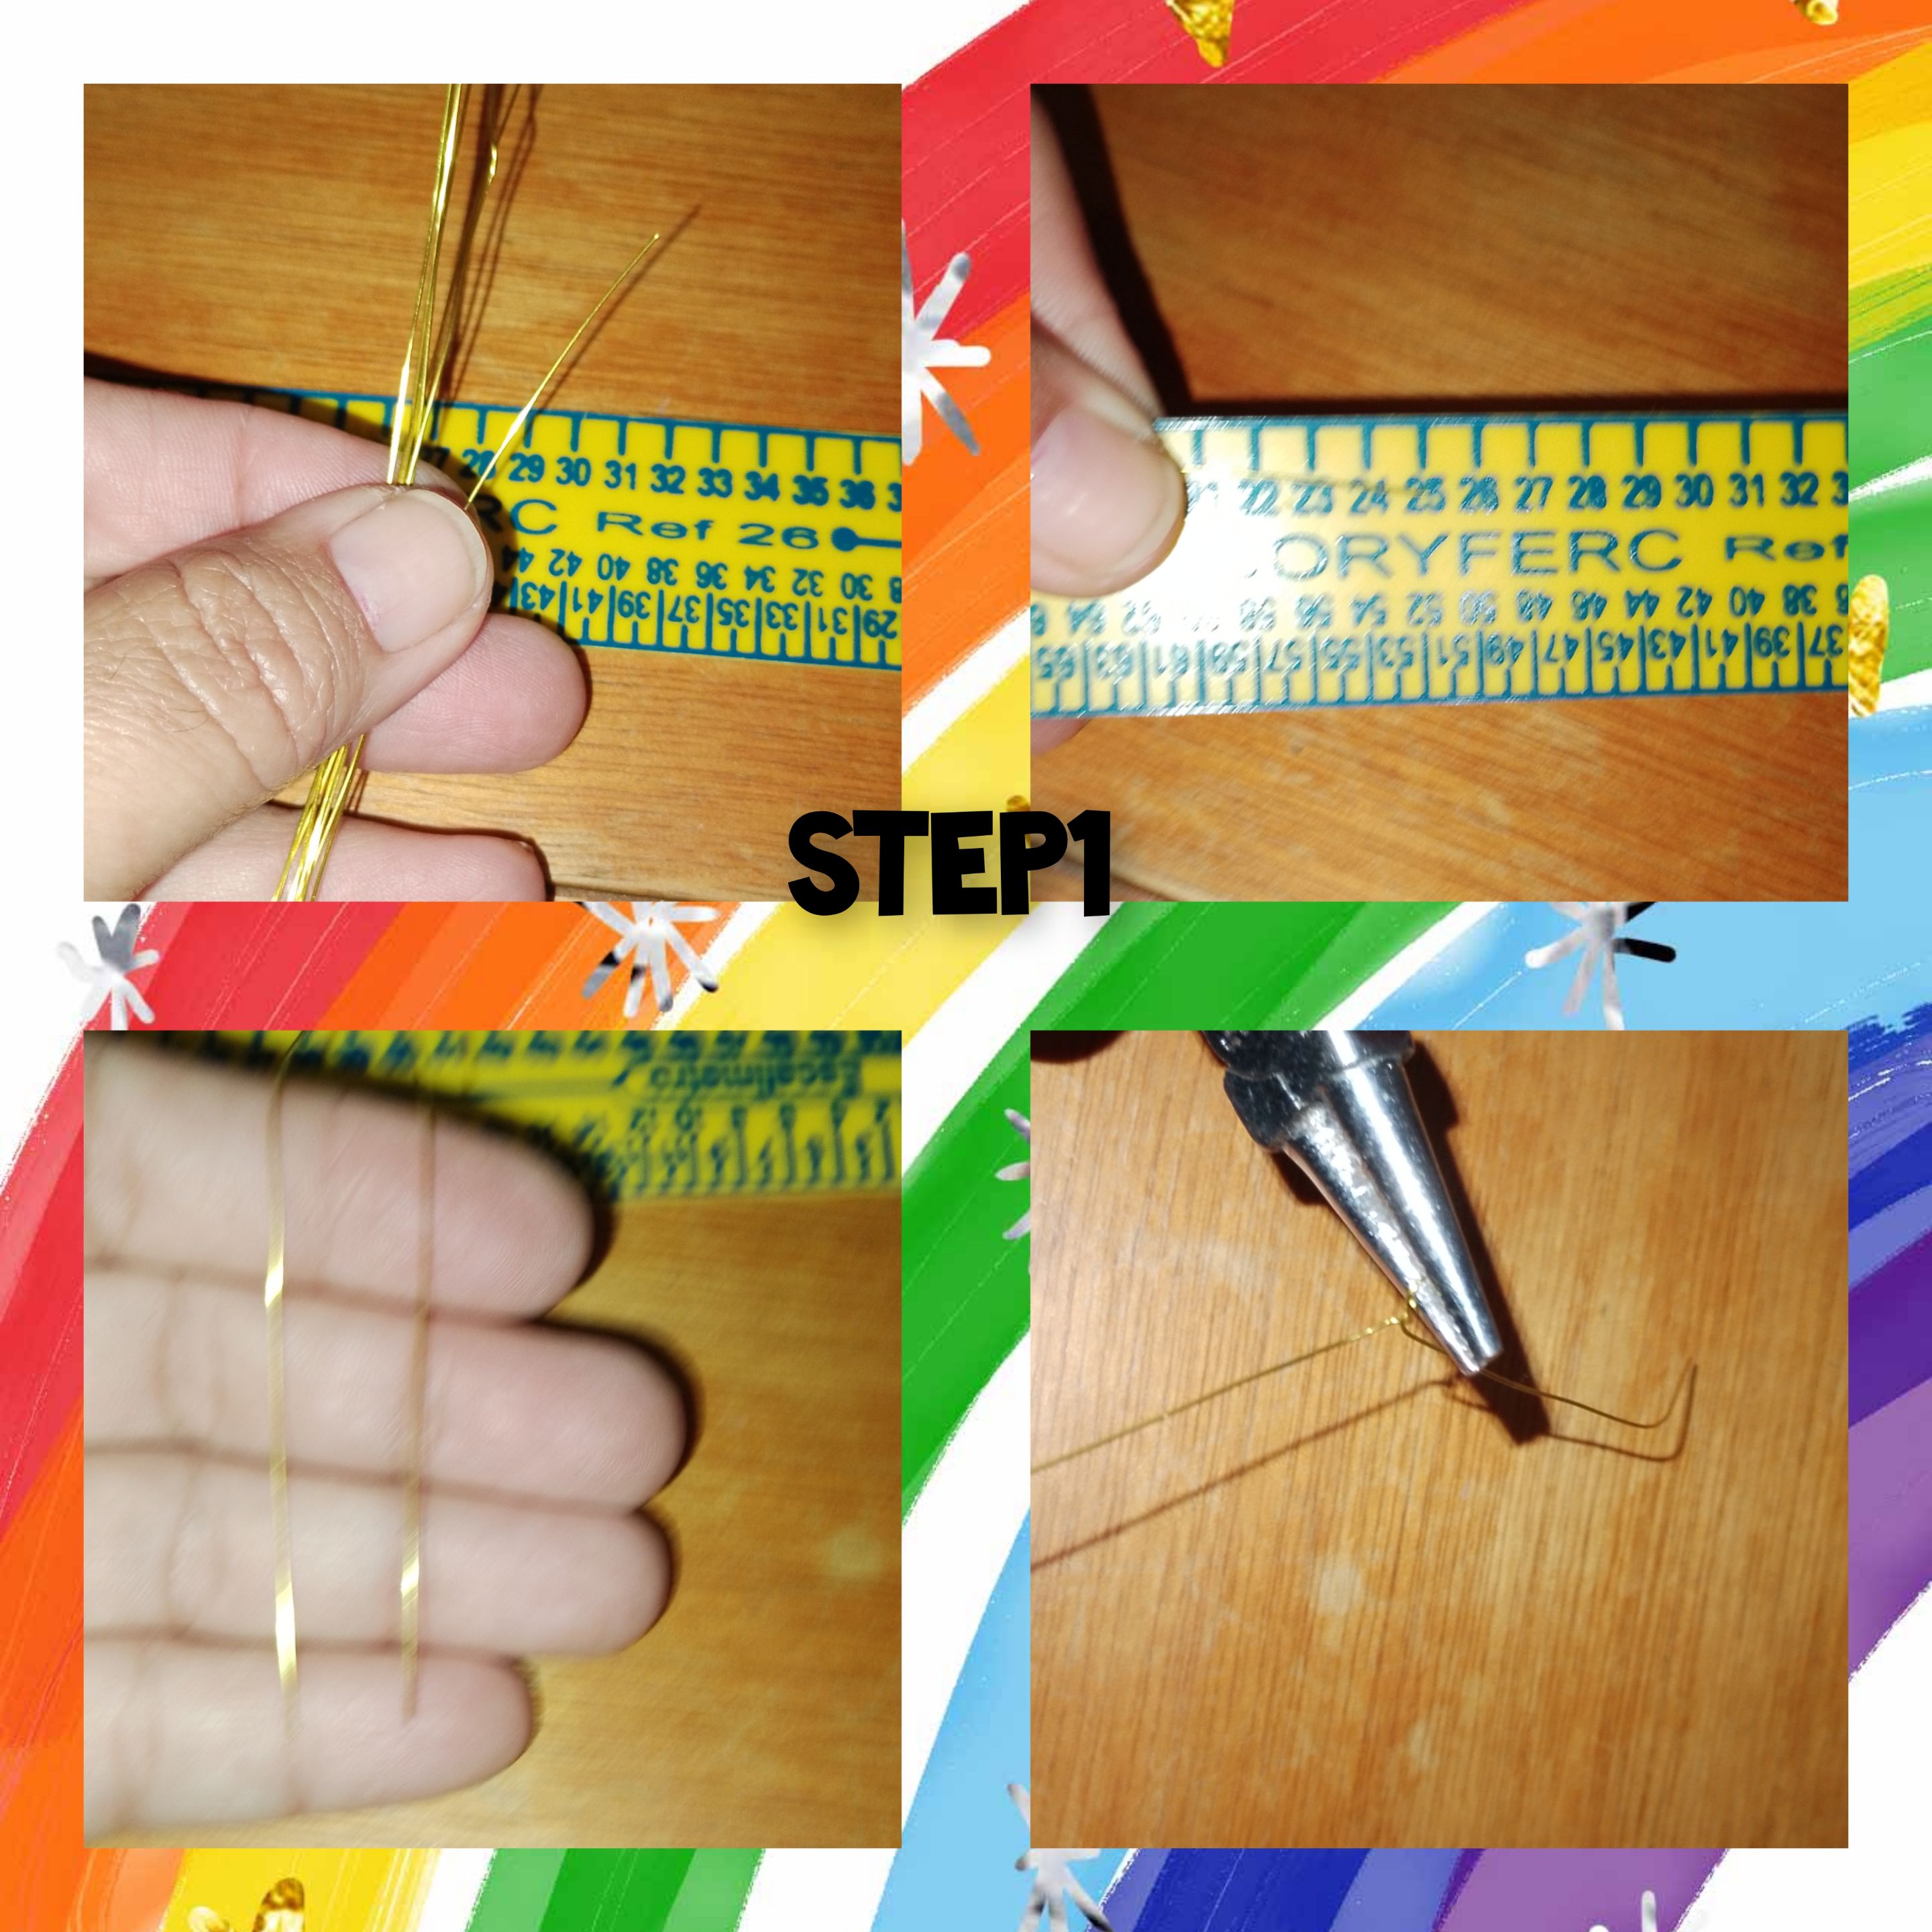
Step 1.) I measure and cut six pieces of #0.5 wire, 25 cm long. Next, I first bend a cut of wire, fold it in equal parts, place the round-tipped jewelry clamp on the cut and make three turns between both wires, as tight and glued as possible.
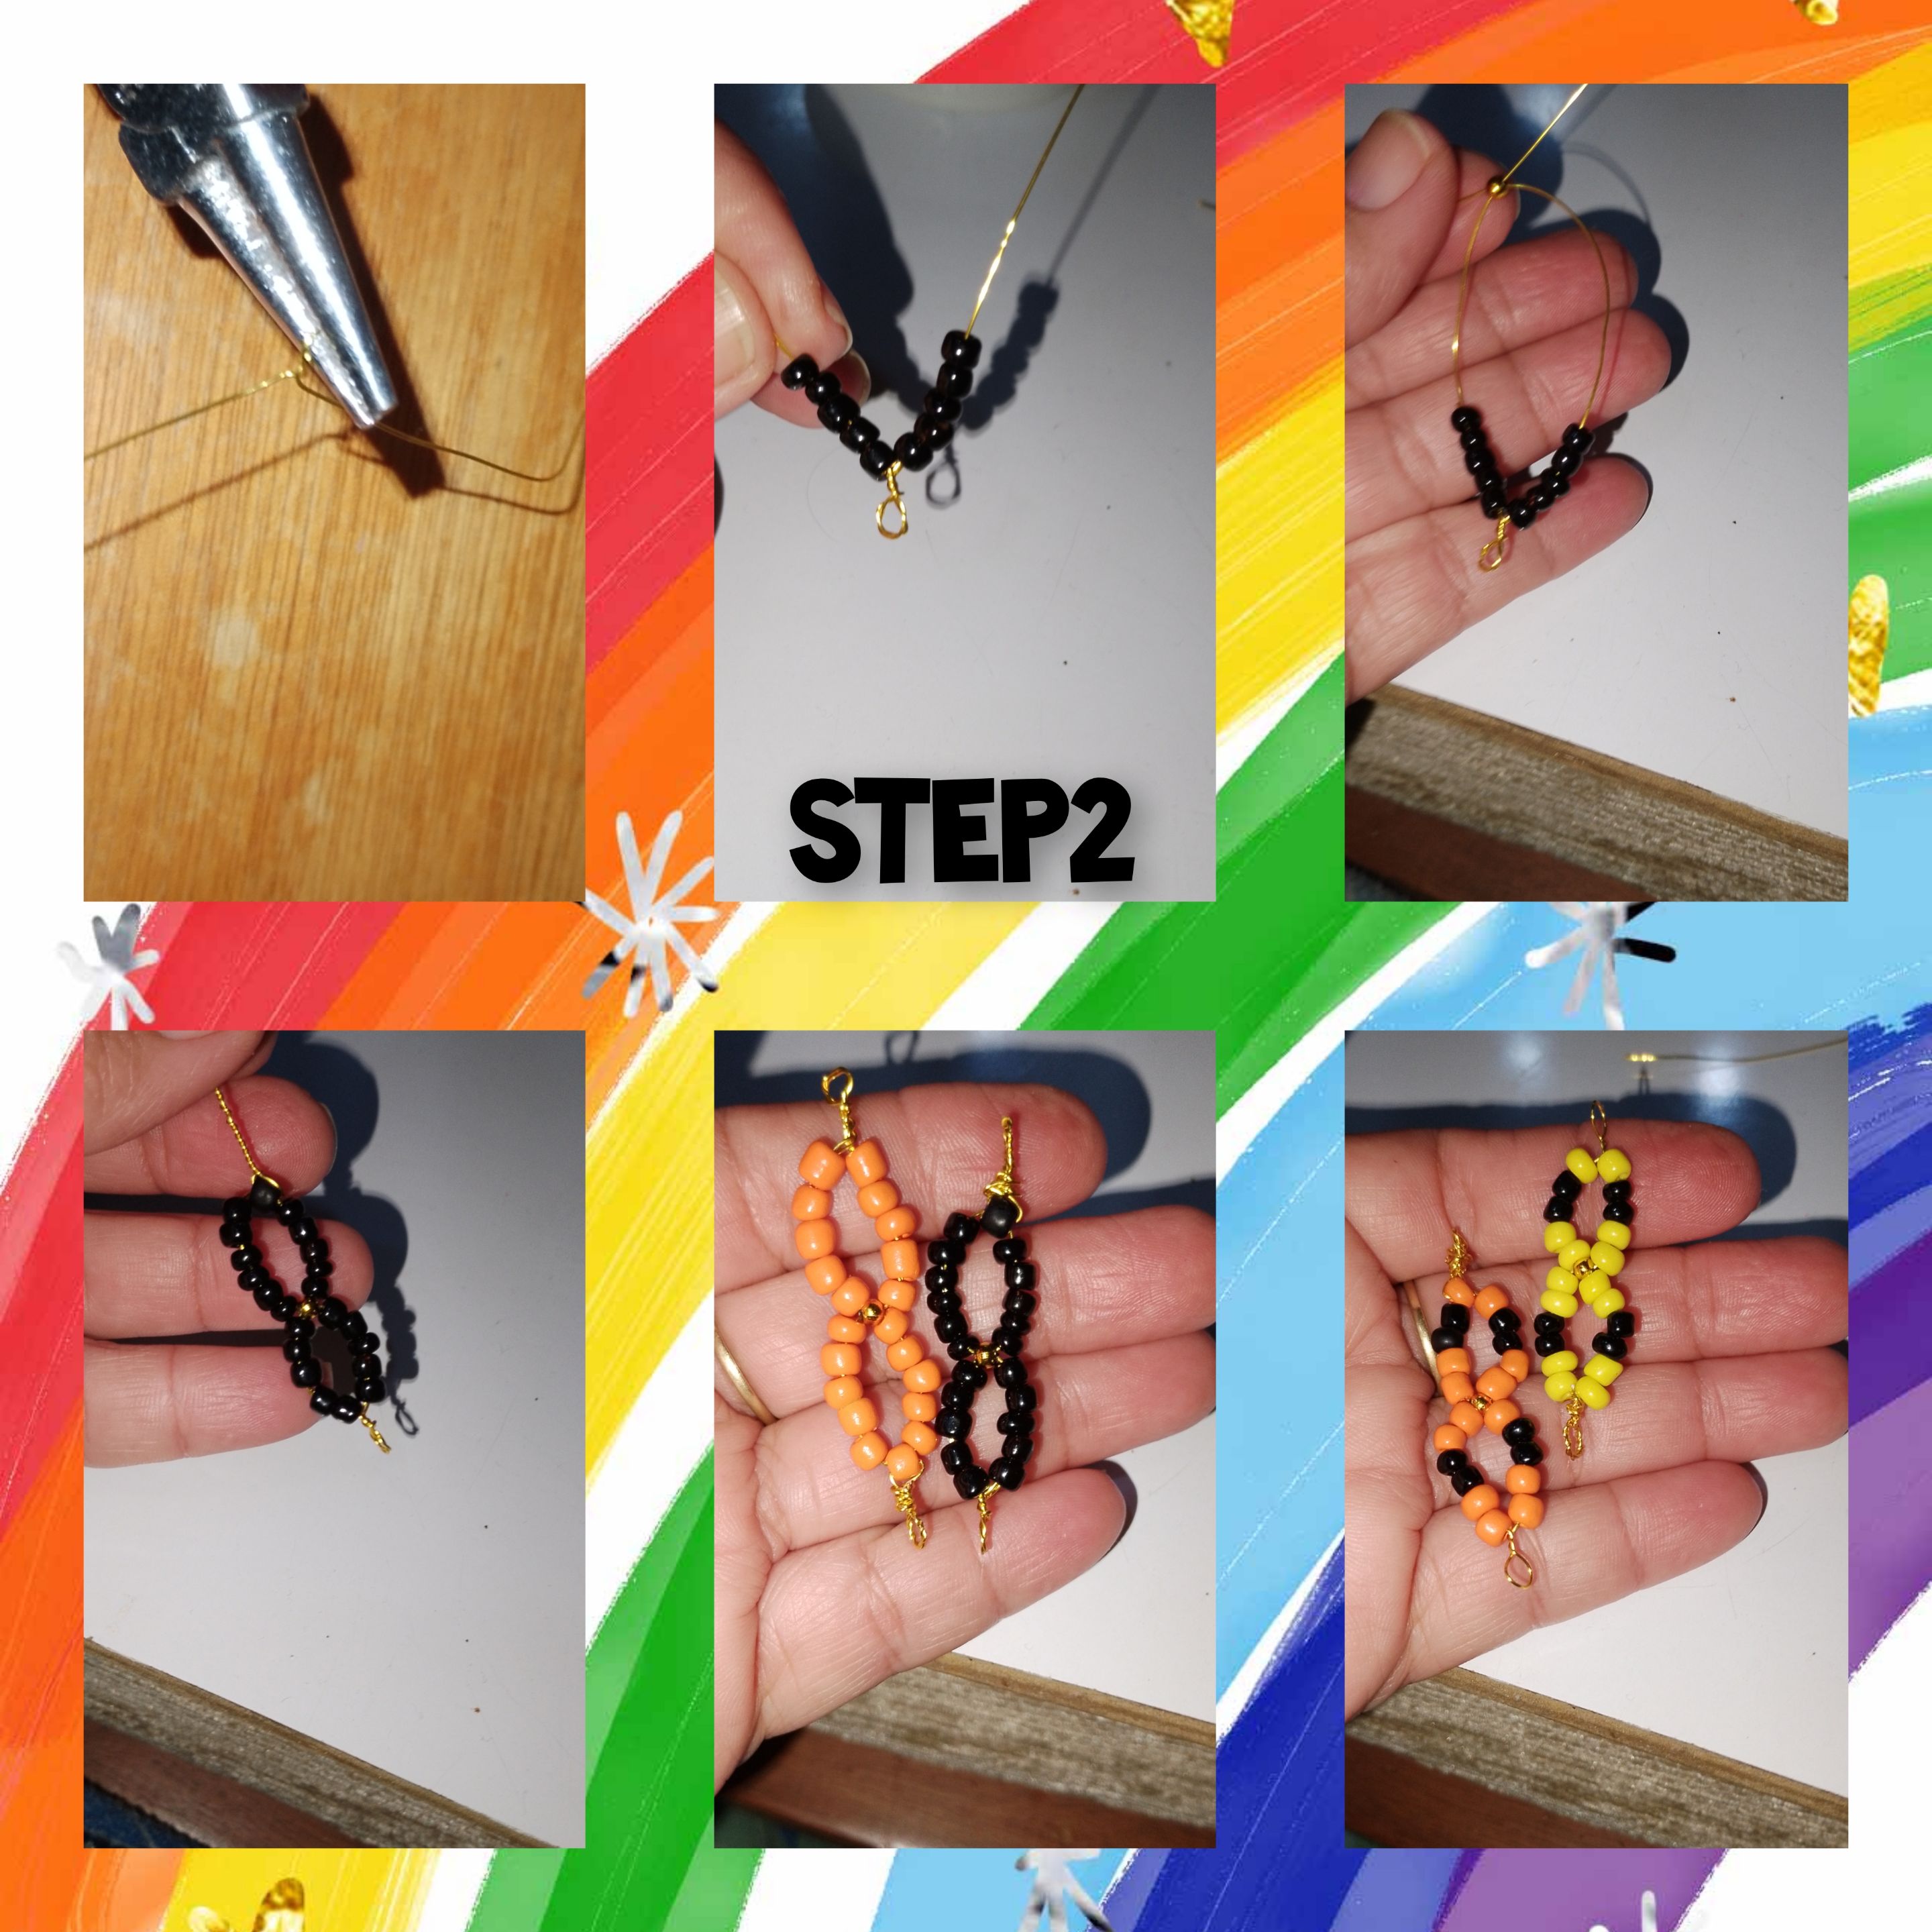
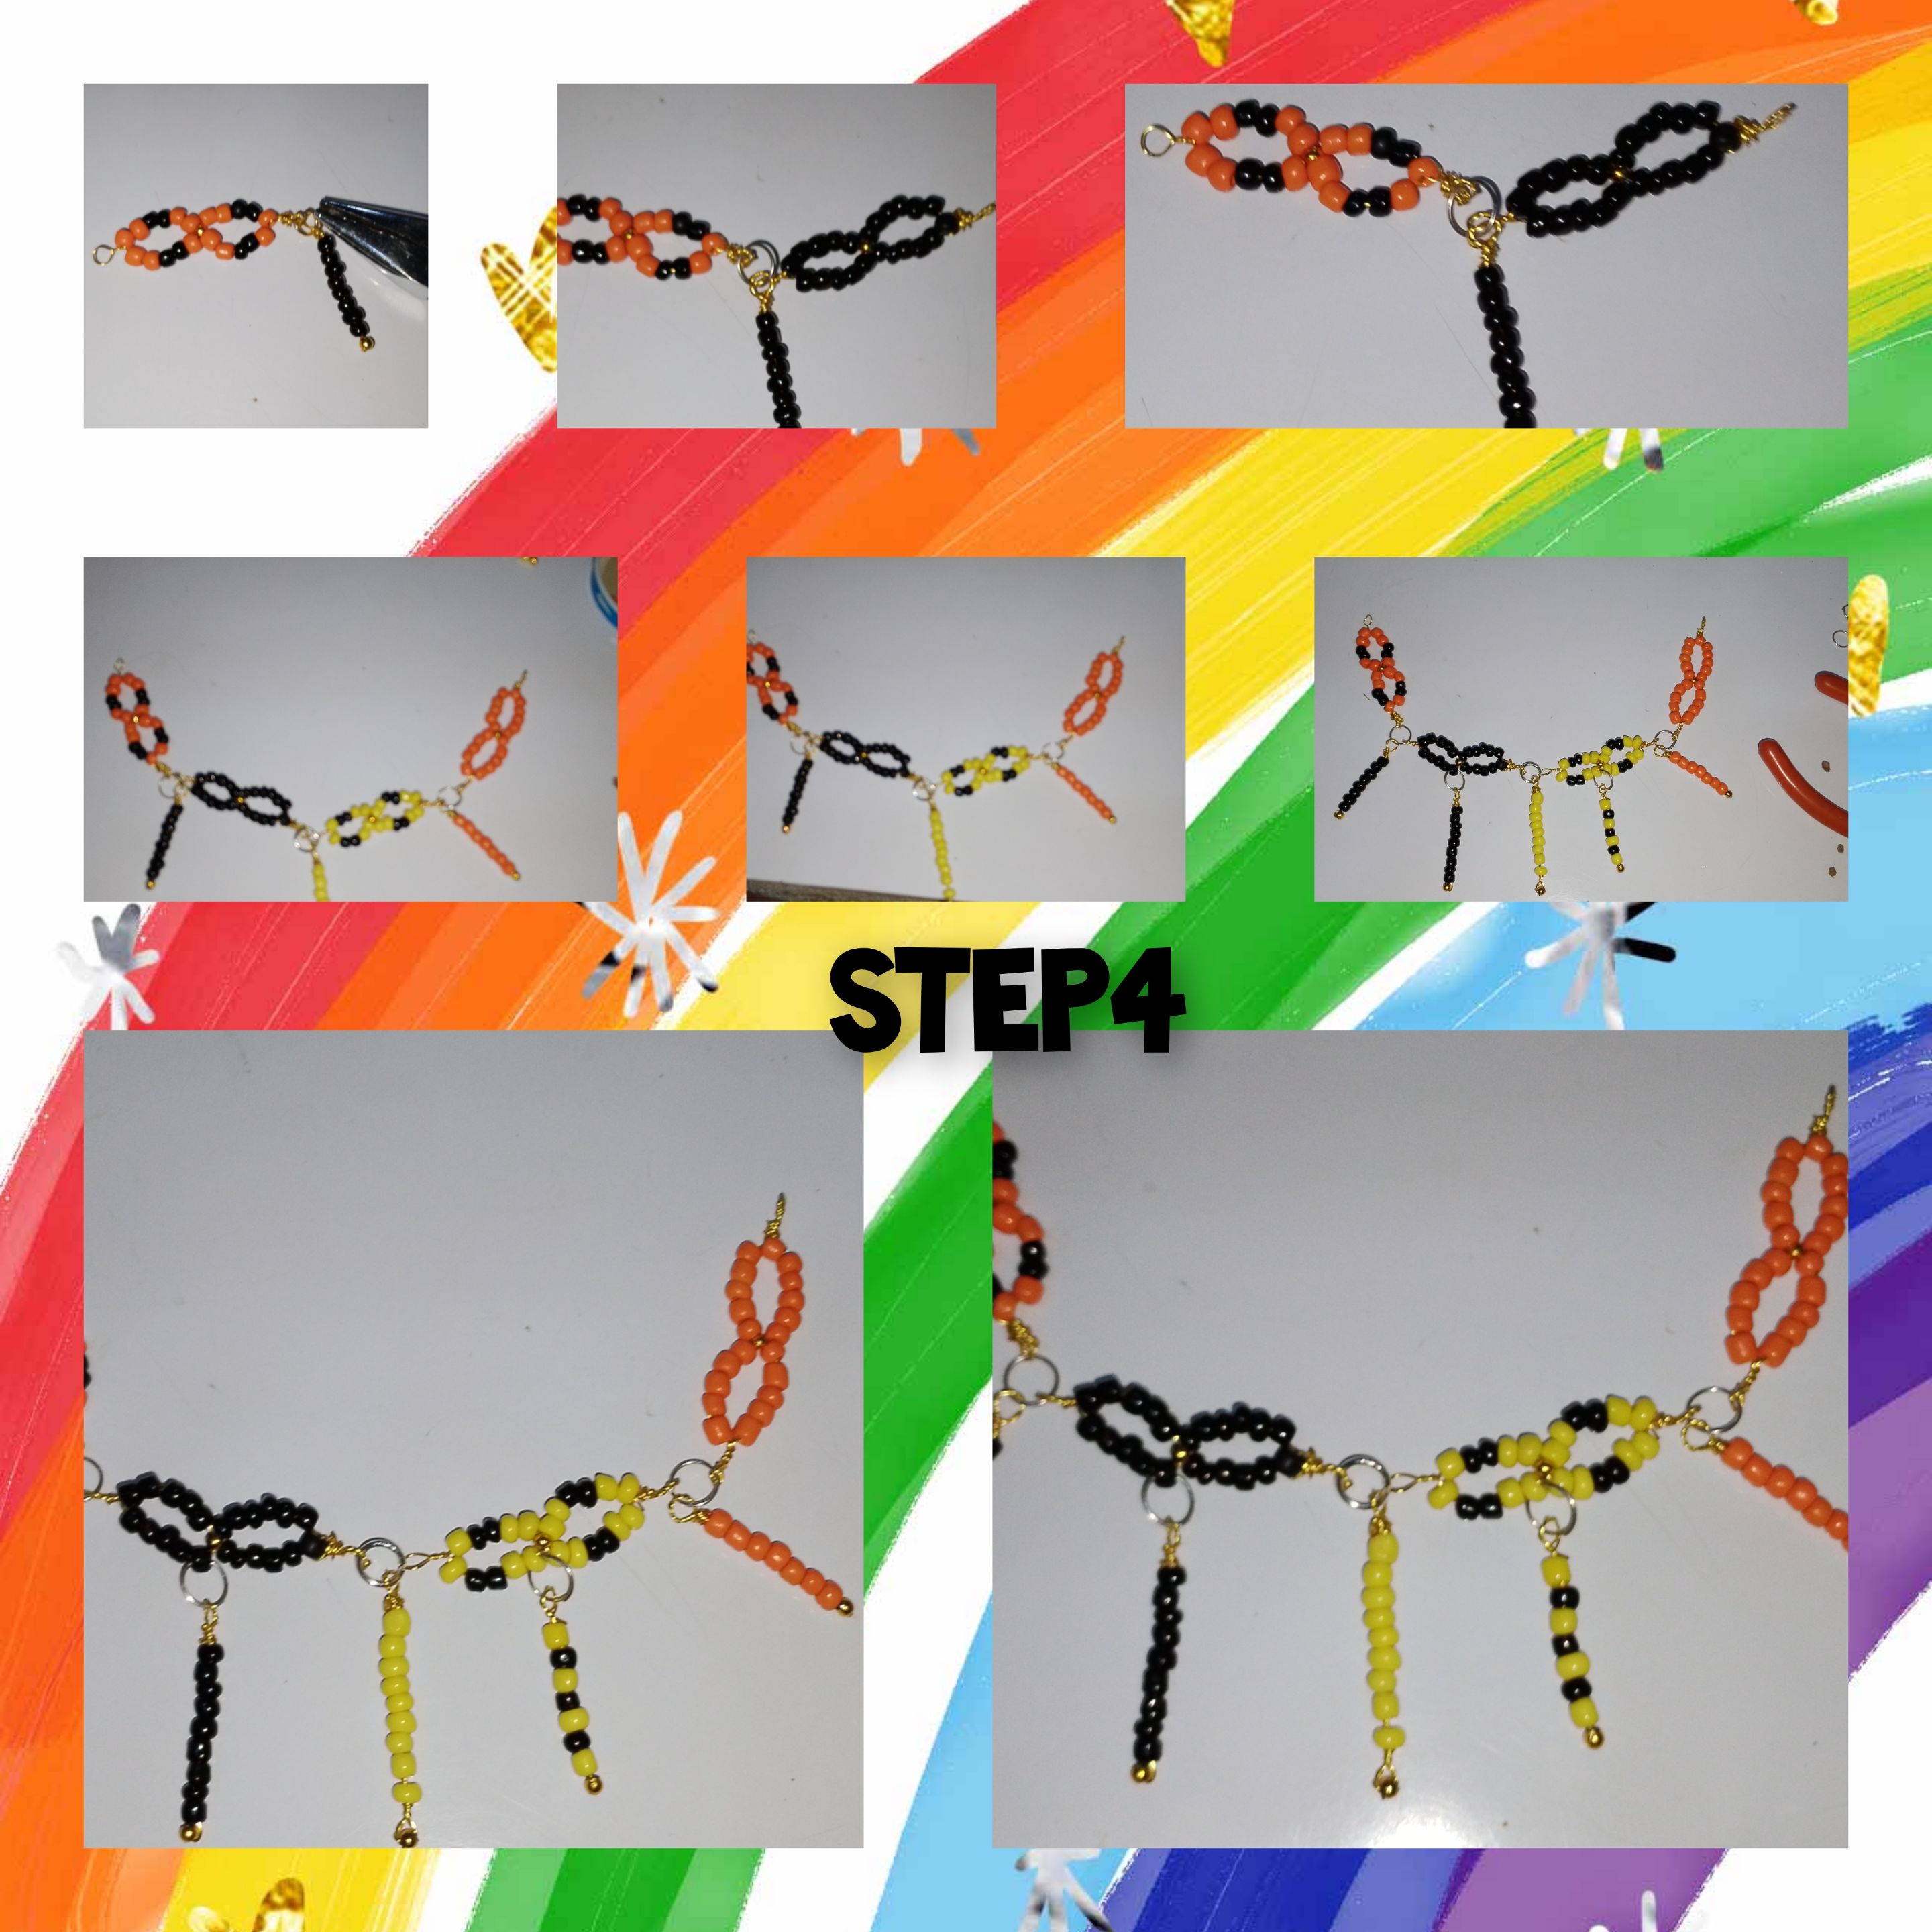
Step 2.) I insert five black beads into each hair of wire, then a golden pearl and cross the wires. I repeat using the same color of beads, in the last bead I make the wire crossing, and the remaining wire, I turn around each other, and using the round tip tweezers, I make a hoop, thus forming the first mask. The process continued, now with orange beads, then yellow with black and orange and black. In total I have made four masks, just the ones I will need for the necklace.
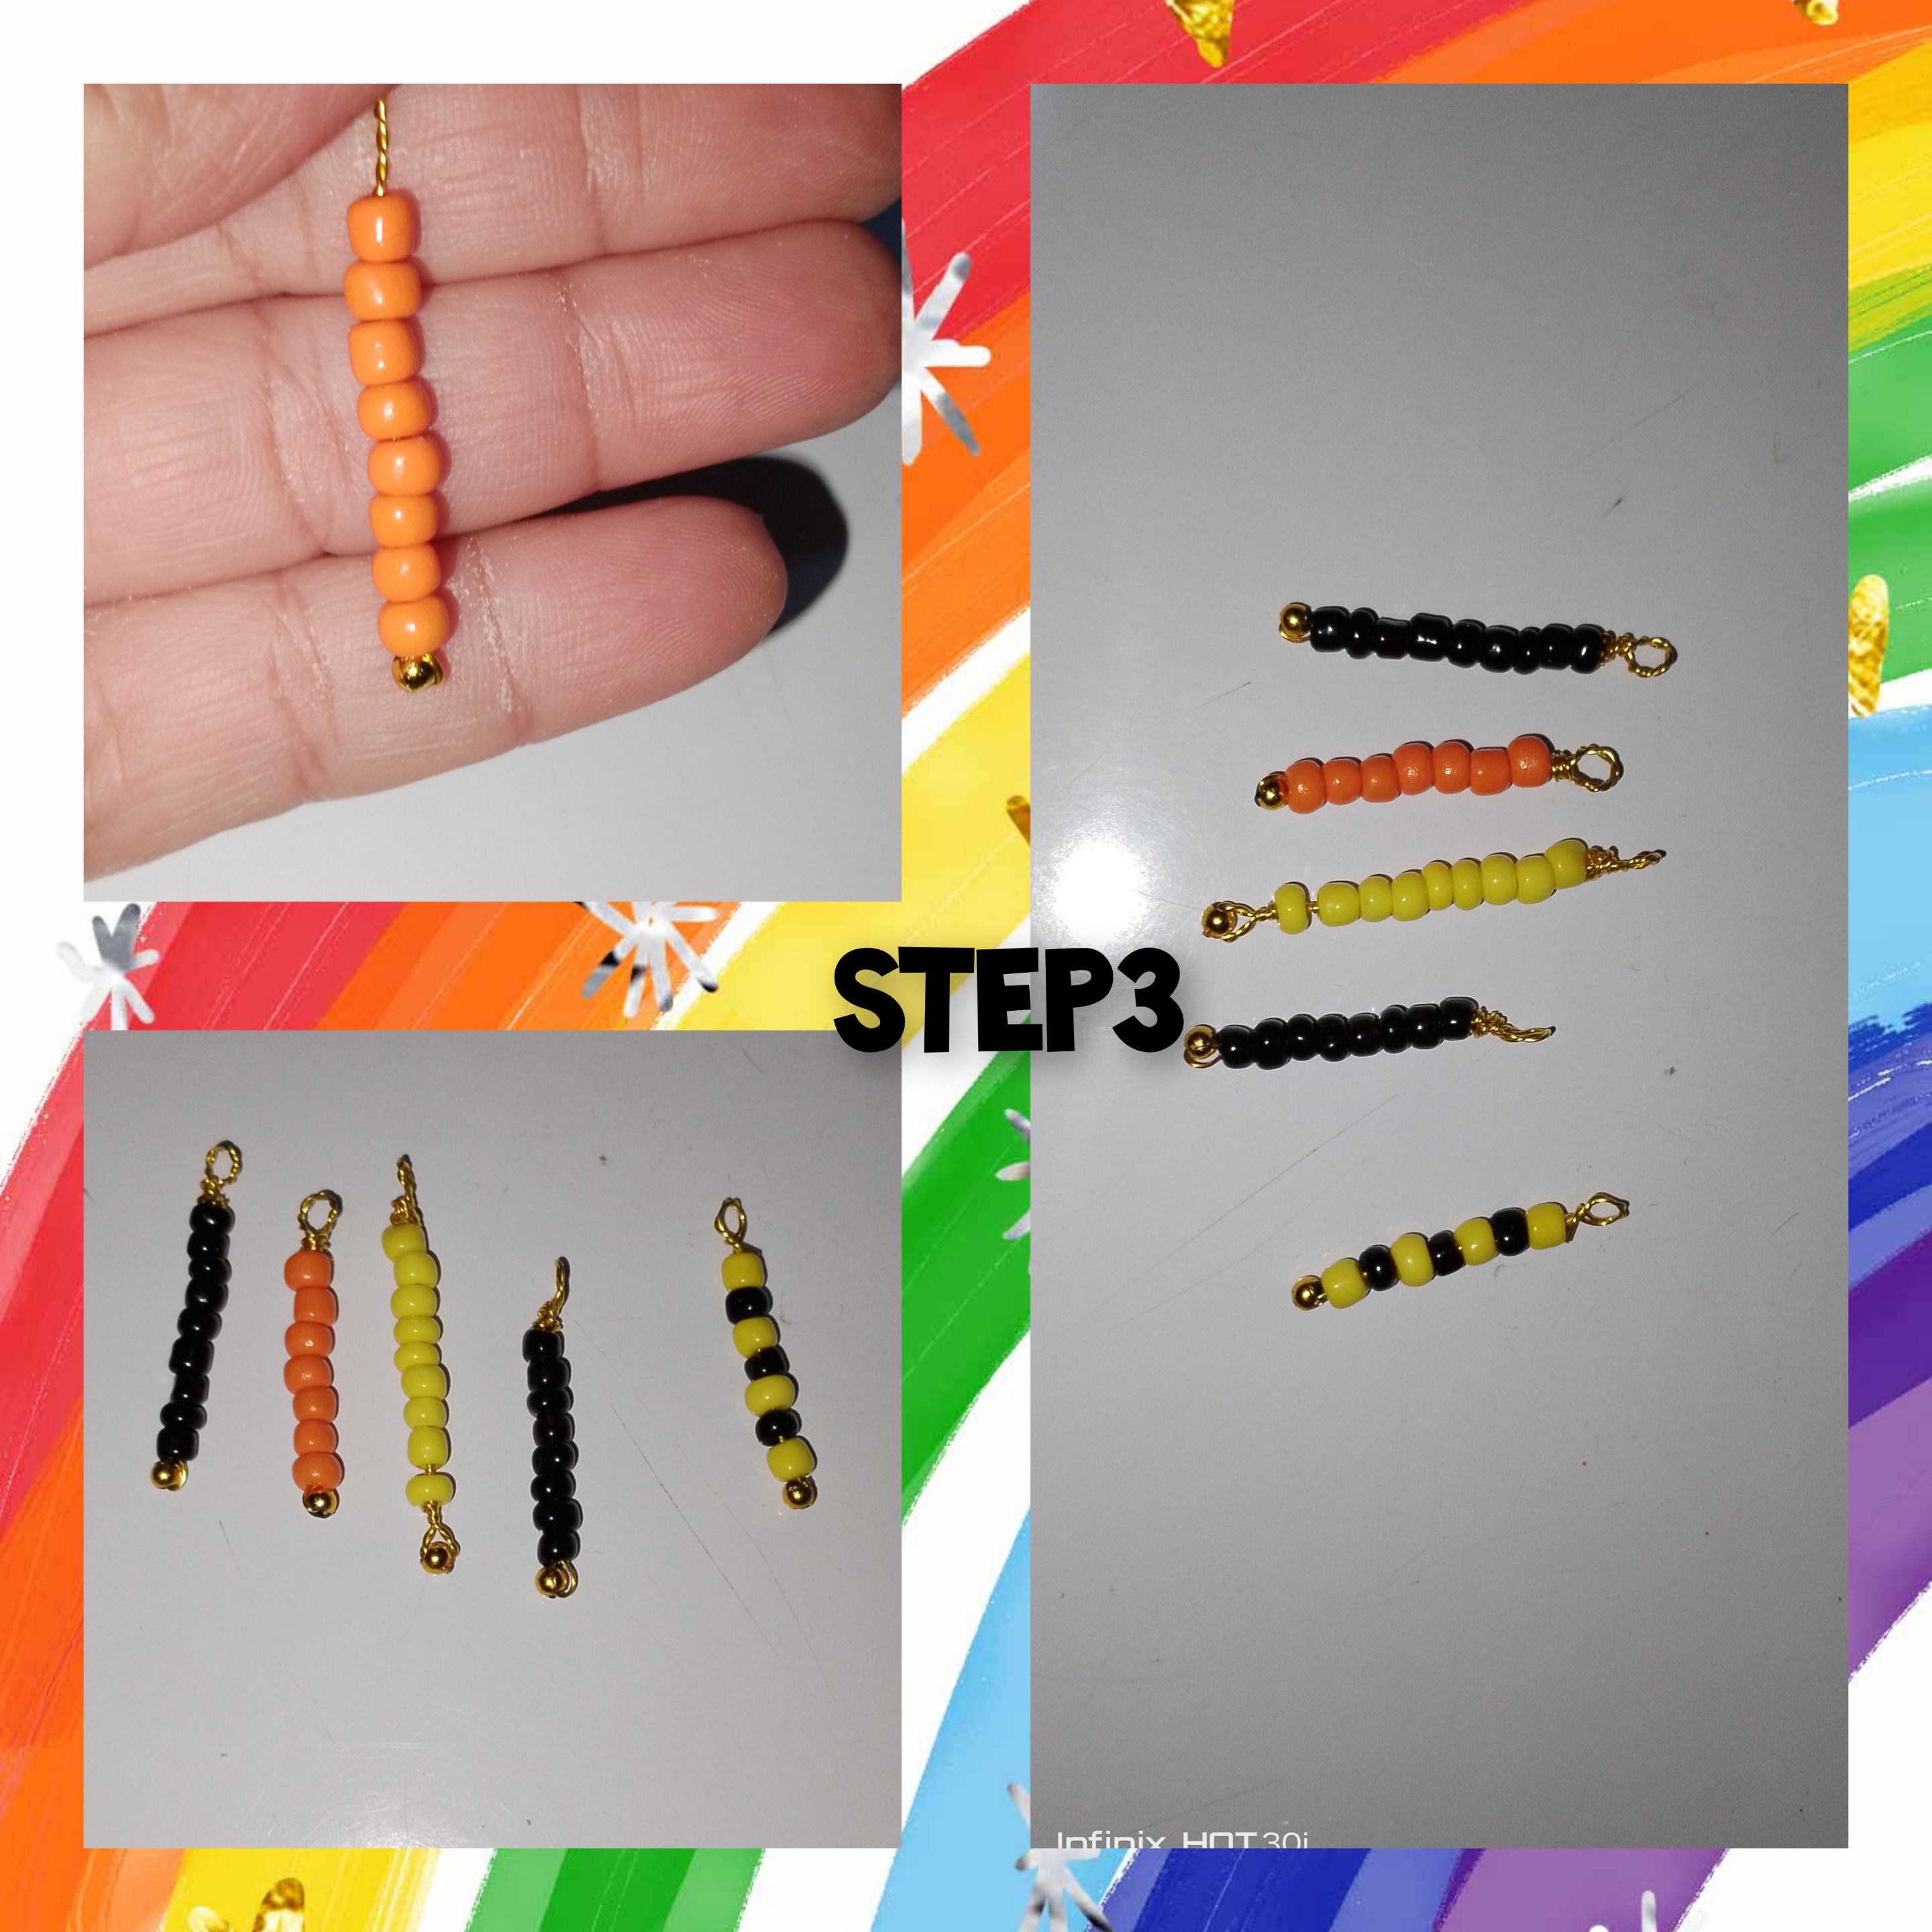
 Step 3.) I measure and cut five 18cm pieces of wire, fold them in equal parts, place a golden pearl, which I leave trapped, as I twist the wire strands around each other, continue eight black beads, and I make a little ring with the tweezers, likewise, I repeat in the next four, obtaining a total of five small pendants, two black, one yellow and black and one orange.
Step 4.) The next thing will be to join the masks, to define the front part of the necklace, so I start by opening a jewelry ring, with the tweezers I insert a first mask inside the ring, a pendant and then the next mask, to close the ring, with the tweezers, in this way, continues, involving the rest of the masks and pendants made, in the previous step, it is not necessary to weara control between the colors, since it is carnival and as you well know, this is not relevant, since the combination is on its own. Of course, if you consider it valid.
5.) I cut 30 cm of black leather, and insert it inside the hoop, the mask, I make a small double and with the help of my fingers, I make a Franciscan, macrame stitch, a technique that is worth mentioning, Since I didn't do it at the beginning, after tying my knot, I run the residue and put a little fire with the tinderbox. I tie the other end of the leather, I make a simple knot, I place a liquid silicone stitch on one of the knot covers, and I insert the leather, I use the tip of the scissors to push, and that it is well inserted, in the knot cover. Then I place a jewelry ring inside the barrette and close the ring.
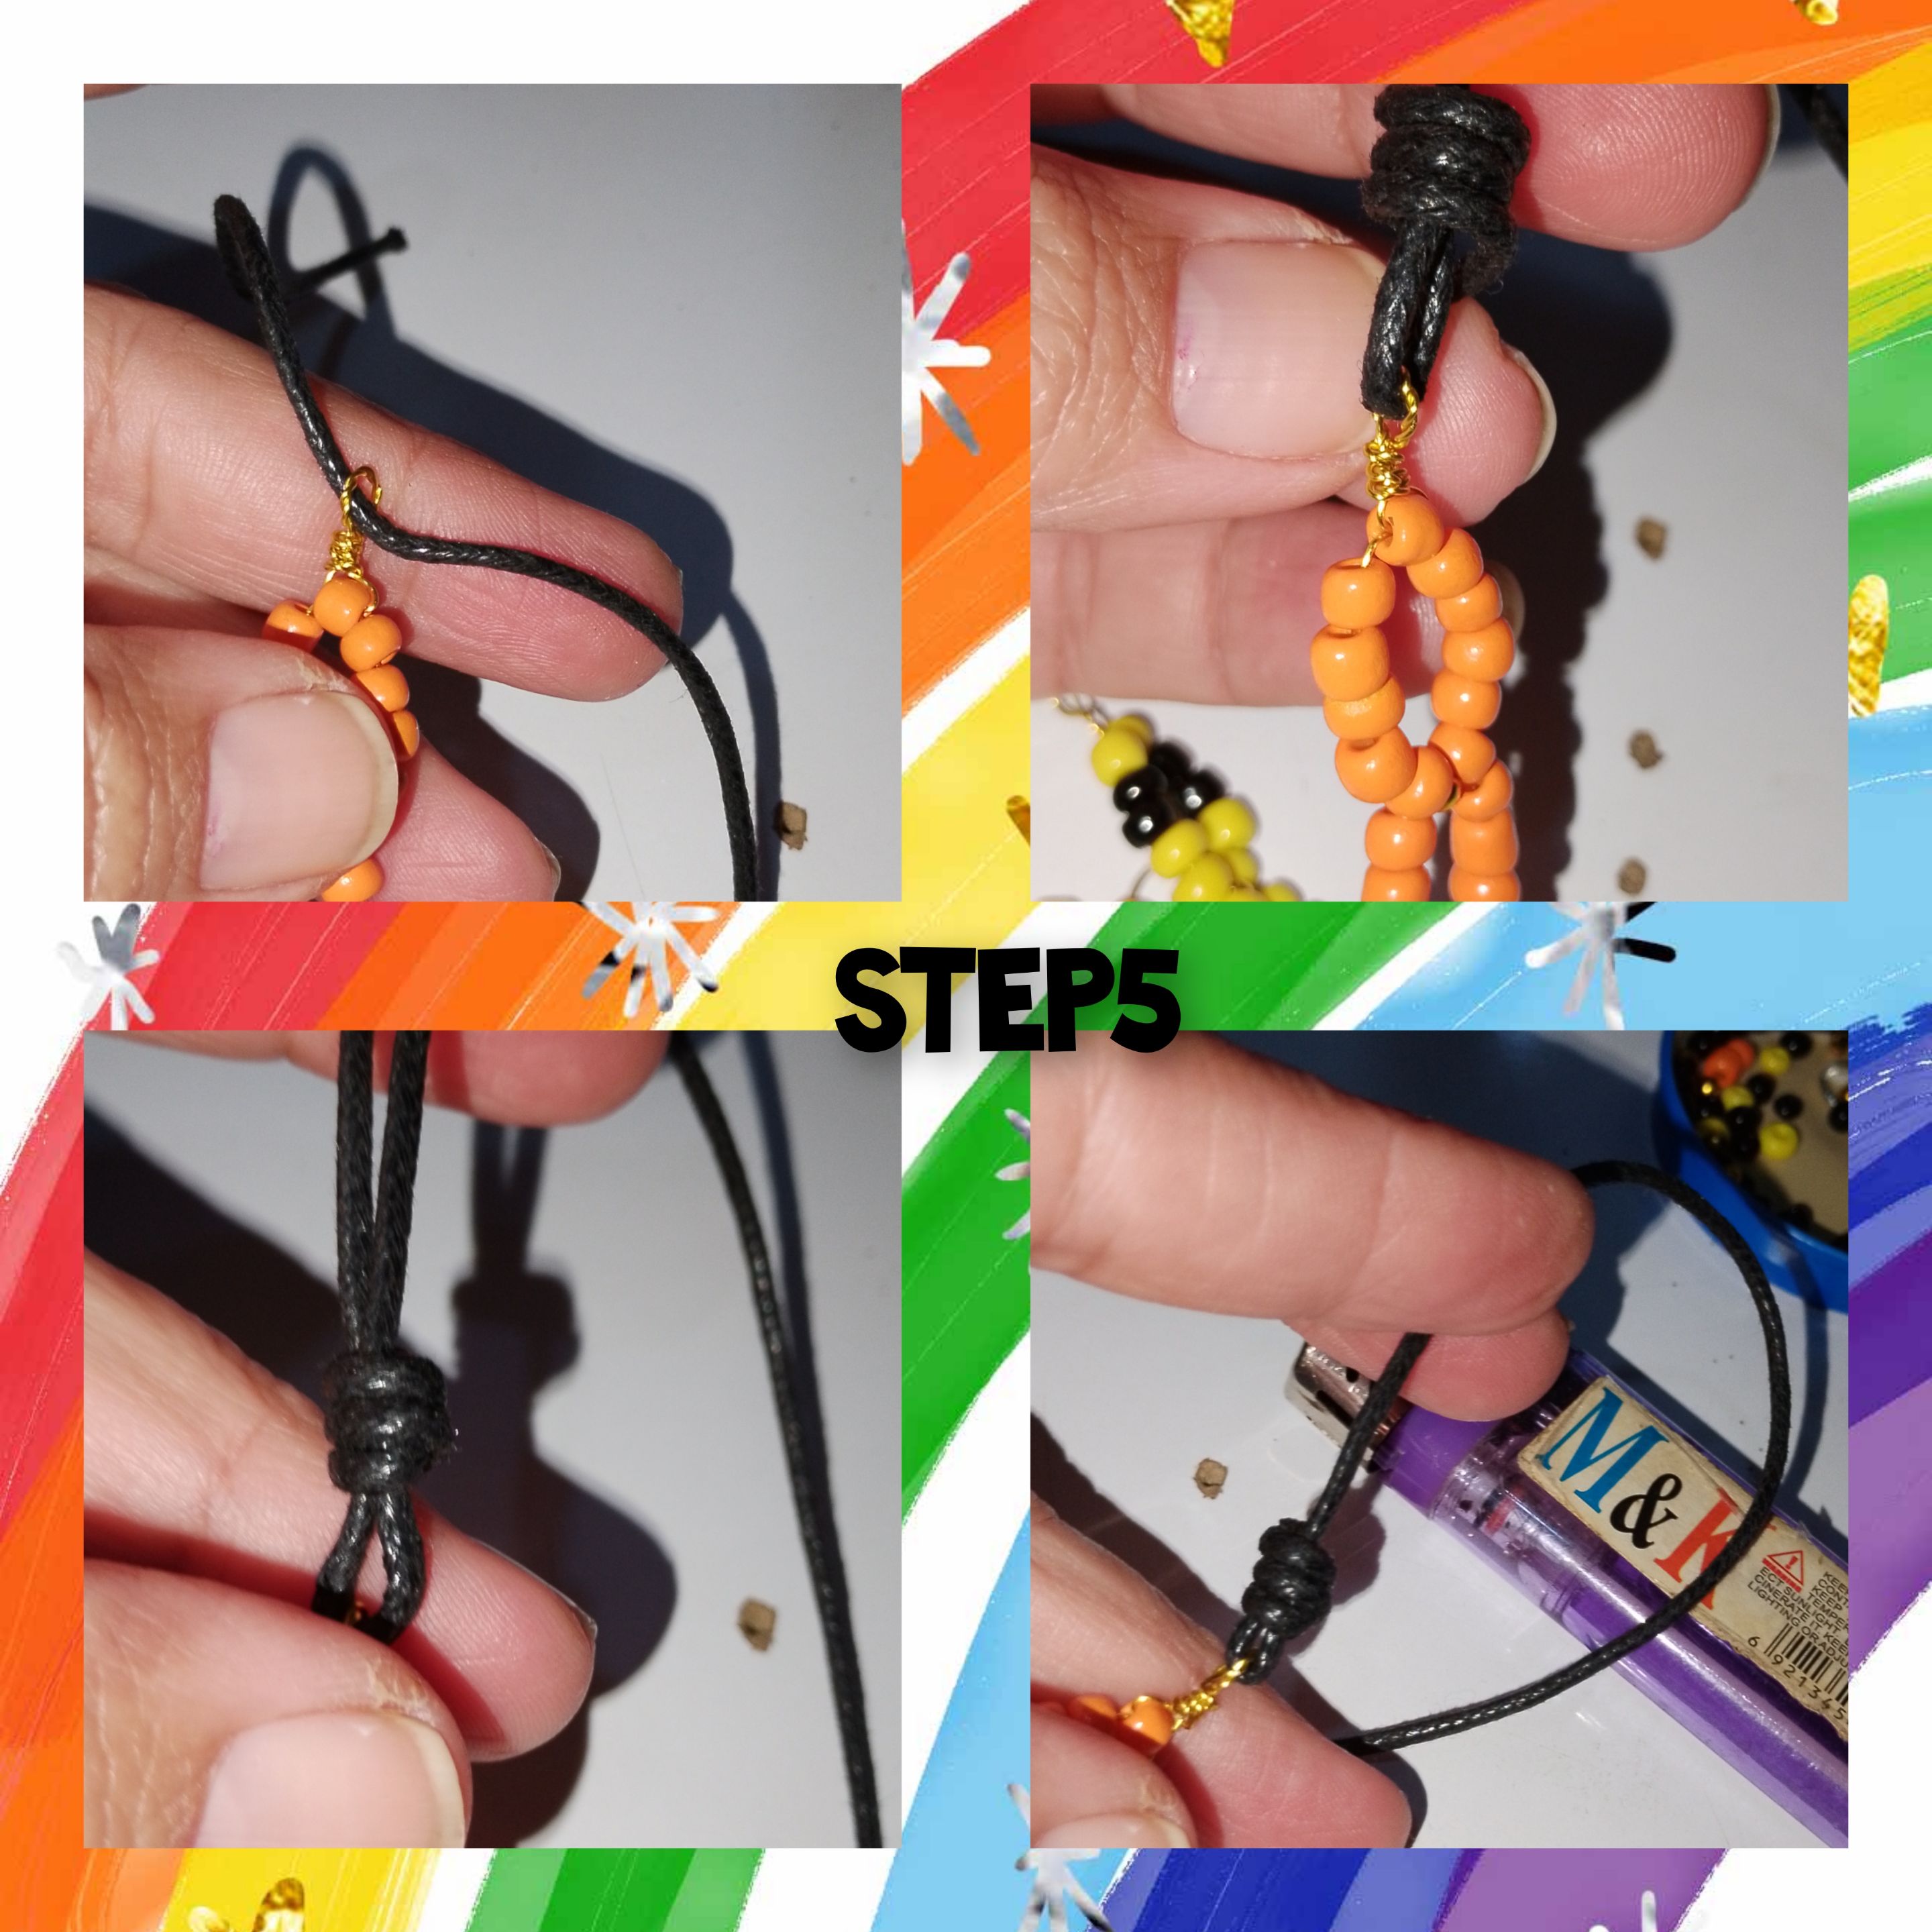
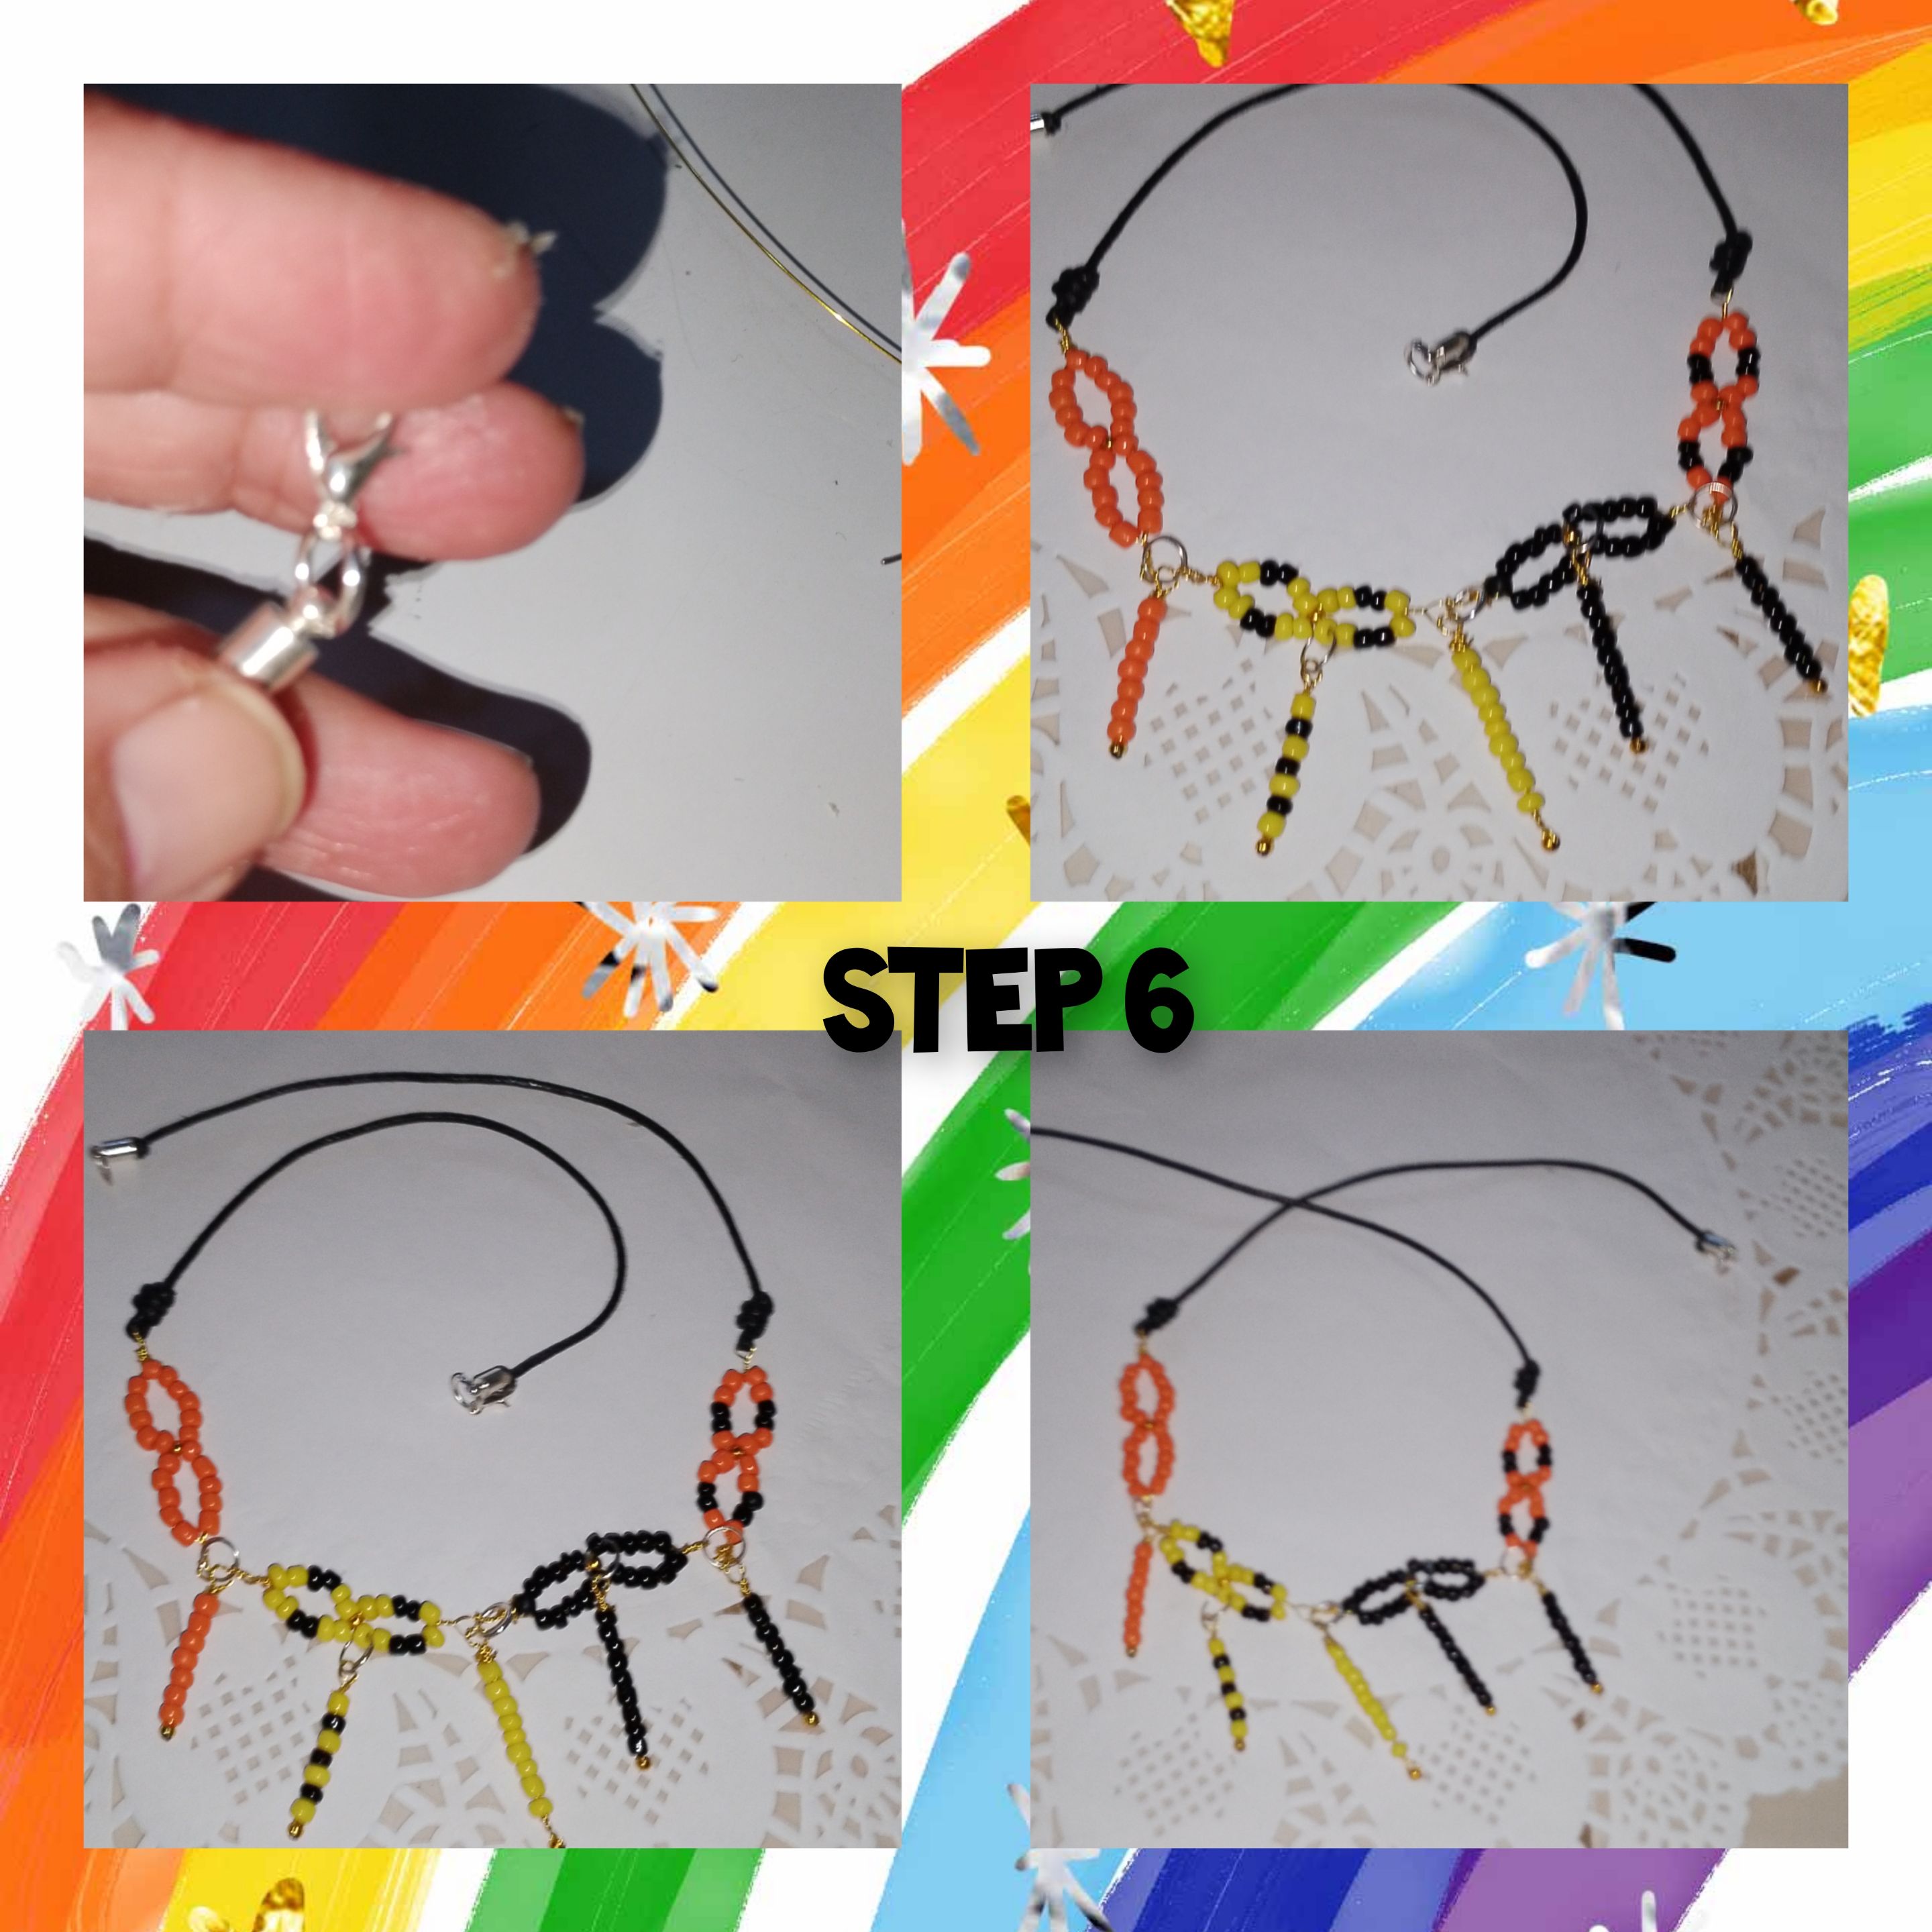
6.) I repeat, on the other side of the necklace, but this time I will place a ring on the knot cover. Thus, the beautiful and colorful Carnival necklace is ready.
7.) After repeating the process of making the masks, he made the next two. And he put together with the jewelry pins, three pairs of each of the earrings.
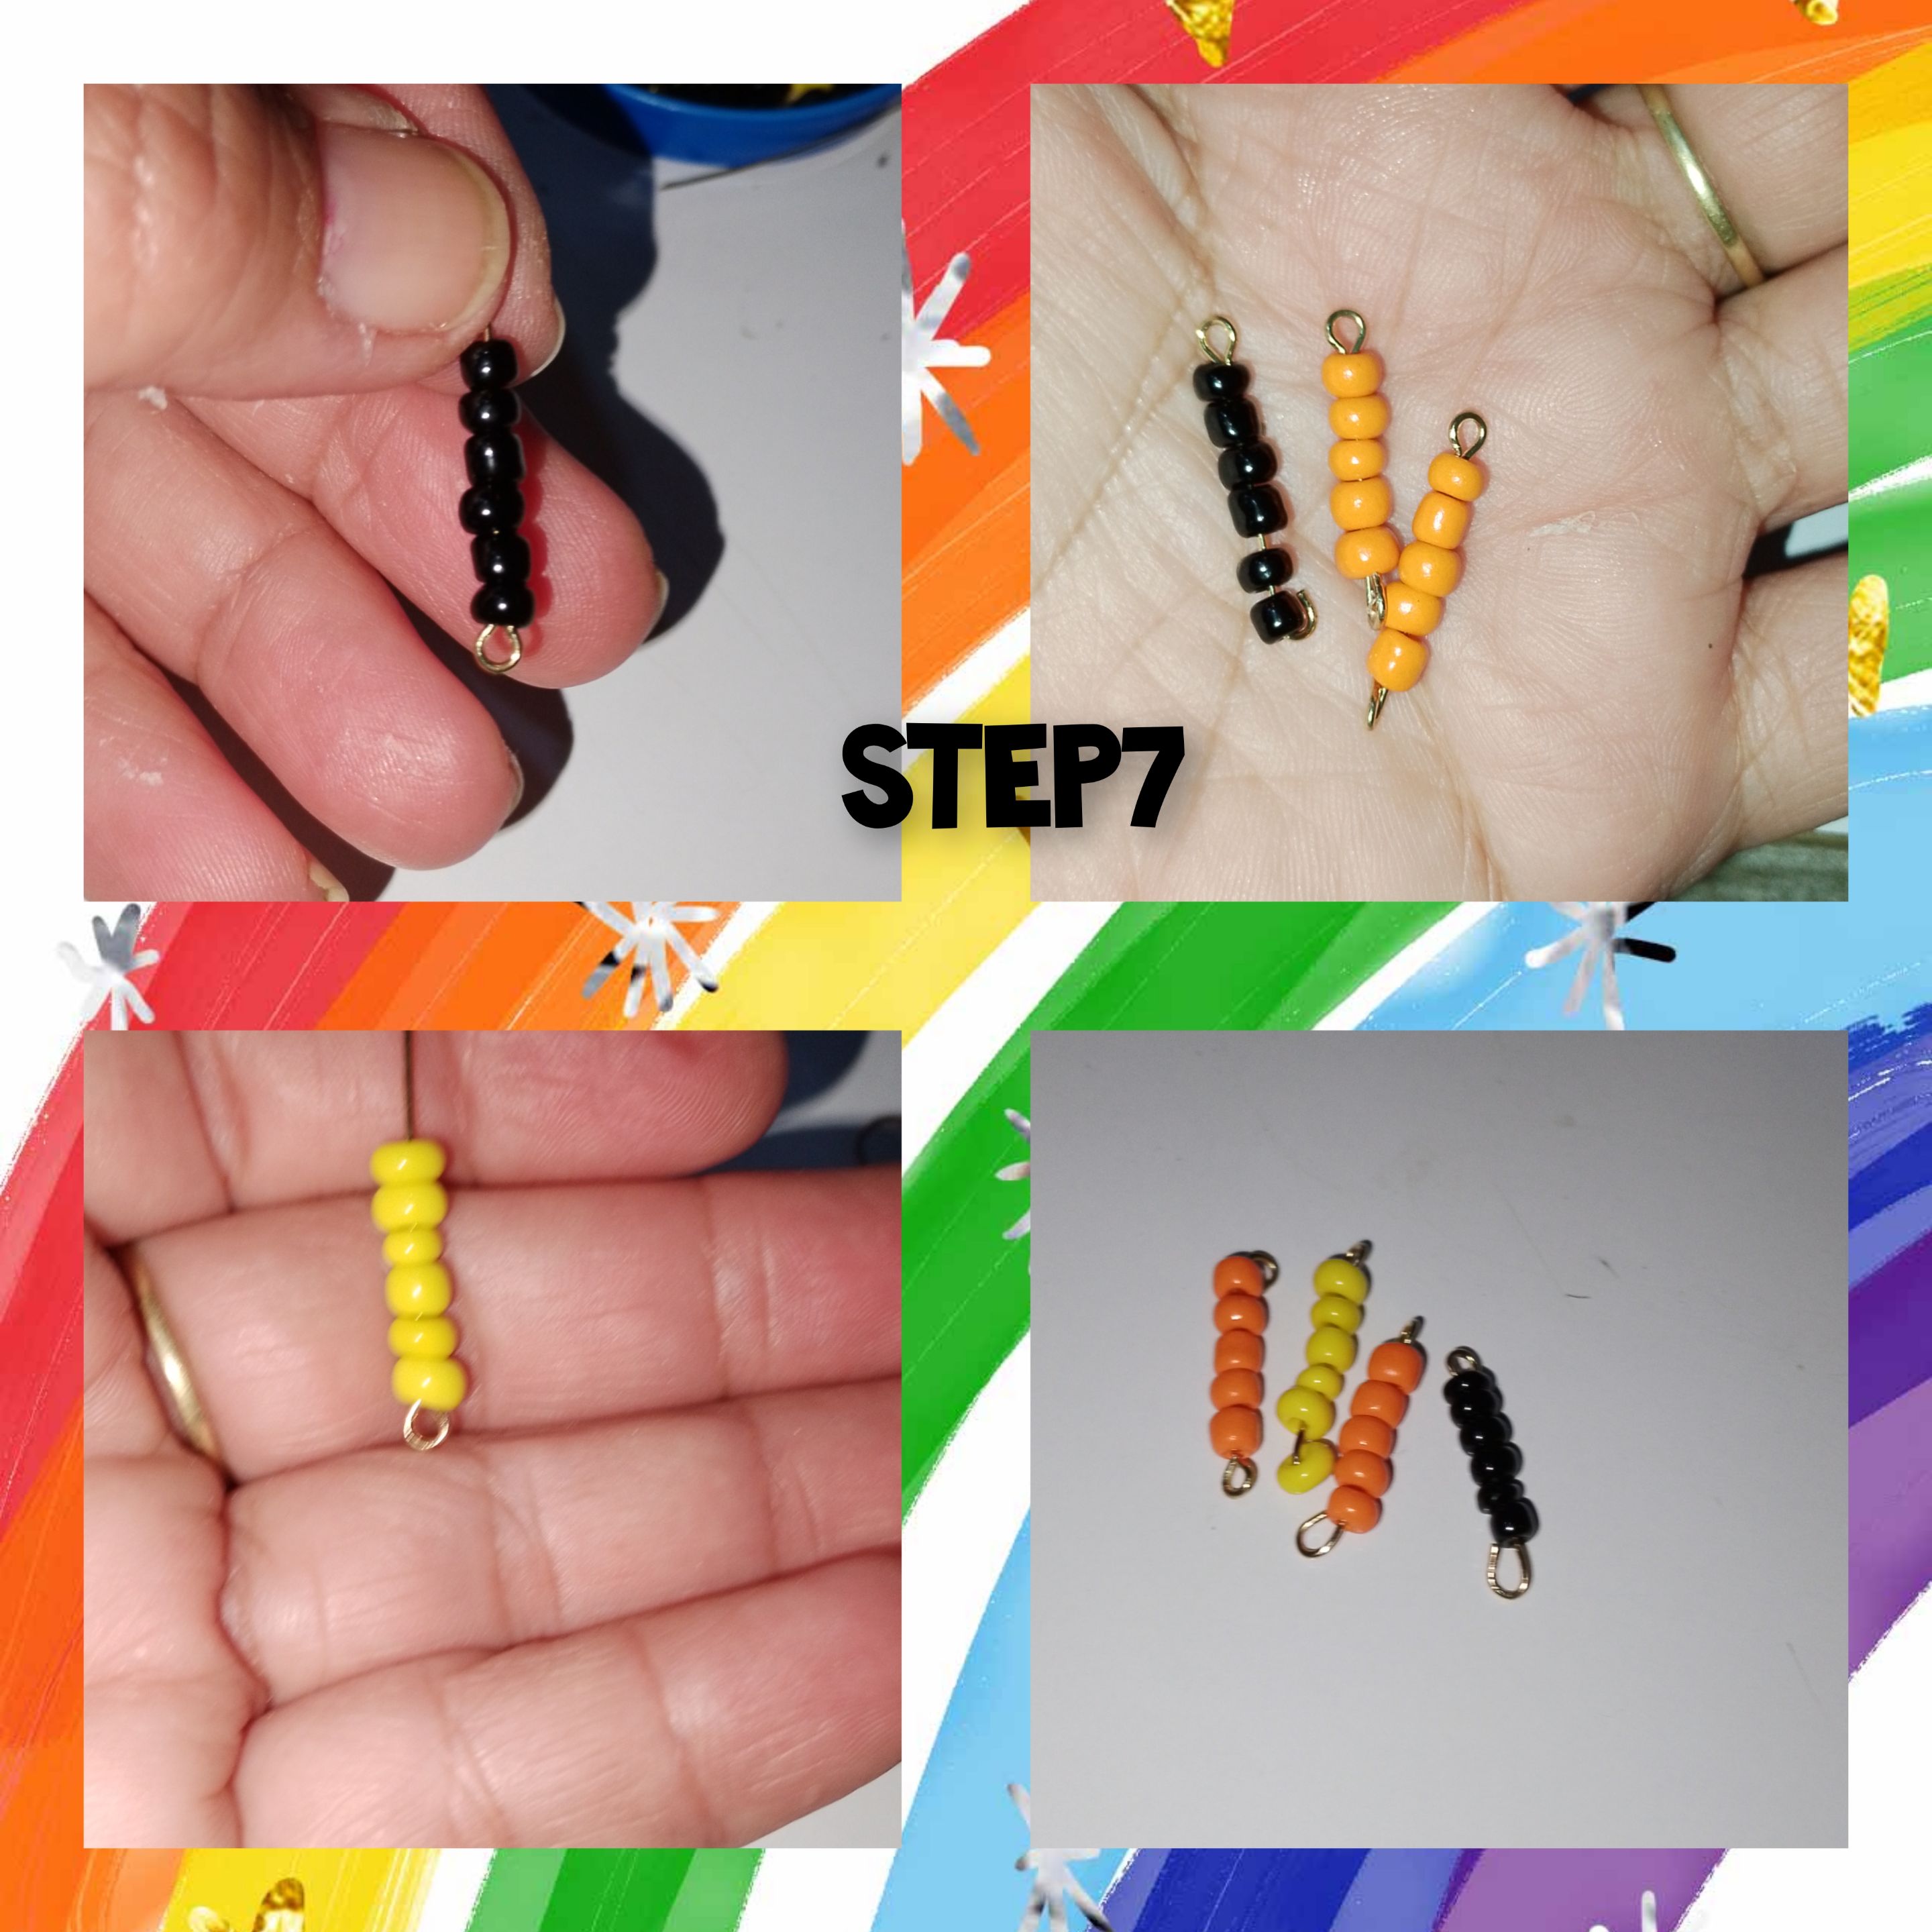
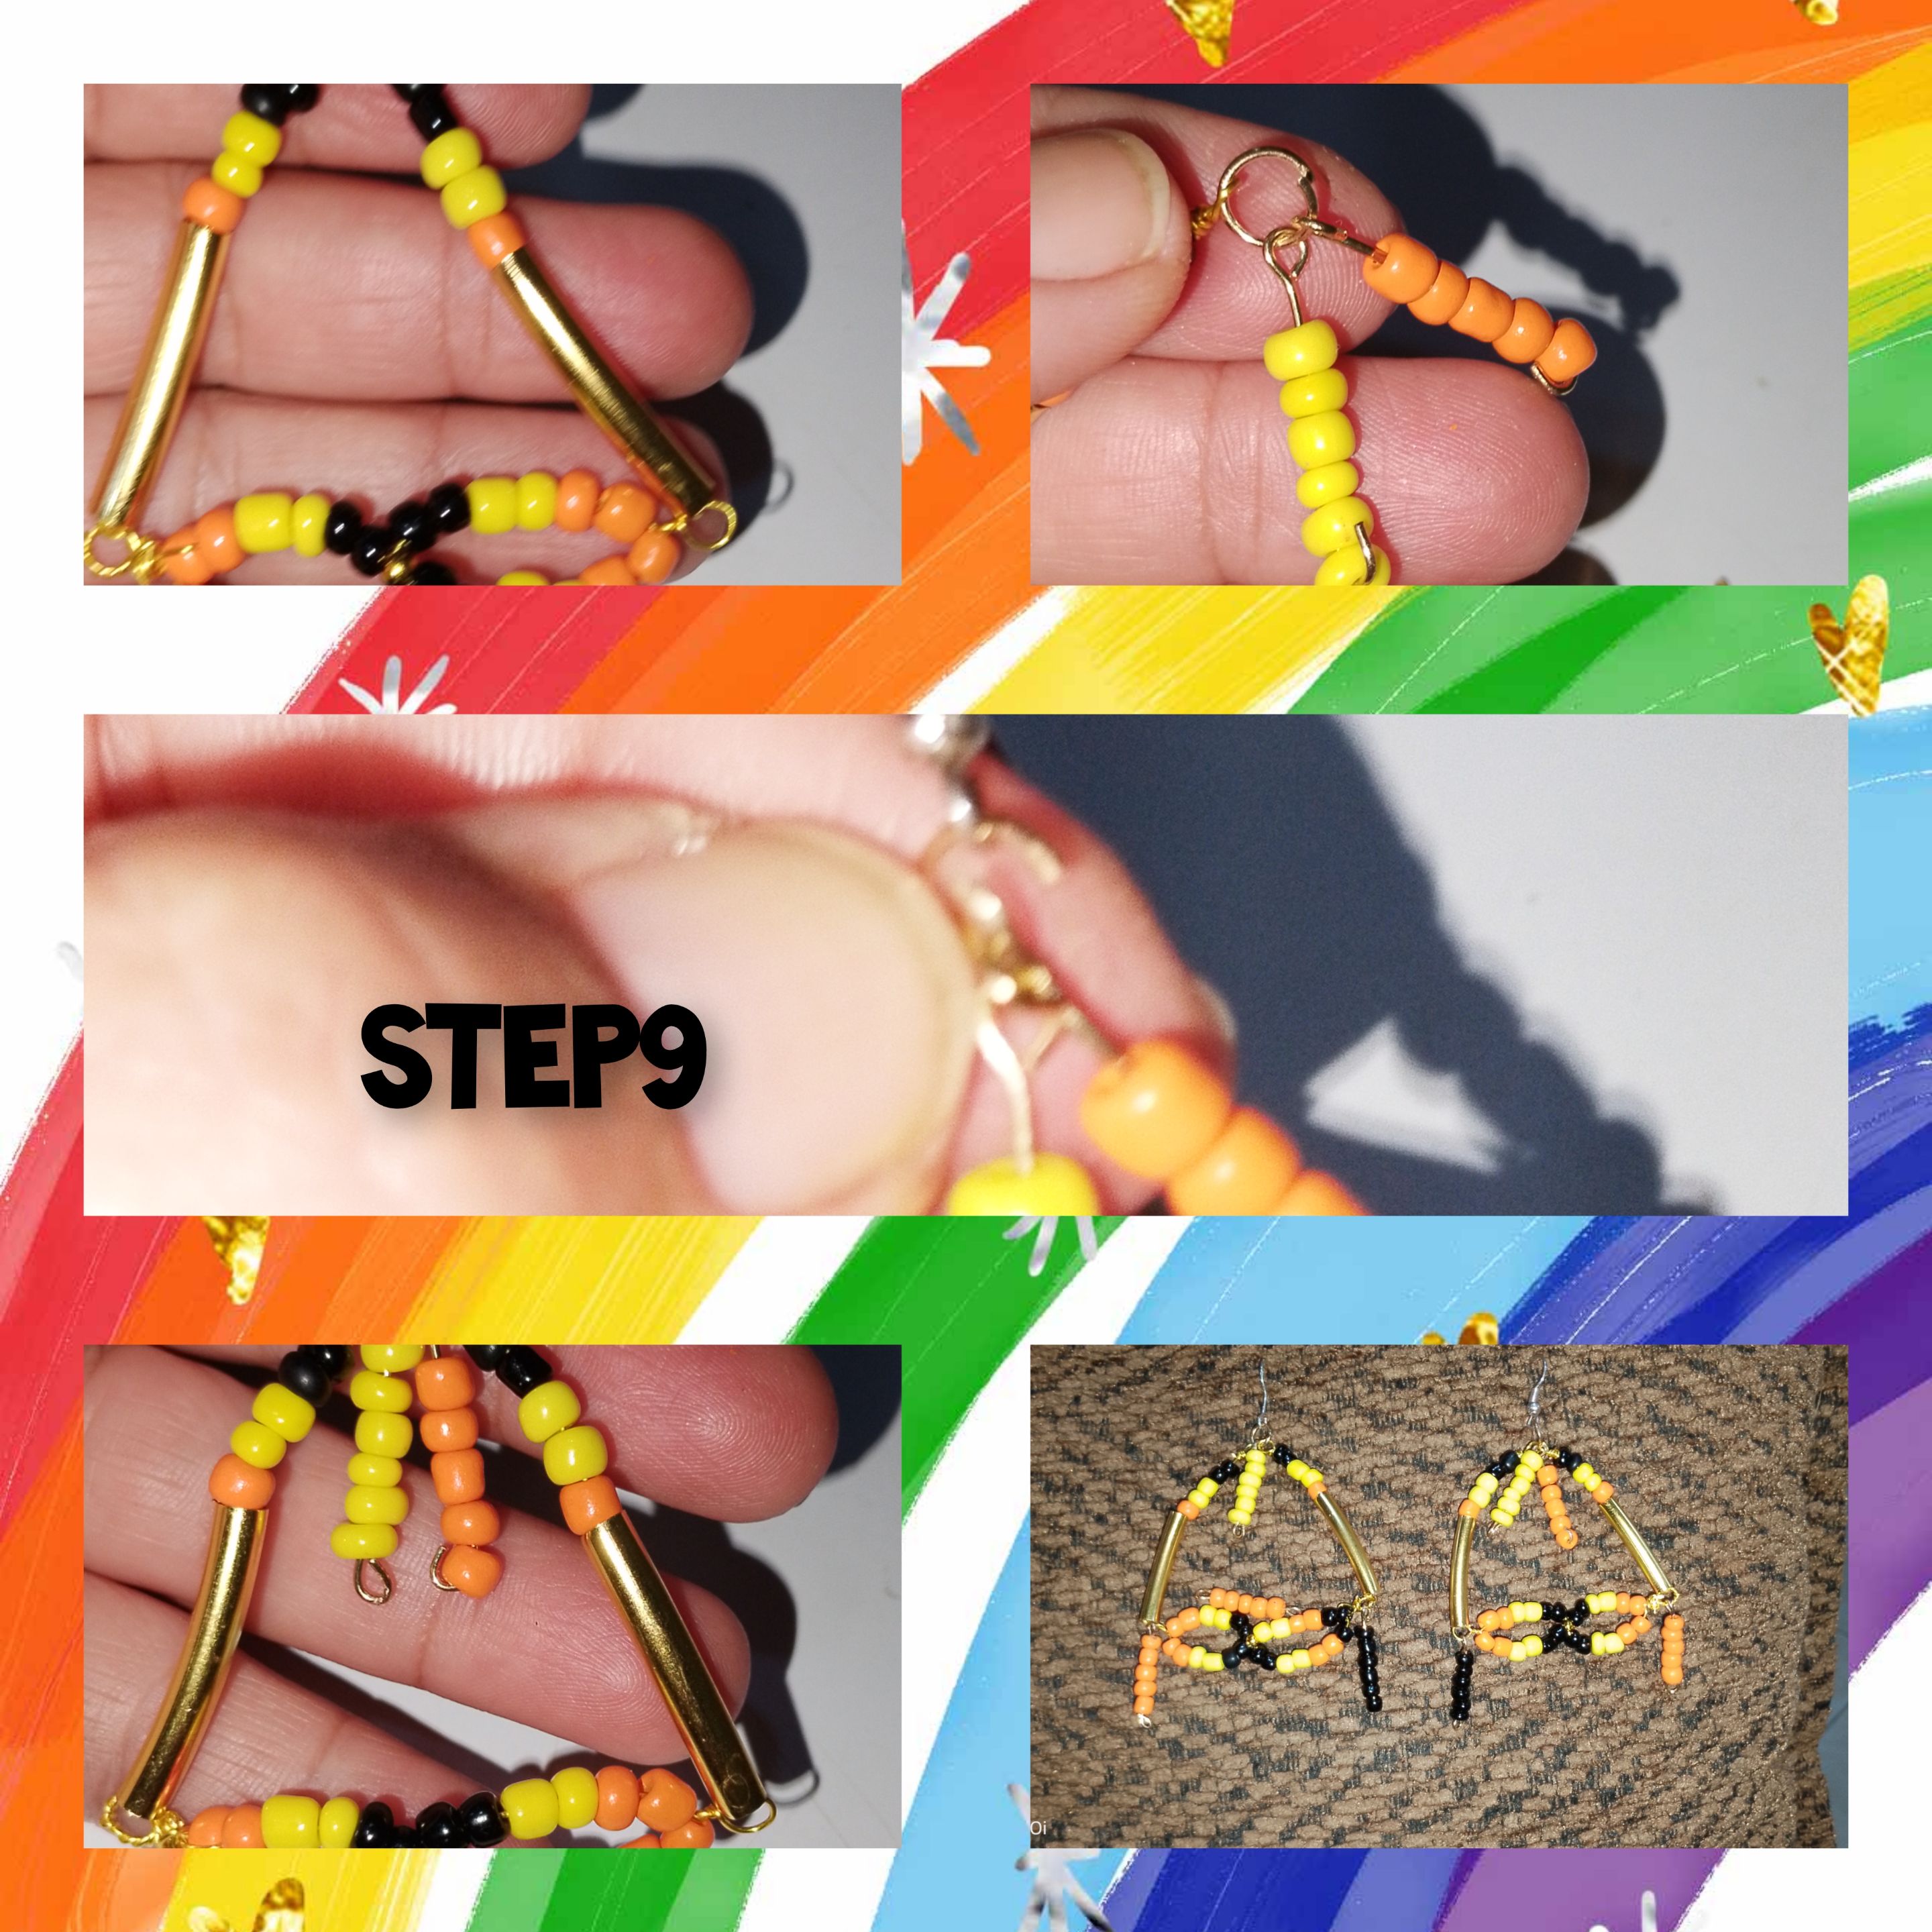
8.) The next thing I will do is cut a piece of wire, insert it through one of the rings formed in the mask, place it in equal parts and begin to twist both strands of wire. When I finish, I insert a small metal tube into the wire, followed by a yellow bead, then two orange ones and two black ones. This is done. With the remaining wire and with the help of the round-tipped pliers, I make a small earring. I repeat in the same way in the next extreme.
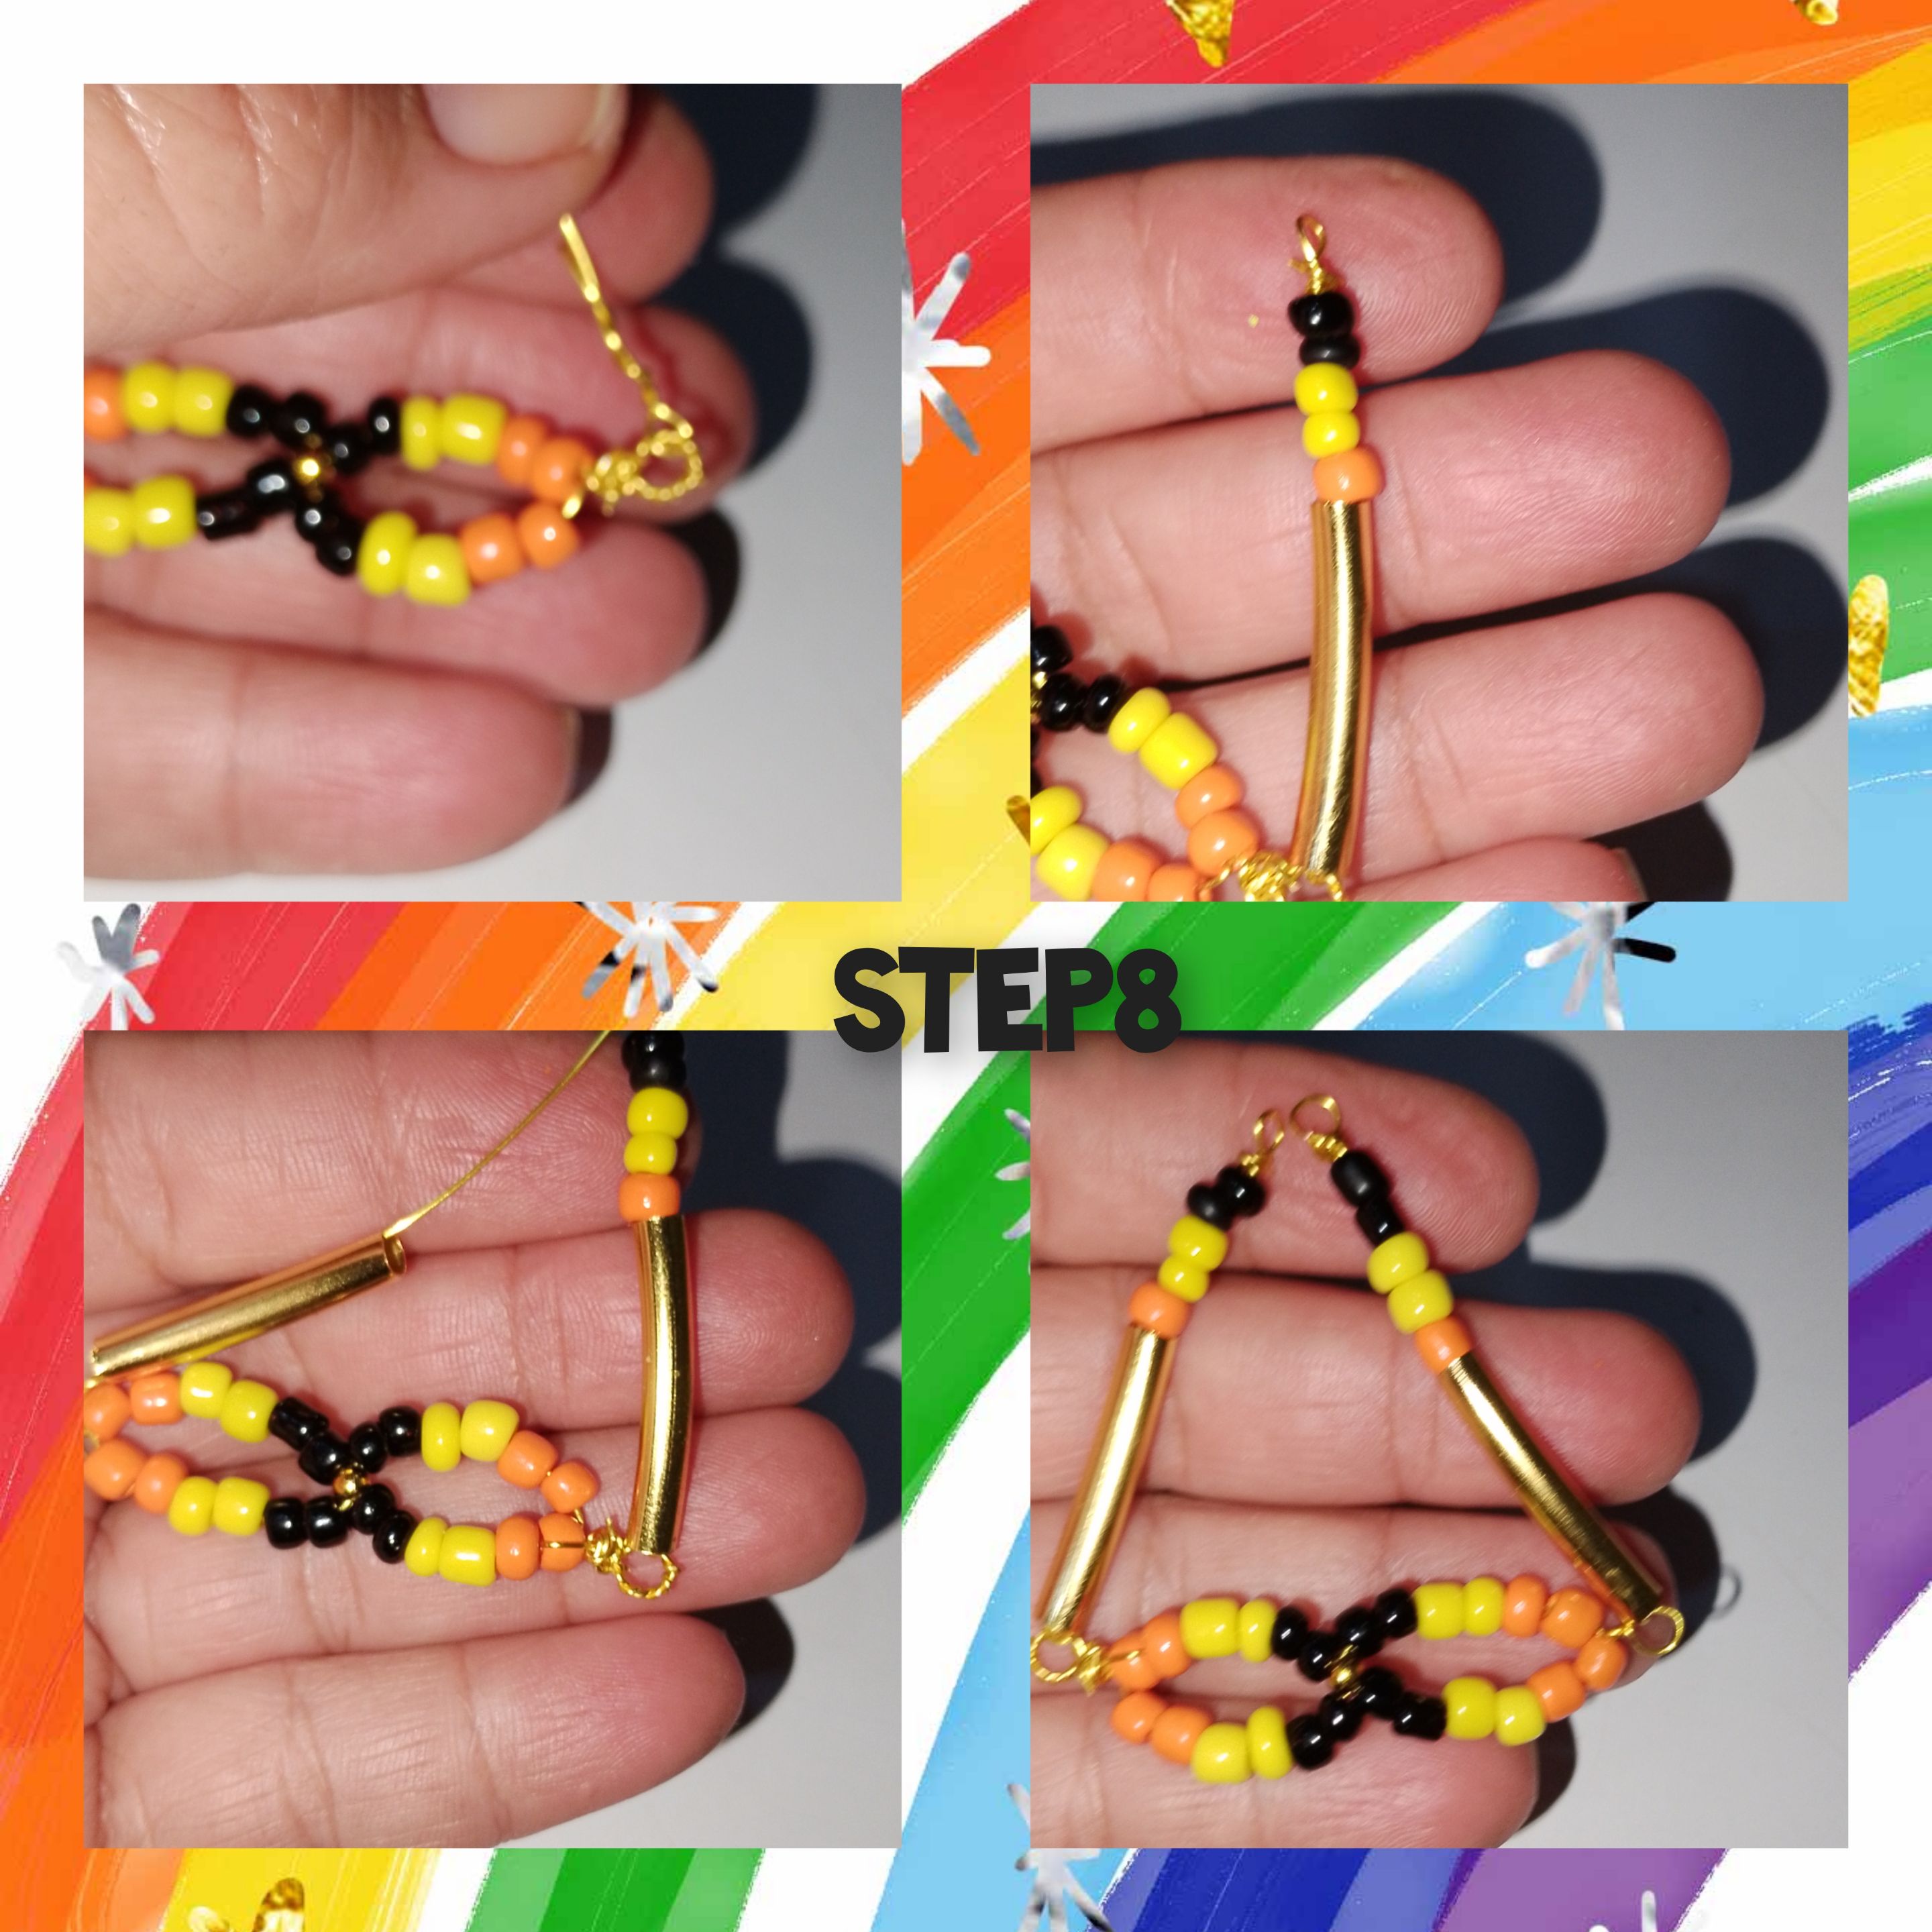
8.) Ready both sides, I open a jewelry ring and begin to insert, on one side of the mask, a pendant made in the last step, with a pin, I chose the colored ones, yellow and orange, continuing with the earring hook and I continue with the other side, now, with the help of the tweezers I close the ring. I go down to the bottom of the mask and this time I will place a small pendant at each end. And in this way, the first earring is ready, the next thing will be to repeat to obtain the pair.
I have already finished, very happy with the final result, what I started with a simple idea, and it gave me a great result, I am looking forward to the moment of sewing and showing it off.

.All photos are my property, taken with my smartphone (Imfinix).
. Use Incollage to show the process of making this project
. Use language translator.
Grateful to everyone who followed me until the end, I hope you enjoyed it, it is always a pleasure to have you on my blog, I will see you next time.
(ESP)
Hola a todos, llena de entusiasmo y colorido en el día de hoy, para unirme a ustedes y esta gran comunidad @jewelry, para crear a propósito de estos ,carnavales y unirme a este Gran Iniciativa " Concurso de Complementos de Carnaval". Para ello, he creado un hermoso, y muy llamativos Aretes y collar, dónde use la técnica de ,Alambrismo y Bisutería, inspirados en, un accesorio, que es muy común usar en estas fiestas, como lo es el Antifaz, de seguro te harán lucir muy hermosa y resaltarlas entre reinas disfraces y comparsas. El antifaz es muy simbólico en esta época, tanto como, las máscaras y disfraces, que bien según el gusto de cada quien podrías fusionarlos y dar un gran toque festivo, y a esto se suman las joyas y diferentes prendas, que bien lo harían lucir. Antes de comenzar, quiero extender la invitación a unas grandes creadoras dentro de la comunidad, que de seguro, ya tienen algo en mente y nos sorprenderán, ellas son @nhaydu, @leidys01 y @creacioneslelys. Sin más, les invito a seguirme. Espero les guste.
Materiales usados, para el proceso:
. Chaquiras de colores (amarillo, anaranjado y negro.
. Perlitas doradas.
. Alambre dorado n0.5
. Aritos de bisutería.
. Cuerito redondo de color negro.
. Tubos perforados color dorado.
. Tapas nudos pequeños de forma redonda.
. Pasador para collar.
. Pinzas de bisutería.
.Pegamento líquido.
. Alfileres de bisutería.
. Pinzas de bisutería.
. Tijera.
. Yeskero.
. Regla para marcar.
Proceso:
Paso 1.) Mido y corto seis pedazos de alambre n0.5, de 25 cm de largo. Seguidamente, doblo primera mente un corte de alambre, doblo en partes iguales coloco en el corte la pinza, de bisutería punta redonda y doy entre ambos alambres tres vueltas, lo más ajustadas y pegada posible.
Paso2.) Introduzco en cada pelo de alambre cinco chaquiras de color negro, luego una perlita dorada y cruzó los alambre. Repito usando el mismo color de chaquiras, en la última chaquira hago el cruce de alambre, y el alambre restante, doy vueltas entre sí, y usando la pinza punta redonda, hago un arito, quedando así formado el primer antifaz. Continuo el proceso, ahora con chaquiras de color anaranjada, luego amarillo con negro y anaranjado y negro. En total he formado cuatro, antifaces, justo los que necesitaré para el collar.
Paso3.) Mido y corto cinco pedazos de alambre,de 18cm, doblo en partes iguales coloco,una perlita dorada, a la cual dejo atrapada, ya que doy vueltas entre se a las hebras de alambre, continuo ocho chaquiras de color negro, y hago un arito con la pinzas, así mismo, repito en las cuatro siguiente, obtenido un total de cinco pequeños colgantes, dos de color negro, uno amarillo y negro y uno anaranjado.
Paso4.) Lo siguiente, será unir los antifazes, para definir la parte delantera de el collar, así que comienzo abriendo un arito de bisutería, con la pinza introduzco un primer antifaz dentro de el arito un colgante y luego el siguiente antifaz, para cerrar el arito, con las pinzas, de esta manera, continuo, involucrando el resto de los antifazes y colgantes hechos, en paso anterior, no es necesario llevar un control entre los colores, ya que es carnaval y como bien sabe, esto no es relevante, ya la combinación va por su sola. Claro que sí usted lo considera es válido.
5.) Corto 30 cm de, cuerito color negro, e introduzco por dentro de el aro, de el antifaz, hago un pequeño dobles y con ayuda de los dedos, hago un punto franciscano, de macramé, técnica que es merecedor de mencionar, ya que no lo hice en el inicio, luego de armar mi nudo, corro el residuo y coloco un poco de fuego con el yeskero. Hago en el otro extremo de el cuero, hago un nudo sencillo, coloco un puntada de silicón líquido, en uno de los tapas nudos, e introduzco el cuerito, uso la punta de la tijera, par empujar, y que este quedé bien introducido, en el tapa nudo. Luego coloco un arito de bisutería dentro de el el pasador y cierro el arito.
6.) Repito, en el otro lado de el collar, pero está vez colocaré en el tapa nudos un arito. Quedando así listo el hermoso y colorido collar carnavazco.
7.) Repetido el proceso de elaboración de los antifaces, realizó los siguientes dos. Y armó con los alfileres de bisutería, tres par cada uno de los aretes.
8.) Lo siguiente que haré,será cortar un trozo de alambre, introducirlo por uno de los aritos, formados en el antifaz, colocarlo en partes iguales y comenzar a dar vueltas a ambas hebras de alambre. Al terminar introduzco, en el alambre, un tubito de metal, seguido de una chaquira amarilla, luego dos anaranjadas y dos de color negro, cumplió esto, con el alambre restante y con ayuda de la pinza punta redonda, hago un pequeño arito. De igual manera repito en el siguiente extremo.
8.) Listo ambos lados, abro un arito de bisutería y comienzo a introducir, un lado de el antifaz, un colgante de los hechos en pasado paso, con alfiler, escogí los de colores,amarillo y anaranjado, continuo con el anzuelo para aretes y continuo con el otro lado, ahora sí, con ayuda de la pinza cierro el arito. Bajo a la parte inferior de el antifaz y está vez colocaré en cada uno de los extremos un pequeño colgante. Y de esta forma,ya ha quedado listo el primer arete, lo siguiente será repetir para obtener el par.
Ya he concluido, muy contenta con el resultado final, lo que comencé, con una sencilla idea, y me dió un gran resultado, a esperar con ansias el momento de coser lucirlo.
.Todas las fotos, son de mí propiedad, tomadas con mí teléfono inteligente.(Imfinix).
. Use Incollage para mostrar el proceso de elaboración de este proyecto
. Use traductor lenguaje.
Agradecida a todos los que me siguieron hasta el final, deseo lo hayan disfrutado, es siempre un placer tenerlos por mí blog, será hasta una próxima oportunidad.