
English
Hi there, friends of the HiveDiy community, it's me again. How are you today?
This is the first time I've dared to upload something art-related here, but I liked these drawings so much, and they were so basic, I felt I had to share them.
I must warn you that this is a tutorial of how I do the drawings my way; however, I think the steps could be adaptable to your style, maybe, because they are just the basic steps. This tutorial is dedicated to beginners, you are loved.
If you want to know how to draw the eyes in a very easy way and not have the two look so different, then keep reading, because I'm here to help you. Here we go!
Materials
- Pencil 2 HB
- Eraser
- Pencil sharpener
- Sheet of paper, any sheet of paper.
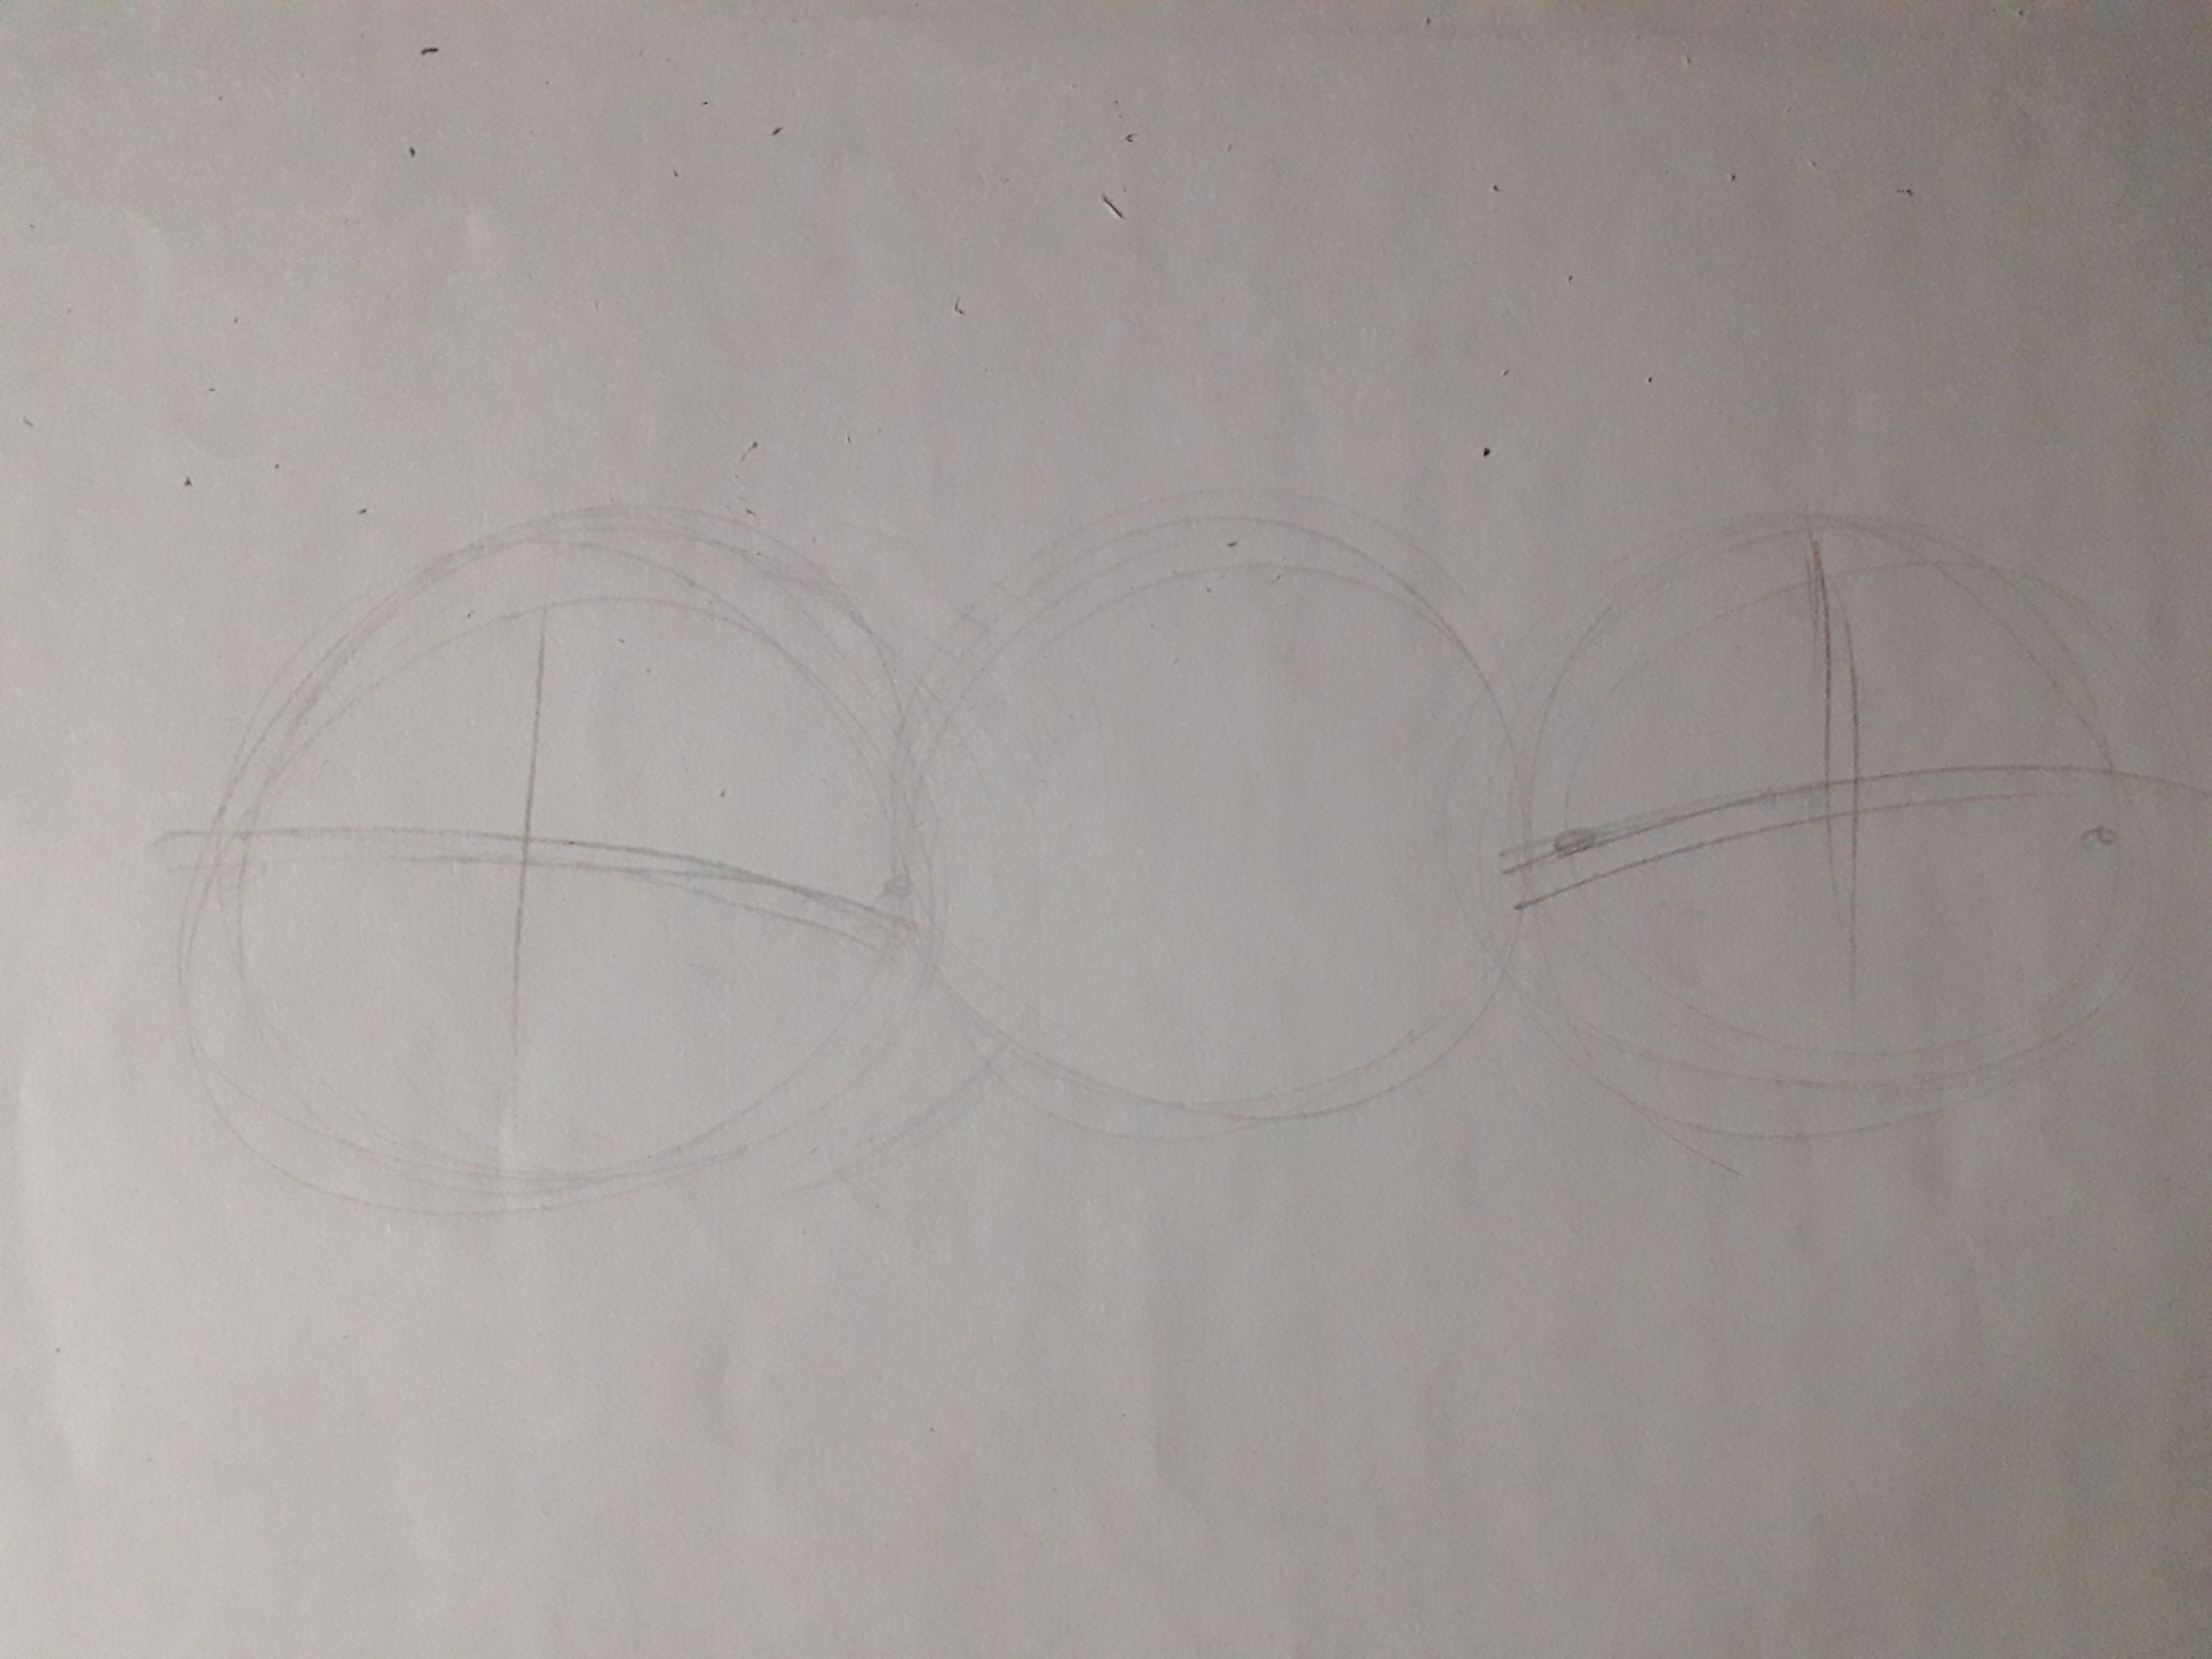
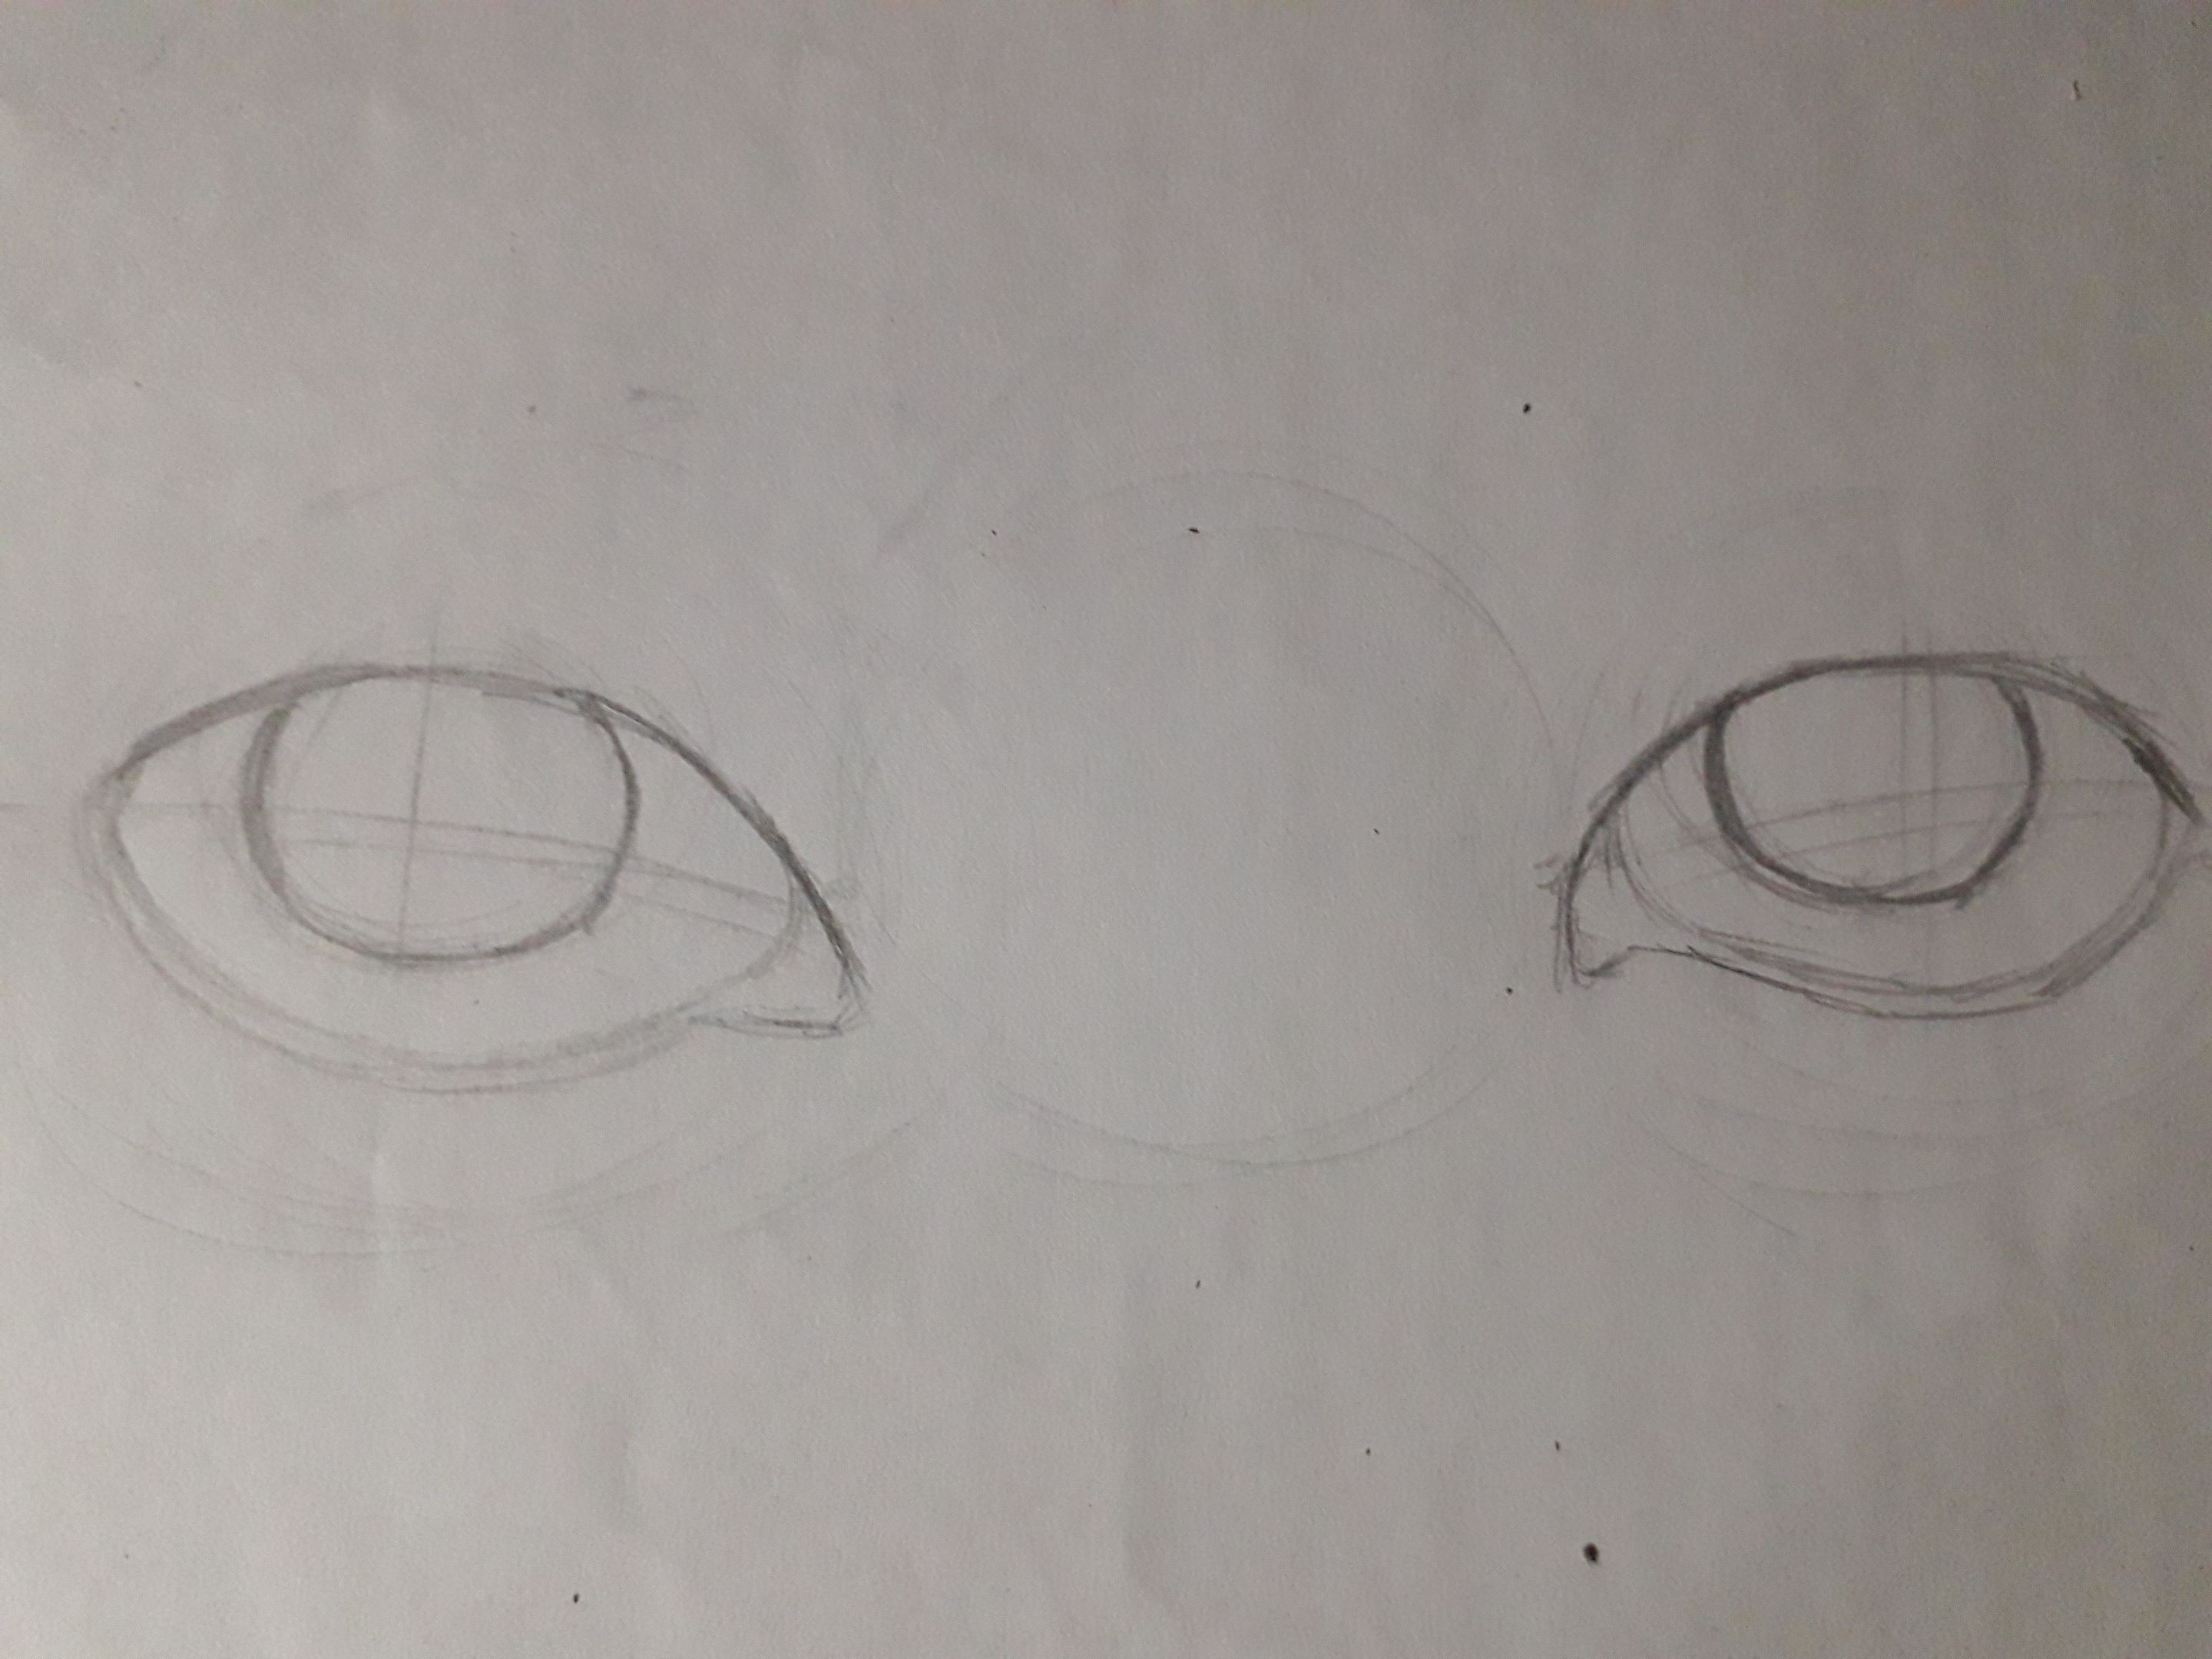
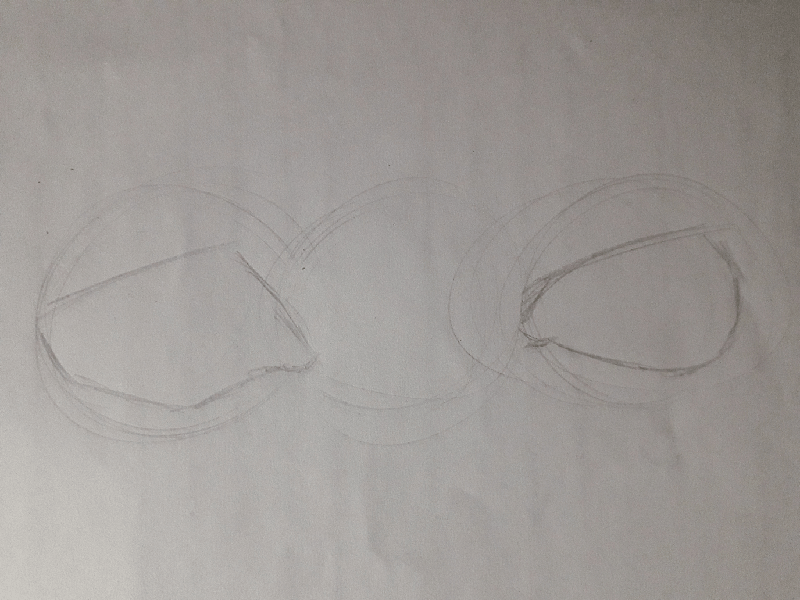
We start by drawing three spheres, which we will divide into a cross, like this. The most advisable would be to use a compass and ruler; however, I don't have these materials, and I prefer to try to improve my pulse. If you have these materials, then go ahead.
The reason I used three spheres or circles is that a very important proportion to keep in mind, is that each eye has the separation of an eye. Do you know what I mean?
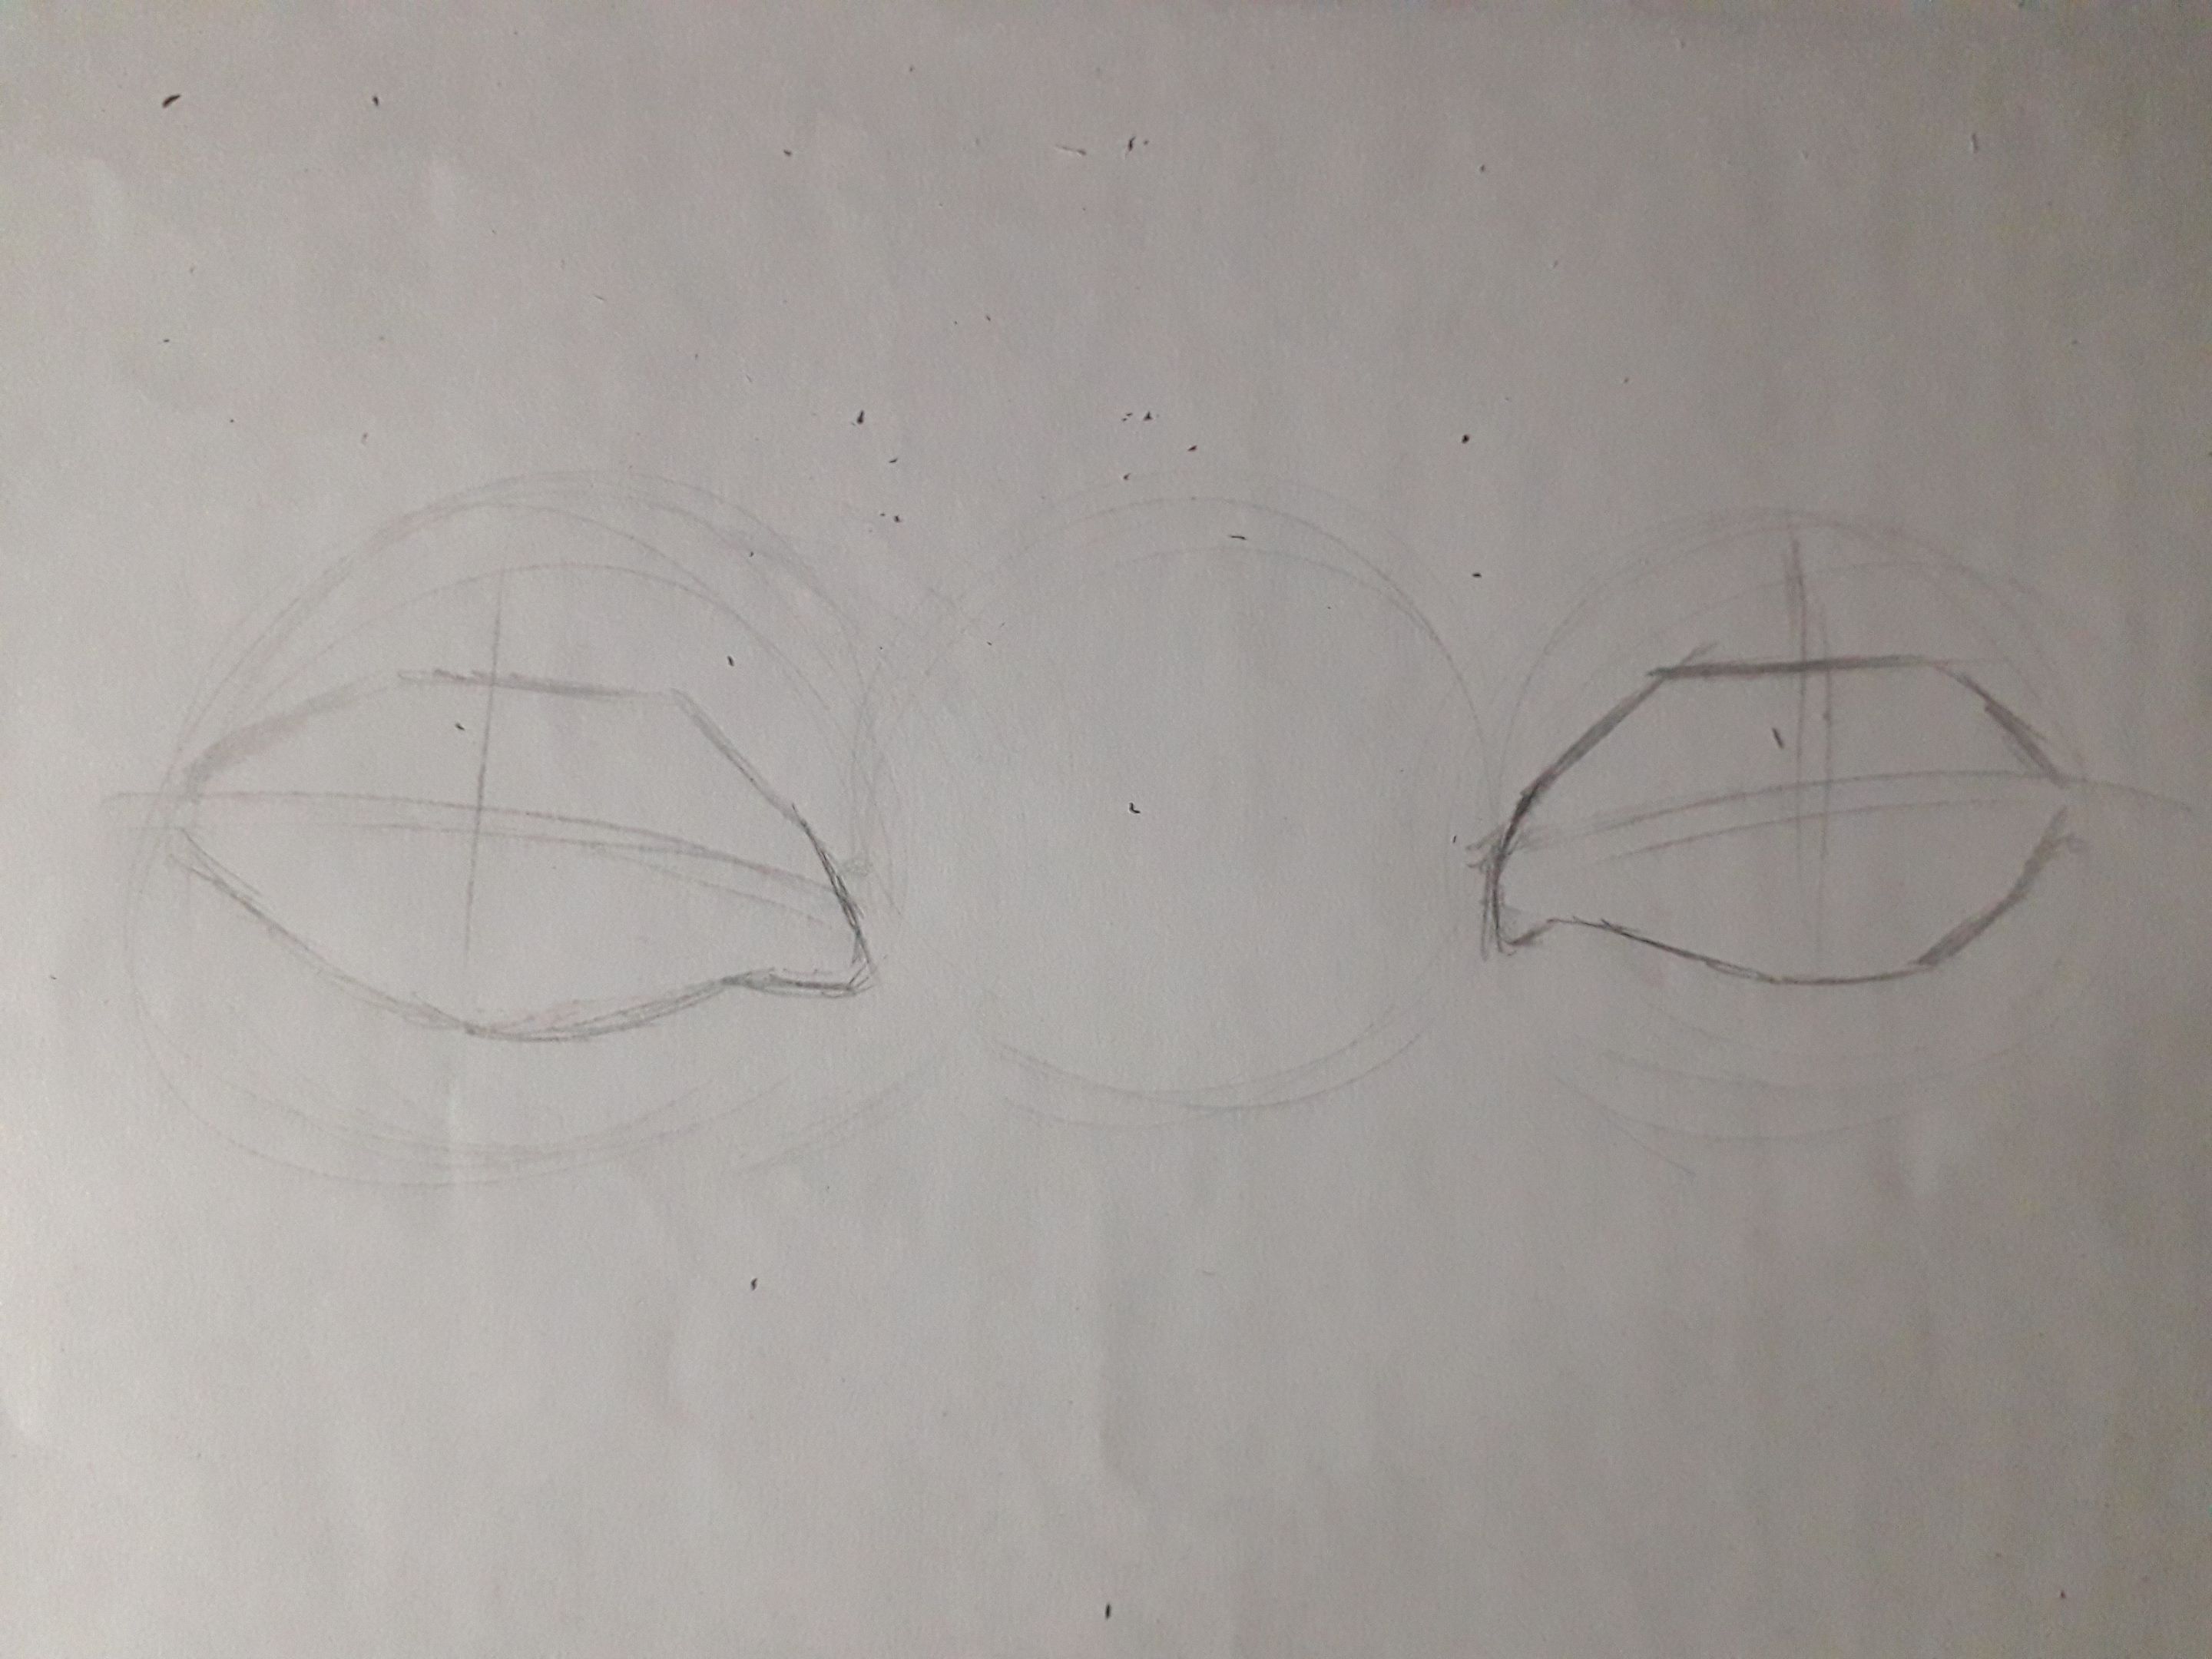
These spheres represent the eyeball, so we start drawing the skin over it. Because yes, that is the anatomy of our eye; basically, they are spheres that are inside sockets, and these spheres have muscles on top, and they also have skin on top.
The shape of an eye will vary from person to person, because everybody is different. To make the curve of the shape of the eye, I would recommend that you simplify it by using straight lines, several of them, because they are easier for our brain to assimilate than a curved line.
The shape of the eye, I divide it into three sections, observe. On the upper eyelid, we have a slanted line that goes from the tear trough to a third of the eye. Then, in the middle, we have a straight line that stops at the remaining third. And finally, a slanted line again, going down to the corner of the eye. The inclination of the lines will depend on each eye. For example, slanted eyes tend to have a longer straight line. The important thing is to study the shape of each eye and draw it according to the way it looks to you. And what you must not forget is to use references to practice; in this case, I did it from my imagination because I have already practiced a little.
Remember to study the shape of the lower eyelid too, and don't forget the space for the teardrop.
 |  |
|---|
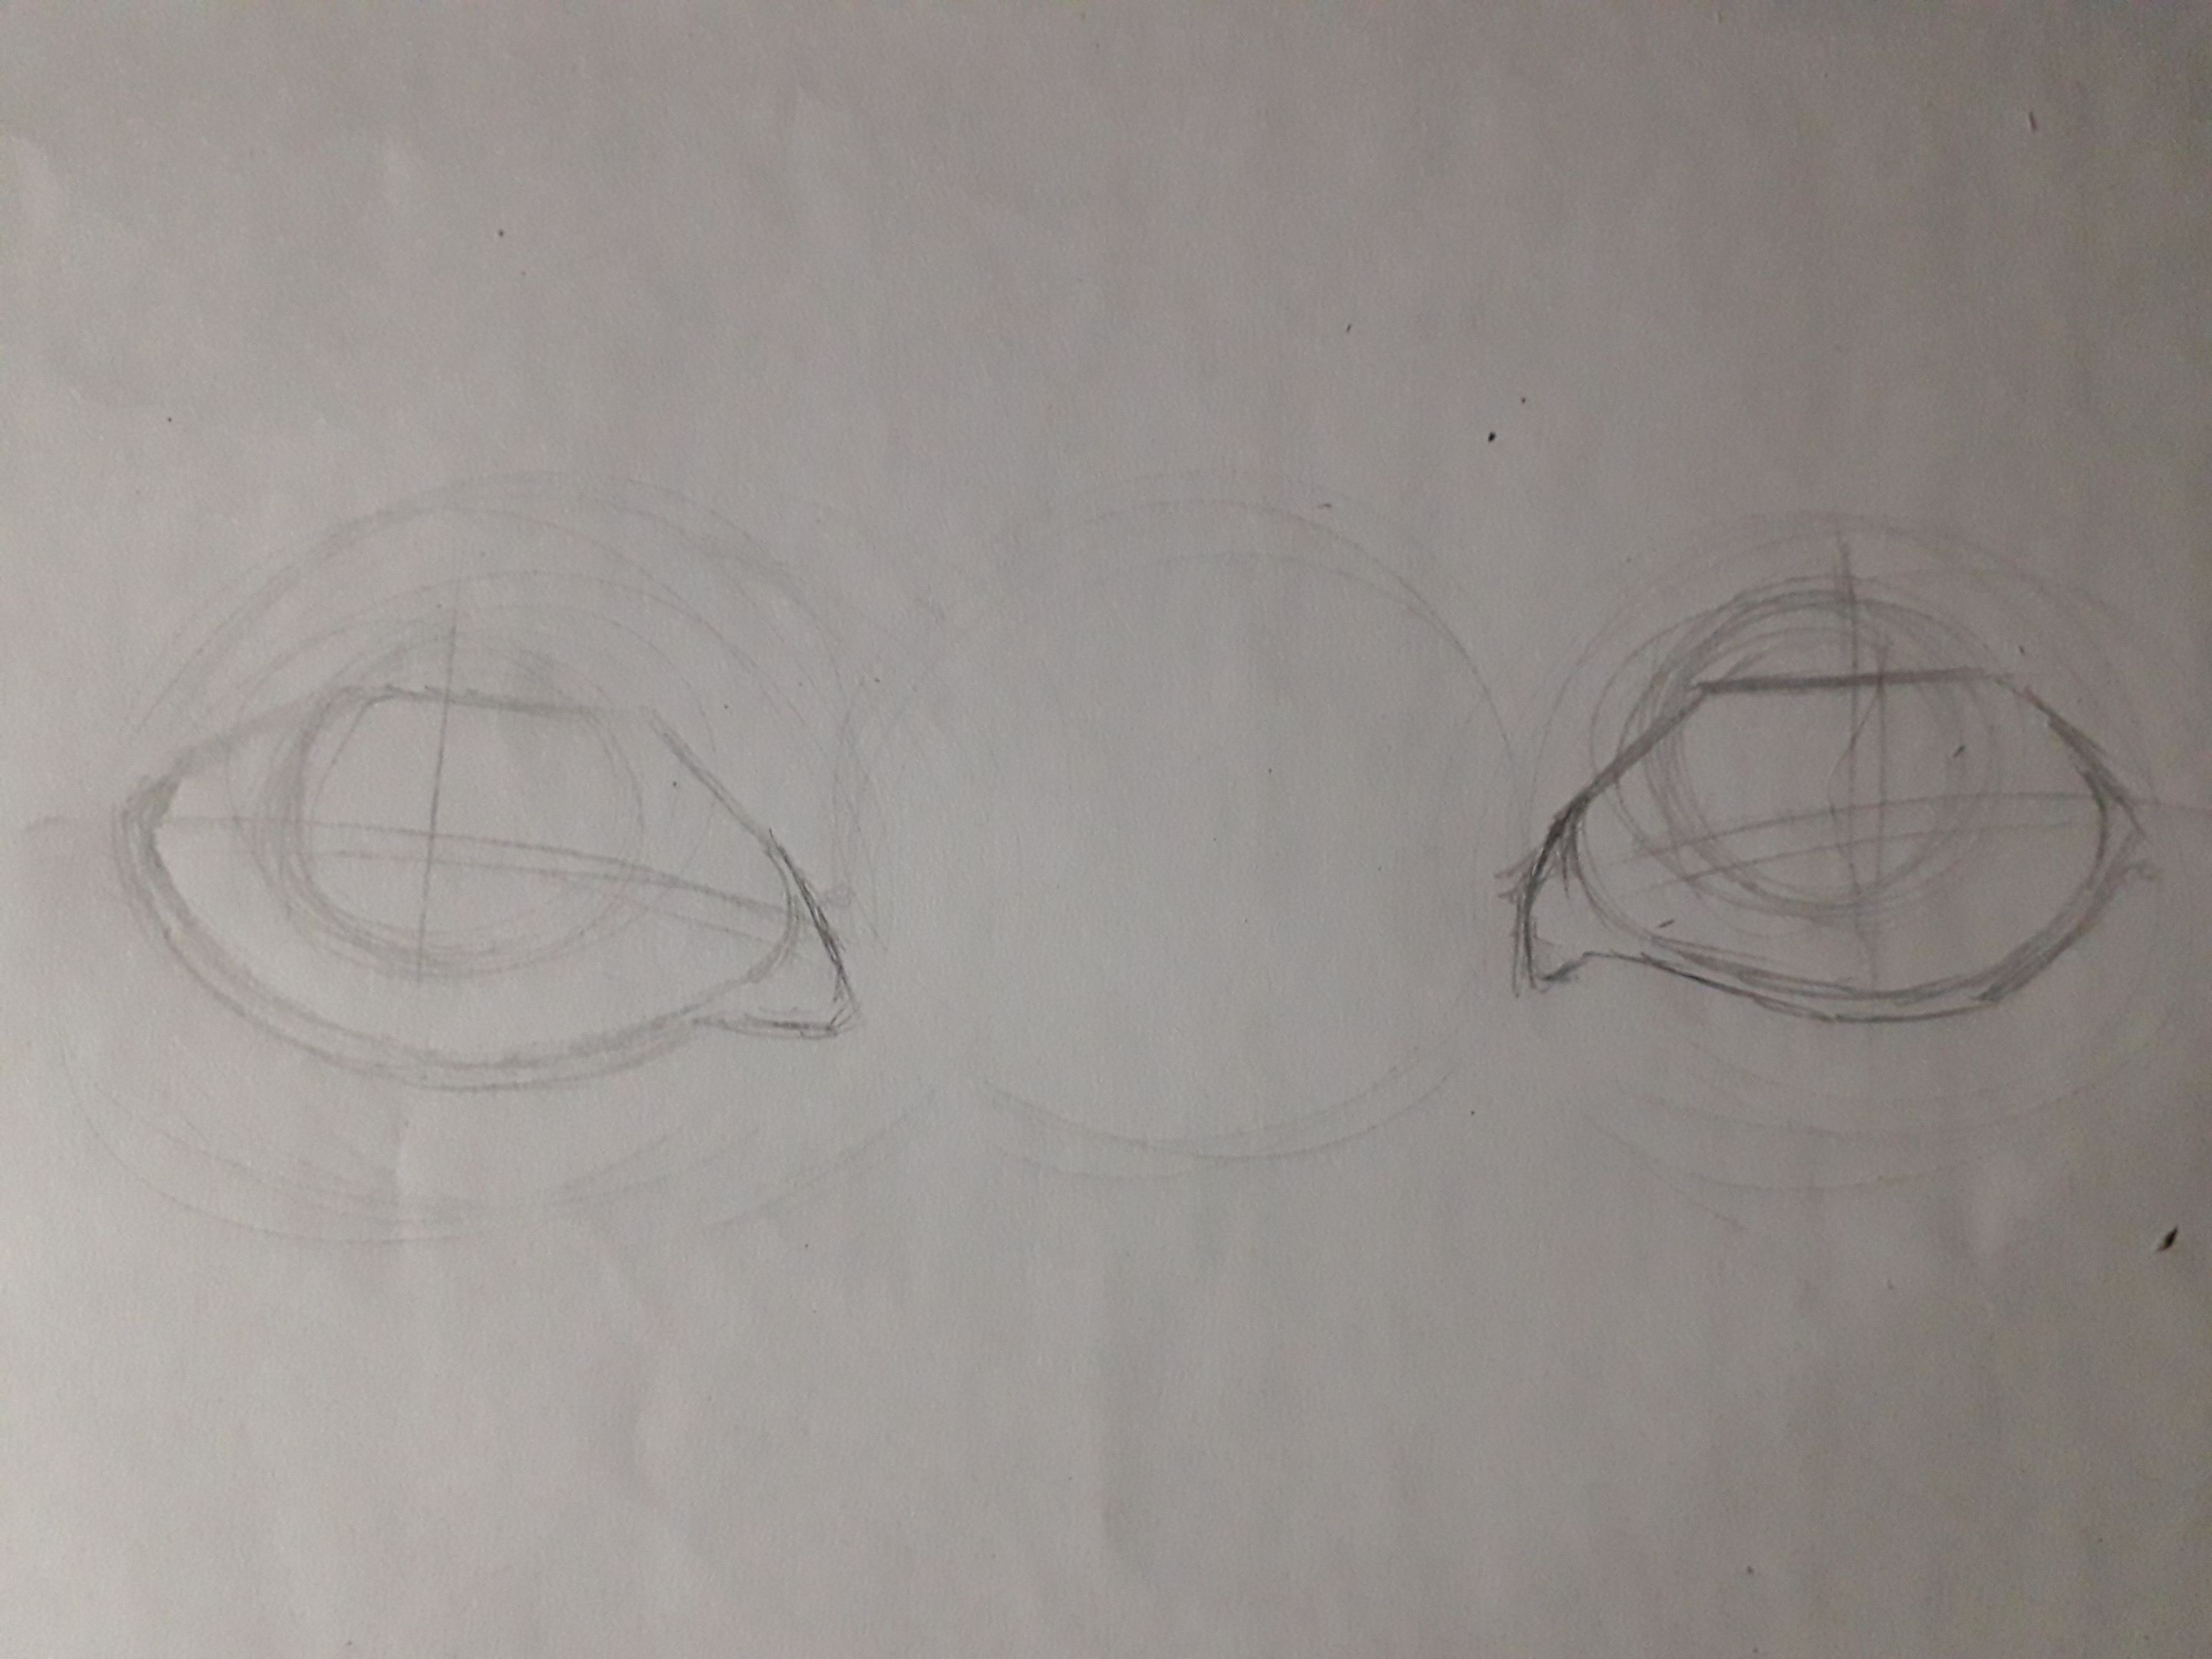
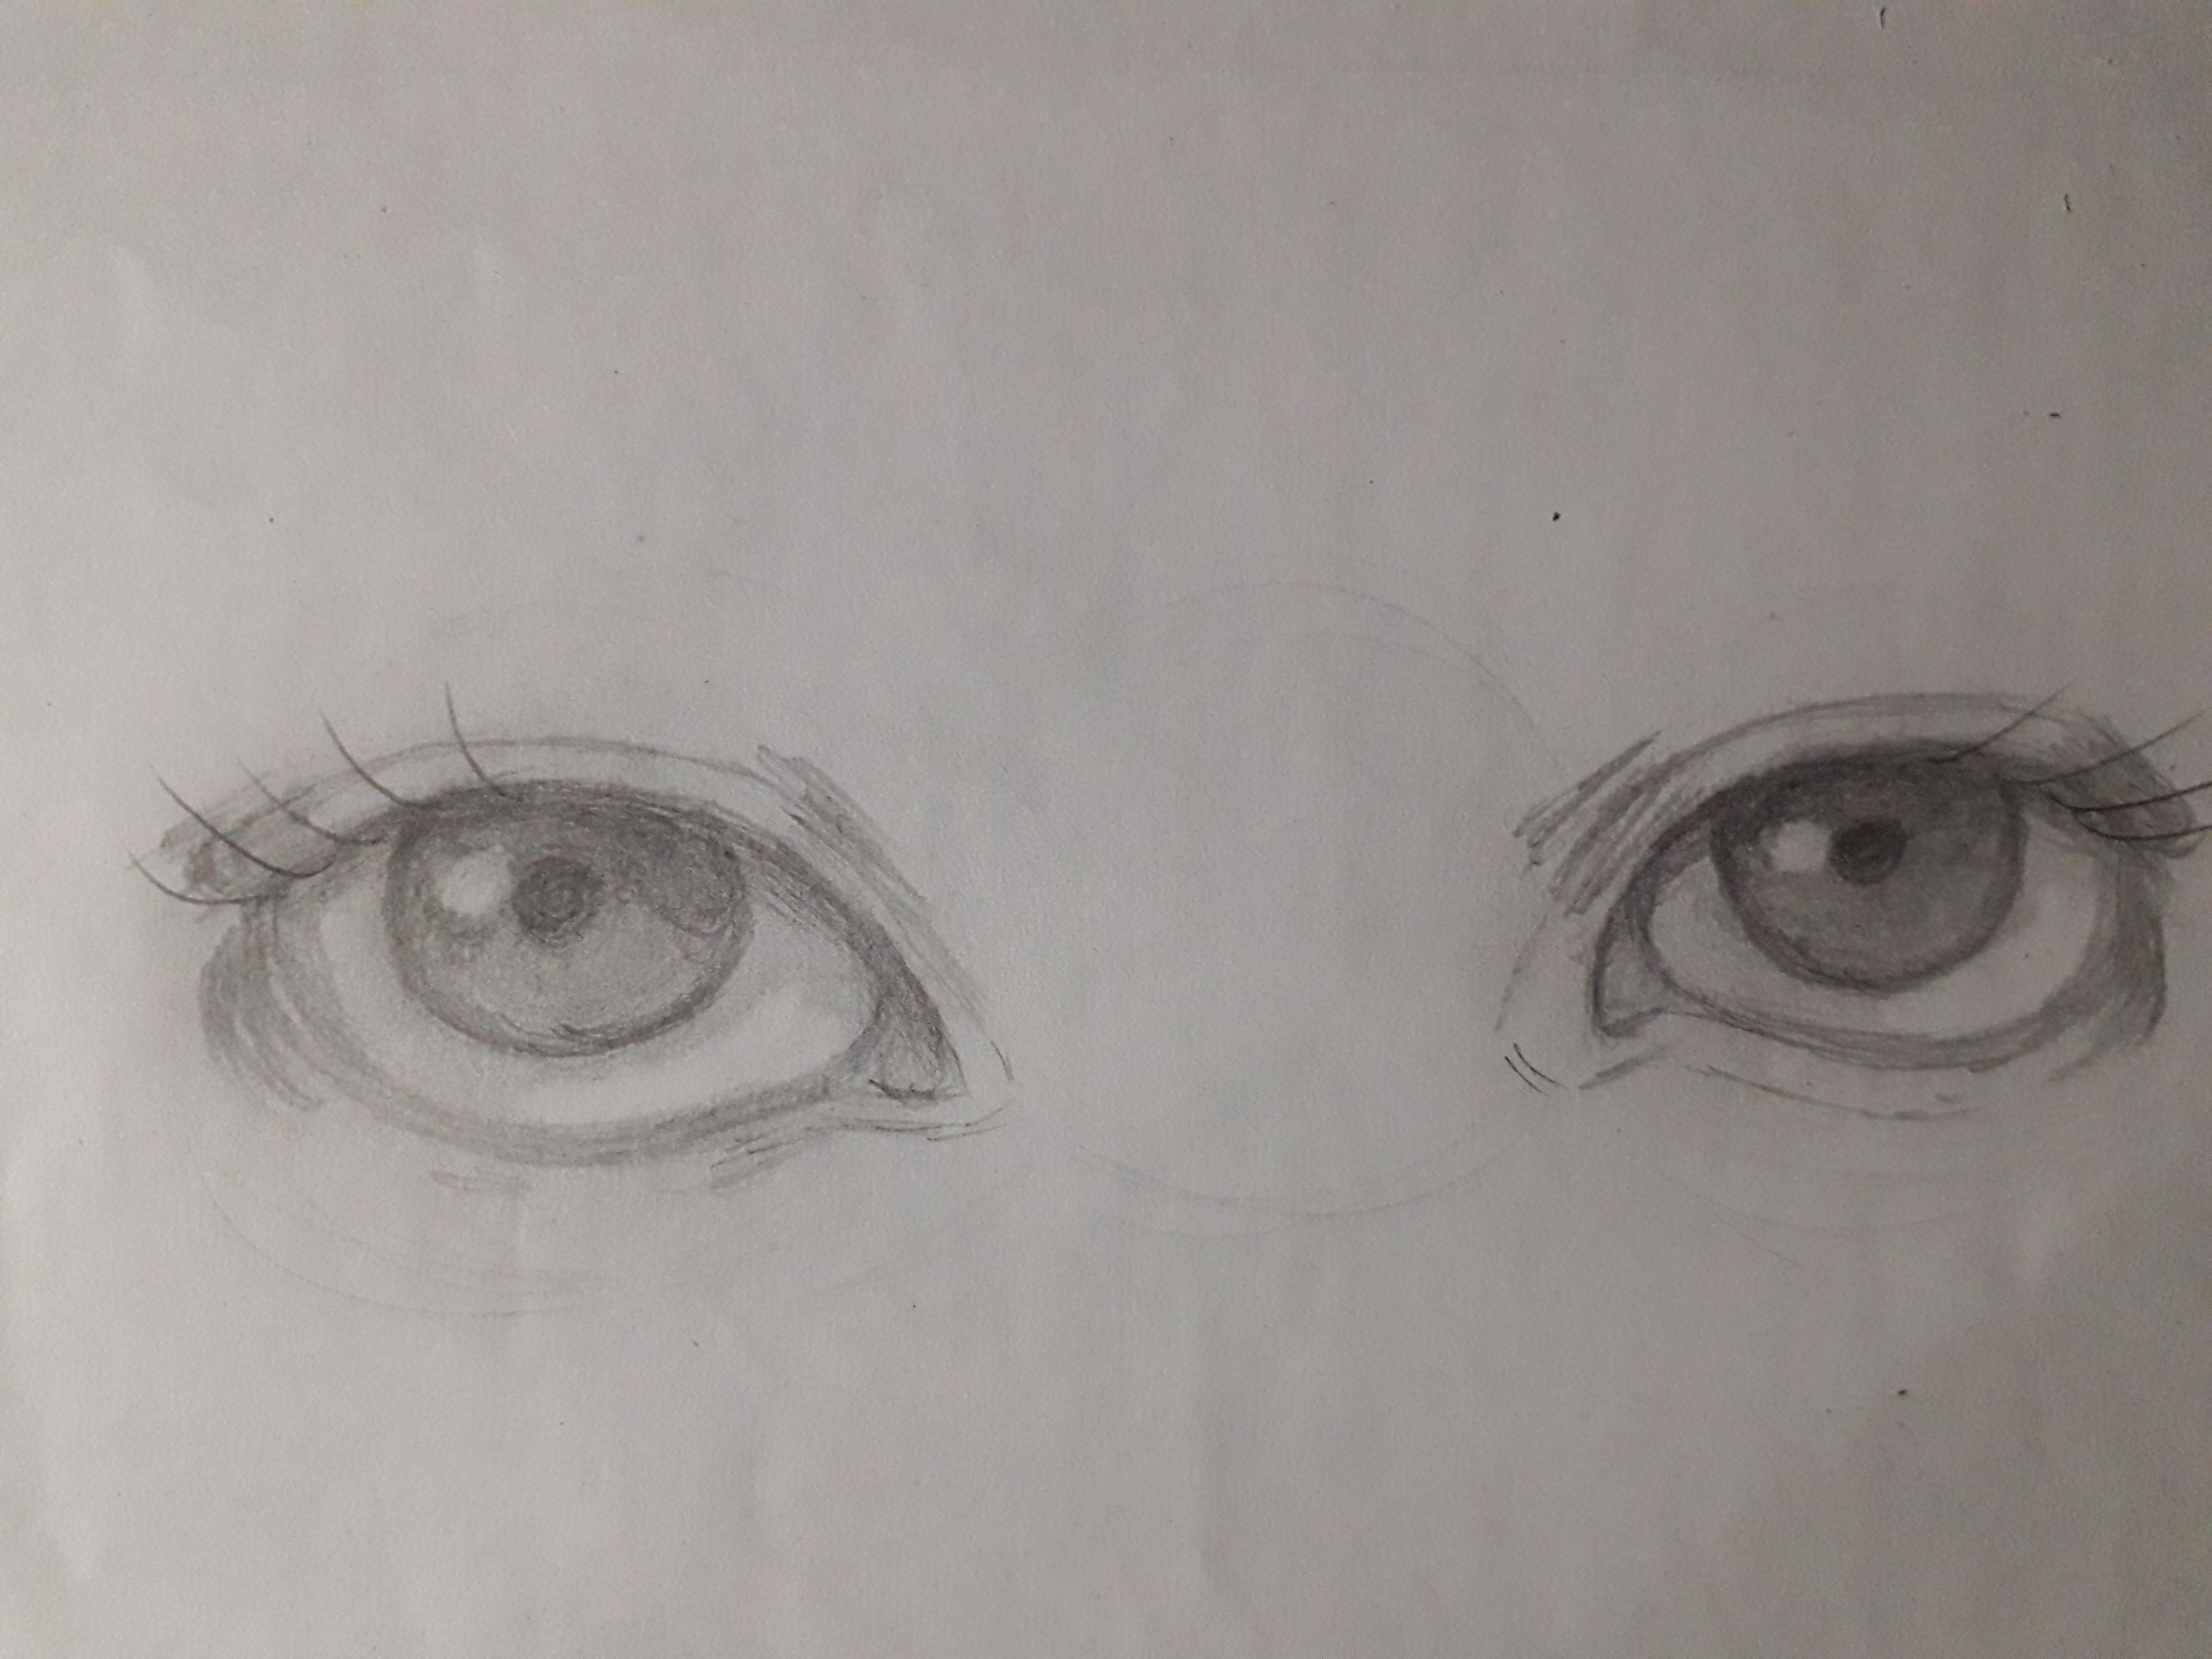
Now, we draw two circles, which would be the irises. It doesn't matter if you want to use compasses; it would be the most advisable. Place each circle depending on which way our character is looking. Then erase the excess of this circle so that it “fits” inside the eye.
A tip for finding the direction in which our references are looking is to look at how the white part of the eye looks and how much of it is visible. If there is a lot of “white part” (called sclera, by the way) visible on one side, then that would mean that the person is looking the other way, of course. Am I clear? The important thing in this is that they learn to observe these “empty” details to learn to take references in a more accurate way (I'm still working on that).
Another relevant detail to mention is that don't forget to draw the inner part of the lower eyelid, as well as the tear trough. This little detail gives a little more depth to the eyes. Besides, it is anatomically more correct.
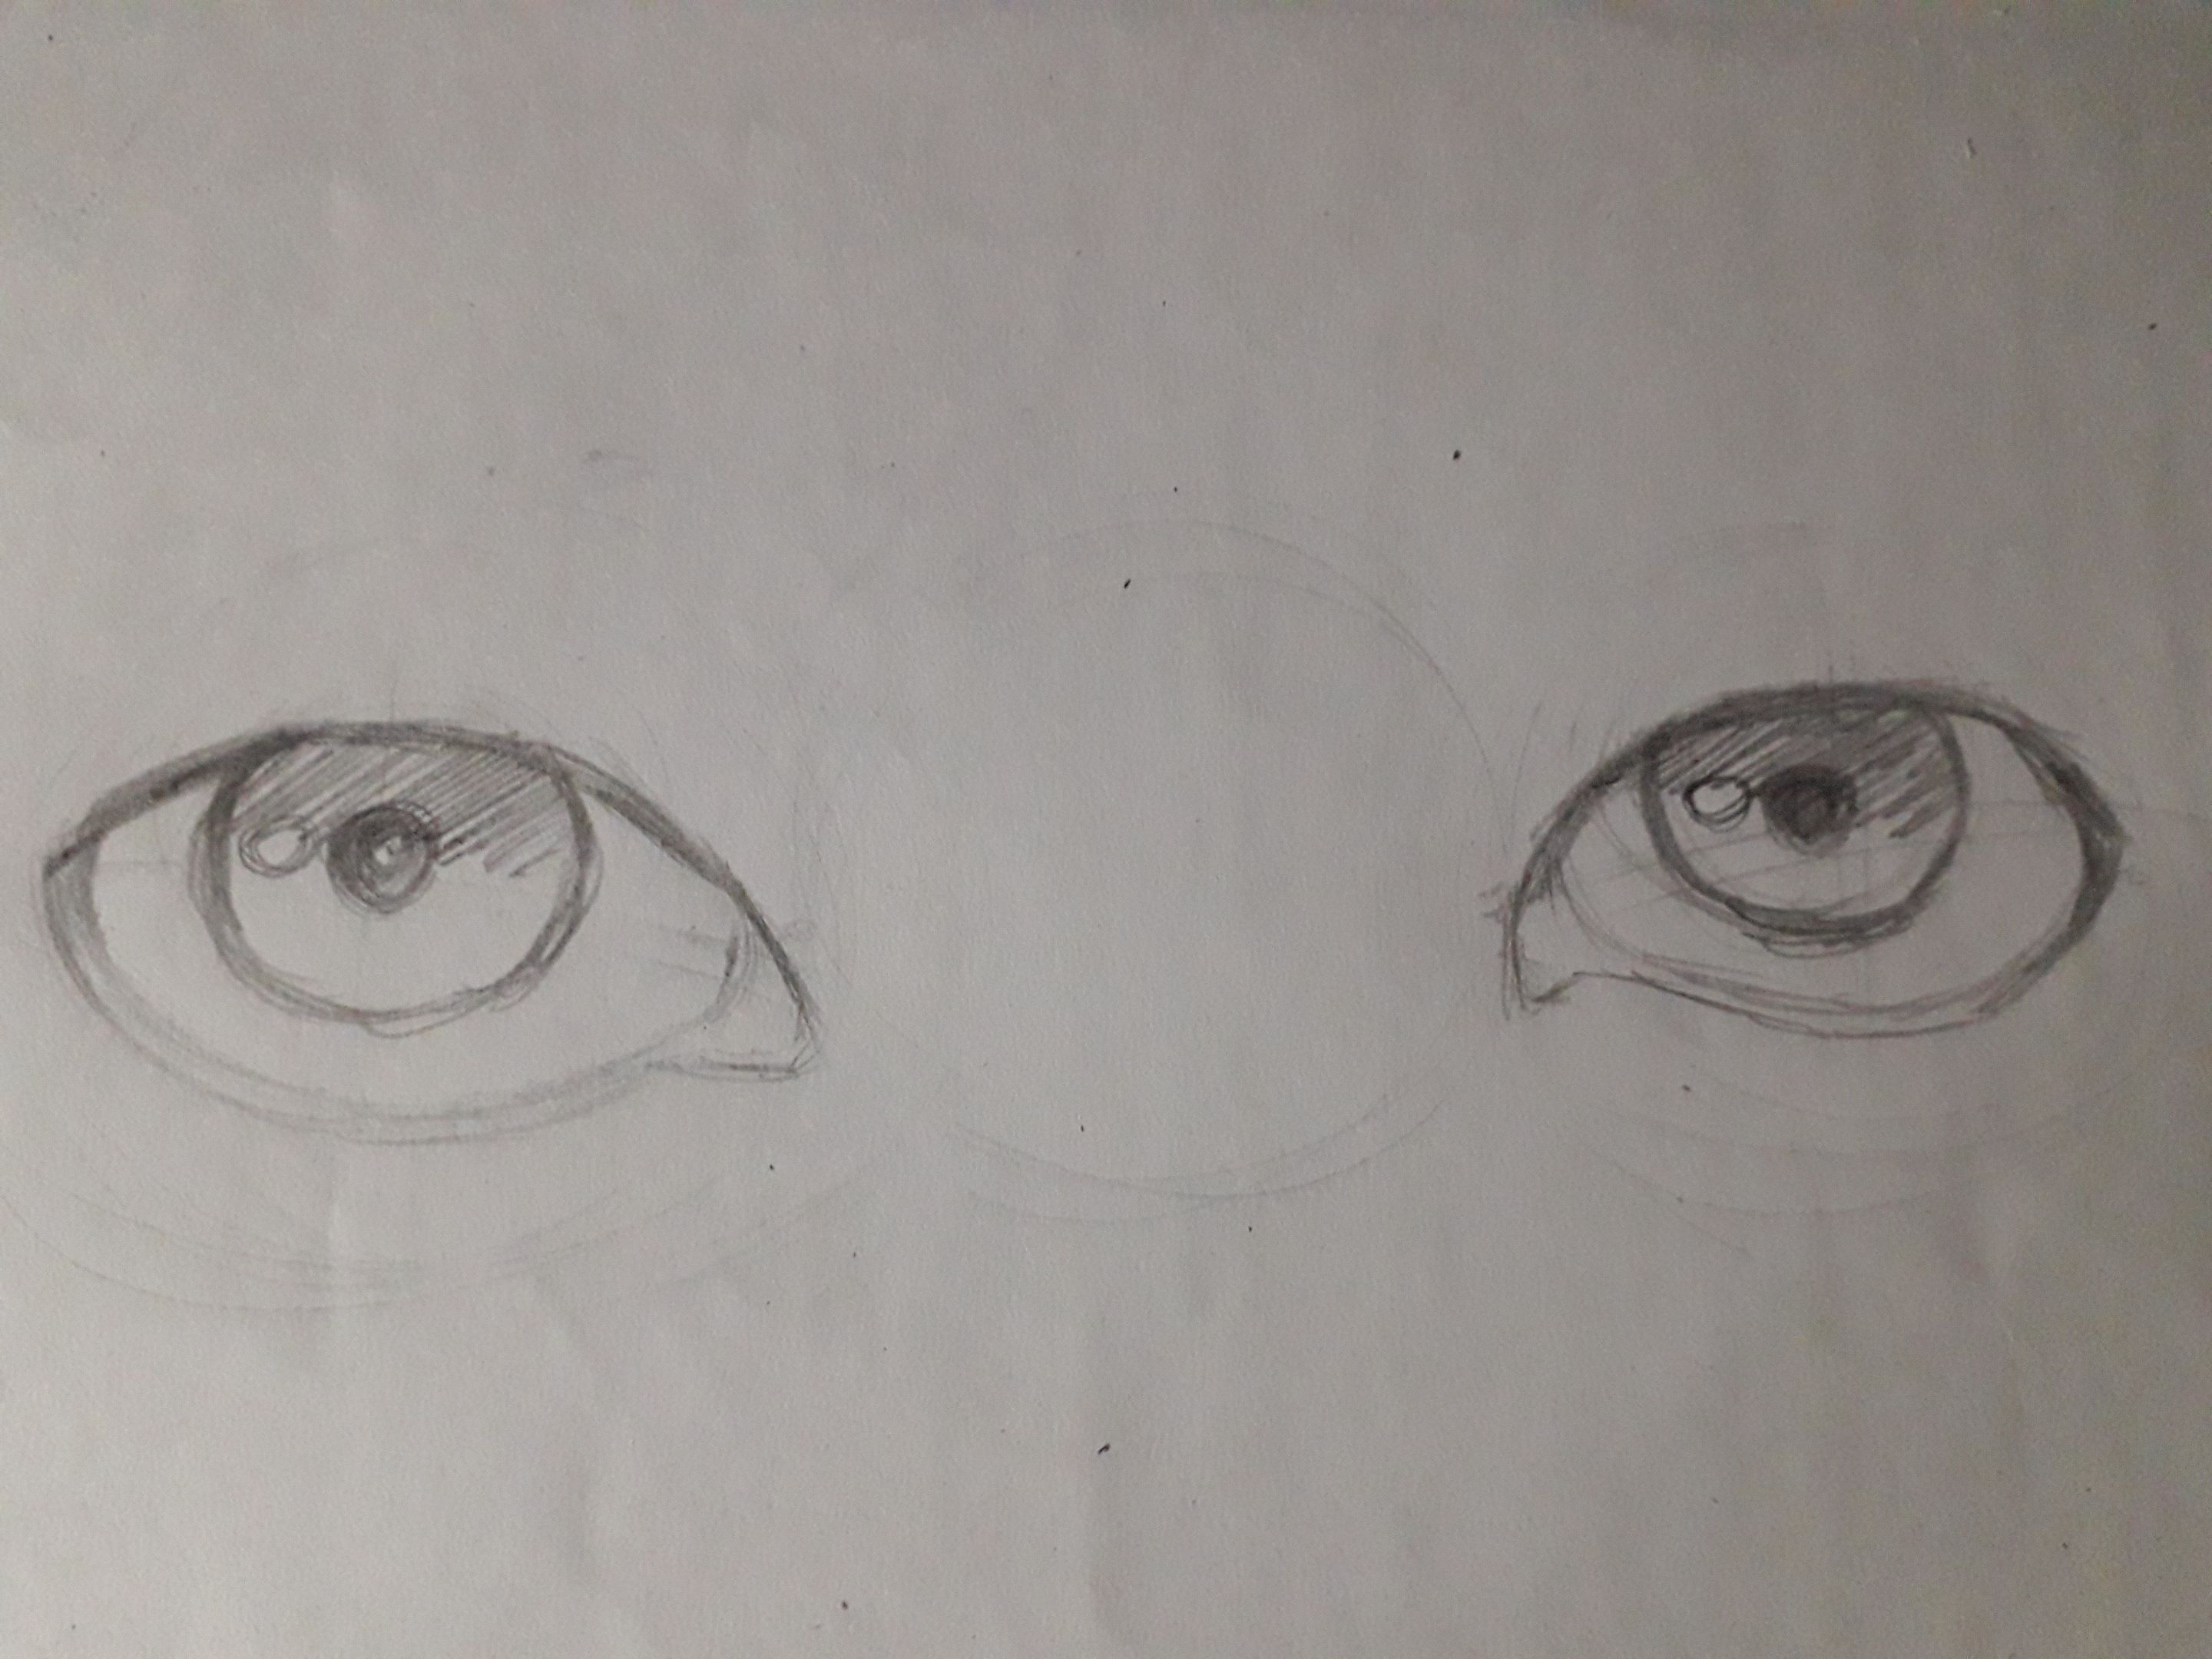
After drawing a bit of shadow only on the upper eyelid, to make it darker, because that is where the eyelashes will be located, we draw the pupils. I also added some shadow to the upper part of the iris and drew a little white ball to represent the light or brightness of the eyes.
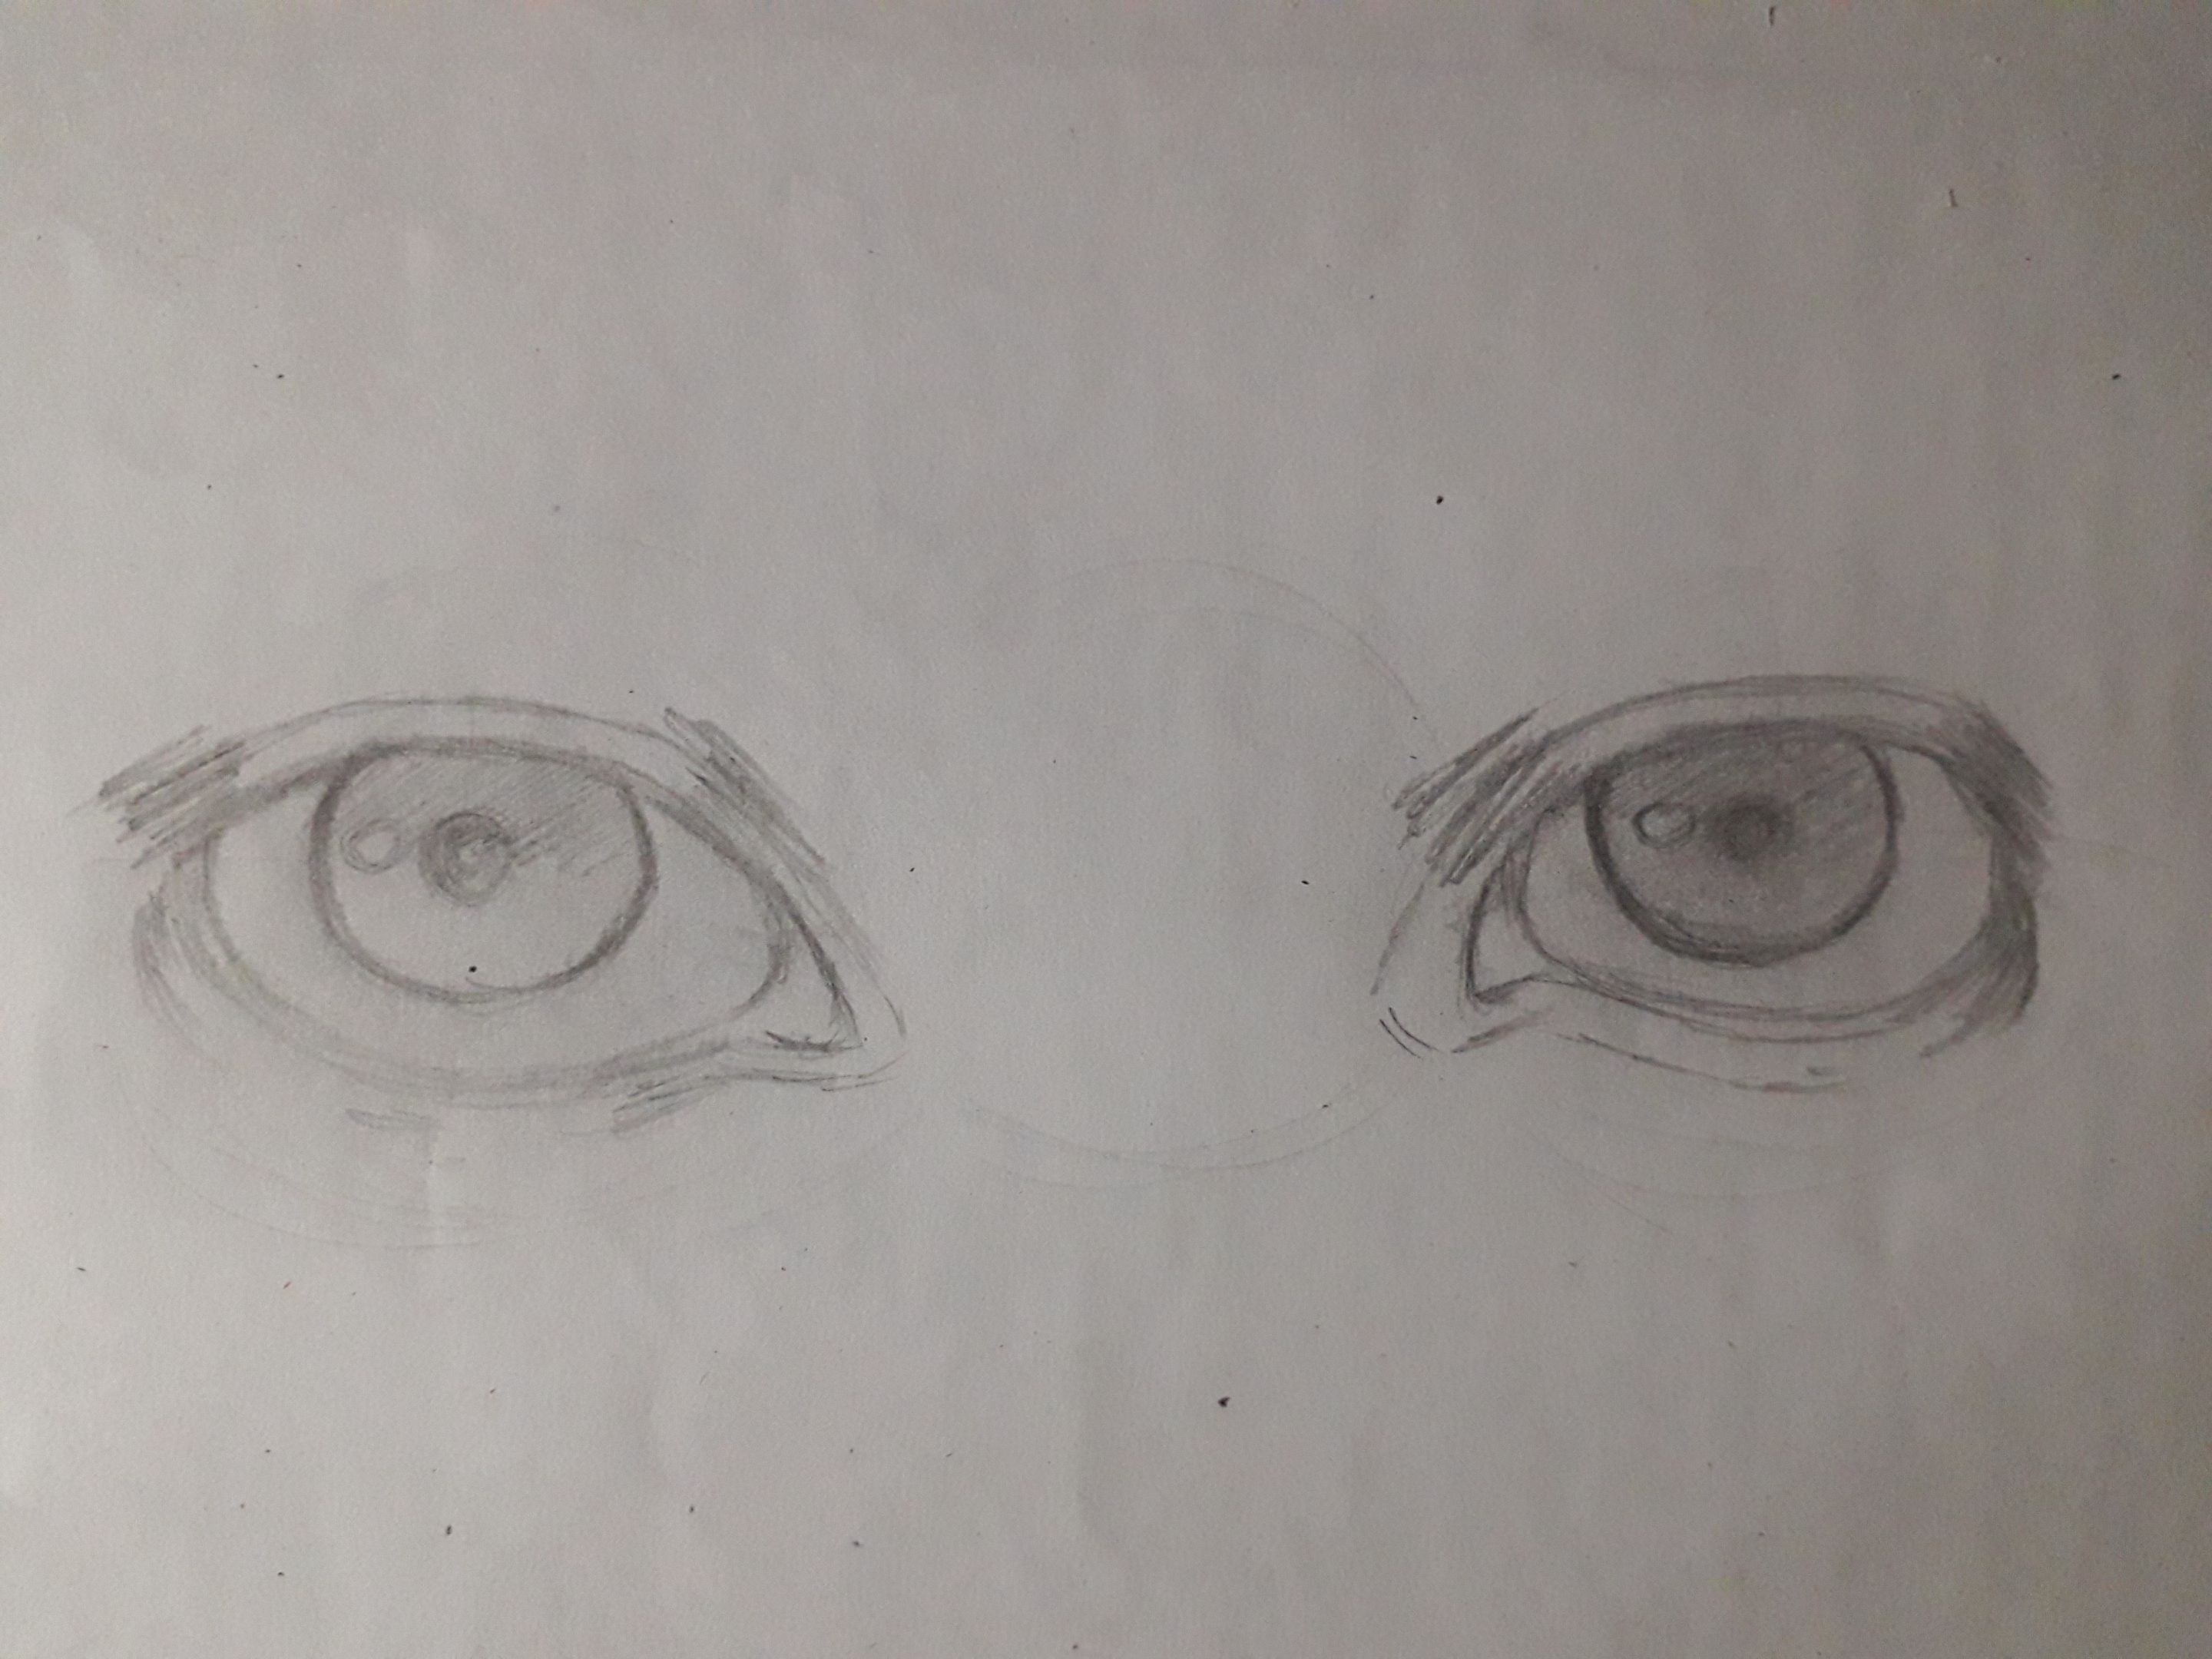
Using my finger, I blurred each eye. And now, we draw the creases of the eyelids, upper and lower, as well as the tear trough. The important thing is to take into account the volume of the eye; that's why the strokes of the creases look a bit curved. At the corners of the eyes, I added a bit of shadow to give them more depth.
We continue giving more “color” to the iris and blending it with my finger. Remember that the upper part of the iris should look a little darker, because there is shadow there, as well as all over the eye, as the upper eyelid projects it. Even if it's a subtle shadow, it's there.
Add more shadow to the eye and blend subtly. Then, with quick strokes, we draw the eyelashes, which should go towards the outside of the face. I drew a few first to guide me.
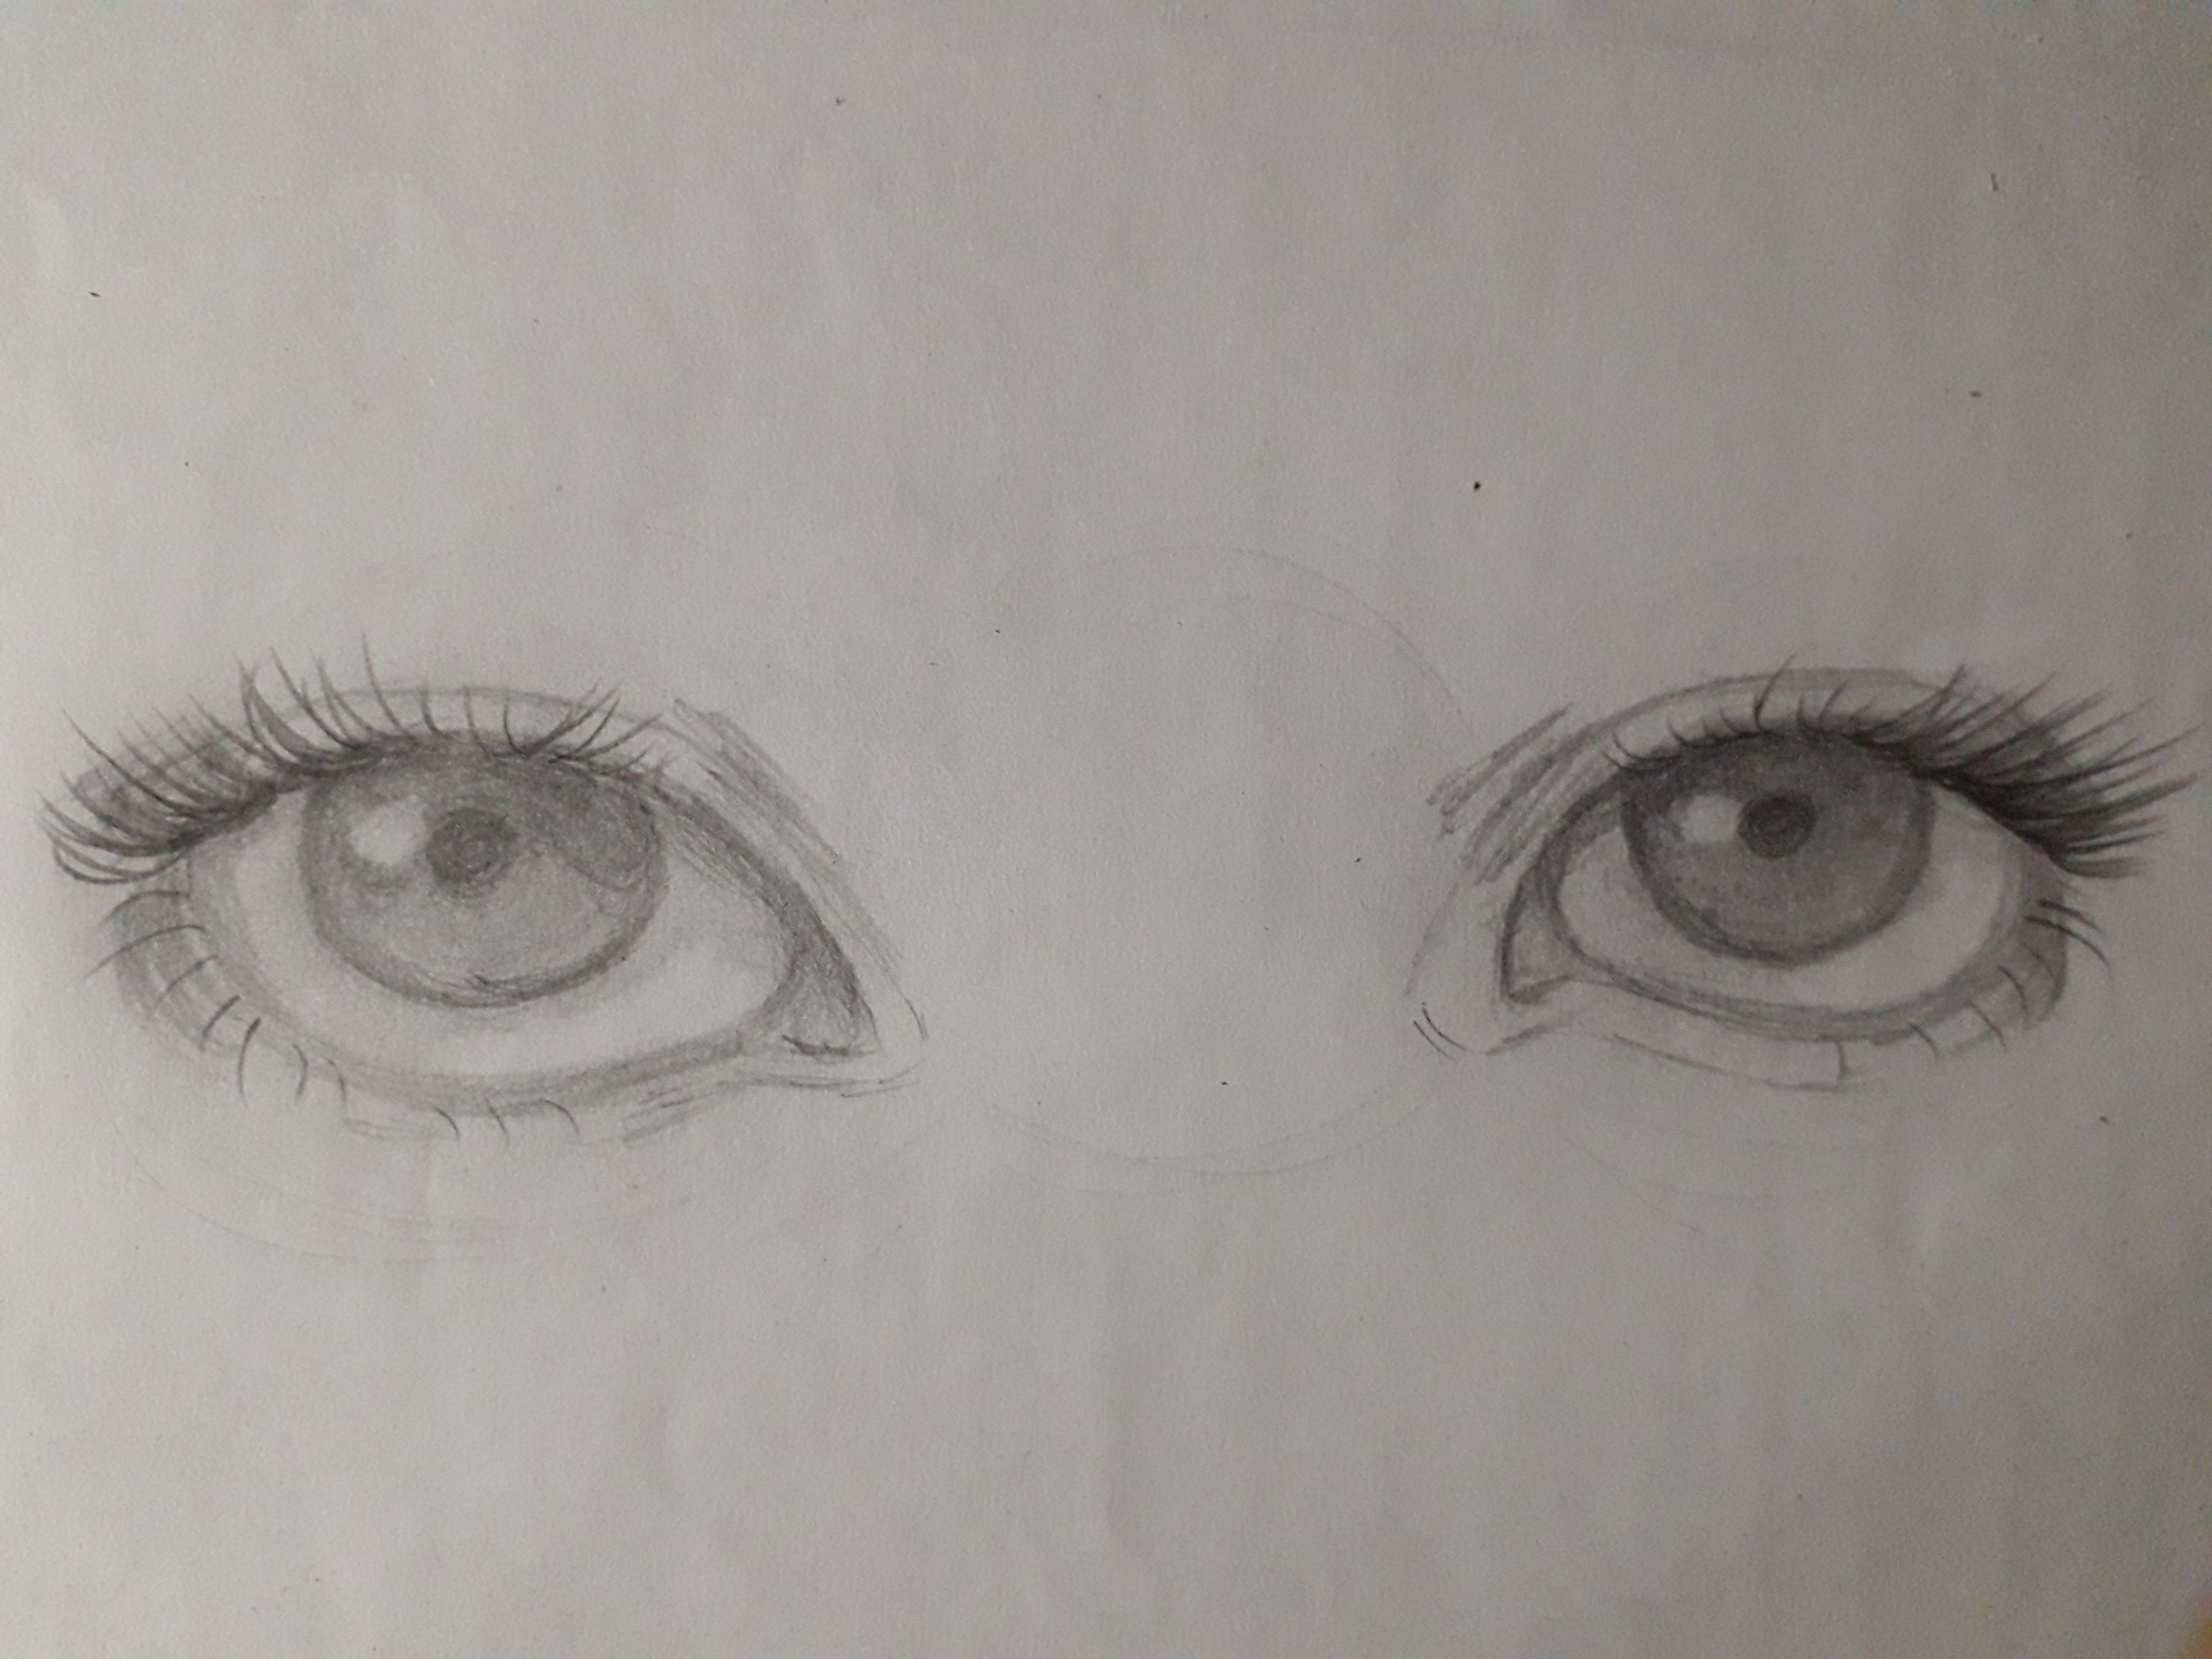
Then I added many more, always with quick strokes, so that they look like little hairs. Don't forget to draw eyelashes on the lower eyelid as well; remember that the eyelashes come from the skin outside the lower eyelid.
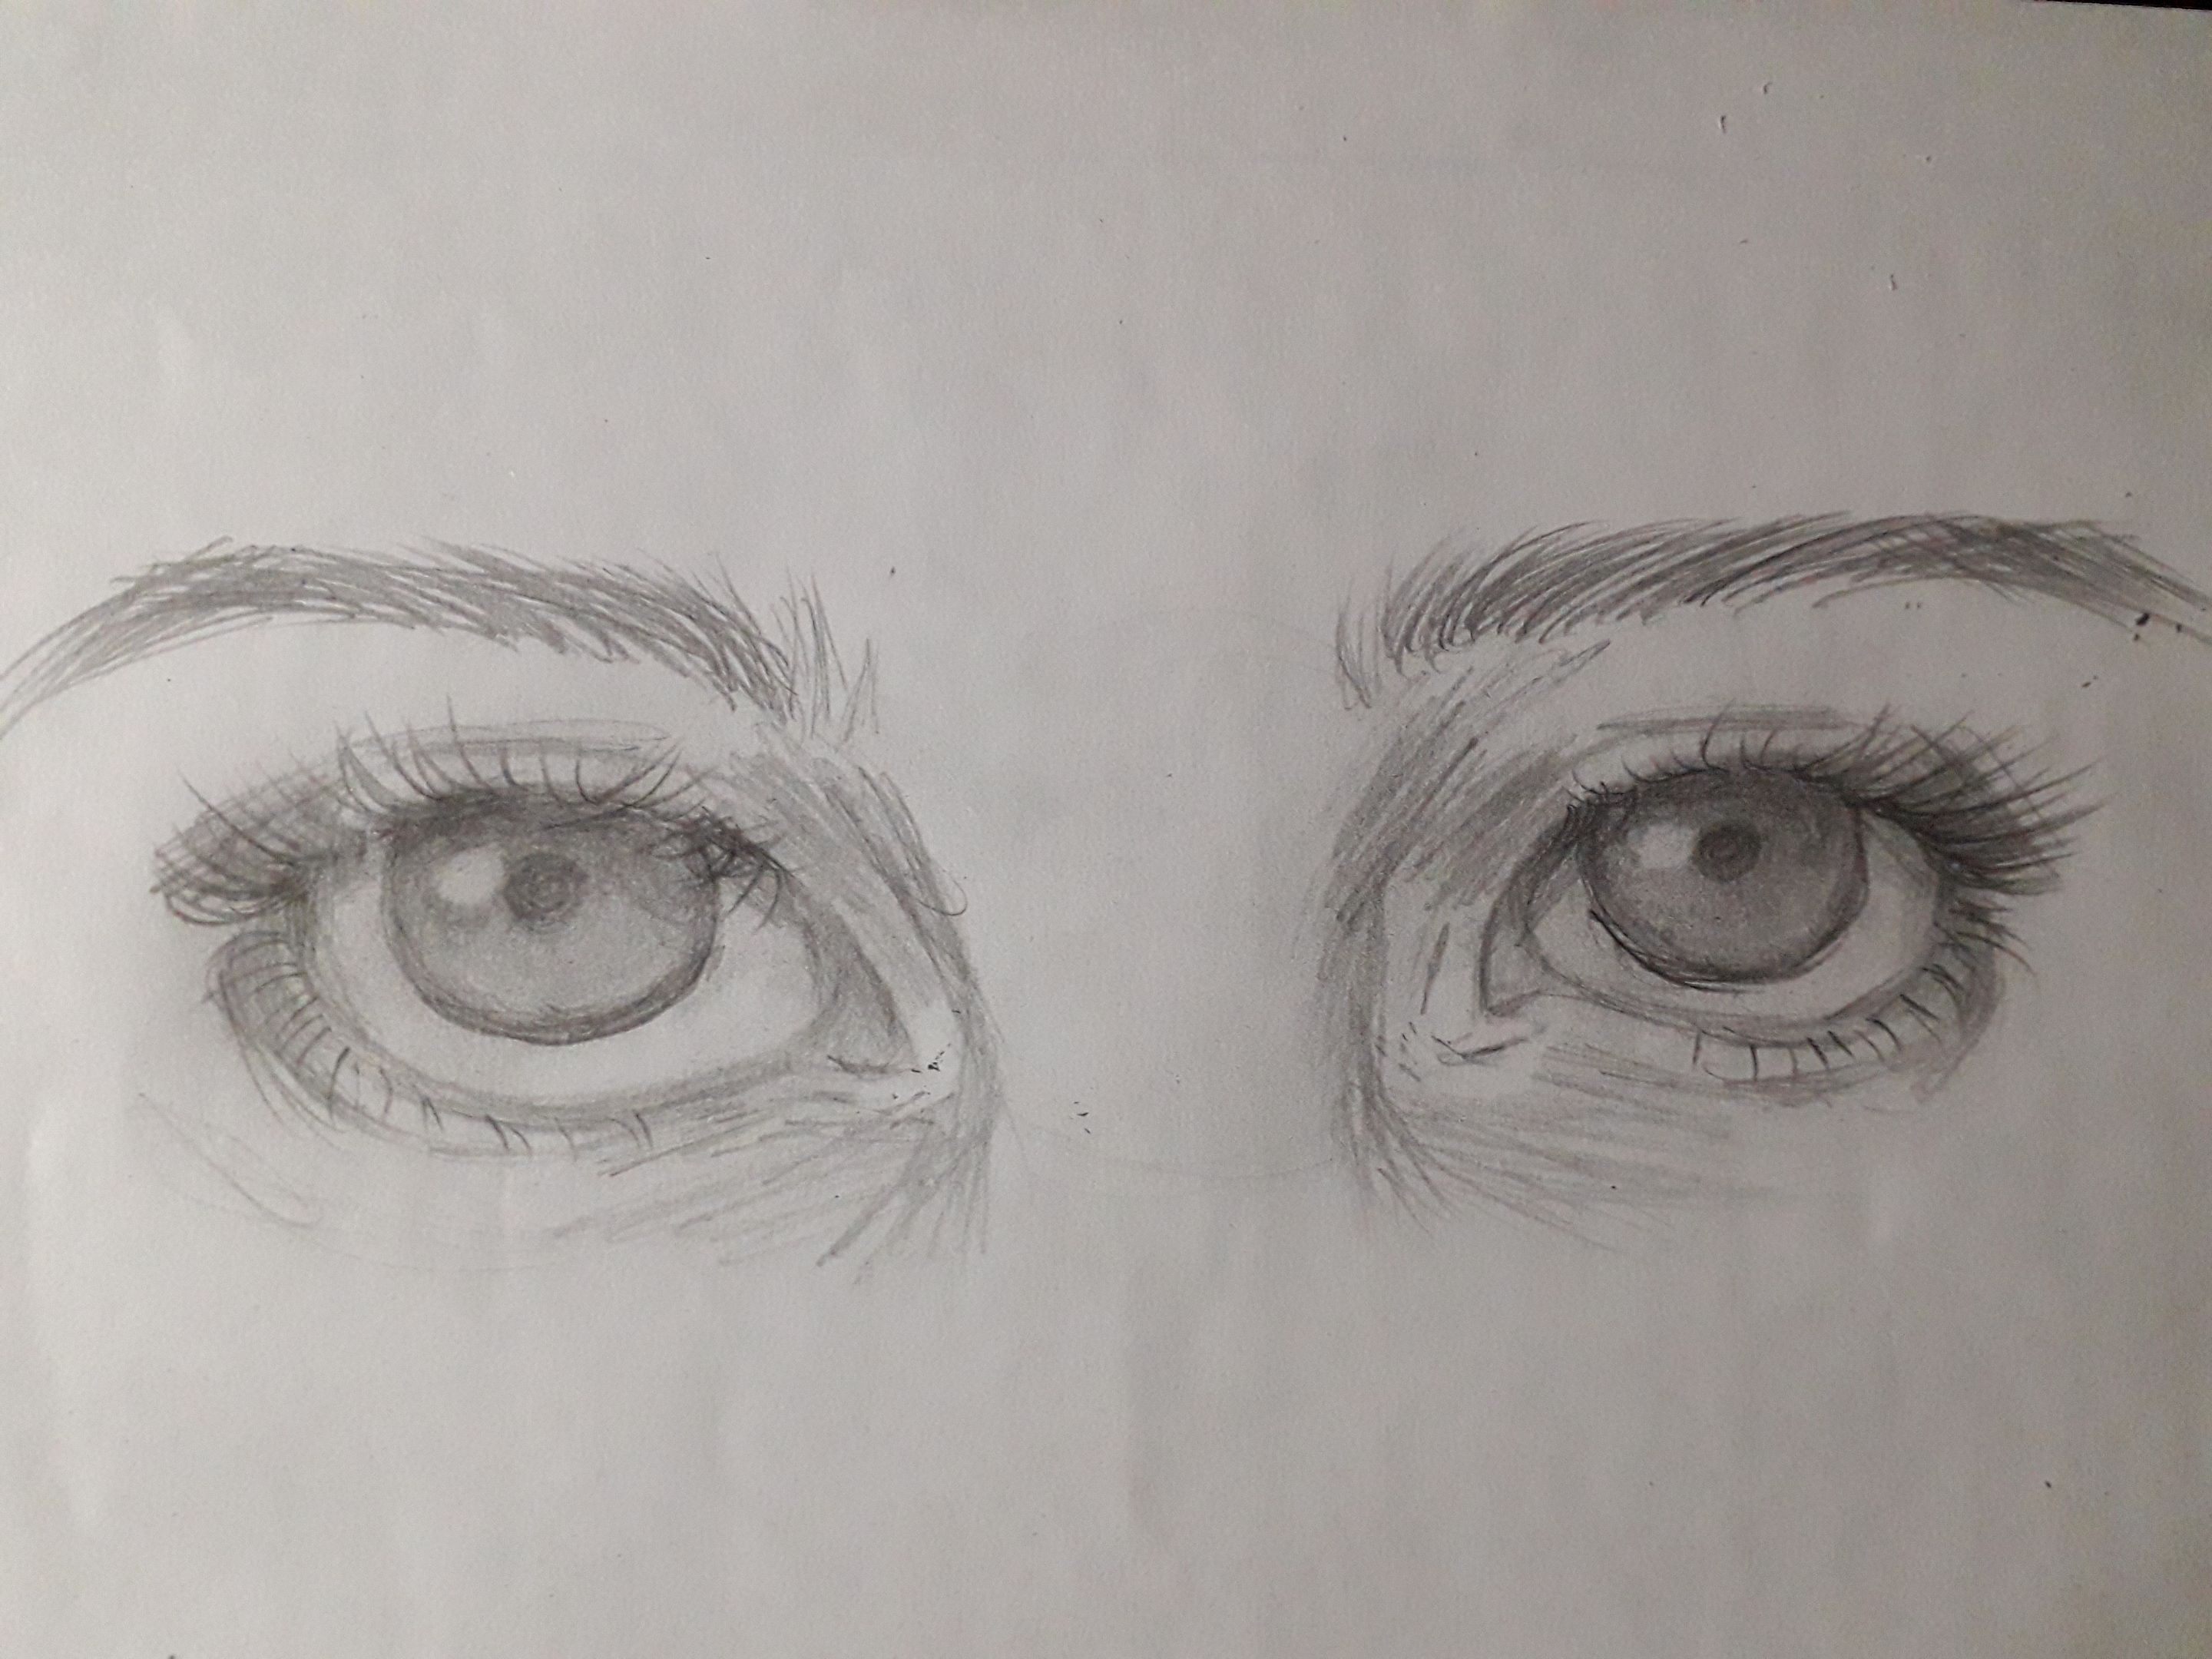
The rest is up to each person. With quick, short strokes, I drew the eyebrows, with the strokes following the direction in which the hair grows.
Then, I added shadows that have more to do with the nose and the skin under the eyes. To do these shadows, I made soft, quick strokes that follow the direction I feel the face is going. For example, the nose goes down, and the skin under the eyes goes towards the outside of the face.
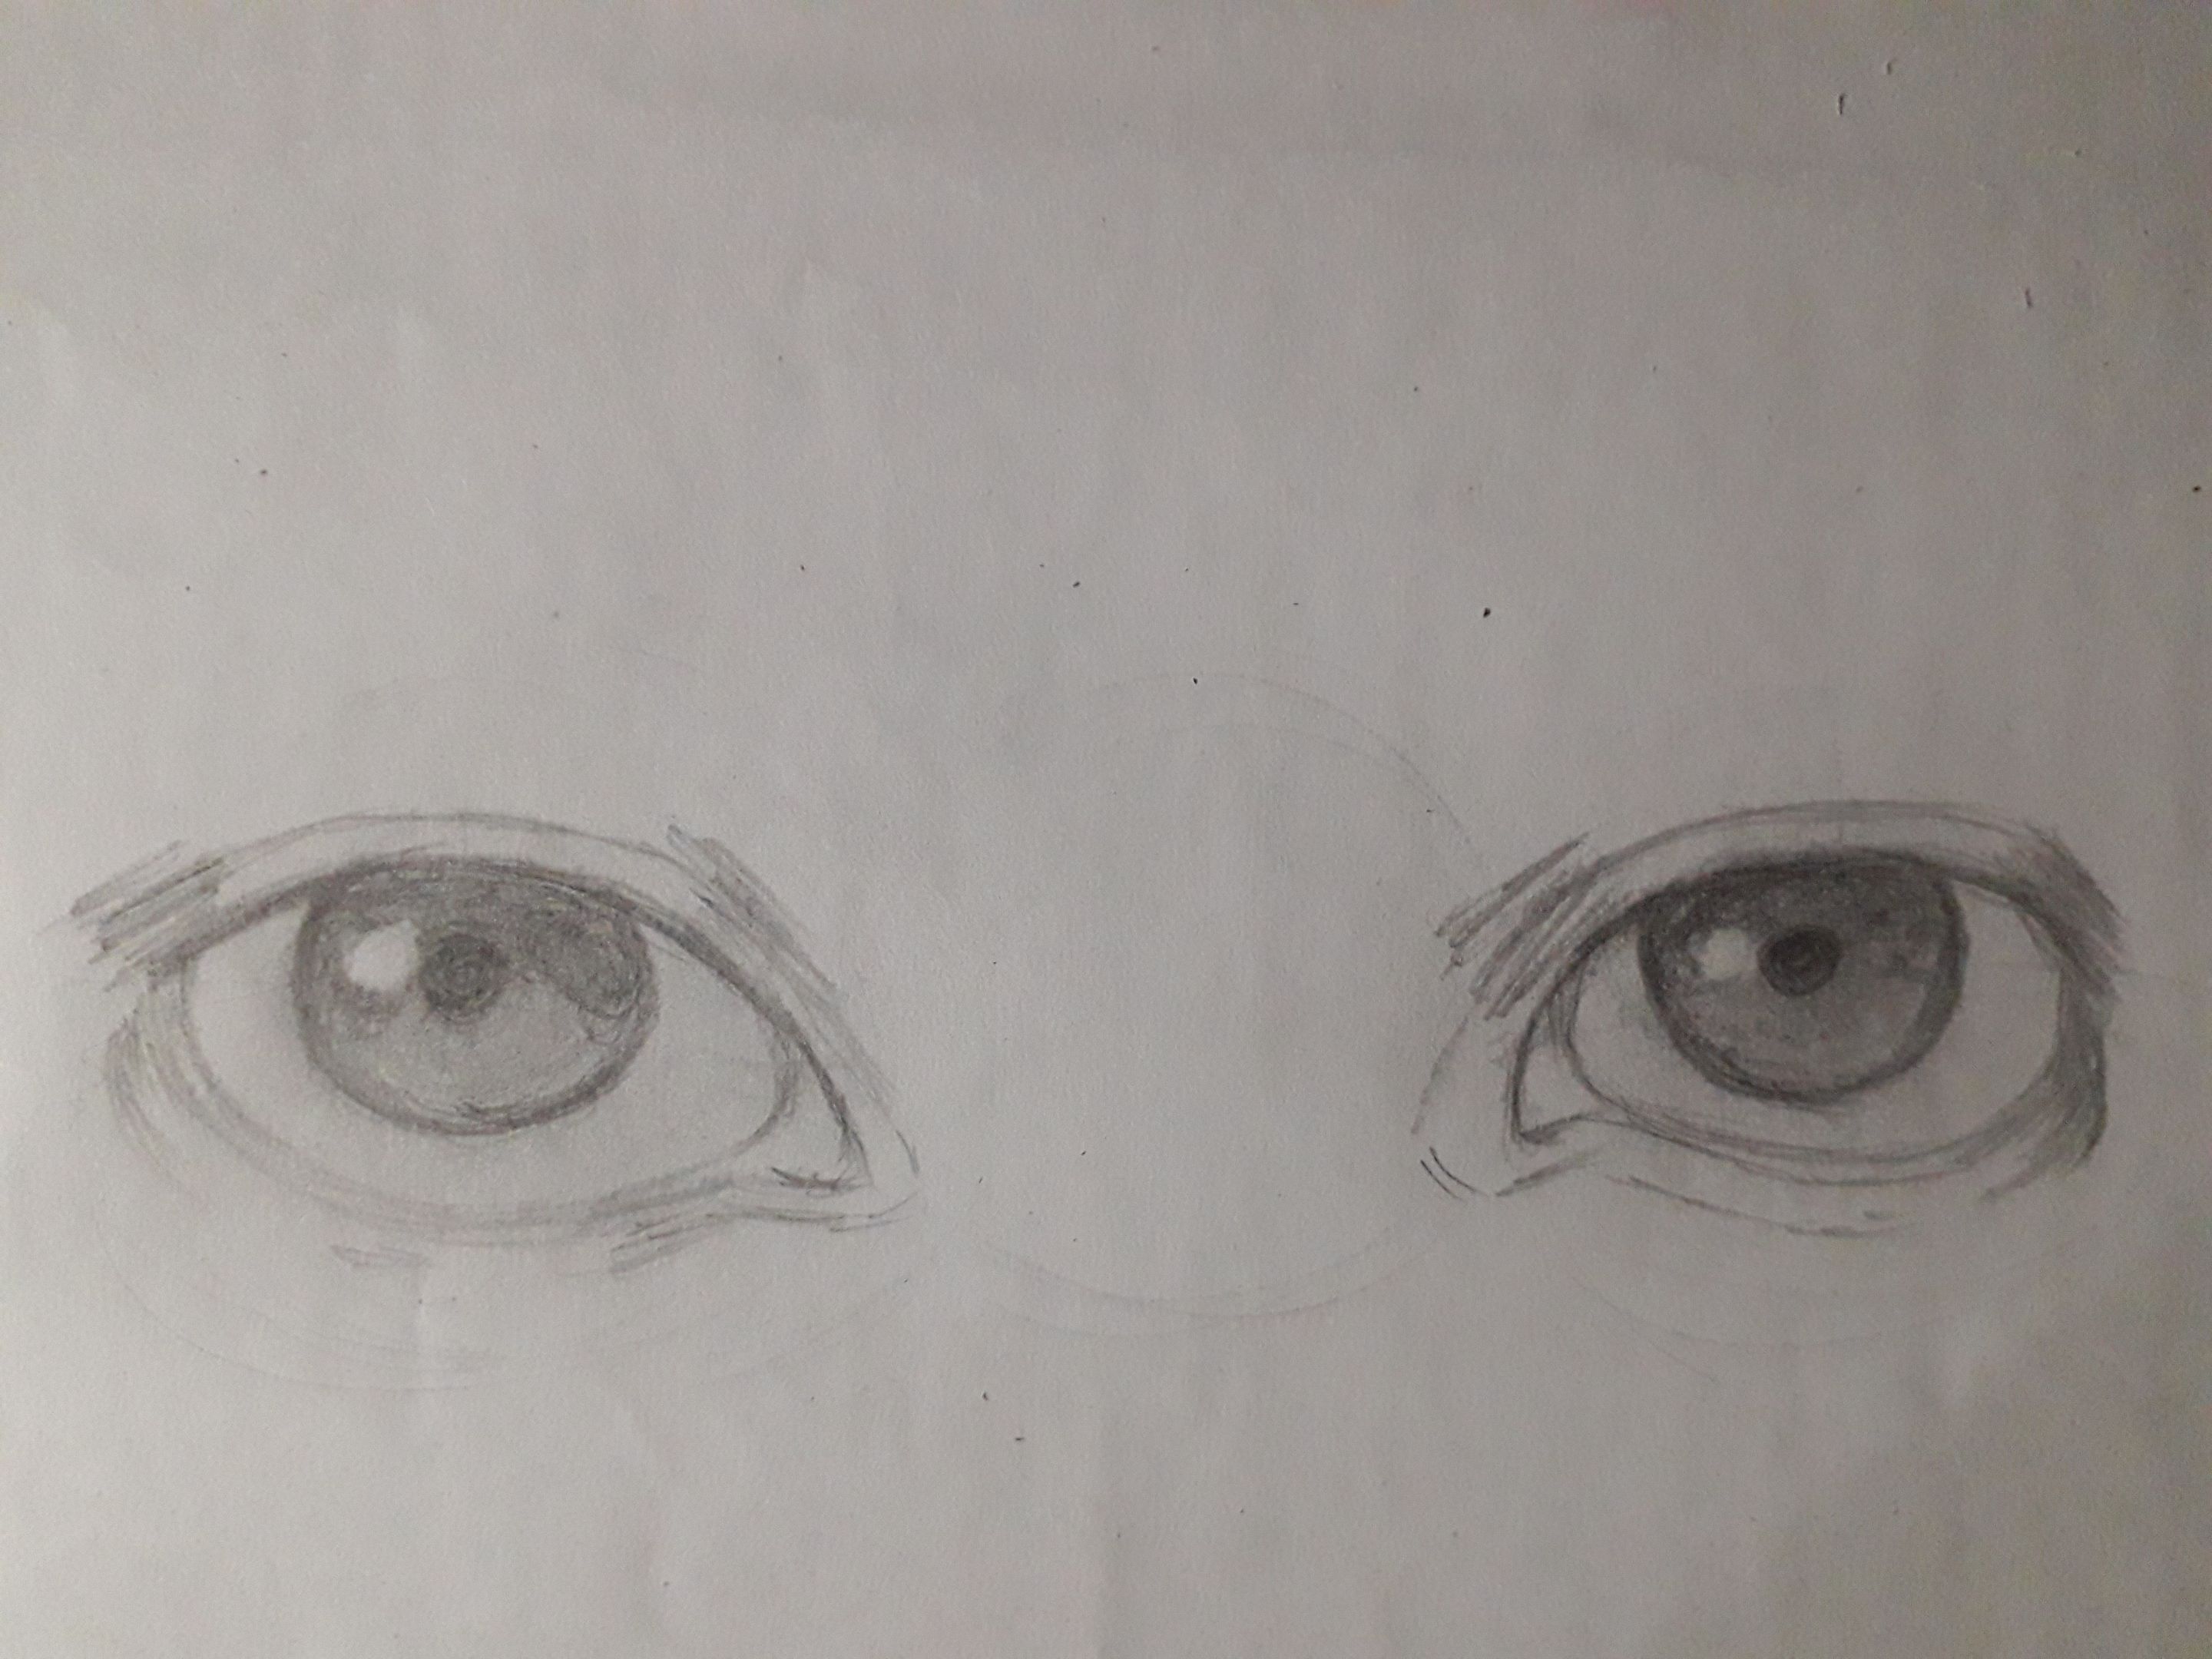
And now I would be, I hope I explain quite well, I also made another pair of eyes with a slightly different angle.
I made this GIF with a lot of love, I hope you can appreciate well how I did each step, and that you yourselves can identify each of the steps that I shared in this post, in this other drawing.
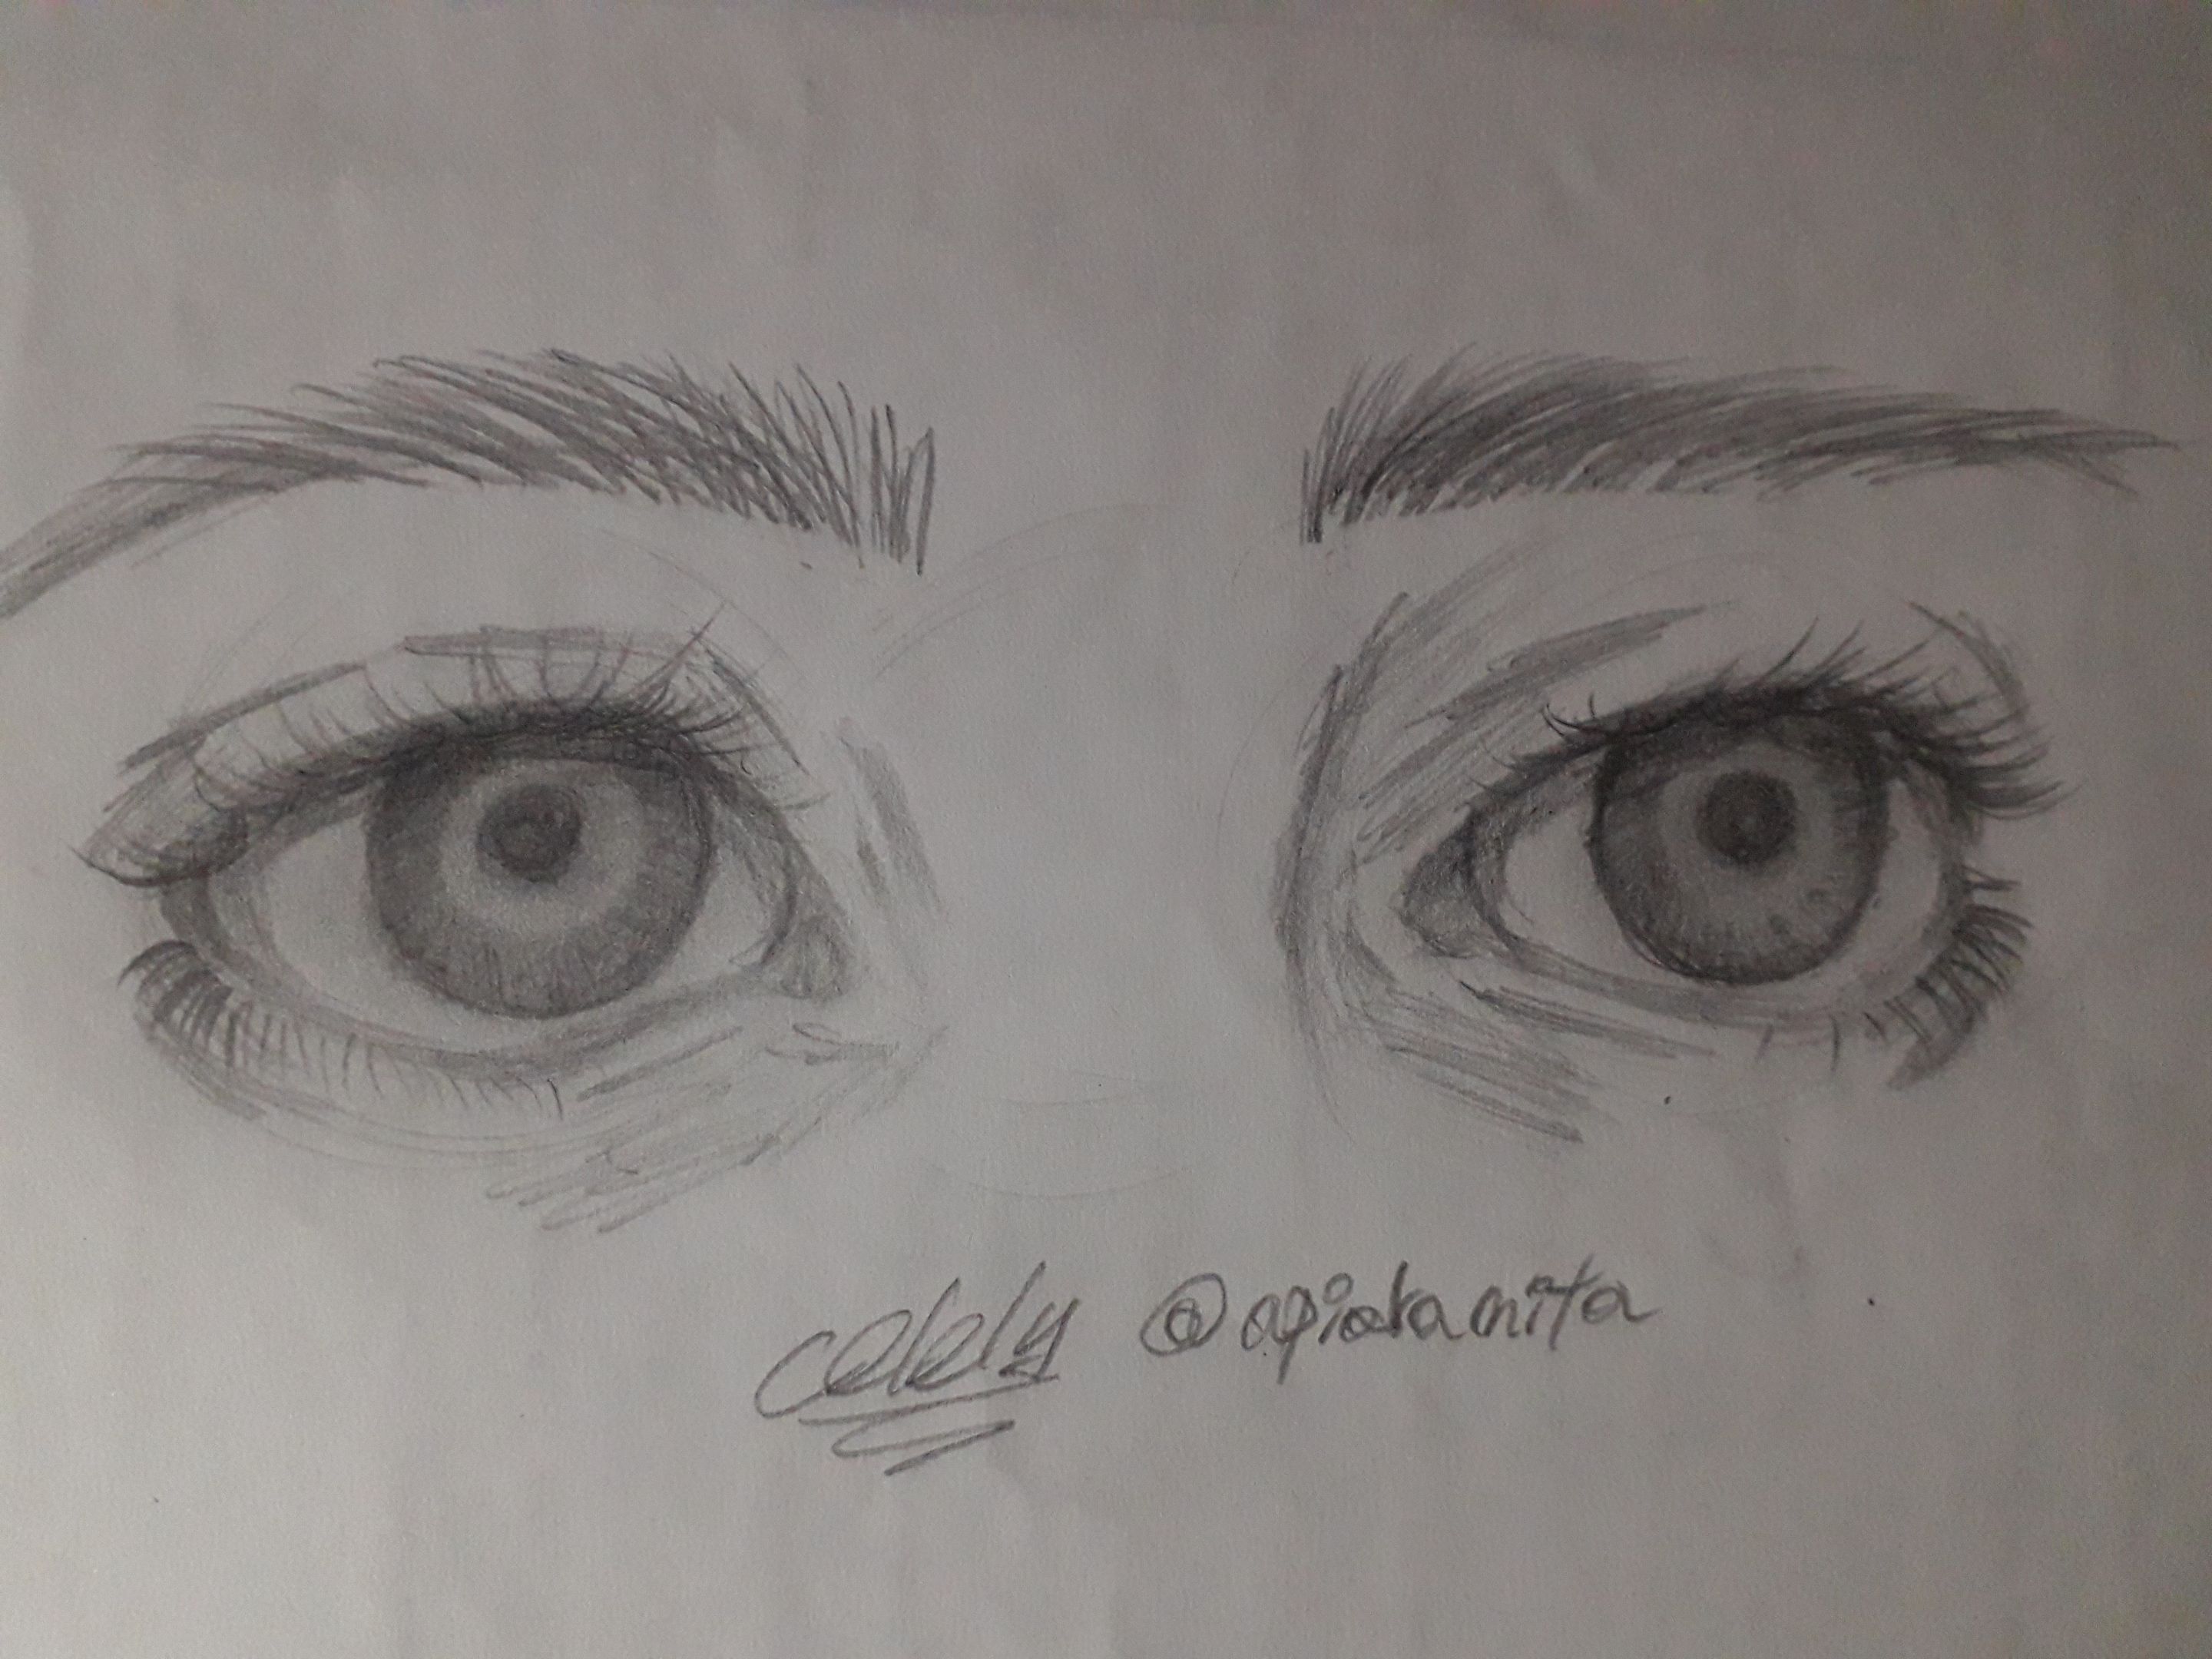
Here is a picture of the final result, which I liked a lot. Here I used the eraser to give light in the center of the iris, around the pupil.
If you're wondering about that @apioranita, it's because, according to me, I was going to upload this drawing to my new art Instagram account, but I didn't; the account is still empty. Do you think I should start uploading content there, or should I wait to draw better?
Anyway, I'm very happy that I was able to share this tutorial with you. It's the first time in my life that I write a drawing tutorial, that is, with the intention of teaching. I really hope it helps you a little, and I wish very much that we all keep improving in art, yay!
Without anything else to add… Take care, drink water, and don't forget to smile. Love you! See you in the next post, bye!
Español
Holiii, amigos de la comunidad de HiveDiy, soy yo de nuevo. ¿Cómo se encuentran el día de hoy?, ¡espero que muy bien!
Es la primera vez que me atrevo a subir algo relacionado con el arte por acá, pero me gustaron tanto estos dibujos y eran algo tan básico, que sentí que tenía que compartirlos.
Debo advertirles que este es un tutorial de cómo hago los dibujos a mi manera, sin embargo, creo que los pasos podían ser adaptables a tu estilo, quizá, pues simplemente son los pasos básicos. Este tutorial está dedicado a los principiantes, se les quiere.
Si quieres saber cómo dibujar los ojos de una forma muy fácil y que no te queden tan diferentes los dos, entonces sigue leyendo, porque aquí estoy para ayudarte. ¡Vamos allá!
Materiales
- Lapiz 2 HB
- Borrador
- Sacapuntas
- Hoja de papel, la que sea.
Comenzamos por dibujar tres esferas, las cuales dividiremos en una cruz, de esta manera. Lo más recomendable sería usar un compás y regla; sin embargo, no tengo estos materiales y prefiero intentar mejorar mi pulso. Si ustedes tienen estos materiales, entonces adelante.
La razón por la que utilicé tres esferas o círculos, es porque una proporción muy importante a tener en cuenta, es que cada ojo tiene la separación de un ojo. ¿Me explico?
Estas esferas representan el globo ocular, por lo cual, comenzamos a dibujar encima la piel que lo recubre. Porque sí, esa es la anatomía de nuestro ojo, básicamente son esferas que están dentro de unas cuencas; y estas esferas tienen músculos encima y también tienen piel encima.
La forma de un ojo va a variar de persona a persona, porque cada cuerpo es un mundo. Para hacer la curva de la forma del ojo, yo recomendaría que lo simplifiquen utilizando líneas rectas, varias de ellas, pues son más fáciles de asimilar para nuestro cerebro que una línea curva.
La forma del ojo yo la divido en tres secciones, observen. En el párpado superior, tenemos una línea inclinada que va desde el lagrimal hasta un tercio del ojo. Después, en la mitad, tenemos una línea recta que se detiene en el tercio restante. Y finalmente, una línea inclinada nuevamente, que baja a la esquina del ojo. La inclinación de las líneas va a depender de cada ojo. Por ejemplo, unos ojos más rasgados suelen tener una línea recta más larga. Lo importante es estudiar la forma de cada ojo, y dibujarla según la forma que este te parezca a ti. Y lo que no deben olvidar, usen referencias para practicar; en este caso, yo lo hice desde mi imaginación porque ya he practicado un poco.
Recuerden estudiar la forma del párpado inferior también, y no se olviden del espacio para el lagrimal.
| |
|---|
Ahora, dibujamos dos círculos, los cuales serían los iris. No importa si quieren usar compas, sería lo más recomendable. Sitúan cada circunferencia dependiendo de hacia dónde esté mirando nuestro personaje. Luego borran el exceso de esta circunferencia para que “quepa” dentro del ojo.
Un tip para atinar a la dirección en la que miran nuestras referencias, es fijarse en cómo se ve la parte blanca del ojo, cuánto de ello es visible. Si hay mucha “parte blanca” (llamada esclerótica, por cierto) visible de un lado, entonces eso significaría que la persona está viendo al lado contrario, claro, jaja. ¿Me explico? Lo importante en esto es que aprendan a observar estos detalles “vacíos” para aprender a tomar referencias de una manera más acertada (yo aún estoy trabajando en eso).
Otro detalle relevante a mencionar, es que no olviden dibujar la parte interna del parpado inferior, al igual que el lagrimal. Este pequeño detalle le da algo de más profundidad a los ojos. Además, es anatómicamente más correcto.
Luego de remarcar un poco solo el párpado de arriba, para dotarlo de más oscuridad, pues ahí estarán situadas las pestañas, nos encargamos de dibujar las pupilas. También agregué algo de sombra en la parte superior del iris, y dibujé una bolita blanca para que represente la luz o el brillo de los ojos.
Con la ayuda de mi dedo, difuminé cada ojo. Y ahora, dibujamos los pliegues de los parpados, superior e inferior, como también en el lagrimal. Lo importante es tener en cuenta el volumen del ojo, es por esto que los trazos de los pliegues se ven algo curvados. En las esquinas de los ojos, agregué un poco de sombra para dotarlos de más profundidad.
Seguimos dando más “color” al iris y difuminándolo con mi dedo. Recuerden que la parte superior del iris debe lucir un poco más oscura, pues ahí hay sombra, al igual que en todo el ojo, pues está proyectada por el párpado superior. Aunque sea una sombra sutil, está ahí.
Damos más sombra al ojo y difuminamos sutilmente. Después, con trazos rápidos, dibujamos las pestañas, las cuales deben ir con dirección hacia afuera del rostro. Yo primero dibujé unas pocas para guiarme.
Luego añadí muchas más, siempre con trazos rápidos, para que queden como pelitos. No olviden dibujar pestañas en el parpado inferior también, recuerden que las pestañas salen de la piel de afuera del parpado inferior.
El resto ya queda de parte de cada quien. Con trazos rápidos y cortos dibujé las cejas, con los trazos siguiendo la dirección en la que crece el vello.
Luego, añadí sombras que tienen que ver más con la nariz y la piel que está bajo los ojos. Para hacer estas sombras, hice trazos suaves y rápidos que siguieran la dirección que yo siento que el rostro tiene. Por ejemplo, la nariz va bajando, y la piel debajo de los ojos va hacia afuera del rostro.
Y ya estaría, espero que se entienda bastante bien, también hice otro par de ojos con un ángulo un poco distinto.
Hice este GIF con mucho amor, espero que se pueda apreciar bien cómo hice cada paso, y que ustedes mismos puedan identificar cada uno de los pasos que yo compartí en este post, en este otro dibujo.
Acá les dejo una foto del resultado final, el cual me gustó bastante. Acá usé el borrador para dar luz en el centro del iris, alrededor de la pupila.
Si se preguntan por ese @apioranita es porque, según yo, iba a subir este dibujo a mi nueva cuenta de Instagram de arte, pero no lo hice; la cuenta sigue vacía… ¿Creen que debería empezar a subir contenido por ahí o espero a dibujar mejor?
En fin, estoy muy feliz de haber podido compartir este tutorial con ustedes. Es la primera vez en mi vida que escribo un tutorial de dibujo, o sea, con la intención de enseñar. Realmente espero que les ayude un poco, y deseo mucho que todos sigamos mejorando en el arte, ¡sííí!
Sin nada más que añadir… Cuídense, tomen agua, y no se olviden de sonreír. ¡Se les quiere! Nos vemos en el próximo post, ¡chau!
Credits | Créditos
- English translation DeepL (sorry for any mistakes, English is my second language)
- Traducción al inglés DeepL (lo siento por cualquier error, el inglés es mi segundo idioma.)
- Dividers drawn by me. Cover and banners made in Canva
- Separadores dibujados por mi. Portada y banners hechos en Canva
- Photos used in the post were taken by me, using a Samsung Galaxy J6
- Las fotos usadas en el post fueron tomadas por mí, usando un Samsung Galaxy J6n by me, using a Samsung Galaxy J6
Posted Using INLEO