Thumbnail made by me, using Canva
All the images from the thumbnail are by @splinterlands
English
Fabfour is one of the latest rule sets to be introduced in Splinterlands. When it's in play, only 4 monsters can be placed on the field.

FabFour Rule set
As there has been little time since its addition, I haven't yet been able to identify what I believe to be the best strategies. But since it's a limiting rule, the suggestion is always to check if another one has come along, and then base yourself on it.
However, there is one thing I've noticed that can help you win when this rule set comes up. It's the use of a good tanker up front, who doesn't necessarily have no attacks, as they usually end up being the best for this role. The fact that the number of monsters on the field is limited reduces the total damage to be received, which is why they are so effective on defense.
Adding support will be very useful if the tanker doesn't have any healing abilities. In addition, a monster that can heal your back line will also be very useful, in matches with a high mana limit. If it's low, less than 20, be wary of the possibility of Sneaks, who attack the last position of that line, placing a card to disrupt them.
In fact, sometimes it's worth giving up a large amount of mana, otherwise you'll hurt yourself defensively.
And for the attack, those monsters that attack the back line become even more important, precisely to avoid the tankers.

In the battle I faced in a recent tournament, in addition to the weekly challenge rule set, there was one more:
Even Stevens: only monsters with an even mana cost could be used.

Even Stevens Rule set
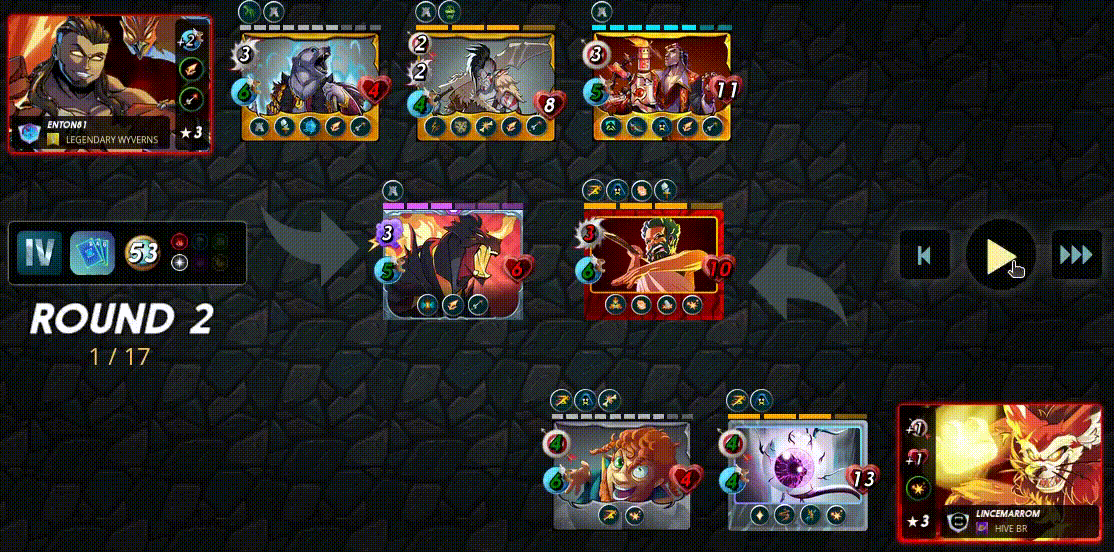
The mana limit available in the battle was 53, but I used far less than I could have, because as I said before, this is a smart decision if you create a good strategy.
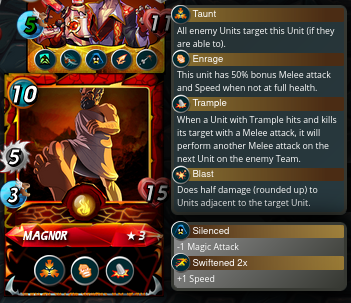
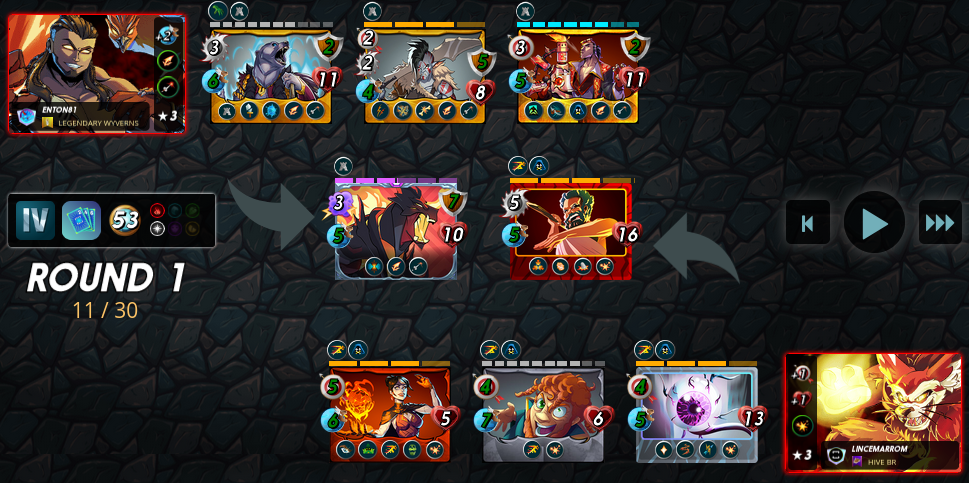
At the front, I placed the Magnor, a monster that makes the entire opposing team attack it, with the exception of those with the Scattershot ability.
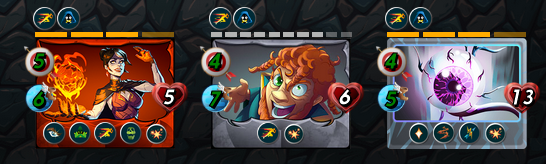
Behind it, I placed a trio of Ranges, with the highlight being the one in last position, the Countess Sinash. It attacks the monster with the least amount of life on the field, and would be my main attacking piece.
What's more, its effectiveness would be improved thanks to the summoner I chose, Yodin Zaku. He gives all my allies the ability Blast, which deals extra damage to monsters adjacent to the target attacked, as well as increasing the attack of the Ranges by 1 point.
My opponent chose the summoner that could cause me problems, Conqueror Jacek. Combined with 2 Ranges, they randomly attack my monsters on the field, and there's no way to stop that, which partially nullifies the effect of my tanker, which is only able to hold Meeles.
And that's the positioning of both teams. The opponent has spent 50 mana points, while I have only spent 40. Speed and damage are in my favor, being inferior to his team only in defense.
In the first round, the RNG was in my opponent's favor, hitting 2 of the 3 "random" attacks on Countess Sinash and eliminating her. I still had the advantage of attacking first in the following round.
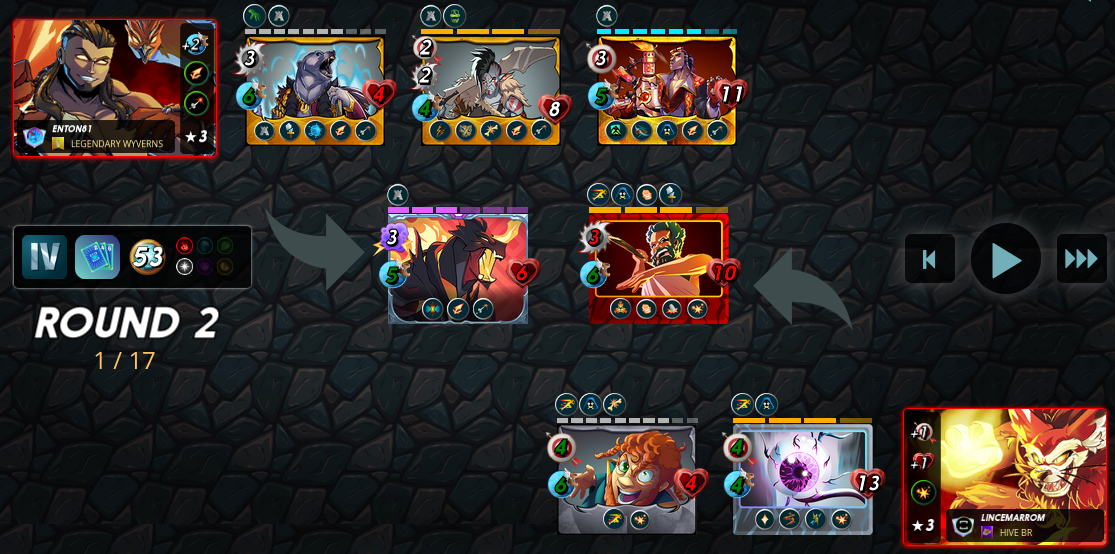
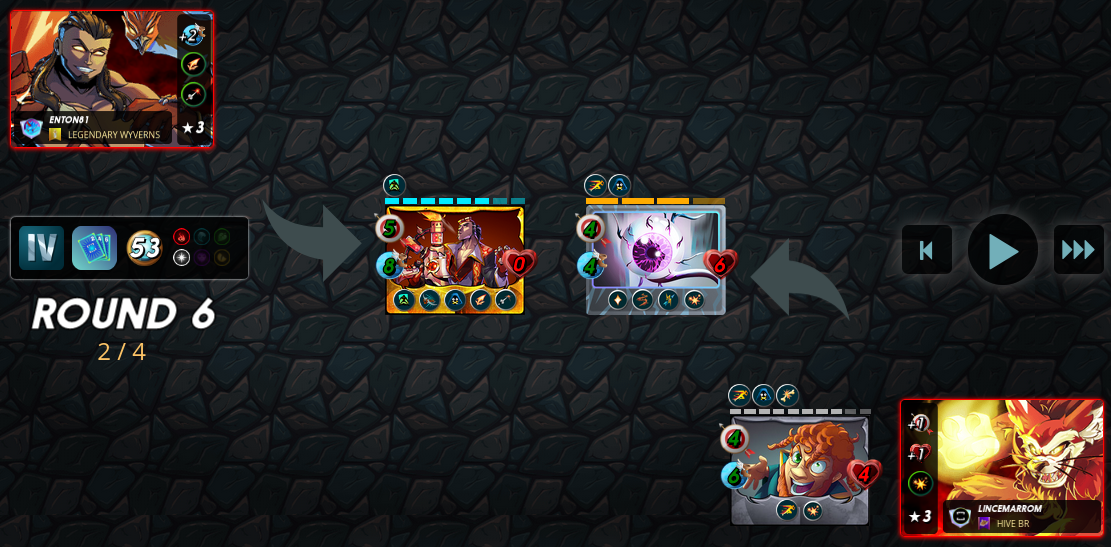
Then in the second round there's a twist, where Magnor lands an attack and eliminates two monsters, causing him to activate his Trample ability, being able to attack again in the same round.
In the sixth round I won the battle, with two of my monsters left on the field.
Click here to watch the full battle!
Even with a much lower mana spending than my opponent and not using all of it, I managed to win the battle, showing how a good strategy is more efficient than just placing monsters with a high mana cost. My superior attack proved to be my strong point in this battle, as I was able to quickly reverse an unfavorable situation.
I hope you've learned something from this post. If you've read this far, thank you very much!
All the images are from @Splinterlands
Divider By: @freeztag
Are you not playing Splinterlands yet? Click HERE and play with me!

Português
Fabfour é uma das mais recentes regras a ser introduzida no Splinterlands. Quando ela está em jogo, apenas 4 monstros podem ser colocados em campo.
Regra FabFour
Por haver pouco tempo desde sua adição, eu ainda não consegui identificar o que eu acredito ser as melhores estratégias. Mas como ela é uma regra do tipo limitante, a sugestão é sempre checar se alguma outra veio, e então se basear nela.
Porém, tem uma coisa que eu consegui perceber e que pode lhe ajudar a vencer quando essa regra aparecer. É o uso de um bom tanker na frente, que não obrigatoriamente não possui ataques, pois normalmente acabam sendo os melhores para tal função. O fato da quantidade de monstros em campo ser limitada, diminui o dano total a ser recebido, e por esse motivo eles se tornam tão eficientes na defesa.
Adicionar um suporte será de muita utilidade, caso o tanker não possua nenhuma habilidade de cura. Além disso, um monstro que consiga curar a sua linha de trás também será muito útil, isso em partidas com límite de mana alto. Se for baixo, menos de 20, fique esperto com a possibilidade de Sneaks, que atacam a última posição dessa linha, colocando uma carta para atrapalhá-los.
Inclusive, algumas vezes valerá mais apena abrir mão de uma grande quantidade de mana disponível, senão você poderá se prejudicar defensivamente.
E para o ataque, aqueles monstros que atacam a linha de trás se tornam ainda mais importantes, justamente para evitar os tankers.
Na batalha que eu enfrentei em um torneio recente, além da regra do desafio semanal, havia mais uma:
Even Stevens: apenas monstros com custo de mana par poderiam ser usados.
Regra Even Stevens
O límite de mana disponível na batalha era de 53, porém eu usei bem menos do que poderia, pois como falado anteriormente, essa é uma decisão inteligente se você criar uma boa estratégia.
Na frente, eu coloquei o Magnor, um monstro que faz todo o time adversário atacá-lo, com exceção daqueles que possuem a habilidade Scattershot.
Atrás eu coloquei um trio de Ranges, com destaque para a que estava na última posição, a Countess Sinash. Ela ataca o monstro com menor quantidade de vida em campo, e seria minha peça principal no ataque.
Além disso, sua efetividade seria melhorada, graças ao invocador que eu escolhi, o Yodin Zaku. Ele fornece a todos os meus aliados a habilidade Blast, que causa dano extra aos monstros adjacentes ao alvo atacado, além de aumentar o ataque dos Ranges em 1 ponto.
Meu oponente fez justamente a escolha do invocador que poderia me causar problemas, o Conqueror Jacek. Combinado a 2 Ranges, eles atacam aleatoriamente meus monstros em campo, e não há forma de impedir isso, o que anula parcialmente o efeito do meu tanker, que é capaz de segurar apenas Meeles.
E assim ficou o posicionamento de ambos os times. O adversário gastou 50 pontos de mana, enquanto eu apenas 40. A velocidade e o dano estão a meu favor, sendo inferior a seu time apenas na defesa.
Na primeira rodada, o RNG esteve a favor do meu adversário, acertando 2 dos 3 ataques "aleatórios" sobre a Countess Sinash e eliminando-a. Eu ainda assim havia vantagem de atacar primeiro na rodada seguinte.
Então na segunda rodada ocorre uma reviravolta, onde o Magnor acerta um ataque e elimina dois monstros, fazendo com que ative sua habilidade Trample, podendo atacar novamente na mesma rodada.
Na sexta rodada eu venço a batalha, restando dois de meus monstros em campo.
Clique aqui para ver a batalha completa!
Mesmo com um gasto de mana bastante inferior ao meu adversário e não utilizando toda ela, consegui vencer a batalha, mostrando como uma boa estratégia é o mais eficiente do que apenas colocar monstros com um custo alto de mana. A minha superioridade no ataque se mostrou o ponto forte nessa batalha, já que consegui rapidamente reverter uma situação desfavorável.
Espero que você tenha aprendido algo com este post. Se você leu até aqui, meu muito obrigado!
Todas as imagens são do: @Splinterlands
Divisor do: @freeztag
Não joga Splinterlands ainda? Clique AQUI e venha jogar comigo!

Posted Using InLeo Alpha