Muy buenas tardes, feliz martes para todos los miembros de la comunidad Jewelry, espero se encuentren bien y que estén pasando un día lleno de bendiciones y éxitos. Hoy me siento súper contenta y animada en crear y compartir nuevos accesorios que podemos utilizar en momentos especiales y lo bueno es que lo realizamos nosotras mismas.
Very good afternoon, happy Tuesday to all members of the Jewelry community, I hope you are well and that you are having a day full of blessings and success. Today I feel super happy and encouraged to create and share new accessories that we can use in special moments and the good thing is that we do it ourselves.
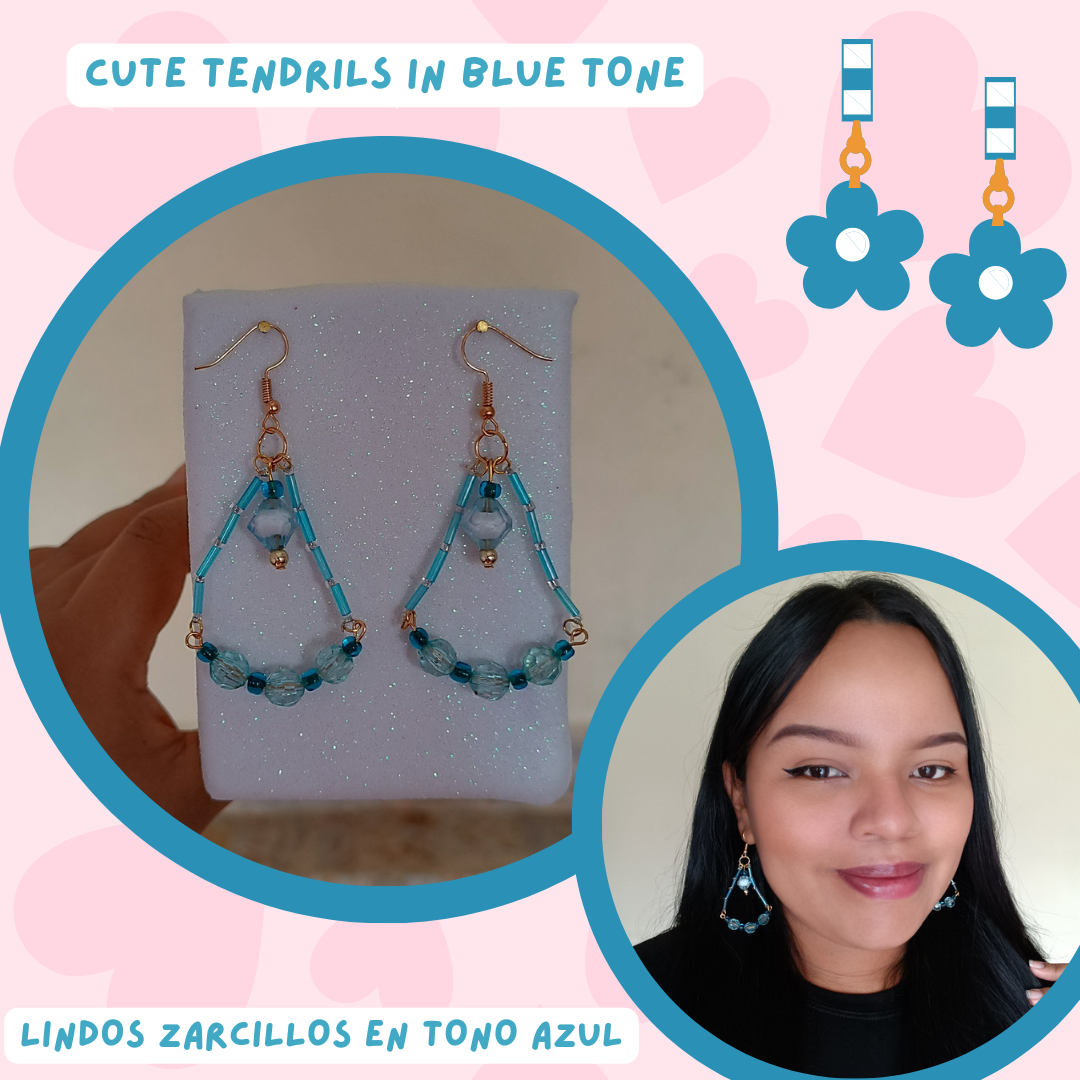
En esta ocasión les comparto unos lindos zarcillos en tono azul elaborados con cristales, canutillos, y mostacillas la combinación de estas piedras quedan muy bien el color azul es uno de mis favoritos y en este modelo de zarcillo resalta muy bien, los podemos utilizar con algún vestido o conjunto casual a continuación les muestro el paso a paso y los materiales que utilicé.
On this occasion I share with you some beautiful earrings in blue tone made with crystals, beads, and beads. The combination of these stones look very good. The color blue is one of my favorites and in this model of earrings it stands out very well, we can use them with some dress or casual outfit below I show you the step by step and the materials I used.

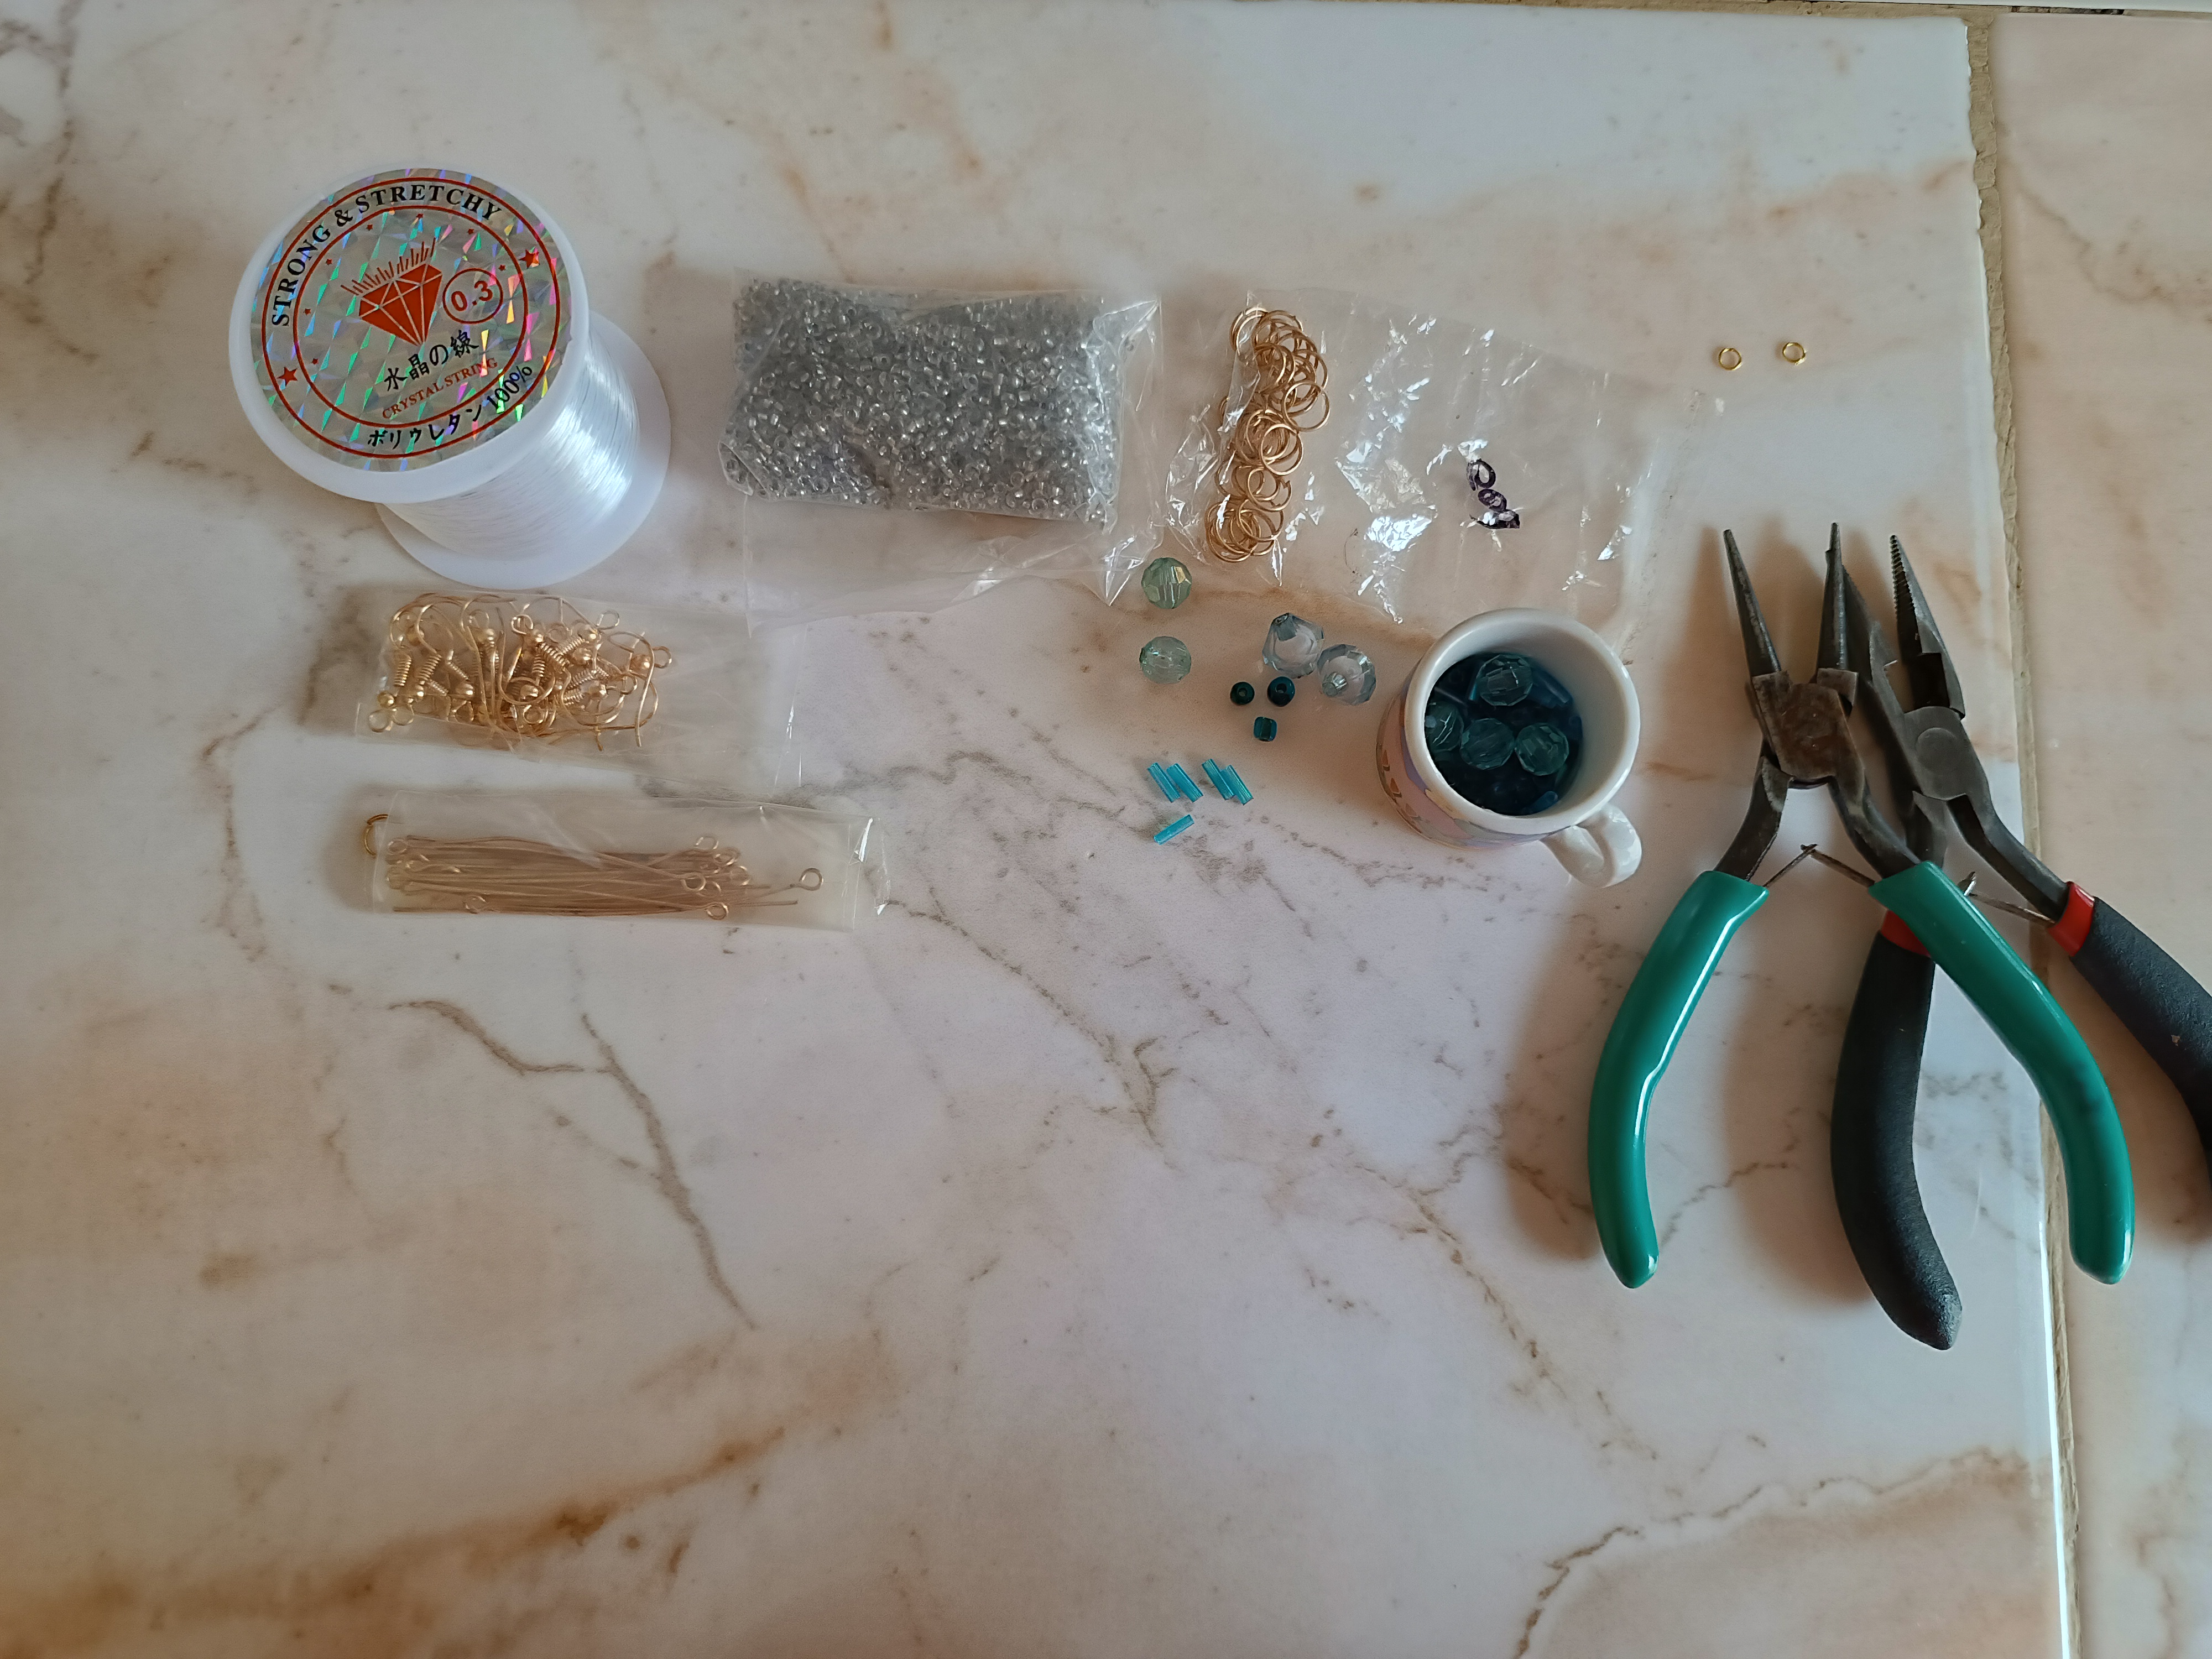
Materiales:
💙16 canutillos color azul claro.
💙20 mostacillas pequeñas transparentes.
💙10 mostacillas medianas color azul oscuro.
💙2 cuentas doradas.
💙2 piedras grandes color azul
💙6 cristales redondos color azul transparente.
💙2 gancho de aro.
💙2 argollas medianas.
💙8 argollas pequeñas.
💙4 alfileres para bisutería.
💙Pinzas de corte y punta redonda.
💙Nylon 0.3 mm
💙Tijera.
Materials:
16 light blue eclairs.
20 small transparent beads.
10 medium dark blue beads.
2 golden beads.
2 large blue stones
6 round transparent blue crystals.
2-ring hook.
2 medium hoops.
8 small rings.
4 jewelry pins.
Cutting and round-nosed pliers.
Nylon 0.3 mm.
Scissors.
Paso a paso / Step by Step
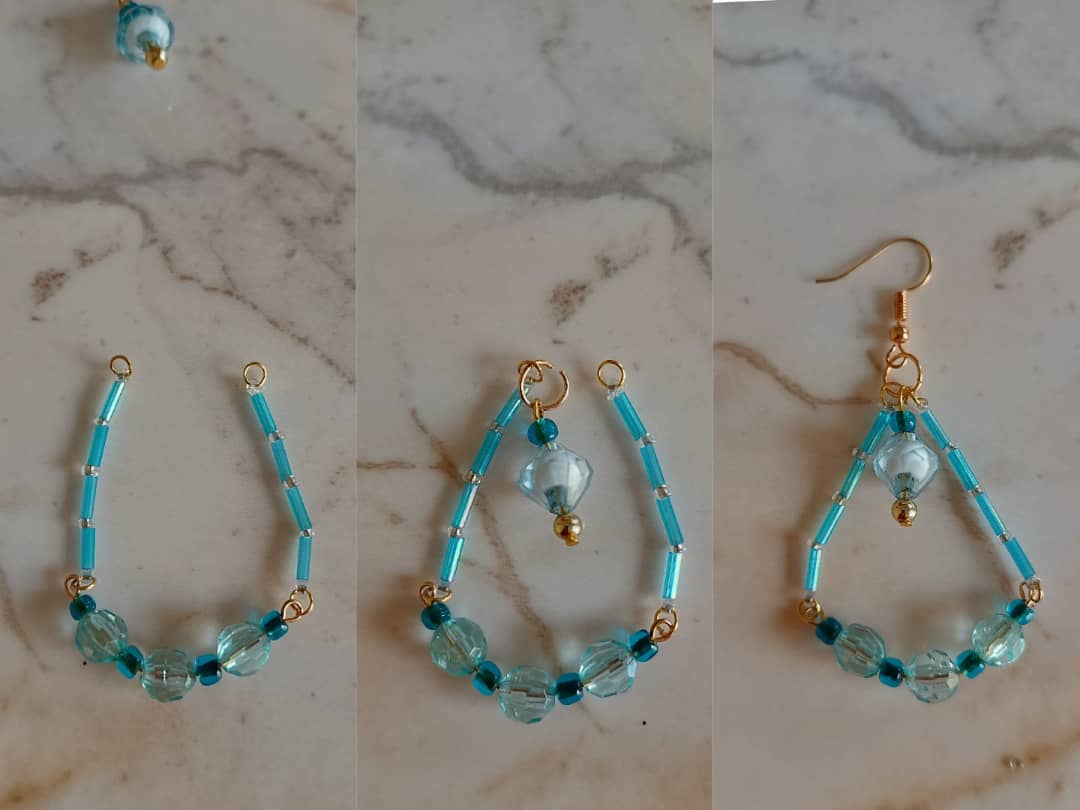
Voy a tomar los alfileres de argolla y en cada uno voy a introducir primero una mostacilla color azúl oscuro seguido de un cristal redondo repetimos el mismo paso hasta completar cuatro mostacillas y tres cristales, luego de esto con una pinza punta redonda voy a cerrar el final y con detenimiento voy a doblar un poco en el centro.
I'm going to take the ring pins and in each one I'm going to first insert a dark blue bead followed by a round crystal. We repeat the same step until we complete four beads and three crystals. After this, with some round nose pliers I am going to close the end. and carefully I'm going to fold a little in the center.
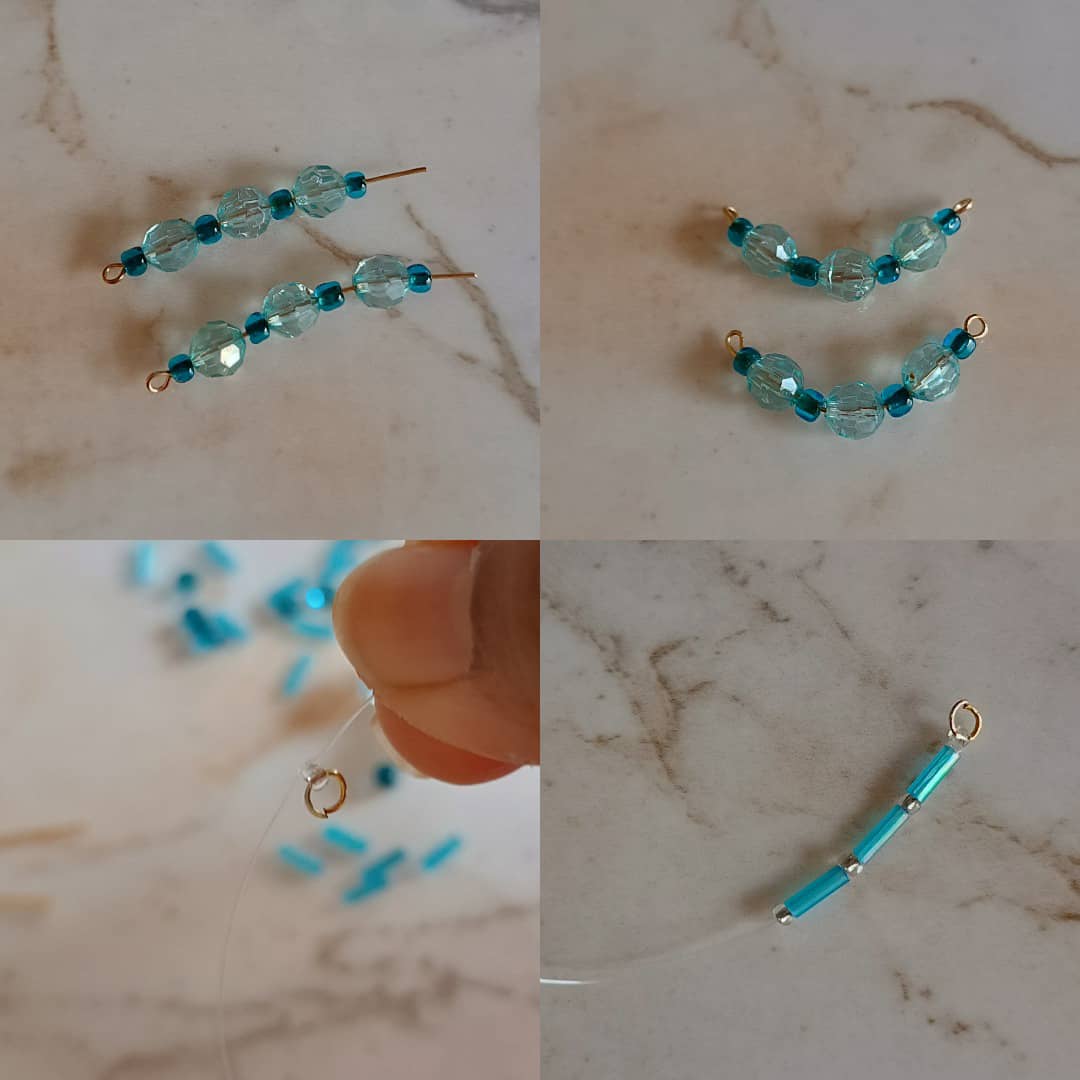
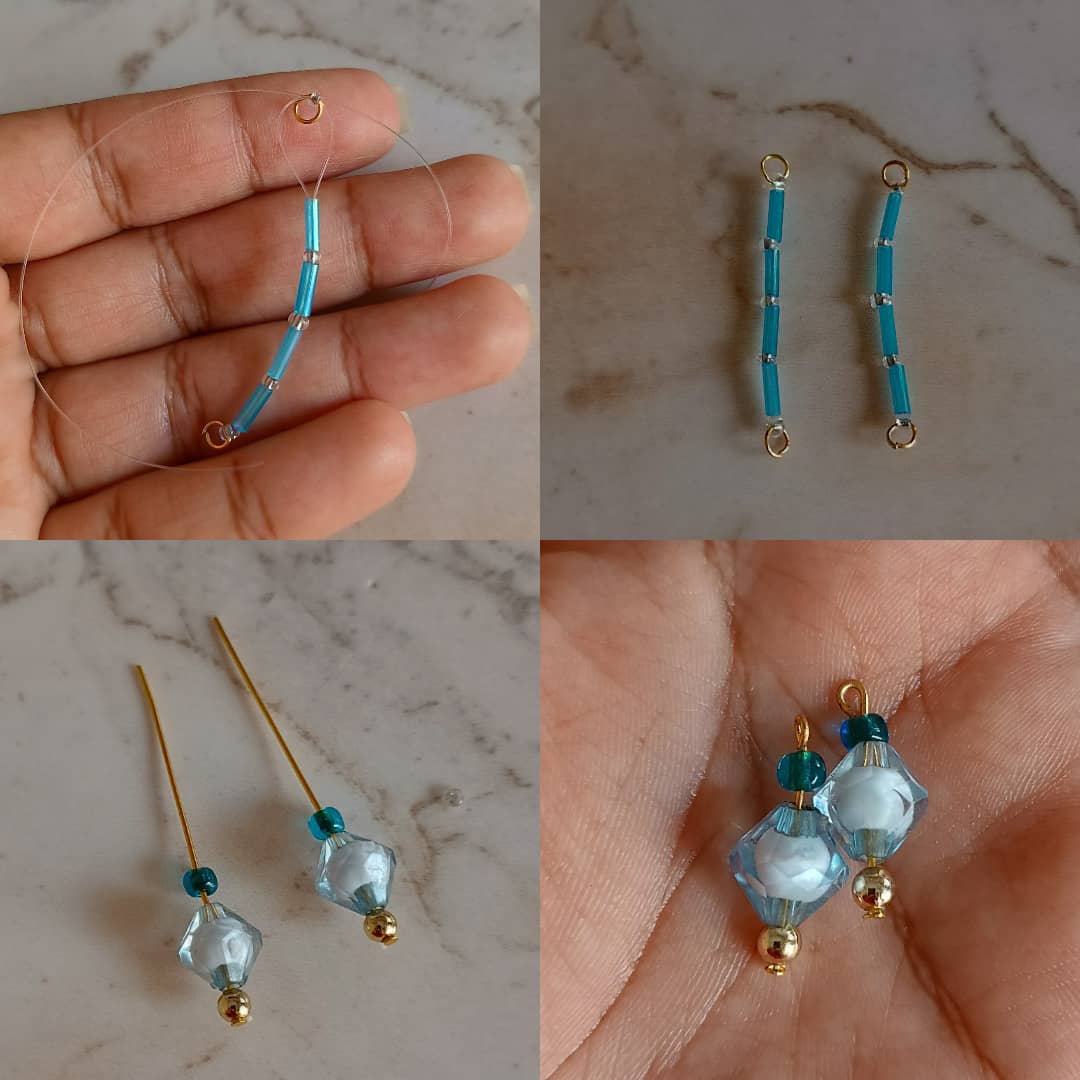
Luego de esto voy a cortar un trozo de nylon suficiente ya que debe quedar doble, en una argolla pequeña voy a introducir una mostacilla transparente y voy a pasar las puntas del nylon a través de la mostacilla nos debe quedar en medio, seguido de esto coloco un canutillo repitiendo el mismo paso a completar cuatro canutillos y cerrando con una mostacilla al igual que en el otro extremo, allí realicé un pequeño nudo y queme la punta con un encendedor, voy a realizar cuatro de estos.
After this I am going to cut a sufficient piece of nylon since it must be double, in a small ring I am going to insert a transparent bead and I am going to pass the ends of the nylon through the bead. It should be in the middle, followed by this I place a bead, repeating the same step until completing four beads and closing with a bead the same as at the other end, there I made a small knot and burned the tip with a lighter, I am going to make four of these.
Es importante tener en cuenta que al momento de quemar las puntas se realicé con mucho detenimiento, ya que se puede desarmar y perder el trabajo, pues ya me pasó realizando este paso.
It is important to keep in mind that when burning the tips it was done very carefully, since it can be disassembled and the work lost, since this has already happened to me when carrying out this step.
Ahora en otro alfiler sin argolla voy a colocar una cuenta dorada, un cristal y una mostacilla azul, cortamos con una pinza y cerramos la punta, de estos realicé dos.
Now on another pin without a ring I am going to place a gold bead, a crystal and a blue bead, we cut with tweezers and close the tip, of these I made two.
Ahora voy a comenzar armar el zarcillo con las partes elaboradas con canutillos, uniendo las argollas en ambos extremos del alfiler, luego voy a tomar una argolla mediana la coloco en lado izquierdo junto al alfiler con cristal que ya teníamos armado y cerramos con la argolla del lado derecho en esa misma argolla coloco el gancho de aro para culminar.
Now I am going to start assembling the earring with the parts made with beads, joining the rings at both ends of the pin, then I am going to take a medium-sized ring, place it on the left side next to the glass pin that we already had assembled and close with the ring of the right side in that same ring I place the ring hook to finish.
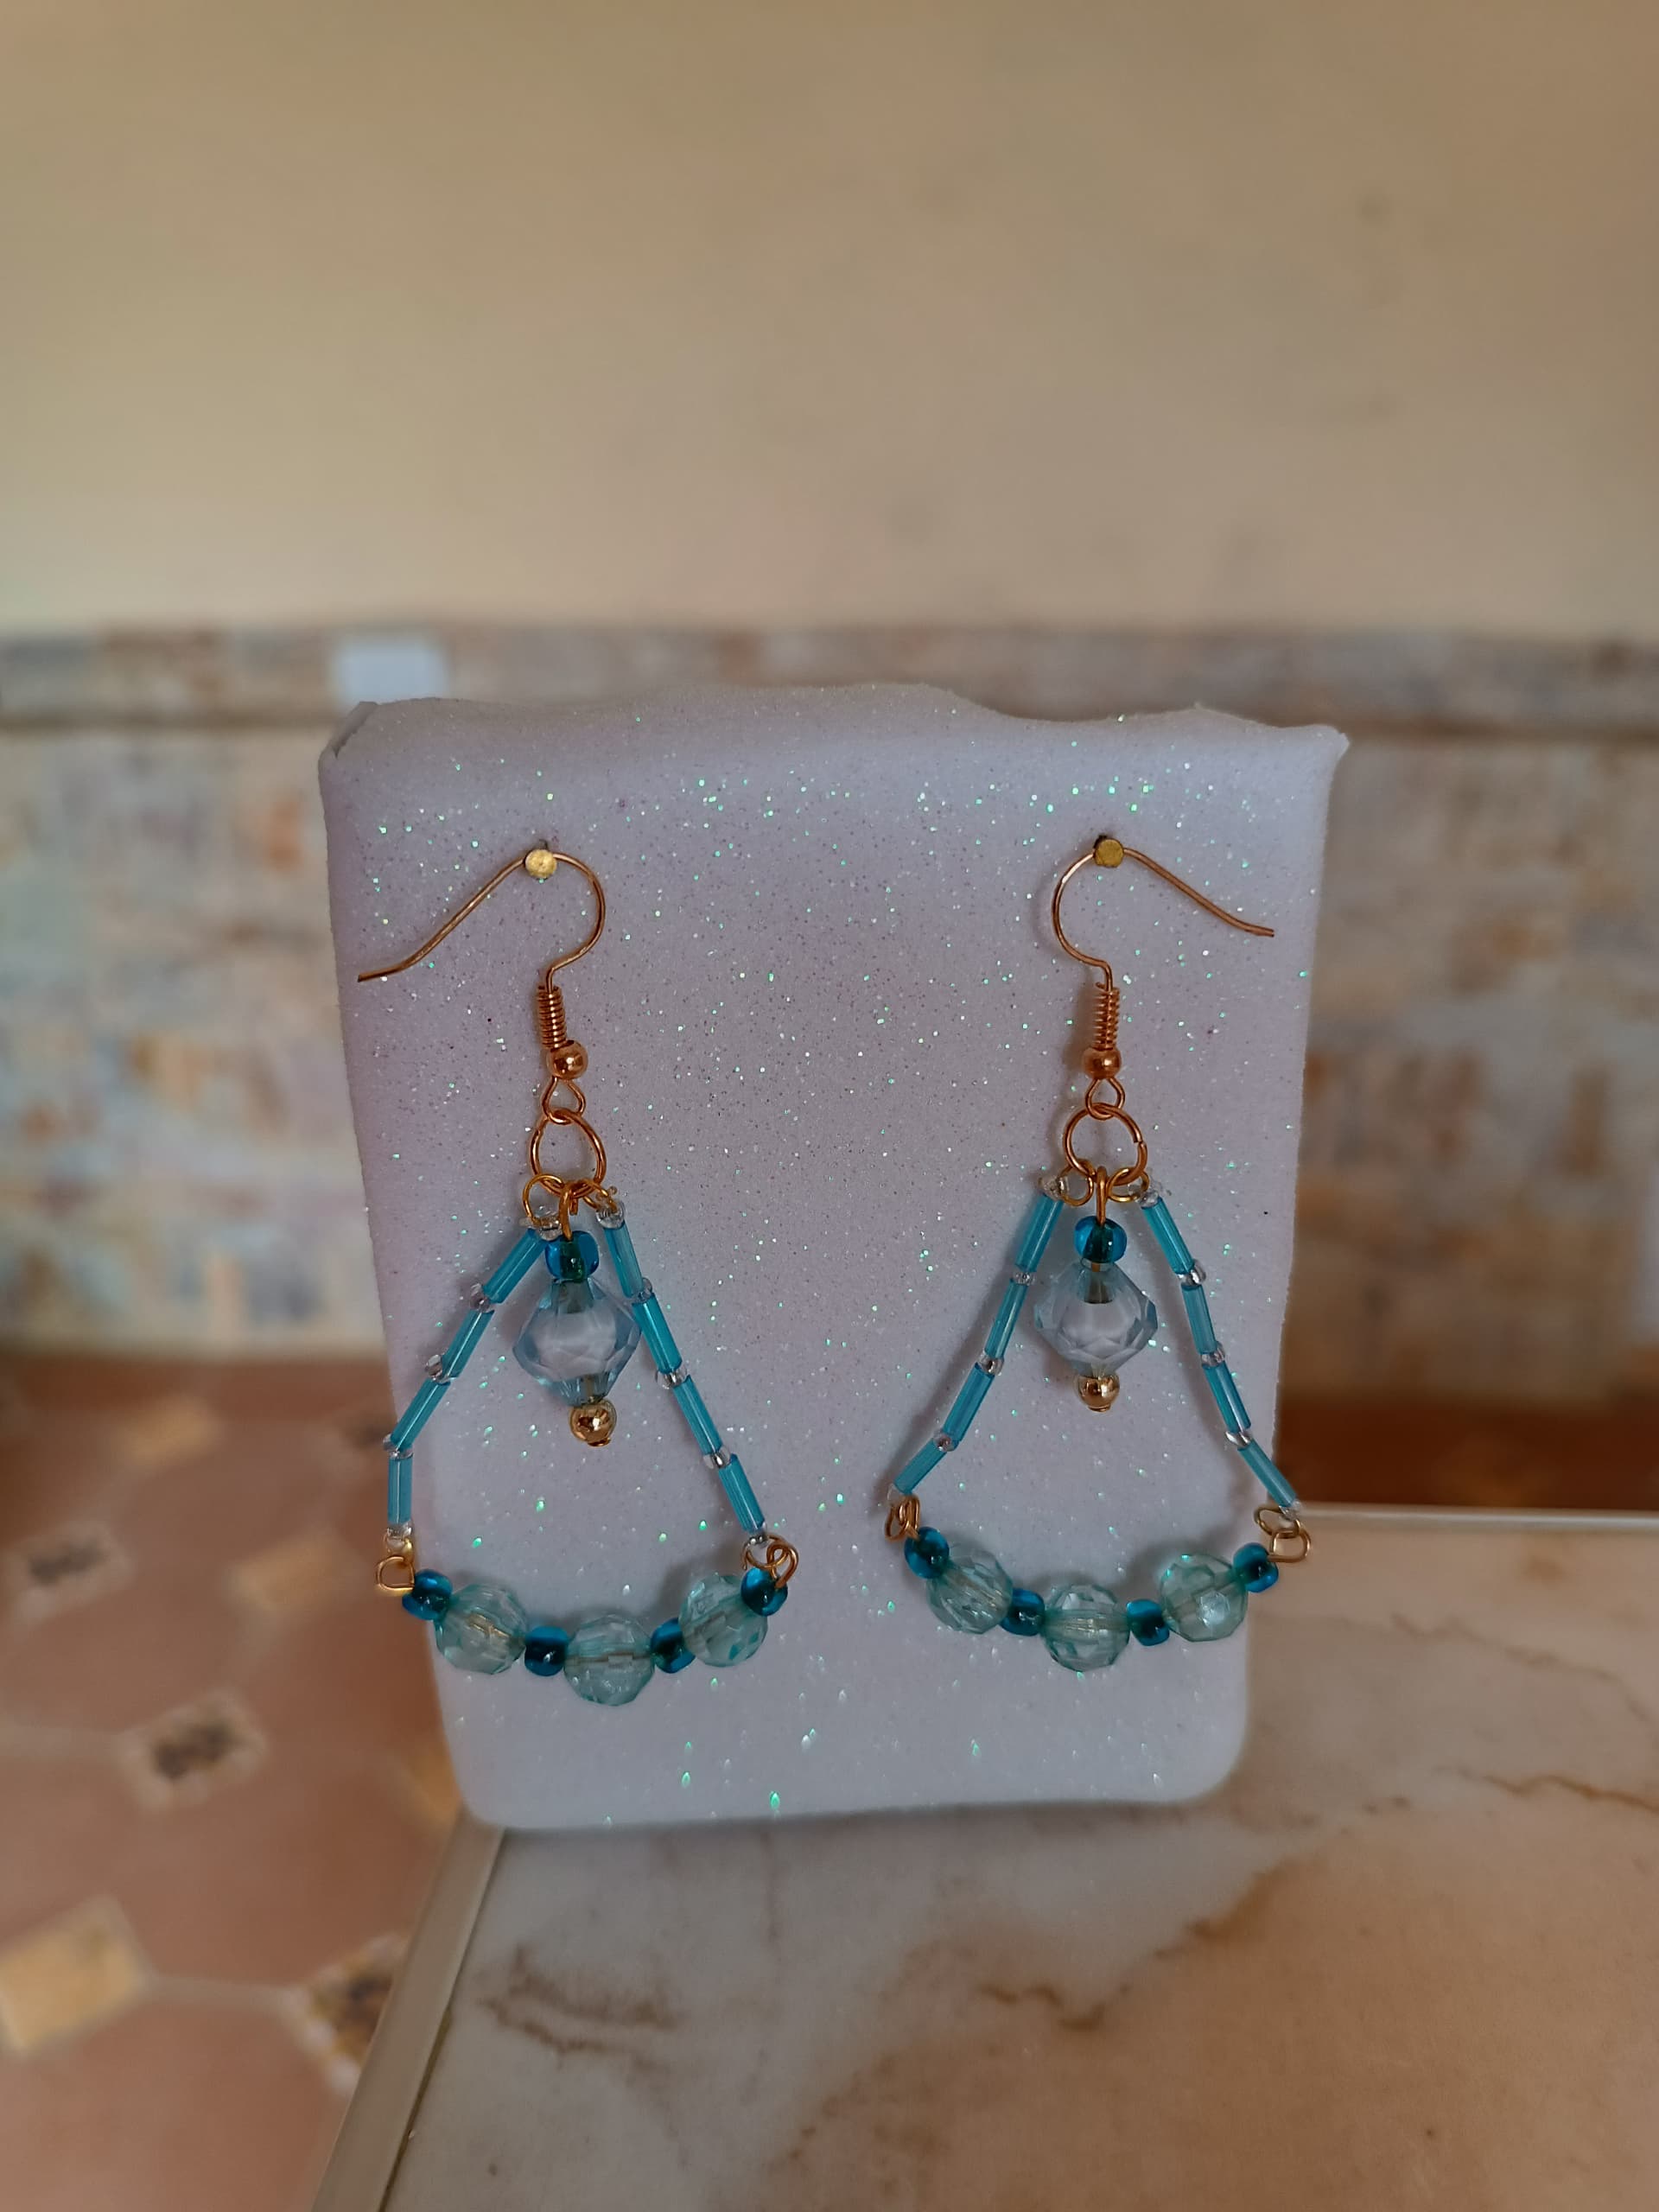
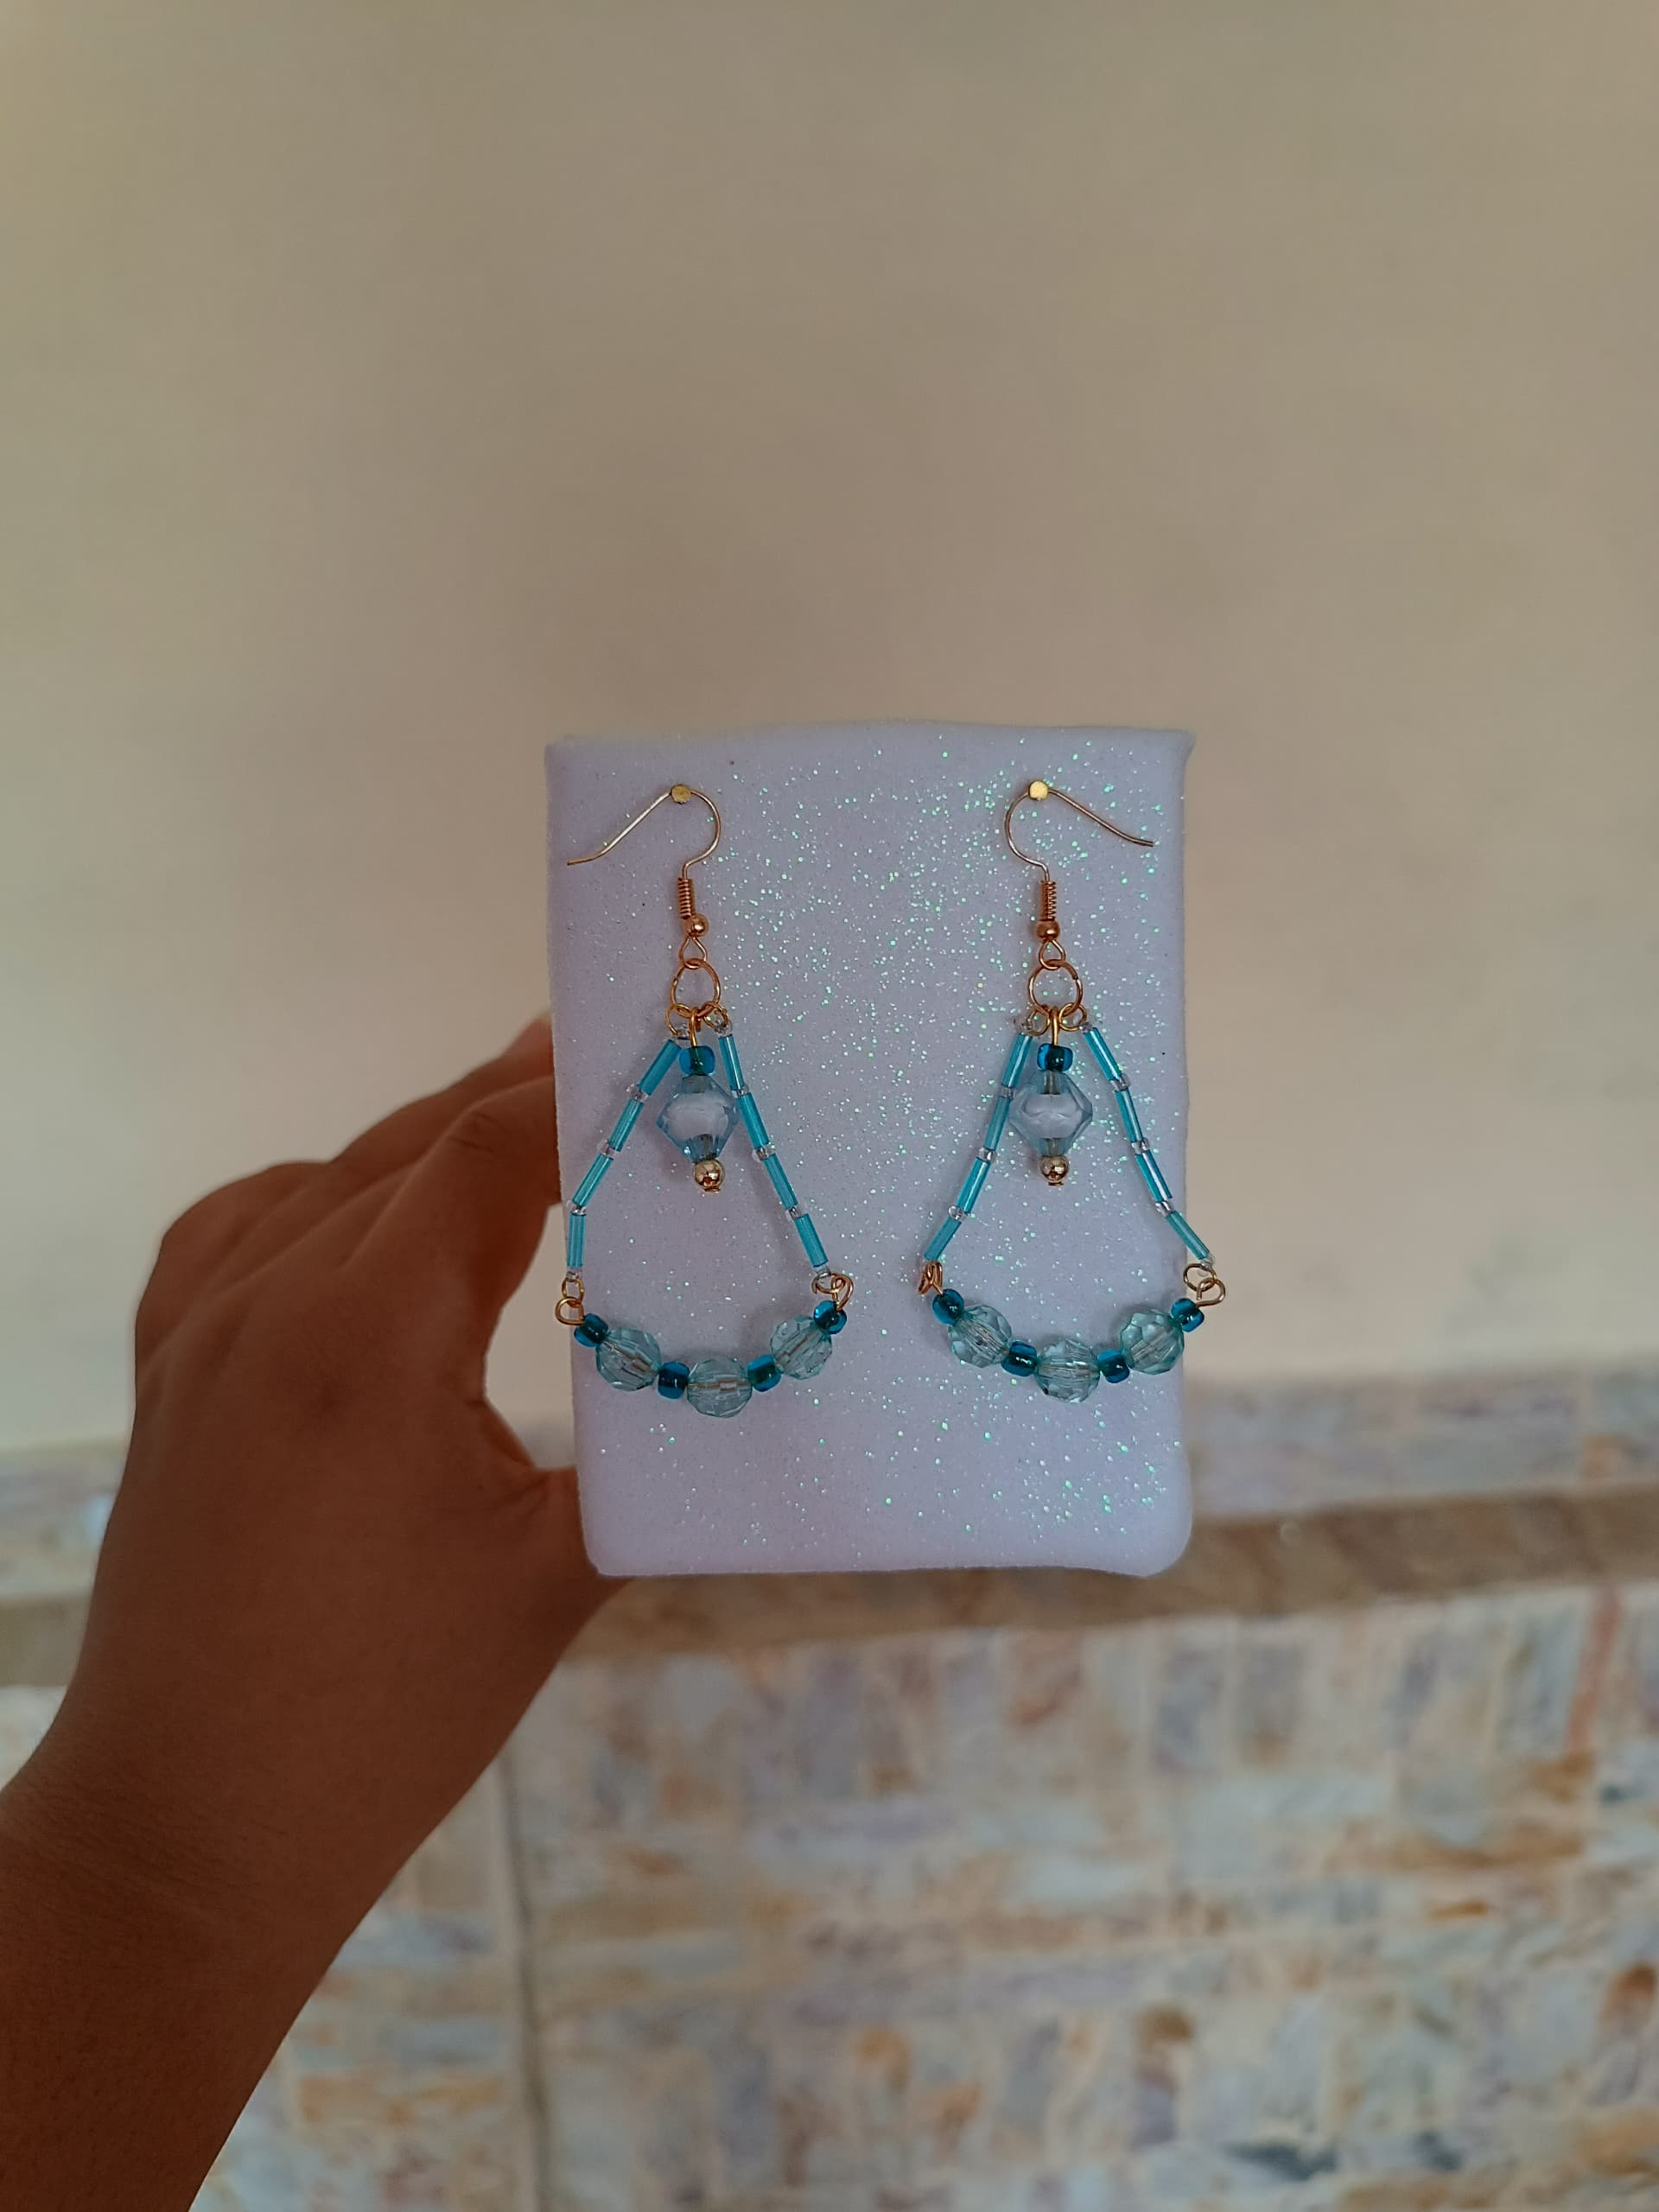
Este paso lo repetí con el otro zarcillo y listo, así quedaron estos lindos zarcillos en tono azul espero les haya gustado y que en algún momento los puedan realizar ustedes también o incluso mejorar el diseño.
I repeated this step with the other tendril and that's it, this is how these beautiful tendrils turned out in a blue tone. I hope you liked them and that at some point you can make them too or even improve the design.
Muchas gracias por visitar mi publicación nos vemos en una próxima oportunidad con más ideas.
Thank you very much for visiting my publication, see you next time with more ideas.


Contenido original. - original content.
Los separadores y banner fueron realizados en Canva. - The dividers and banner were made in Canva.
Las fotografias son tomadas con mi teléfono Redmi Note 11s y editadas en PicsArt - The photographs are taken with my Redmi Note 11s phone and edited in PicsArt.
Traducción de: Google traductor - Translation of: Google translator.