✦ This is a tutorial with an interesting hack that will save you a lot of time and effort! - Cover and Editing in FotoJet, Photos by @Tesmoforia ✦

🇪🇸 ~ A muchos artesanos nos gusta empezar los proyectos desde cero por el bienestar que sentimos en cada etapa del proceso, sin embargo y sobre todo si queremos ayudar a otros, ¡cada paso que podamos simplificar es valioso!, pero claro, ninguno de nosotros esta dispuesto a sacrificar calidad o belleza en ese nuevo y mas accesible método de fabricación, ¿o me equivoco?.
🇺🇸 ~ Many of us artisans like to start projects from scratch because of the comfort we feel at each step of the process, however, and especially if we want to help others, every step we can simplify is valuable, but of course, none of us is willing to sacrifice quality or beauty in this new and more accessible method of manufacturing, or am I wrong?.

✦ It looks complicated but I assure you that you can do it even if you are a beginner in sewing ✦
¡Utilicemos esta experiencia como ejemplo!, hace unos días una vecina me pregunto si podía elaborar unos chalequitos a juego para sus hijos (un niño de 6 años y su hermana pequeña de 3 años); por supuesto, le dije que sí con mucho gusto.
Let's use this experience as an example! A few days ago a neighbor asked me if I could make matching jackets for her children (a 6 year old boy and his 3 year old little sister); of course, I said yes with pleasure.
| 🇪🇸 ~ Materiales & Herramientas: Tela para la parte externa (raso, gabardina, tela de camisería), tela para la parte interna (raso tafeta, forro), hilos, aguja regular, tijera, papel, alfileres, plancha para ropa y máquina de coser (opcional). |
|---|
| 🇺🇸 ~ Materials & Tools: Outer fabric (satin, gabardine, shirting fabric), inner fabric (satin taffeta, lining), threads, regular needle, scissors, paper, pins, iron and sewing machine (optional). |
Normalmente después de tomar las medidas a los niños, haría patrones personalizados para cada uno, sin embargo pensé, "¿cómo podría realizar este proyecto con el mínimo de pasos, que una persona amateur pueda entender?".
Normally after taking the children's measurements, I would make custom patterns for each one, however I thought, "how could I make this project with the minimum of steps, that an amateur person could understand?".

✦ And remember that the best tool in every sewing project is your good attitude! ✦
¡Y asi fue!, así que el día de hoy, te enseñare cómo adaptar un patrón genérico de chaleco para niños con pocas medidas pre-anotadas, sin necesidad de imprimir ni utilizar reglas de costura. ¡Simple, rápido y efectivo!.
And so it was!, so today, I'll show you how to adapt a generic children's vest pattern with a few pre-noted measurements, without printing or using sewing rulers Simple, fast and effective!
• STEP BY STEP TUTORIAL •
« DIY: Kids' Waistcoat »
 |  |  |
|---|
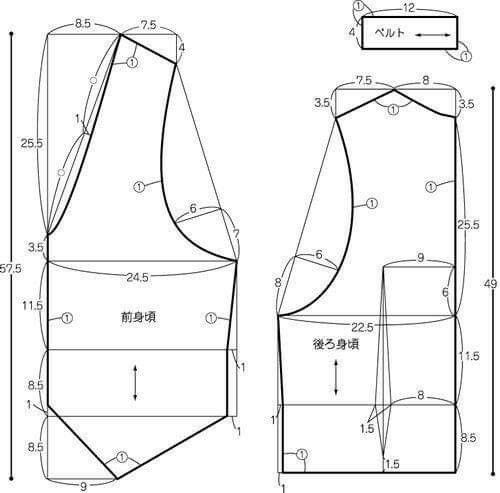
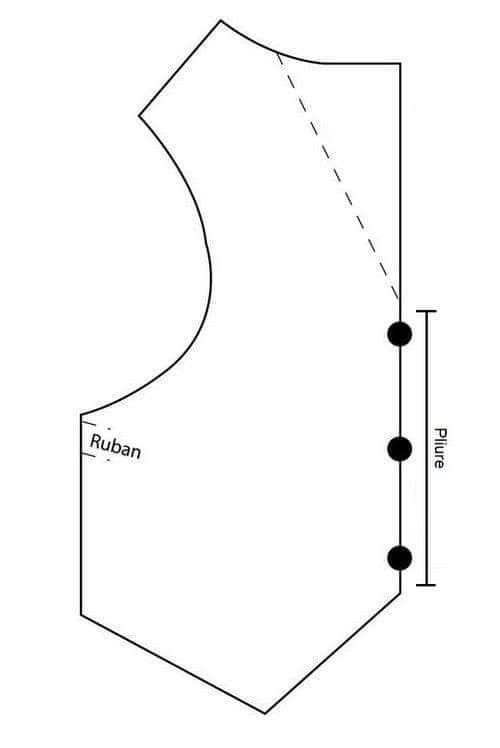
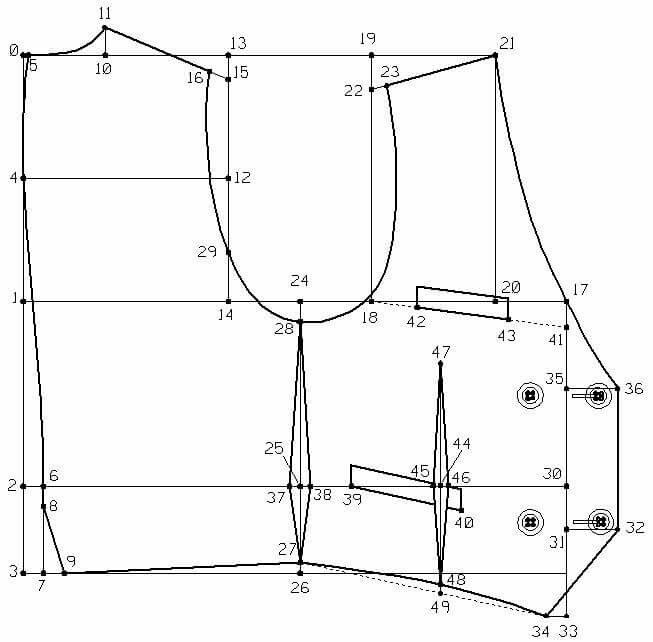
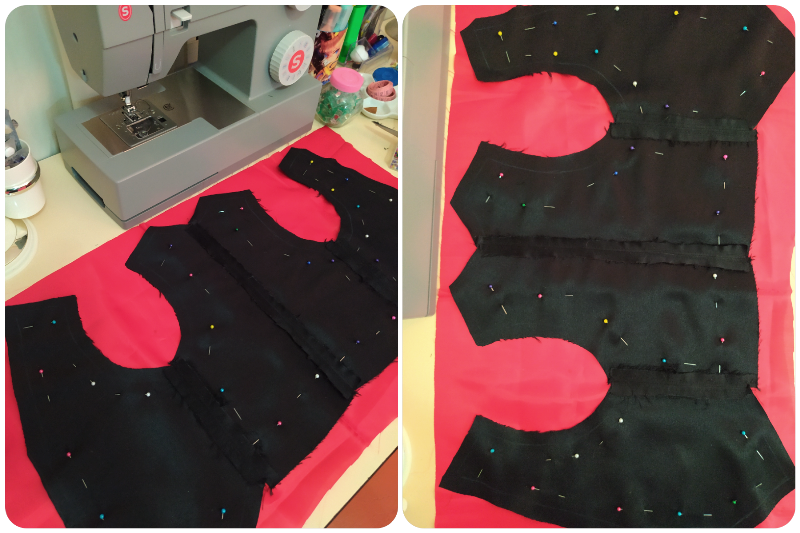
¡EMPECEMOS POR EL MISMO HACK! - El feliz secreto para simplificar el método de elaboración de esta pieza es tomar únicamente las medidas de alto y ancho de la parte superior del niño o niña, y dibujar la figura guía que vez allá arriba como ejemplos, del tamaño que se adapte a esa medida de alto y ancho. No es necesario verificar la pinza o la distancia entre los hombros, con la medida de ancho y alto es suficiente. Y si estas inseguro, agrega algunos centímetros extra (3cm por ejemplo).
LET'S START WITH THE SAME HACK! - The happy secret to simplify the method of making this piece is to take only the height and width measurements of the boy's or girl's top, and draw the guide figure you see above as examples, in the size that fits that height and width measurement. You don't need to check the pintuck or the distance between the shoulders, the width and height measurement is enough. And if you are unsure, add a few extra centimeters (3cm for example).
✦ If you don't have bond paper or pattern paper it's not a problem, you can use newsprint or paper from old notebooks, everything will work fine! ✦
PASO 1 - Tal cual dice la instrucción anterior, vamos a dibujar en papel la parte delantera y trasera de patrón, la mitad es suficiente porque podemos replicarla las veces que necesitemos volteando el patrón sobre la tela. Éstos tienen el alto y el ancho del niño con más edad, decidí hacer ambas piezas iguales.
STEP 1 - As the previous instruction says, we are going to draw on paper the front and back of pattern, half is enough because we can replicate it as many times as we need by flipping the pattern over the fabric. These have the height and width of the older child, I decided to make both pieces the same.
✦ You must obtain 4 pieces for each garment you want to make ✦
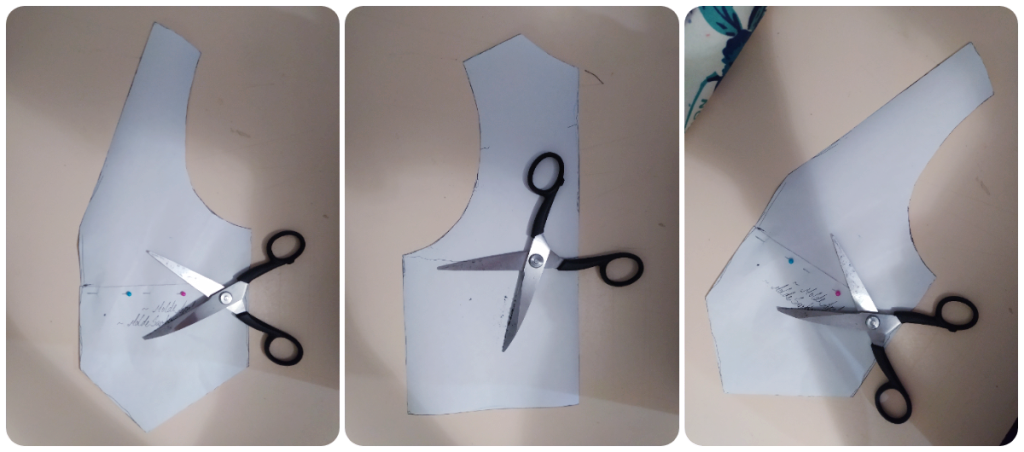
PASO 2 - Colocaras las piezas de papel sobre la tela que hayas escogido, y marcarás con un pedacito de tiza o jabón todo su contorno; luego cortaras la tela dejando 2 cm de tela como margen de la línea que dibujaste.
STEP 2 - Place the pieces of paper on the fabric you have chosen, and mark with a piece of chalk or soap all around it; then cut the fabric leaving 2 cm of fabric as a margin of the line you drew.
✦ It's already taking shape, look how nice and balanced it looks ✦
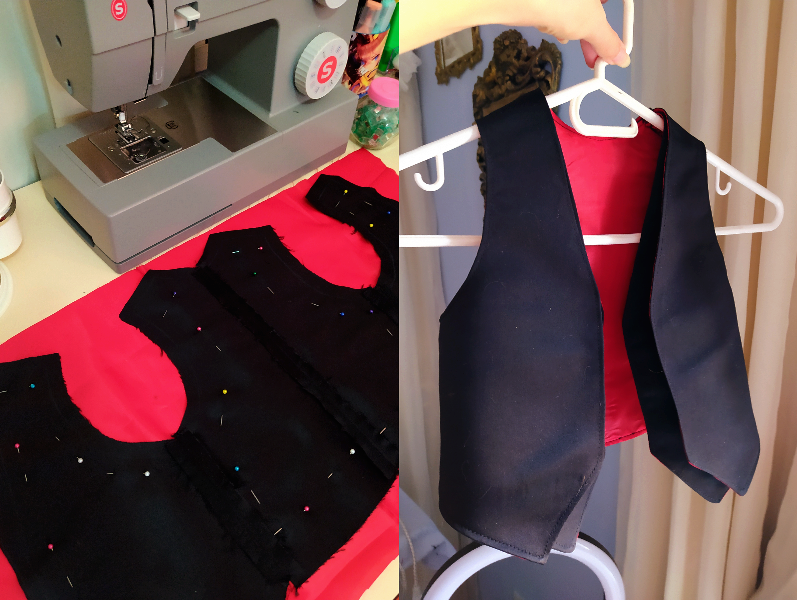
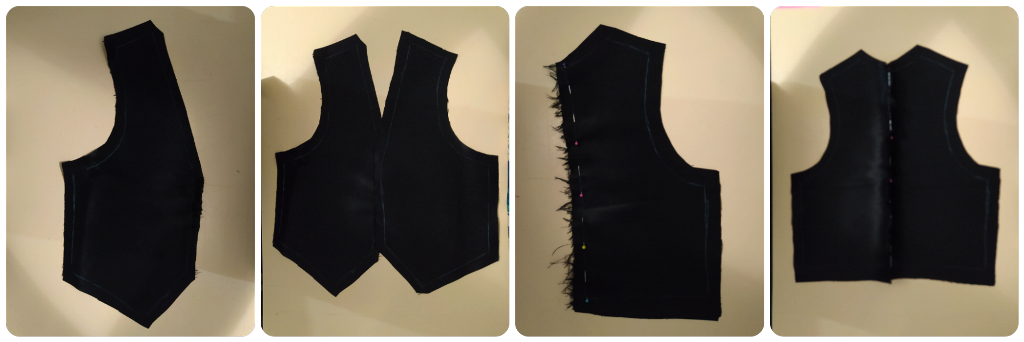
PASO 3 - Sujetaras en su posición como se ve en la imagen todas las piezas con ayuda de alfileres pequeños normales. Y coseras a mano con puntada pequeña o con máquina de coser (puntada N° 3) para unir todas las piezas. Luego plancharas a temperatura media alta.
STEP 3 - You will hold in position as shown in the picture all the pieces with the help of normal small pins. And sew by hand with a small stitch or with a sewing machine (stitch N° 3) to connect all the pieces. Then you will iron at medium high temperature.

✦ We are almost finished! ✦
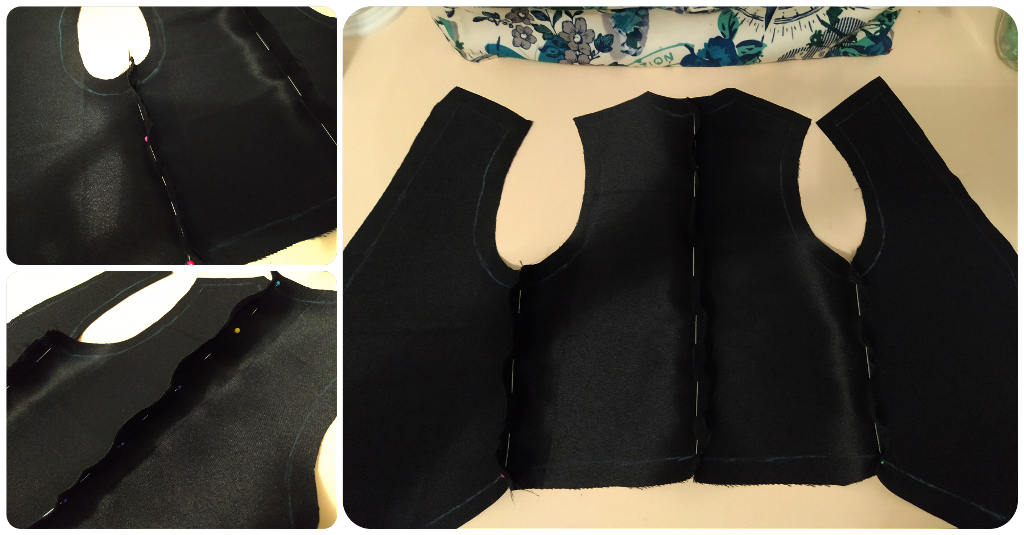
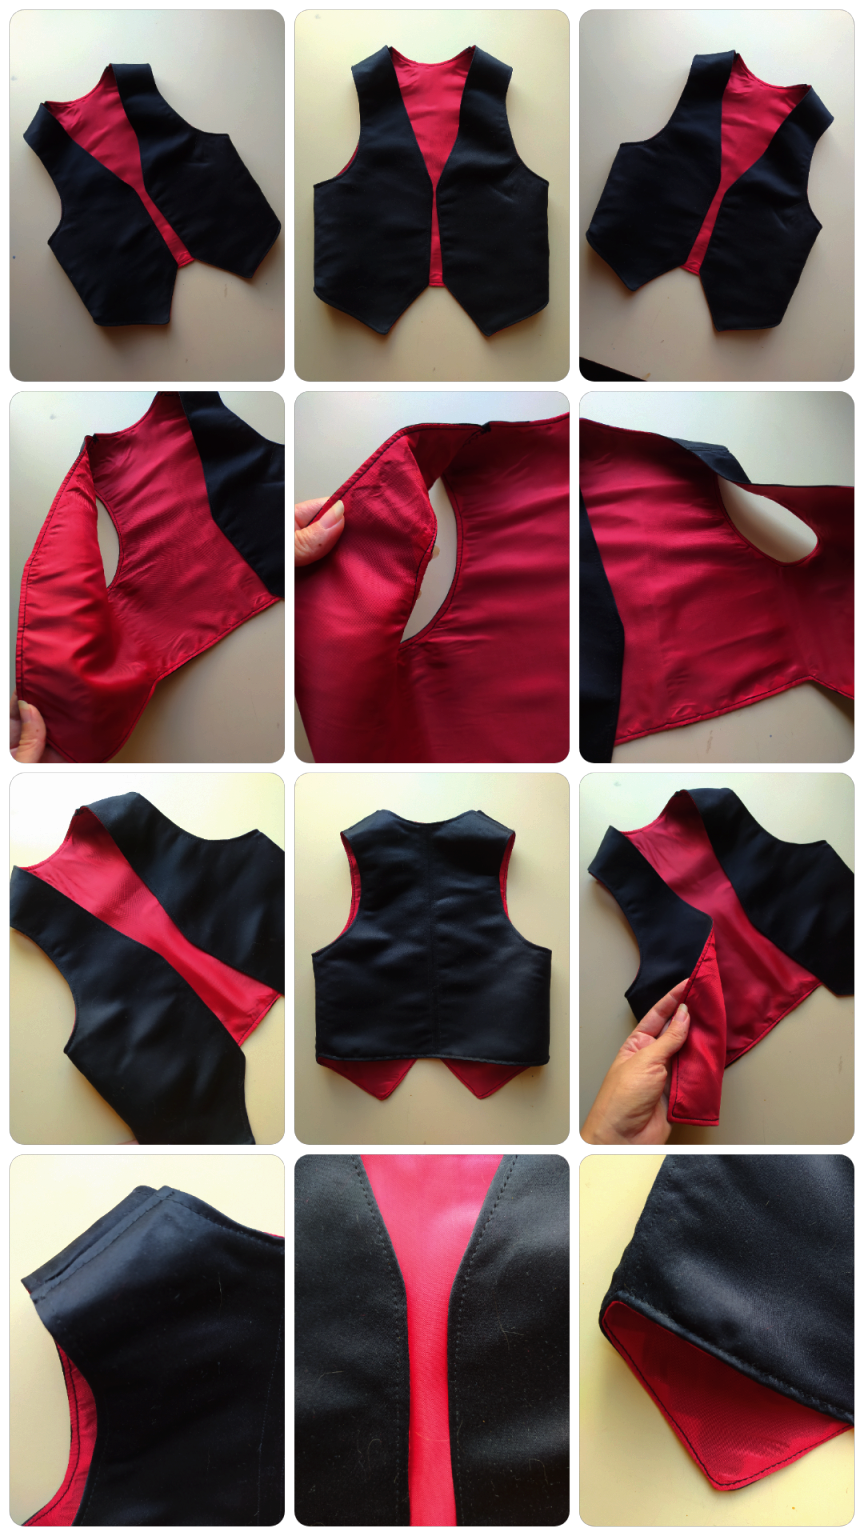
PASO 4 - En lugar de repetir los pasos en la tela del interior de la prenda (replicar 4 veces el patrón y luego coser las piezas) vas a colocar la pieza exterior completamente extendida sobre la tela que escogiste como forro, y la sujetaras con alfileres en todo su borde como se ve en las fotos guía.
STEP 4 - Instead of repeating the steps on the inside fabric of the garment (replicating the pattern 4 times and then sewing the pieces together) you are going to place the outside piece fully extended on the fabric you chose as lining, and pin it all around the edge as shown in the guide photos.
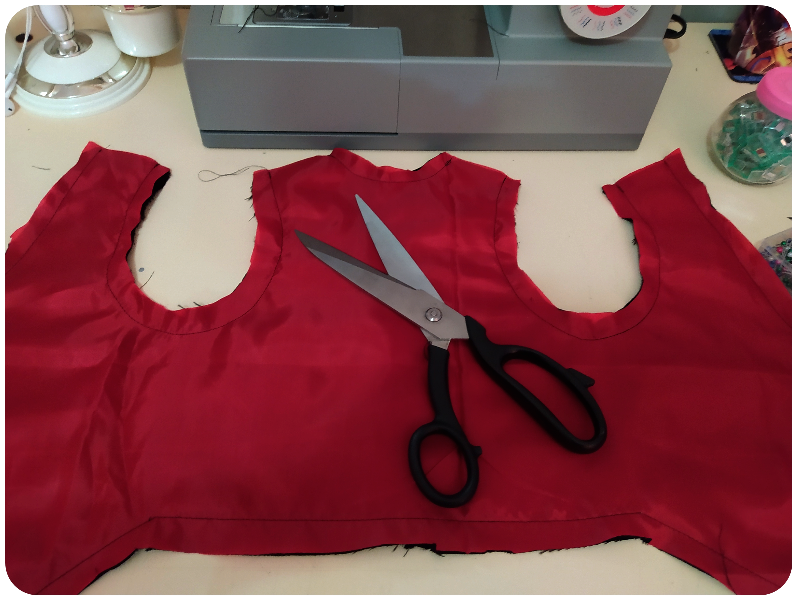
PASO 5 - En esta etapa ya casi estas en la recta final; vas a coser (a mano o con máquina de coser) por toda la linea guía que dibujaste con puntada recta. Dejaras sin coser la parte donde "se conectan los hombros."
STEP 5 - At this stage you are almost in the final stretch; you are going to sew (by hand or with a sewing machine) along the guide line you drew with a straight stitch. You will leave the part where "the shoulders connect" unsewn.
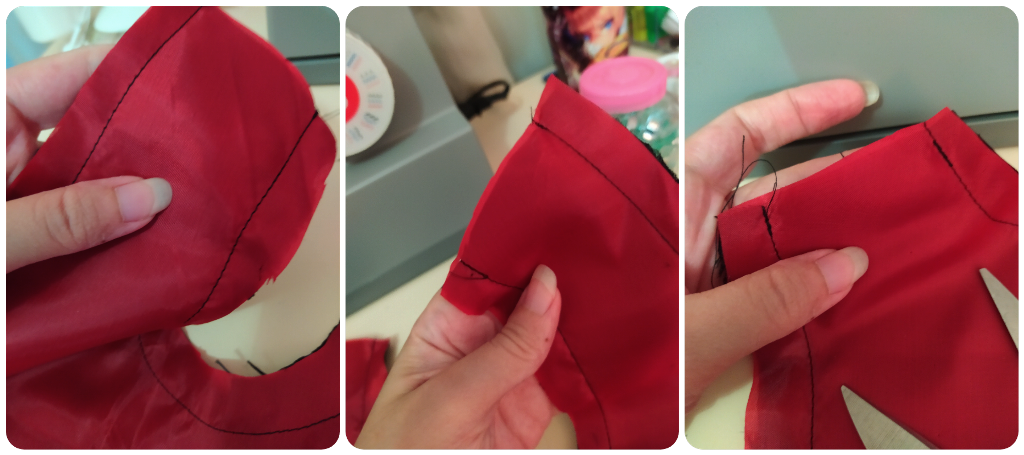
PASO 6 - Recortaras todo el exceso de tela del borde de la pieza, y es precisamente por estas aberturas que dejaste en el paso anterior que voltearas toda la prenda; preferiblemente hazlo por una de las aberturas de los hombros que corresponden a la parte trasera.
STEP 6 - You will trim all the excess fabric from the edge of the piece, and it is precisely through these openings that you left in the previous step that you will flip the whole garment; preferably do it through one of the shoulder openings that correspond to the back.
✦ The finish is not particularly professional but it works well and looks nice on the outside ✦
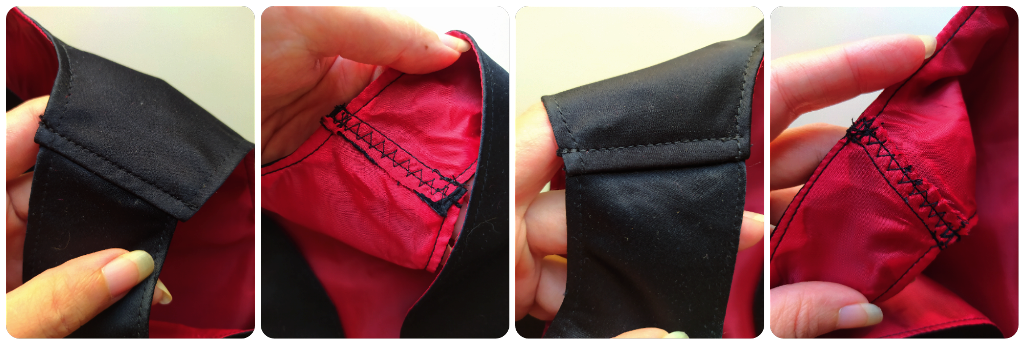
PASO 7 - ¡Para finalizar!, plancha con temperatura media-alta toda la prenda, y para un mejor acabado hazle una costura pequeña en todo su borde cerca del margen. Para terminar, une los hombros con una costura simple y suave, no te esfuerces demasiado porque cuando necesites agrandar esta prenda para darle más vida útil cuando el niño crezca, es precisamente por esta parte que descoserás para hacerlo un poquito mas grande.
STEP 7 - To finish, iron with medium-high temperature the whole garment, and for a better finish, make a small seam all around the edge near the margin To finish, join the shoulders with a simple and smooth seam, do not try too hard because when you need to enlarge this garment to give it more useful life when the child grows, it is precisely in this part that you will unpick to make it a little bit bigger.
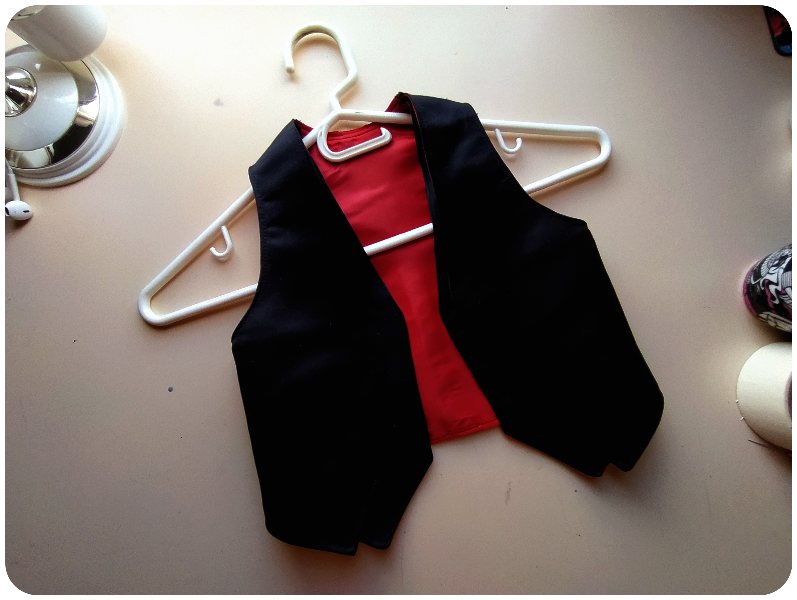
« Let's see the result! »
| 🇪🇸 ~ UN CONSEJO INTERESANTE: Adaptar un patrón a mano alzada puede resultar complejo si es la primera vez que lo haces. Una alternativa es aumentar al tamaño que desees el patrón que quieres calcar en la pantalla de una computadora o de un tv inteligente, y CON MUCHO CUIDADO Y CON UN LAPIZ CON LA PUNTA REDONDEADA (o creyón de cera) muy delicadamente colocaras el papel sobre la pantalla y calcaras la figura. Hago bastante hincapié en "hacerlo con delicadeza" porque puedes dañar la pantalla si afincas la punta de tu lápiz o creyón. Pero es un método muy efectivo si no tienes impresora o no quieres dibujar a mano alzada. |
|---|
| 🇺🇸 ~ AN INTERESTING TIP: Adapting a freehand pattern can be complex if you are doing it for the first time. An alternative is to enlarge to the size you want the pattern you want to trace on the screen of a computer or a smart tv, and VERY CAREFULLY AND WITH A PENCIL WITH A ROUNDED TIP (or wax crayon) very delicately place the paper on the screen and trace the figure. I emphasize "do it gently" because you can damage the screen if you stick the tip of your pencil or crayon. But it is a very effective method if you don't have a printer or don't want to draw freehand. |
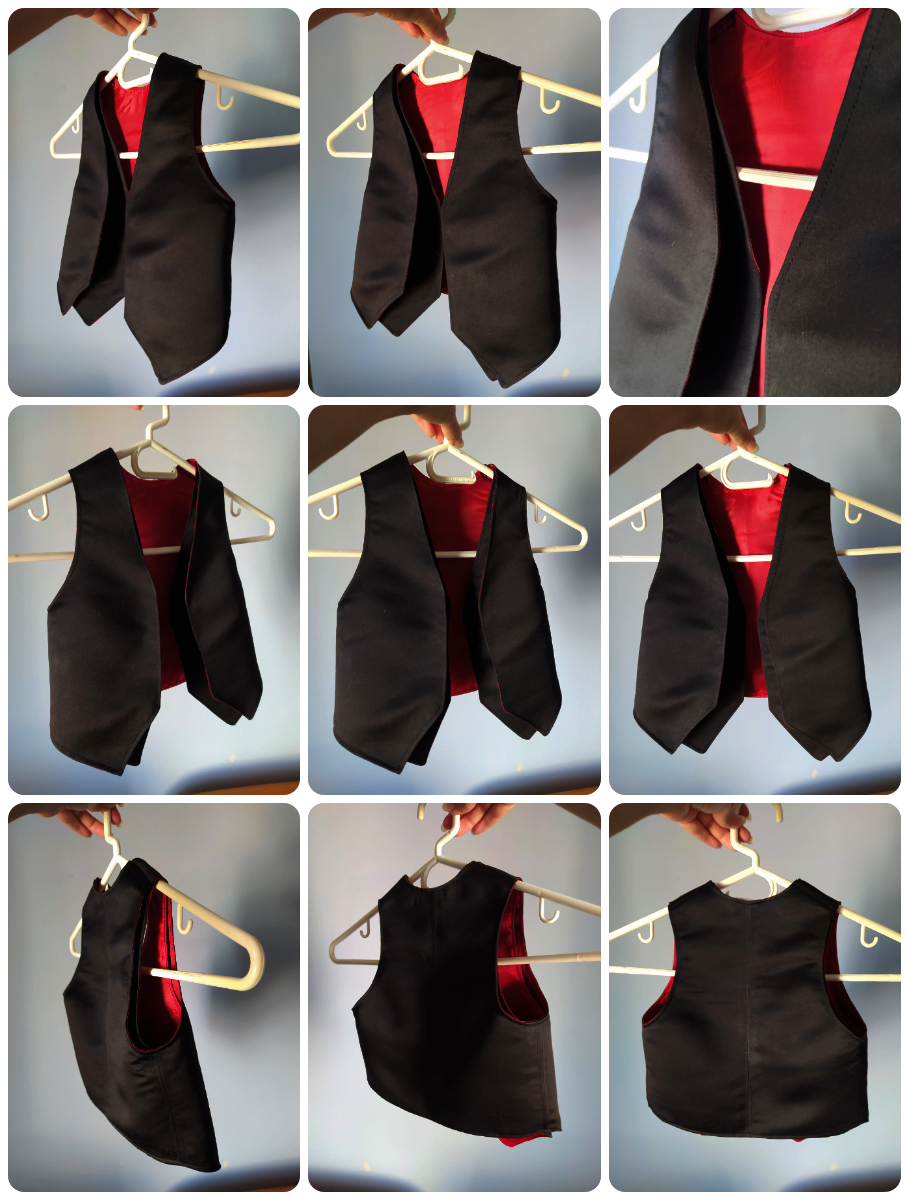
✦ It looked as good as if I had taken full measurements and created a completely custom pattern. Beautiful! ✦
Por supuesto y como siempre, recomiendo una última aplicación de la plancha para ropa en temperatura media-alta. Cuando aplicas calor en cada etapa de tu proyecto de costura eso garantiza una terminación de calidad superior en la prenda, no importa el grado de instrucción que tengas elevara la calidad de tus resultados.
Of course and as always, I recommend a final application of the garment iron on medium-high heat. When you apply heat at every stage of your sewing project that guarantees a superior quality finish on the garment, no matter how much instruction you have it will elevate the quality of your results.
Y esa es la manera de cómo puedes elaborar algunas prendas para niños pequeños, utilizando solo la medida "alto y ancho" aplicándola a una guía o patrón pre-fabricado sin la necesidad de utilizar todas las medidas tradicionales.
And that's the way how you can make some garments for small children, using only the "height and width" measurement by applying it to a pre-made guide or pattern without the need to use all the traditional measurements.
Creo que pocas veces me he encontrado con un "hack" tan útil como éste. No estoy segura de si funcionara para prendas más complejas o en el caso de la ropa para adultos, pero averigüémoslo en un futuro próximo, y por supuesto que documentando la experiencia para compartirla en "HiveDIY" 💖 Les deseo un feliz fin de semana a todos, ¡un abrazo y mucho cariño! 🍵 🌼 👏
I think I've rarely come across a "hack" as useful as this one. I'm not sure if it will work for more complex garments or in the case of adult clothing, but let's find out in the near future, and of course documenting the experience to share it on "HiveDIY" 💖 I wish you all a happy weekend, hugs and lots of love! 🍵 🌼 👏
~ You must login to the site first, then click on the text above ~


✨ 🍓 All texts and images by @Tesmoforia 🍓 ✨
📸 Tools: Xiaomi Redmi Note 8 📲 Snow 🎬 Remini 🌓 FotoJet 📐
🚨 ¡Please do not take, edit or republish my material without my permission! 🚨
💌 ¿Do you wish to contact me? Mino.Cosplay@Gmail.com 💌
🌙 Banner, signature and separators by Keili Lares