✦ This is a complete step-by-step tutorial on how to make yourself a very romantic heart-shaped shoulder bag with bangs! This is the kind of key piece that can elevate your looks. Get pencil and paper, and enjoy! - Cover edition with FotoJet, photos by @Tesmoforia ✦

🇪🇸 ~ ¿Cuántas veces has salido de compras y has regresado decepcionado porque no consigues algo que te guste?, muchas veces navegamos en Pinterest y nos estrellamos con objetos hermosos que nos encantan, ah, pero las tiendas pueden estar en un país muy distante, el tema de importaciones es algo complicada y también, ¡el catalogo puede estar en otro idioma o en métodos de pago que no manejas! 😱 💦
🇺🇸 ~ How many times have you gone out shopping and come back disappointed because you don't get something you like?, many times we browse Pinterest and crash with beautiful items that we love, ah, but the stores may be in a very distant country, the import issue is somewhat complicated and also, the catalog may be in another language or payment methods you don't handle! 😱 💦

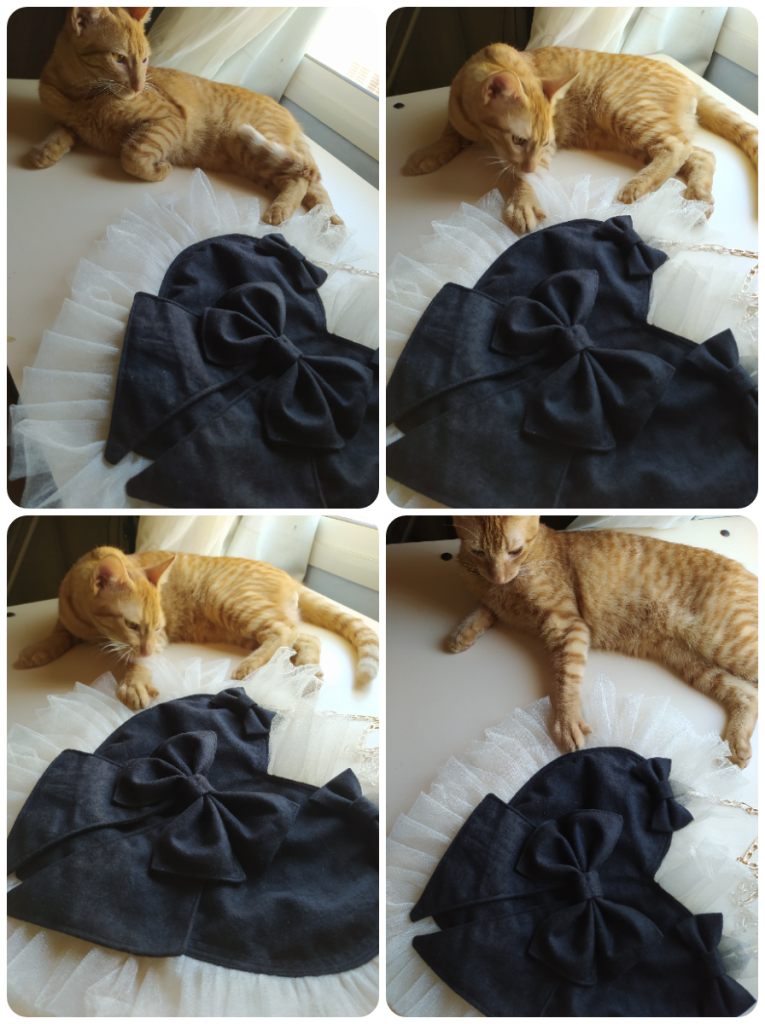
✦ This is a kitten approved project, 100% guaranteed results! ✦
Aprender a hacer accesorios por ti mismo es una estupenda inversión de tiempo que siempre recomendaré (¡sigue leyendo hasta el final para encontrar una lista de beneficios!): Pero antes de continuar debo decir, no estoy a favor de la copia o plagio de diseño de otros creativos, emprendimientos o tiendas, por el contrario puedes diseñar piezas propias donde añadas elementos muy puntuales de diseños que te hayan gustado.
Learning to make accessories on your own is a great investment of time that I will always recommend (read on to the end for a list of benefits!): But before I continue I must say, I am not in favor of copying or plagiarizing design from other creatives, ventures or stores, on the contrary you can design pieces of your own where you add very pointed elements from designs you liked.
En esta publicación no solo te enseñare a diseñar un bonito bolso de estupendo acabado con materiales simples de conseguir, también te enseño a cómo adaptar elementos puntuales de forma equilibrada hasta conseguir un diseño original, y hablamos de la importancia de mantenernos honestos, creativos y originales 👑 ✨
In this publication I will not only teach you how to design a beautiful and beautifully finished bag with simple to obtain materials, I will also teach you how to adapt specific elements in a balanced way to achieve an original design, and we will talk about the importance of keeping it honest, creative and original 👑 ✨
« 𝕋 𝕆 𝕆 𝕃 𝕊 • & • 𝕄 𝔸 𝕋 𝔼 ℝ 𝕀 𝔸 𝕃 𝕊 »
✦ Although you can always modify and add more elements if you want! ✦
| 🇪🇸 • Aguja regular, hilo color oscuro, hilo color beige o blanco, tela de forro tafeta, tela de tapicería, tela de tul o organza transparente, cierre de metal de 20 centímetros, tijera, reglas, lápiz, borrador, bolígrafo, papel o cartulina, alfileres regulares, pinzas de costura, tiza para tela o creyón blanco, plancha para tela, y máquina de coser (opcional). |
|---|
| 🇺🇸 • Regular needle, dark colored thread, beige or white thread, taffeta lining fabric, upholstery fabric, tulle or transparent organza fabric, 20 centimeter metal zipper, scissors, rulers, pencil, eraser, pen, paper or cardboard, regular pins, sewing pins, fabric chalk or white crayon, fabric iron, and sewing machine (optional). |
• 𝕊𝕋𝔼ℙ 𝔹𝕐 𝕊𝕋𝔼ℙ 𝕋𝕌𝕋𝕆ℝ𝕀𝔸𝕃 •
« Crossed Heart Bag with Bows (PART 1) »

✦ I always recommend not to sew at night, but this idea got me very excited and I sewed the first part before going to sleep ✦
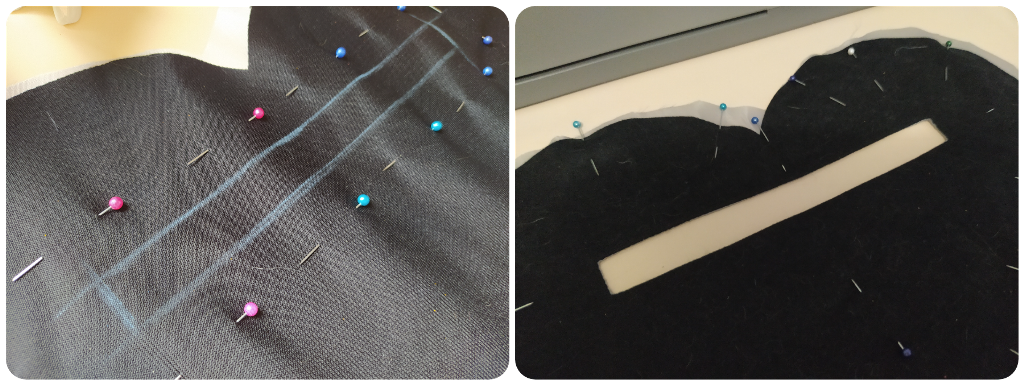
🖤 PASO 1 ✦ Toma 2 rectángulos de tela de tapicería (35 x 35 cm), y plánchalos a temperatura alta. Fija una pieza contra la otra con algunos alfileres regulares.
⚫ STEP 1 ✦ Take 2 rectangles of upholstery fabric (35 x 35 cm), and iron them at high temperature. Pin one piece against the other with some regular pins.

✦ Cloth clamps are a good option to hold the folded pattern guide and check that it is symmetrical ✦
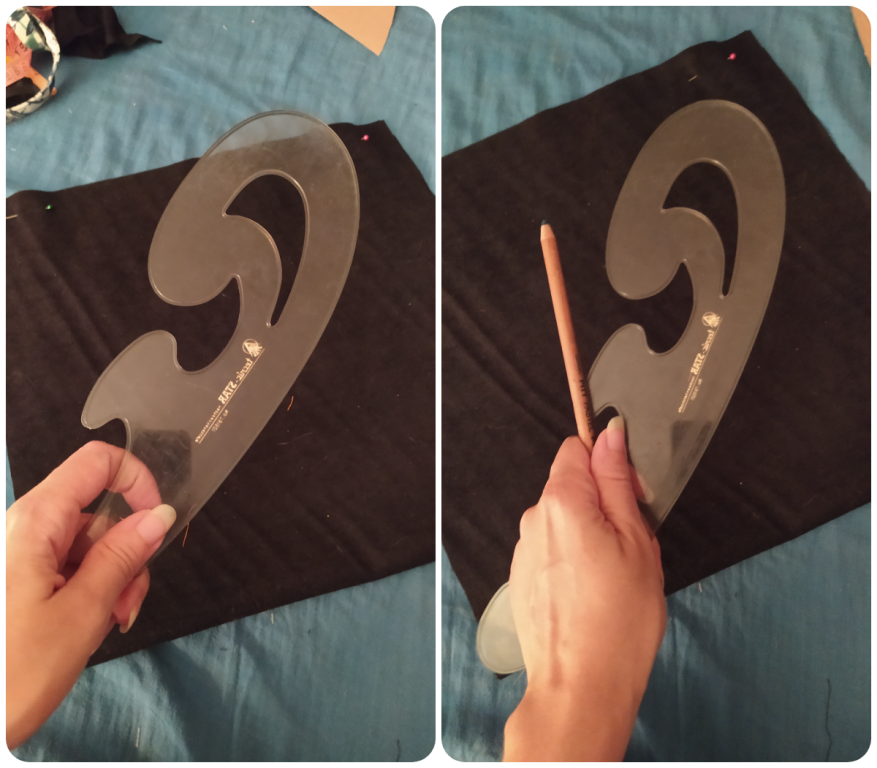
🖤 PASO 2 ✦ Ahora con el cartón o el papel que has escogido para fabricar tu patrón guía, dóblalo por la mitad y dibuja la mitad de un corazón. Incluye de 1 a 2 cm extra sobre la medida que quieres que tenga el bolso (que ronde los 30 a los 35 cm).
⚫ STEP 2 ✦ Now with the cardboard or paper you have chosen to make your guide pattern, fold it in half and draw half of a heart. Include an extra 1 to 2 cm over the size you want the bag to be (around 30 to 35 cm).
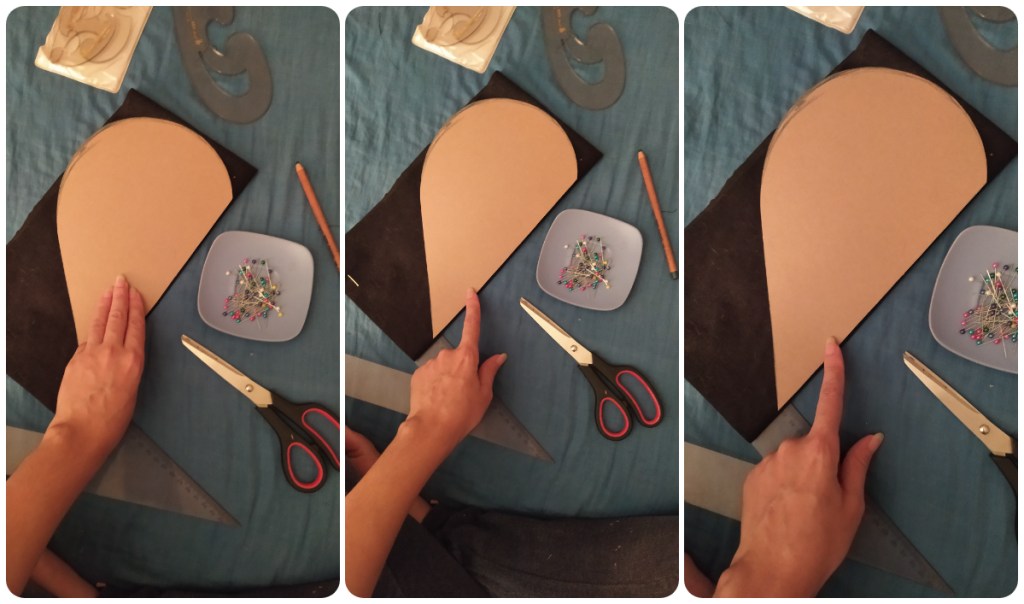
🖤 PASO 3 ✦ Finalmente pasaremos el patrón guía a la tela de tapicería, marcaras el borde con el creyón blanco y recortaras ambas caras del bolso.
⚫ STEP 3 ✦ Finally we will transfer the pattern guide to the upholstery fabric, mark the edge with the white crayon and cut out both sides of the bag.
• 𝕊𝕋𝔼ℙ 𝔹𝕐 𝕊𝕋𝔼ℙ 𝕋𝕌𝕋𝕆ℝ𝕀𝔸𝕃 •
« Crossed Heart Bag with Bows (PART 2) »
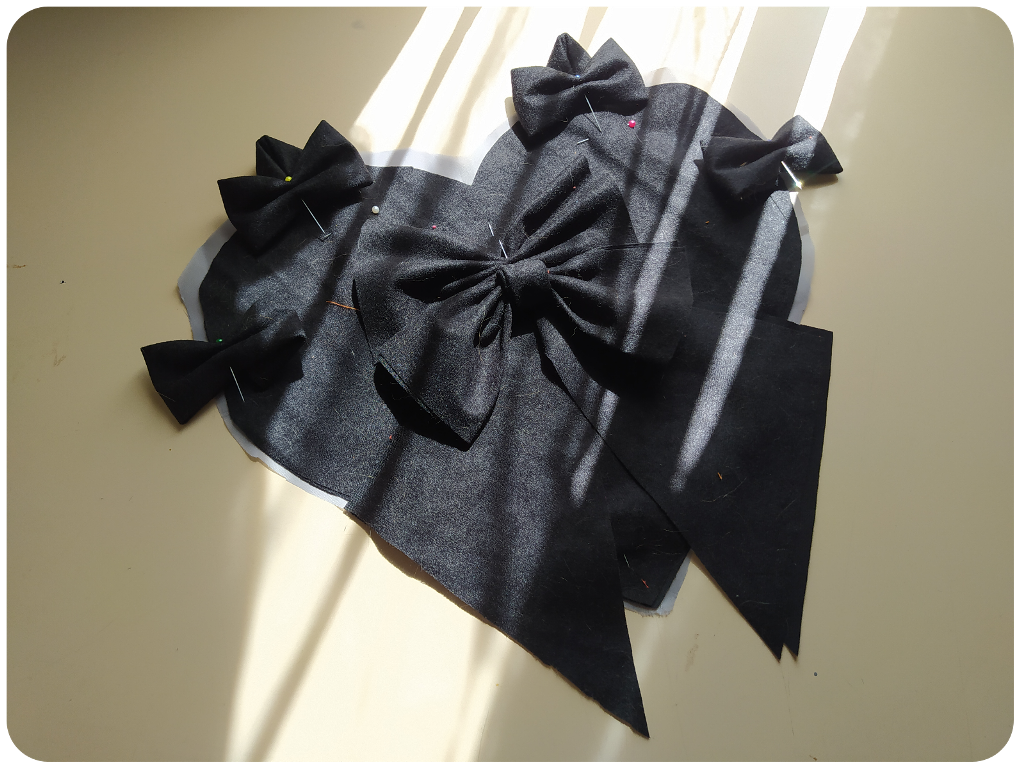
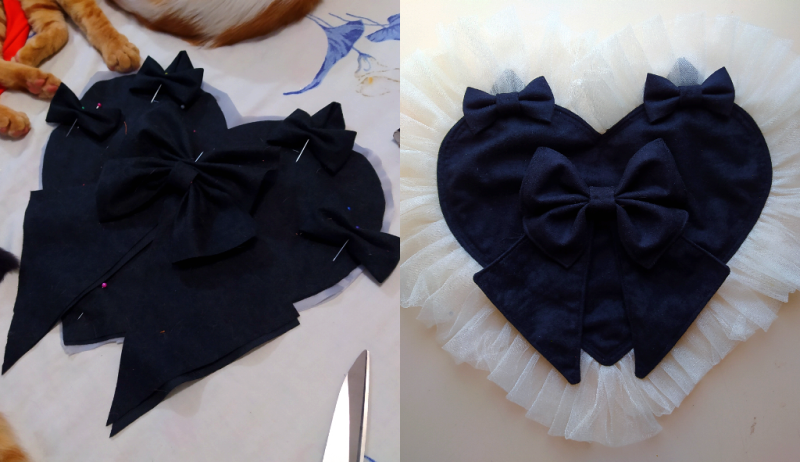
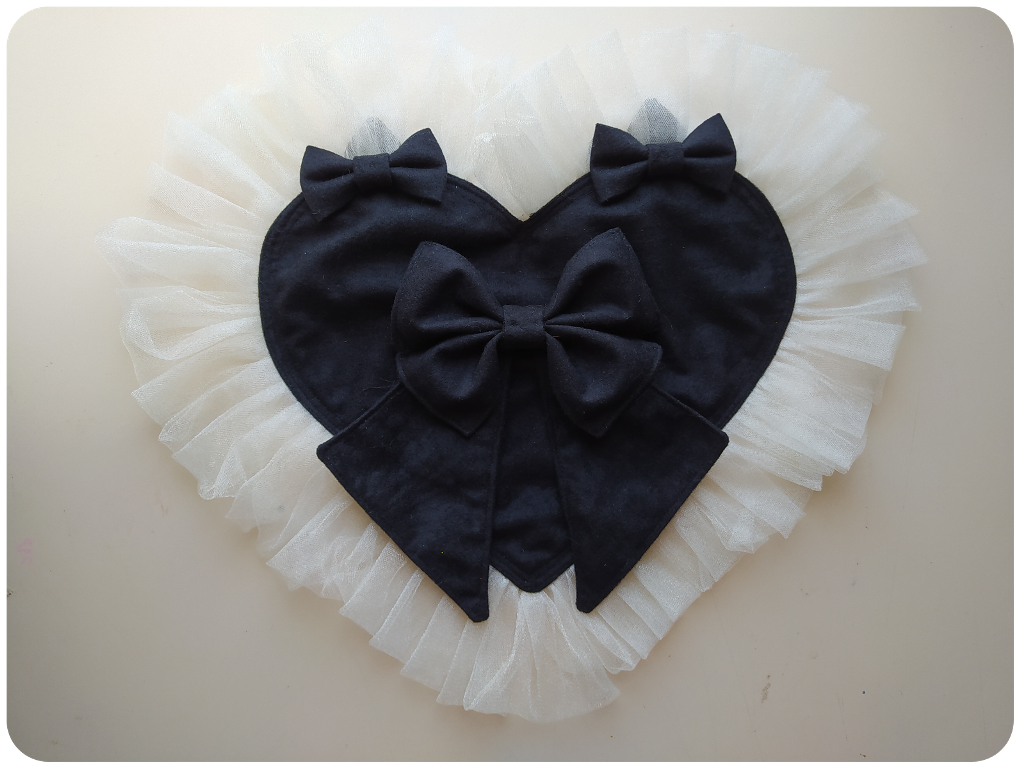
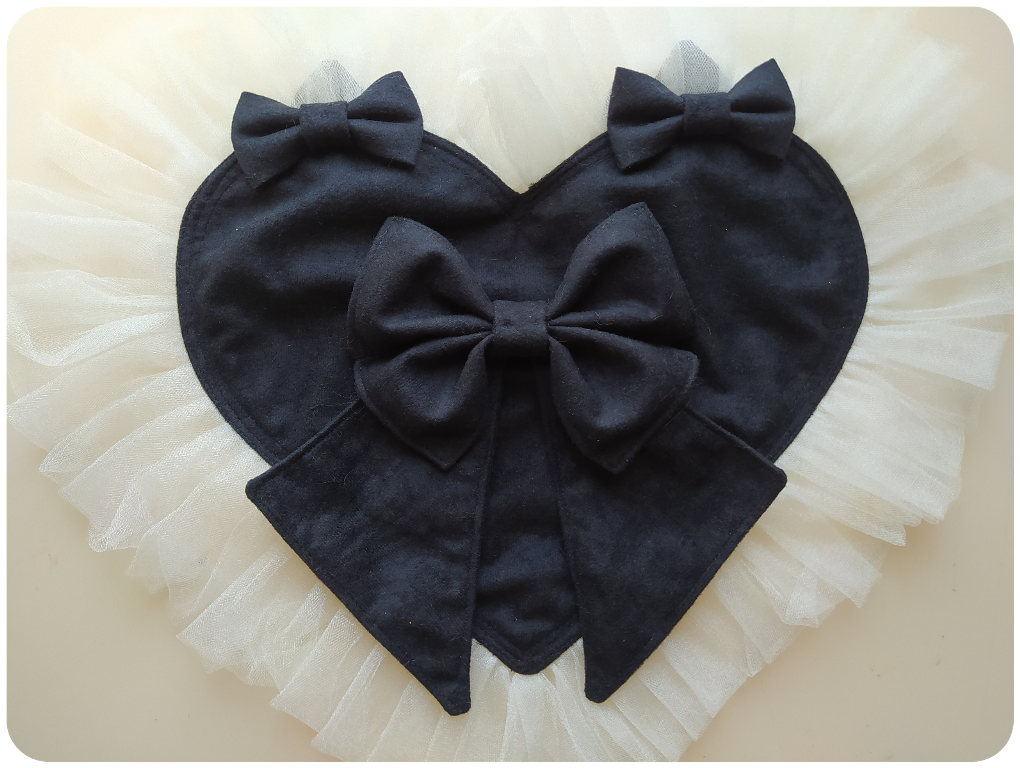
✦ After transferring the heart pattern to the taffeta fabric that we will use for the lining, before continuing we will place all the overlapping pieces to have an estimate of how the result will be. This is a good time to reconsider the size or position of the loops ✦
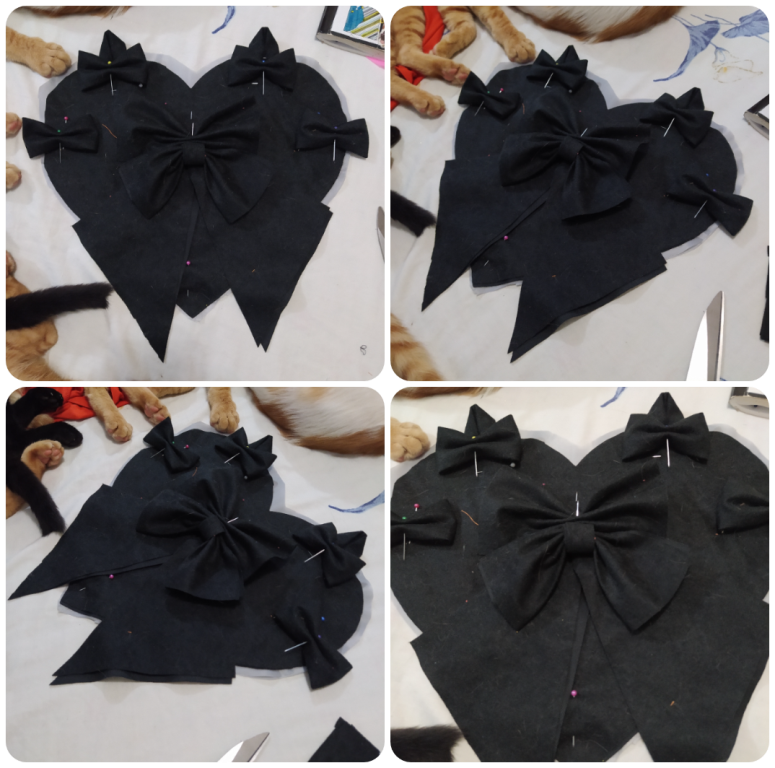
✦ In my initial vision all bows would be installed in the front but later this changes ✦
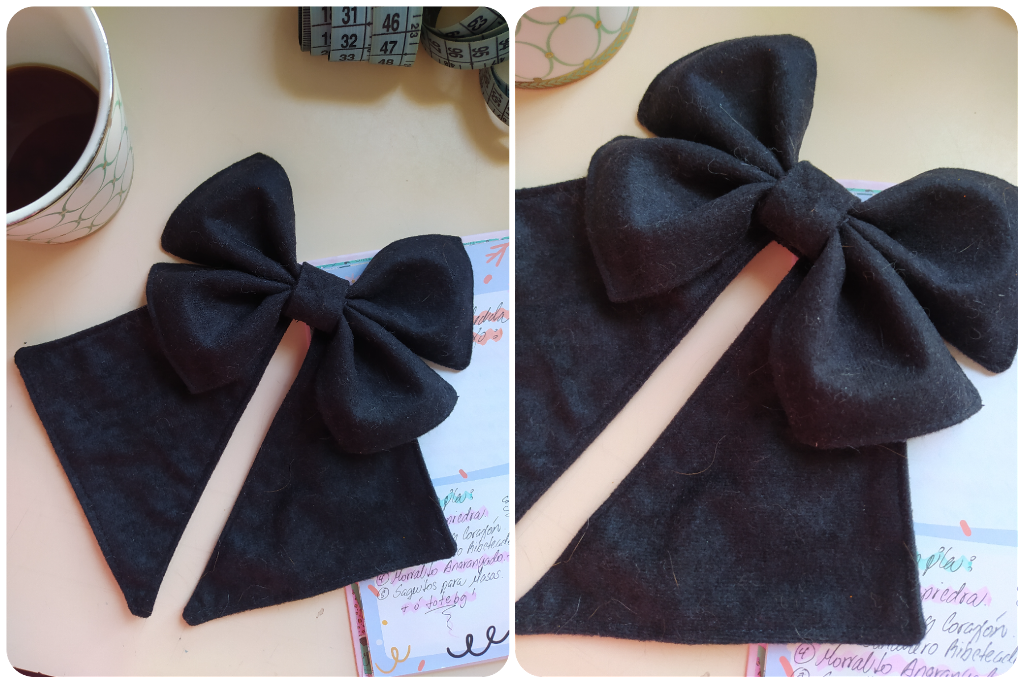
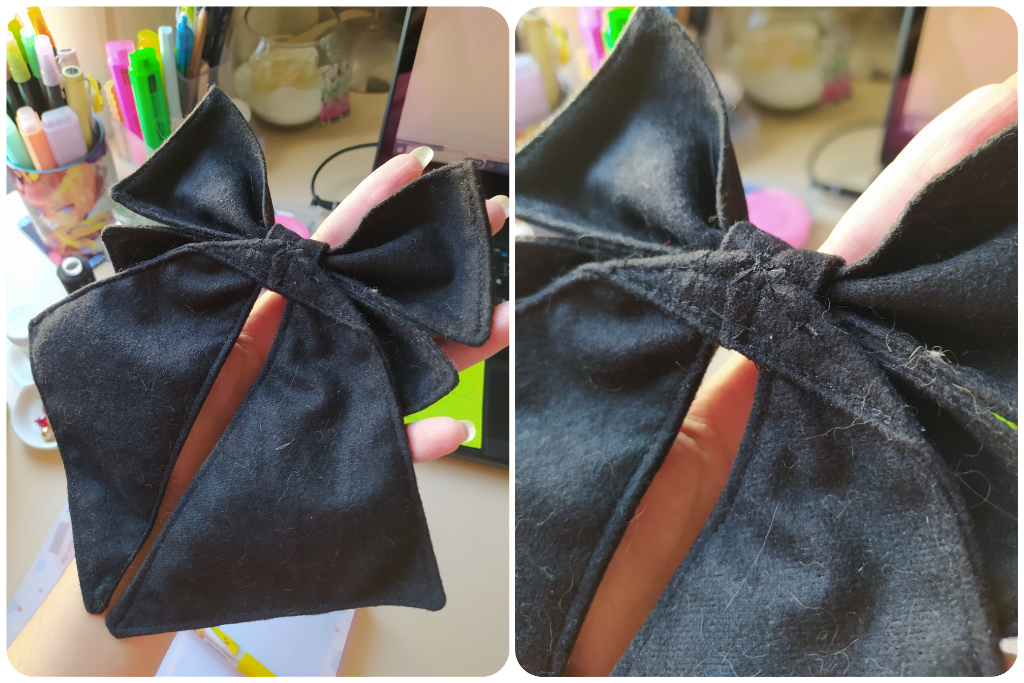
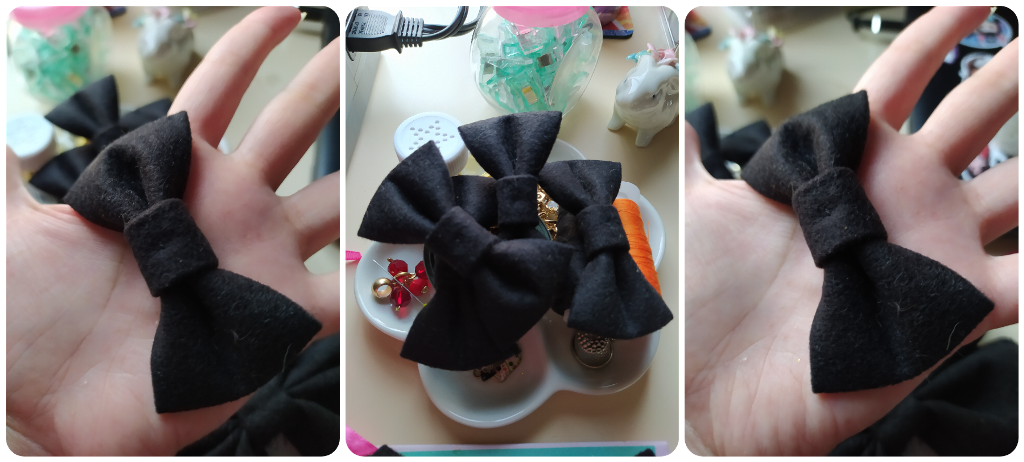
| 🇪🇸 ~ Las medidas de los lazos son: Para los pequeños, un rectángulo de 8 x 14 cm. Para el lazo del centro, 2 piezas de 13 x 15 cm, y 4 triángulos de 16, 12 y 14 cm. |
|---|
| 🇺🇸 ~ The sizes of the bows are: For the small ones, a rectangle of 8 x 14 cm. For the center loop, 2 pieces of 13 x 15 cm, and 4 triangles of 16, 12 and 14 cm. |
Para elaborar los lazos que se aprecian en las fotos guía, los mas pequeños se doblan hacia dentro 2 veces. Para elaborar el lazo grande, éstas piezas no se doblan, se cosen una sobre otra y se voltean como su fuera "una mini funda de almohada".
To make the bows shown in the guide photos, the smaller ones are folded inward twice. To make the large bow, these pieces are not folded, they are sewn one on top of the other and flipped over as if it were a "mini pillowcase".
• 𝕊𝕋𝔼ℙ 𝔹𝕐 𝕊𝕋𝔼ℙ 𝕋𝕌𝕋𝕆ℝ𝕀𝔸𝕃 •
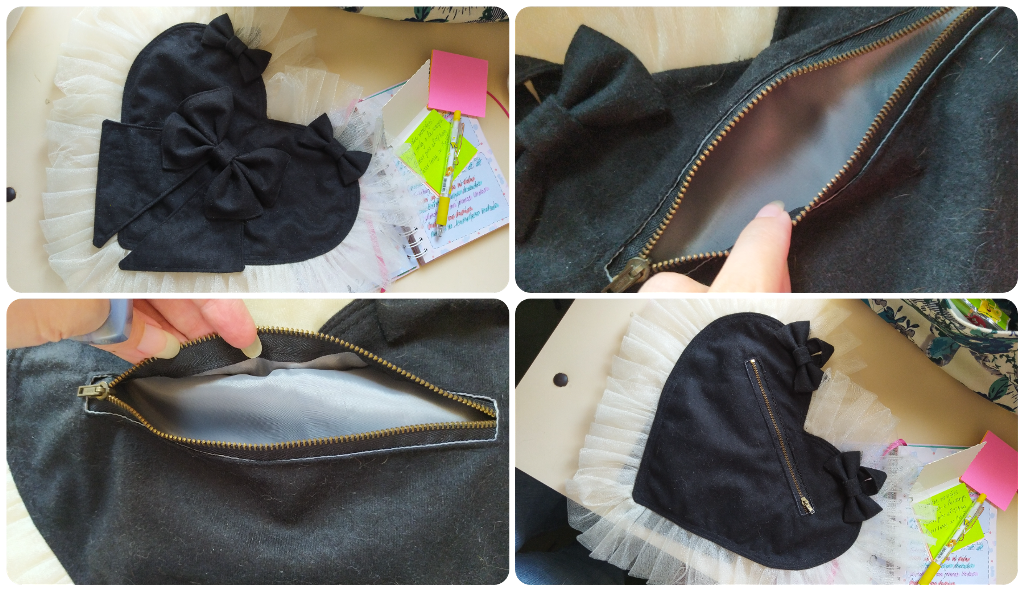
« Crossed Heart Bag with Bows (PART 3) »
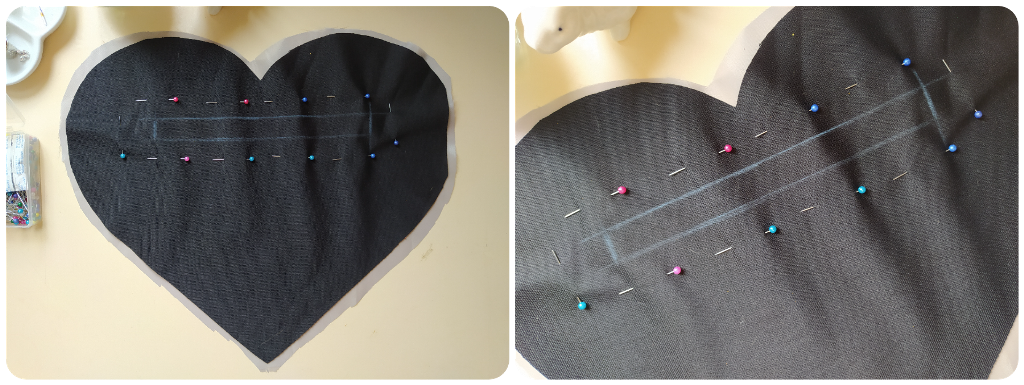
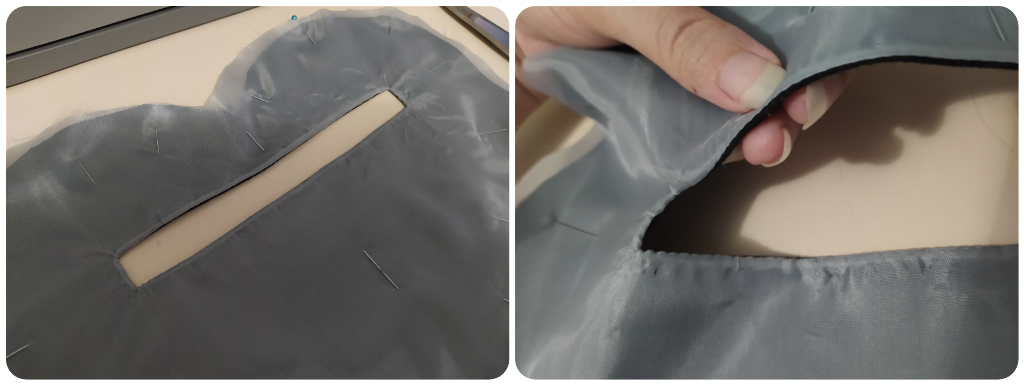
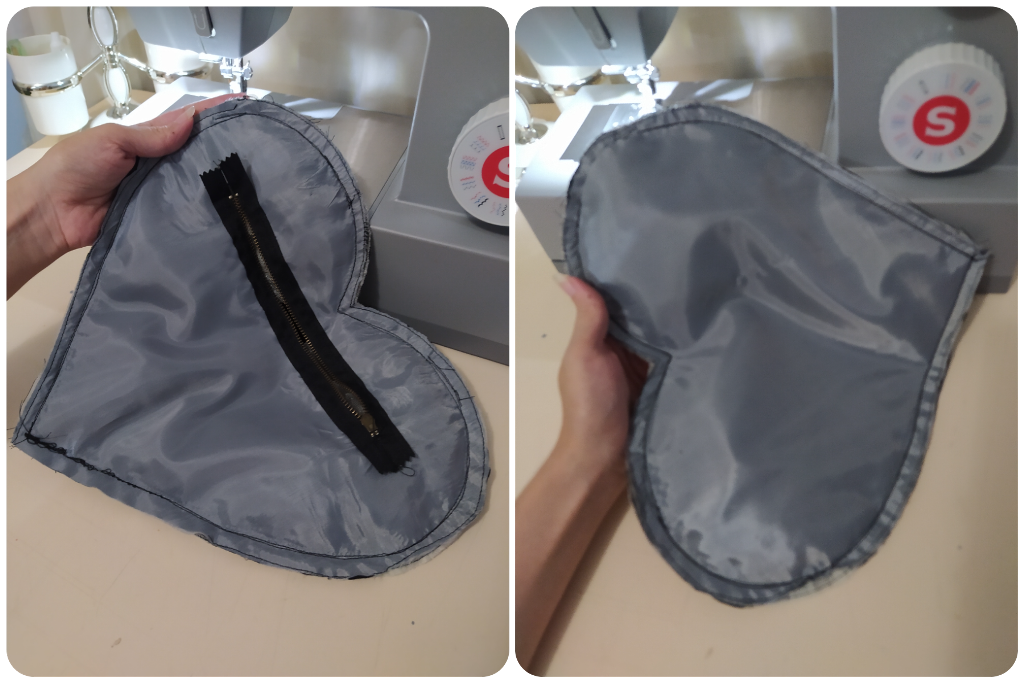
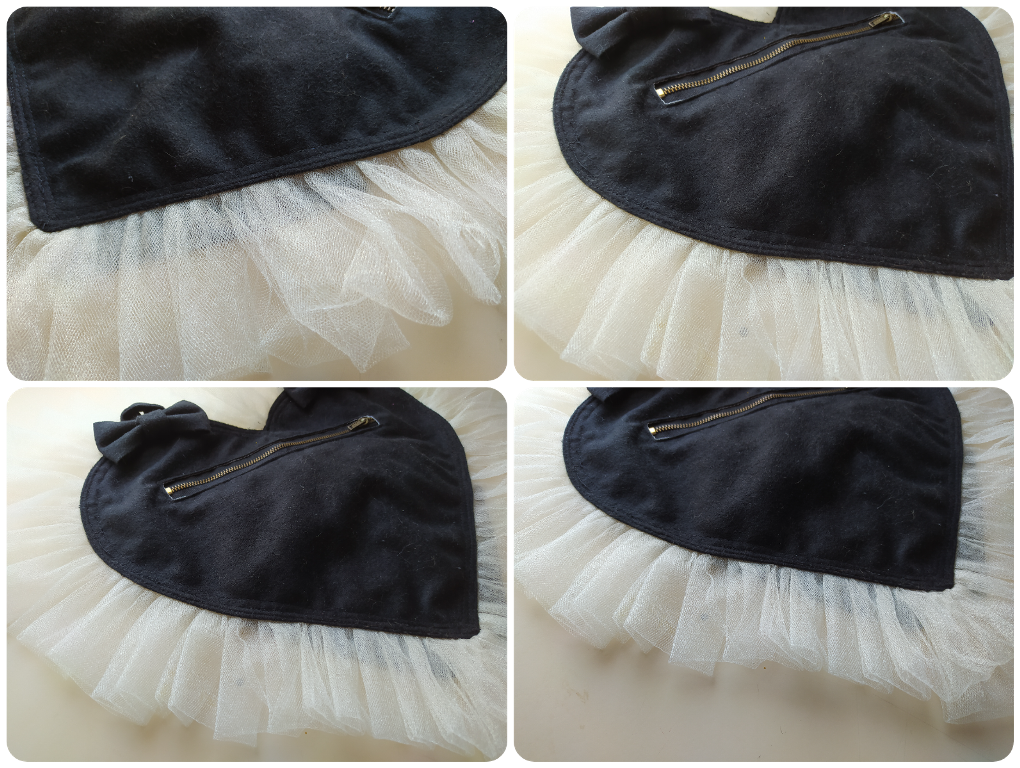
✦ The locking window measures 1.5 cm wide x 18 cm long ✦
🖤 PASO 4 ✦ Para instalar el cierre, coloca una pieza de tela de tapiceria y de forro tafeta una sobre otra, con la parte que debe quedar al exterior hacia abajo. Asegura ambas piezas con los alfileres.
⚫ STEP 4 ✦ To install the zipper, place a piece of upholstery fabric and taffeta lining on top of each other, with the side that should be on the outside facing down. Secure both pieces with the pins.
✦ An alternative for marking dark colored fabric, if you do not have white creyon, you can use a piece of fine soap or chalk ✦
🖤 PASO 5 ✦ A continuación coseras con la máquina de coser (o a mano) por toda la línea que has dibujado. Cuando termines, recortaras el interior de ese largo rectángulo lo más cerca del borde posible pero con mucho cuidado de no cortar el hilo, y pasarás la tela del forro hacia el otro lado, y sujetaras con alfileres.
⚫ STEP 5 ✦ Next you will sew with the sewing machine (or by hand) all along the line you have drawn. When you're done, you'll trim the inside of that long rectangle as close to the edge as possible but being very careful not to cut the thread, and you'll pass the lining fabric to the other side, and pin.
✦ I find this to be the simplest and best way to install a zipper on this type of bag ✦
🖤 PASO 6 ✦ Una vez volteada la pieza, debes plancharla a temperatura media-alta para que los bordes de la ventana queden limpios y definidos.
⚫ STEP 6 ✦ Once the piece is turned over, you should iron it at medium-high temperature so that the edges of the window are clean and defined.
✦ It looks complicated but it's not, it's actually entertaining I promise! ✦
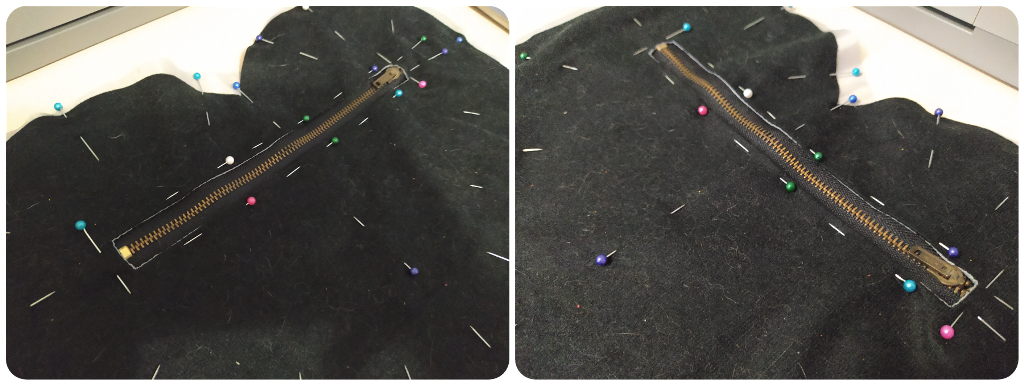
🖤 PASO 7 ✦ Para finalizar la instalación del cierre, lo colocaras en la cara interna mirando hacia afuera, y coseras con una puntada muy pequeña por todo el borde de la ventana.
⚫ STEP 7 ✦ To finish the installation of the zipper, you will place it on the inside facing out, and sew with a very small stitch all the way around the edge of the window.
• 𝕊𝕋𝔼ℙ 𝔹𝕐 𝕊𝕋𝔼ℙ 𝕋𝕌𝕋𝕆ℝ𝕀𝔸𝕃 •
« Crossed Heart Bag with Bows (PART 4) »
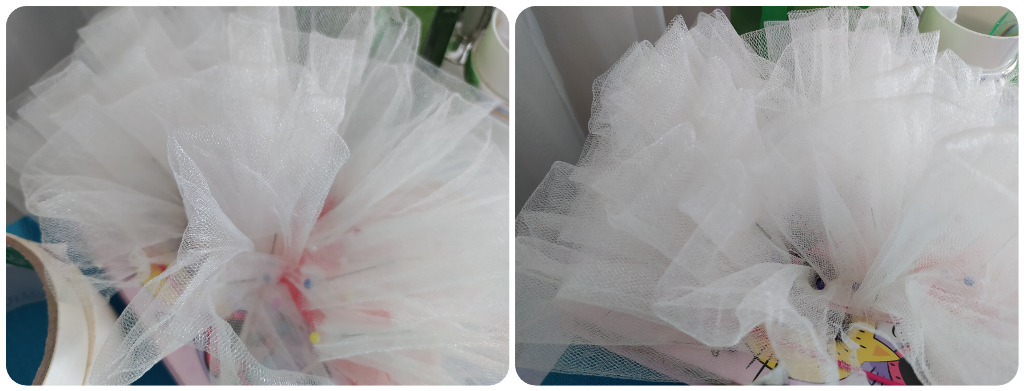
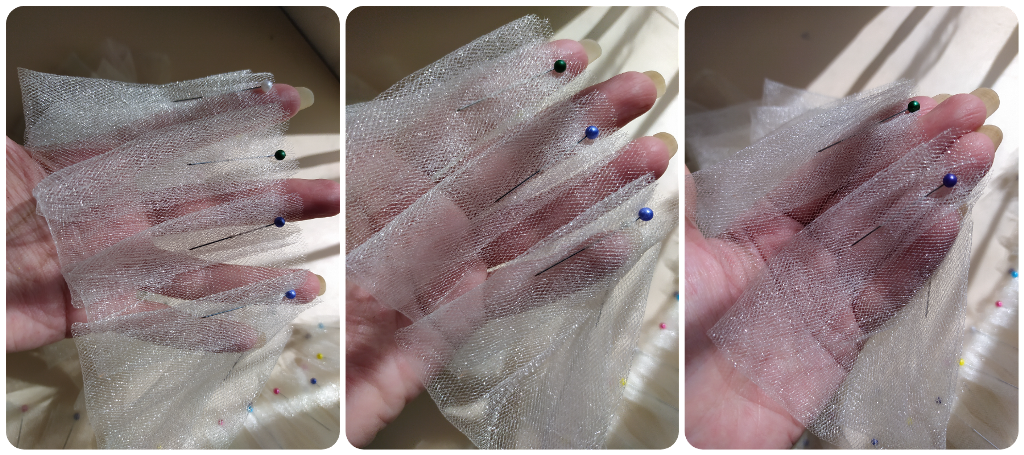
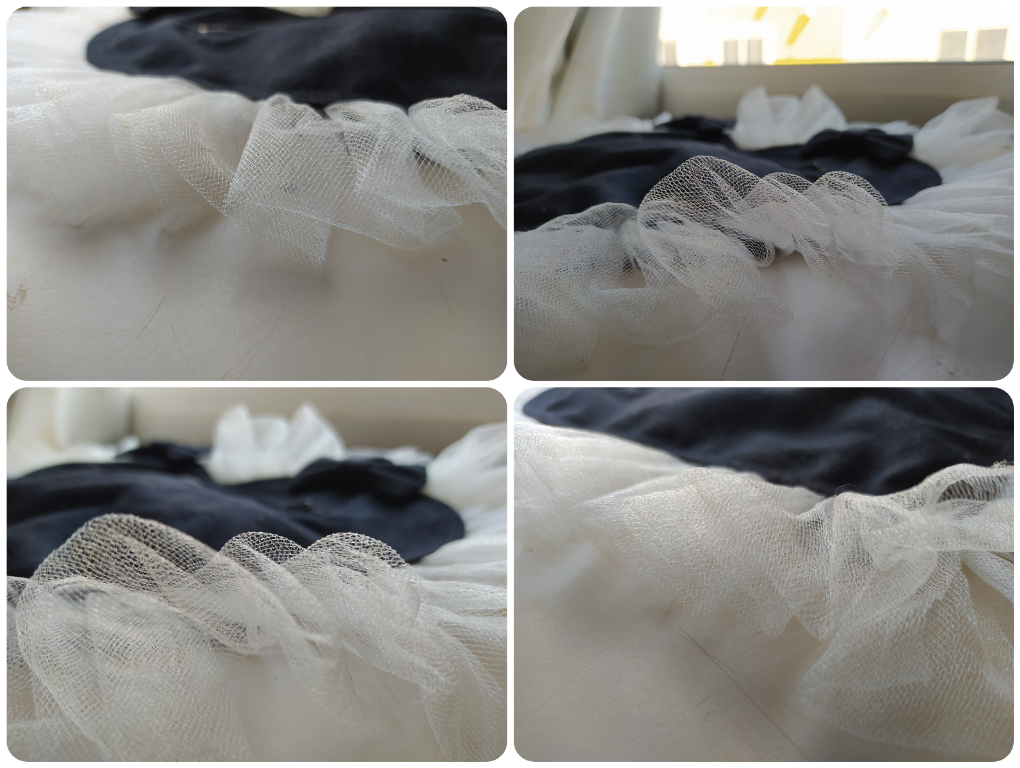
✦ The width of this piece of tulle is 8 cm, the length depends on how many pleats you want. I recommend a meter and a half or two meters ✦
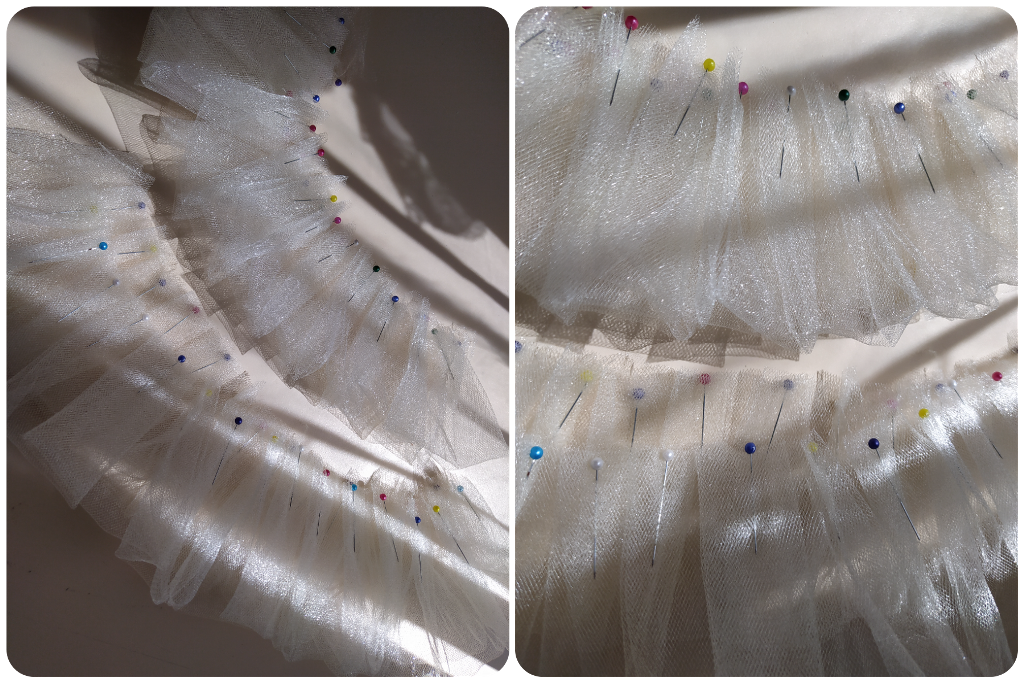
✦ You can make the stitching with a ruler, with specific measurements, by eye or freehand. Whatever method you use is fine! ✦
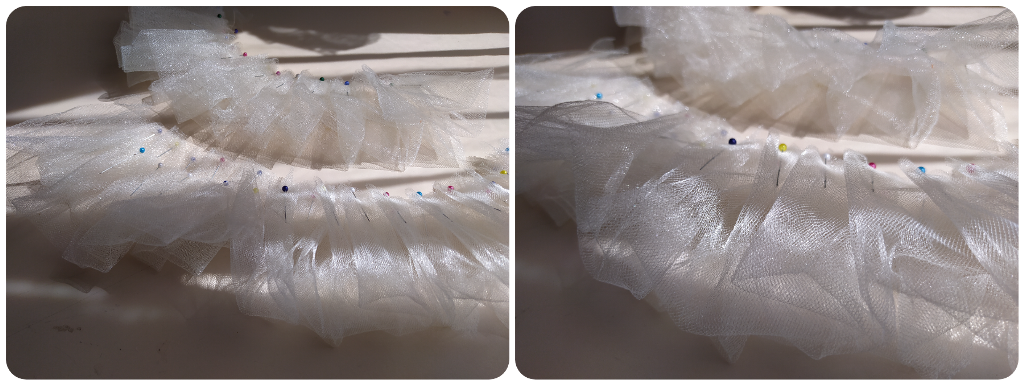
✦ For this piece, use a strip of approximately 2 meters by 16 cm wide, fold it in half and pin it in a disorderly way ✦
✦ In these photos you can better appreciate the sequence that I use ✦
✦ Remove the pins before reaching the foot of the sewing machine ✦
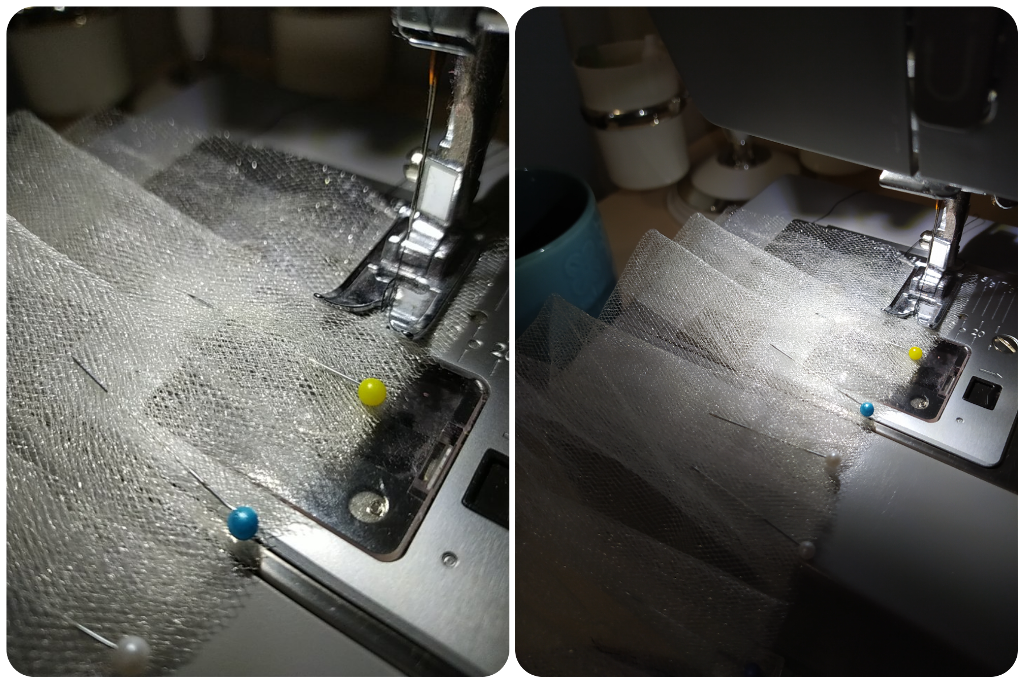
🖤 PASO 8 ✦ Después de preparar el tul para el borde, vamos a coser primero una puntada de seguridad de 1 cm de distancia del margen.
⚫ STEP 8 ✦ After preparing the tulle for the border, we will first sew a safety stitch 1 cm away from the margin.
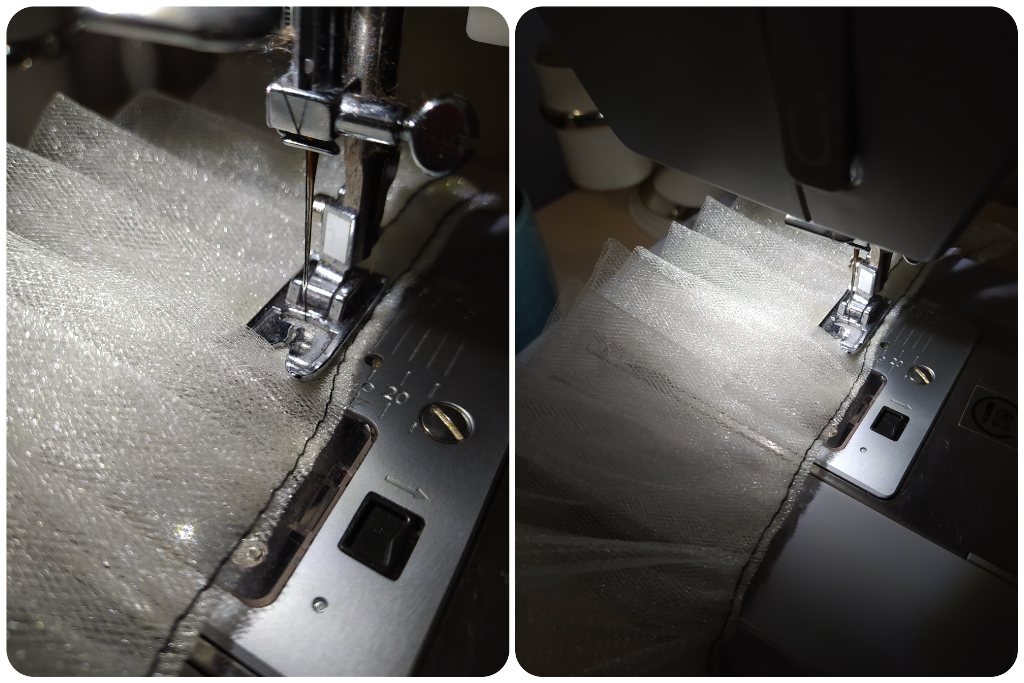
✦ This step ensures that this ruffle strip does not lose its shape while being installed on the bag ✦
🖤 PASO 9 ✦ Recortaras el exceso desigual de tela, y coseras por segunda vez otra puntada de seguridad a medio centímetro de la primera costura que hiciste.
⚫ STEP 9 ✦ You will trim off the uneven excess fabric, and sew a second time another safety stitch half a centimeter from the first seam you made.
• 𝕊𝕋𝔼ℙ 𝔹𝕐 𝕊𝕋𝔼ℙ 𝕋𝕌𝕋𝕆ℝ𝕀𝔸𝕃 •
« Crossed Heart Bag with Bows (PART 5) »
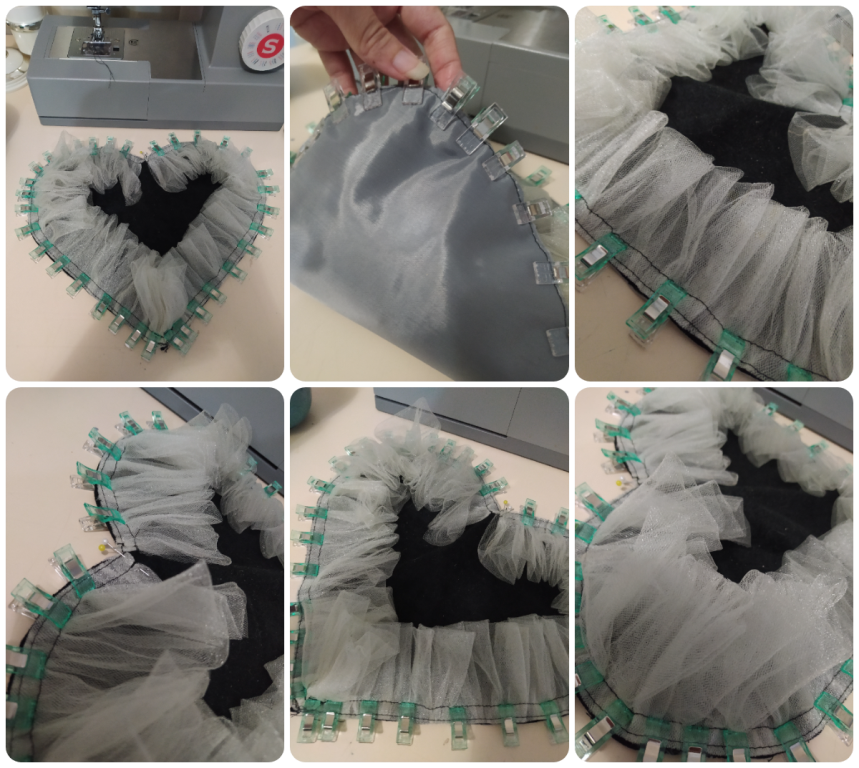
✦ This is a very nice sequence, isn't it? ✦
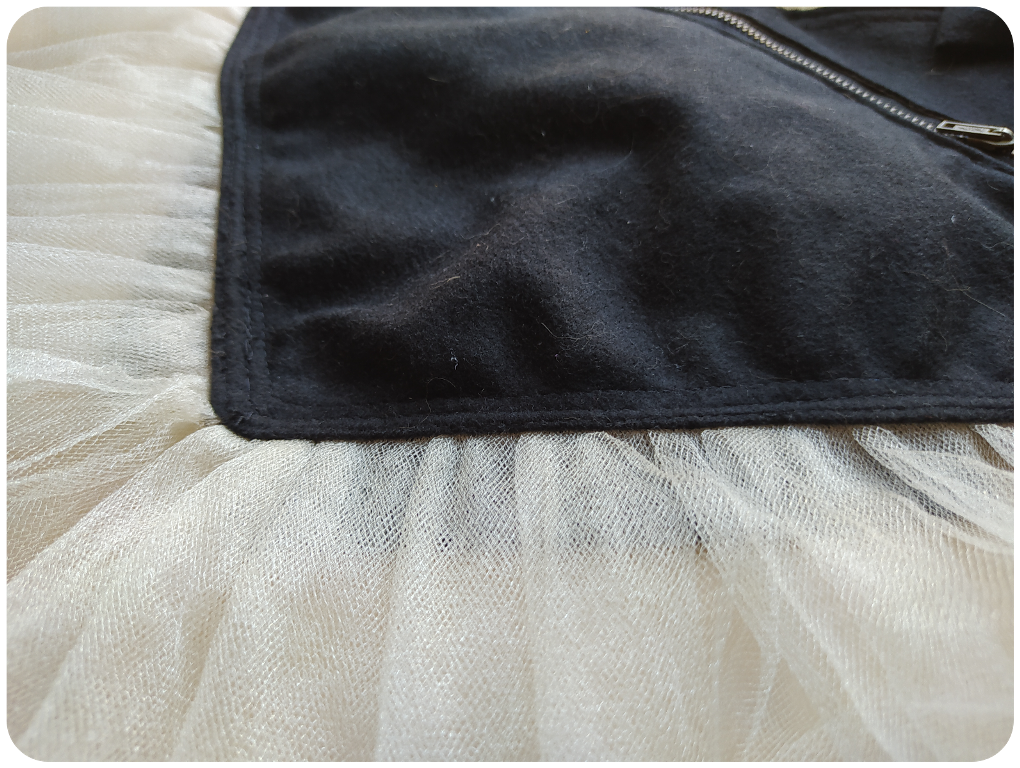
🖤 PASO 10 ✦ Para instalar el borde decorado que hemos preparado vamos a ubicarlo con las pinzas para tela tal cual se aprecia en las imágenes. La pieza de corazon que se ve es la parte frontal del bolso.
⚫ STEP 10 ✦ To install the decorated border we have prepared, we are going to place it with the fabric clamps as shown in the pictures. The heart piece you see is the front of the bag.
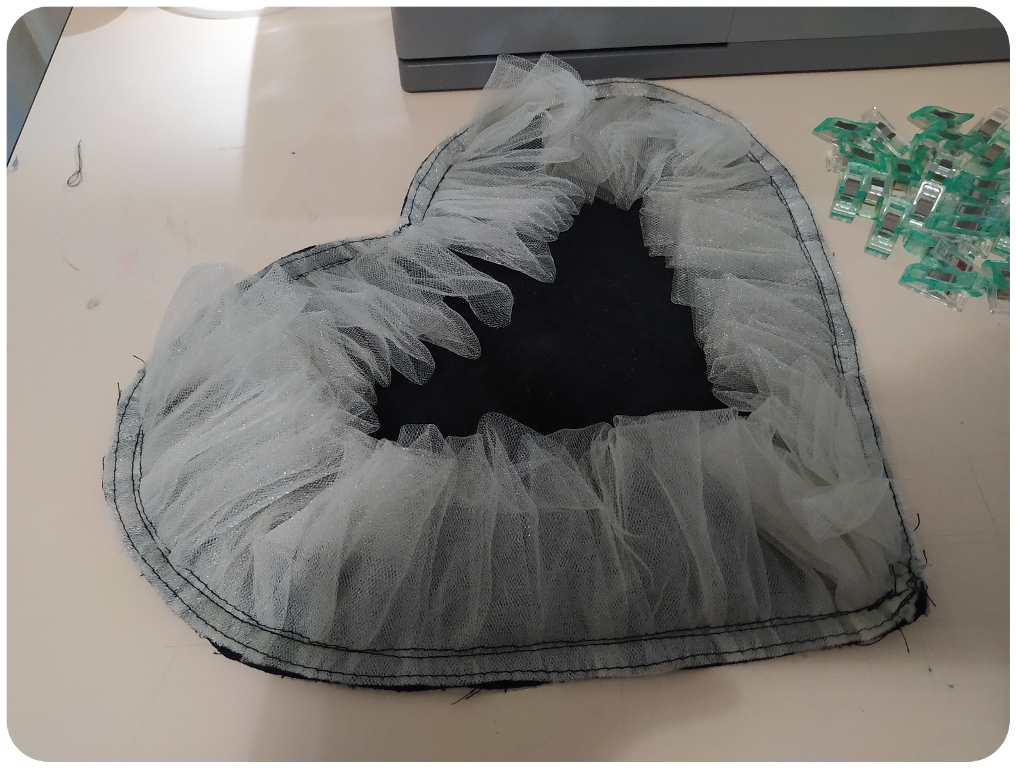
✦ We take to the sewing machine or by hand, and sew twice around the edge at 1cm from the margin ✦
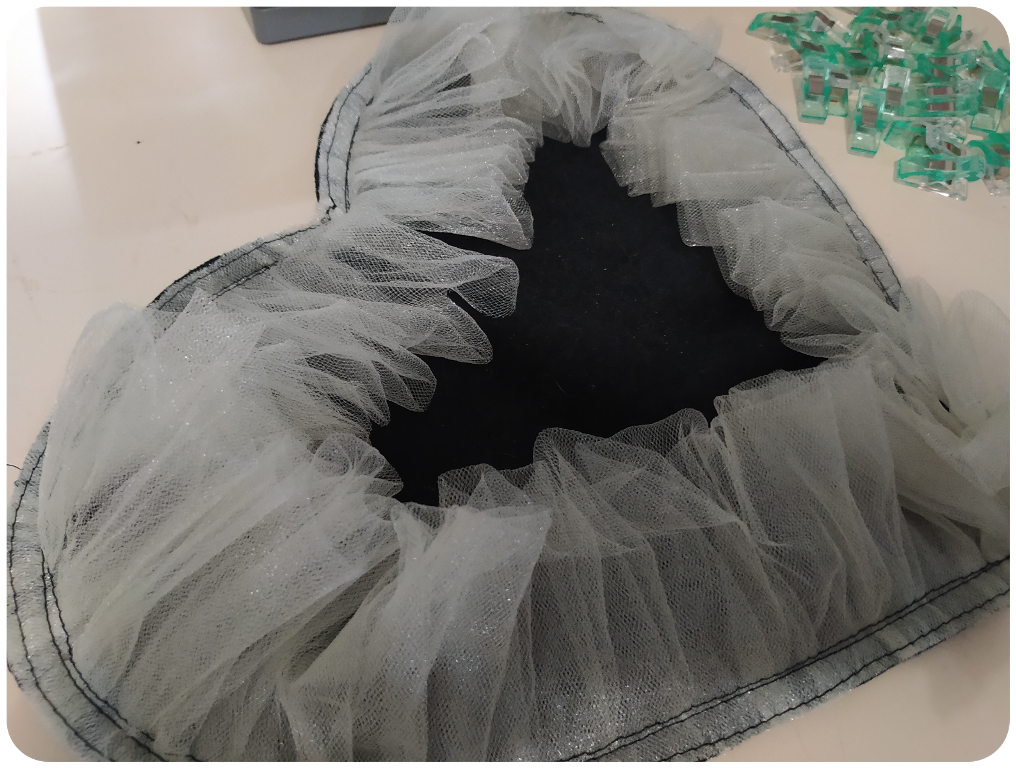
✦ With the help of the scissors, trim all irregularities, threads, and excess fabric from the edge ✦
✦ Don't worry about the edge decoration, during this final step it won't get damaged thanks to all the initial safety stitches you made ✦
🖤 PASO 11 ✦ Vas a colocar la parte posterior del bolso como "tapa" sobre la cara inferior a la que cosimos el tul, coseremos con puntada pequeña y ajustada, volveremos a limpiar el exceso de tela e hilos sobrantes. y le daremos al vuelta.
⚫ STEP 11 ✦ You are going to place the back of the bag as a "cover" over the bottom side to which we sewed the tulle, we will sew with small and tight stitch, we will clean again the excess fabric and excess threads. and we will turn it over.
• 𝕊𝕋𝔼ℙ 𝔹𝕐 𝕊𝕋𝔼ℙ 𝕋𝕌𝕋𝕆ℝ𝕀𝔸𝕃 •
« Crossed Heart Bag with Bows (PART 6) »
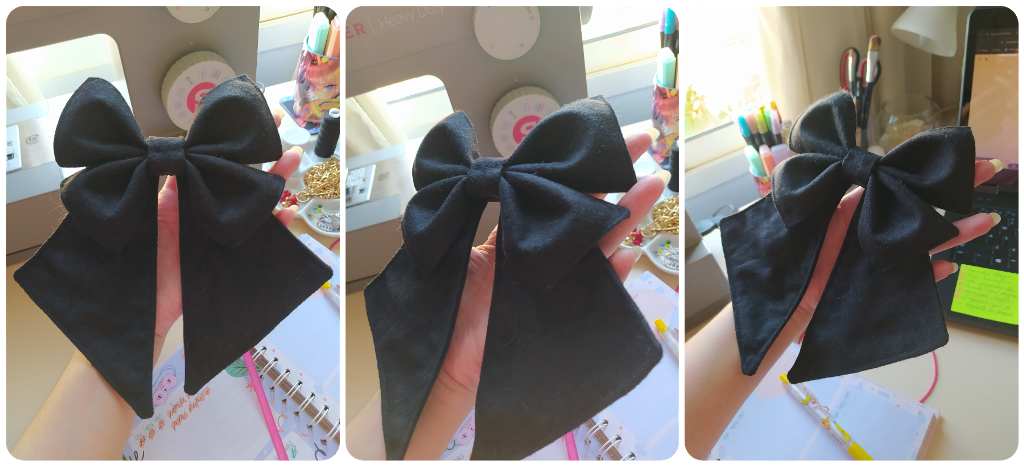
✦ The fabrication of this loop is quite intuitive! ✦
✦ Should I make a tutorial specifically for this design? Please tell me in the comments! ✦
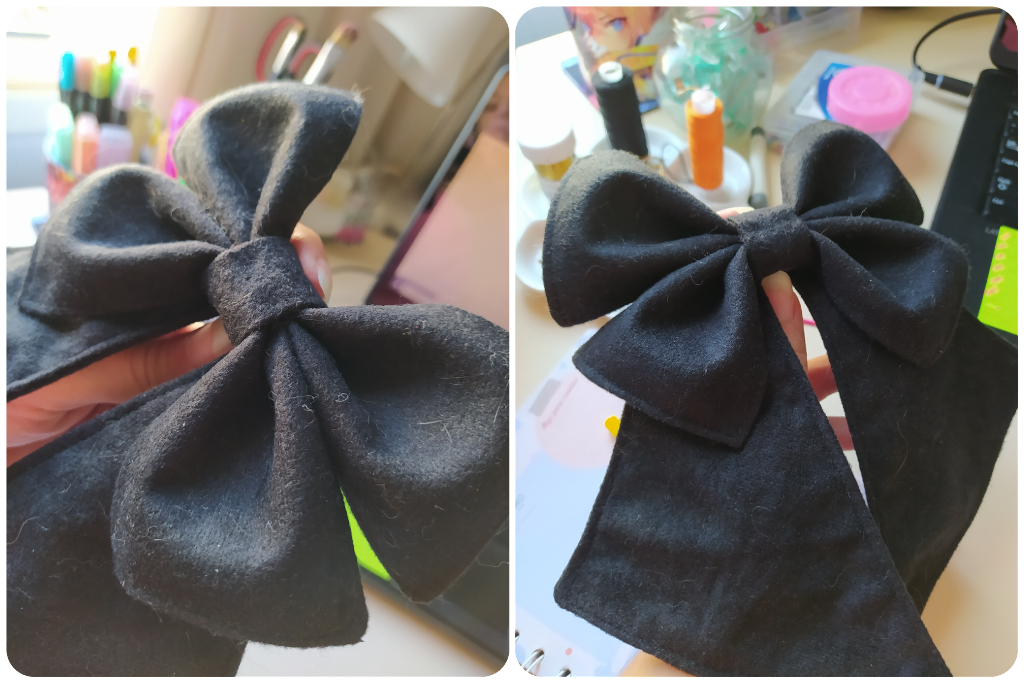
✦ I am very proud of this ribbon, it is one of my favorite designs ✦
✦ I was tempted to install a brooch on the back and wear it on a shirt hahaha ~ ✦
✦ These here are very nice! I really like making them, they work for both large and small projects ✦

✦ The loops can be installed at the end next to the bows, or you can put them in place at the junction stage of both sides of the bag, both options are functional although I prefer the second one ✦
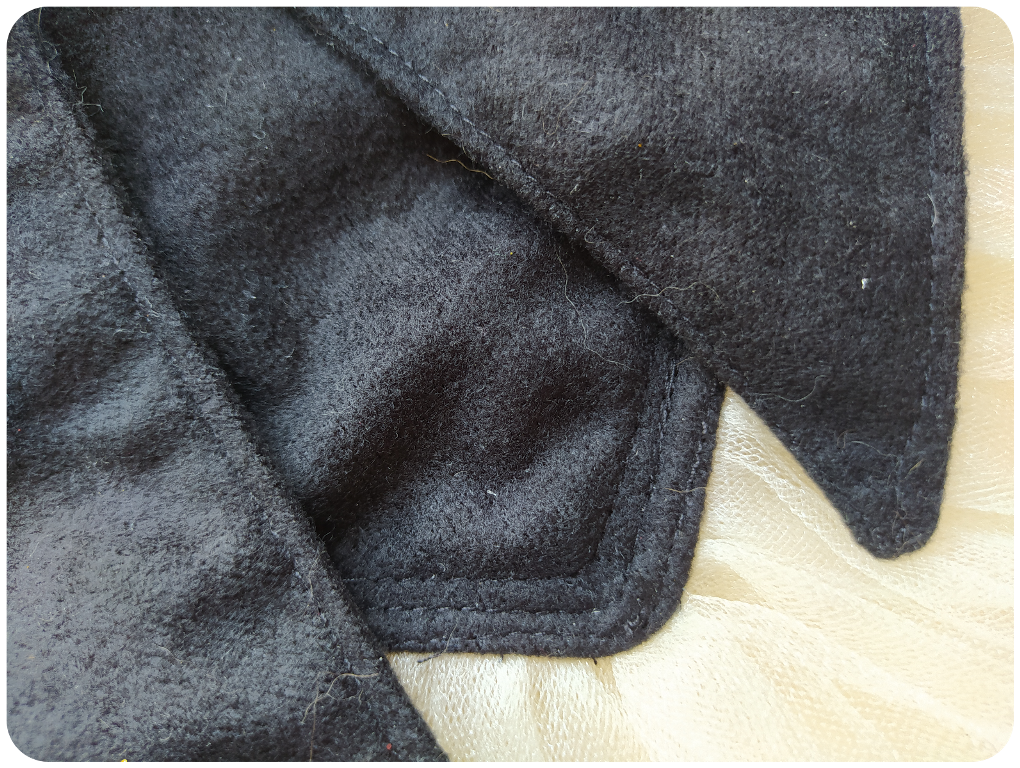
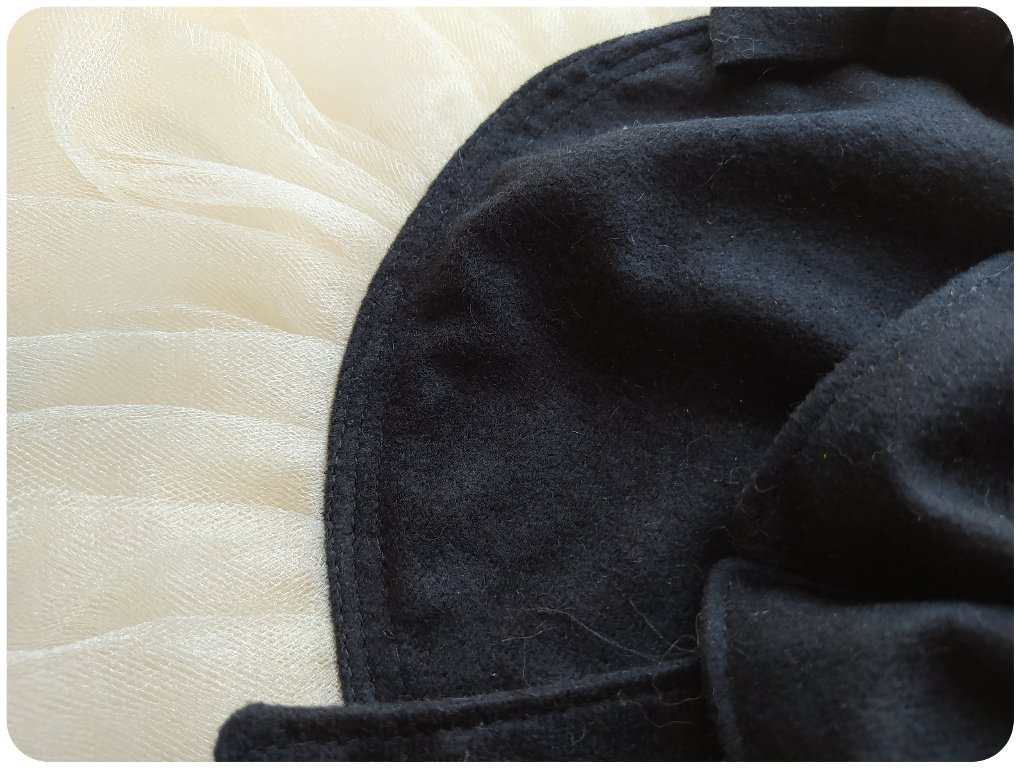
Como paso final, vamos a coser 3 veces con puntada recta por todo el borde exterior del bolso, esto le dará alta resistencia y un acabado realmente bonito (se aprecia mejor en las fotos de la sección de resultados); y como pueden ver, al final agregue unas pequeñas azas y abrase en la base de cada una un par de lacitos. ¡Y eso es todo! 💯 ✨
As a final step, we are going to sew 3 times with straight stitch all around the outer edge of the bag, this will give it high resistance and a really nice finish (it is better appreciated in the photos in the results section); and as you can see, at the end add some small loops and fasten at the base of each one a couple of bows. And that's it!!! 💯 ✨
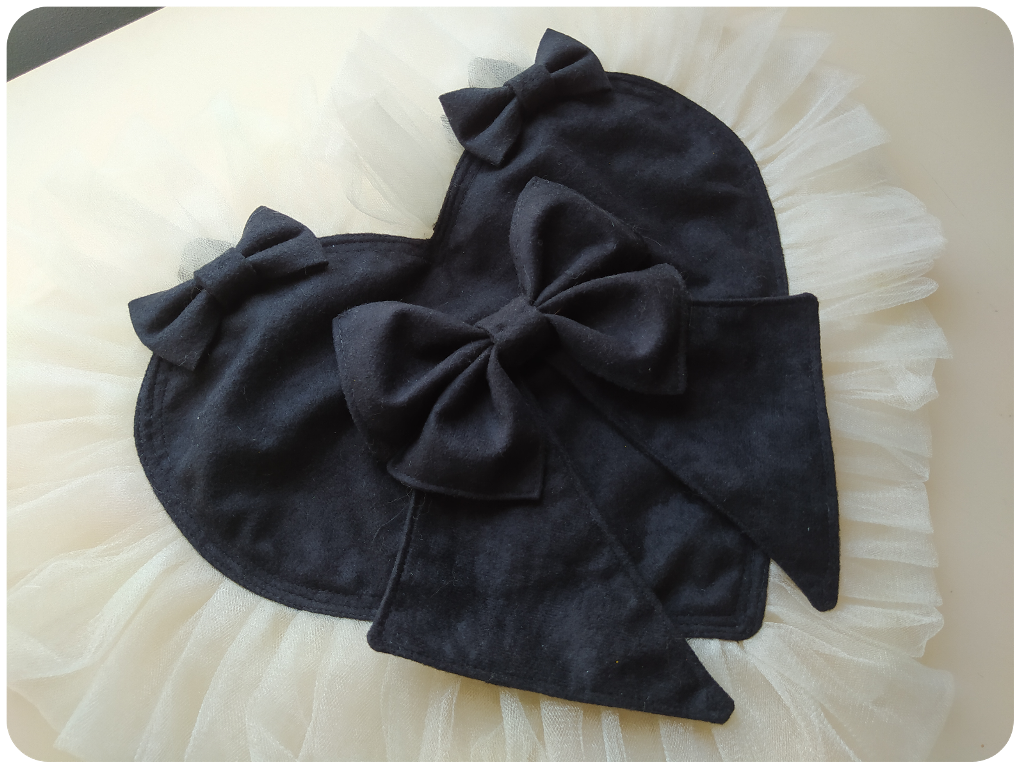
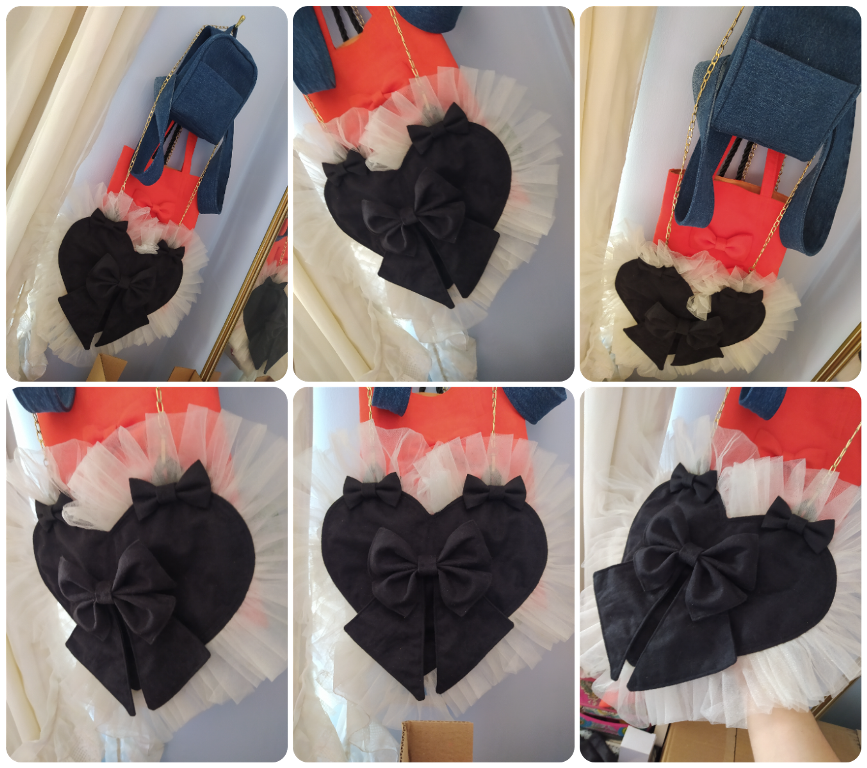
« F I N A L ✦ R E S U L T »
✦ Unedited photos with natural light ✦


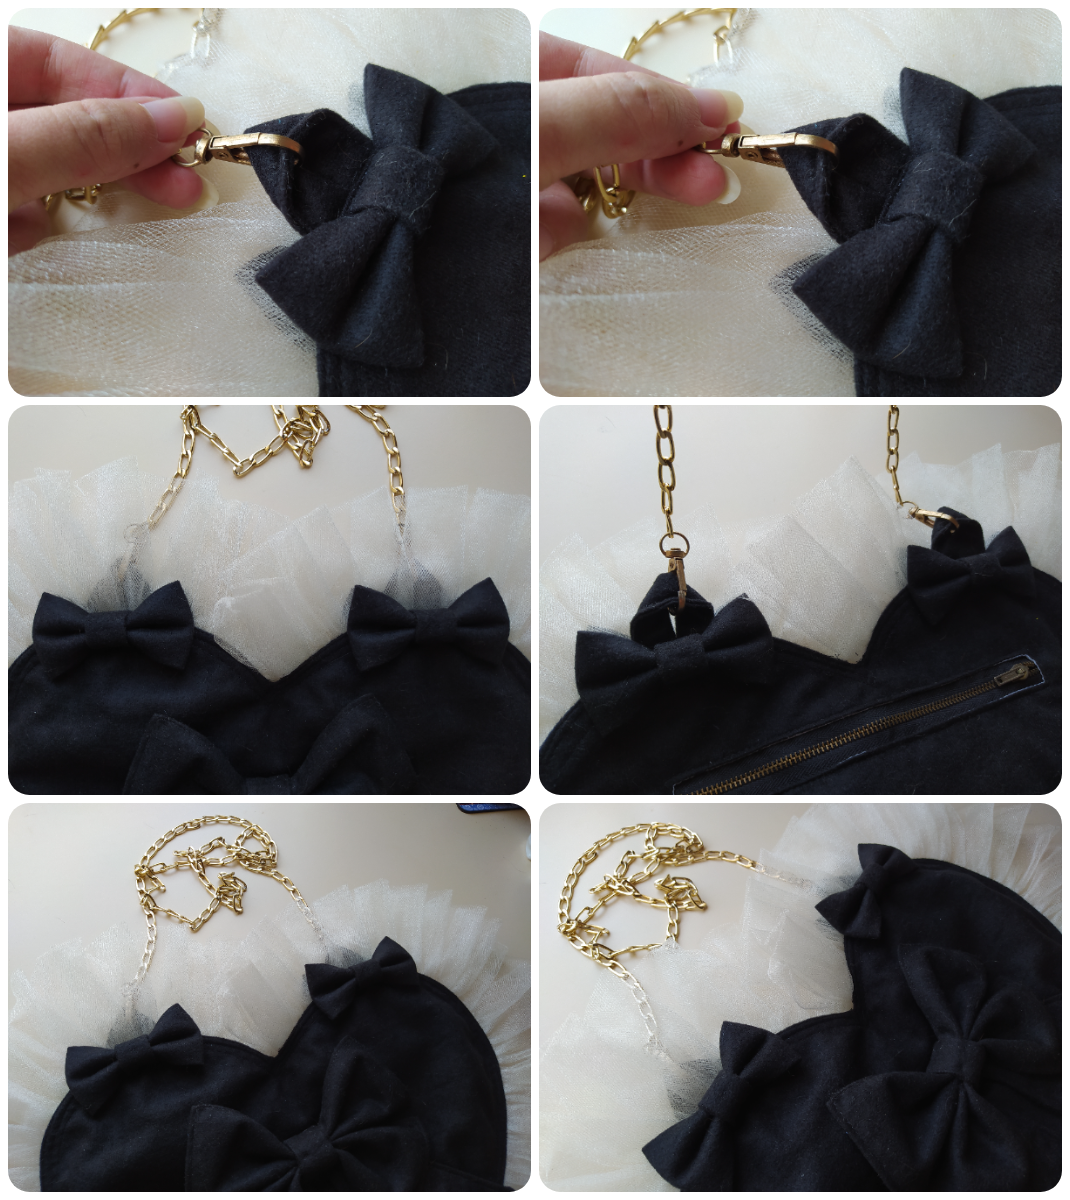
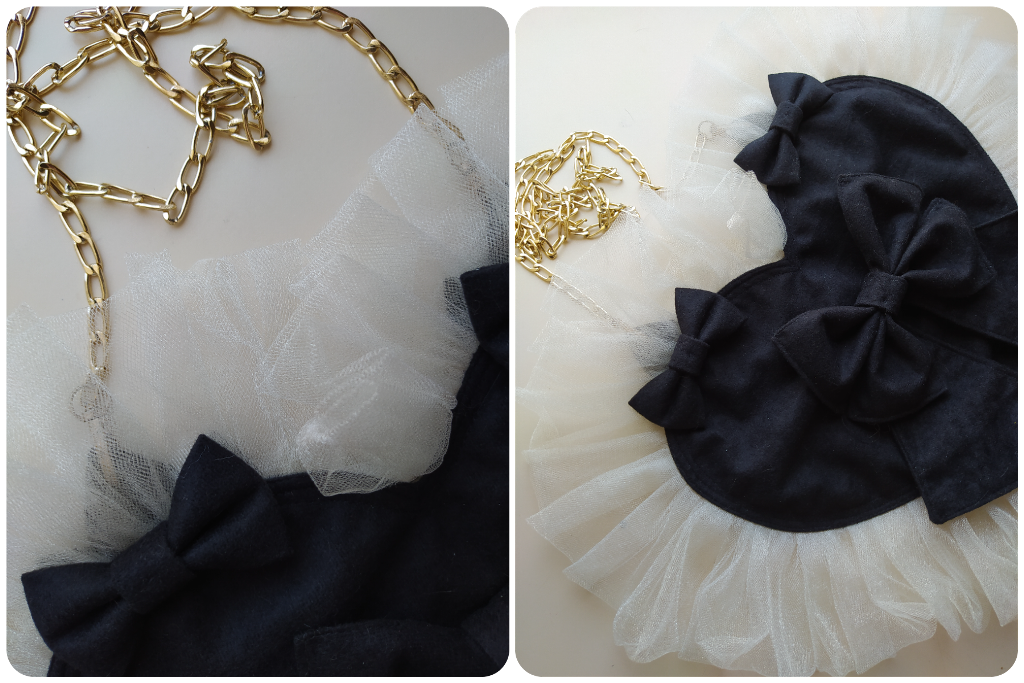
✦ In my case I recycled the chain that I had saved from a bag that had expired, but you can buy this type of metal or plastic chain in haberdasheries. If you don't like chains, you can make a strap with the same type of upholstery fabric of the bag, or buy by the meter a small narrow strap ✦
INSTRUCIONES DE LAVADO: (retira la cadenilla primero) Para que este bolso no se maltrate y los lazos no pierdan la forma, las indicaciones son introducirlo en una funda para almohada, y meterlo en la lavadora en ciclo suave con agua fría, de menos 5 minutos el ciclo de lavado y enjuague, y no centrifugar. Exprimir suavemente (no estrujar) y dejar secar bajo sombra 🧼 ✅
WASHING INSTRUCTIONS: (remove the chain first) To keep this bag from getting damaged and the bows from losing their shape, the instructions are to put it in a pillow case, and put it in the washing machine on gentle cycle with cold water, minus 5 minutes wash and rinse cycle, and do not spin. Squeeze gently (do not wring) and leave to dry in the shade 🧼 ✅
« "Let's recap and share some final recommendations!" »
✦ This bag is the first test I did while experimenting with heart-shaped patterns for my store, and as it turned out to be successful, I transformed the record of this adventure into an exclusive tutorial for Hive DIY, I hope you like it! ✦
"¿Cómo adaptar elementos de distintos diseños en tus proyectos personales de forma respetuosa?" 🤔 ~ A veces por la popularidad de ciertos diseños o tendencias, es muy difícil dar con la fuente original o su creador, aún así, creo es prudente ser respetuoso con la creación de otros, especialmente si los elementos que fabricaras no son para uso personal sino con propósitos comerciales.
"How to adapt elements from different designs in your personal projects in a respectful way?" 🤔 ~ Sometimes due to the popularity of certain designs or trends, it is very difficult to find the original source or its creator, even so, I think it is wise to be respectful with the creation of others, especially if the elements you will make are not for personal use but for commercial purposes.
🎀 Recomendación: Una opción educada y gentil es reunir distintas referencias que te inspiren, utilizar una paleta de colores distinta, hacer una selección de telas y materiales diferentes, elaborar patrones con dimensiones propias, ¡tambien utilizar otras técnicas de costura y ensamblaje!, y asi crear algo completamente nuevo pero que contenga ese "algo especial" que tanto te ha gustado.
🎀 Recommendation: A polite and gentle option is to gather different references that inspire you, use a different color palette, make a selection of different fabrics and materials, make patterns with your own dimensions, use other sewing and assembly techniques, and create something completely new but with that "something special" that you liked so much.
✦ I invite you to admire some of the beautiful work that inspired me to make this design! I still think it can be improved but I am very happy with the results so far ~ 1 - 2 - 3 - 4 ✦
Fabricar bolsos consiste en una serie de pasos que en su mayoría tratan de la preparación del material y atención a las medidas, si eres una persona paciente y cuidadosa, el esfuerzo y el cariño será recompensado con resultados solidos, ¡te lo garantizo! 😍 ✌ Espero hayas disfrutado este tutorial y te animes a experimentar, y a crear tus propios diseños 💕
Bag making consists of a series of steps that mostly deal with material preparation and attention to measurements, if you are a patient and careful person, the effort and love will be rewarded with solid results, I guarantee it! 😍 ✌ I hope you have enjoyed this tutorial and are encouraged to experiment, and create your own designs 💕
~ You must login to the site first, then click on the text above ~


✨ 🍓 All texts and images by @Tesmoforia 🍓 ✨
📸 Tools: Xiaomi Redmi Note 8 📲 Snow 🎬 Remini 🌓 FotoJet 📐
🚨 ¡Please do not take, edit or republish my material without my permission! 🚨
💌 ¿Do you wish to contact me? Mino.Cosplay@Gmail.com 💌
🌙 Banner, signature and separators by Keili Lares