feliz y bendecido día tengan todos ustedes, hoy es un día muy especial pues les quiero compartir un hermoso detalle que con mucho cariño realicé para conmemorar un día tan especial como lo es el cumpleaños número 3 de nuestra hermosa comunidad, esta comunidad que nos ha brindado tanto apoyo y enseñanza y que día a día sigue creciendo y brindándole las herramientas necesarias a sus artesanos para seguir aprendiendo y emprendiendo.
Por mi parte quiero felicitar a @equipodelta y a todo su equipo @dayadam @yennysferm71@lauracraft @gaboamc2393 @lionsaturbix por el valioso y hermoso trabajo que realizan día a día y que se puede visualizar en esta hermosa comunidad.
Happy and blessed day to all of you, today is a very special day because I want to share with you a beautiful detail that I lovingly made to commemorate a day as special as the 3rd birthday of our beautiful community, this community that It has given us so much support and teaching and continues to grow day by day and provide the necessary tools to its artisans to continue learning and undertaking.
For my part, I want to congratulate @equipodelta and their entire team @dayadam @yennysferm71@lauracraft @gaboamc2393 @lionsaturbix for the valuable and beautiful work they do every day and that can be seen in this beautiful community.
Tengo mucho que agradecerle a esta comunidad ya que desde mis principios en esta plataforma fue aquí donde inicié y encontré ese apoyo necesario y ese empuje a seguir creando y fortaleciendo mis habilidades.
Antes de compartir el paso a paso, de esta decoración quiero desearle que este nuevo año sea de mucho éxito y que sea muchos años más gracias por todo su apoyo.
I have a lot to thank this community since from my beginnings on this platform it was here where I started and found that necessary support and that drive to continue creating and strengthening my skills.
Before sharing the step by step of this decoration, I want to wish you that this new year is very successful and many more years to come, thank you for all your support.
Les comento que sentía una gran preocupación pues transcurría los días y no tenía materiales para realizar una decoración tan hermosa que pudiese ser digna de esta celebración sin embargo imaginando e imaginando fue buscando materiales que tenía en casa guardados y pensé en reutilizarlo para realizar esta bella creación, todo lo utilizado fue parte de mis recursos guardados, por lo que pueden observar una muy sencilla decoración pero espero sea de su total agrado.
I tell you that I felt great concern because the days went by and I did not have materials to make such a beautiful decoration that could be worthy of this celebration.
However, imagining and imagining, I was looking for materials that I had stored at home and I thought about reusing them to make this beautiful creation. , everything used was part of my saved resources, so you can see a very simple decoration but I hope you like it completely.
- cajita de madera
- papel crepé amarillo.
- cartulina Rosada y blanca
- foami rojo.
- Tijera, pega, marcadores.
- globo
- decoraciones
- wooden box
- yellow crepe paper.
- Pink and white cardboard
- red foam.
- Scissors, glue, markers.
- balloon
- decorations
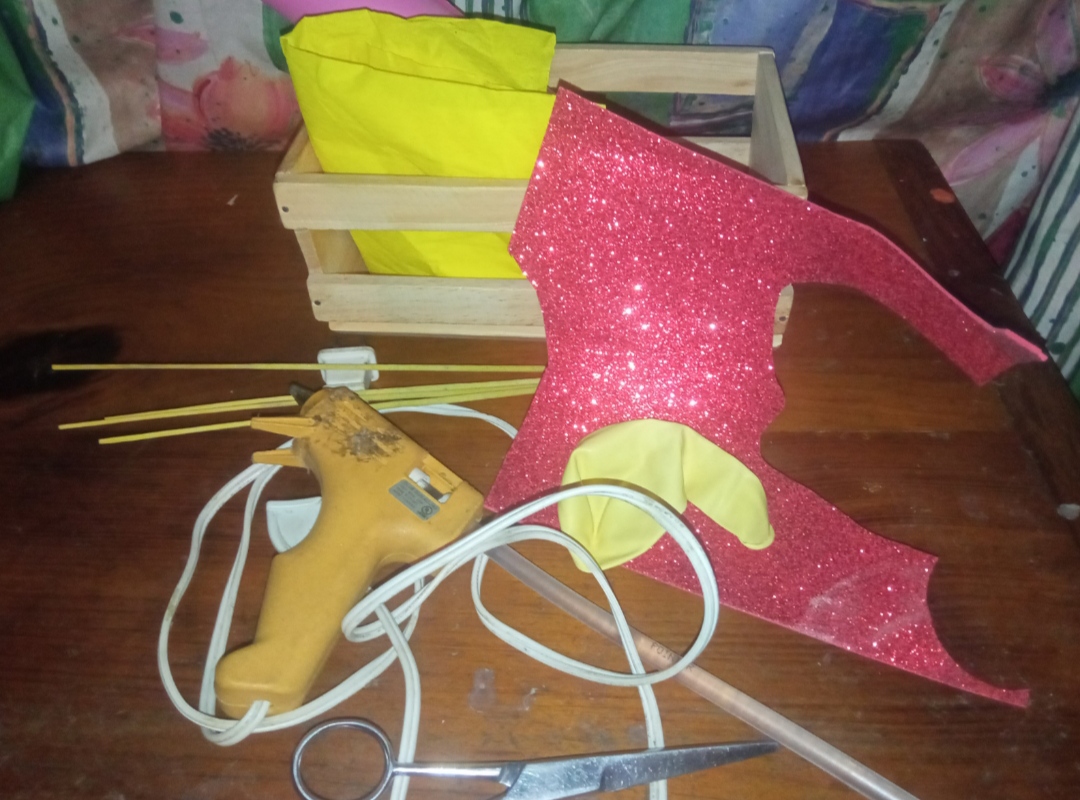
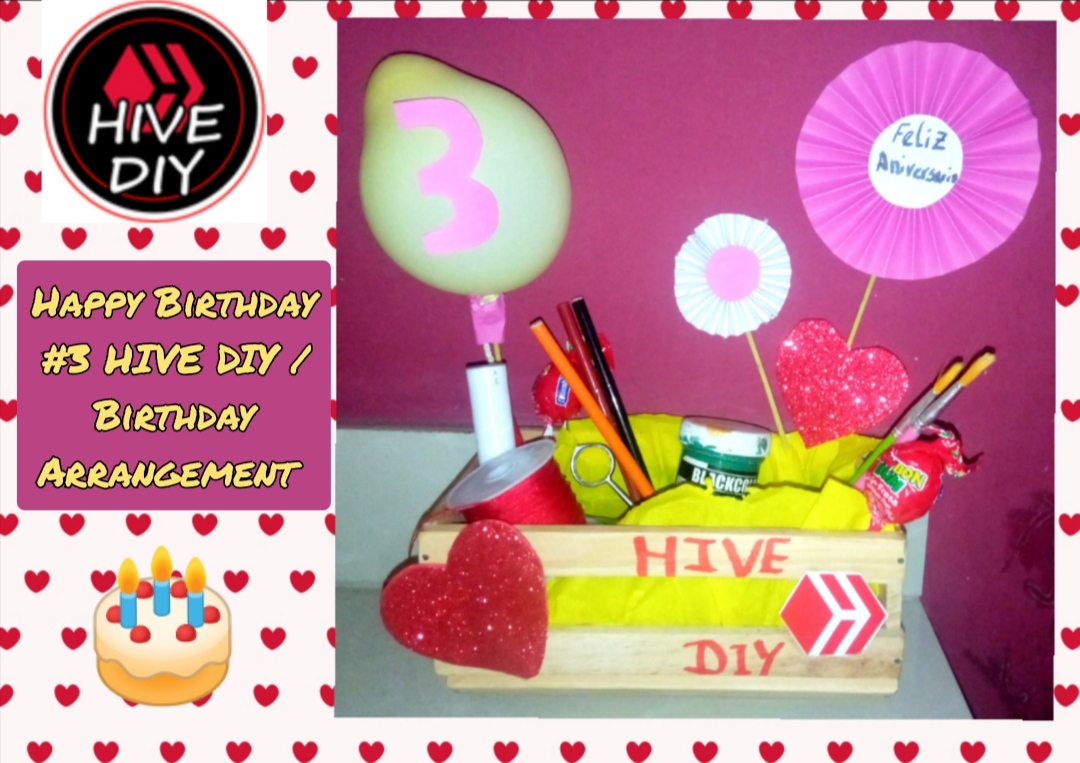
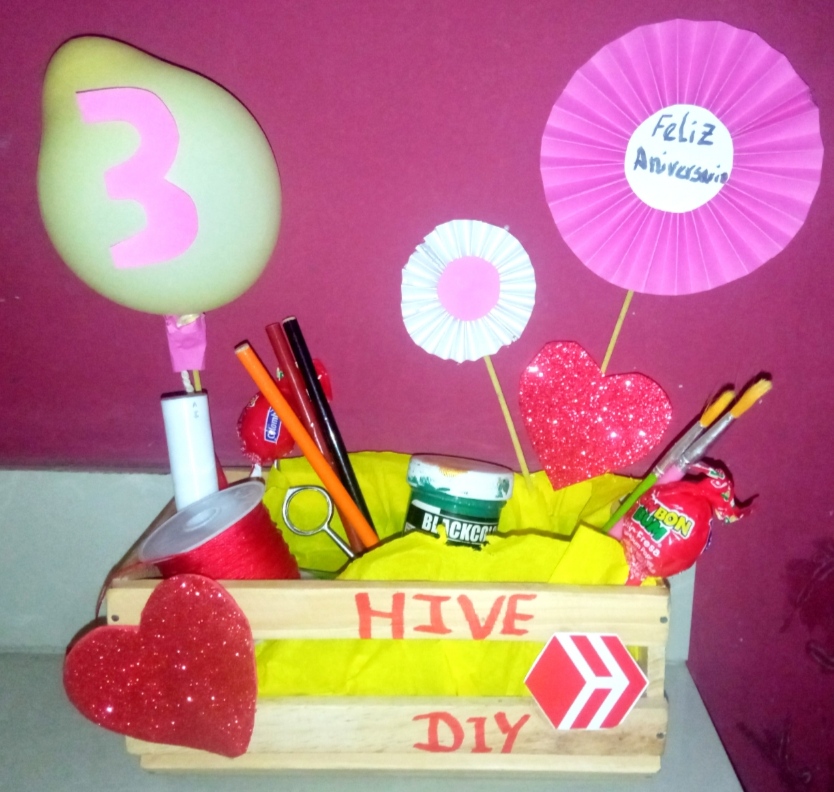
⭐ Paso 1: para esta decoración utilicé una cajita de madera que había elaborado un primo y me había regalado hace un tiempo es muy sencilla como pueden observarla En las siguientes imágenes.
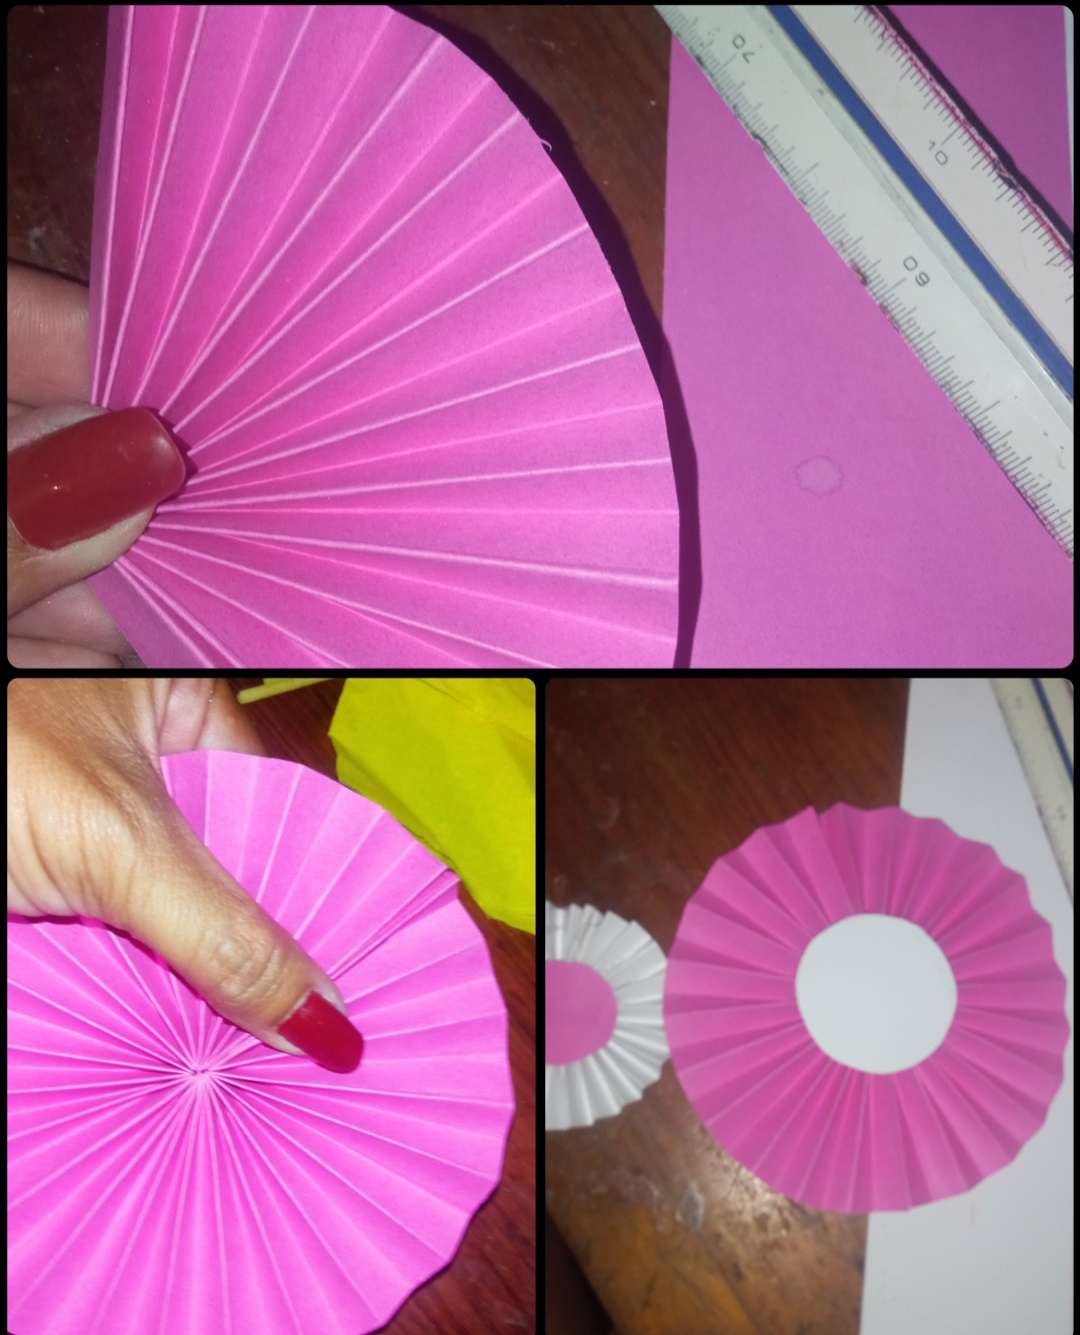
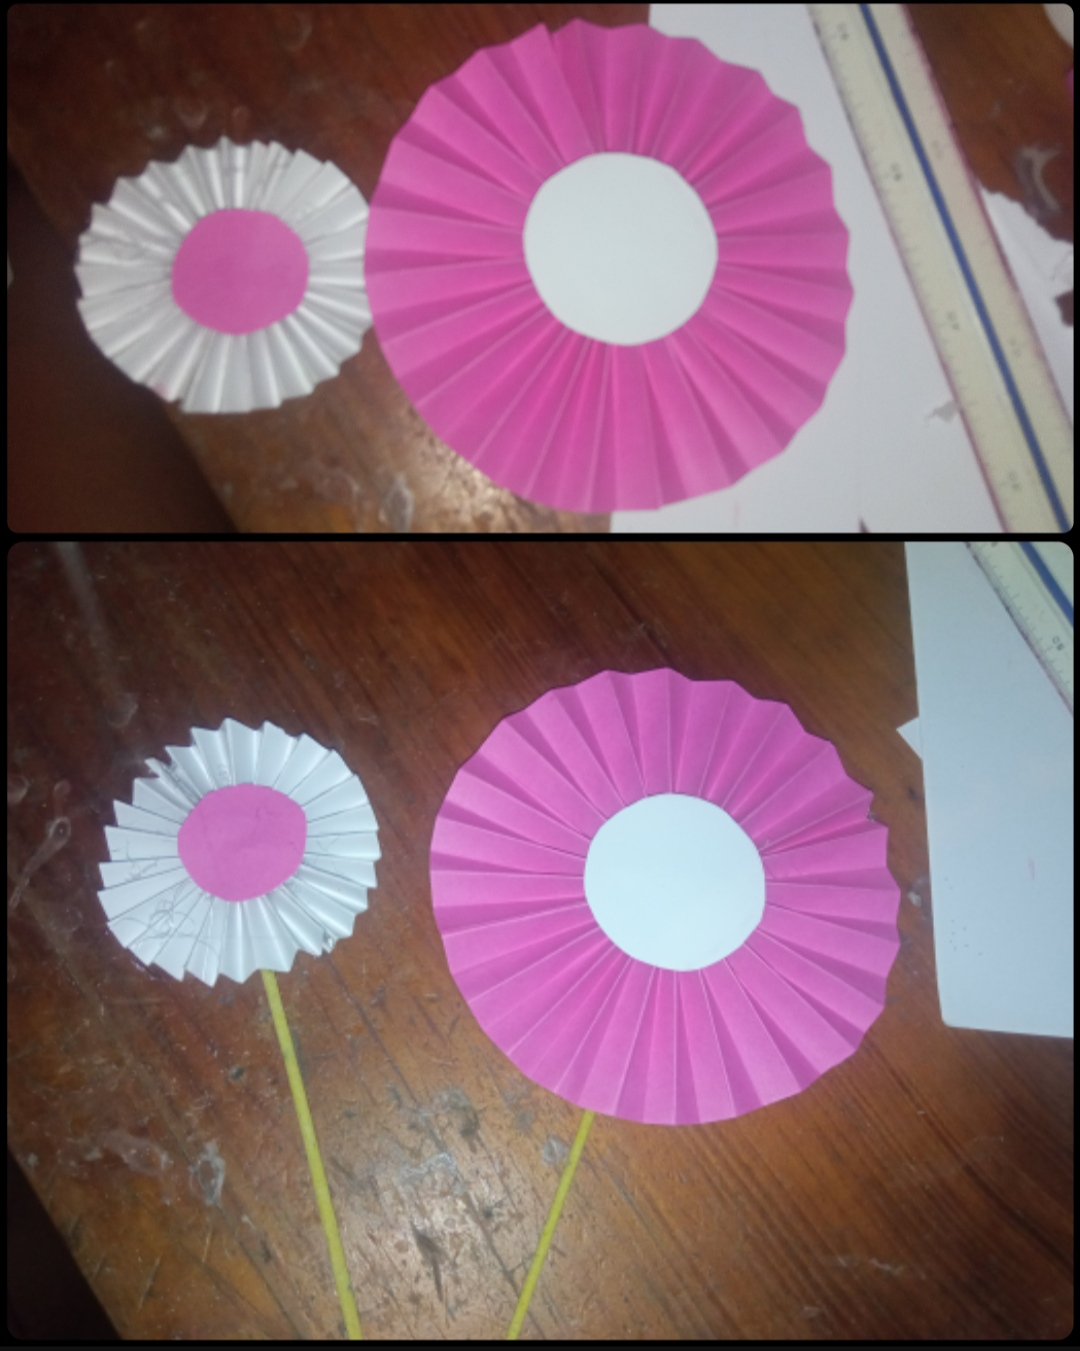
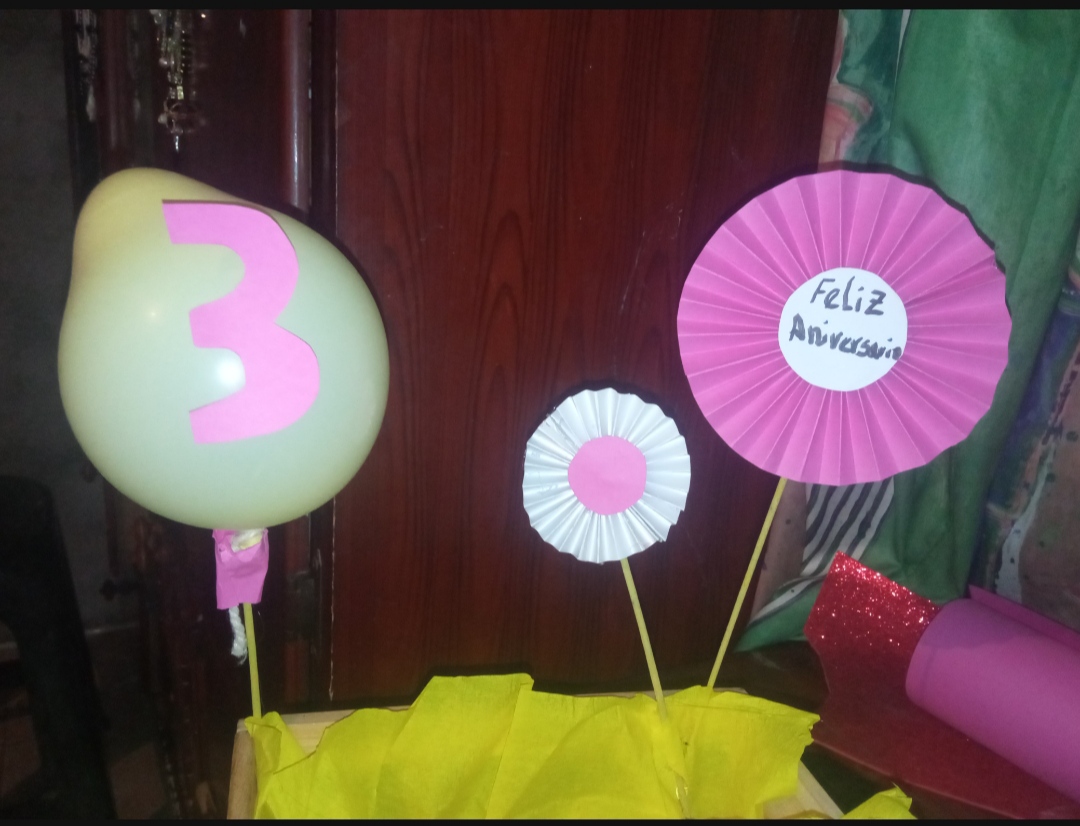
Lo primero que quise realizar fueron unas pequeñas decoraciones en forma de abanico circular para ello corte tiras de cartulina rosadas y blancas y seguidamente inicié a doblarlas como pueden observar en las imágenes como para realizar un abanico, luego con el pegamento caliente uní las dos piezas y en el centro le coloqué una forma circular para sujetar y que quedase más fuerte nuestra decoración.
Una vez vista y seca procedí a tomar un palillo de altura y se lo pegué en la parte de atrás de cada una de las dos formas elaboradas y en una de ellas escribí con un marcador la palabra "Feliz Aniversario"
⭐ Step 1: for this decoration I used a small wooden box that a cousin had made and had given me as a gift a while ago.
It is very simple as you can see in the following images. The first thing I wanted to make was some small decorations in the shape of a circular fan. For this, I cut strips of pink and white cardboard and then I began to fold them as you can see in the images to make a fan, then with hot glue I joined the two pieces and In the center I placed a circular shape to hold and make our decoration stronger.
Once dressed and dry, I proceeded to take a tall toothpick and stuck it on the back of each of the two elaborate shapes and on one of them I wrote the word "Happy Anniversary" with a marker.
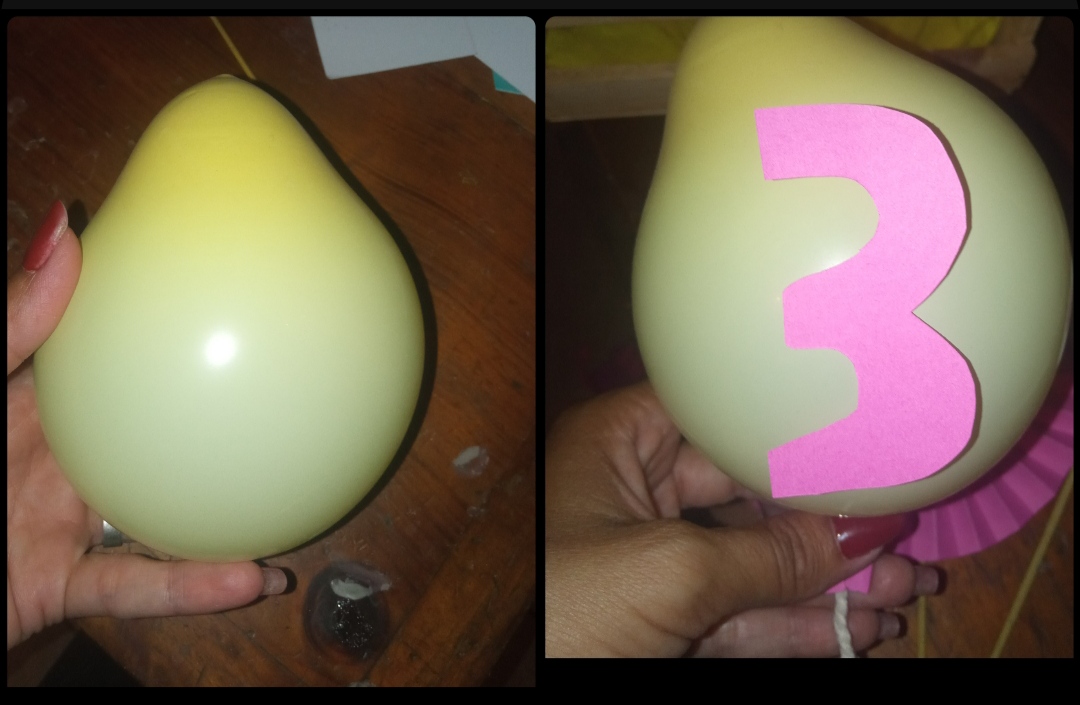
⭐ Paso 2: tenía un globo color amarillo el cual llené solo un poco pues era un globo grande nada más que la punta y la pegué en un palillo de altura luego recorté un número tres de la cartulina rosada y la pegué encima del globo.
Teniendo estas pequeñas decoraciones elaboradas procedí a tomar el papel crepé color amarillo y corrugándolo un poco lo introduje en la cajita de manera de rellenar el espacio y seguidamente procedí a pegar las decoraciones en la caja de madera con ayuda de la pega caliente de un lado pegué el palillo con el globo y del otro las formas de abanico circulares una un poco más alta que la otra para darle un poco de vistosidad.
⭐ Step 2: I had a yellow balloon which I filled only a little because it was a large balloon, just the tip and I glued it on a tall toothpick, then I cut out a number three from the pink cardboard and glued it on top of the balloon. Having these small elaborate decorations, I proceeded to take the yellow crepe paper and, corrugating it a little, I introduced it into the box in order to fill the space and then proceeded to glue the decorations on the wooden box with the help of hot glue on one side.
the toothpick with the balloon and on the other the circular fan shapes, one a little higher than the other to give it a little showiness.
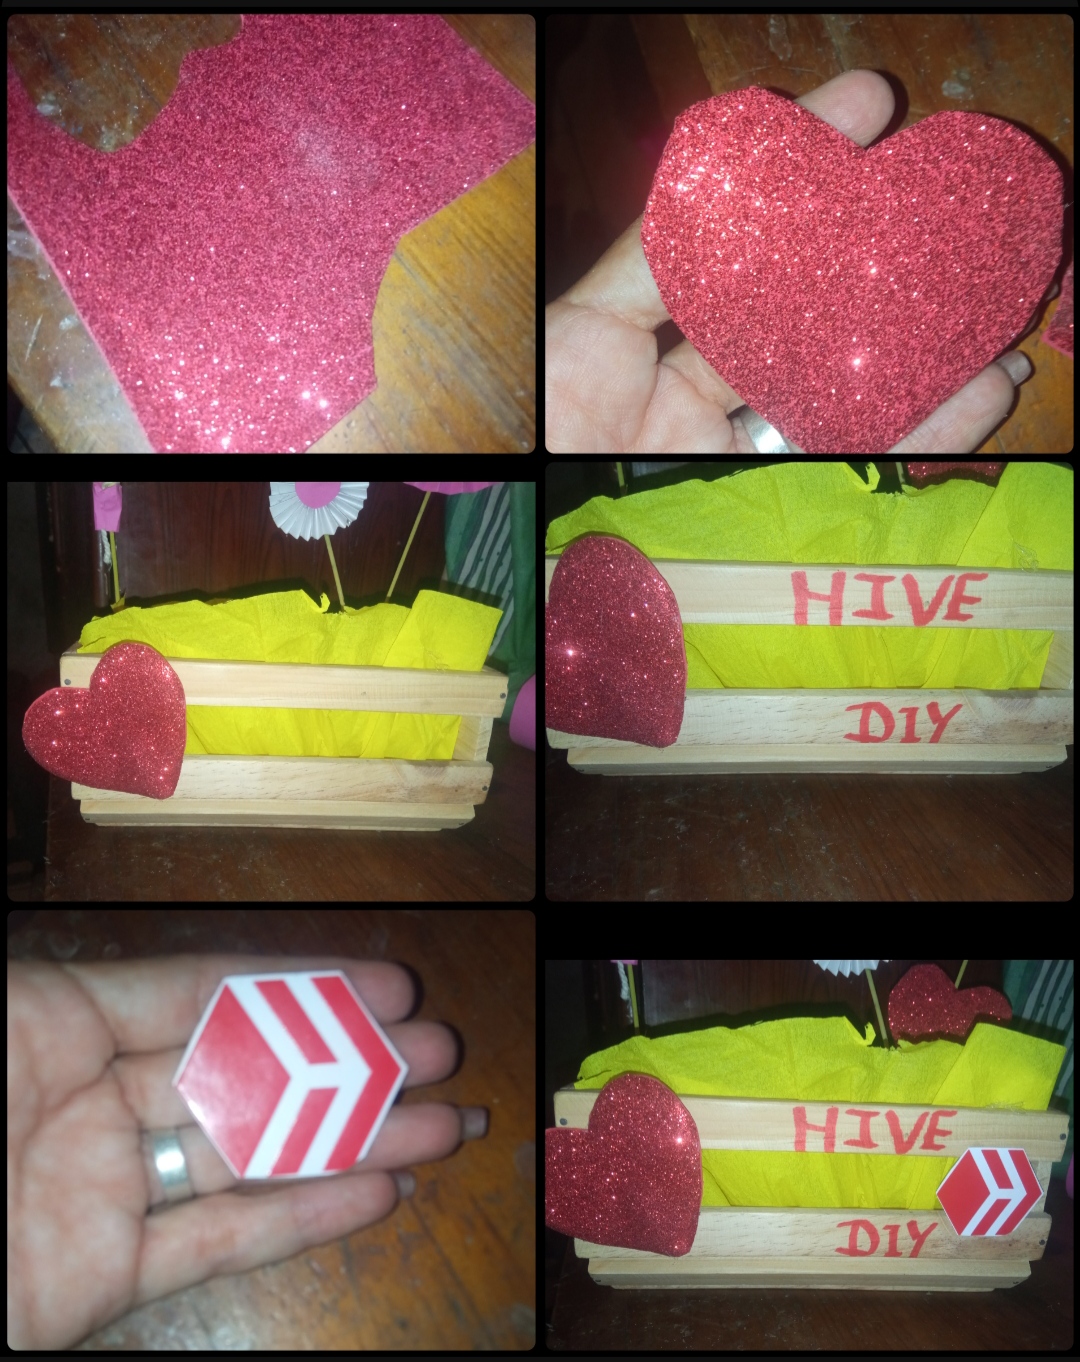
⭐ Paso 3: ahora tomé un pedazo de foami color rojo escarchado y recorte una forma de corazón la cual puse doble y pegué en la parte frontal de la caja de madera en uno de sus lados, recorté otro pequeño corazón del mismo tamaño y lo pegué en uno de los palillos que ya estaba sujetos a la caja.
Luego tomé un marcador color rojo y en las tablitas delgadas de la caja escribí el nombre de nuestra bella comunidad #hivediy y del otro lado pegué el logo de #hive.
⭐ Step 3: now I took a piece of frosty red foam and cut out a heart shape which I doubled and glued to the front of the wooden box on one of its sides, I cut out another small heart of the same size and I stuck it on one of the toothpicks that was already attached to the box.
Then I took a red marker and on the thin boards of the box I wrote the name of our beautiful community #hivediy and on the other side I pasted the #hive logo.
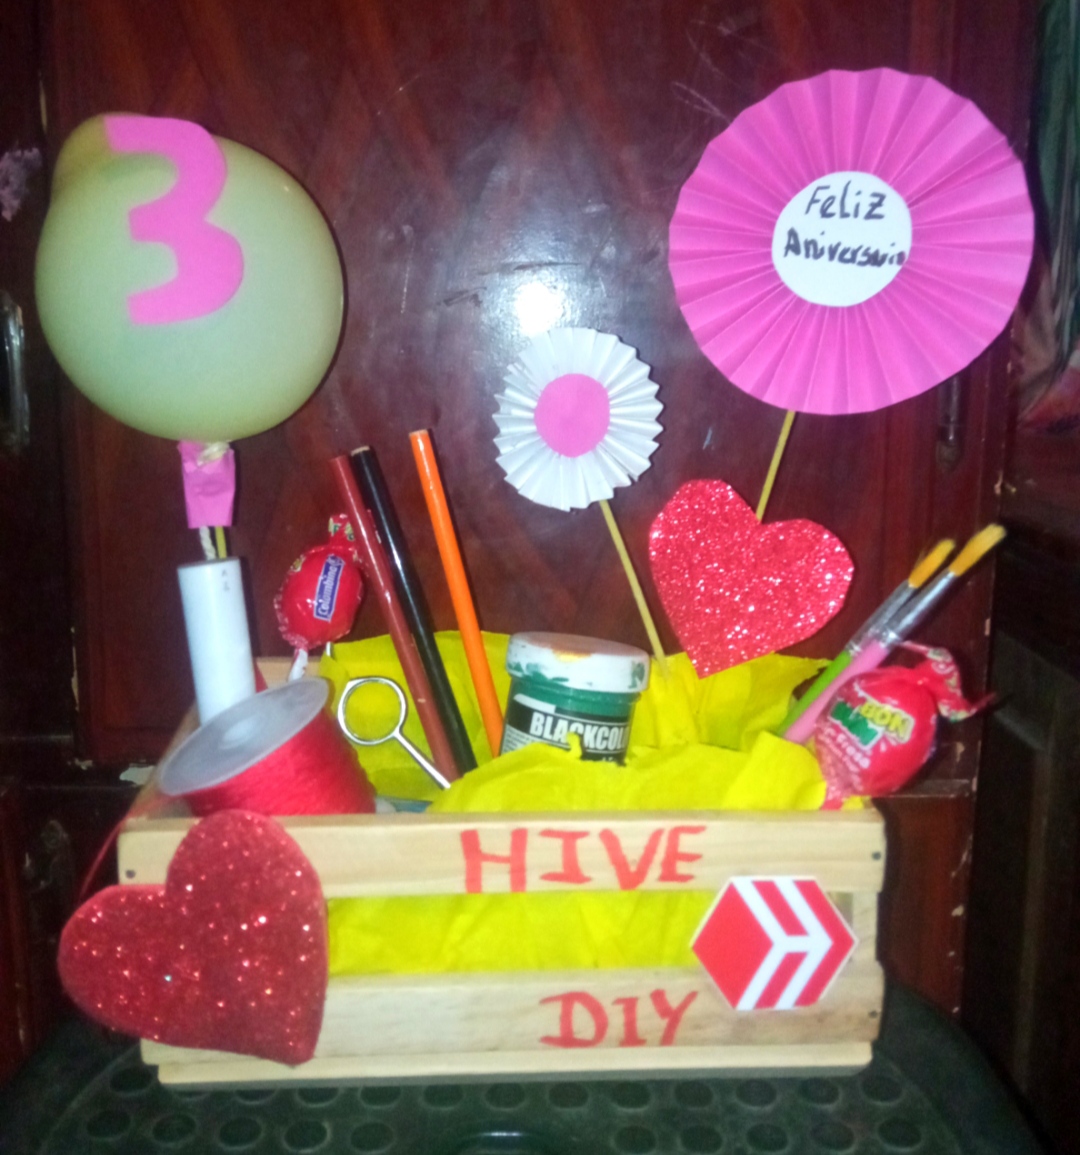
⭐ Paso 4: una vez teniendo nuestra caja con las decoraciones elaboradas proseguí a colocar algunas decoraciones extras Como por ejemplo pinceles, colores,marcadores, tijeras, pues estas son algunos de los instrumentos que identifican nuestra creativa comunidad y a nuestros queridos artesanos.
También como estas cajitas son utilizadas para realizar regalos de chucherías con lo que algunas golosinas como chupetas y galletas y así terminé la elaboración de mi sencilla decoración para celebrar un día especial.
⭐ Step 4: once we had our box with the elaborate decorations, I continued to place some extra decorations, such as brushes, colors, markers, scissors, since these are some of the instruments that identify our creative community and our beloved artisans.
Also, these boxes are used to make gifts of sweets, with some goodies such as lollipops and cookies, and that's how I finished making my simple decoration to celebrate a special day.
 Mi querida y apreciada comunidad esta decoración fue elaborada con todo mi cariño y a pesar de que quisiera haber realizado algo más acorde con una celebración, con esta sencilla elaboración les envío todo mi amor mi cariño y mi agradecimiento, feliz aniversario mi querida casa, que sean muchísimos años más.
Para despedirme quisiera aprovechar la ocasión para invitar a mis amigas @venusl19 y @eumelysm a unirse a esta celebración.
Mi querida y apreciada comunidad esta decoración fue elaborada con todo mi cariño y a pesar de que quisiera haber realizado algo más acorde con una celebración, con esta sencilla elaboración les envío todo mi amor mi cariño y mi agradecimiento, feliz aniversario mi querida casa, que sean muchísimos años más.
Para despedirme quisiera aprovechar la ocasión para invitar a mis amigas @venusl19 y @eumelysm a unirse a esta celebración.
Todas las Fotos son de mi autoría y fueron tomadas con mi Celular Redmi 9.My dear and appreciated community, this decoration was made with all my love and although I would like to have done something more in keeping with a celebration, with this simple preparation I send you all my love, affection and my gratitude, happy anniversary my dear house, may you be many more years.
To say goodbye, I would like to take this opportunity to invite my friends @venusl19 and @eumelysm to join this celebration.
All Photos are my authorship and were taken with my Redmi 9 Cellphone
Posted Using InLeo Alpha