Feliz y bendecido día, espero estén bien llenos de buenas energías, ánimo, siempre positivos, y felices!!! Como saben me encanta crear, y no podía perder la oportunidad de participar en este maravilloso concurso que nos tiene la comunidad de @jewelry para celebrar el carnaval! El carnaval es vida, color, alegría y diversión! Para muchos es asociado con viajes, vacaciones! Para este concurso realice un collar multicolor con la técnica del Soutache y mi toque personal, es un collar bastante elaborado, que te lo explicare paso a paso a través de una secuencia de imágenes donde te voy mostrando resultados de todo el proceso. Son aproximadamente 16 pasos, quizás lo veas largo, aunque realmente es un proceso repetitivo donde lo diferente es la posición de las piezas para ir formando un diseño en específico! Aunque yo solo te indico mi proceso puedes usar lo aprendido y hacerlo tú proceso y tú creación diversificando las formas y modelos! Recuerda el límite es tu imaginación..
Happy and blessed day, I hope you are well full of good energy, encouragement, always positive, and happy!!!! As you know I love to create, and I could not miss the opportunity to participate in this wonderful contest that the @jewelry community has for us to celebrate carnival! Carnival is life, color, joy and fun! For many it is associated with travel, vacations! For this contest I made a multicolored necklace with the Soutache technique and my personal touch, it is a very elaborate necklace, I will explain it step by step through a sequence of images where I will show you the results of the whole process. There are approximately 16 steps, maybe you see it long, but it is really a repetitive process where the different is the position of the pieces to form a specific design! Although I only show you my process you can use what you have learned and make it your process and your creation diversifying the shapes and models! Remember the limit is your imagination...
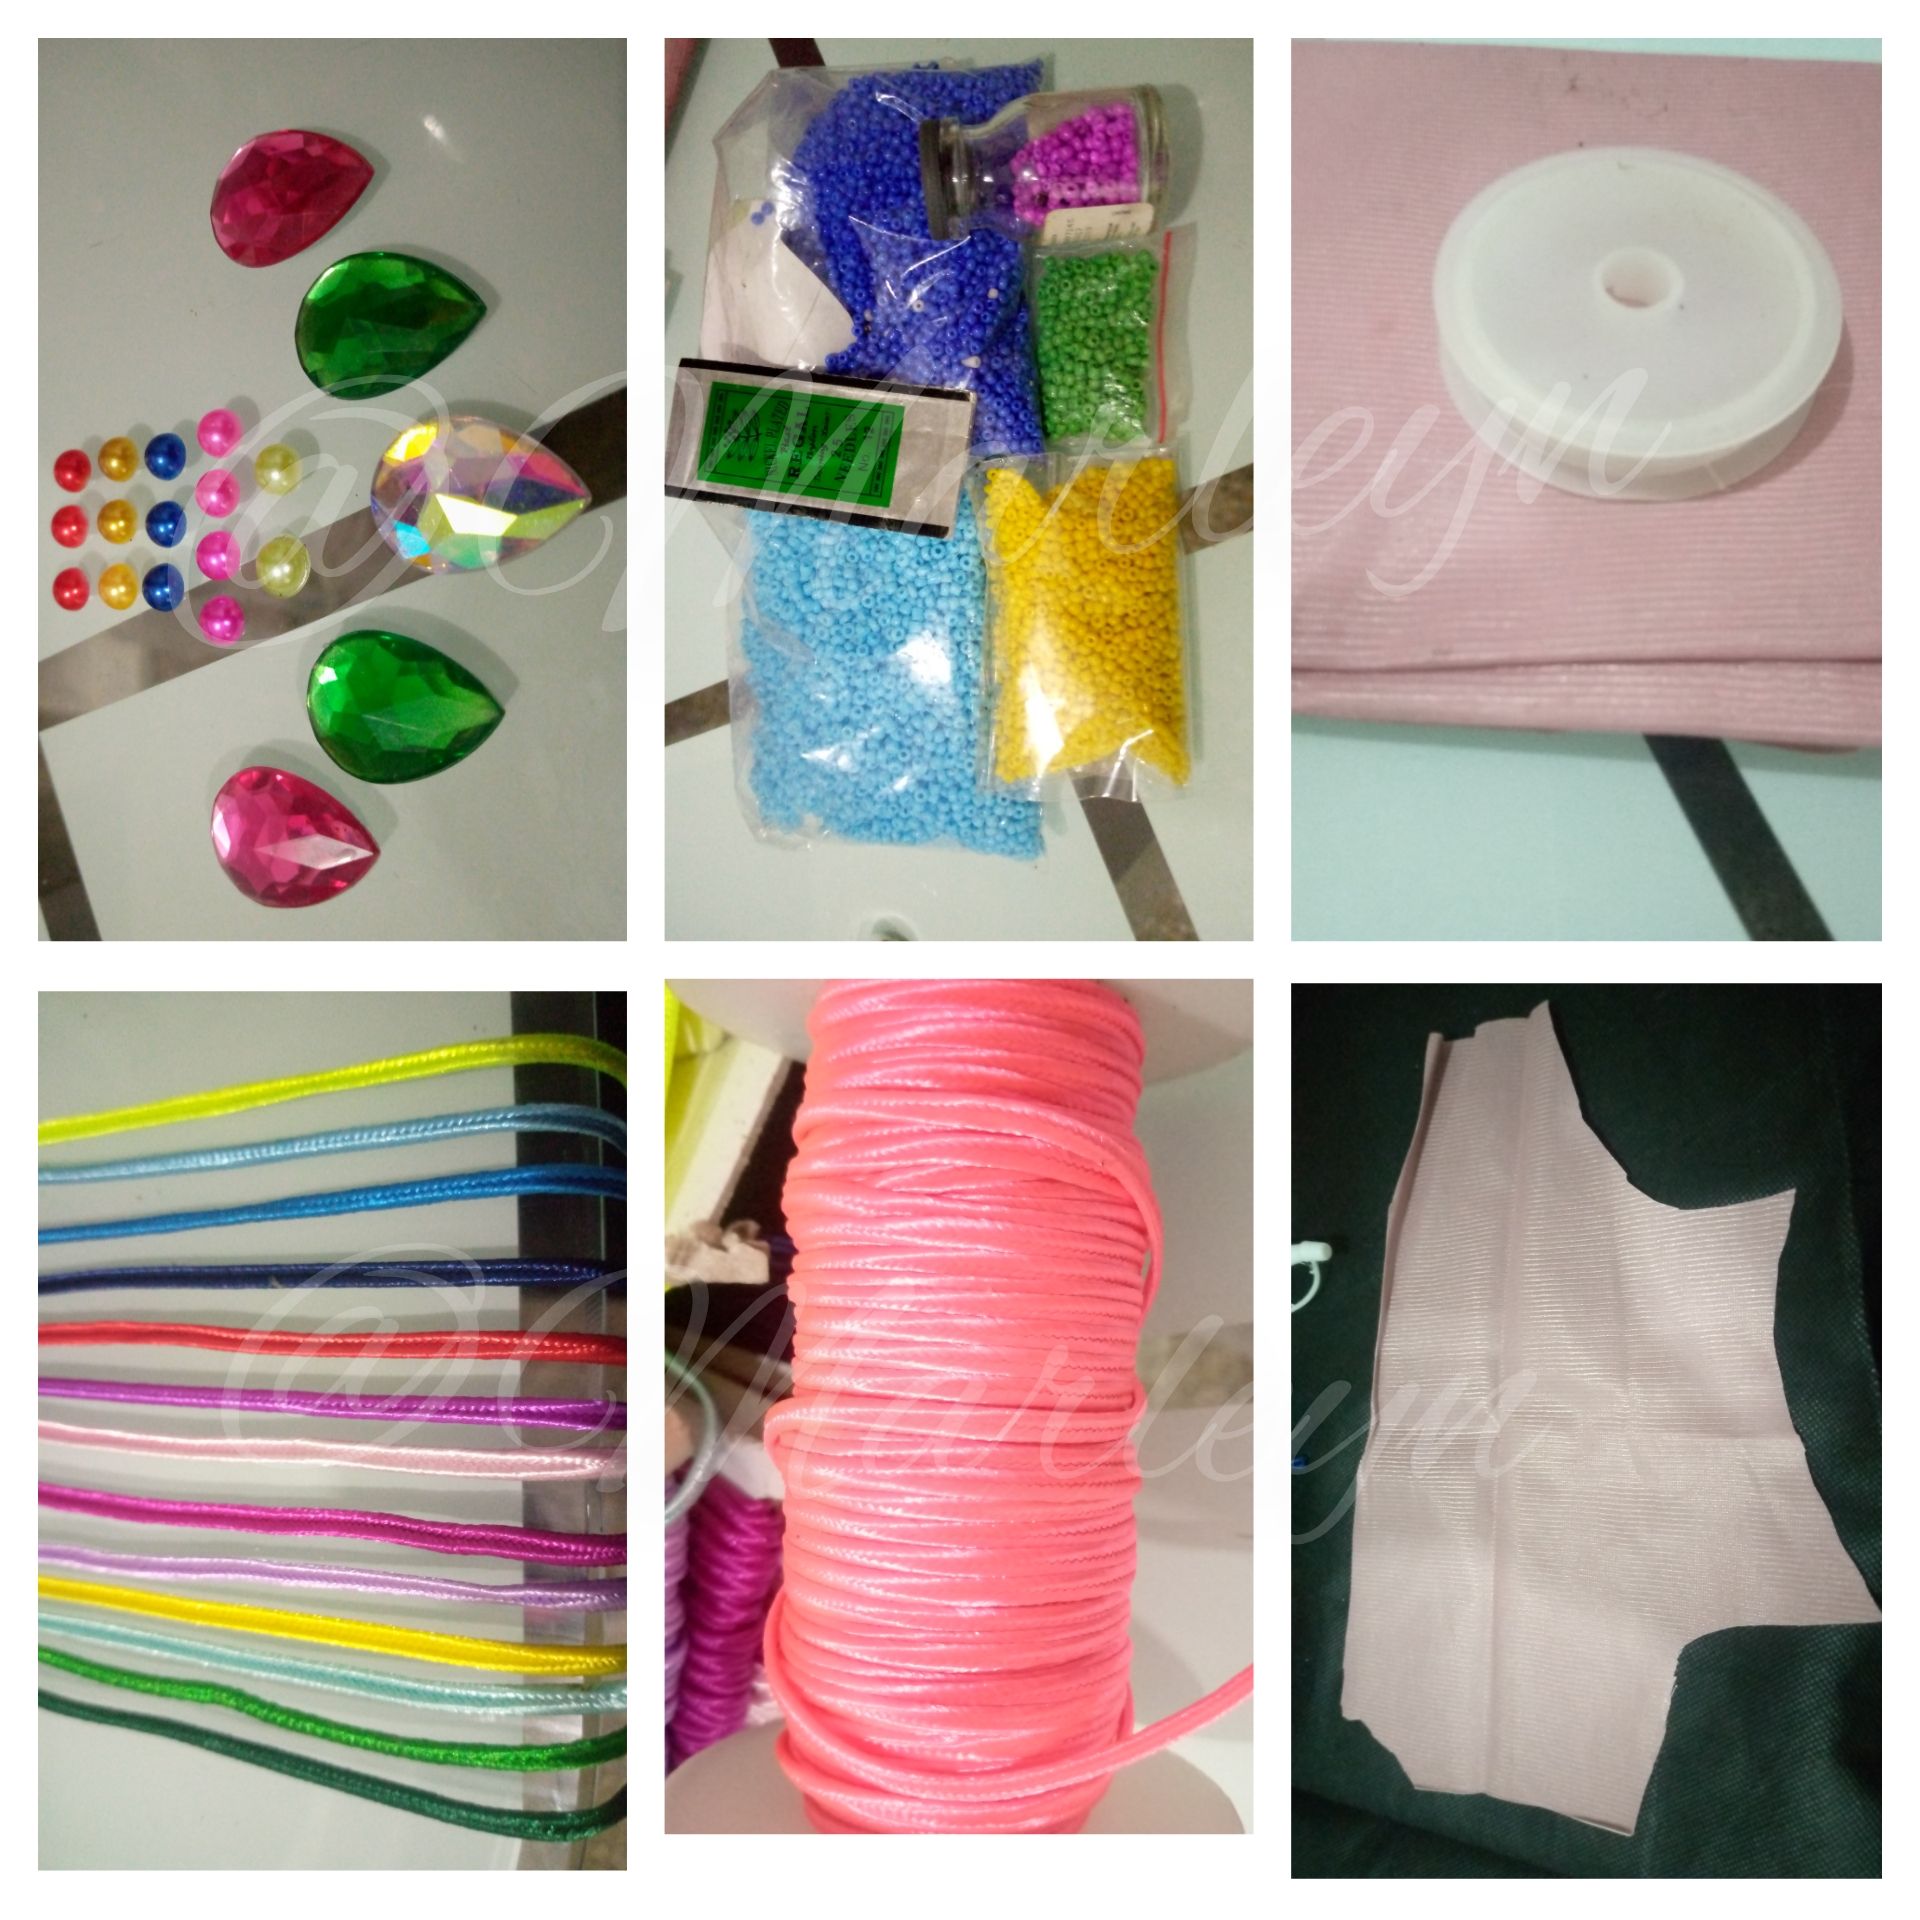
Todos los materiales son de fácil acceso, aunque son muchos puedes hacerlo de un solo color y no utilizas tanto material
Materiales:
Tijera, Silicon liquido, encendedor, tela POP ( esa es la tela que usan para las batas de los cirujanos) tela Gamuza, hilo de rayón o soutache de 3 milímetros, hilo y aguja, 5 Gotas de apliques plano de 2.5 milímetros de ancho por 3 milímetros de alto, apliques redondos varios colores que hagan contraste con los tonos de los hilos, mostacilla #11 o mostacilla china no importa si es irregular del color de los hilos que estemos utilizando, broche, aros, cadena, pinza de bisutería punta redonda y punta plana, 2 maletas o sujetadores!
All materials are easily accessible, although there are many you can do it in one color and you don't use so much material
Materials:
Scissors, liquid Silicon, lighter, POP fabric (that's the fabric they use for surgeons' gowns) Chamois fabric, rayon or soutache thread of 3 millimeters, thread and needle, 5 drops of flat appliqués of 2. 5 millimeters wide by 3 millimeters high, round appliqués of various colors that contrast with the tones of the threads, #11 mustard or Chinese mustard, it doesn't matter if it is irregular in the color of the threads we are using, brooch, earrings, chain, round tip and flat tip jewelry clamp, 2 suitcases or fasteners!
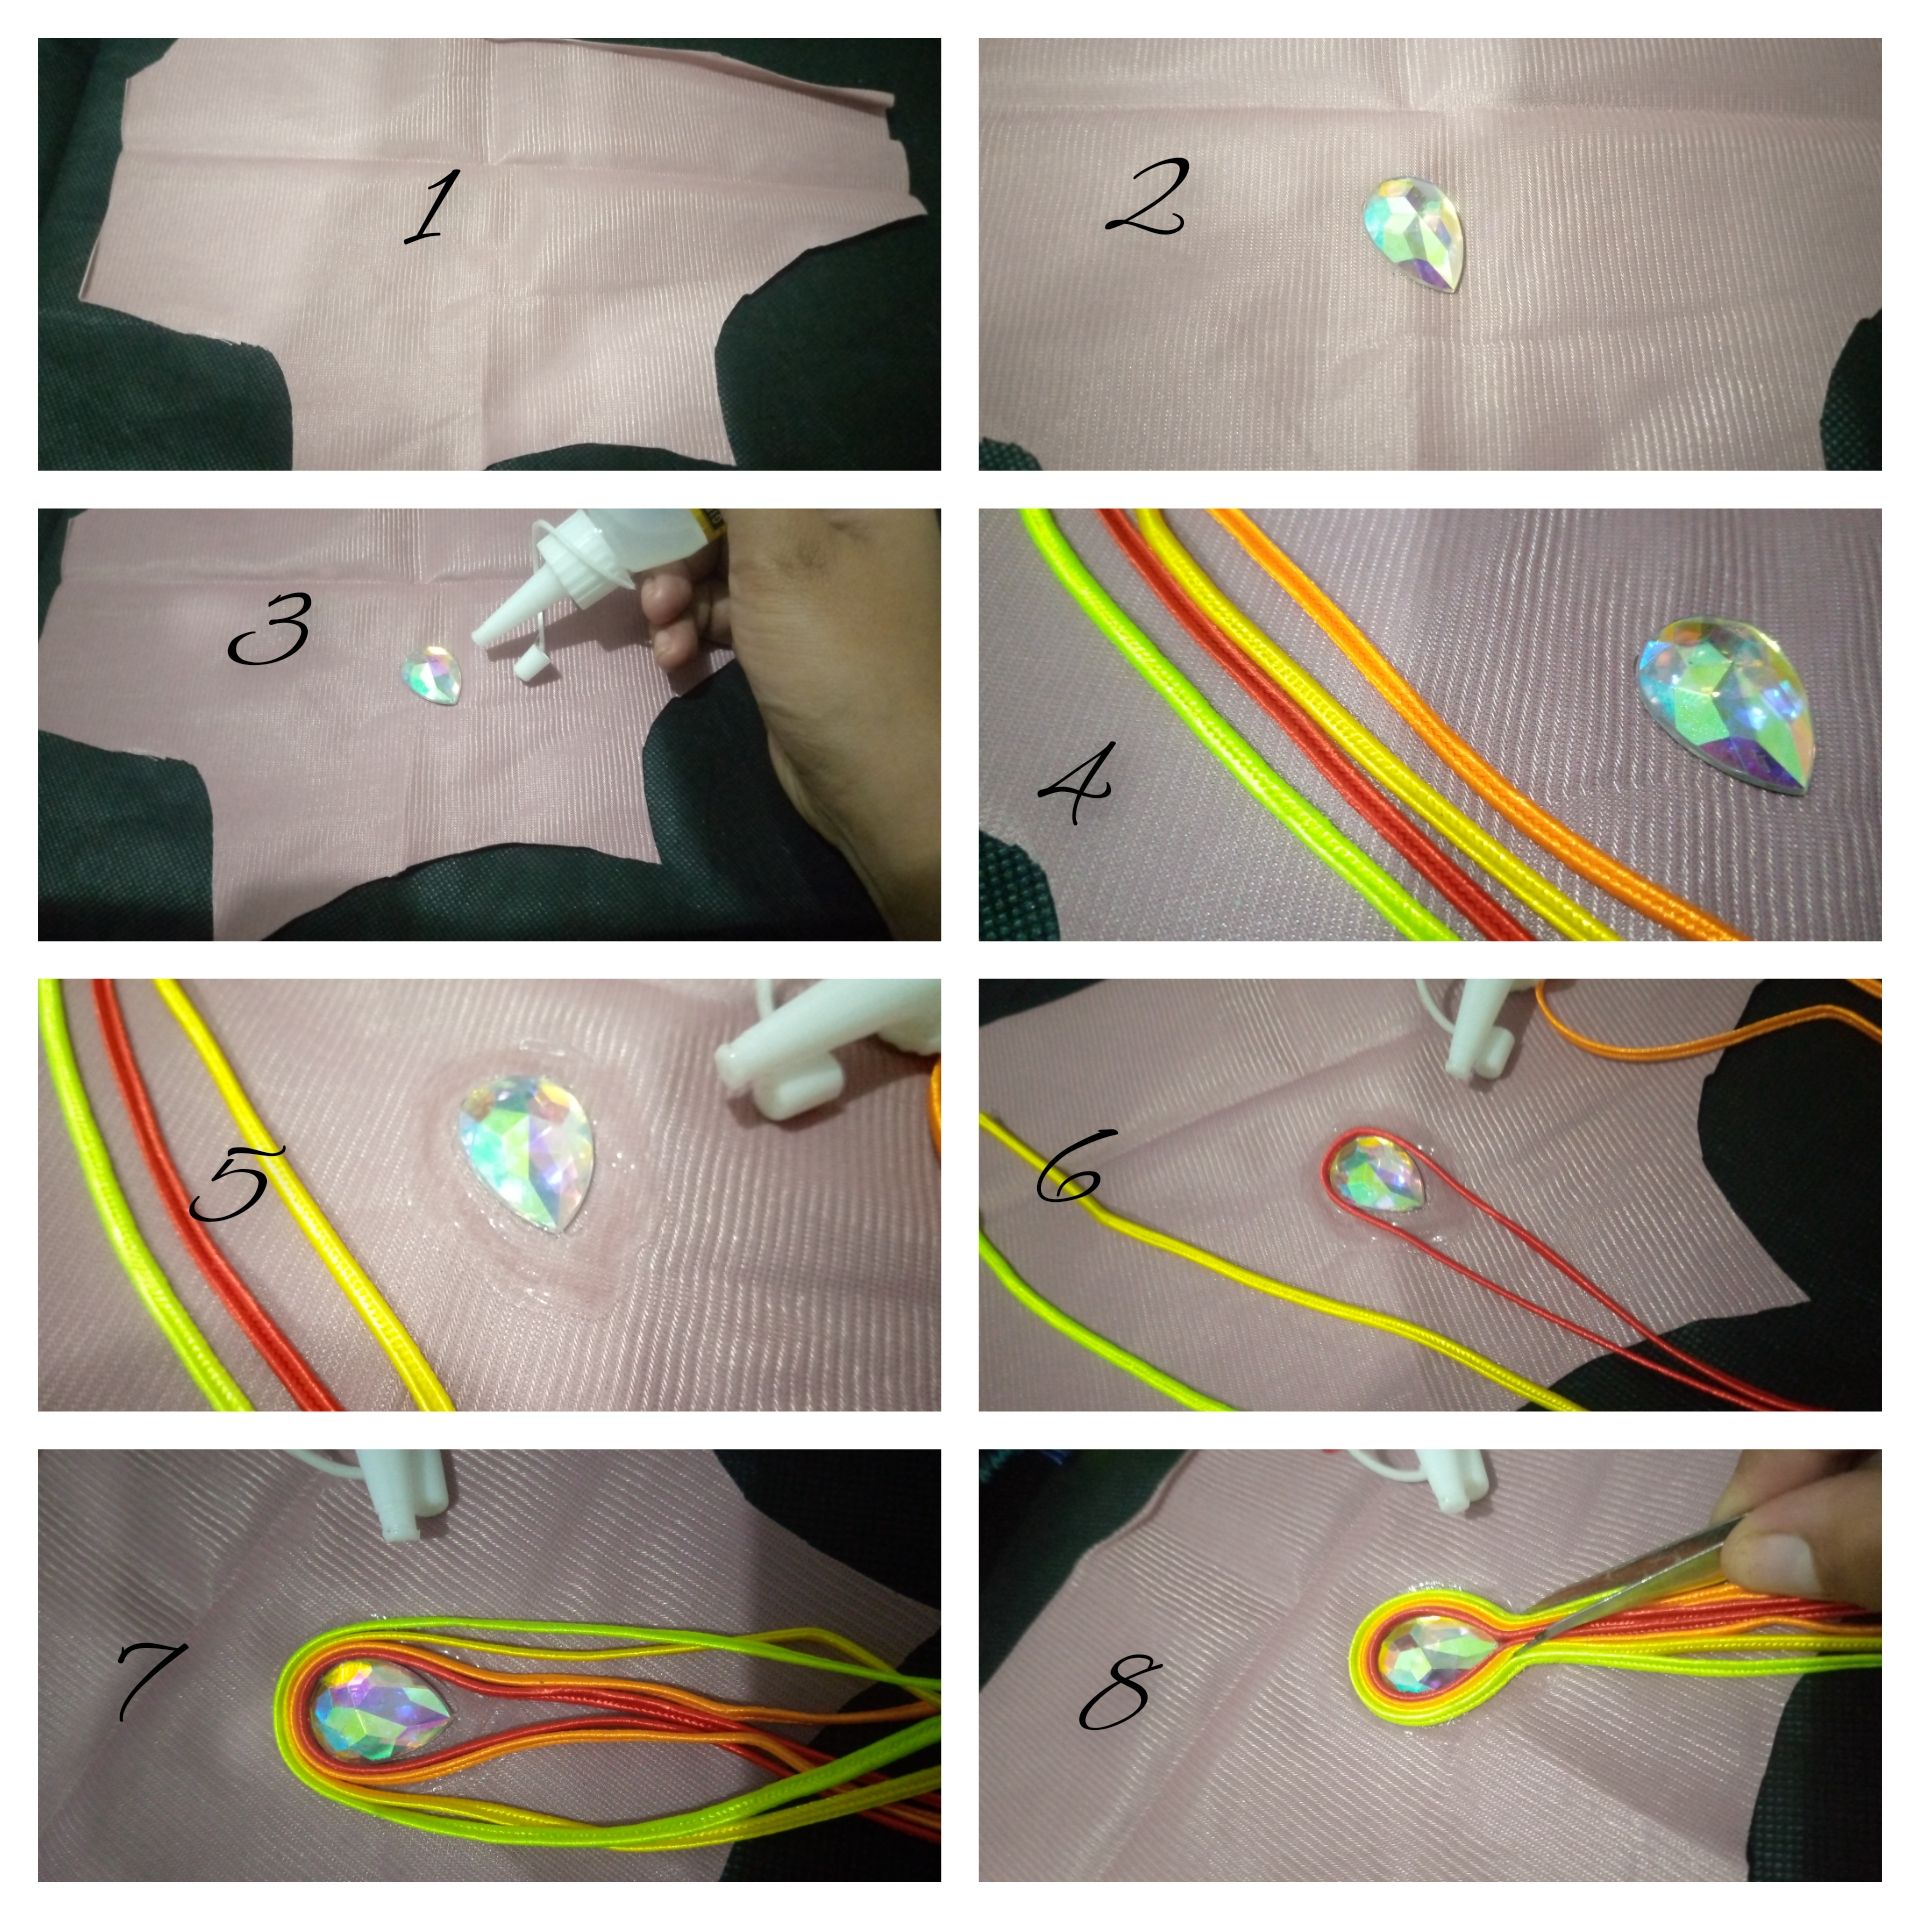
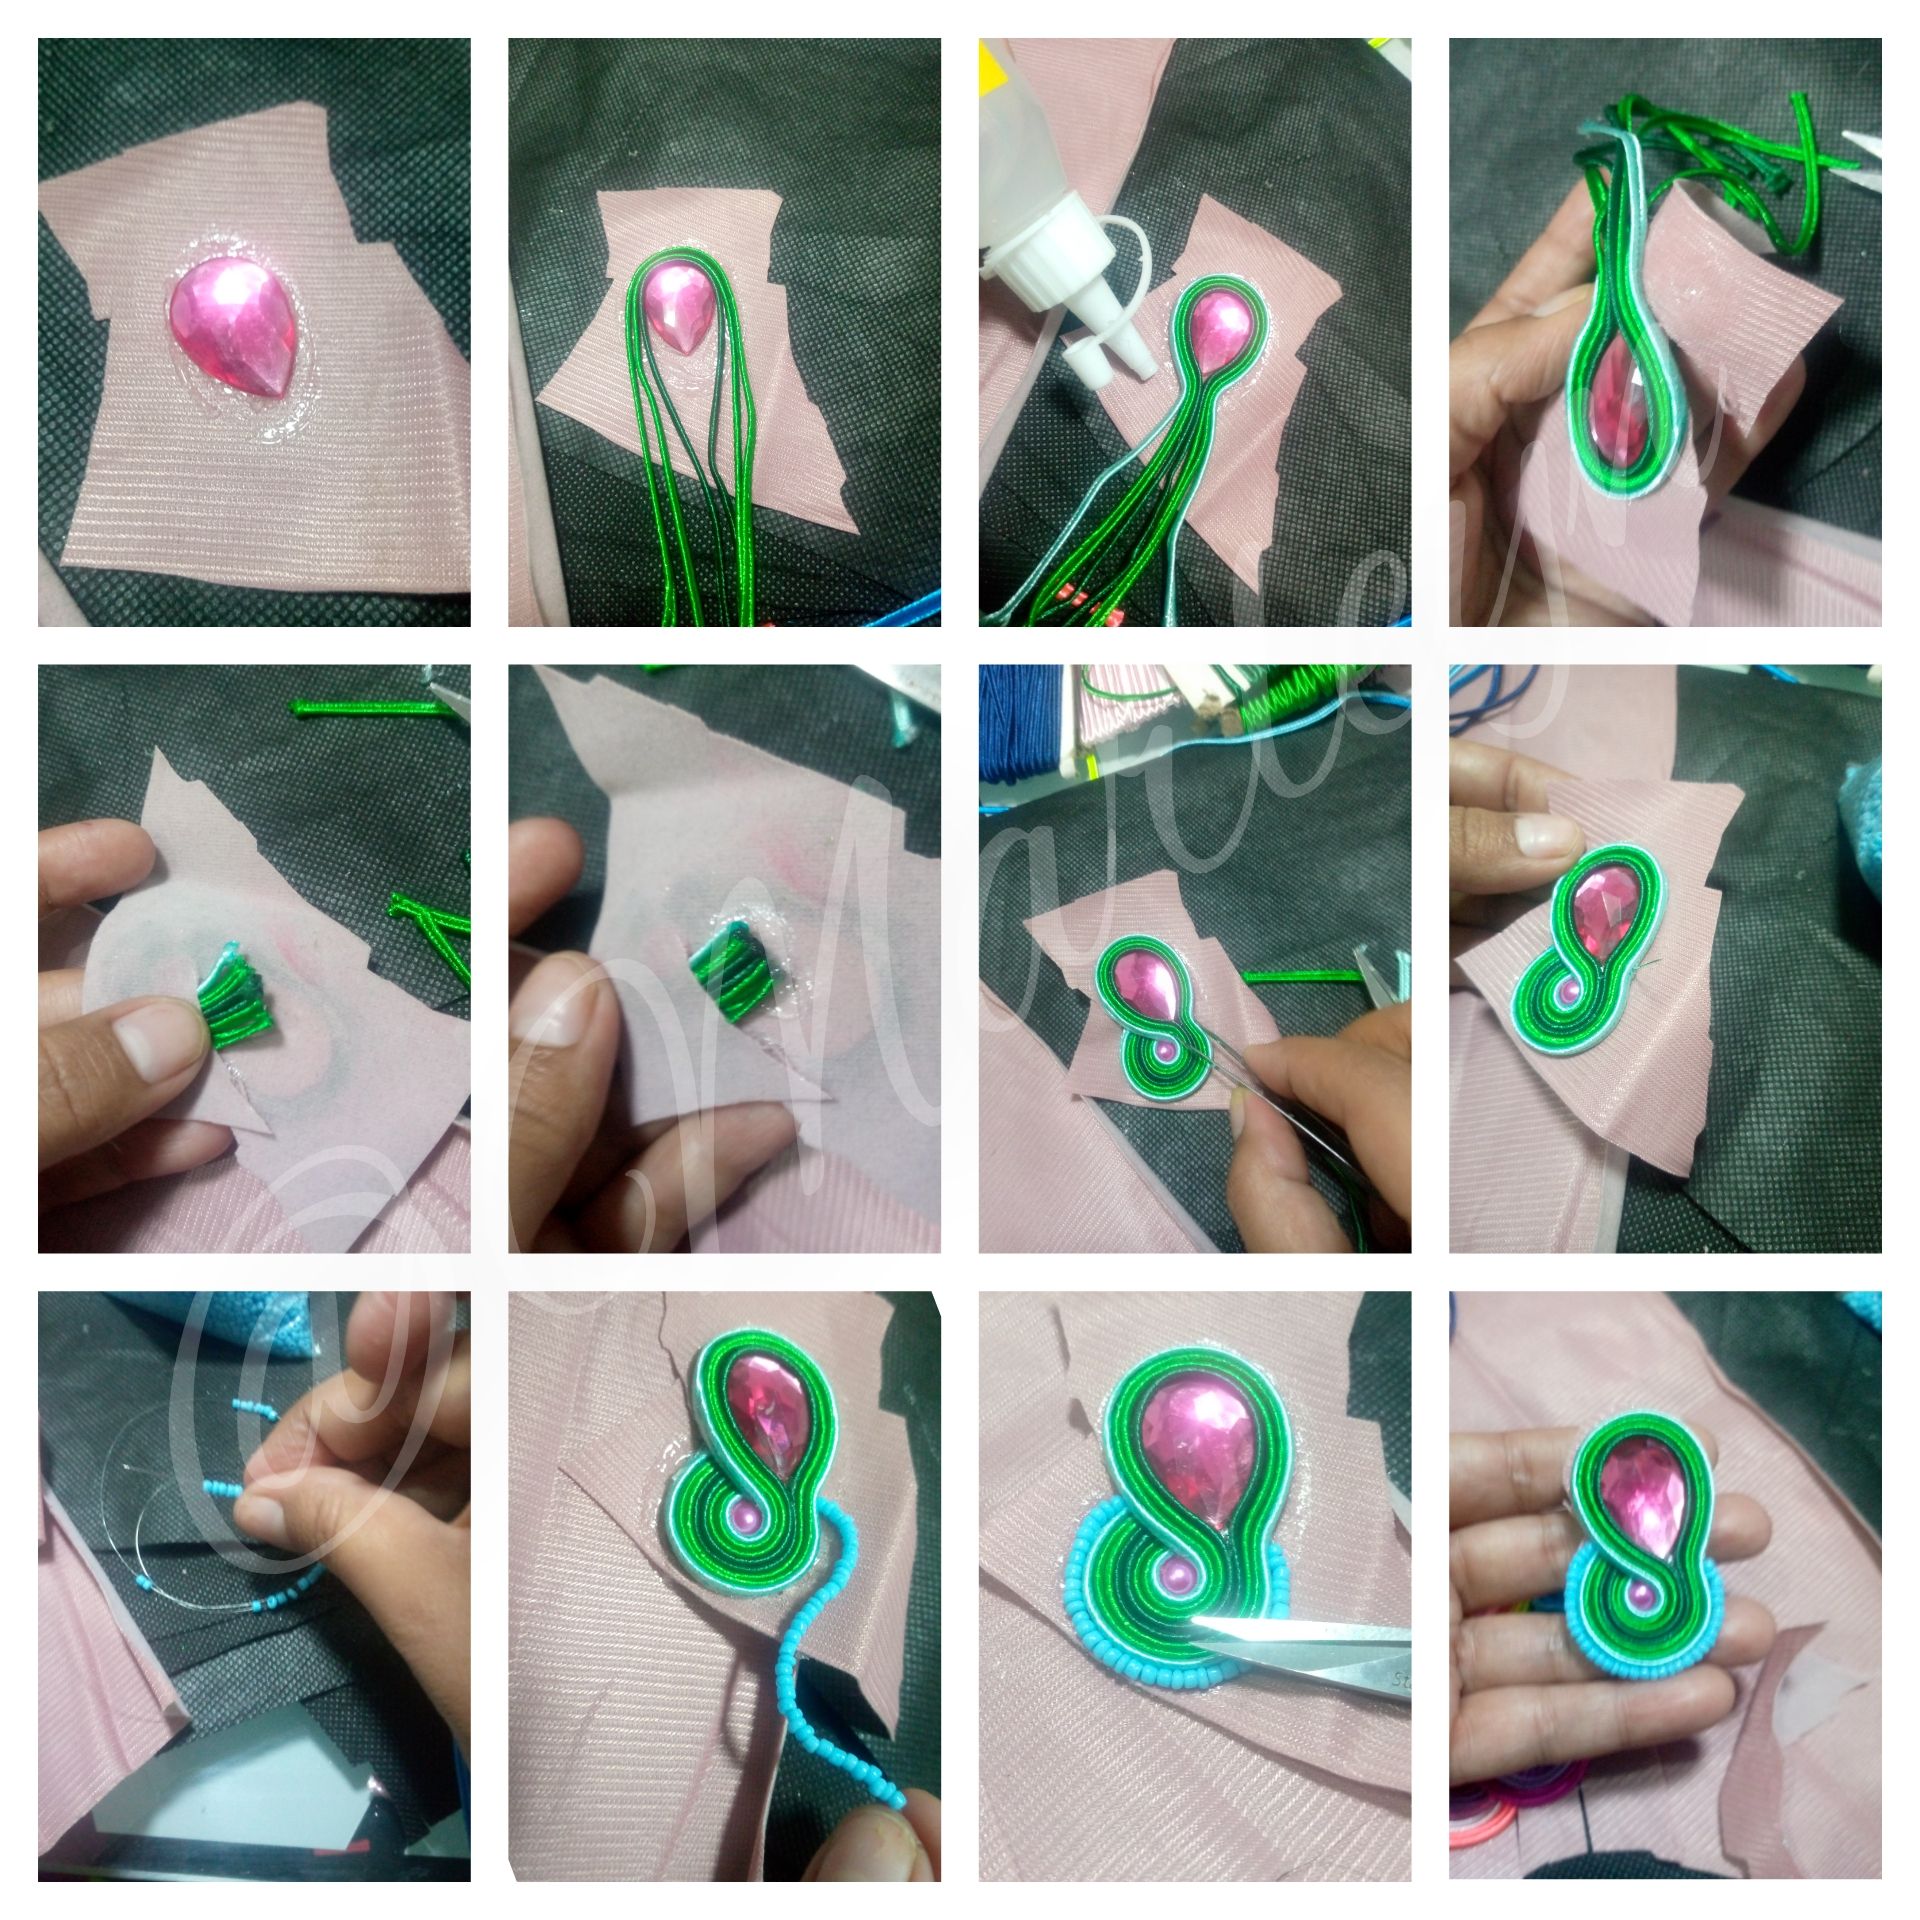
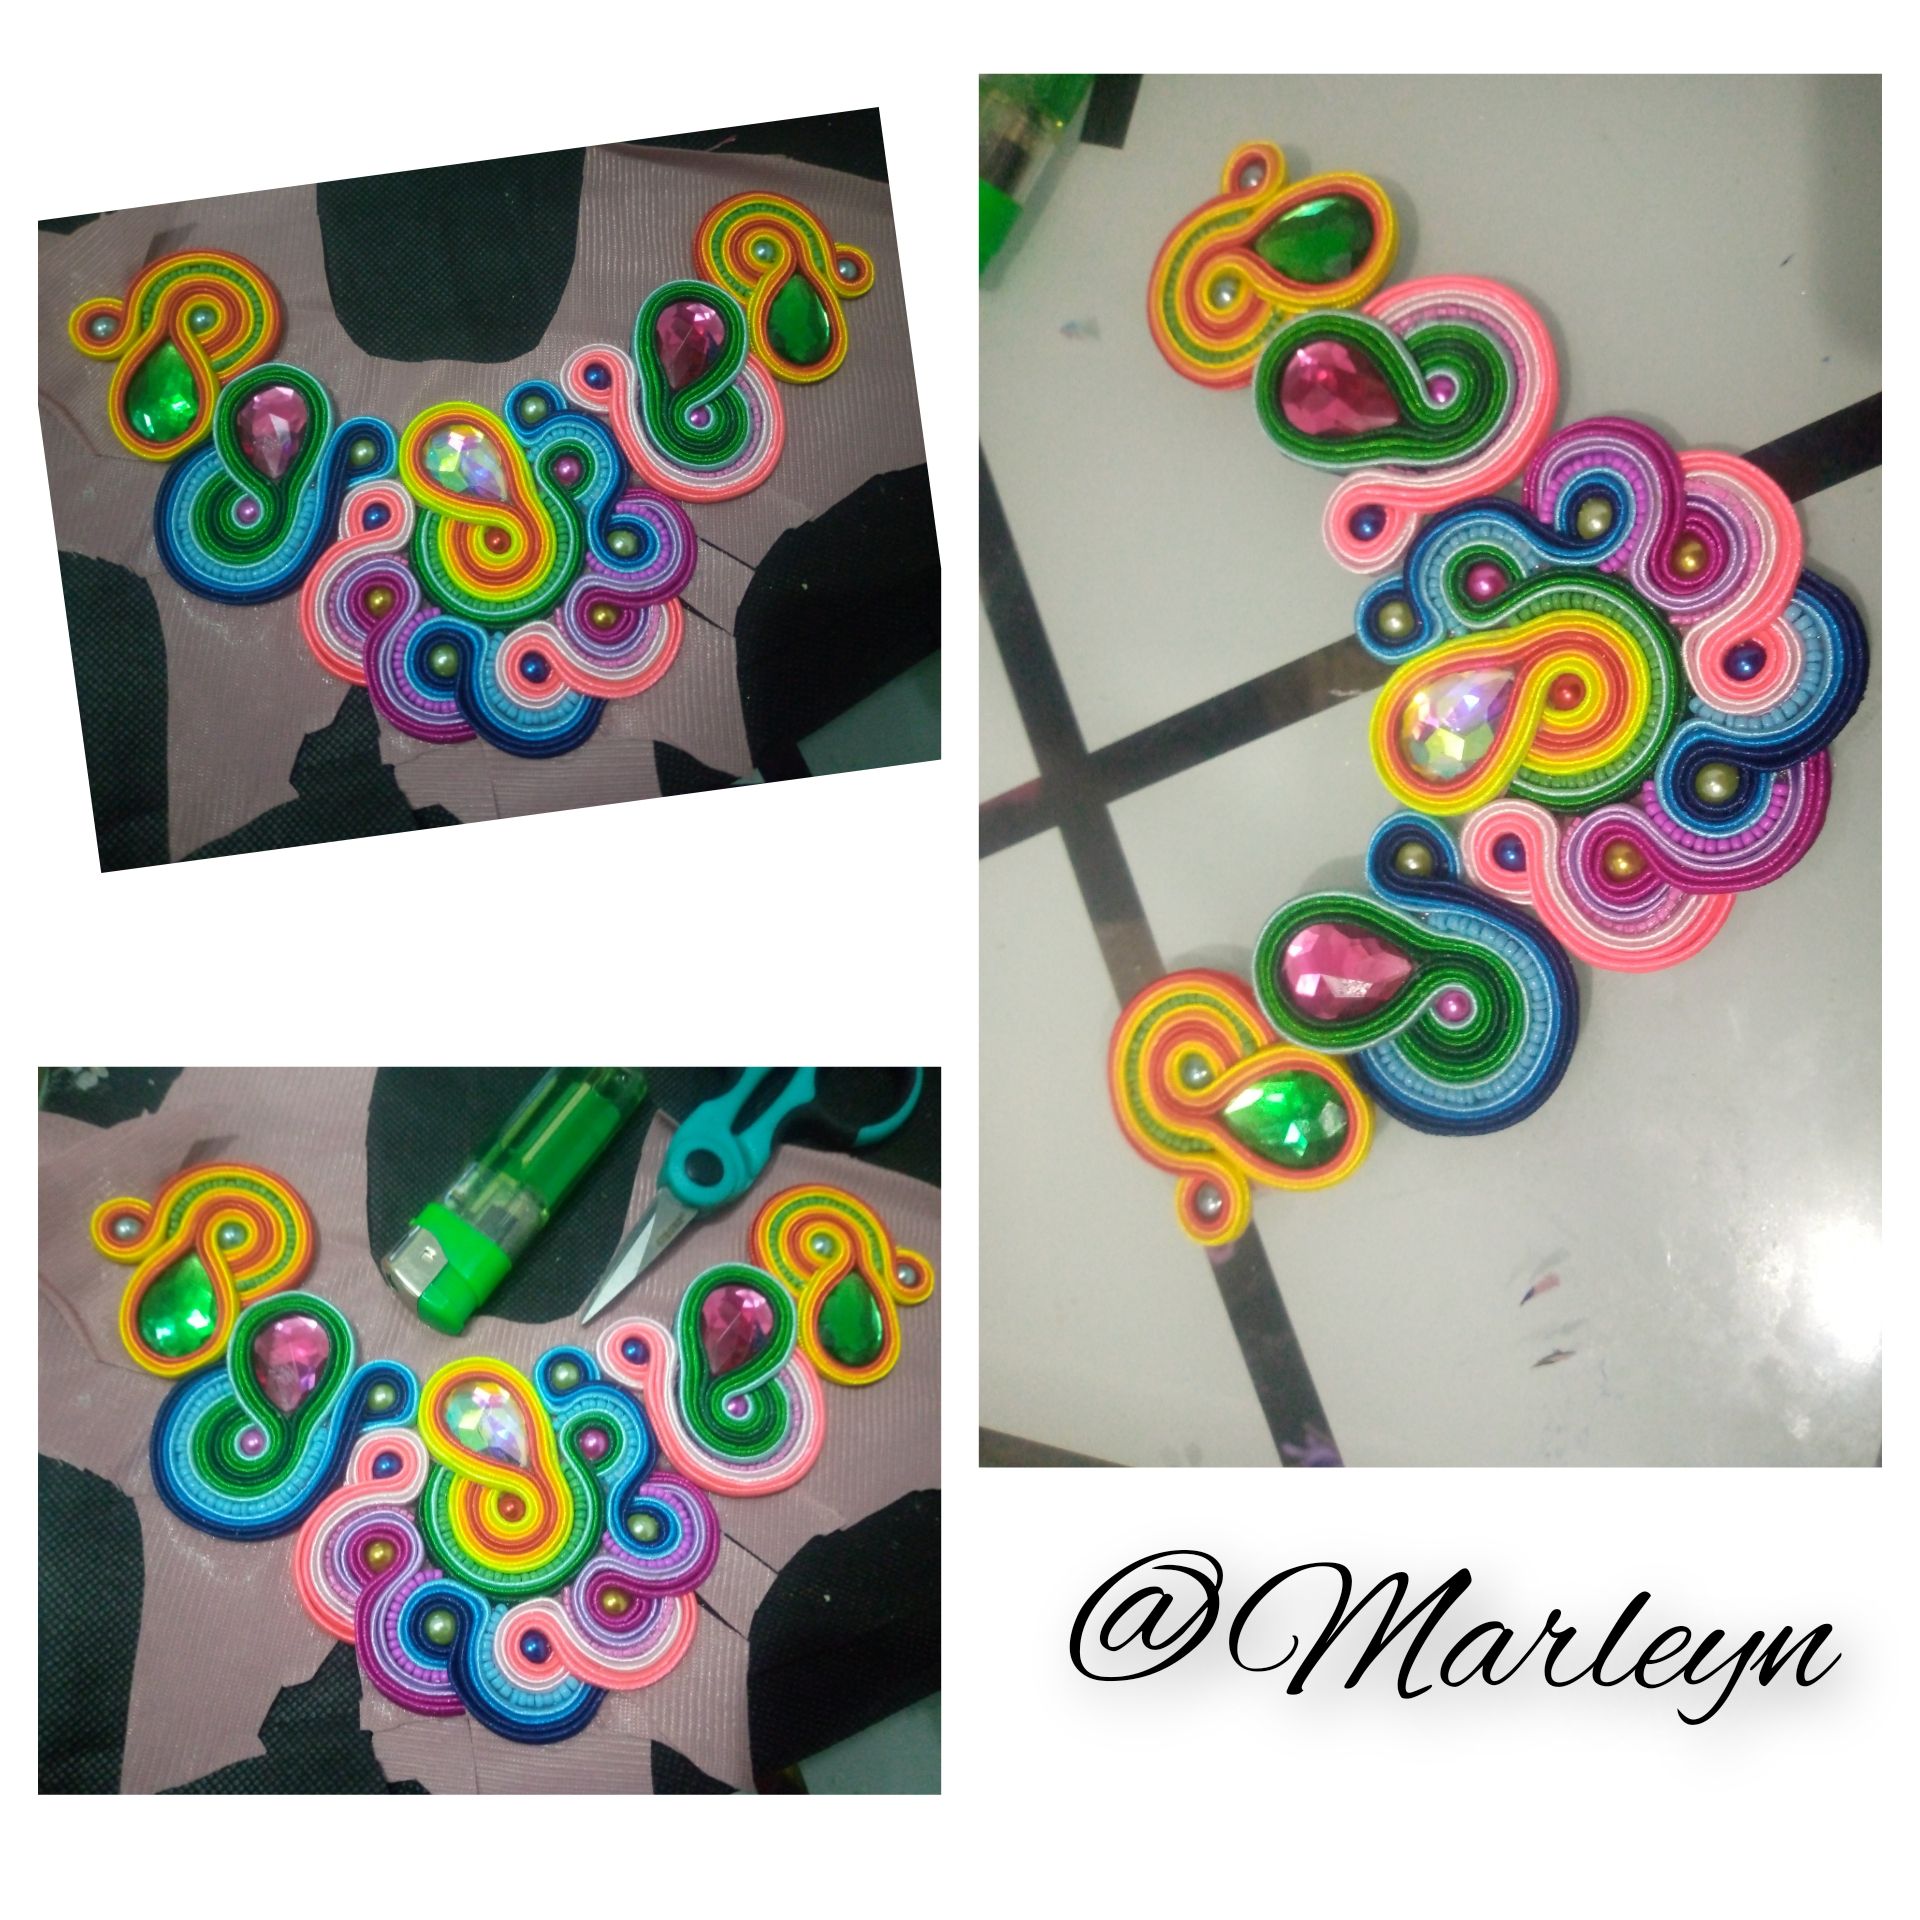
Vamos a cortar un trozo de tela de unos 20 centímetros de alto por 25 centímetros de largo, busca el centro a ojo y coloca un poco de silicon liquido, pegaremos una gota yo utilice una transparente tornasol para que sea el punto focal de mi pieza, vamos a empezar a jugar con el degradado y el tono de los colores que vamos a usar! Esta fue la parte que más se me dificultó porque todo fue ensayo y error antes de tener el resultado deseado, vamos a cortar 4 hilos de 15 centímetros aproximadamente colocamos Silicon liquido alrededor del aplique y comenzamos pegando el hilo rojo,segundos con el tono naranja, luego amarillo pollito y terminamos con un verde neón casi amarillo, para que ese tono le dé ese contraste que resalta y dará el impacto vibrante que esperamos en esta diversidad de colores! Puedes ayudarte de una pinza de cejas o una pinza de relojería para colocar los hilos y no ensuciar la parte superior!
Nota: Solo está imagen le coloque los números,de todas las demás imágenes se dará por entendido que serán en la misma secuencia solo que no tendrán el número!
We will cut a piece of fabric about 20 centimeters high by 25 centimeters long, find the center by eye and place a little liquid silicone, we will paste a drop I used a transparent litmus to be the focal point of my piece, let's start playing with the gradient and the tone of the colors that we will use! This was the part that was the most difficult for me because everything was trial and error before having the desired result, we will cut 4 threads of 15 centimeters approximately, we place liquid Silicon around the applique and start gluing the red thread, second with the orange tone, then chick yellow and finish with a neon green almost yellow, so that this tone will give that contrast that stands out and give the vibrant impact we expect in this diversity of colors! You can help yourself with an eyebrow tweezers or a tweezers to place the threads and not mess up the top!
Note: Only this image I placed the numbers, all the other images will be in the same sequence but without the numbers!
o!
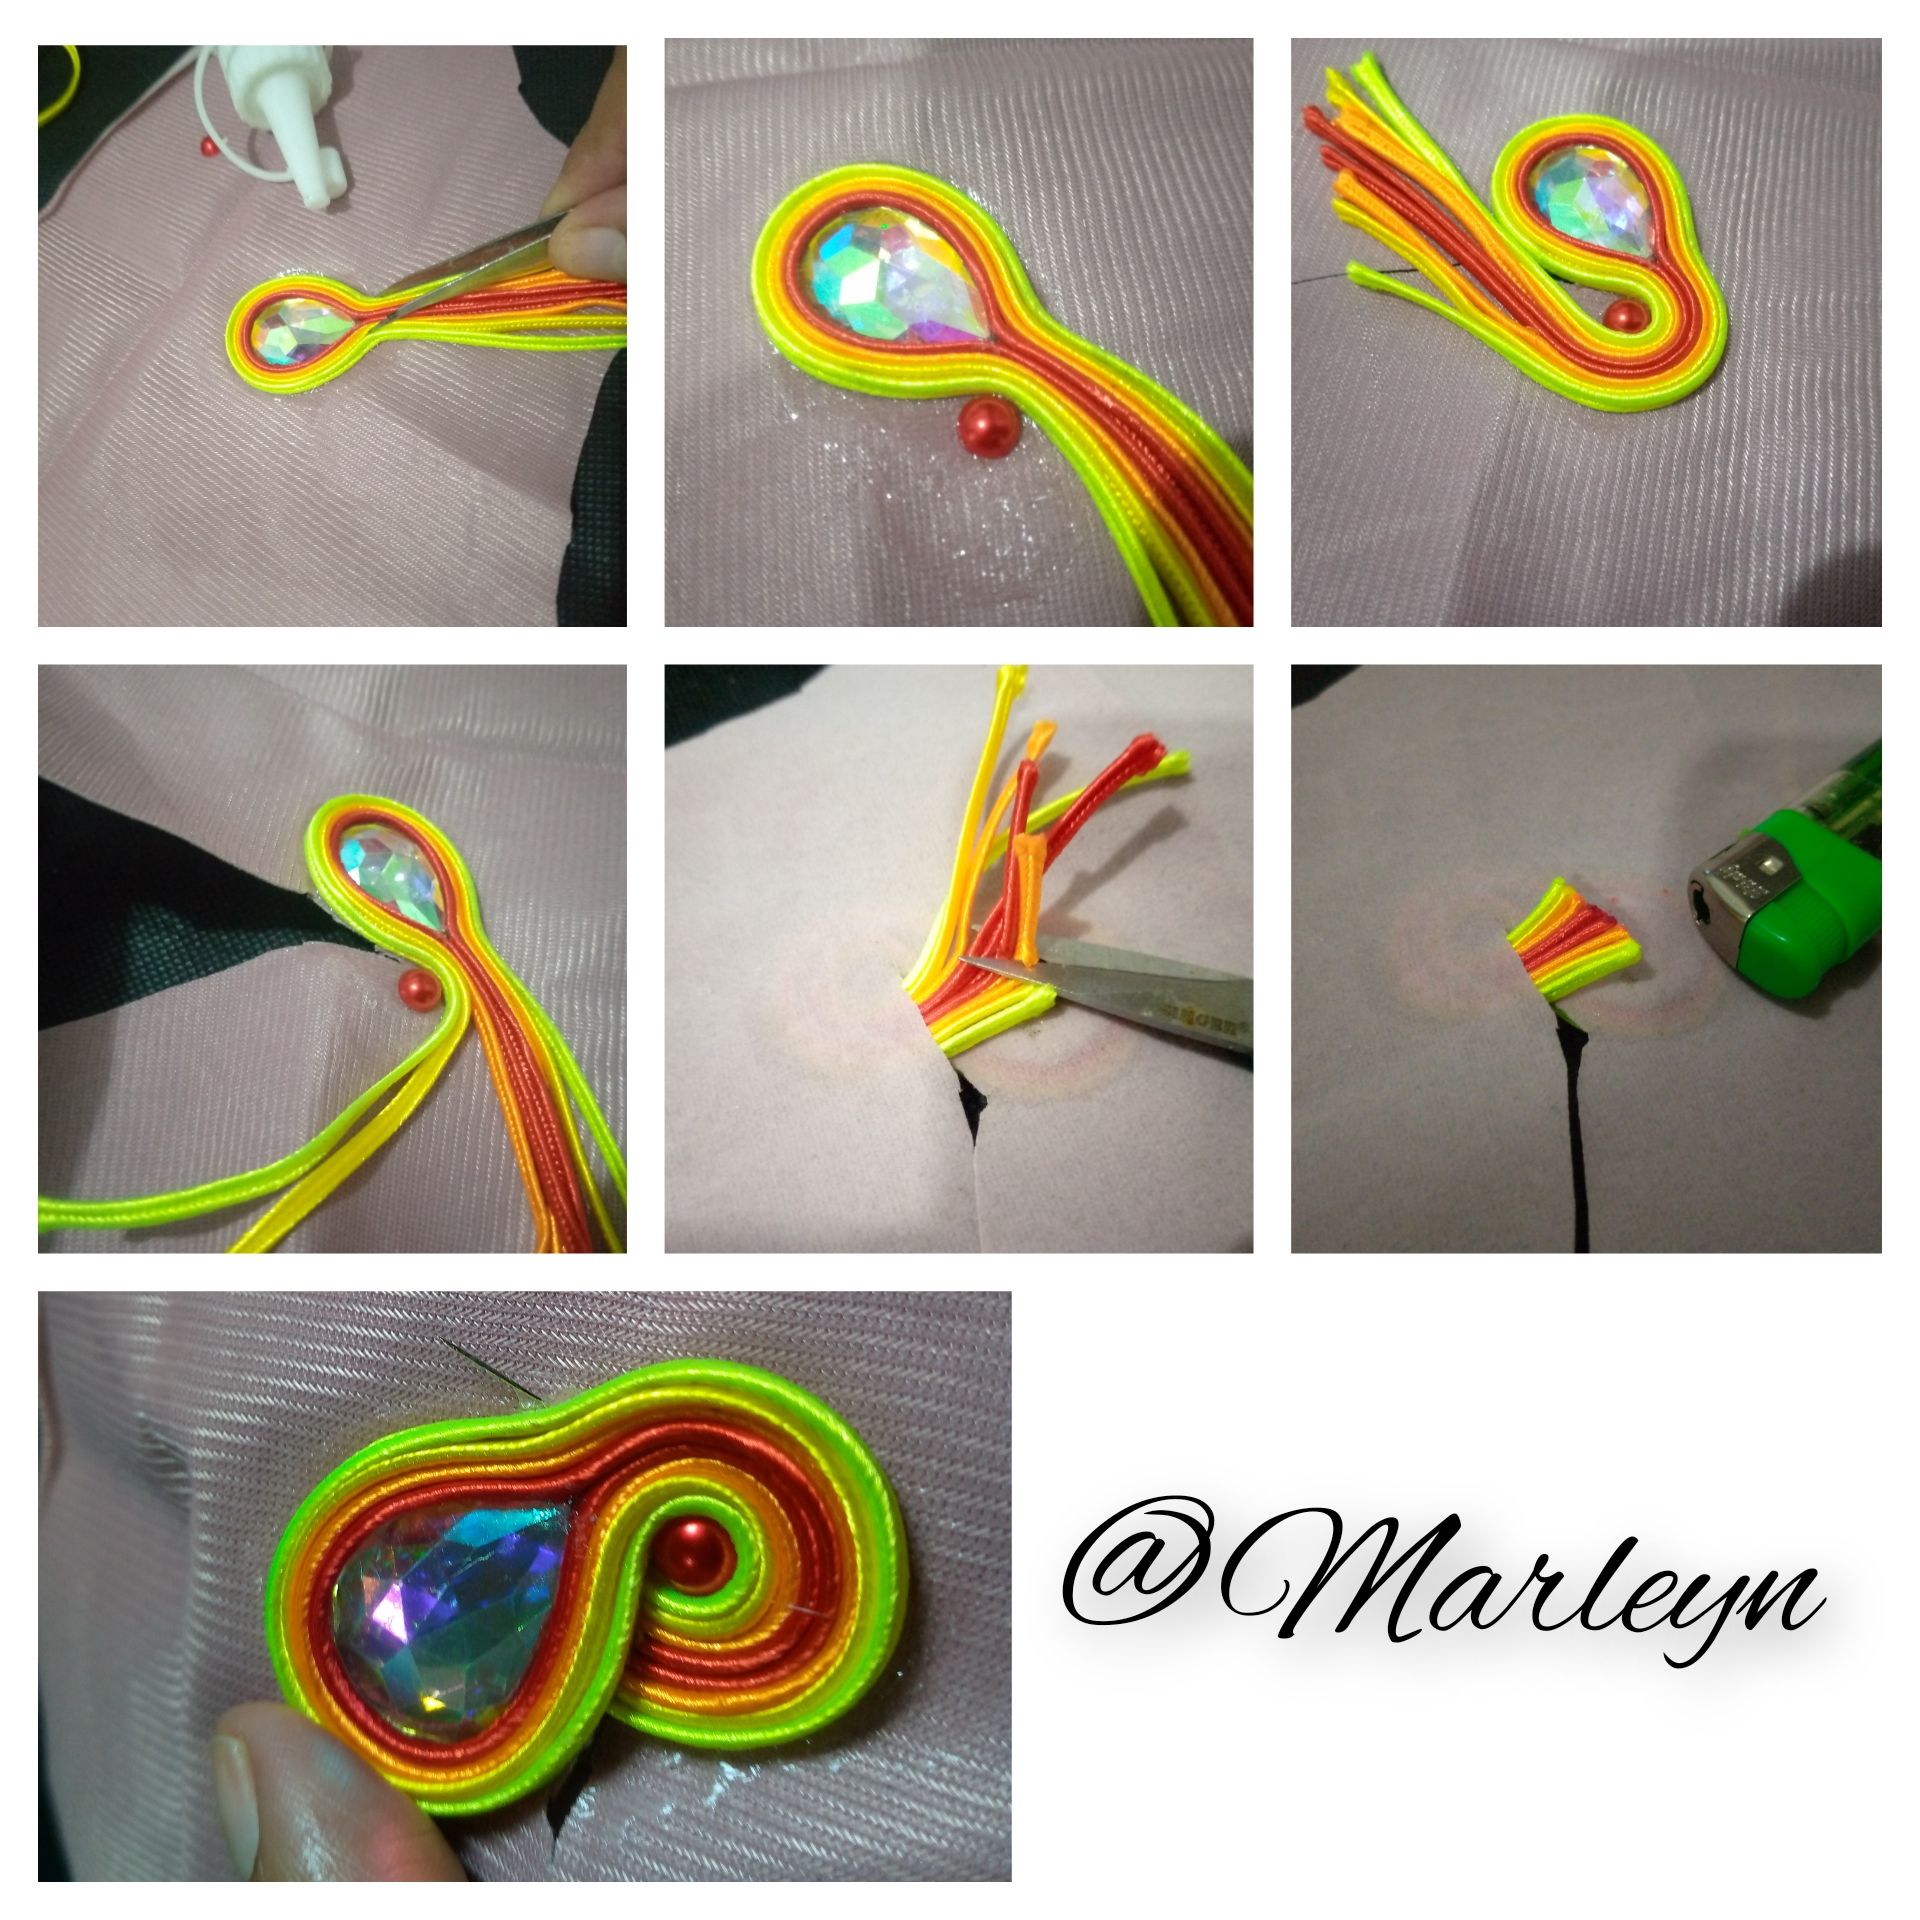
A mano derecha de la pieza, coloca Silicon liquido como te muestro en las imágenes y coloca un aplique redondo de tono rojo, si es brillante mejor, y arropalo con los hilos, es decir pasa los hilos de uno en uno y ve pegándolo a su alrededor, ahora con la tijera realiza un corte justo por la orilla del aplique de arriba, hacia abajo para que pasemos los hilos por abajo de la pieza, corta el hilo que sobra, quemas las puntas y coloca Silicon liquido para pegarlos.
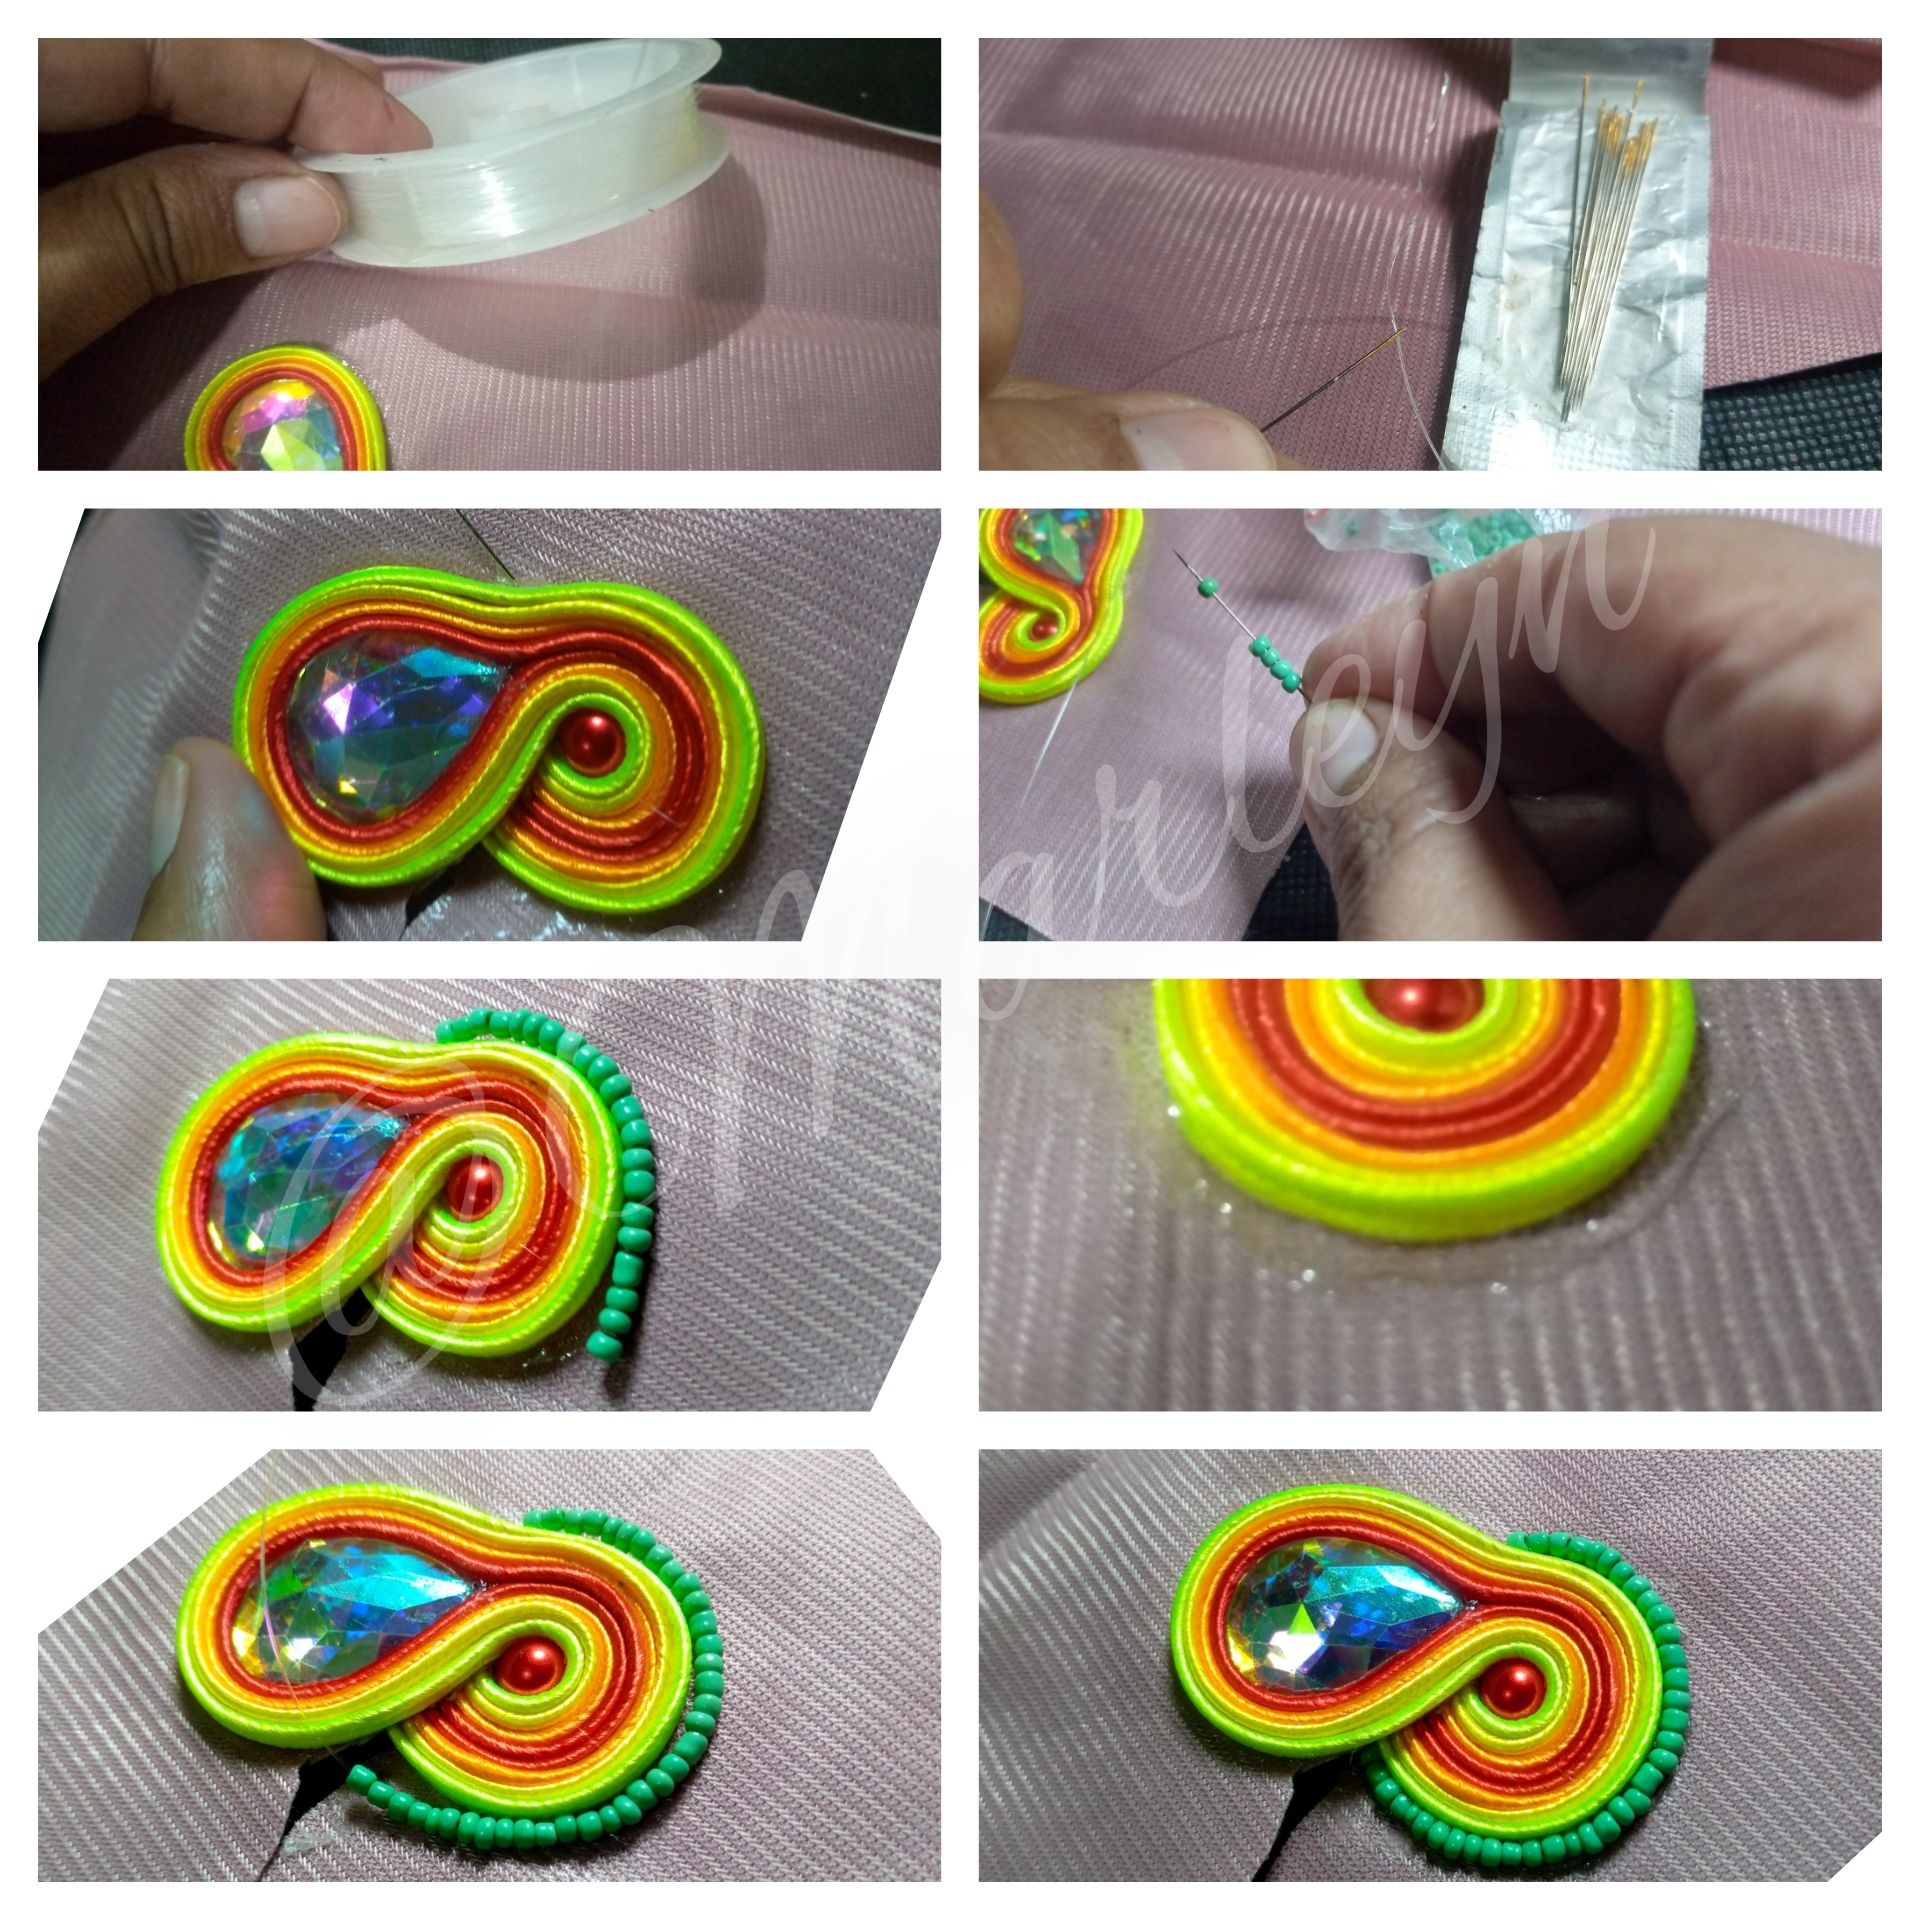
Ensarta hilo y aguja, sácalo por una orilla como te muestro en la imagen y comienza a ensartar las mostacillas color verde, mide que llegue de un extremo a otro como ves en la imagen, coloca Silicon liquido pegar, sacamos la aguja hacia atrás y realizamos un nudo para que no se suelte.
String thread and needle, pull it out by one edge as shown in the image and start stringing the green beads, measure that it reaches from one end to the other as you see in the image, place the liquid Silicon glue, pull the needle back and tie a knot so that it does not come loose.
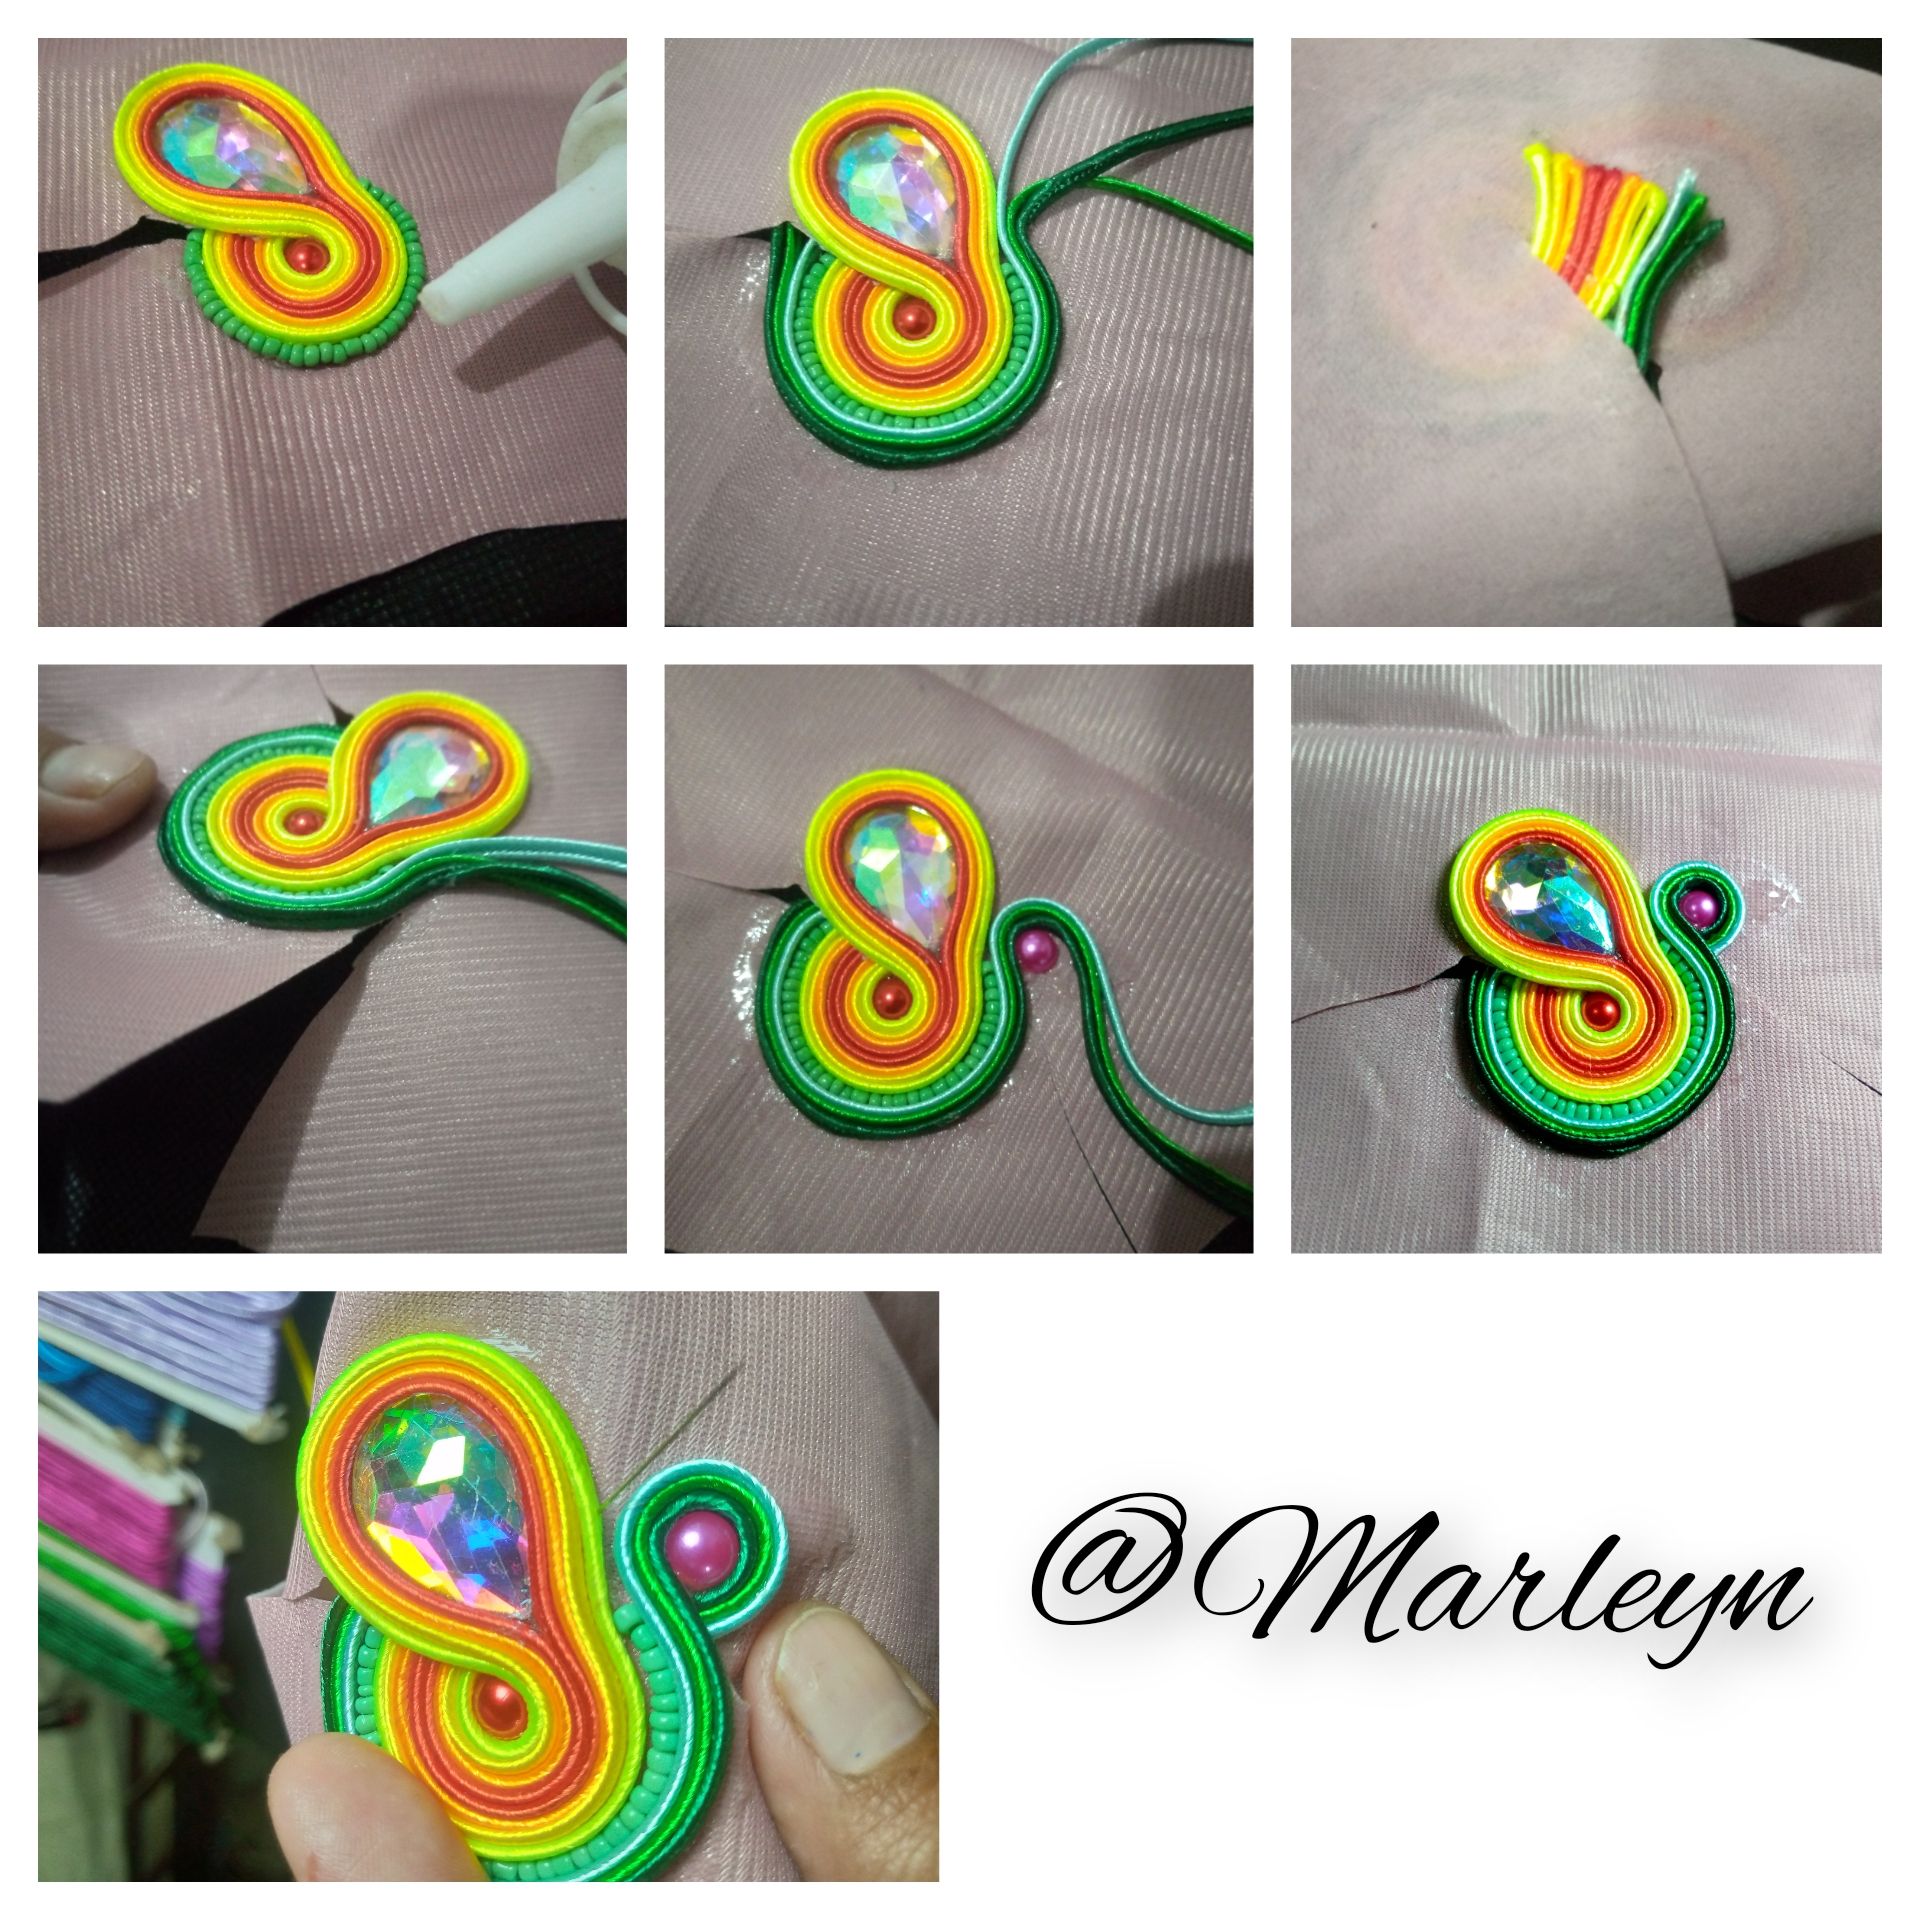
Vamos ahora con los tonos verdes, colocamos Silicon liquido alrededor de la mostacilla verde, yo utilice 3 tonos verdes del más oscuro al más claro, sacamos el hilo sobrante por la ranura que formamos en el paso anterior, mismo proceso cortamos el sobrante, quemamos las puntas y pegamos! Hacia el otro vamos a pegar un aplique redondo fucsia para que resalte el color y le dé más vida a la pieza, pasando el hilo por encima, damos la vuelta al aplique y el hilo va a pasar por abajo del mismo, para hacer esto realizar un pequeño corte en la tela como ves en la imagen!
Let's go now with the green tones, we place liquid silicon around the green beads, I used 3 shades of green from the darkest to the lightest, we remove the excess thread through the groove that we formed in the previous step, same process cut the excess, burn the ends and glue! On the other side we will glue a round fuchsia applique to highlight the color and give more life to the piece, passing the thread over it, we turn the applique and the thread will pass under it, to do this make a small cut in the fabric as you see in the picture!

En el círculo verde pequeño vamos a colocar mostacillas azul claro, igual al paso anterior siempre haremos lo mismo para colocar las mostacillas, introducir la aguja, ensartar las mostacillas, colocar el Silicon y hacer el nudo por atrás! Ahora bien al terminar colocamos los hilos azules, ya empezamos a ver los contrastes de los colores, empezamos por el azul oscuro 3 tonos, como te muestro en las imágenes en cada extremo formamos un círculo con un aplique redondo color verde claro. Metemos los hilos por abajo, realiza un corte en cada extremo como ves en las imágenes. Al terminar en el círculo de abajo colocamos mostacillas moradas, y tres tonos de hilo morado.
In the small green circle we are going to place light blue beads, just like the previous step we will always do the same to place the beads, insert the needle, thread the beads, place the silicon and tie the knot in the back! Now when we finish we place the blue threads, we begin to see the contrasts of the colors, we start with the dark blue 3 tones, as I show you in the images at each end we form a circle with a round light green applique. We put the threads at the bottom, make a cut at each end as you can see in the images. At the end of the circle at the bottom we place purple beads and three shades of purple thread.
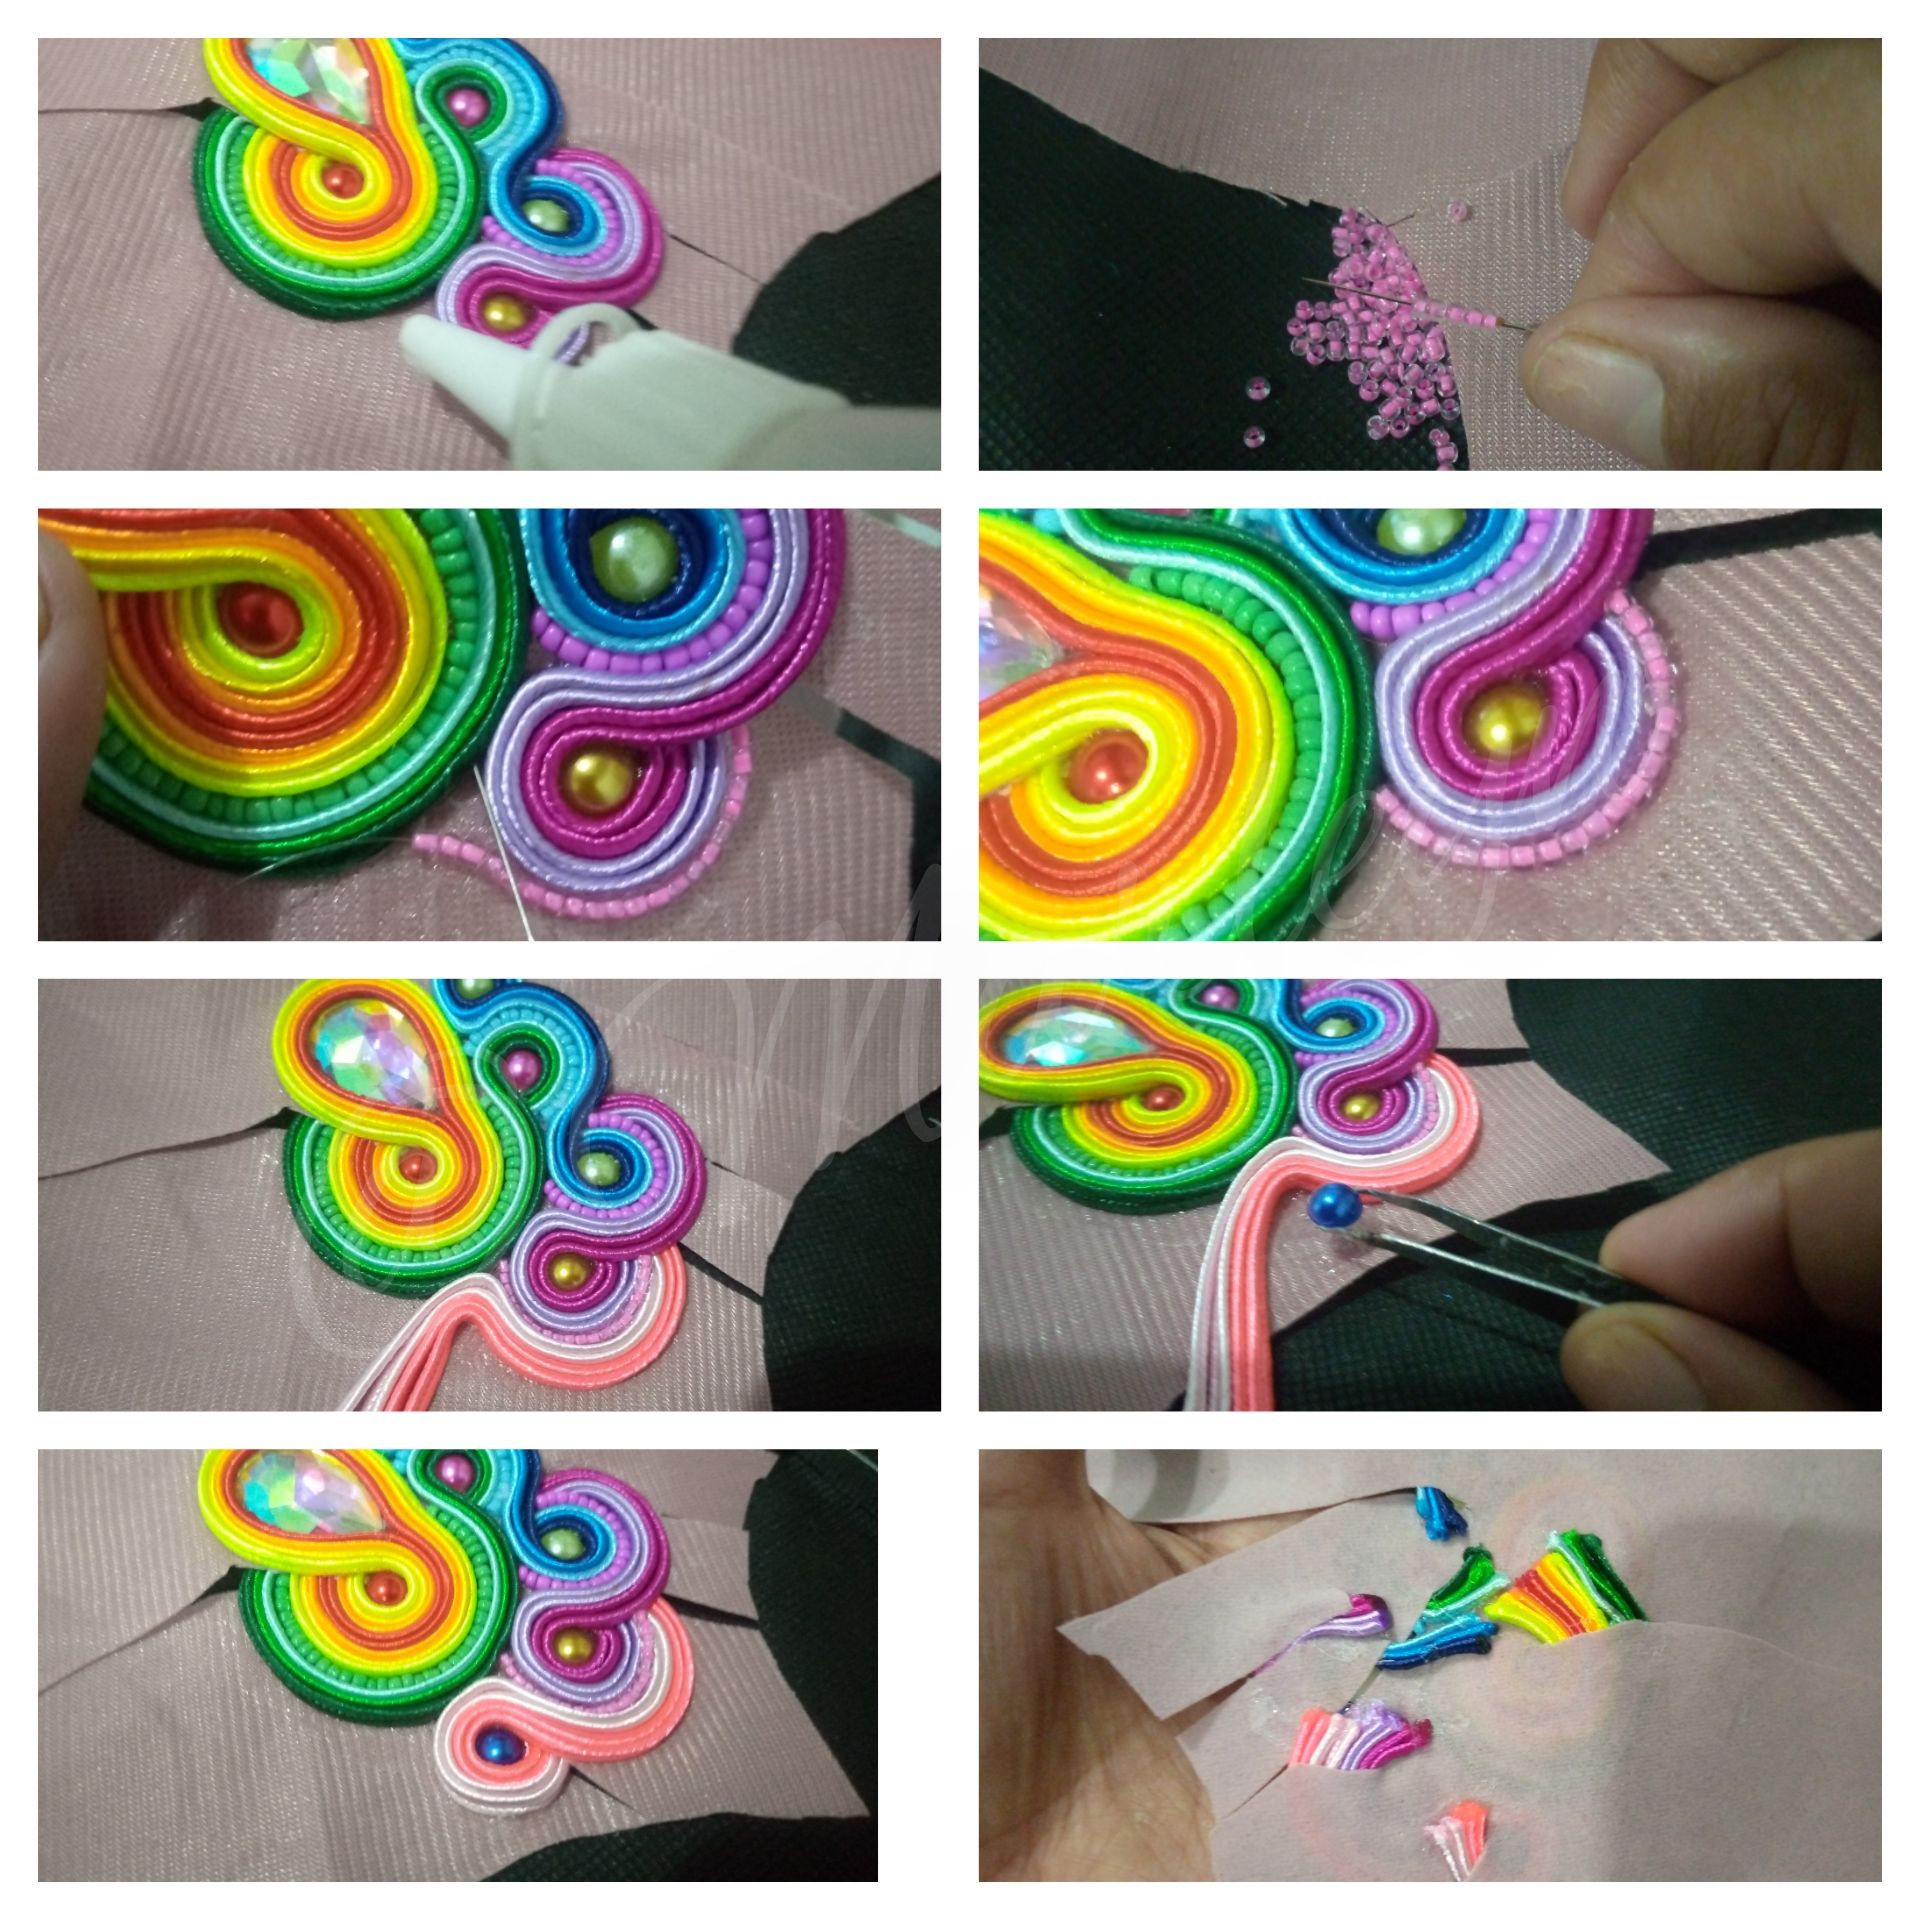
Esta vez realizamos el mismo procedimiento anterior ahora con unos tono rosados dándole más vida a nuestra pieza, finalizando con un aplique redondo color azul oscuro, arropado con los hilos rosados, realiza un corte en la tela y pasa el hilo por atrás, cortamos el sobrante, quemamos las puntas y pegamos.
This time we perform the same procedure as before, now with pink tones giving more life to our piece, ending with a round dark blue applique, wrapped with pink threads, make a cut in the fabric and pass the thread through the back, cut the excess, burn the ends and glue.
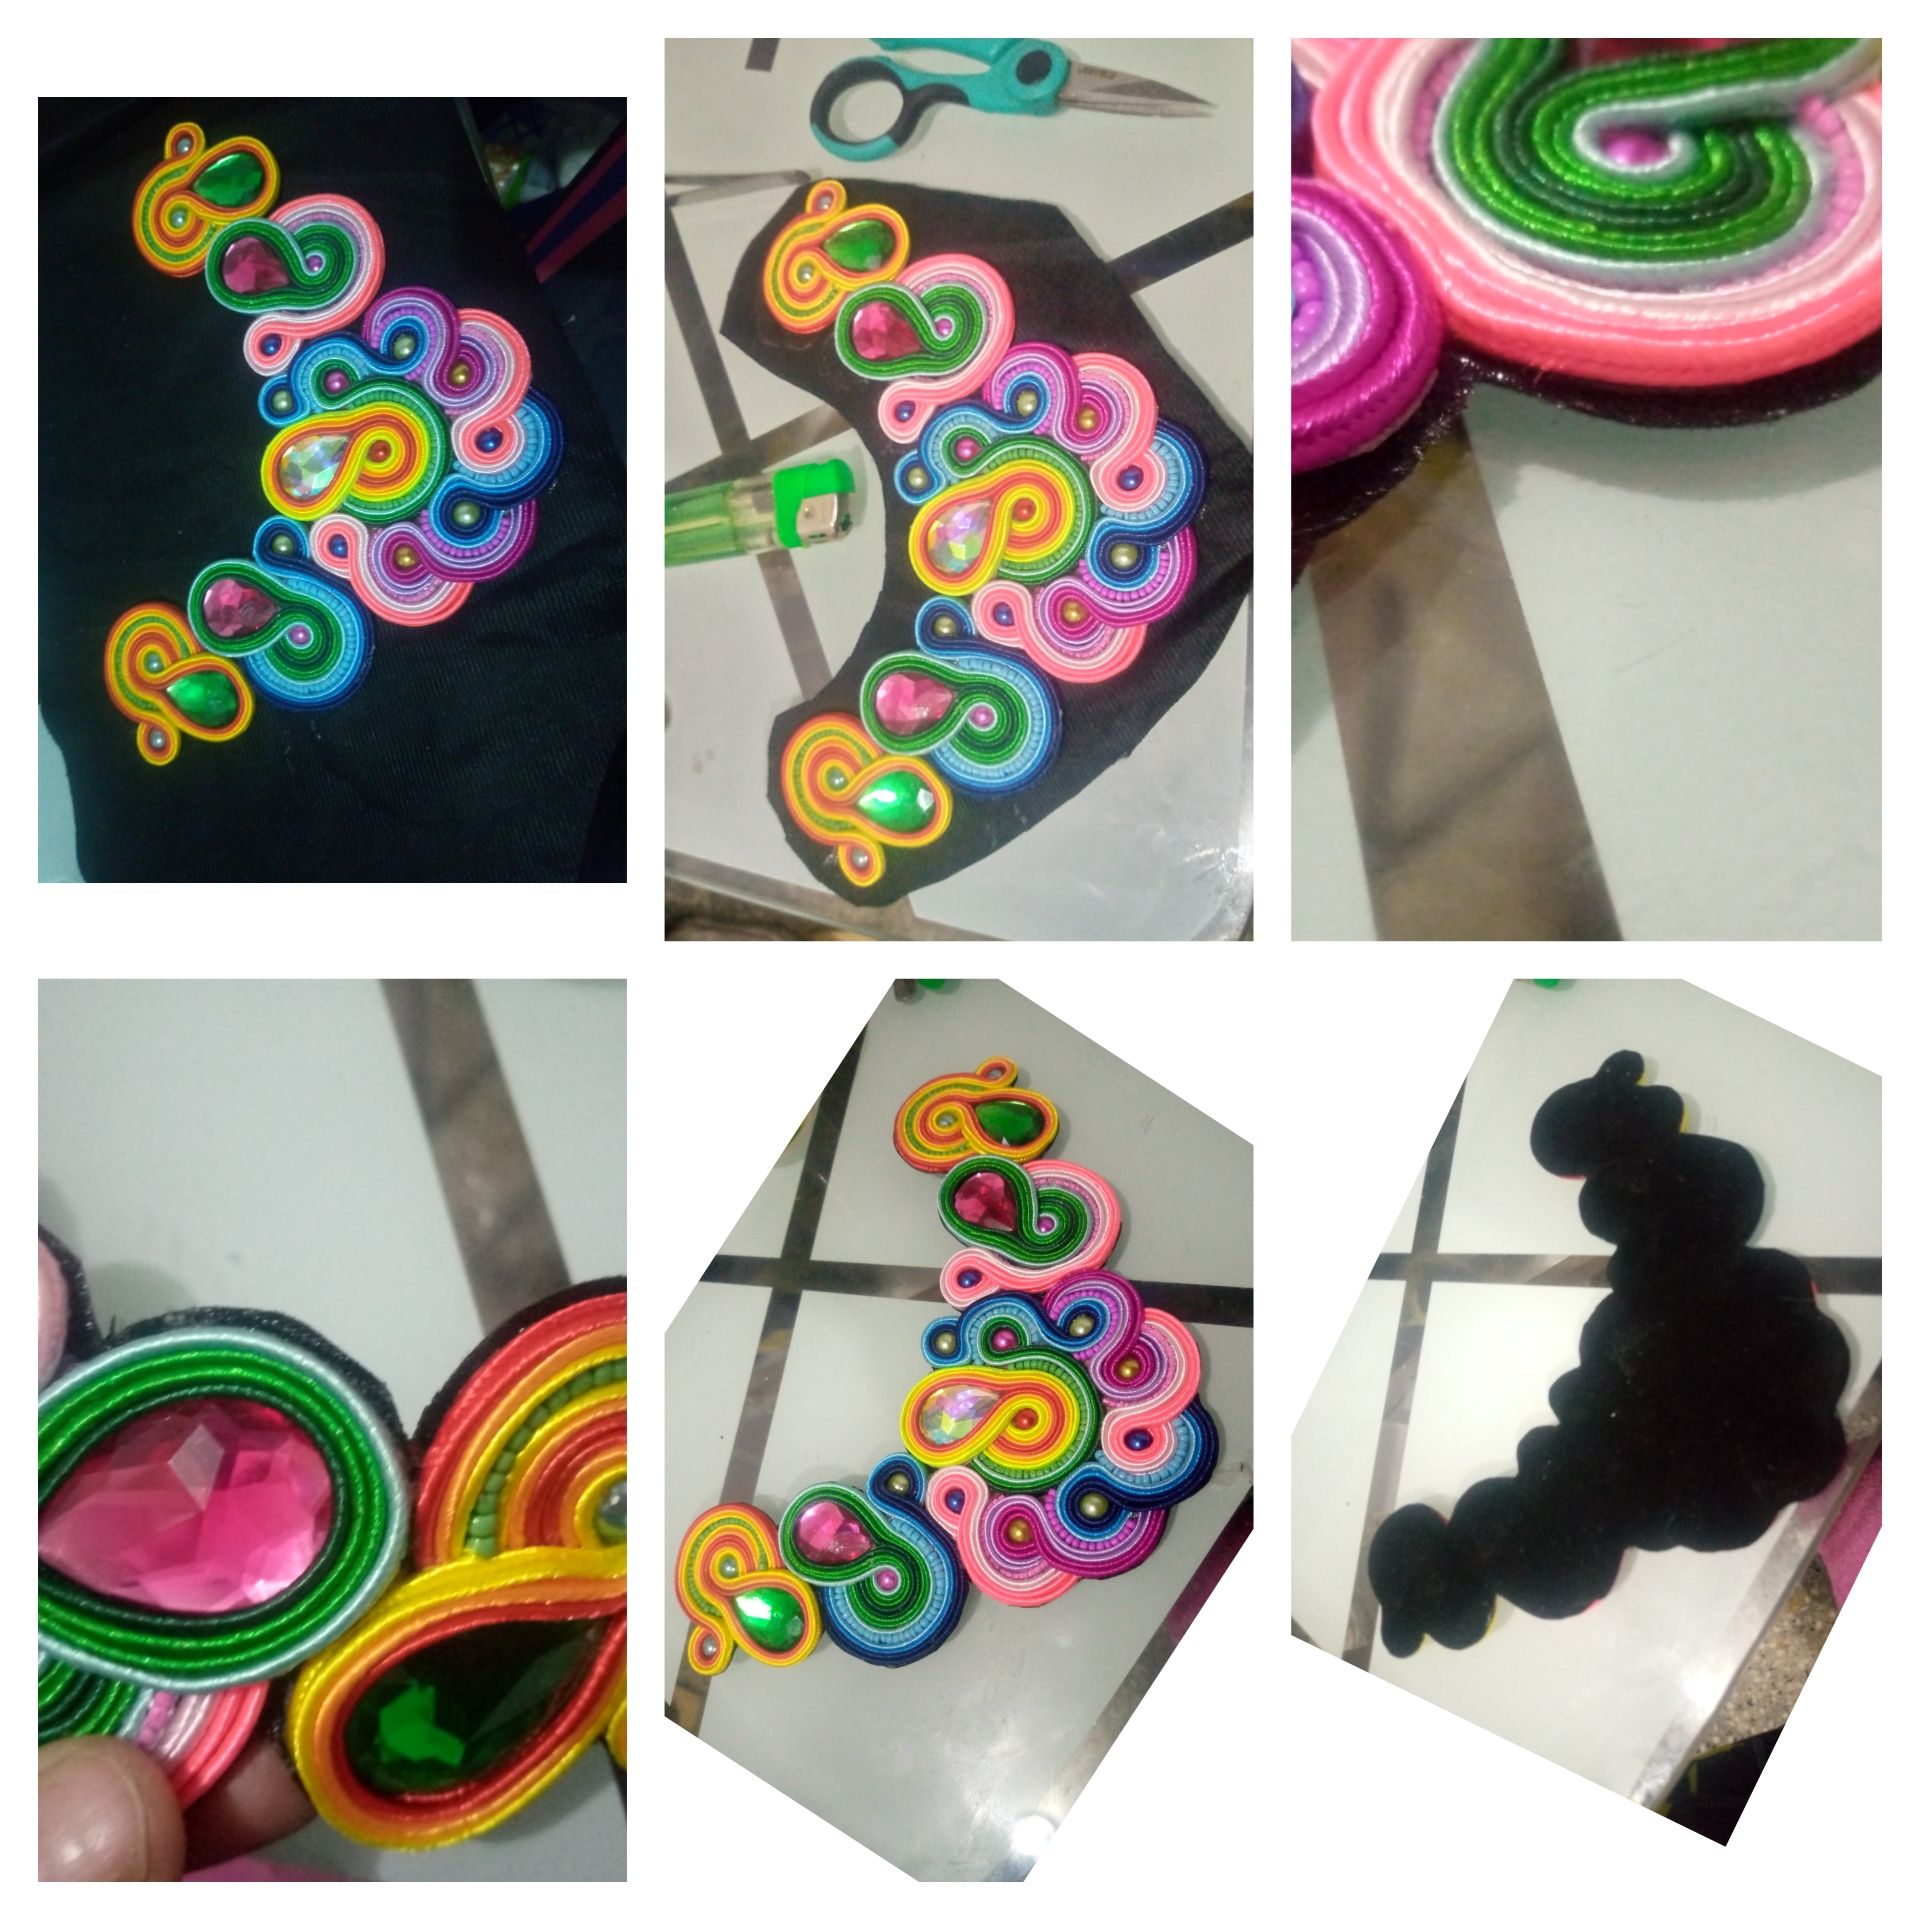
Vamos a seguir con el mismo proceso, con el azul, con el morado hasta llegar nuevamente al rosado, y finalizamos con un pequeño círculo azul nuevamente! Este solo realizamos el círculo pequeño y la próxima piezas se va a realizar en un trozo de tela aparte.
Esta pieza la realice a parte para mayor facilidad, pegaremos un aplique fucsia tipo gota grande, y lo vamos a cubrir con hilos verdes, es el mismo proceso de la pieza central, al terminarlo colocamos mostacillas azul claro por afuera, cerramos atrás y realizamos un nudo! Cortamos toda la tela sobrante.
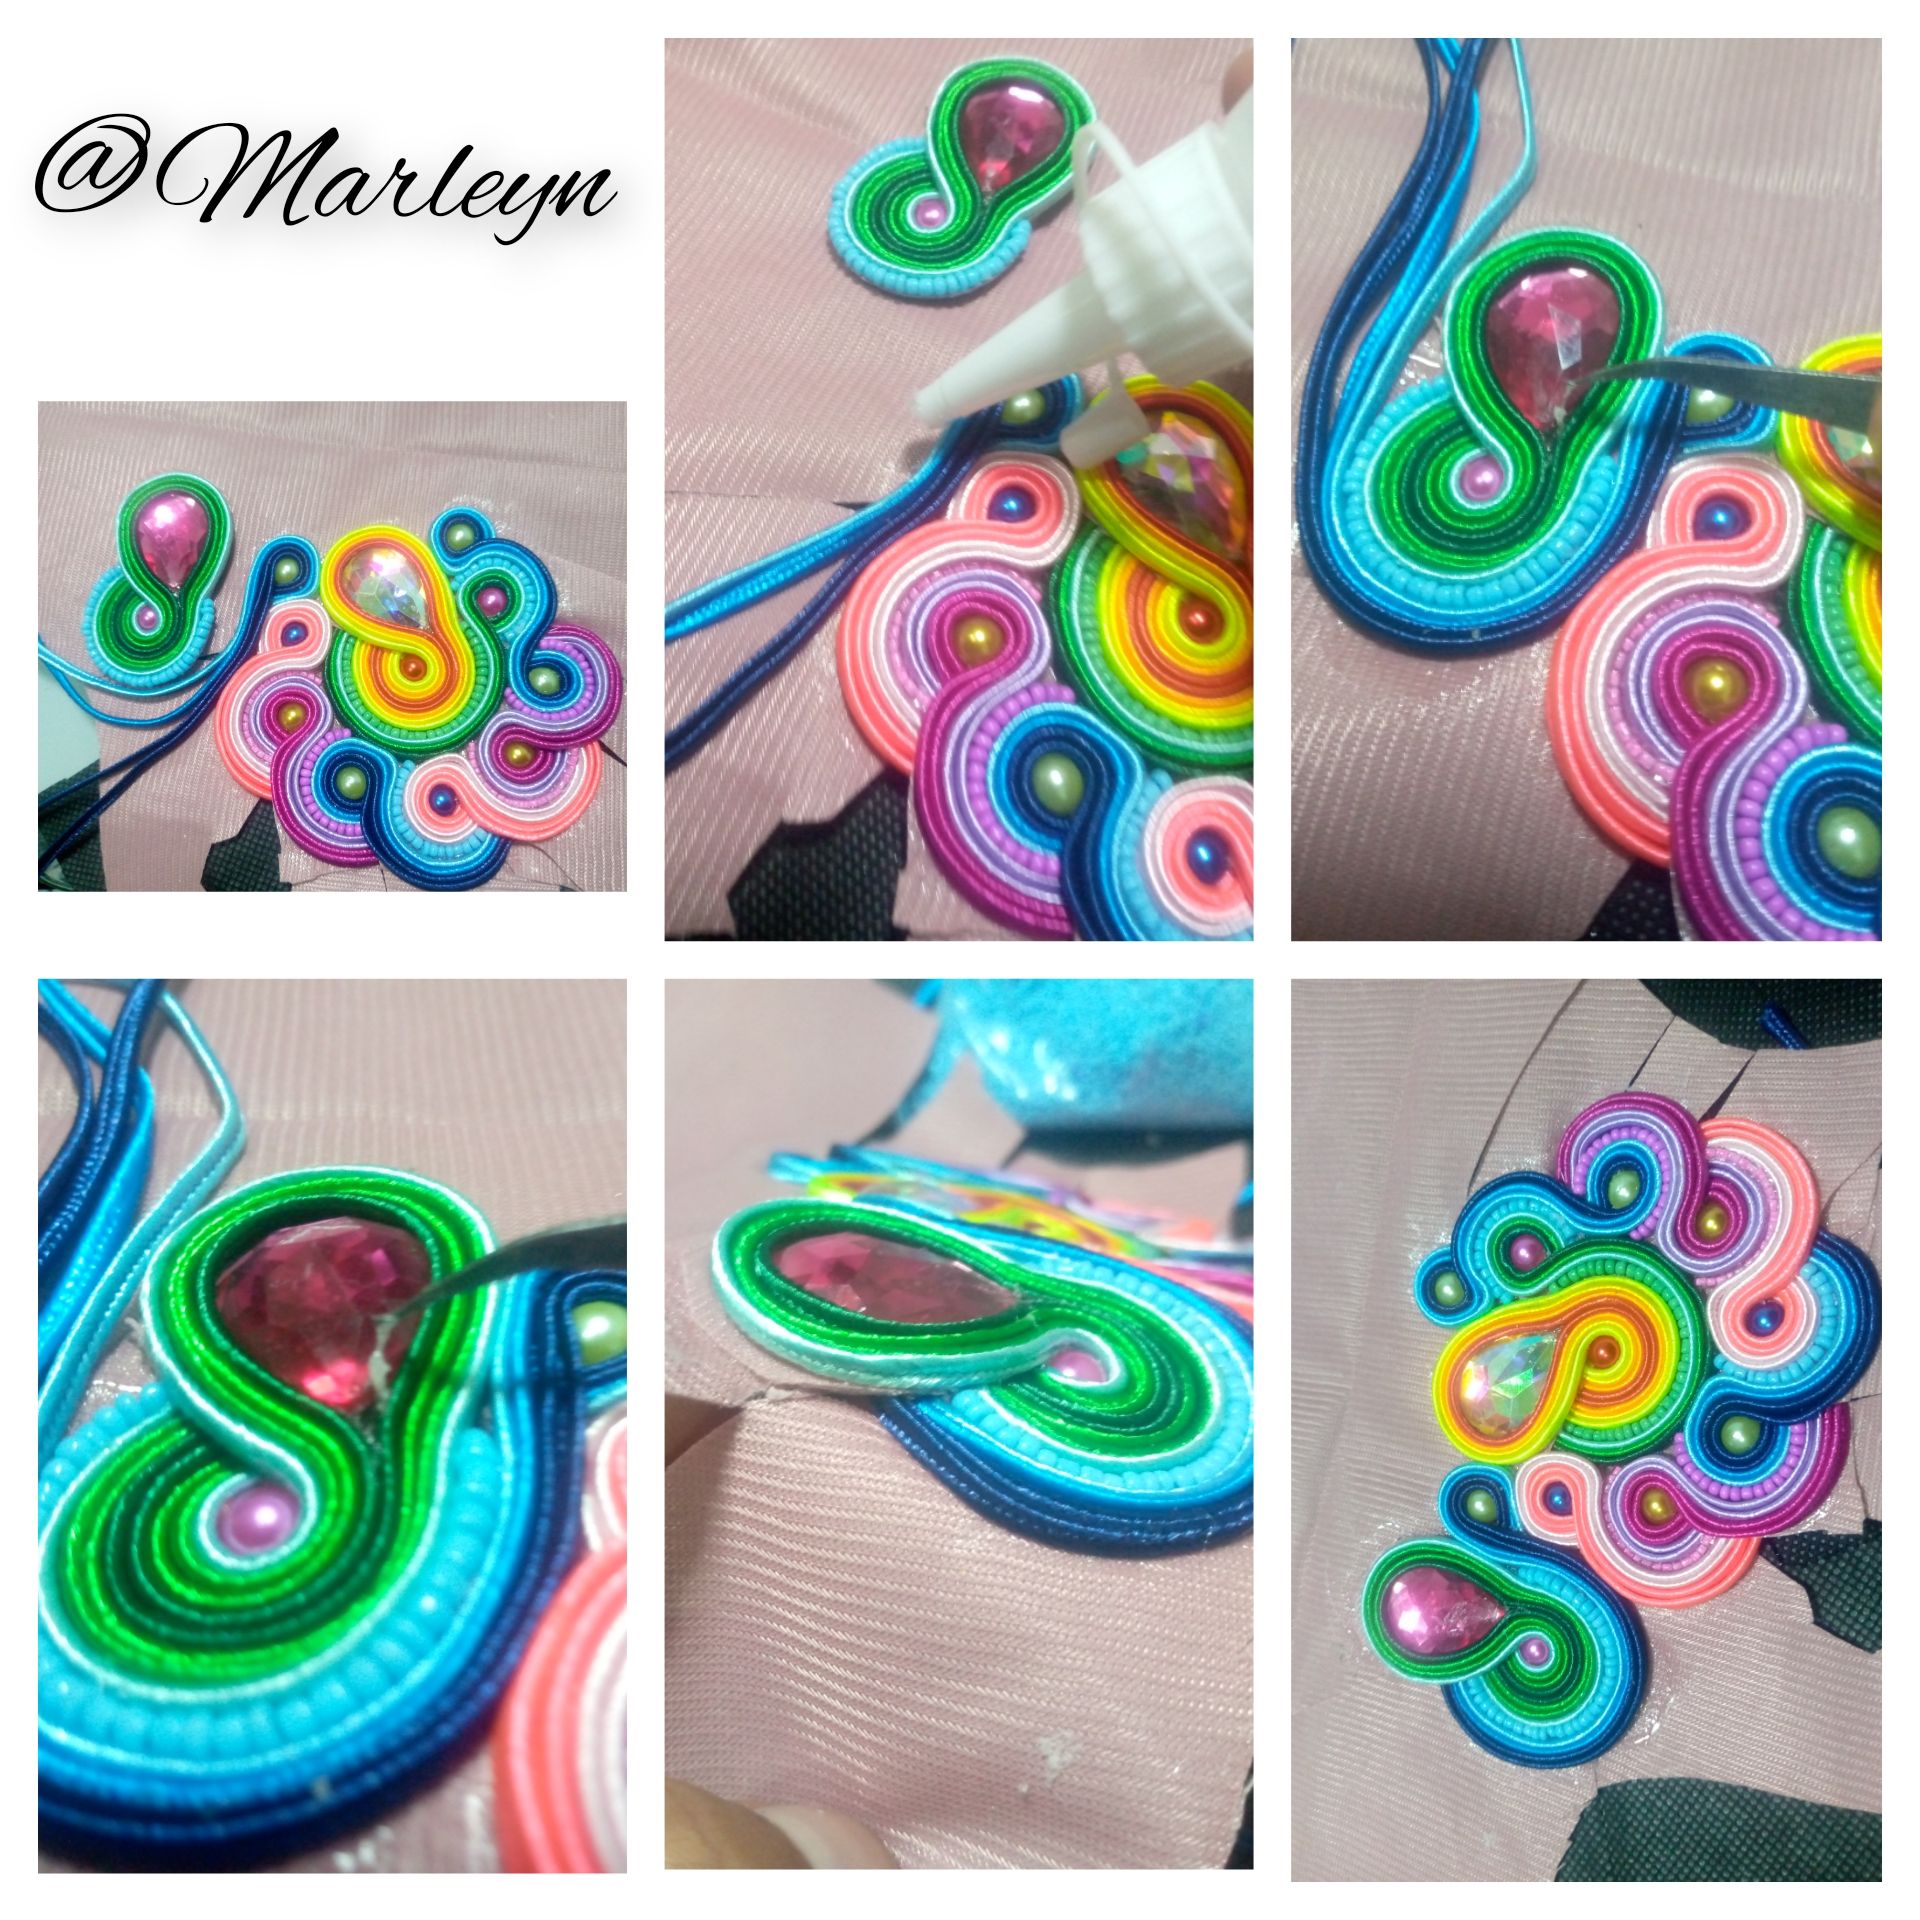
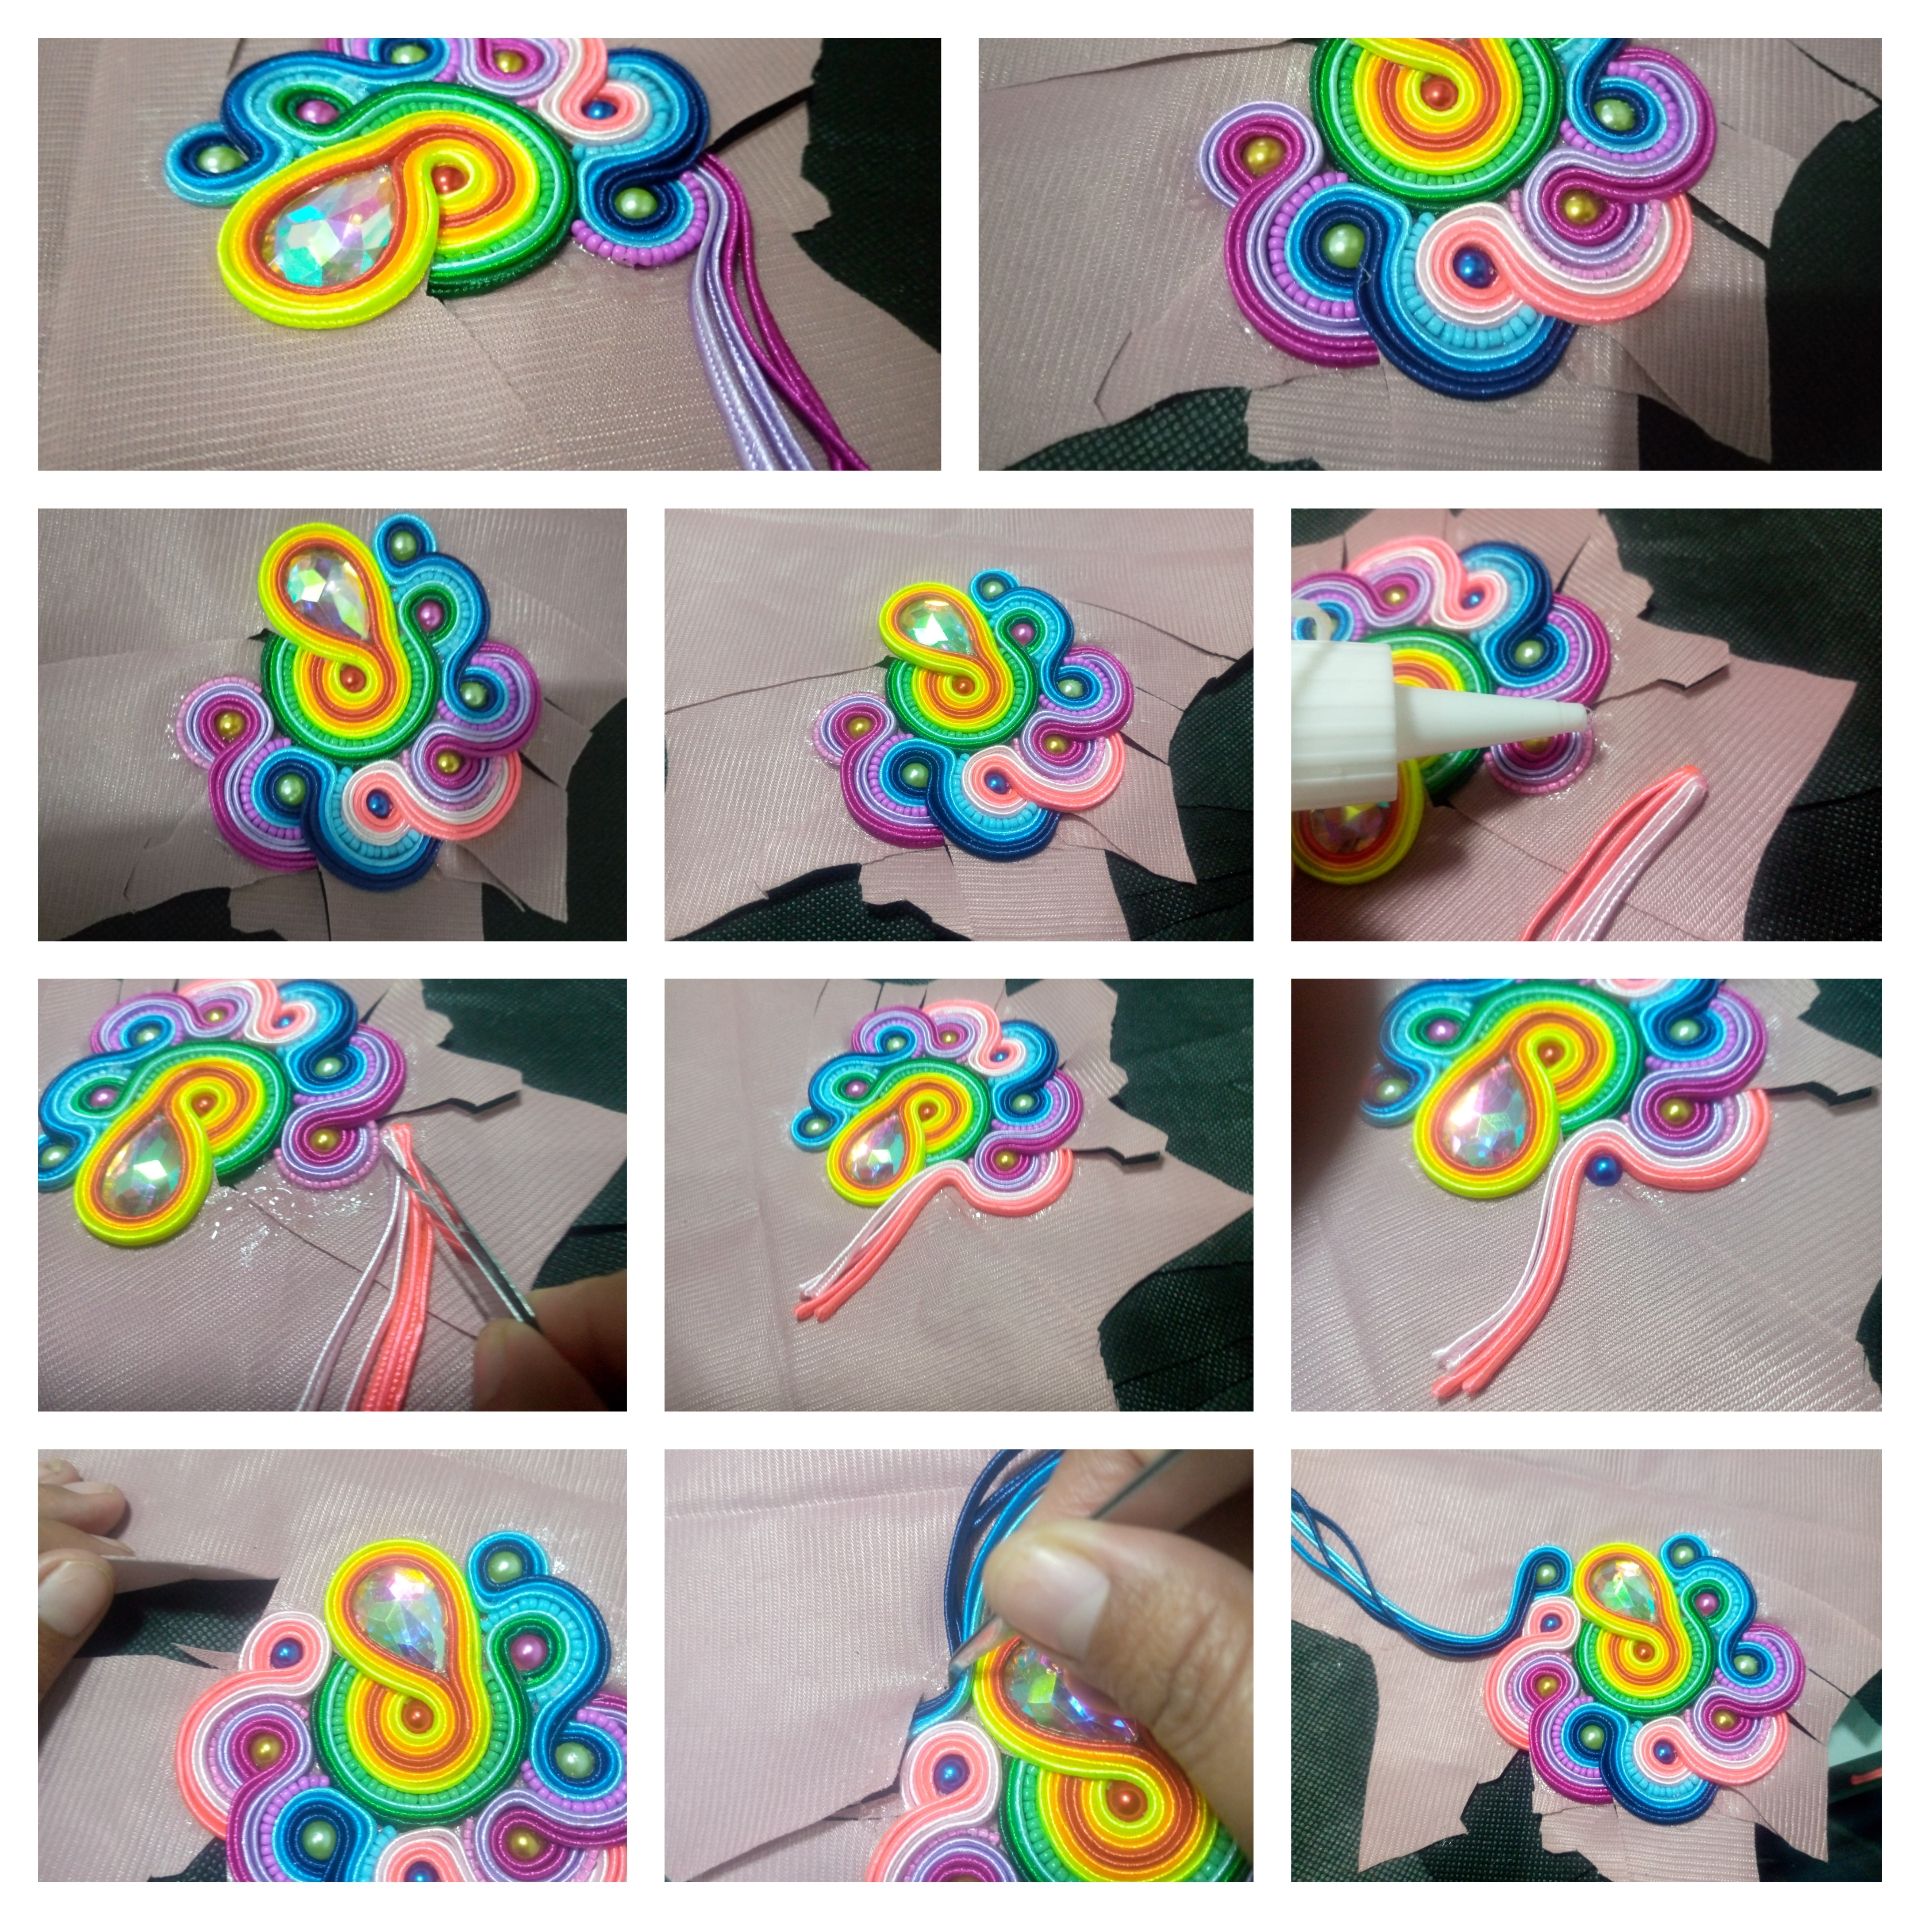
En la pieza central en la parte que dejamos el hilo azul listo, vamos a colocar Silicon liquido y pegaremos la pieza que realizamos en el paso anterior, como ves en la.imagen recubre con el hilo azul y forma un círculo en la parte de arriba realiza un pequeño corte para introducir los hilos por atrás.
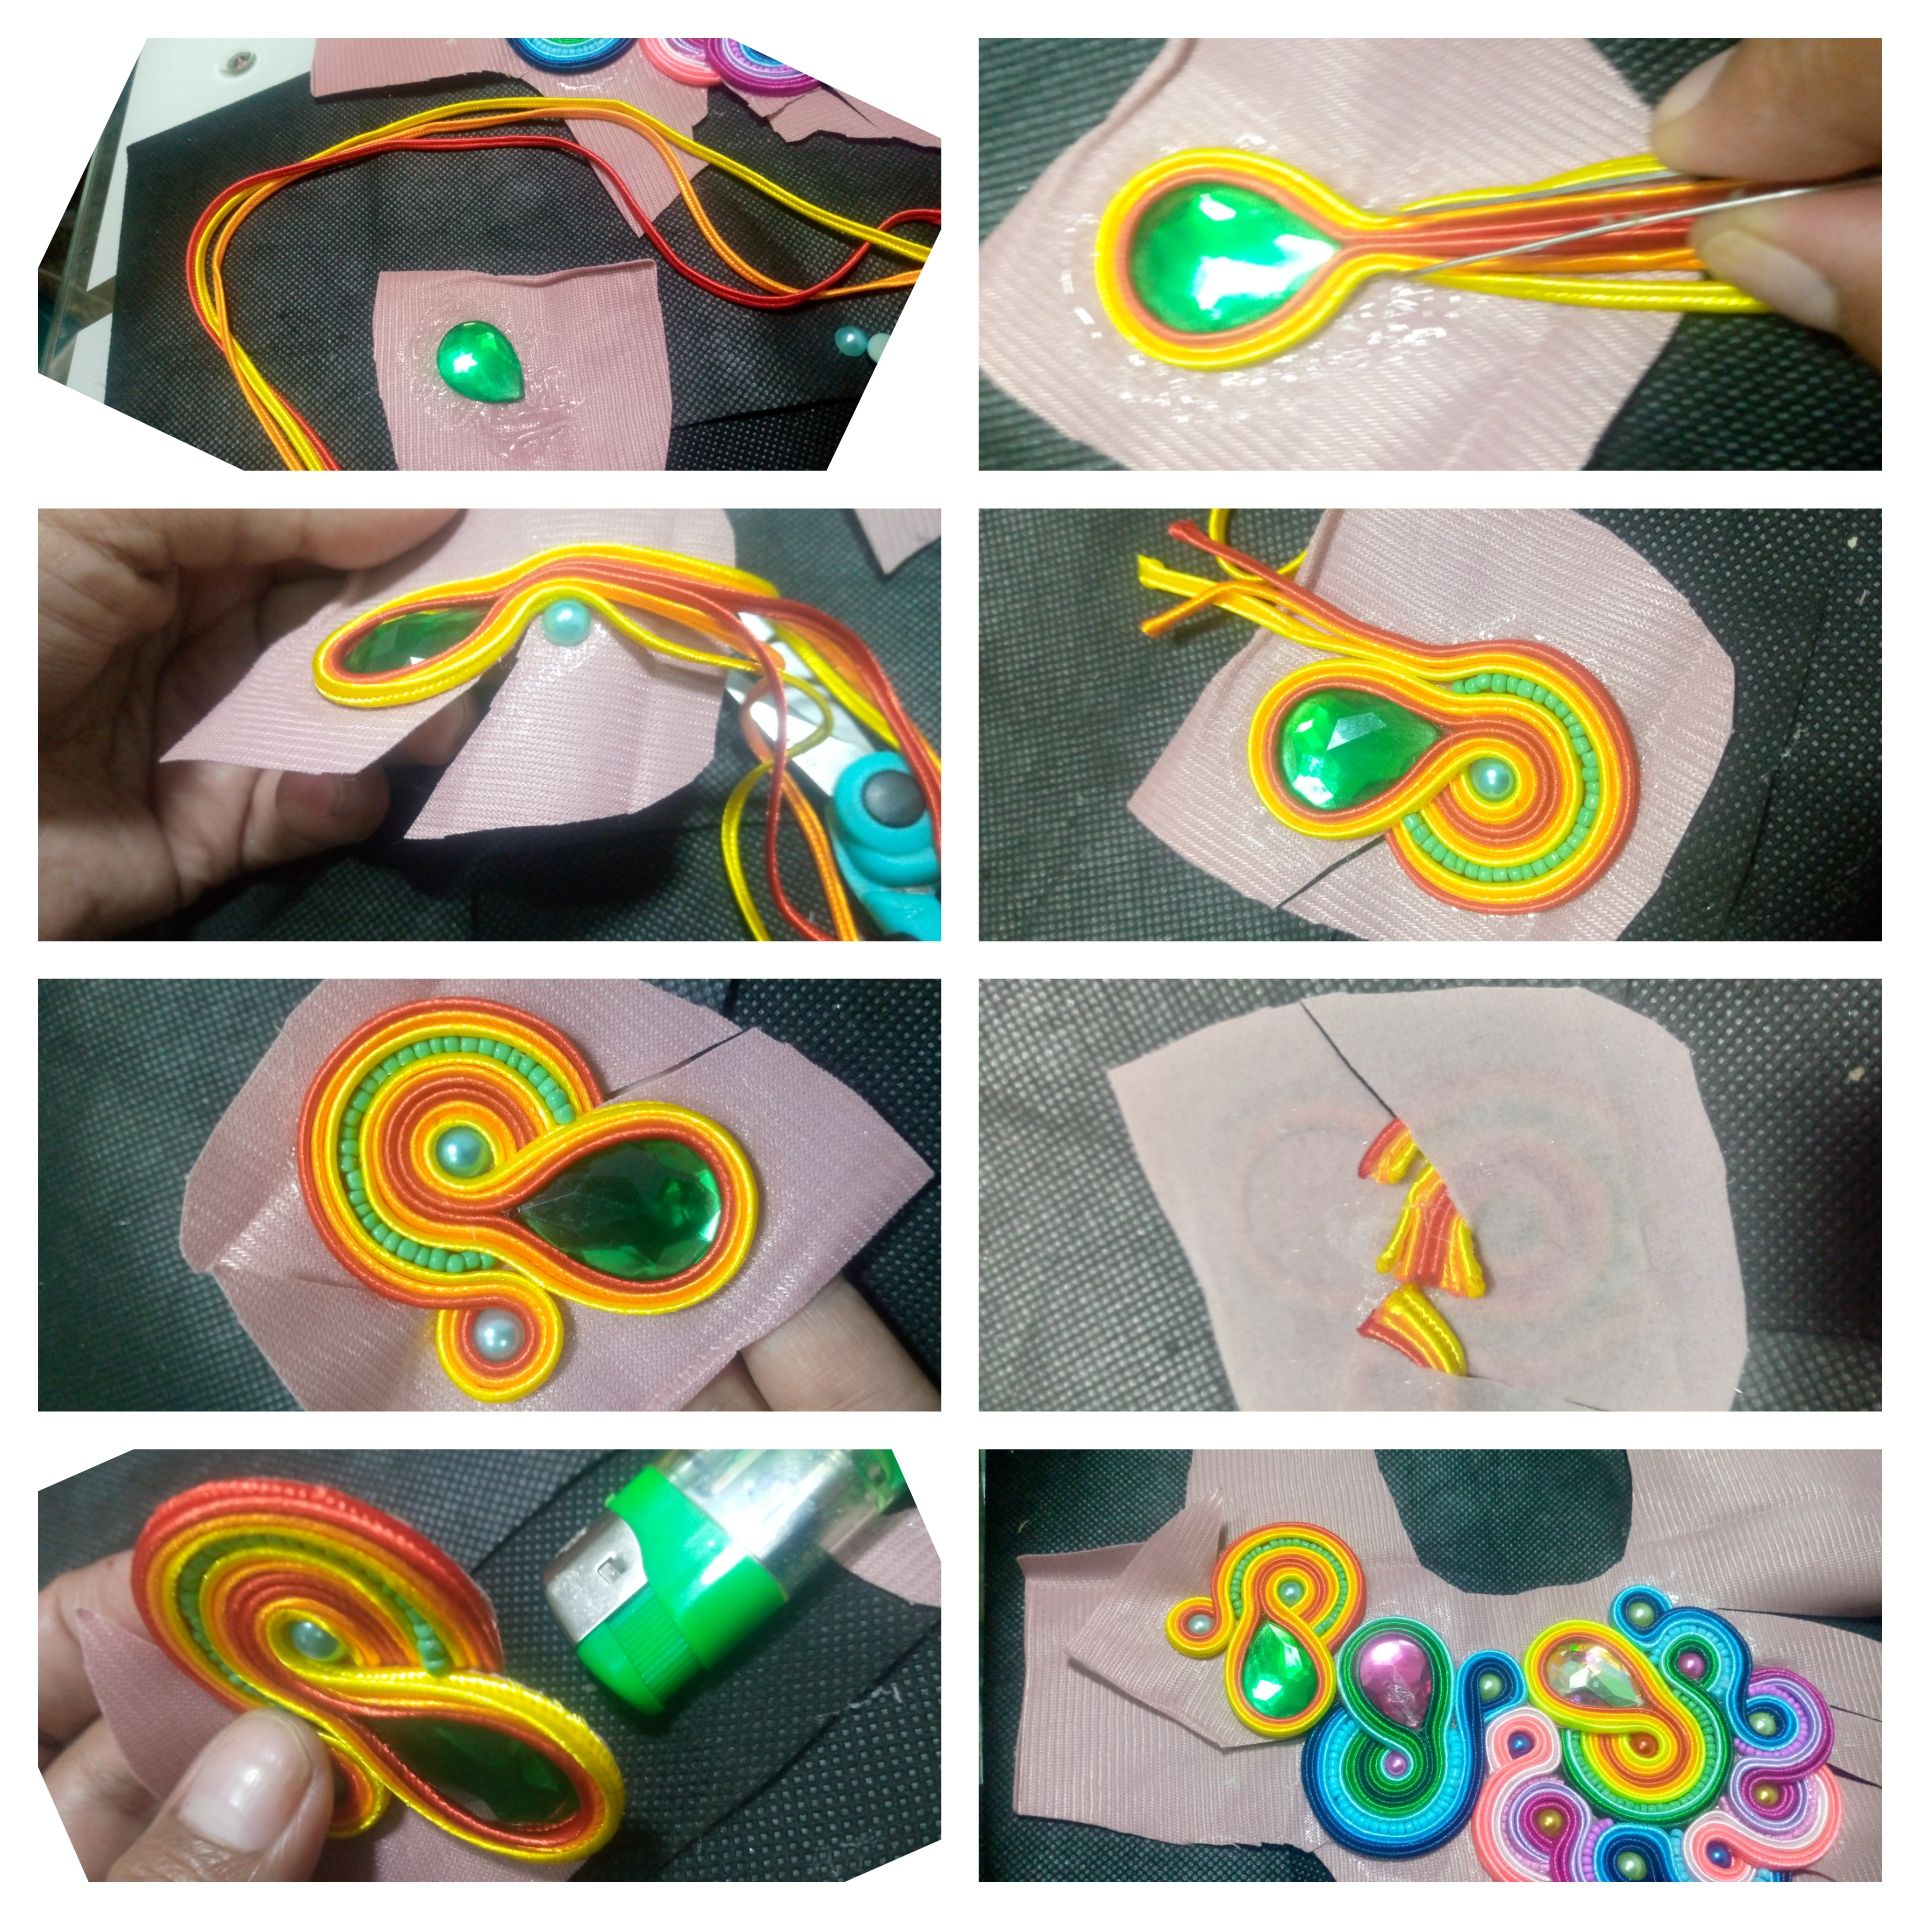
Realizamos la pieza última pieza del lado derecho, está la vamos a hacer con los mismos tonos de la pieza central de la misma manera que realizamos la anterior solo que esta vez la colocaremos con la gota hacia abajo, de esta manera se hará un contraste entre los tonos y las piezas encajaran correctamente!
We make the last piece on the right side, we are going to make it with the same tones of the central piece in the same way we made the previous one, only this time we will place it with the drop down, this way there will be a contrast between the tones and the pieces will fit correctly!
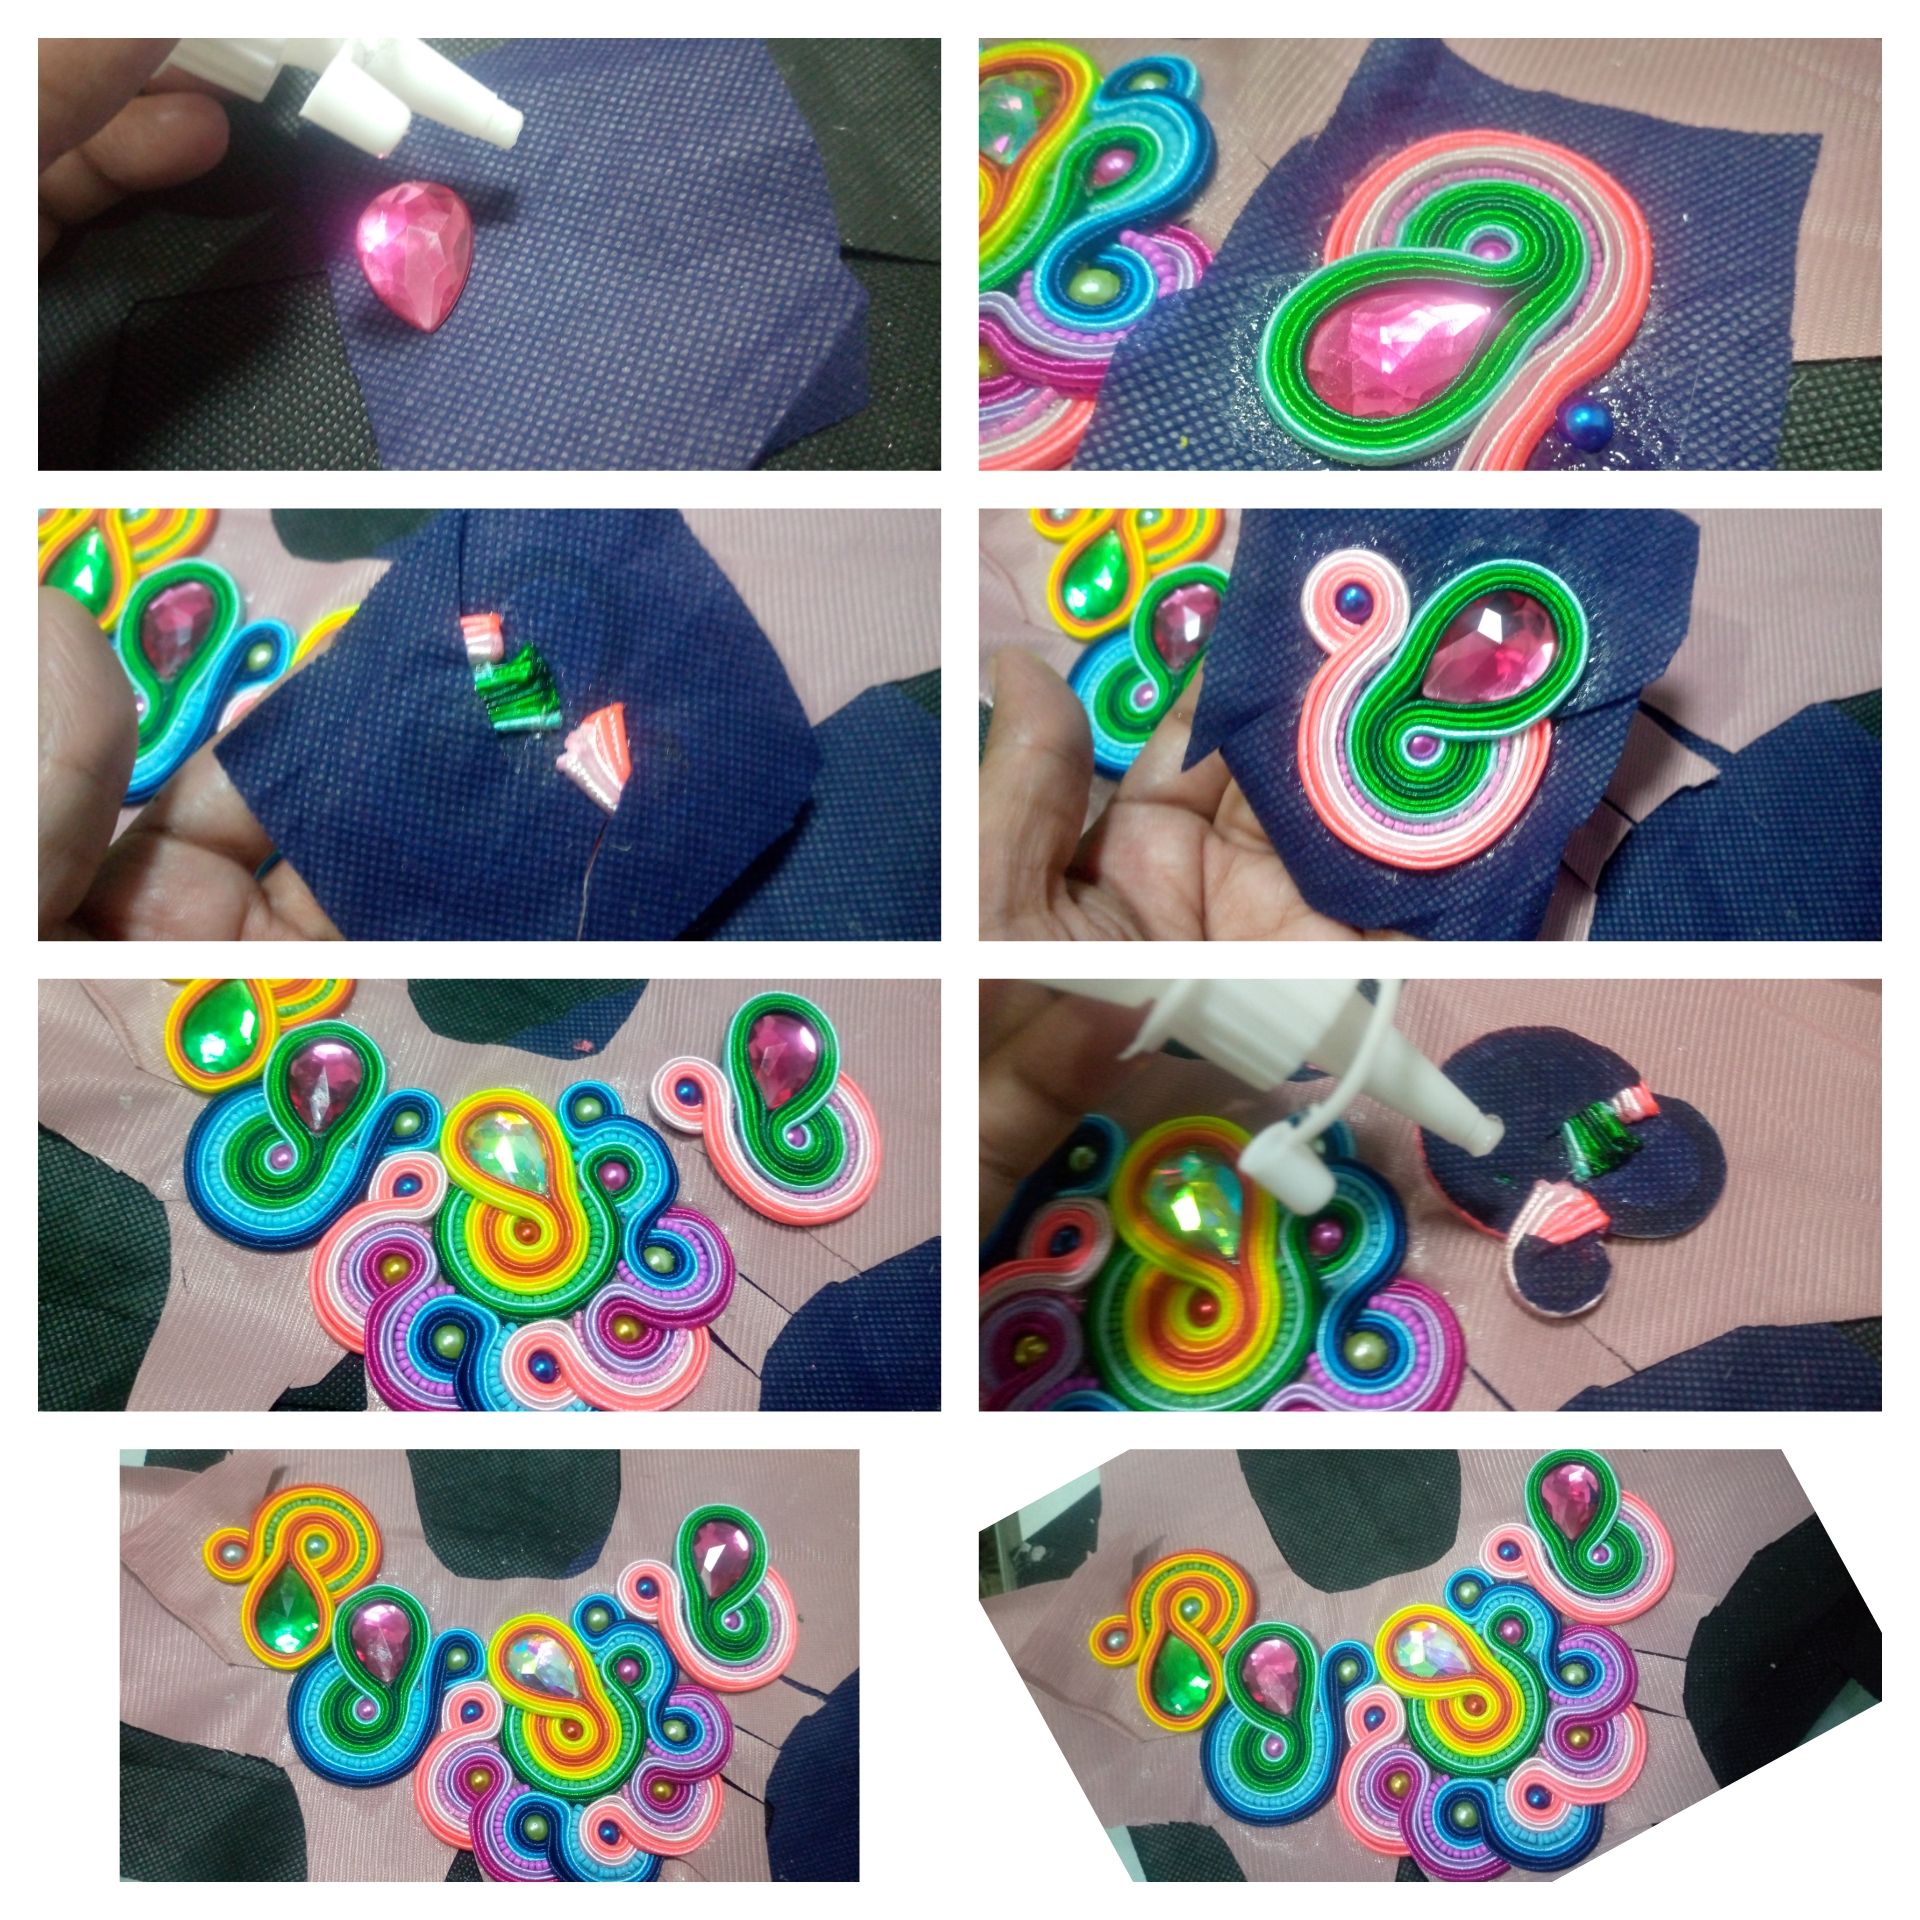
Realizamos los dos últimos procesos anteriores pero del otro lado del collar, verifica que esta vez los círculos que formamos con los apliques redondos pequeños sean hacia el otro lado, vamos pegando las piezas y de esta manera todo va como un engranaje acoplando paso a paso!
We perform the last two previous processes but on the other side of the necklace, verify that this time the circles that we form with the small round appliqués are towards the other side, we glue the pieces and in this way everything goes like a gear coupling step by step!
Corta toda la tela sobrante y pasa la llama del encendedor por toda la pieza muy rápido y la llama azul de esta manera sellas los hilos y le das como un toque brillante a los mismos!
Cut all the excess fabric and pass the flame of the lighter over the whole piece very fast and the blue flame in this way seals the threads and gives them a shiny touch!
Pega la pieza en la gamuza y deja un milímetro de distancia aproximadamente entre la gamuza y la pieza, al terminar de cortar la pieza pasamos el encendedor por toda la orilla, y de esta manera la gamuza tiende a adherirse a la pieza y el acabado es mucho mejor.
Glue the piece on the chamois and leave a millimeter of distance approximately between the chamois and the piece, when we finish cutting the piece we pass the lighter along the entire edge, and in this way the chamois tends to adhere to the piece and the finish is much better.

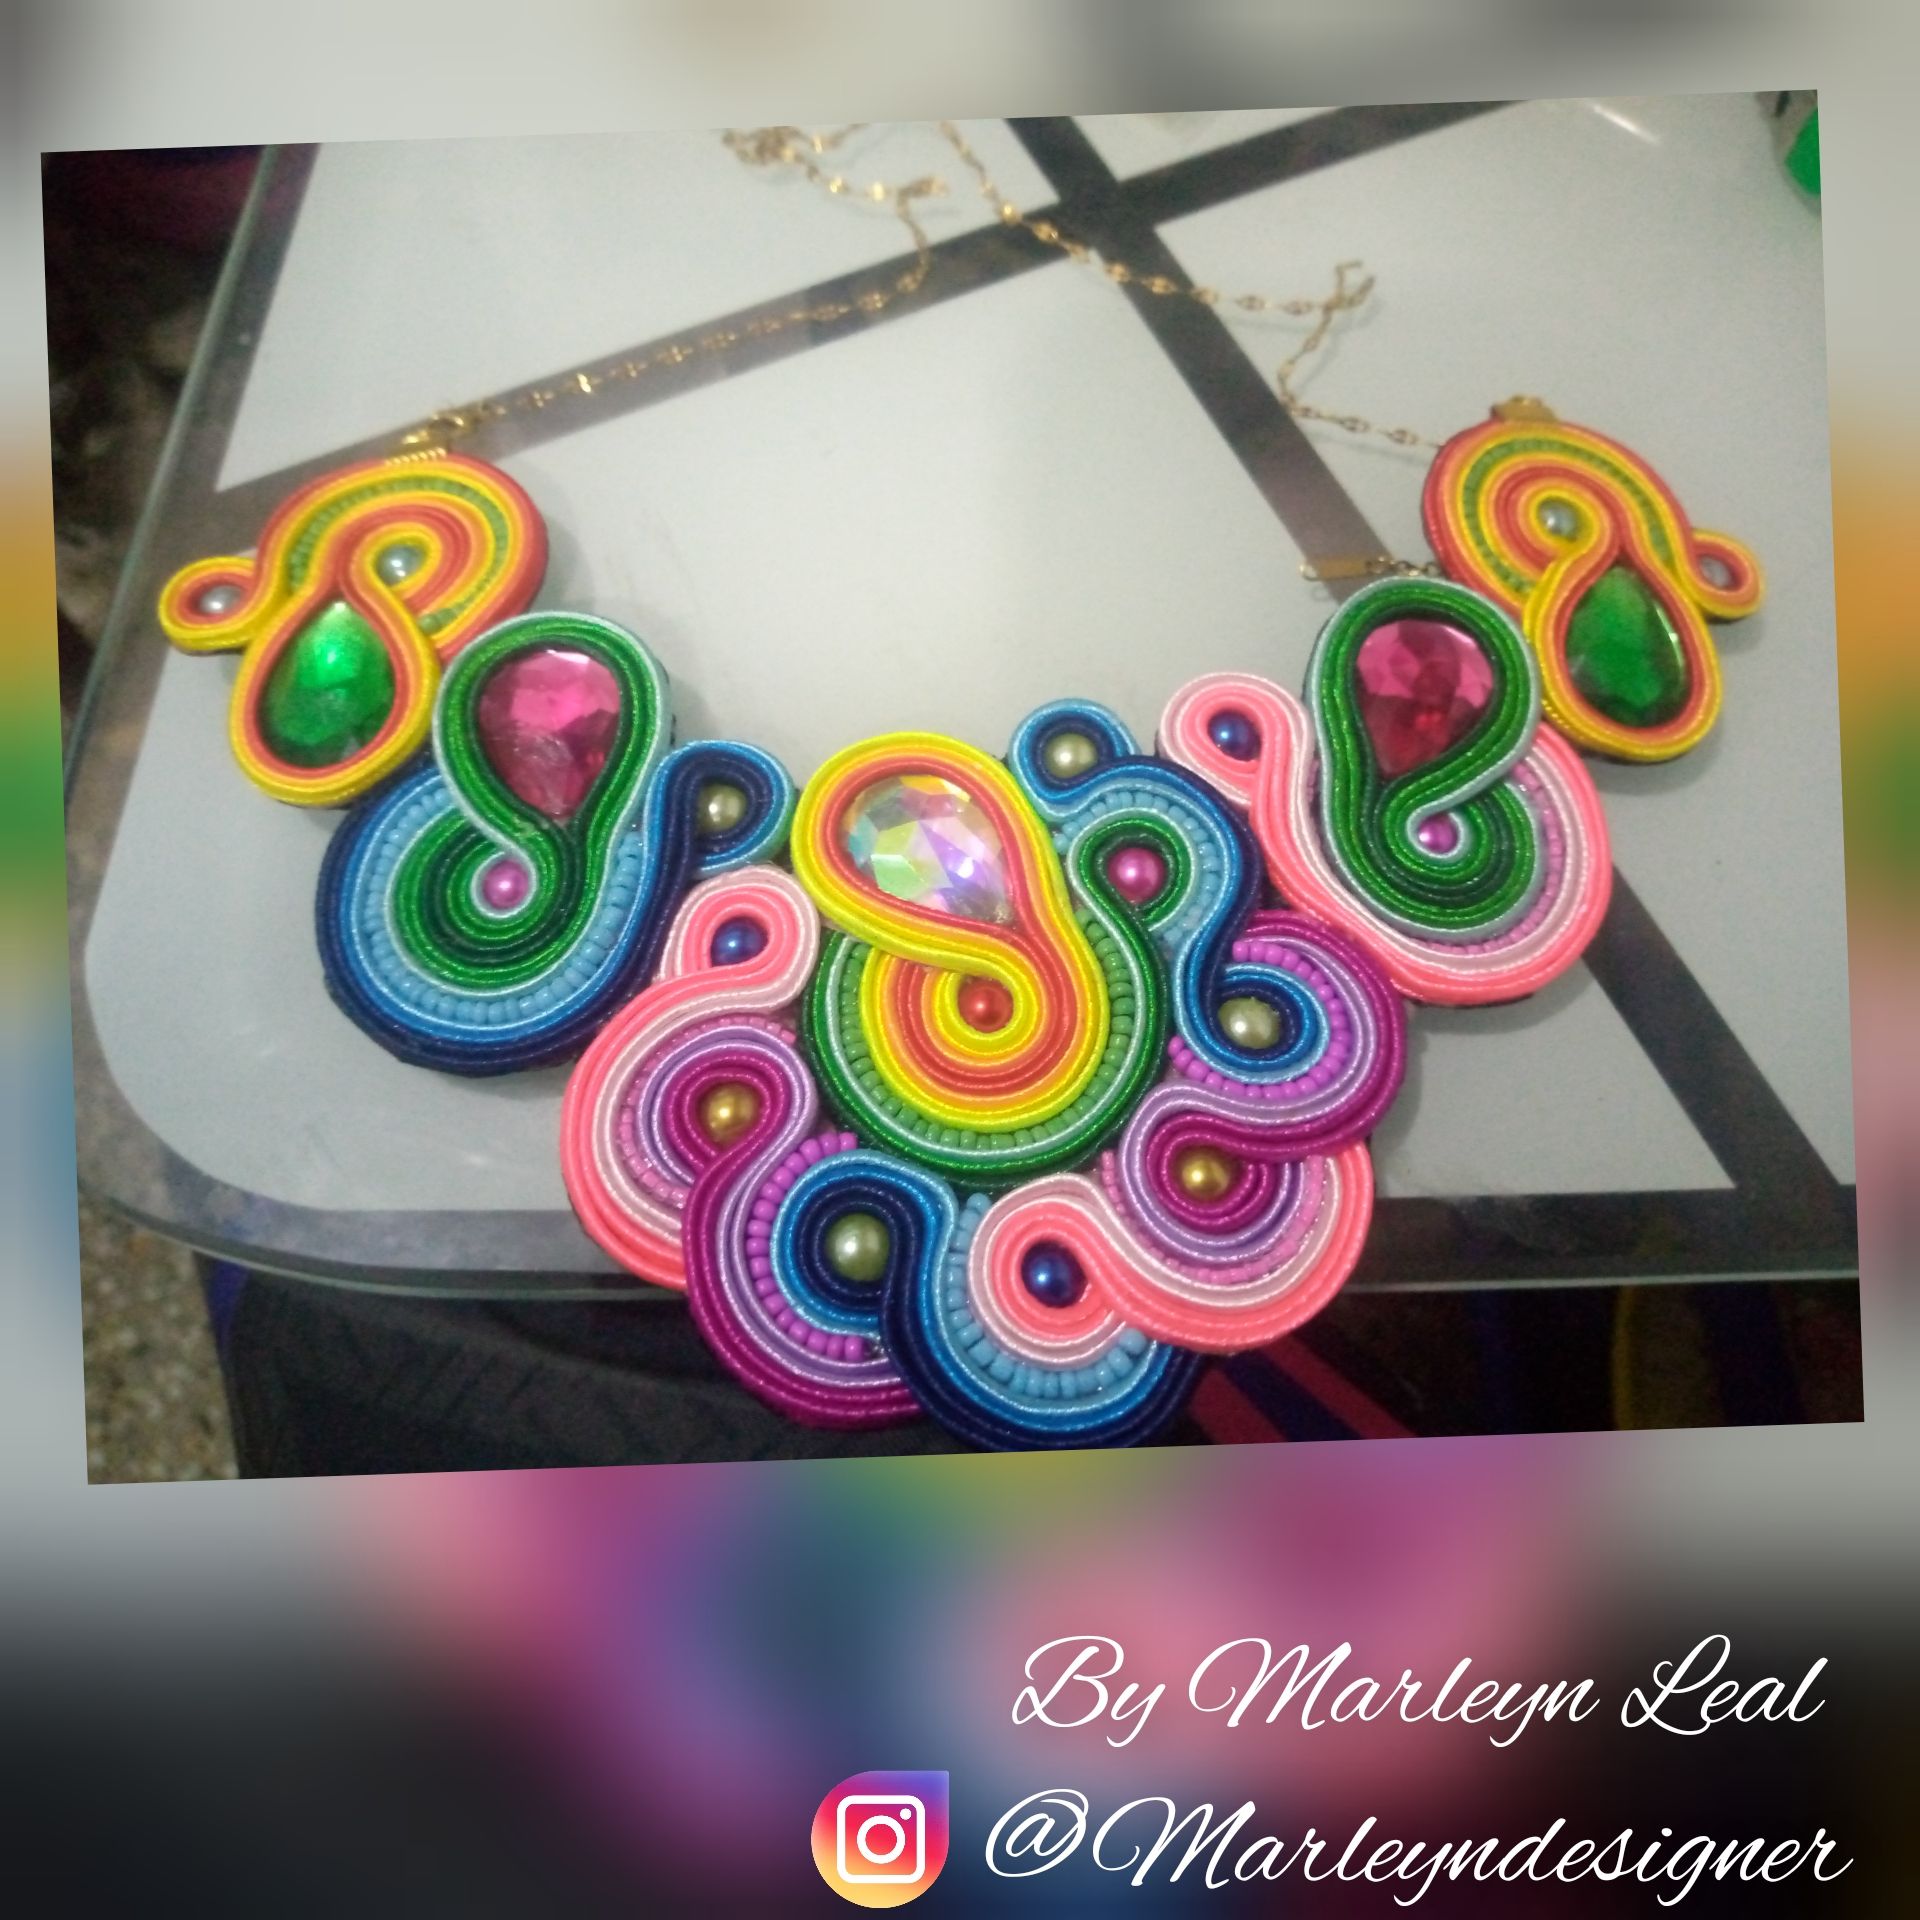
Ahora con ayuda de una pinza de bisutería colocaremos dos maletas, unos aros, cadena y broche poco de loro! Es fácil encaja en cada pieza superior una maleta y aprieta para asegurar que no se salga, abre los aros y introduce el aro en la maleta y luego a la cadena procedemos a cerrar el aro, del otro lado abre un aro introduce la maleta y el broche, cierra el aro, ahora coloca un aro a la altura de la cadena que deseas te quede el collar! A mí me gusta bien pegado al cuello. De esta manera hemos terminado un collar, colorido perfecto no solo para el carnaval si no para agregar vida y color a tus días, queda genial con vestido negro sin mangas, cabello con un moño tipo dona y zarcillos muy delicados para que así la pieza de tu outfit sea el collar agregando color a tus días!!!

Gracias por tu apoyo, por leerme! Espero que te guste esta pieza tanto como ame hacerla! Suerte a todos los concursantes, todas sus piezas con excepcionales! Es realmente grandioso vernos crecer como comunidad y amigos! Invito a @migda @carolinacardoza @zullyscott


IMAGENES CREADAS EN CANVA
IMAGES CREATED IN CANVA