
Buenas noches mis queridos y siempre amigos de esta Comunidad tan querida para mi.
Bienvenidos sean nuevamente a este mi lugar favorito donde me es grato compartir con ustedes.
Y aprovechando que ya estamos en Carnavales, hoy te voy a mostrar como realizar una hermosa corona, hecha con cartulina metalizada y acetato, también puedes usar foami o alternar distintos materiales. Esta Corona la hice para la niña de una amiguita que participó en un desfile y bueno tomé fotos del paso a paso para que aprendas como hacerla.
Entonces ahora te invito a que me acompañes!
Para esta corona vas a necesitar:
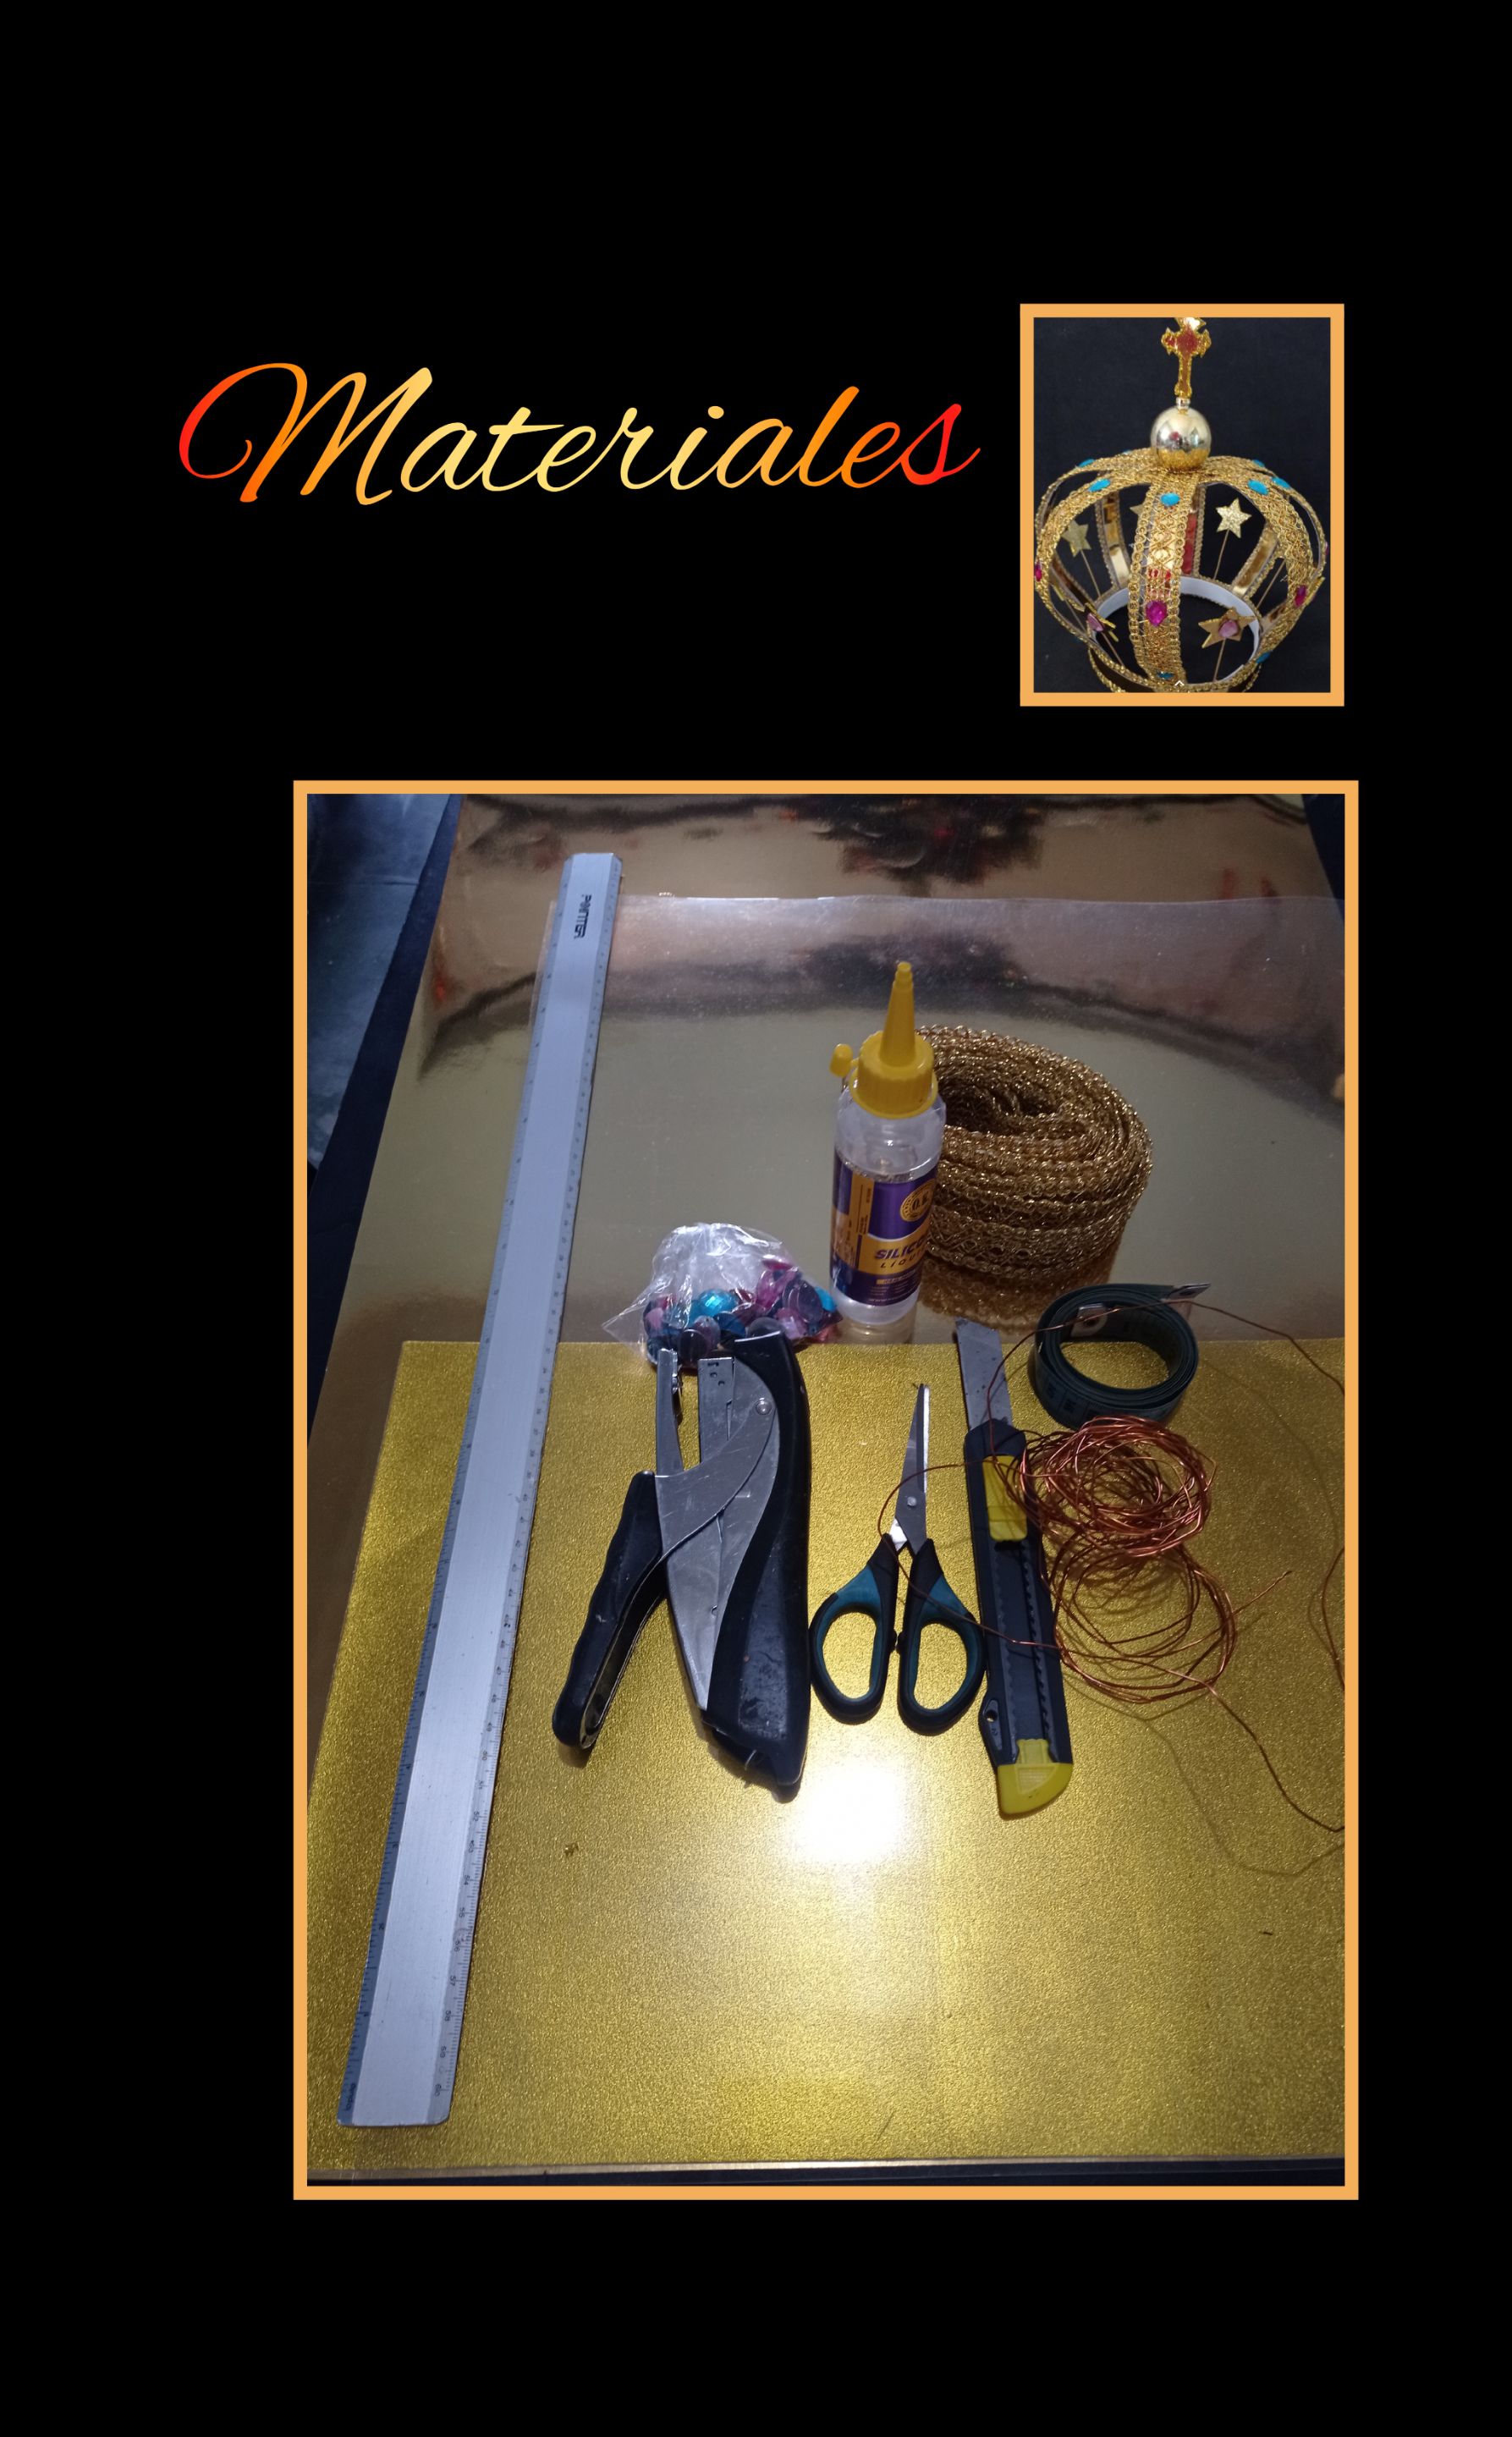
| Cartulina metalizada dorada | Acetato |
|---|---|
| Pasamanería o adornos dorados | Pedrería |
| Alambre | Esfera dorada(reciclando de arbolito |
| Alambre (reciclado) | Silicón |
| Tijera | Cuchilla |
| Regla, cinta métrica | Lija |
| Palito de madera | Foami |
| Pintura dorada | Pistola de silicón |
Ahora si comencemos nuestro paso a paso.
Paso 1:
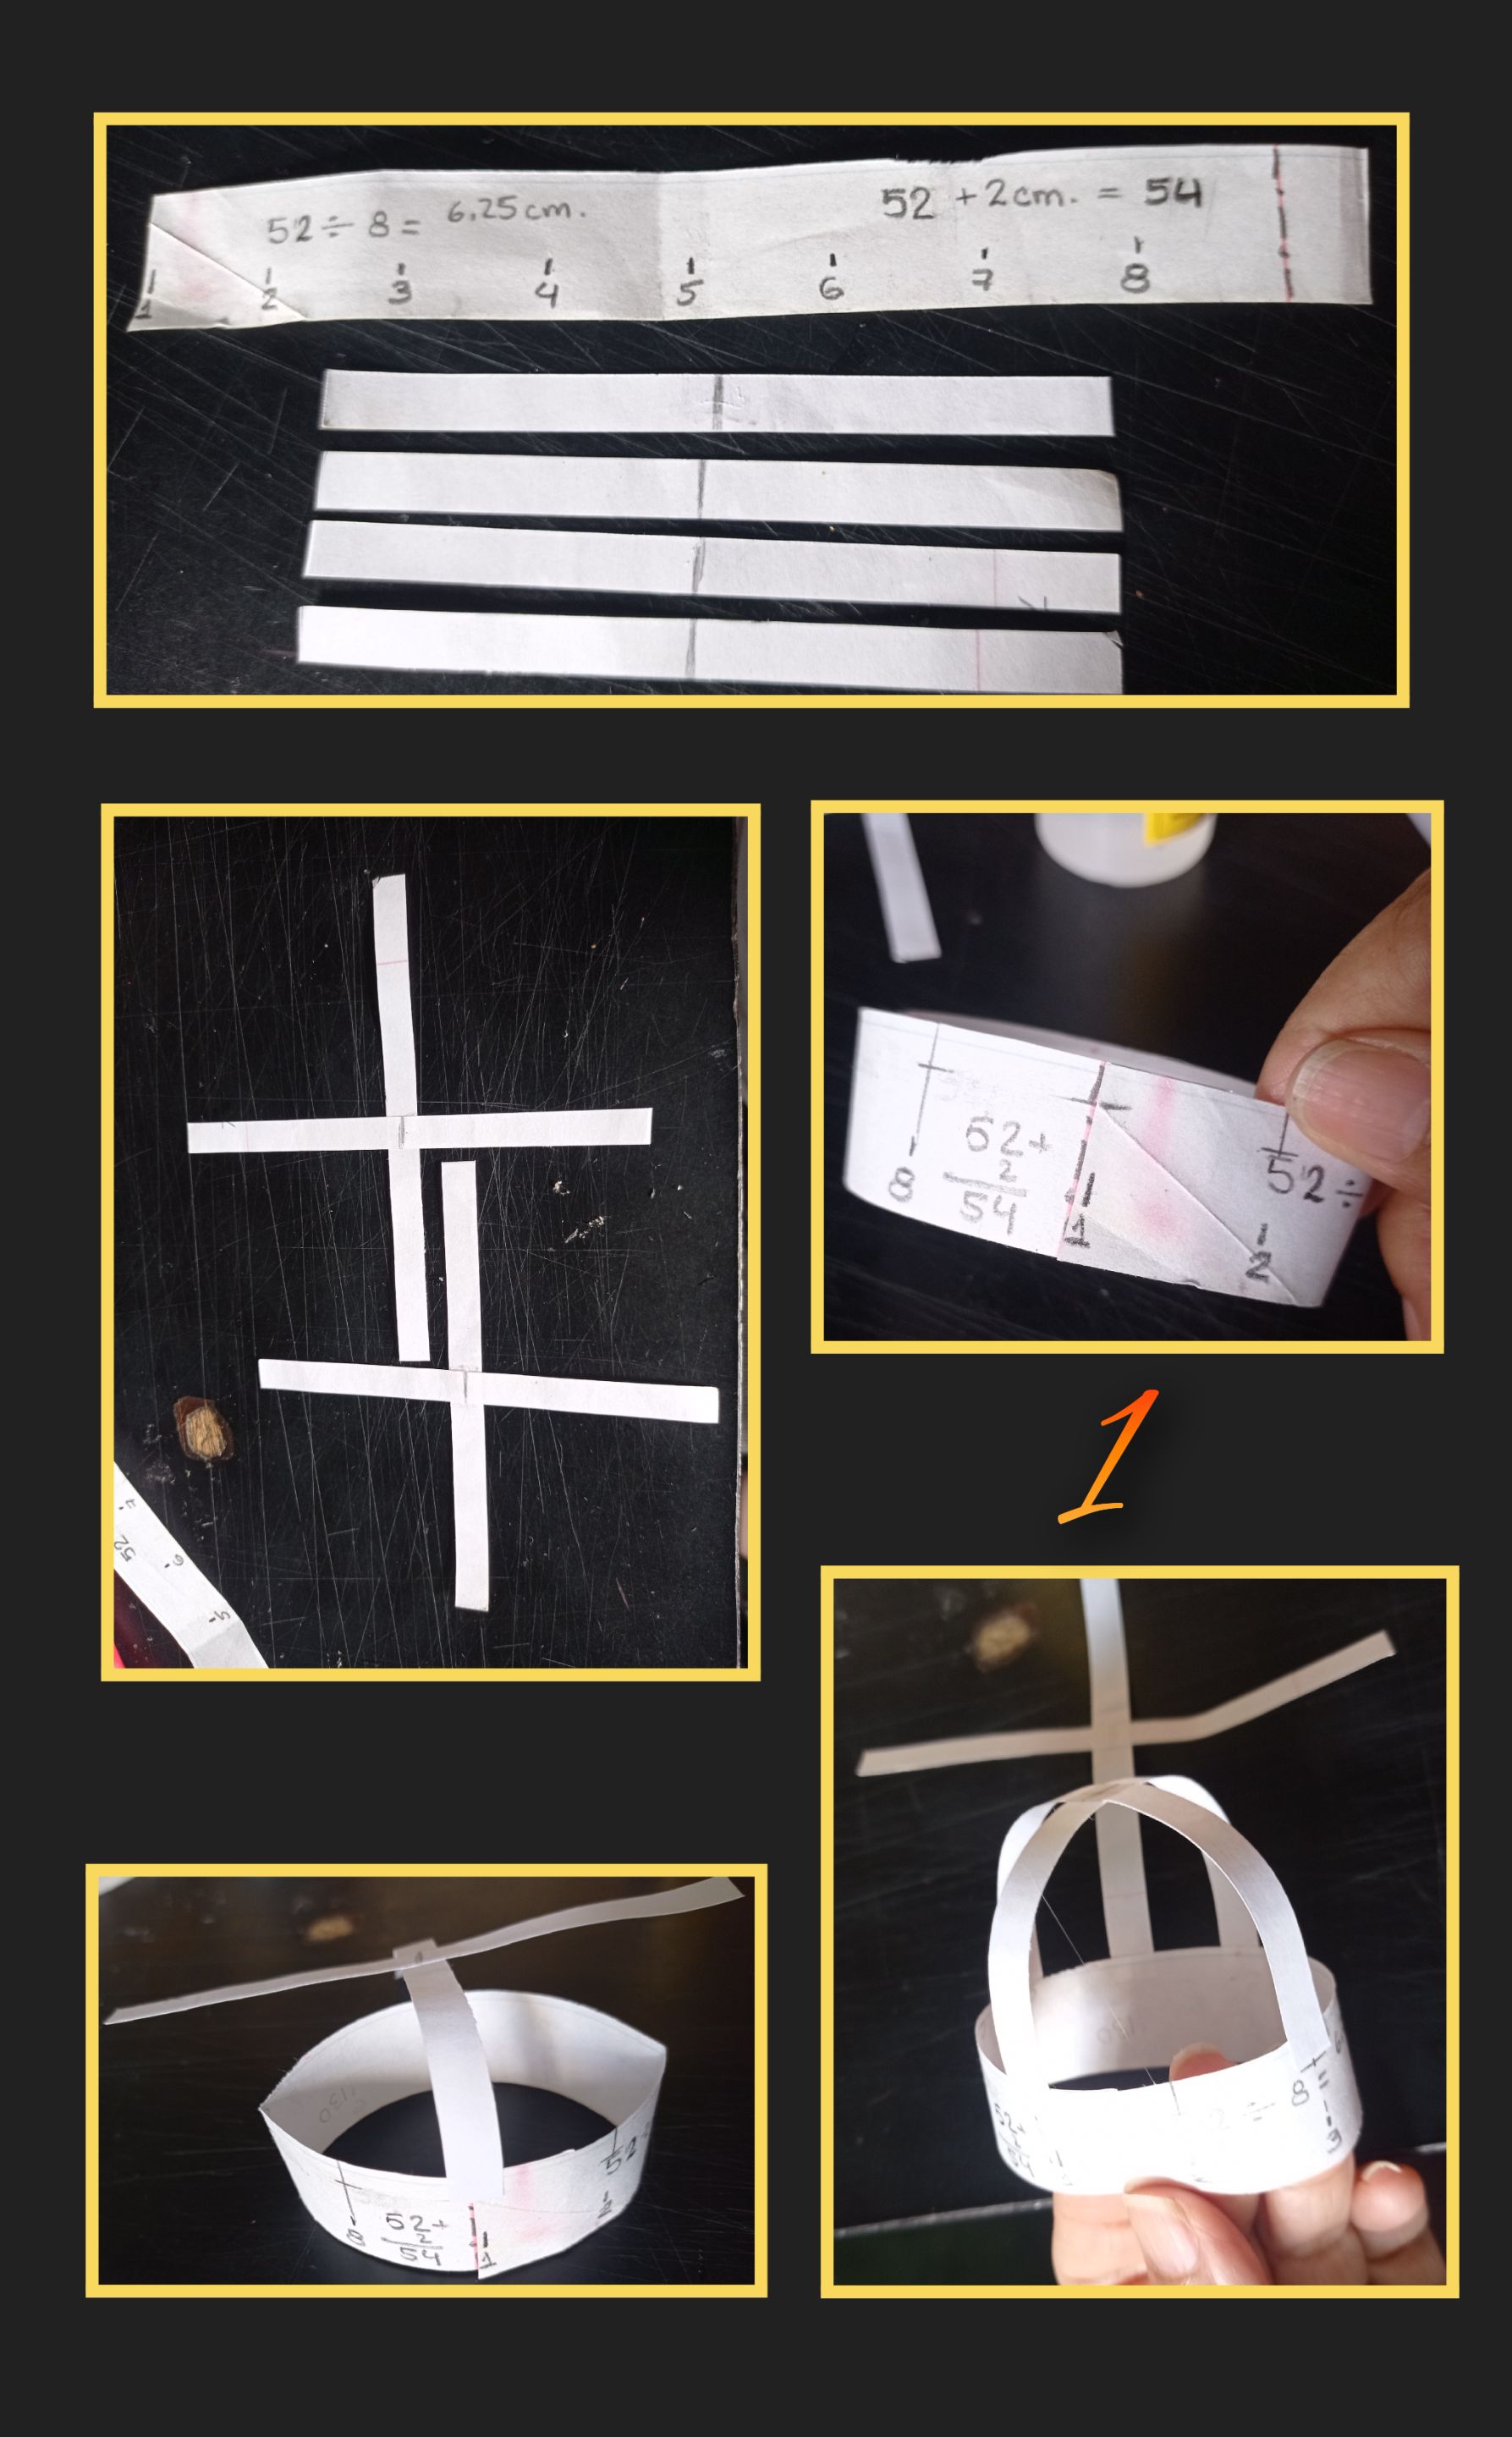
- Lo primero que harás será tomar las medidas del contorno de la cabeza, en este caso son 52cms.
- Ahora traza sobre la cartulina una tira de 52cms de largo y le aumentas 2 cms que servirán para cerrar y armar una circunferencia, el ancho es a tu gusto, yo la hice de 3cms.
- Luego divide la tira de 52 cms en 8 partes iguales y enumera.
- Aparte recorta 4 tiras de 50cm de largo x 3 de alto y las divides por toda la mitad marcando con un lápiz.
Ahora vas a pegar así:
en el 1 y 5 la tira vertical (de la primera cruz).
en el 3 y 7 la tira horizontal.
Luego la segunda cruz.
en el 2 y 6 la tira vertical y
en el 4 y 8 la tira horizontal.
Paso 2:
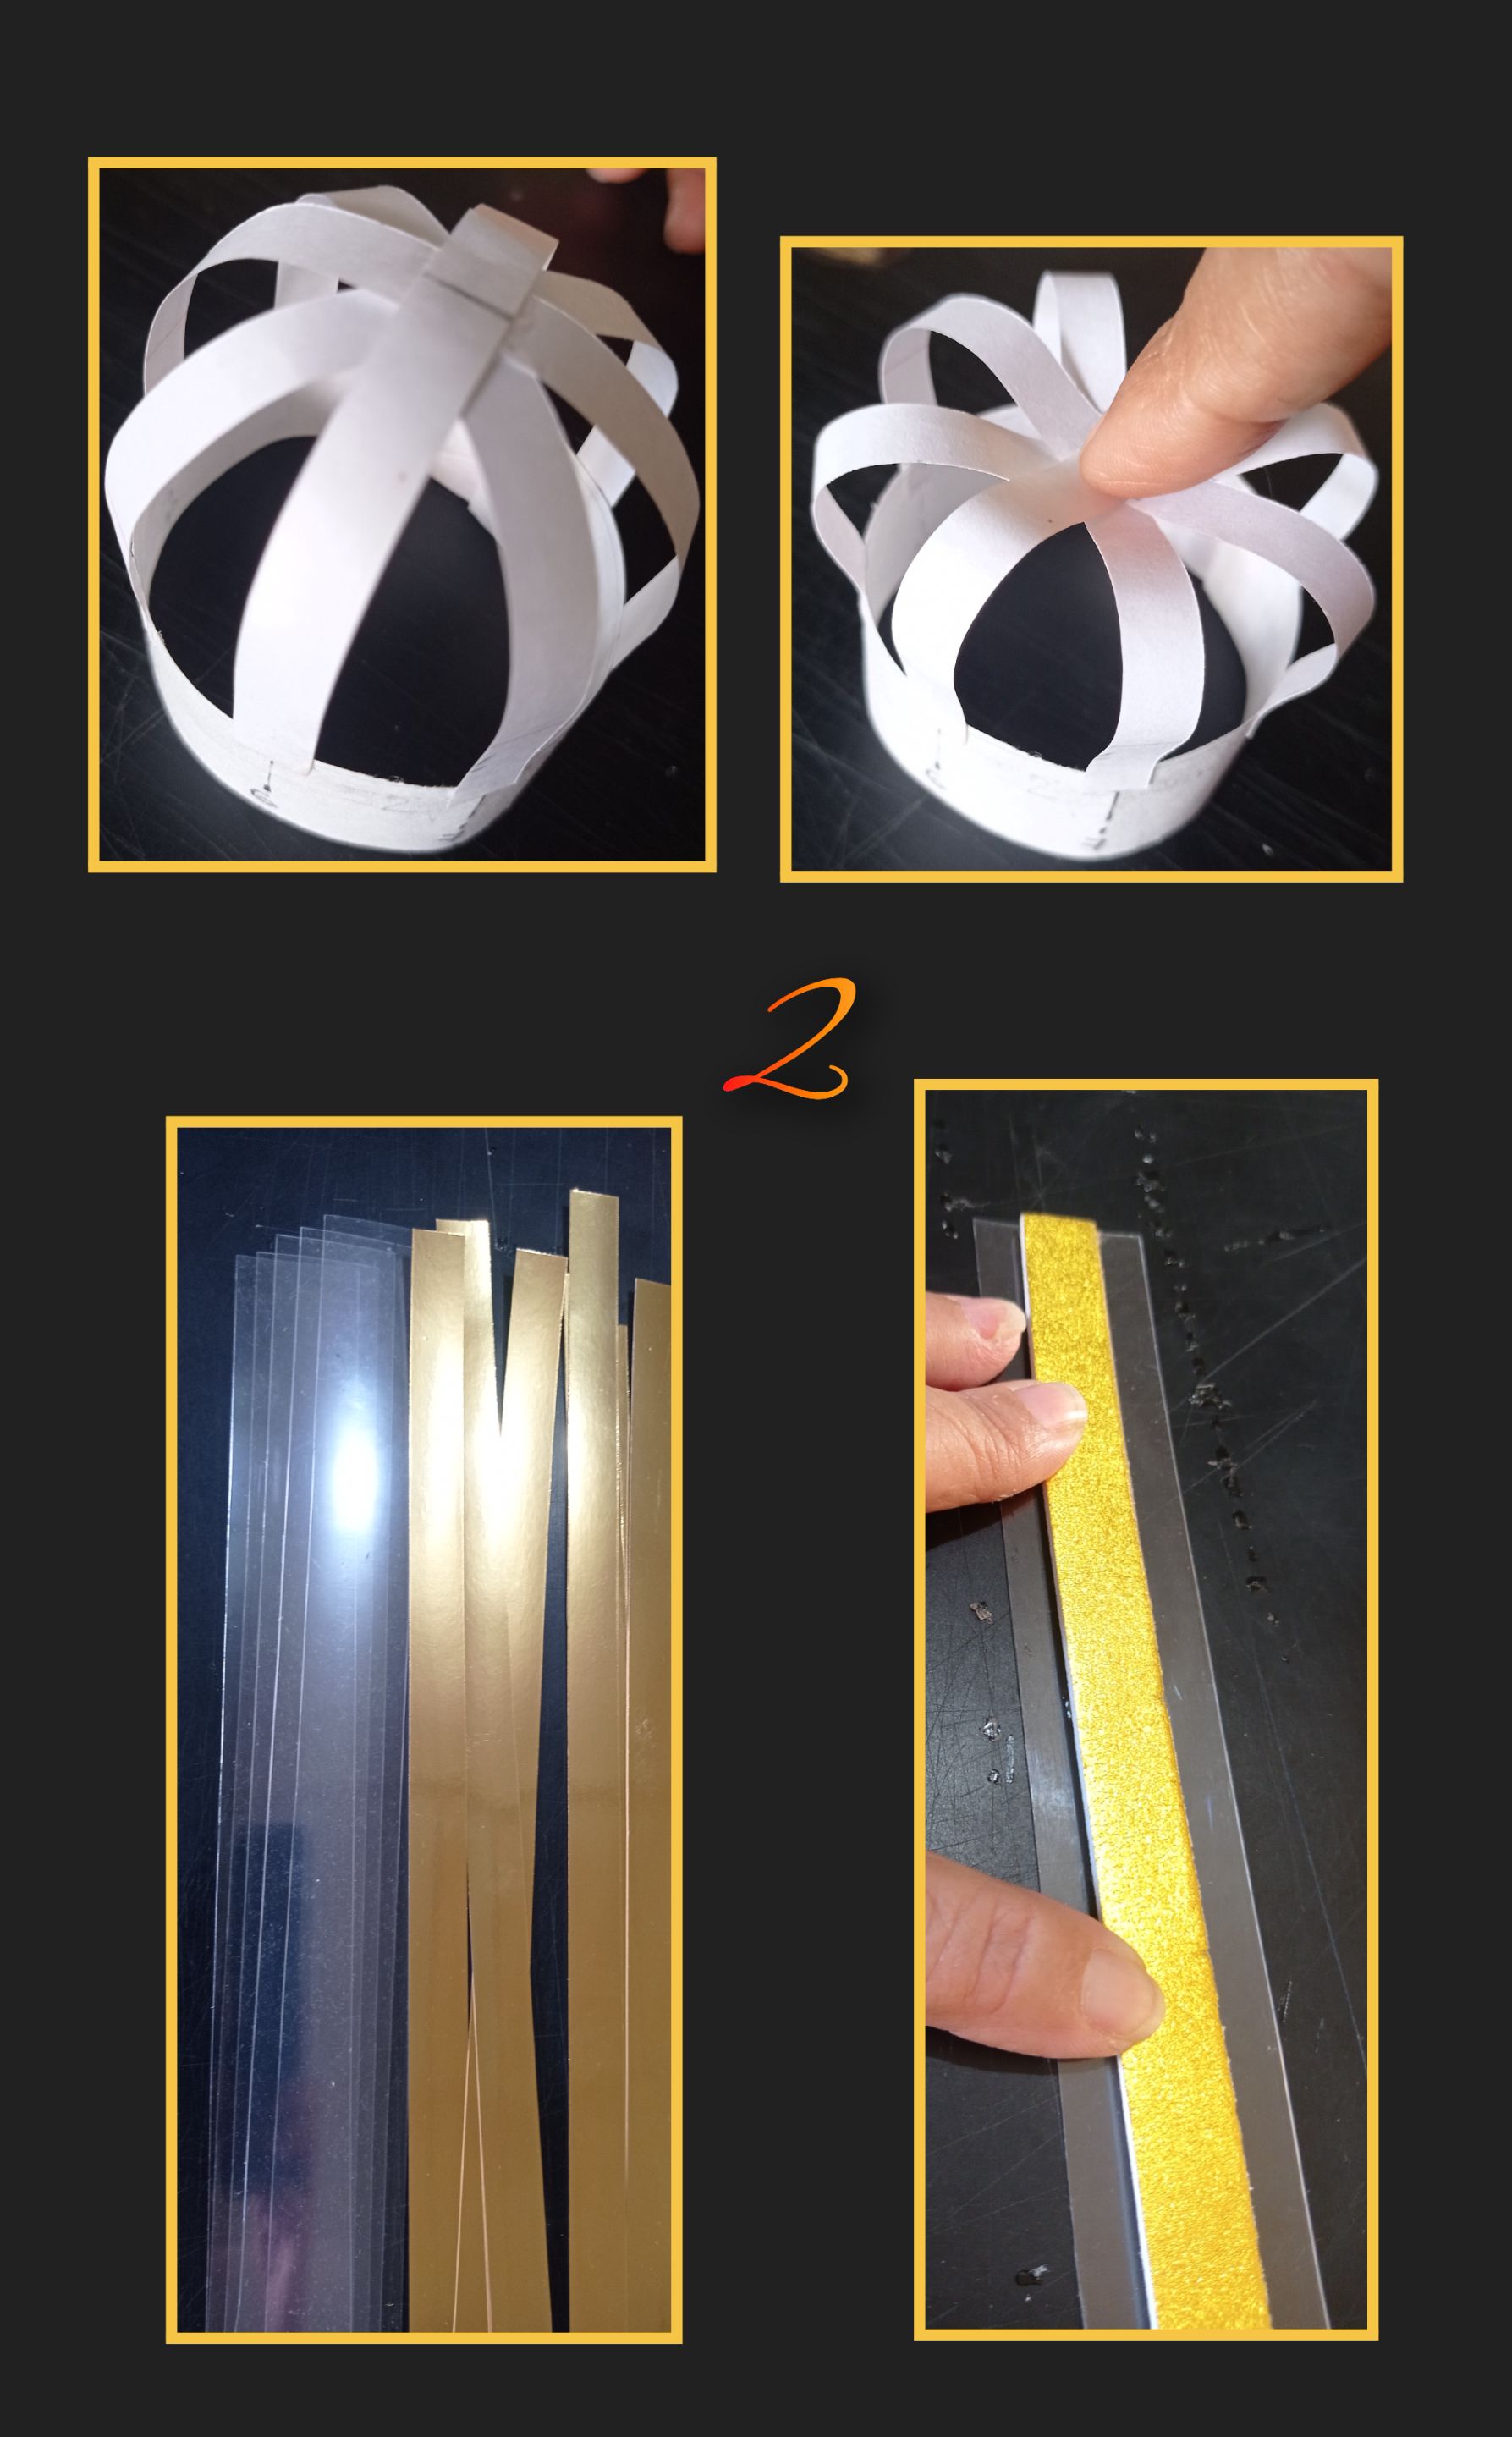
- Te hice esta explicación con tiras de papel para que vieras el procedimiento ya que no puedo marcar la cartulina metalizada ni el acetato.
- Ahora marca y recorta las tiras en en el material que tengas a la mano.
Sugerencia: Si deseas darle más forma en la parte de arriba a la corona, puedes pegar en el medio de las tiras alambre.
Paso 3:
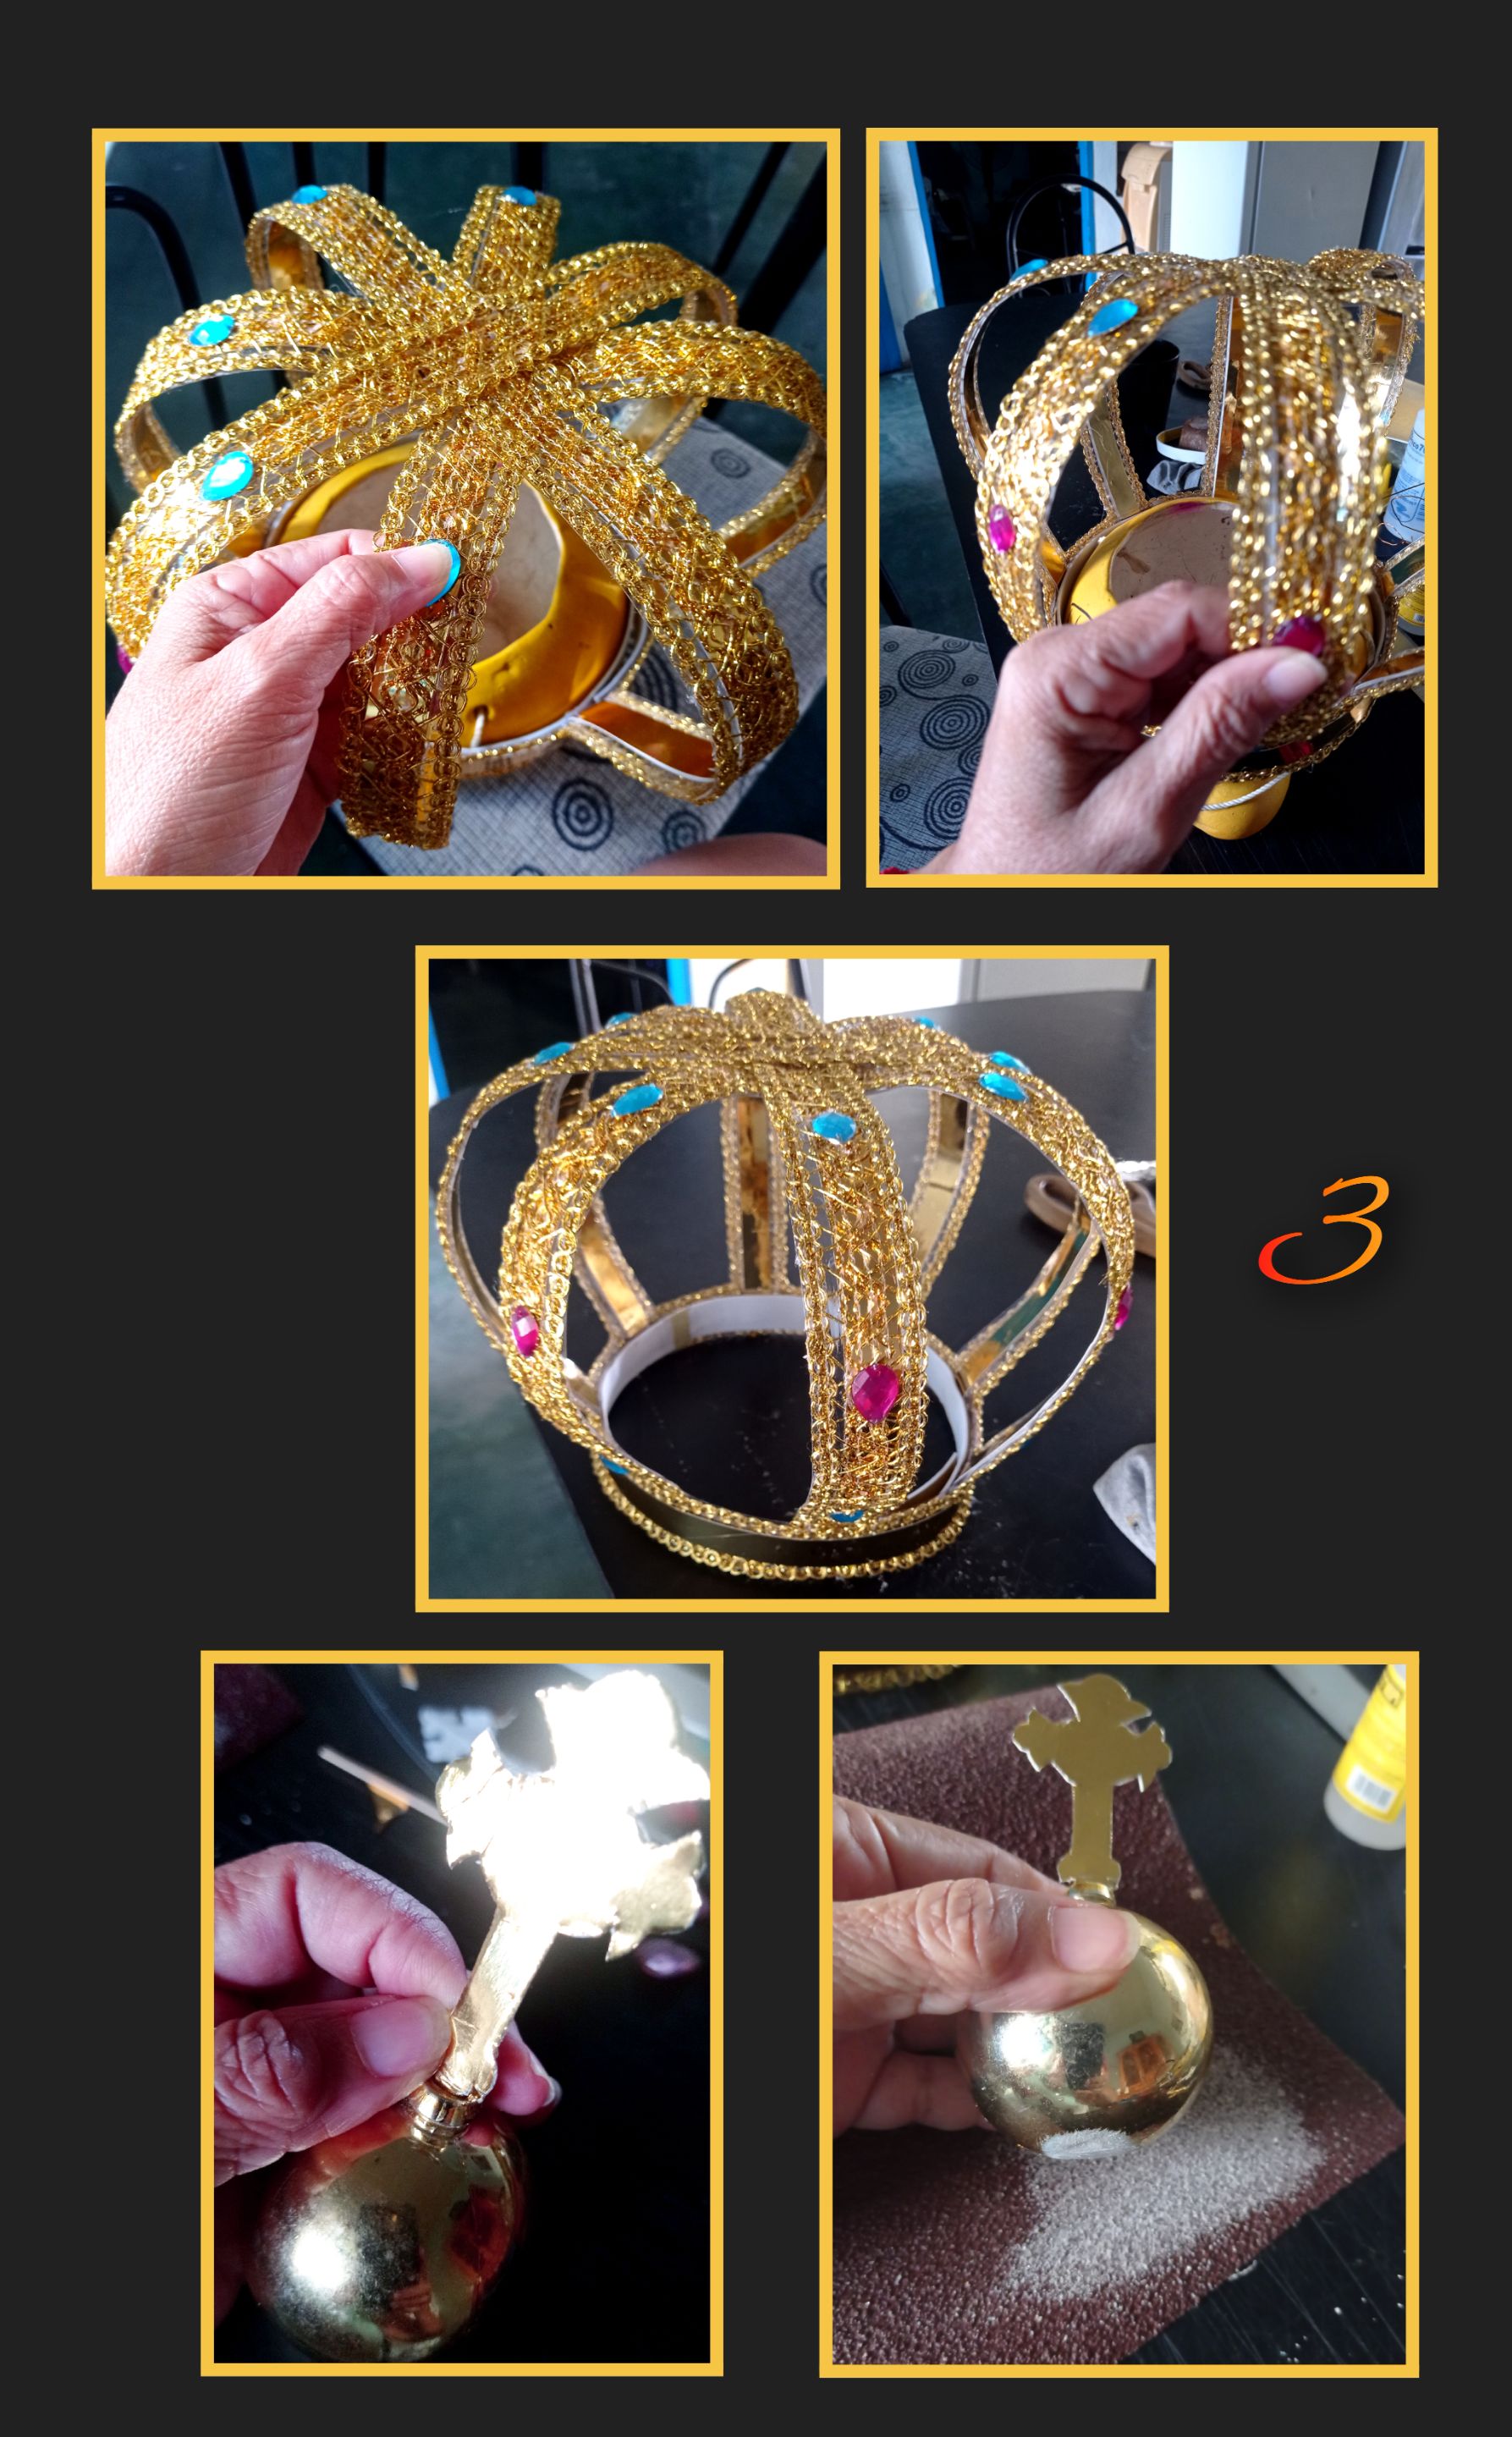
- En este paso si deseas puedes decorar con pasamanería y pegar pedrería o recortar figuras de foami escarchado y pegar. todo lo dejo a tu imaginación.
- Luego dibuja y recorta en cartulina o foami, la cruz y pega en la parte de abajo un palito de madera e inserta en la bolita dorada, luego con mucho cuidado lija en la parte inferior para quitarle el brillo y se adhiera bien el silicón a la hora de pegar.
Paso 4:
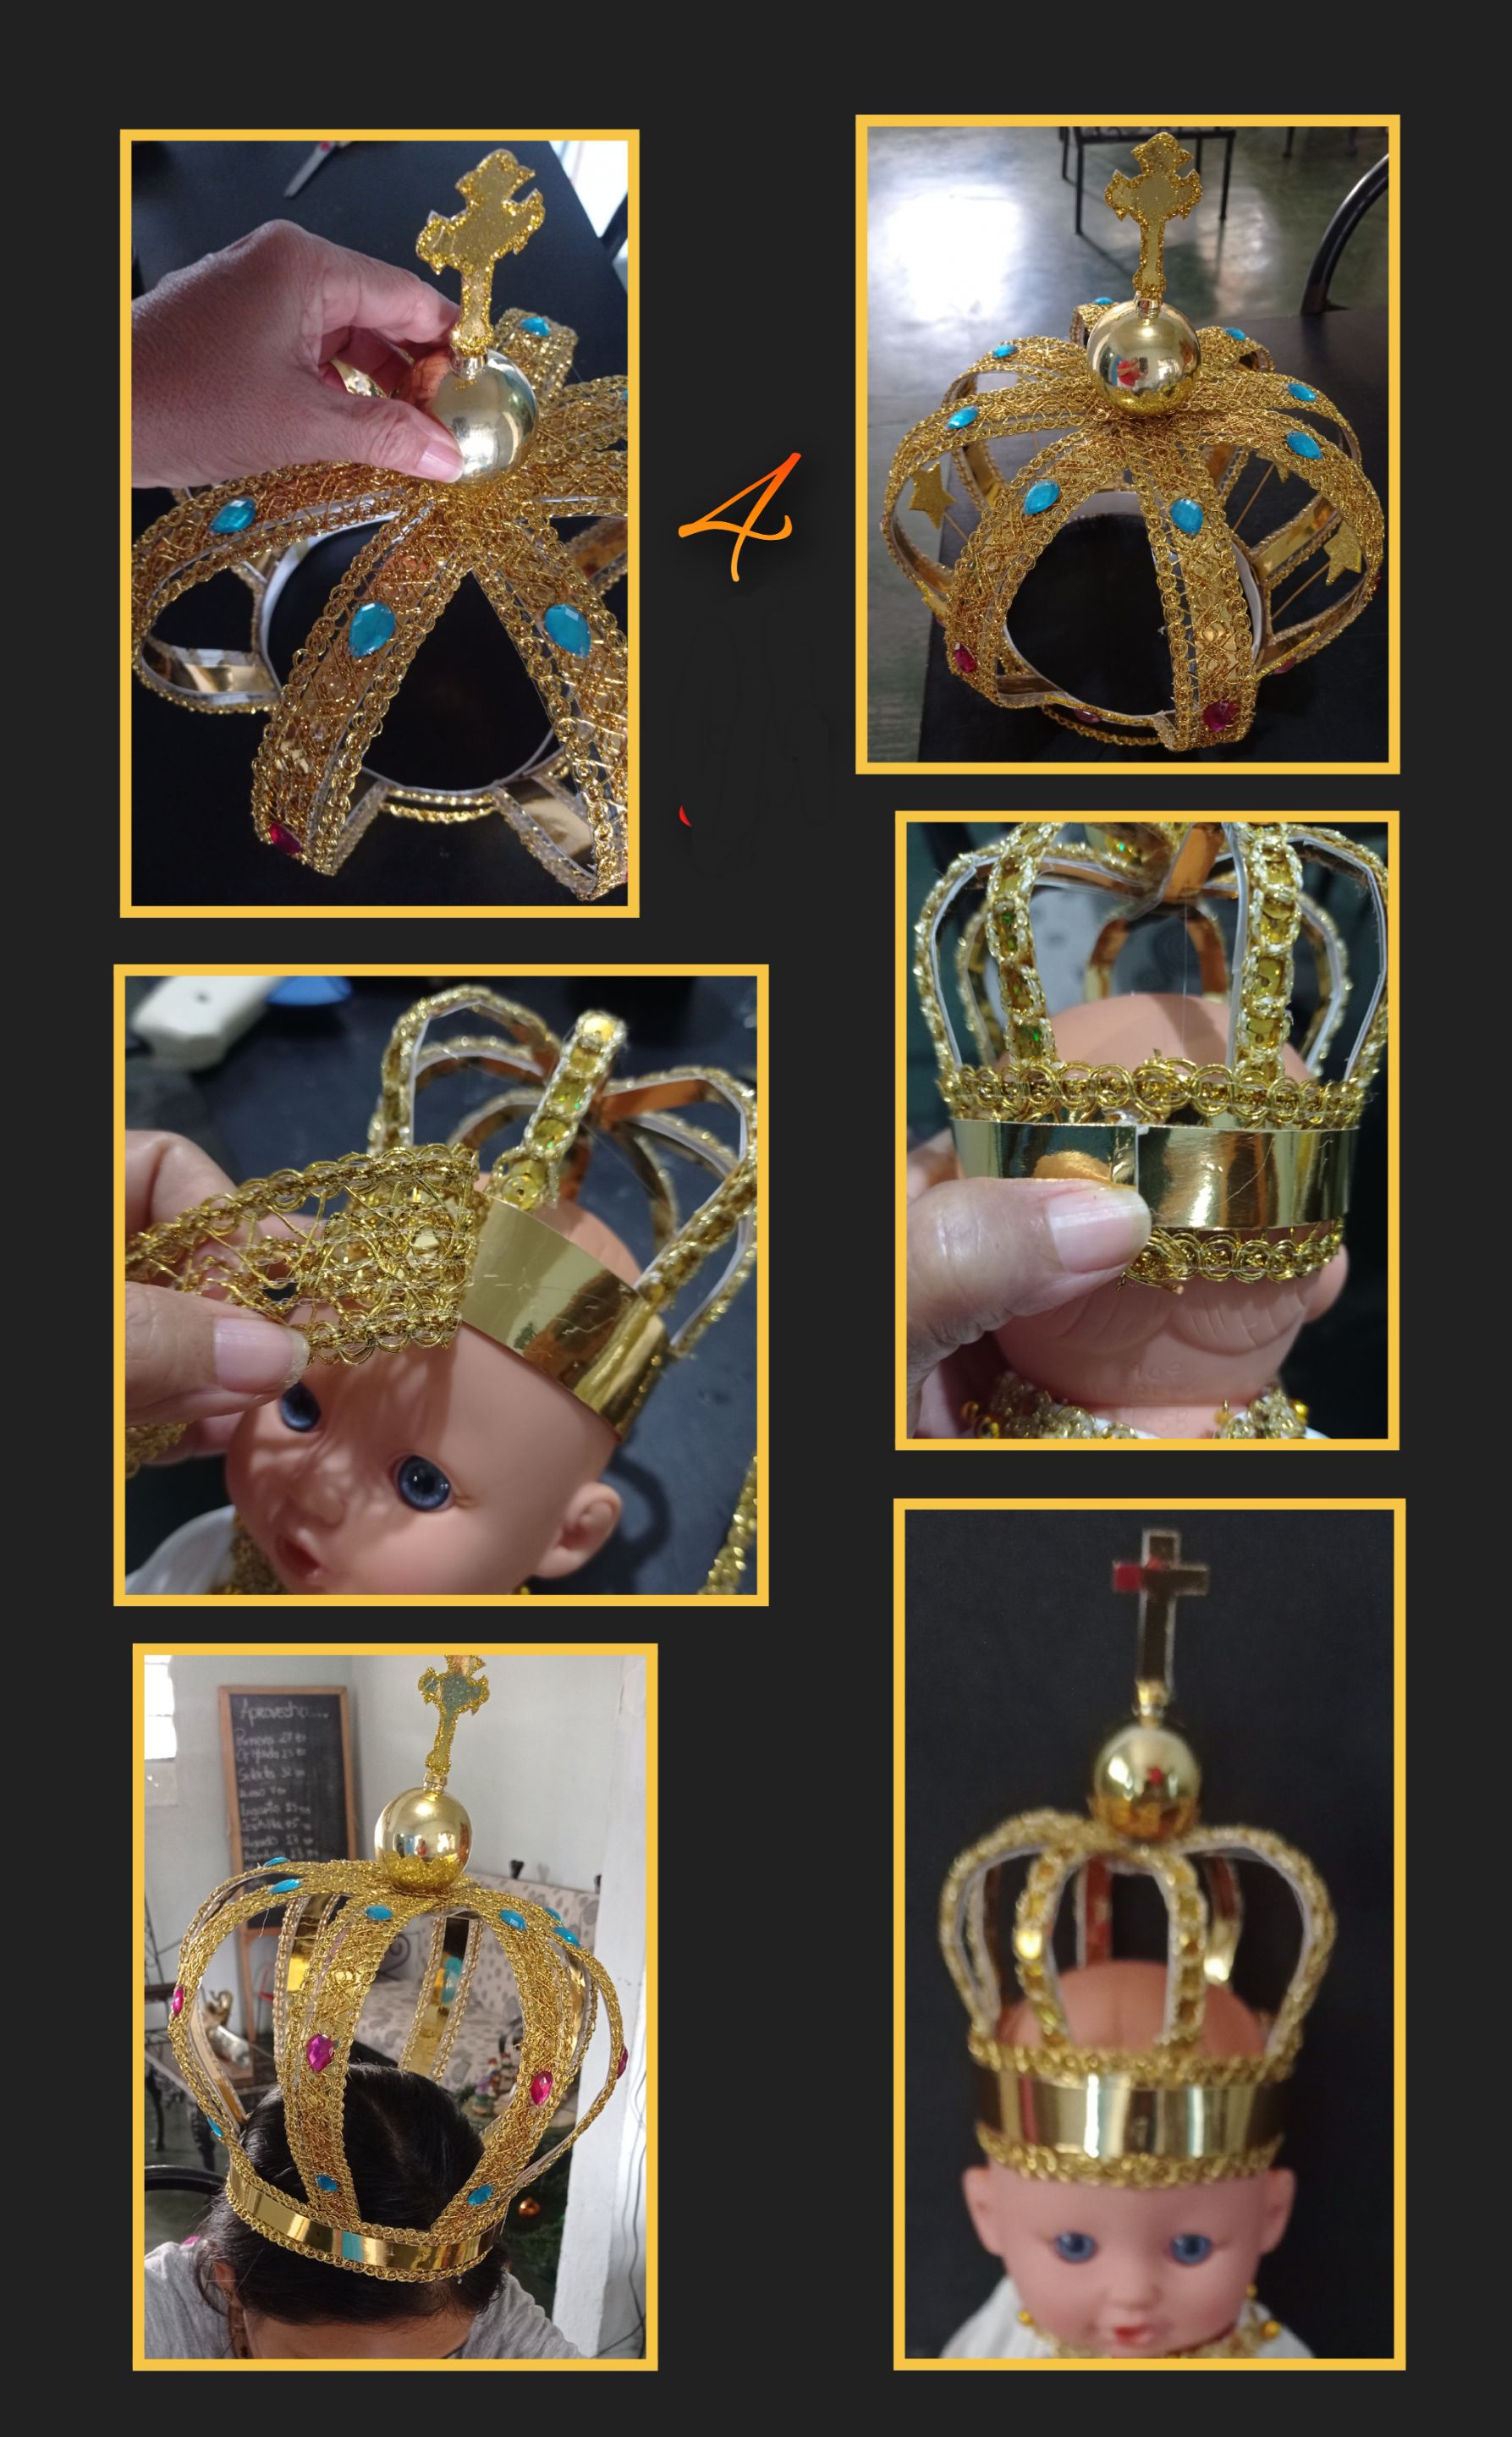
- Pega y haz un poco de presión hasta que pegue bien, también puedes pegar con silicón caliente.
- Aparte recorta unos pedazos de alambre y pinta con pintura dorada y en una de las puntas pega unas estrellas y en el centro pega pedrería, luego en el otro extremo aplica silicón frío y pega en la tira de abajo de la corona.
- Para la coronita pequeña solo tienes que repetir los pasos y decorar.

Mi publicación está traducida con DeepL
Las fotos las capturé con mi Redmi Note y están editadas con GridArt.
Usé Etiquetas HTML.
Ahora me despido agradeciendo tu visita y con ella el apoyo a mi publicación.
Espero te guste.
Saludos.
English:
Good evening my dear and always friends of this Community so dear to me.
Welcome back to this my favorite place where I am pleased to share with you.
And taking advantage that we are already in Carnival, today I'm going to show you how to make a beautiful crown, made with metallic cardboard and acetate, you can also use foami or alternate different materials. I made this wreath for a friend's little girl who participated in a parade and I took pictures of the step by step so you can learn how to make it.
So now I invite you to join me!
For this wreath you'll need:
| Gold metallized cardboard | Acetate |
|---|---|
| Gold trimmings or golden ornaments | Rhinestones |
| Wire | Gold sphere (from recycled tree) |
| Wire (recycled) | Silicone |
| Scissors | Blade |
| Ruler, tape measure | Scissors |
| Wooden stick | Foami |
| Gold paint | Silicone gun |
Now let's start our step by step.
Step 1:
- The first thing you will do is to take the measurements of the contour of the head, in this case are 52cms.
- Now draw on the cardboard a strip of 52cms long and increase it by 2 cms that will serve to close and make a circumference, the width is to your liking, I made it of 3cms.
- Then divide the 52 cm strip in 8 equal parts and number them.
- Then cut 4 strips of 50 cm long x 3 cm high and divide them in half, marking them with a pencil.
Now you are going to glue like this:
on 1 and 5 the vertical strip (from the first cross).
On the 3 and 7 the horizontal strip.
Then the second cross.
on 2 and 6 the vertical strip, and
on 4 and 8 the horizontal strip.
Step 2:
- I made this explanation with paper strips for you to see the procedure since I can't mark metallic cardboard or acetate.
- Now mark and cut out the strips on the material you have on hand.
Tip: If you want to give more shape to the top of the wreath, you can glue wire in the middle of the strips.
Step 3:
- In this step if you wish you can decorate with trimmings and glue rhinestones or cut out frosted foami figures and glue them. I leave it to your imagination.
- Then draw and cut out of cardboard or foami, the cross and glue a wooden stick on the bottom and insert it into the golden ball, then carefully sand the bottom to remove the shine and adhere well the silicone when gluing.
Step 4:
- Glue and make a little pressure until it sticks well, you can also glue with hot silicone.
- Separately cut some pieces of wire and paint with gold paint and on one of the ends glue some stars and in the center glue rhinestones, then on the other end apply cold silicone and glue on the bottom strip of the wreath.
- For the small crown just repeat the steps and decorate.
The photos were captured with my Redmi Note and are edited with GridArt.
I used HTML tags.
Now I say goodbye thanking you for your visit and with it the support to my publication.
I hope you like it.
Greetings.