Saluditos Artistas Creativos de las Manualidades y la Joyería, deseo para todos el mejor fin de semana, que puedan divertirse en grande visitando la playa los ríos, parques, centro comerciales etc., etc., y llegamos a finales del mes de marzo la próxima semana será abril para mí el mes más bonito del año pues entre sus días está mi cumpleaños y ya estoy presta para el gran mandarrion🤣. Bueno, bueno siempre comento en mis publicaciones que colaboro en una comunidad artesanal donde las manualidades especialmente la artesanía es una de los de ahora llamado emprendimiento con más visitas; especialmente de turistas que aprovechan asuetos como carnavales, fin de semana largo, semana santa, etcétera; por ser una zona playera.
Para estás fechas siempre tengo muchos encargos de bisutería casi todos collares, aretes, pulseras, sandalias y la mayoría son accesorios para ir de playa, me gustaría compartir con ustedes piezas como una salida del mar o sea lo que llamamos un pareo, pero su elaboración casi siempre las hago en macramé y serían muchos nudos para un tutorial.
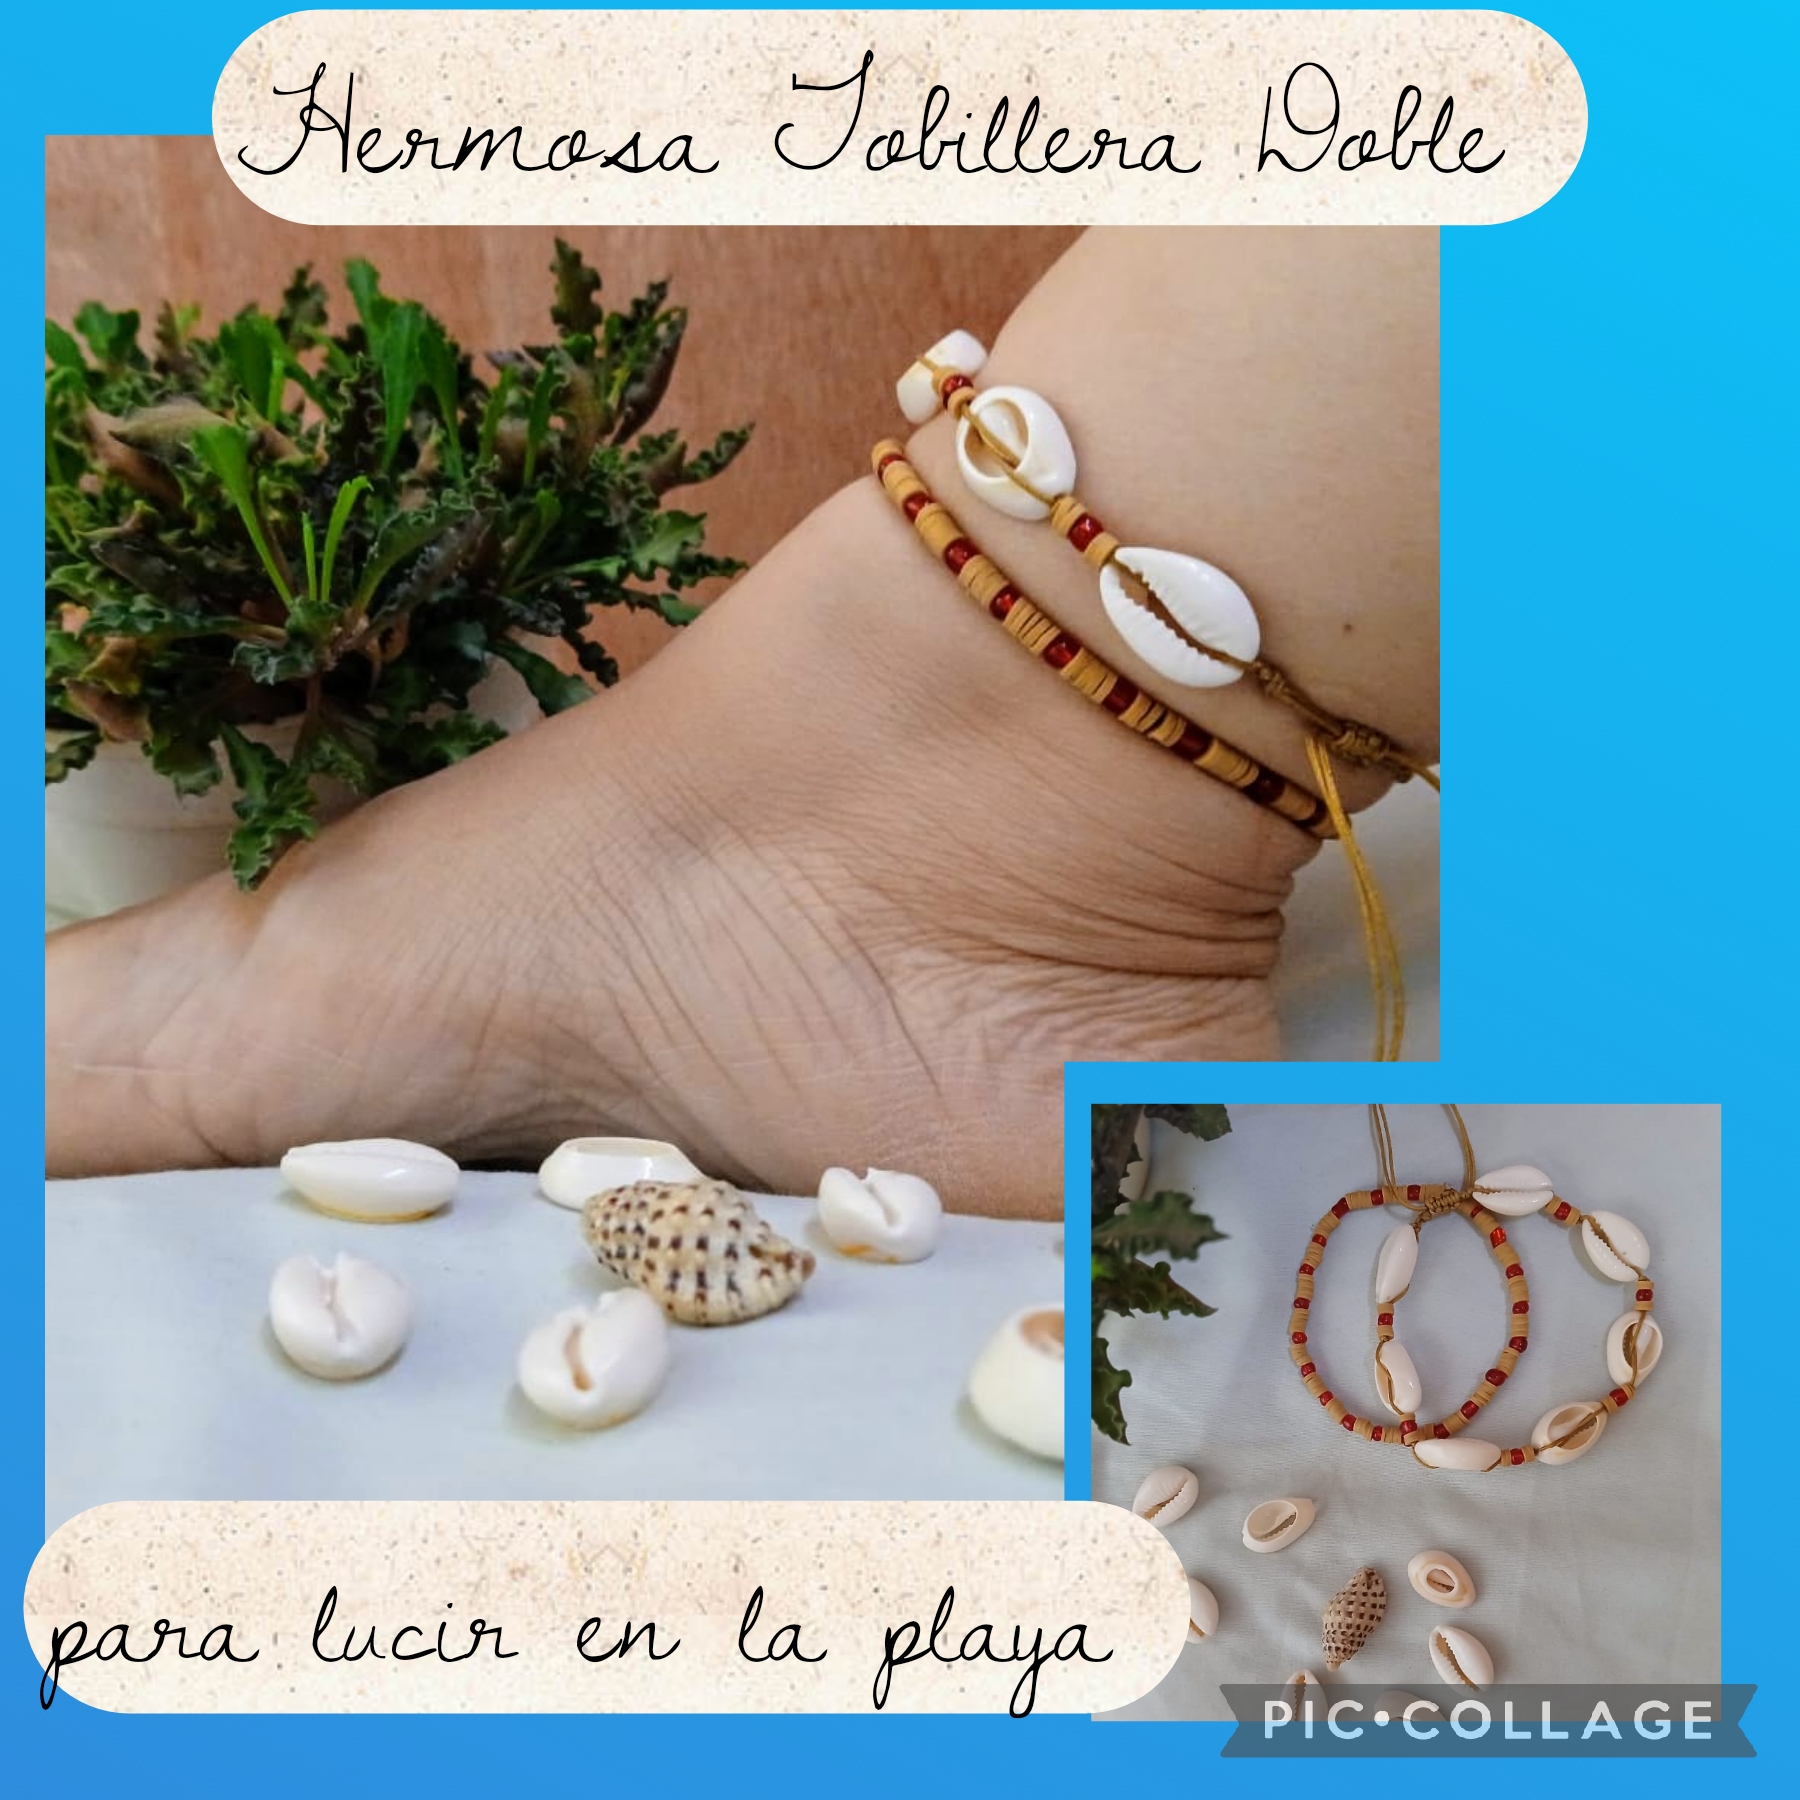
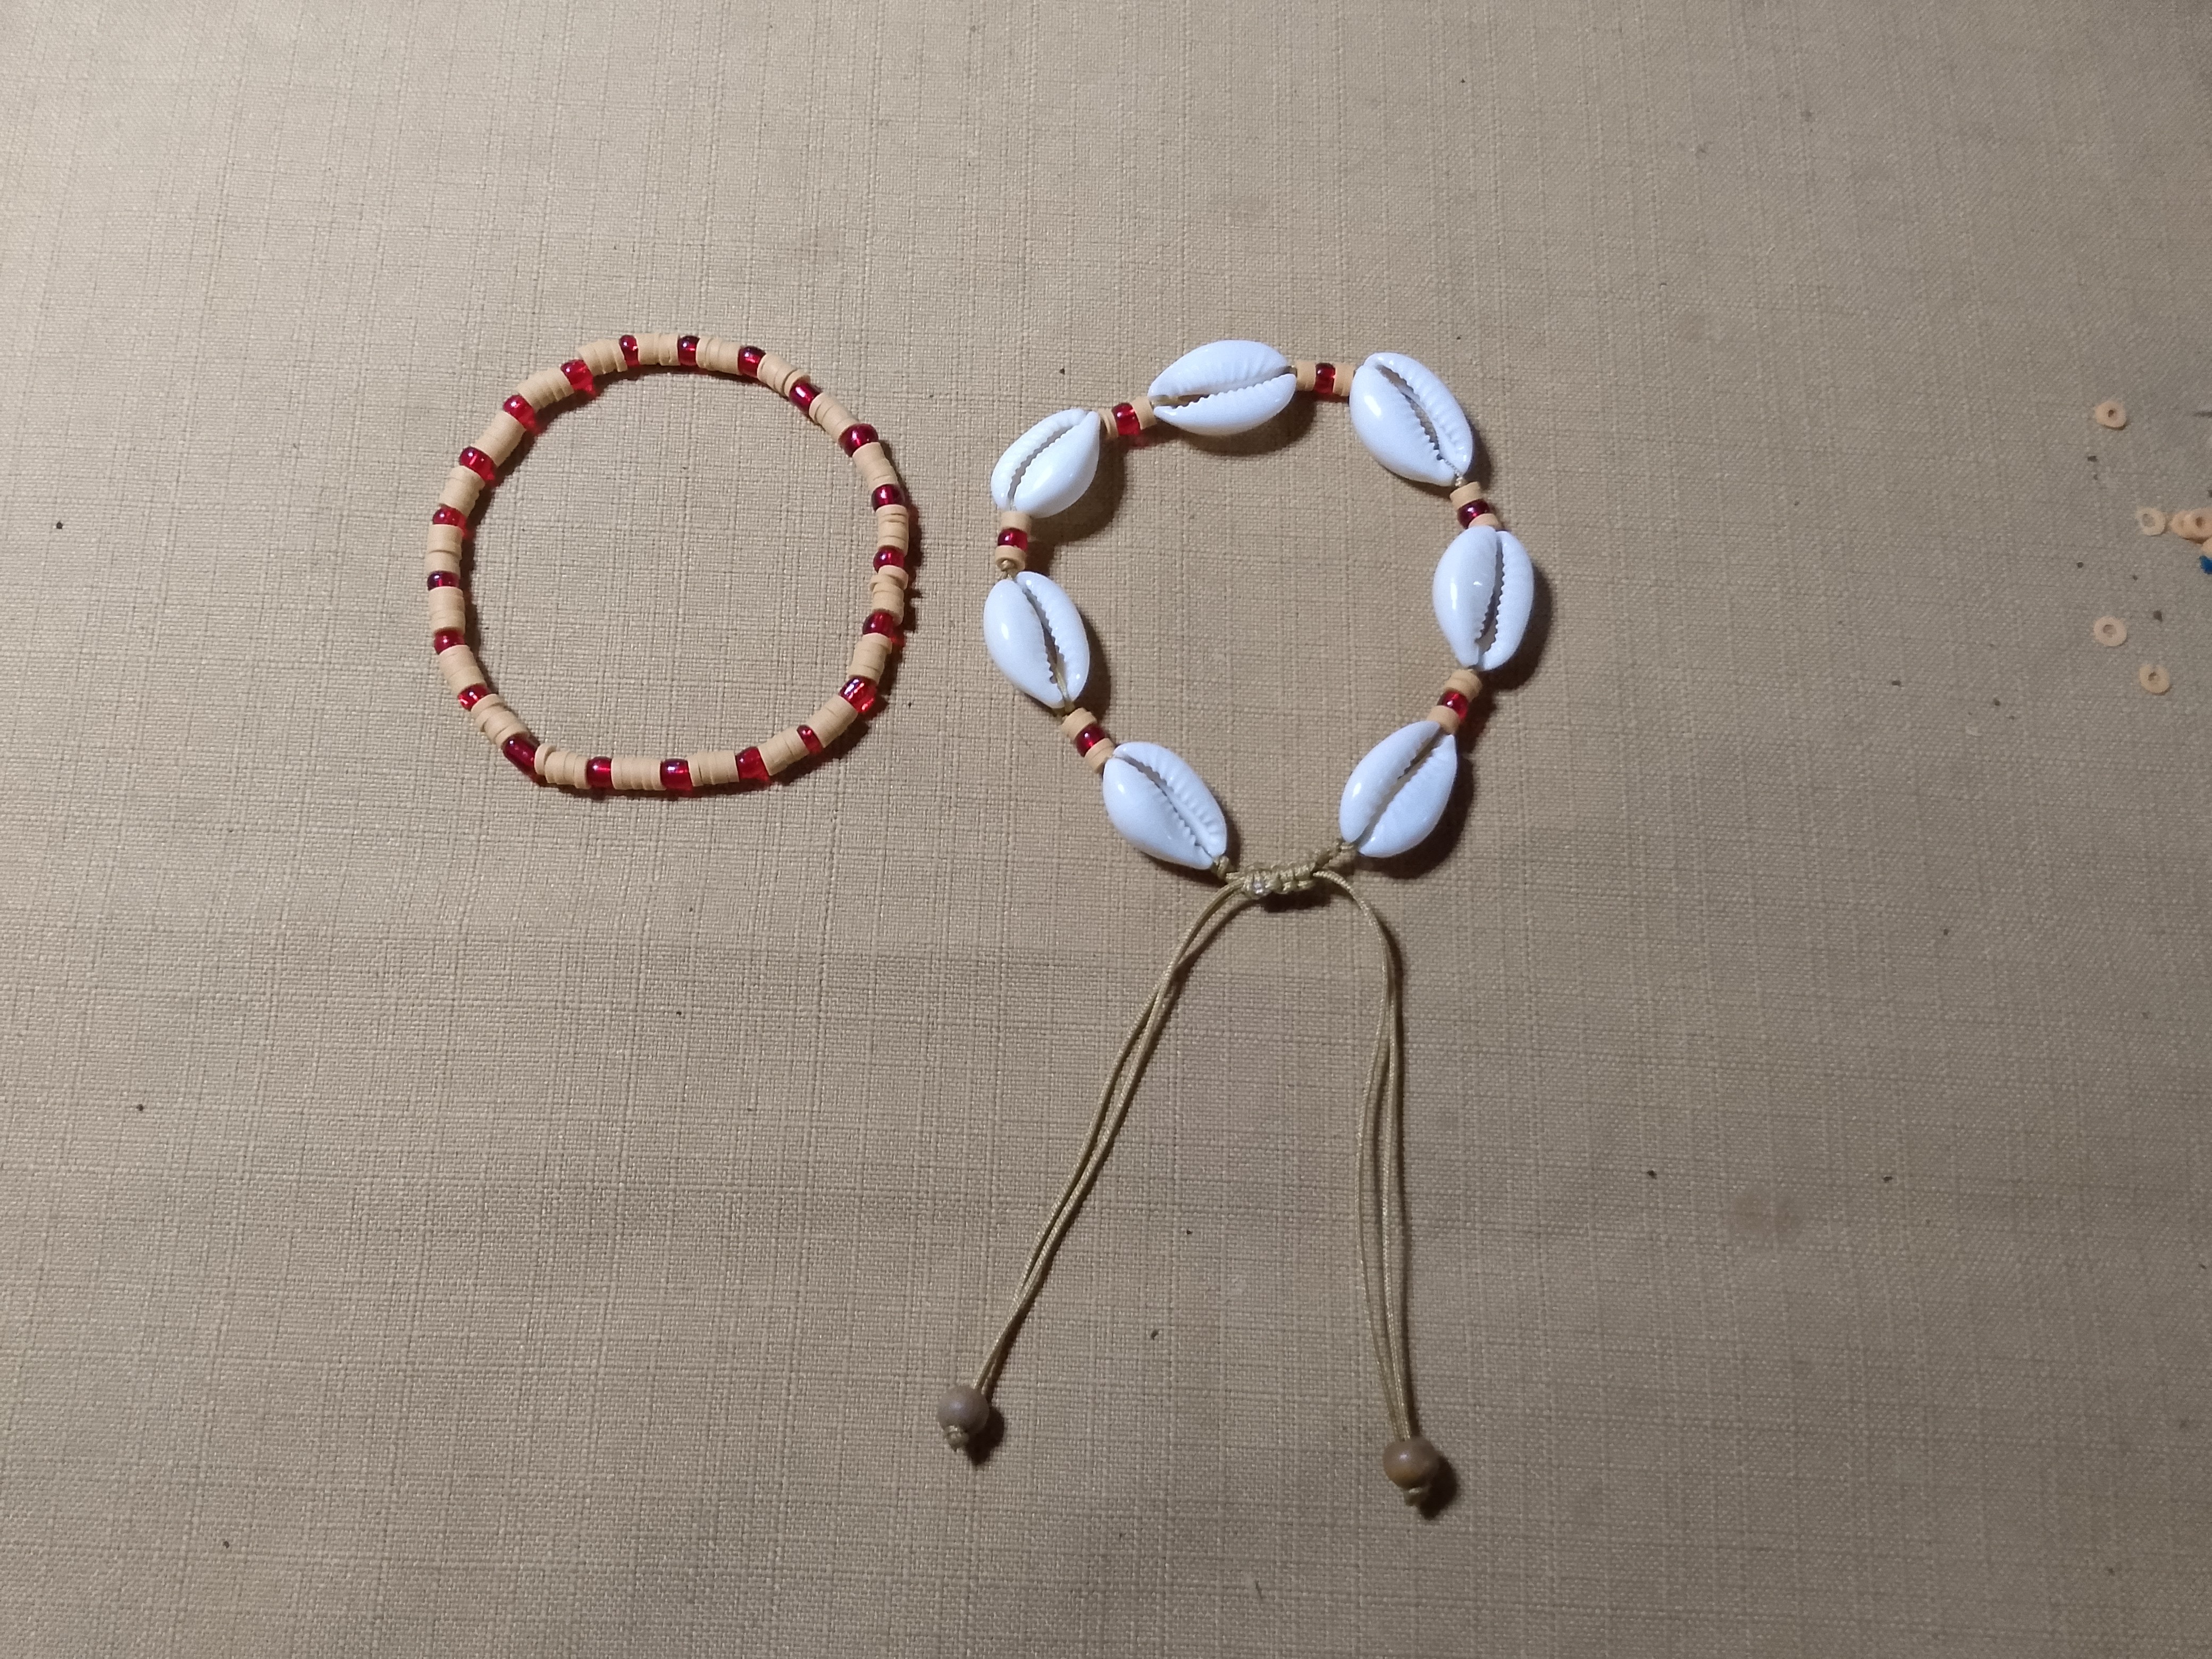
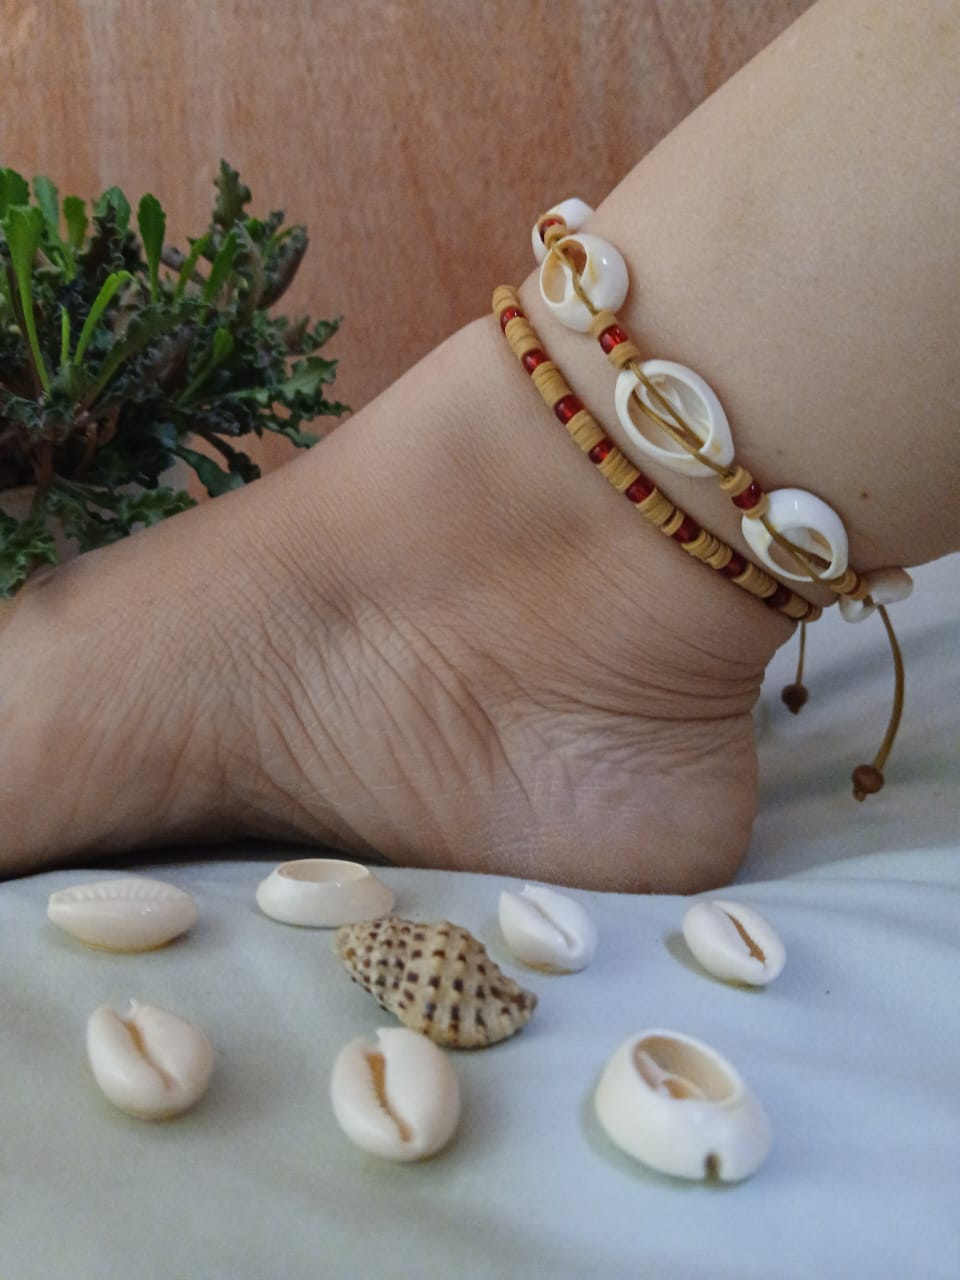
En esta oportunidad les traigo un diseño marino de una tobillera doble que realicé con unos caracolitos sintéticos como base principal que me encantaron y otros abalorios, con los que completé su elaboración.
Sigan leyendo para que vean el paso a paso de como lo hice:
Greetings Creative Artists of Crafts and Jewelry, I wish you all the best weekend! May you have a great time visiting the beach, rivers, parks, shopping malls, etc., etc. As we reach the end of March, next week April will be the most beautiful month of the year for me, as my birthday falls among its days, and I'm already ready for the Grand Mandarion. 🤣 Well, well, I always mention in my posts that I collaborate with an artisan community where crafts, especially handicrafts, are one of the most visited businesses, especially from tourists who take advantage of holidays like Carnival, long weekends, Holy Week, etc., because it's a beach area.
Around this time, I always have a lot of jewelry orders, almost all necklaces, earrings, bracelets, sandals, and most are beach accessories. I'd like to share with you pieces like a sarong, or what we call a pareo. However, I almost always make them in macramé, and there would be too many knots for a tutorial.
This time, I'm bringing you a nautical design for a double anklet that I made using some synthetic shells as the main base, which I loved, and other beads, which I used to complete the piece.
Read on to see the step-by-step instructions:
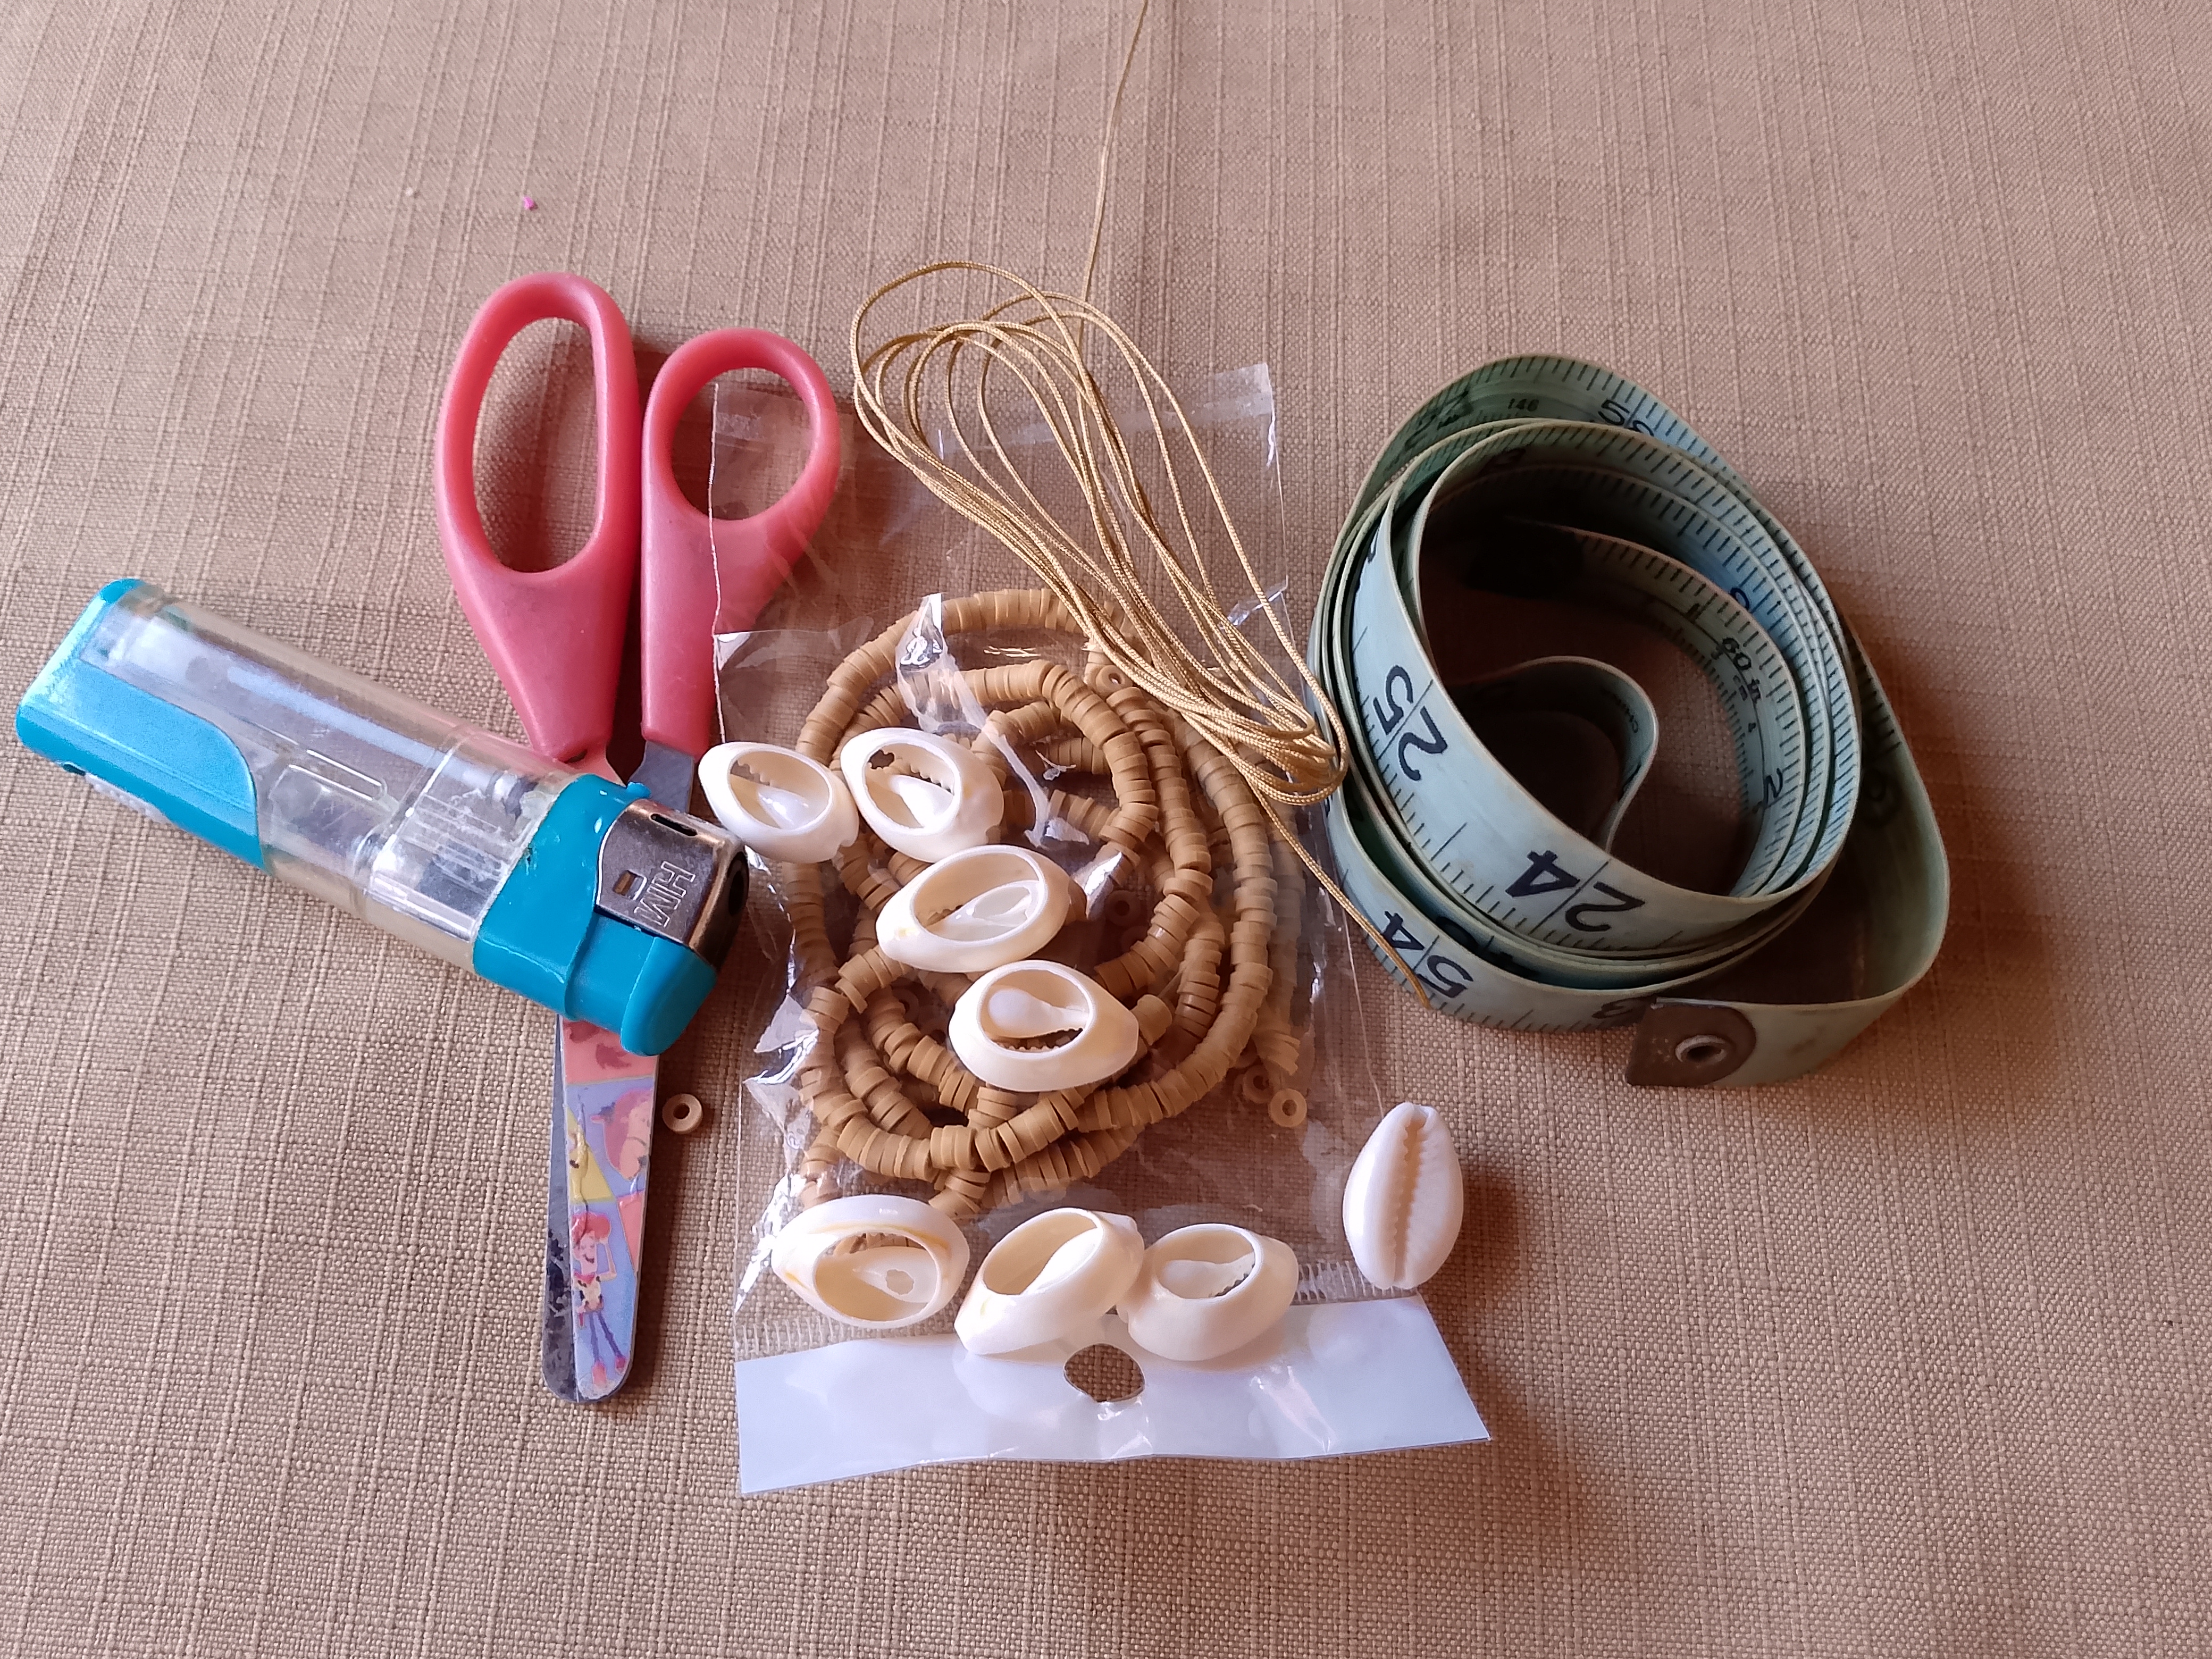
MATERIALES USADOS EN SU ELABORACIÓN:
✓ Siete caracoles sintéticos color perla.
✓ Un metro cincuenta de hilo chino de 0,6
milímetros color marrón.
✓ Mostacillones rojos.
✓ Pucas marrón.
✓ Hilo elástico.
✓ Tijeras.
✓ Encendedor.
✓ Cinta métrica.
✓ Dos cuentas de madera color marrón.
MATERIALS USED IN ITS PREPARATION:
✓ Seven synthetic pearl-colored shells.
✓ One meter and fifty meters of 0.6 millimeter brown Chinese thread.
✓ Red seed beads.
✓ Brown beading needles.
✓ Elastic thread.
✓ Scissors.
✓ Lighter.
✓ Tape measure.
✓ Two brown wooden beads.
PARA CONFECCIONAR ESTE PROYECTO USE LOS PASOS SIGUIENTES:
PRIMER PASO:
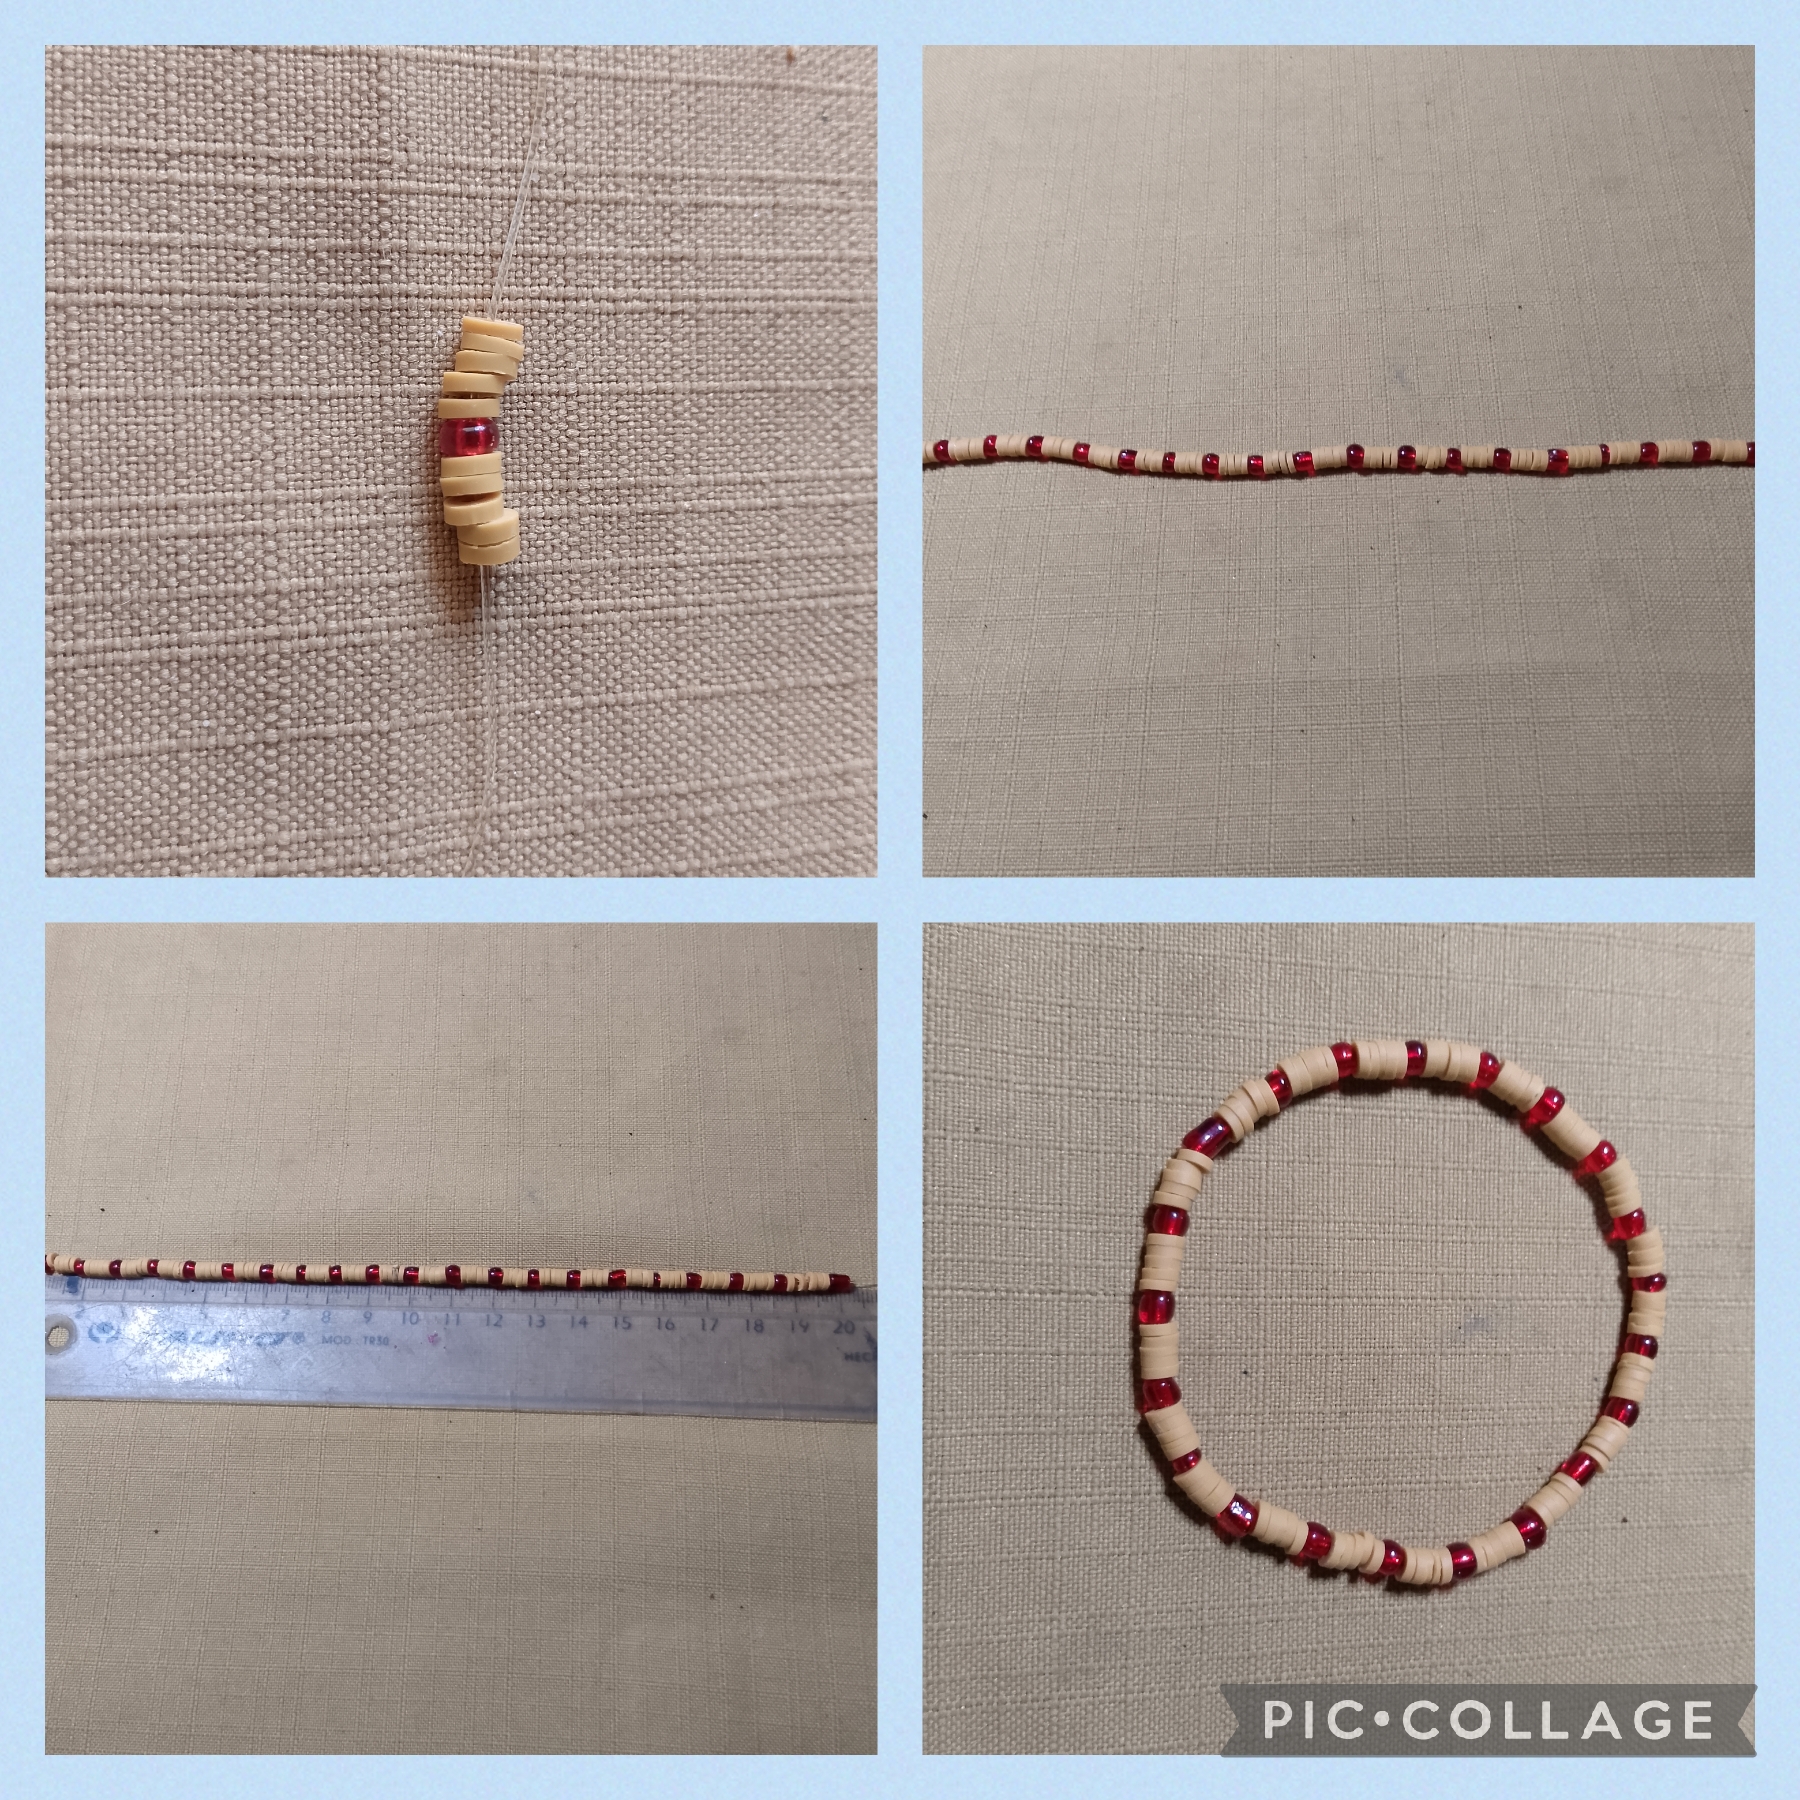
Comienzo la elaboración de mi primera tobillera, ocupando el metro y medio del hilo chino marrón y lo doblo a la mitad, me ayudo con la cinta métrica y a una medida de doce centímetros realizo un nudo sencillo, abro los hilos y voy a pasar uno de ellos por la abertura del caracol por la parte de arriba hacia abajo, hago un procedimiento contrario con el otro hilo o sea lo paso de abajo hacia arriba, tenso los dos hilos y así queda, lo llevo hasta el nudo que realicé, ahora uno las dos puntas y paso tres pucas marrones luego un mostacillón rojo y después tres pucas más.
De nuevo abro los hilos para realizar un procedimiento igual al que acabo de hacer o sea inserto un caracol, luego tres pucas marrón un mostacillón rojo y tres pucas marrón, estos pasos los voy a secuenciar hasta tener siete caracoles insertados en el hilo así:
TO MAKE THIS PROJECT, USE THE FOLLOWING STEPS:
STEP ONE:
I begin making my first anklet by taking a meter and a half of brown Chinese thread and folding it in half. I use the measuring tape to help me, and at a measurement of twelve centimeters, I make a simple knot. I open the threads and pass one of them through the opening of the snail from top to bottom. I do the opposite with the other thread, that is, I pass it from bottom to top. I tighten the two threads and tie it like this. I take it to the knot I made. Now I join the two ends and pass three brown beads, then a red seed bead, and then three more beads.
I open the threads again to follow the same procedure I just did, that is, I insert a snail, then three brown beads, one red seed bead, and three brown beads. I will sequence these steps until I have seven snails inserted into the thread like this:
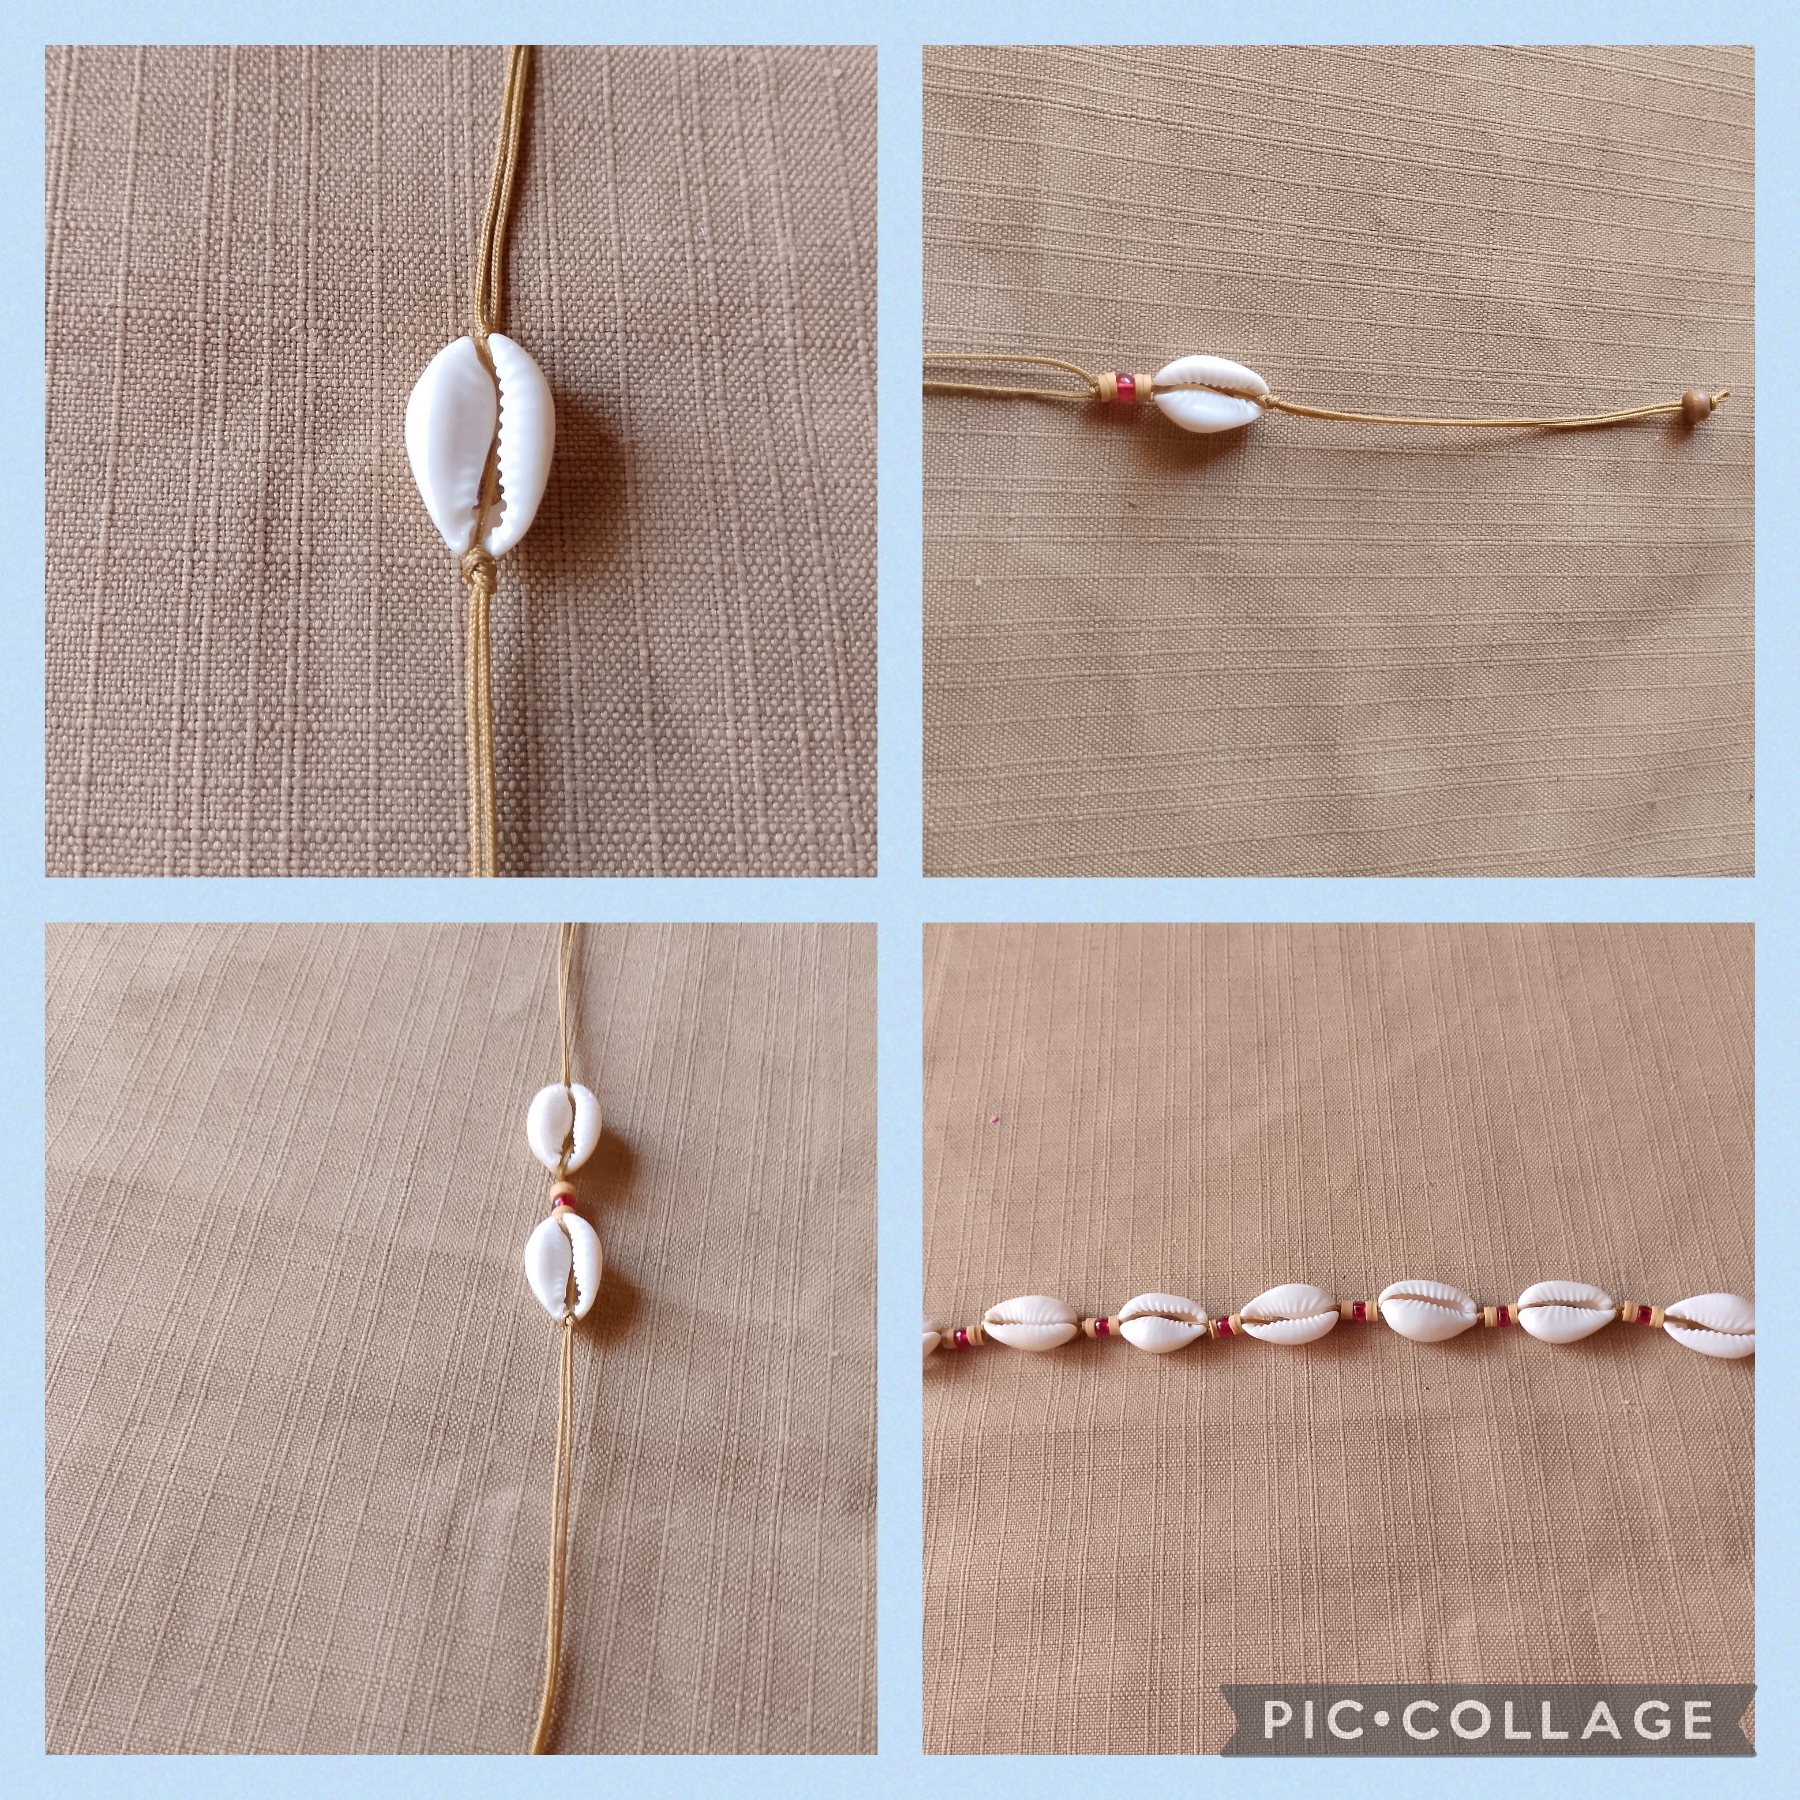
SEGUNDO PASO:
En este paso ya tengo insertado los siete caracoles que van a formar la tobillera, halo bien los hilos para que se unan todos y hago como en el inicio un nudo sencillo; dejo una medida igual de doce centímetros como al comienzo, uno los hilos en cada extremo y coloco una cuenta de madera, hago un nudito simple y uso el encendedor para sellar los hilos; aquí ya voy a realizar el cierre y esto lo hago con nudo plano como muestro, uso las tijeras corto los excedentes y sellamos con el encendedor.
STEP TWO:
In this step, I've already inserted the seven snails that will form the anklet. I pull the threads tight so they all join together, and I tie a simple knot, just like I did at the beginning. I leave a measurement of twelve centimeters, join the threads at each end, and place a wooden bead. I tie a simple knot and use the lighter to seal the threads. Now I'm going to close the threads, and I do this with a flat knot, as shown. I use scissors to cut off the excess and seal with the lighter.
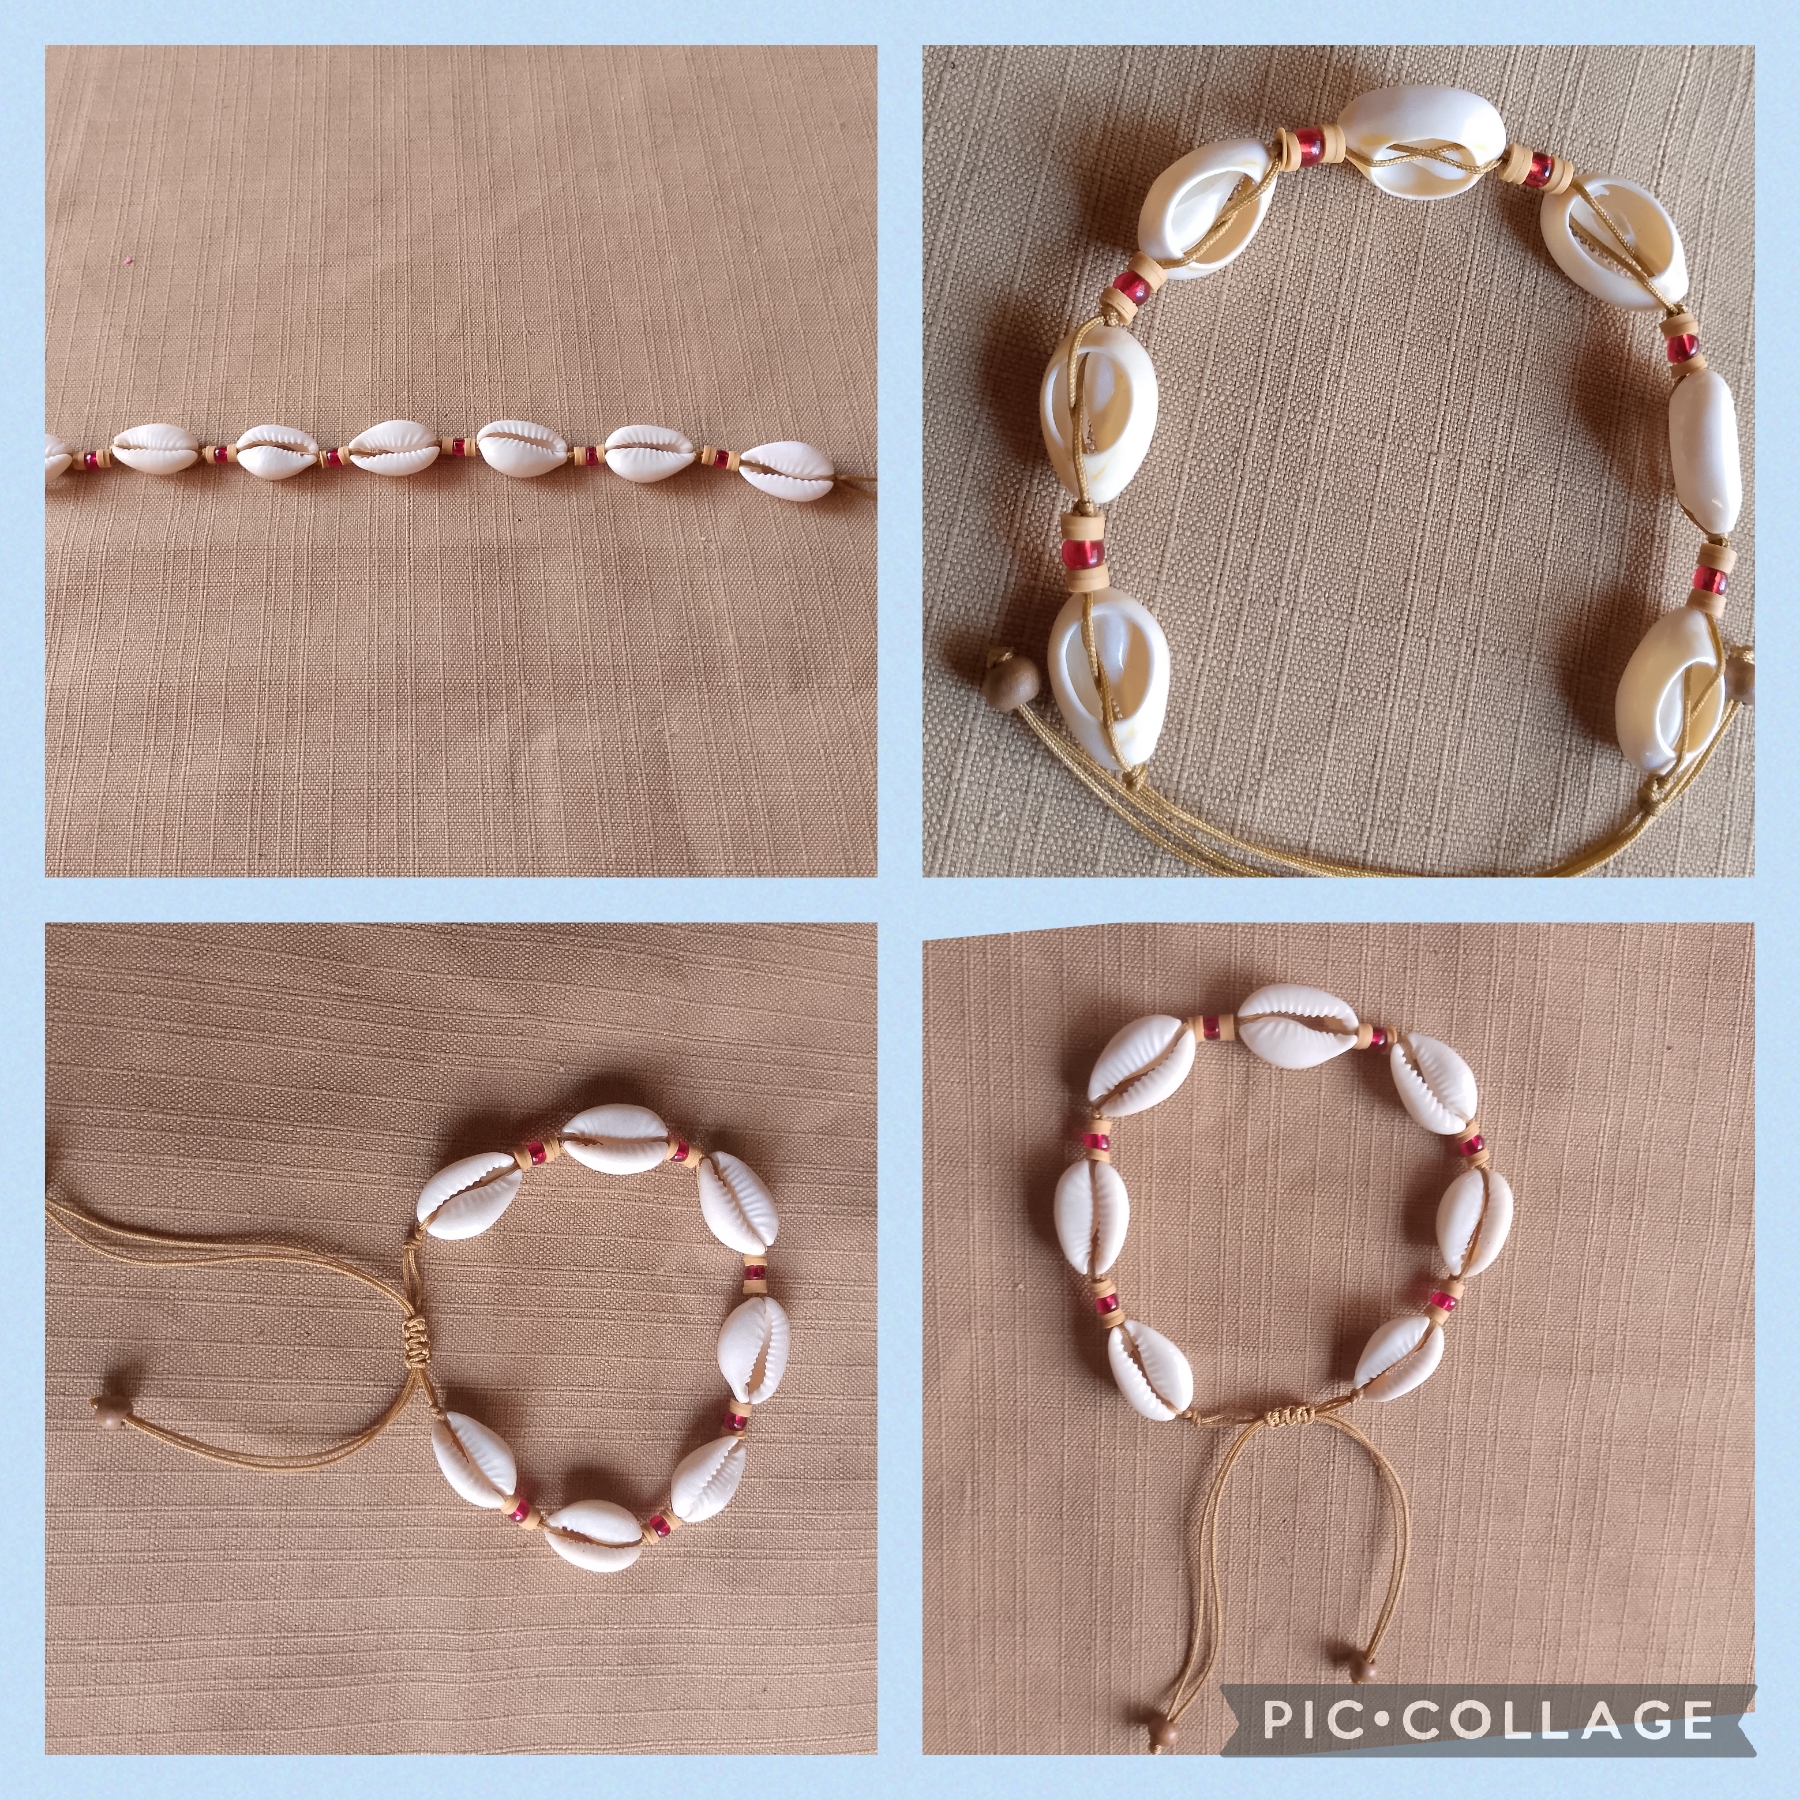
TERCER PASO:
Ahora en este paso realizo la segunda tobillera complemento de la anterior, está la hago con hilo elástico, corto un hilo de quince centímetros que estiramos para asegurar una medida holgada hasta veintidós centímetros que es la medida de la primera tobillera, por un extremo inserto tres pucas, un mostacillón rojo, tres pucas, de nuevo un mostacillón rojo tres pucas y de esta forma lleno el hilo elástico terminando con un mostacillón rojo para que quede igual, ahora realizo el Nudo del cierre junto las puntas y hago una cruz entrelazando los hilos pero sin apretar demasiado, luego voy hacer otro nudo pero este lo hago doble, osea paso dos veces una punta dentro del círculo para hacer el nudo y ahora si halo fuerte hago otro nudo simple, ajusto bien, paso por un mostacillón los hilos para que no se vea , corto los excedentes y así terminó está segunda tobillera.
THIRD STEP:
Now in this step I make the second anklet, a complement to the previous one. I make it with elastic thread. I cut a fifteen-centimeter thread that we stretch to ensure a loose measurement up to twenty-two centimeters, which is the measurement of the first anklet. At one end I insert three studs, a red seed bead, three studs, again a red seed bead, three studs, and in this way I fill the elastic thread, ending with a red seed bead so that it is the same. Now I make the closing knot together the ends and make a cross interlacing the threads but without tightening too much. Then I will make another knot, but this one I make it double, that is, I pass one end inside the circle twice to make the knot. Now if I pull it tight, I make another simple knot, I adjust it well, pass the threads through a seed bead so that it is not visible, cut the excess and that's how this second anklet is finished.
Artistas Creativos de las Manualidades y la Joyería este es el resultado final de mi manualidad que realicé en este día, espero que les guste y usen la idea con su toque personal para sus creaciones, como siempre agradecida con todos por ver, leer mis publicaciones y dejarme sus valiosos comentarios, feliz noche y nos vemos en la próxima manualidad, bye,bye.
Creative Artists of Crafts and Jewelry, this is the final result of my craft that I made today. I hope you like it and use the idea with your personal touch for your creations. As always, grateful to everyone for viewing and reading my posts and leaving me your valuable comments. Have a nice evening, and see you for the next craft. Bye, bye.
Las imágenes y redacción de este tutorial son de mi exclusiva propiedad, las fotos fueron tomadas con mi teléfono celular Tecno Spark Go 20, y las edite con una aplicación gratis del mismo.
Para traducir texto use Google traductor.
The images and writing in this tutorial are my exclusive property. The photos were taken with my Tecno Spark Go 20 cell phone, and I edited them with a free app for it.
Use Google Translate to translate the text.