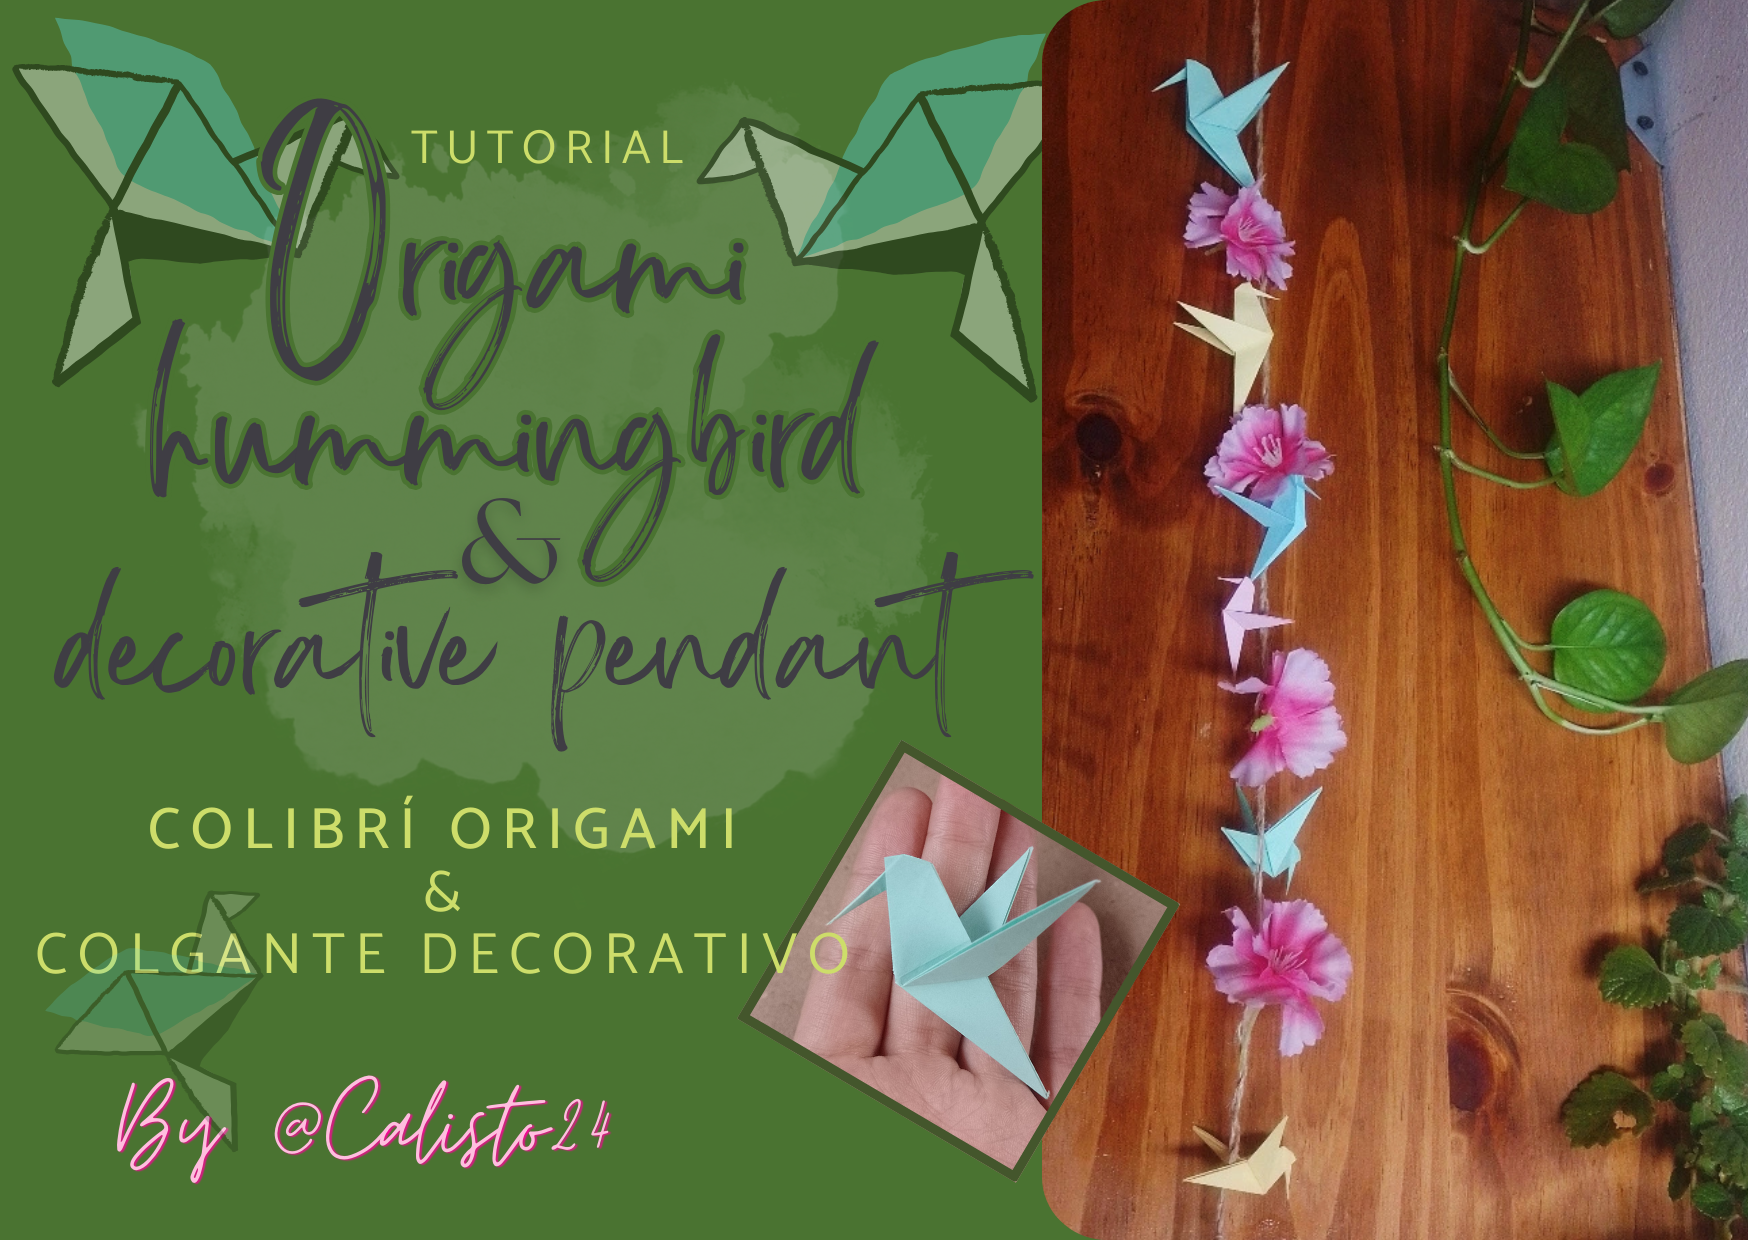
Hey dear friends who love creativity!
Today I return to this beautiful community to bring you the tutorial of another animal made in origami, since some have asked me for it in my last post about this content. In addition, I also bring you a decorative idea to get the most out of it! I hope you like it 💙.
Hey queridos amigos amantes de la creatividad!
Hoy vuelvo a esta bella comunidad para traerles el tutorial de otro animalito hecho en origami, ya que algunos me lo han pedido en mi ultimo post sobre este contenido. Además, también les traigo una idea decorativa para sacarle todo el provecho! espero les guste 💙.
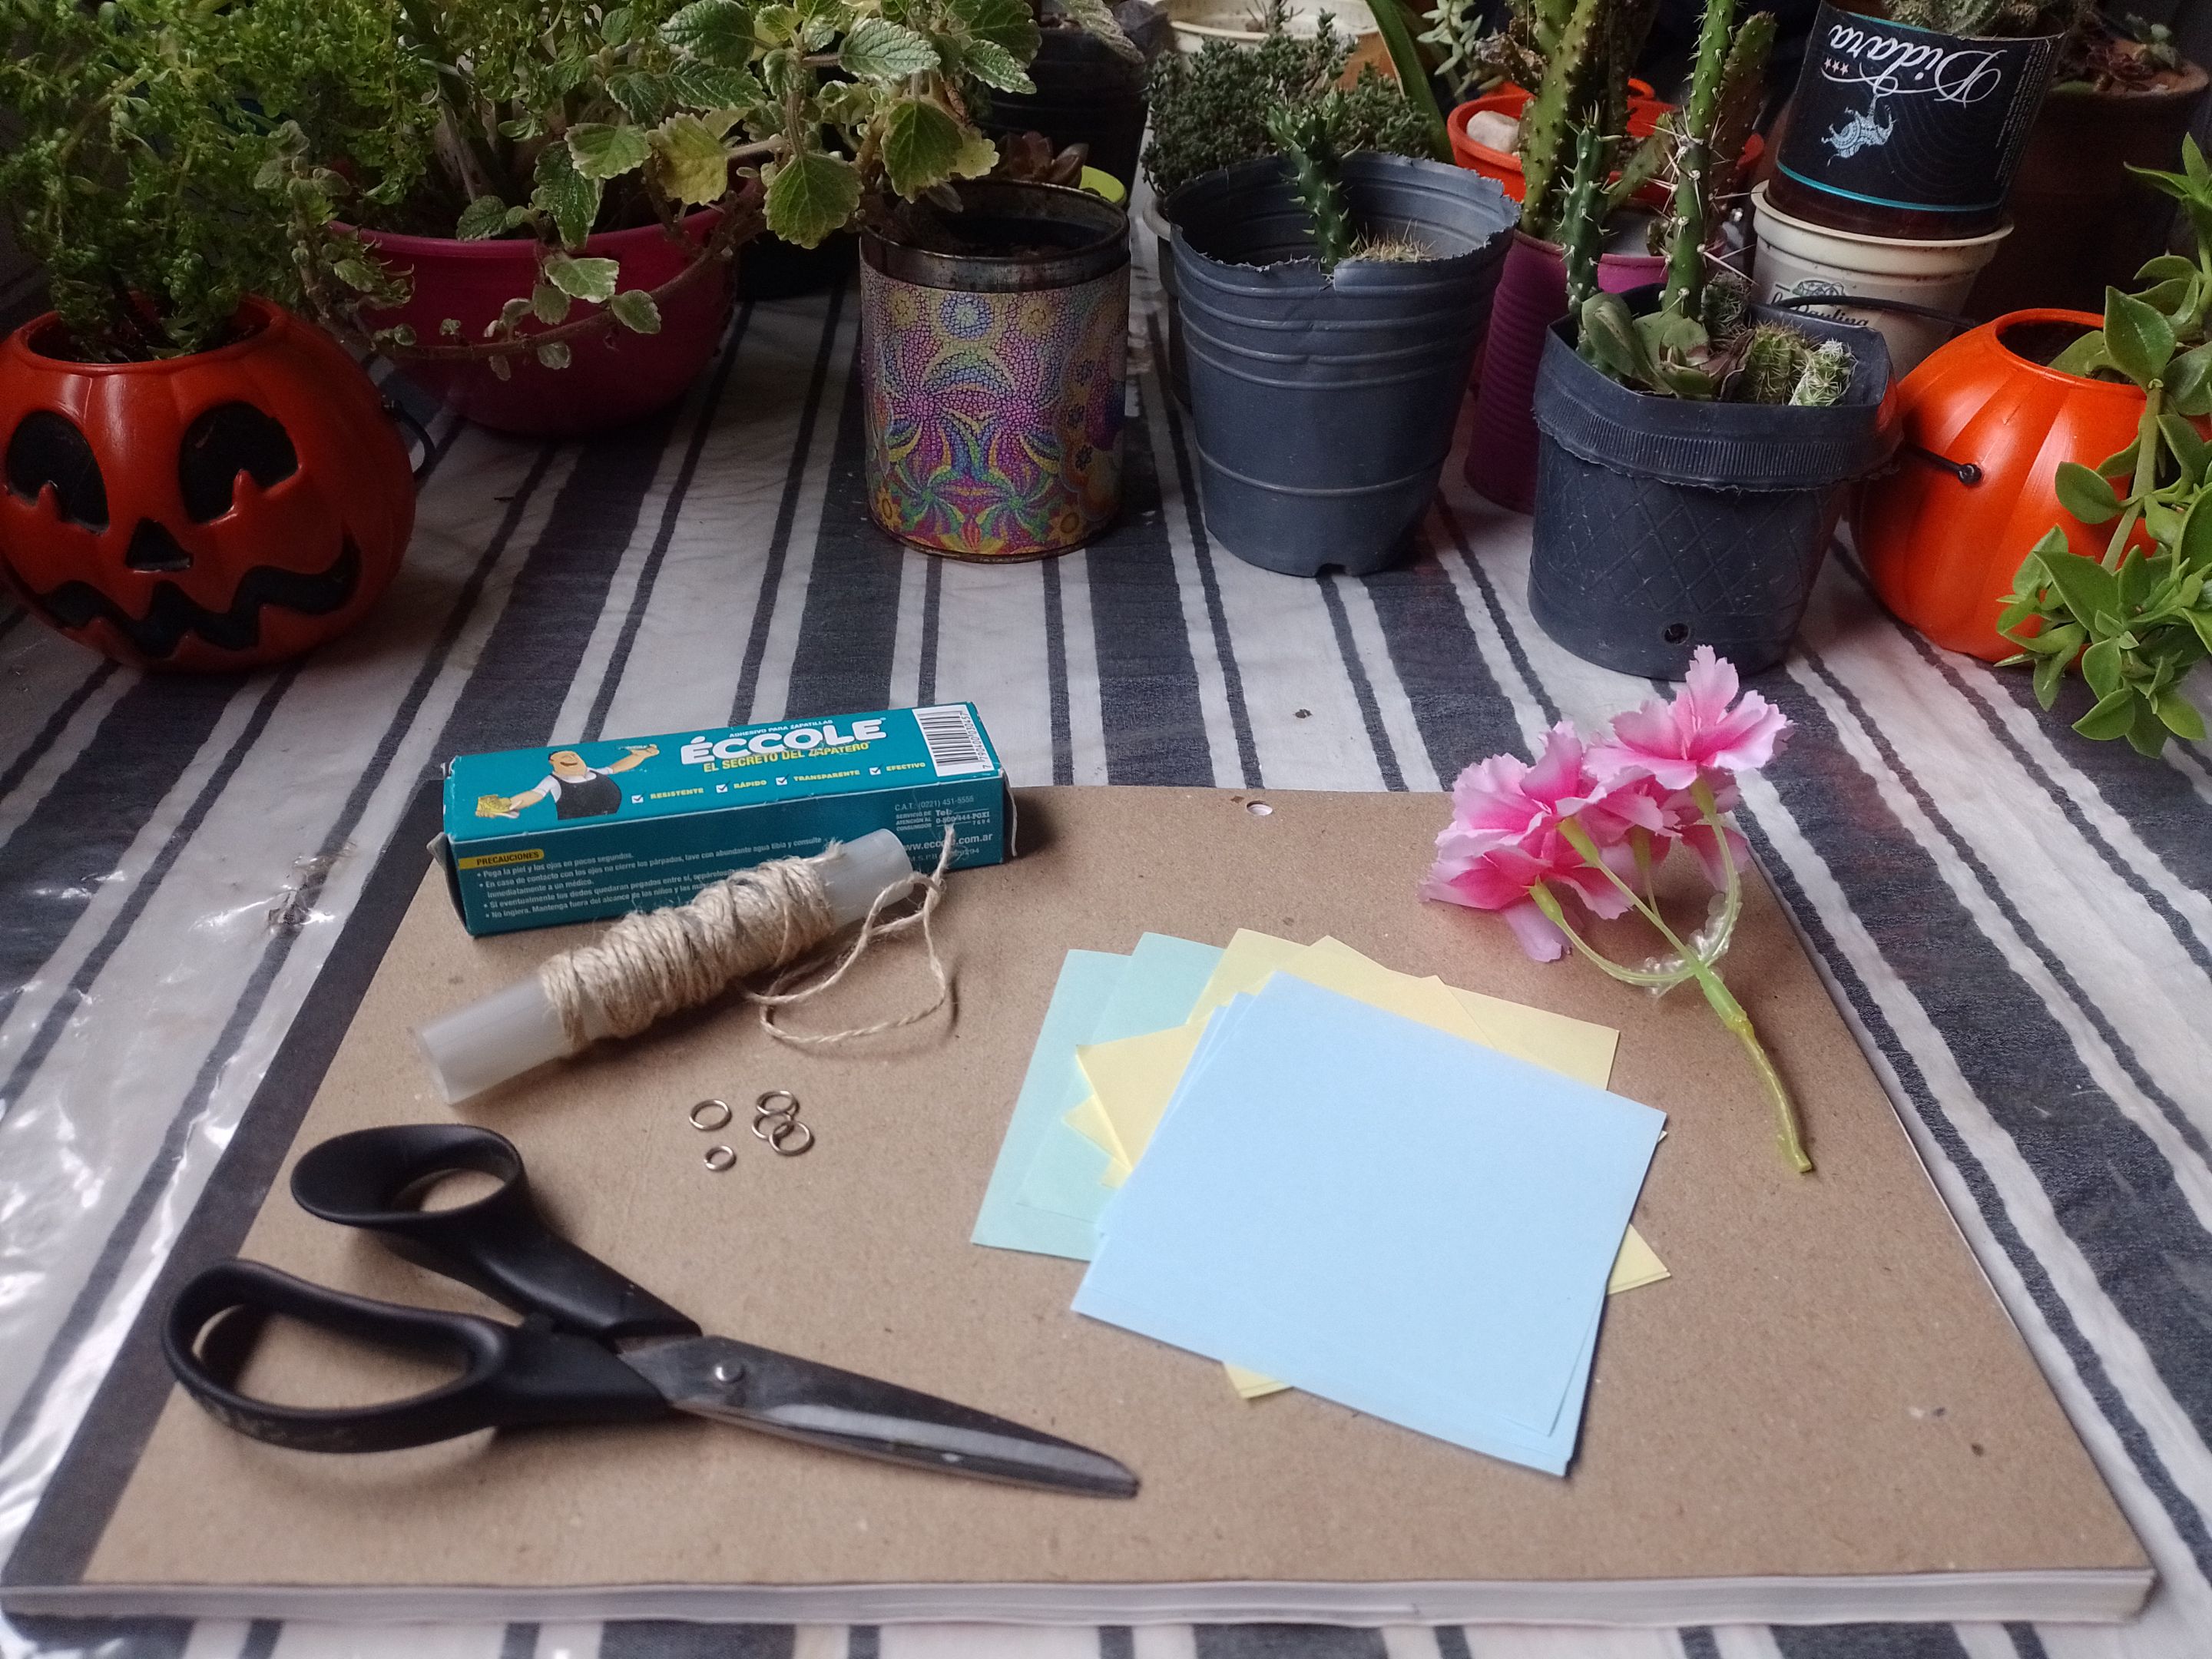
Necesitaremos los siguientes materiales:
- Cuadrados de papel del tamaño que mas te guste.
- Hilo sisal fino.
- Pegamento.
- Algunas flores de plástico.
- Tijeras.
We will need the following materials:
- Paper squares of the size you like the most.
- Fine sisal thread.
- Glue.
- Some plastic flowers.
- Scissors.
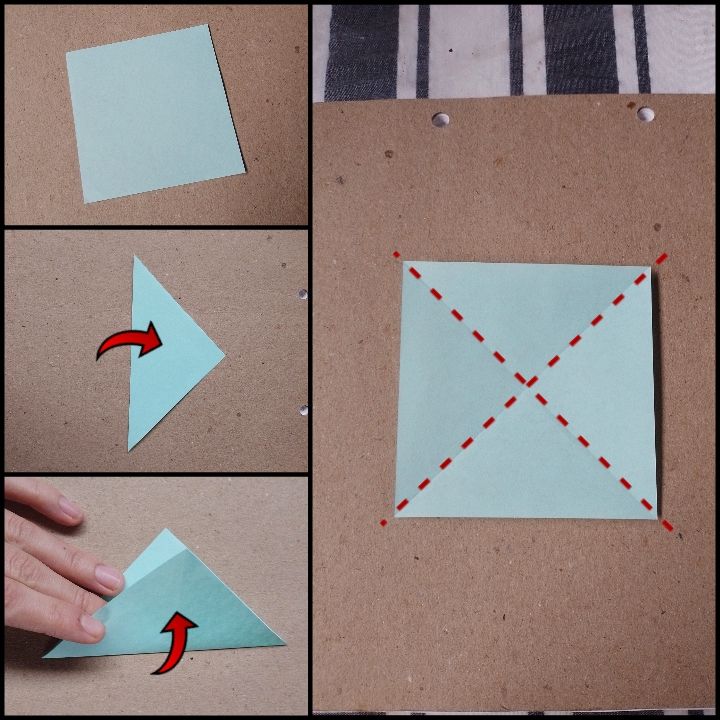
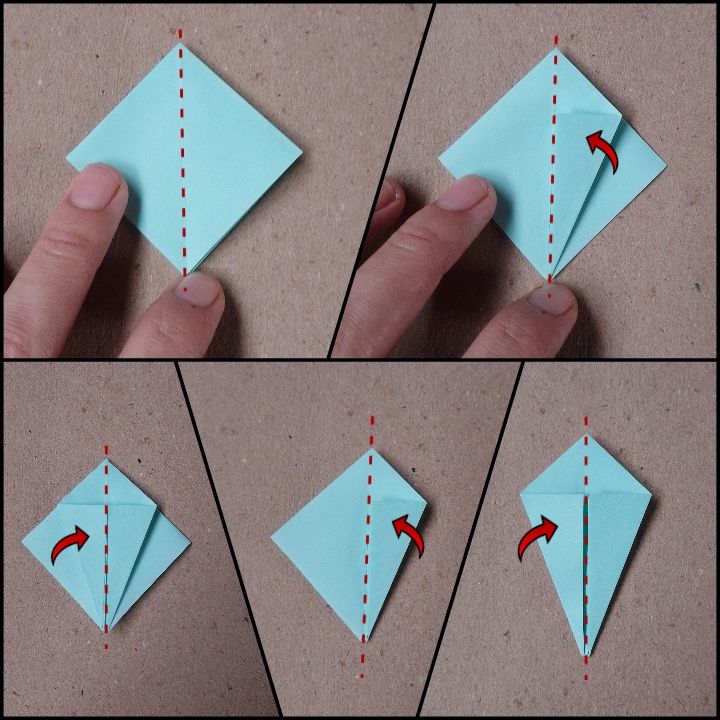
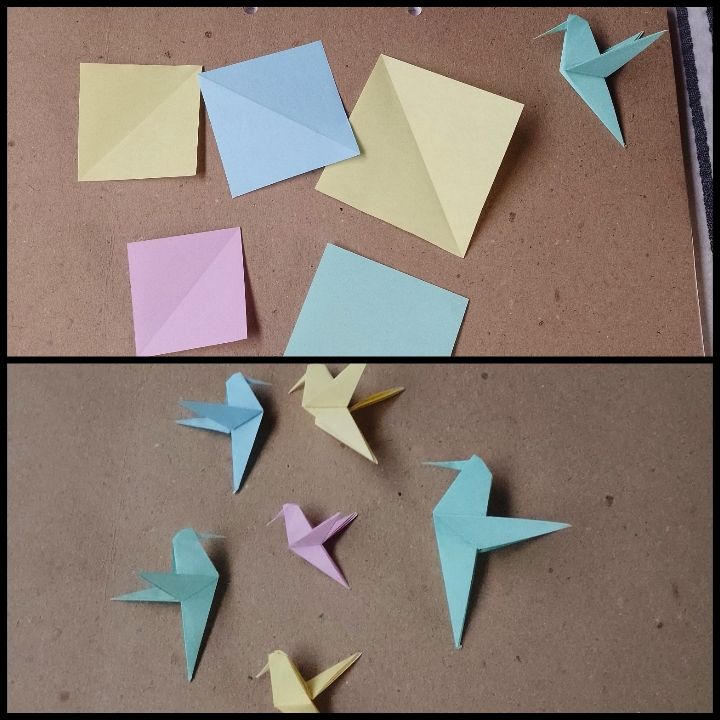
Well, friends, we will start by cutting out a square of paper, of the color and size of your preference, the important thing is that all its sides measure exactly the same. In my case, I used the typical office papers that are already square and all their sides are 12 centimeters.
Next we will place the paper in such a way that we have a rhombus and then make two folds right in the middle. We will start with a double from side to side (joining the lateral points), we will return it to its initial shape to make another double by joining the bottom point with the top, highlighting the fold together in the middle.
We will return to the initial shape and we will notice that an X was marked.
Bien, amigos, comenzaremos recortando un cuadrado de papel, del color y medida de tu preferencia, lo importante es que todos sus lados midan exactamente lo mismo. En mi caso, utilicé los típicos papeles de oficina que de por si ya son cuadrados y todos sus lados son de 12 centímetros.A continuación ubicaremos el papel de tal manera que nos quede un rombo para luego hacer dos dobleces justo por la mitad. comenzaremos con un dobles de lado a lado (juntando las puntas laterales), lo volveremos a su forma inicial para hacer otro dobles juntando la punta de abajo con la de arriba, remarcando el doblez junto por la mitad.
volveremos a la forma inicial y notaremos que nos quedó marcada una X.
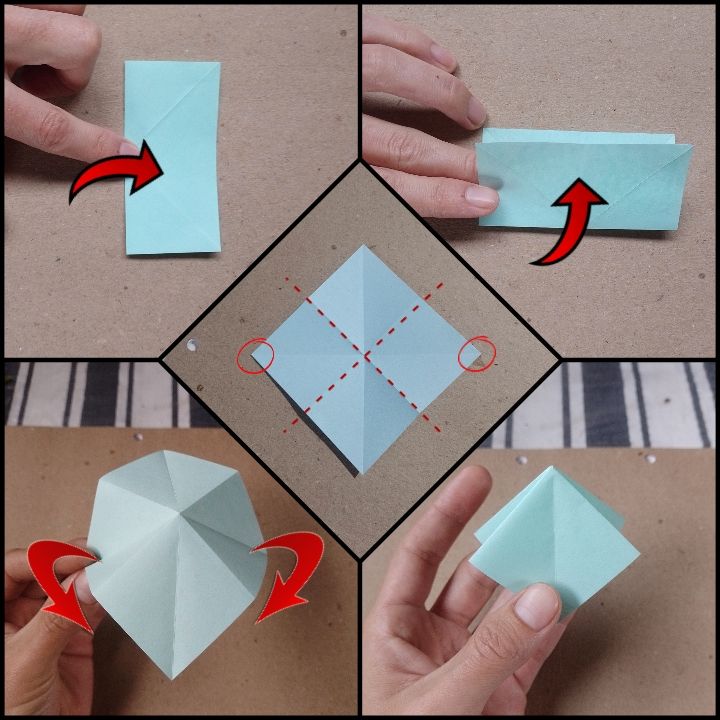
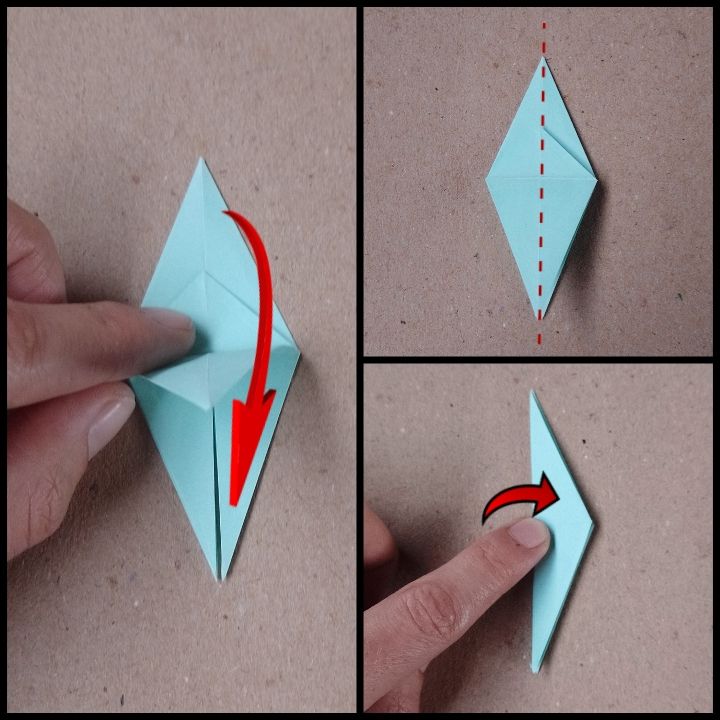
Now we will place the paper so that there is a square in front of us and we will fold it in halves again, this time horizontally and vertically. We join the lower side with the upper side, mark the fold, return to the original shape and fold bringing the left side with the right side. We mark the fold and return to the original shape.
Once we have all the folds marked, we position the square again as if it were a rhombus and we will join the lateral points behind the rhombus. These tips must be positioned in the lower corner and inside. The marked folds that we made previously will help in this step.
We should have another rhombus left but smaller.
Ahora ubicaremos el papel de modo a que nos quede un cuadrado frente a nosotros y volveremos a doblar por las mitades, esta vez de manera horizontal y vertical. Juntamos el lado inferior con el lado superior, marcamos el doblez, volvemos a la forma original y doblamos llevando el lateral izquierdo con el derecho. Marcamos el doblez y volvemos a la forma original.Una vez que tengamos todos los dobleces marcados, volvemos a posicionar el cuadrado como si fuese un rombo y juntaremos las puntas laterales por detrás del rombo. Dichas puntas deben quedar posicionadas en la esquina inferior y por dentro. Los dobleces marcados que hicimos previamente, ayudará en este paso.
Nos debería de quedar otro rombo pero mas pequeño.
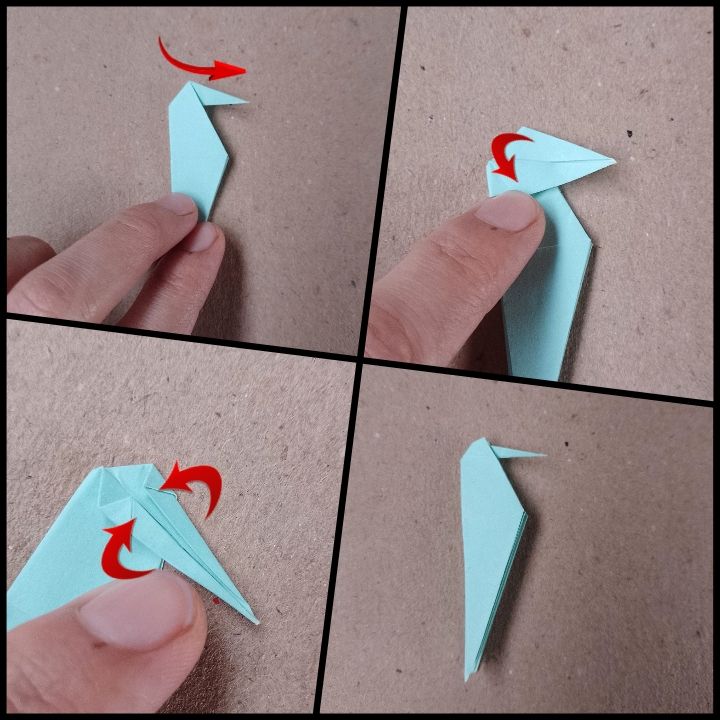
We will notice that one of the sides of the small rhombus has an opening with a flap on each side. That opening should be on the bottom side of the rhombus, so we will place it that way.
We will take one of those flaps and bring the tip of that side inside the rhombus, so that this new side (which is located in the center of the rhombus) is perfectly aligned with the line marked in the center of the rhombus. We will mark that new fold and then do exactly the same with the other side flap.
We will repeat this procedure with the back side of the rhombus. We should have a symmetrical trapezoid.
Notaremos que uno de los lados del rombo pequeño tiene un apertura con una solapa en cada lateral. Esa apertura debe quedar del lado de abajo del rombo, por lo que lo ubicaremos de esa manera.Tomaremos una de esas solapas llevaremos la punta de ese lateral hacia adentro del rombo, de manera que ese nuevo lateral (que queda ubicado en el centro del rombo) quede perfectamente alineado con la línea marcada en el centro del rombo. Marcaremos ese nuevo doblez y luego haremos exactamente lo mismo con el la otra solapa lateral.
Repetiremos ese procedimiento con el lado de atrás del rombo. nos debería de quedar un trapezoide simétrico.
Above the last folds we made, there will be a small triangle on the top corner. We will have to bend that small triangle downwards (in front and behind the trapezoid) and we will return it to its initial position.
Then we will open the last two flaps that we have folded and bring the bottom point up. We will be guided by the small triangle mark that we marked in the previous step. You can help yourself by pressing that small upper triangle with a finger, and then, bring the lower point upwards until the lateral ends are perfectly aligned in the vertical center of the figure.
Once ready, we will repeat the process with the back side of the trapezoid.
Por encima de los últimos dobleces que hicimos, quedará un pequeño triangulo sobre la esquina superior. Deberemos doblar ese pequeño triangulo hacia abajo (por delante y por detrás del trapezoide) y lo regresaremos a su posición inicial.Luego abriremos las ultimas dos solapas que hemos doblado y llevaremos la punta inferir hacia arriba. Nos guiaremos por la marca del pequeño triangulo que marcamos en el paso anterior. Pueden ayudarse presionando ese pequeño triangulo superior con un dedo, y ahí si, llevar la punta inferior hacia arriba hasta lograr que los extremos laterales queden perfectamente alineados en el centro vertical de la figura.
Una vez listo, repetiremos el proceso con el lado trasero del trapezoide.

That last fold we made, we will take it down, right in the middle. You will see that this half is already marked by the small triangle that we made before. This triangle will be visible again.
We will do this process only on one side.
Next we will take the tip that we had left on the left side and join it with the tip of the right side, marking the fold right in the middle vertically.
Ese ultimo doblez que hicimos, lo llevaremos para abajo, justo por la mitad. verán que esa mitad ya está marcada por el pequeño triangulo que hicimos antes. Dicho triangulo volverá a quedar visible.Ese proceso lo haremos solo por uno de los lados.
A continuación llevaremos la punta que nos quedó en el lateral izquierdo y la juntaremos con la punta del lateral derecho, marcando el doblez justo a la mitad de manera vertical.
Later we will take the tip that was left at the upper end and take it down inside the figure. ensuring that the lower side of said tip is horizontal.
We will have two flaps left in that last fold. We will take the front flap down. and then bring the lateral tips of those two flaps inward (like the folds we had made at the beginning).
Once ready, we will raise the flap again, joining it with the back one.
Posteriormente tomaremos la punta que nos quedó en el extremo superior y la llevaremos hacia abajo por dentro de la figura. logrando que el lado inferior de dicha punta quede horizontal.Nos quedaran dos solapas en ese ultimo doblez. llevaremos la solapa de enfrente hacia abajo. para luego llevar las puntas laterales de esas dos solapas hacia adentro (como los dobleces que habíamos hecho mas al principio).
Una vez listo, volveremos a levantar la solapa juntándola con la de atrás.
Finally, we will take the front flap and also the back flap (which we left at the lower end of the figure), upwards, forming the wings of our beautiful hummingbird.
Por ultimo llevaremos la solapa delantera y también la trasera (que nos quedaron en el extremo inferior de la figura), hacia arriba, formando las alas de nuestro bello colibrí.
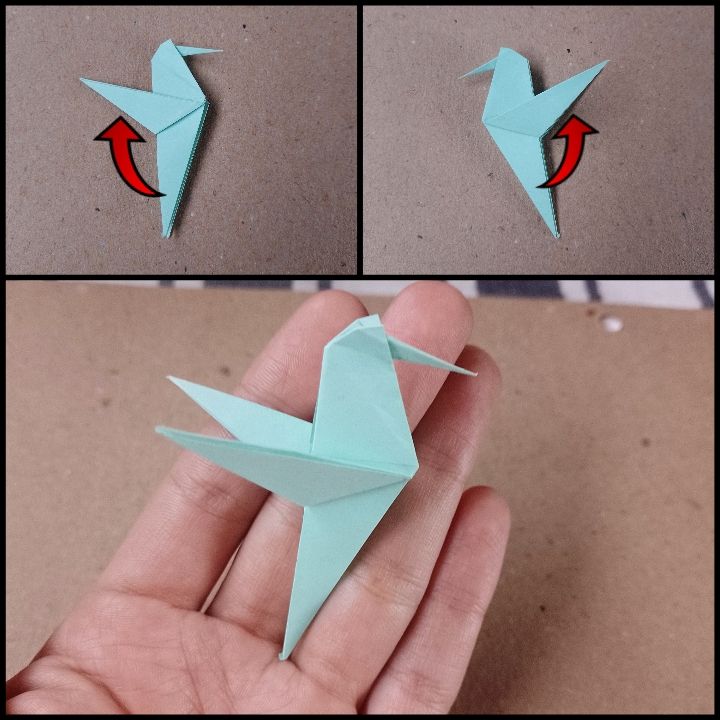
We will repeat all these steps again, assembling more hummingbirds of the sizes and colors that you like the most.
In my case I decreased the size with each one I put together, the important thing is that we always start with a perfect square.
Volveremos a repetir todos estos pasos armando mas colibrís de los tamaños y colores que mas te gusten.En mi caso fui disminuyendo el tamaño con cada uno que armaba, lo importante es que siempre arranquemos con un cuadrado perfecto.
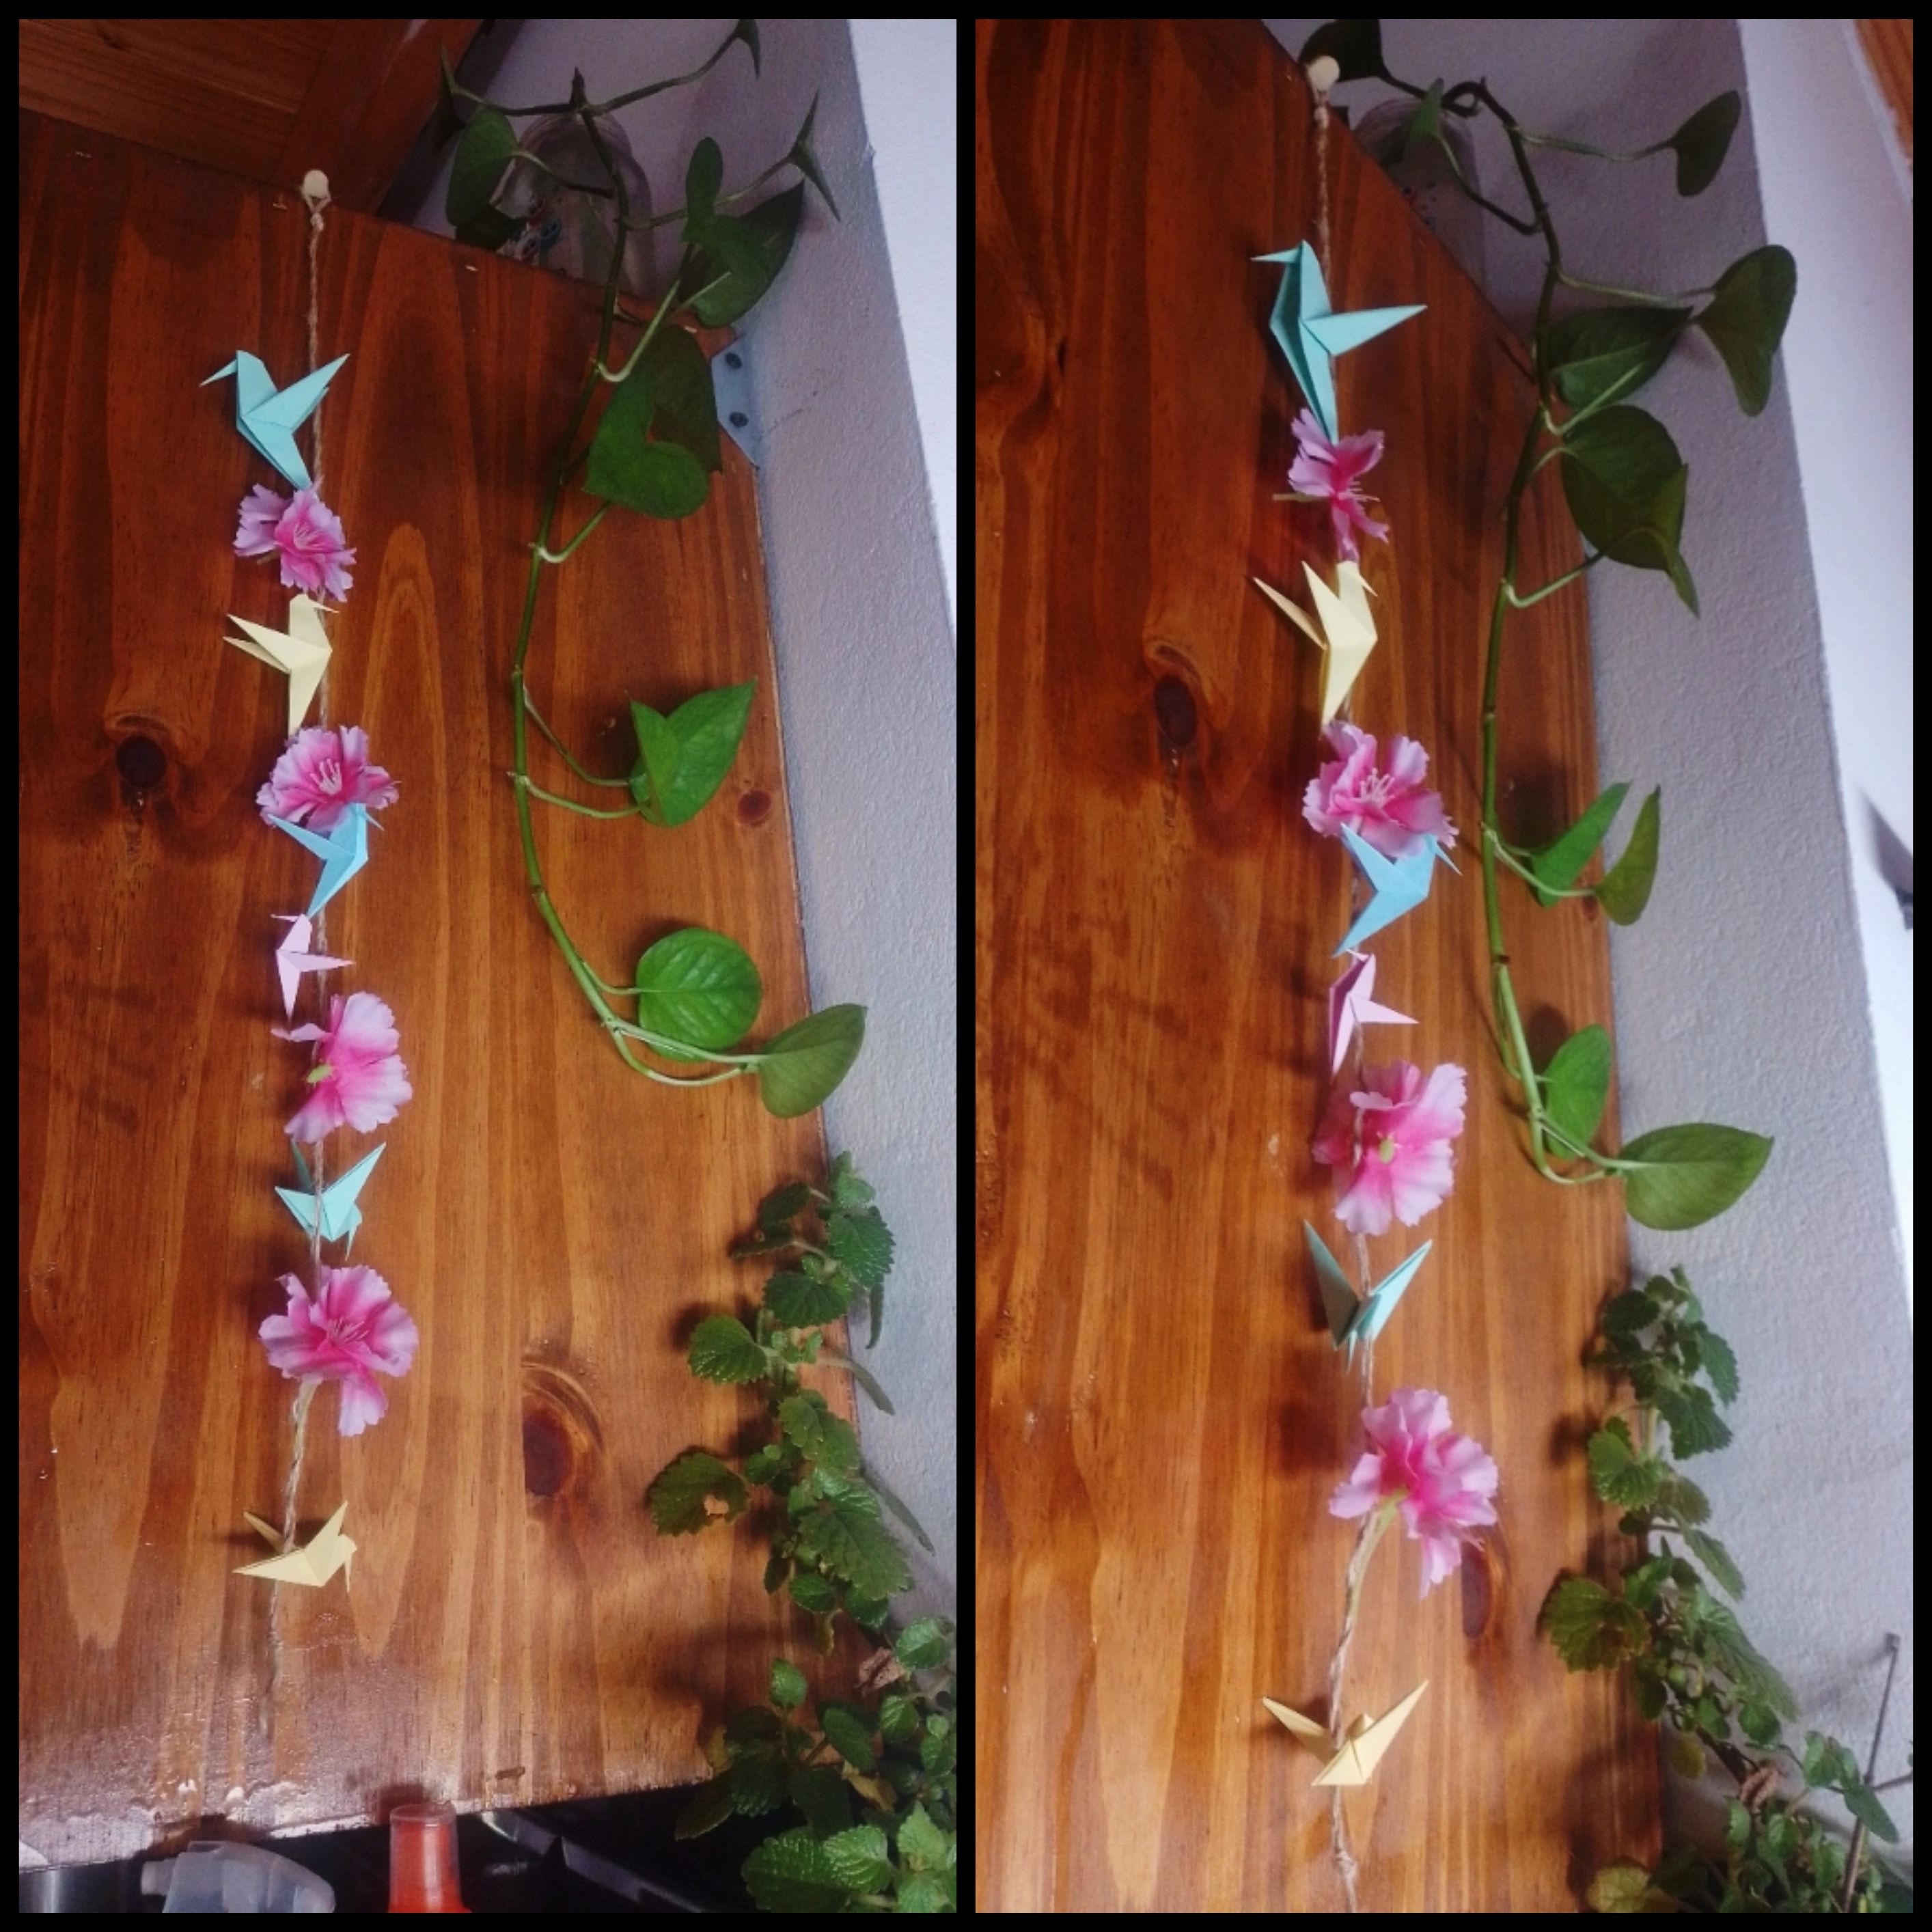
Once we have all the figures we want to use ready, we can continue with the pendant. From here on everything becomes super fast and easy.
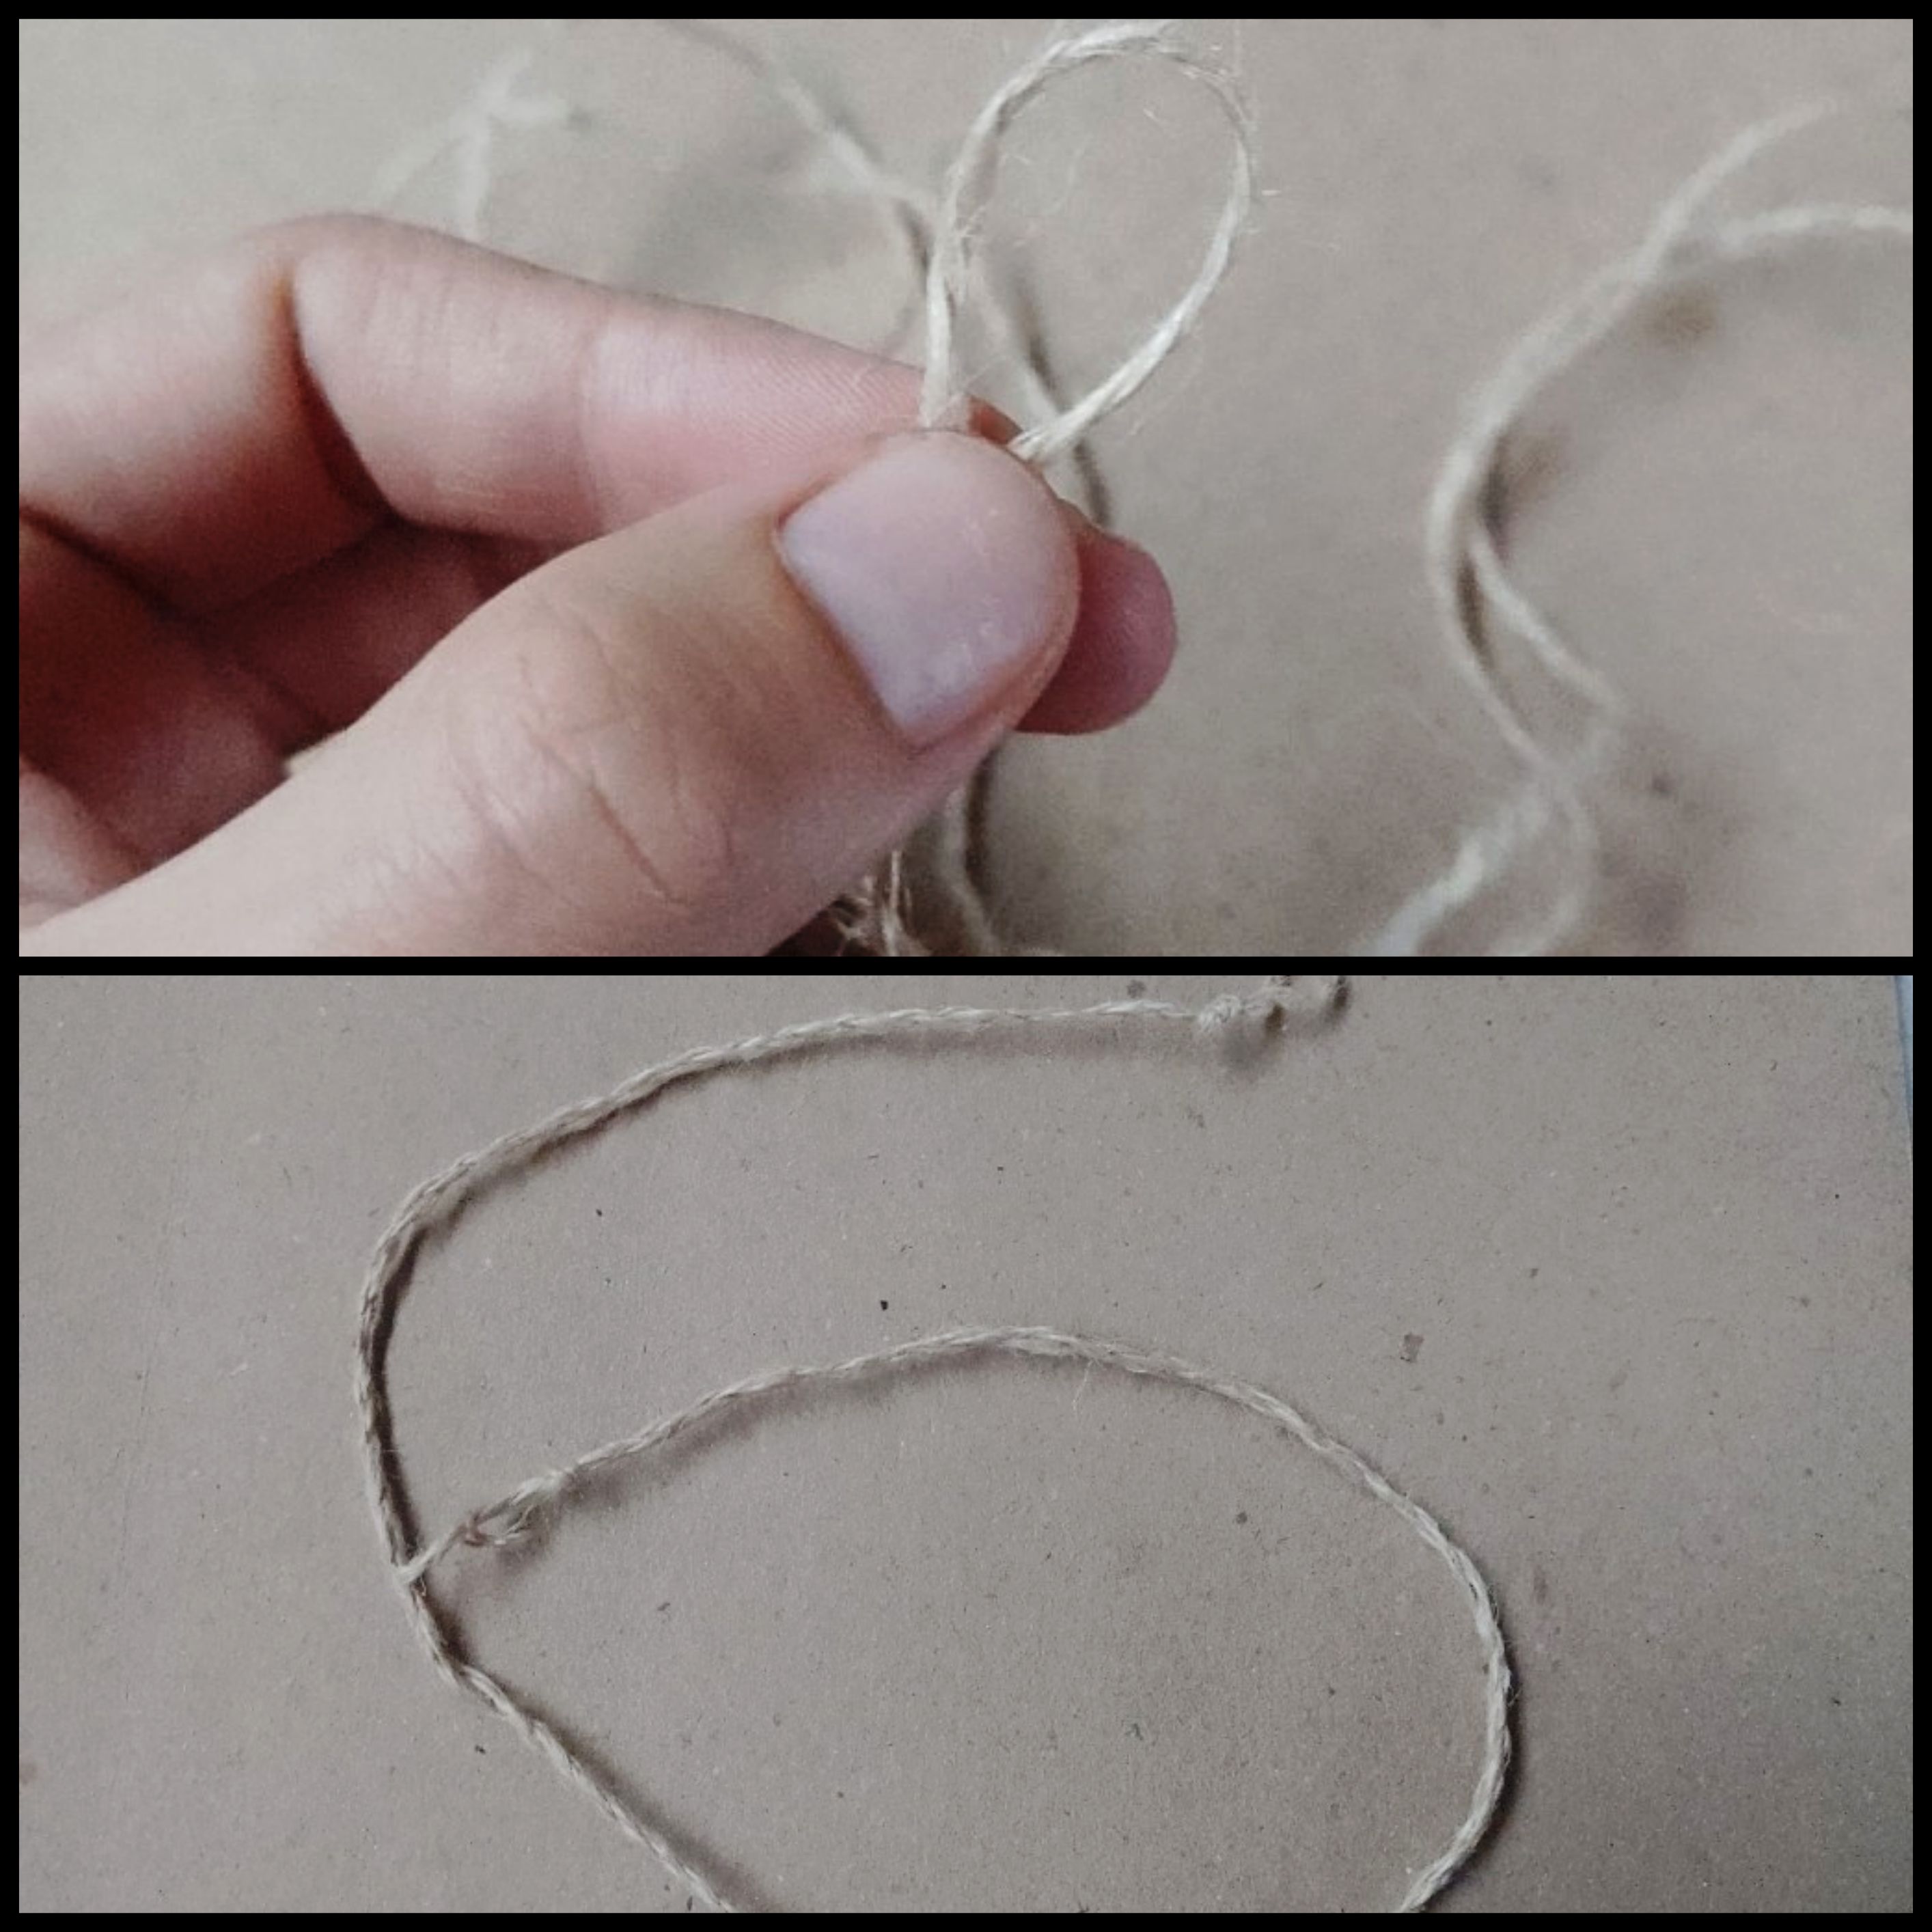
Now we will take the sisal thread and cut a strip of 80 centimeters.
We will take the middle of the strip and tie a knot, leaving 1 or 2 centimeters so we can hang it later.
Next we will roll both halves on top of each other, forming a single strip.
Una vez que tengamos listas todas las figuras que queramos utilizar, podemos continuar con el colgante. De aquí en adelante todo se vuelve super rápido y fácil.Ahora tomaremos el hilo sisal y cortaremos una tira de 80 centímetros.
Tomaremos el medio de la tira y hacemos un nudo dejando 1 o 2 centímetros para luego poder colgarlo.
A continuación enrollaremos amabas mitades sobre si mismas formando una misma tira.
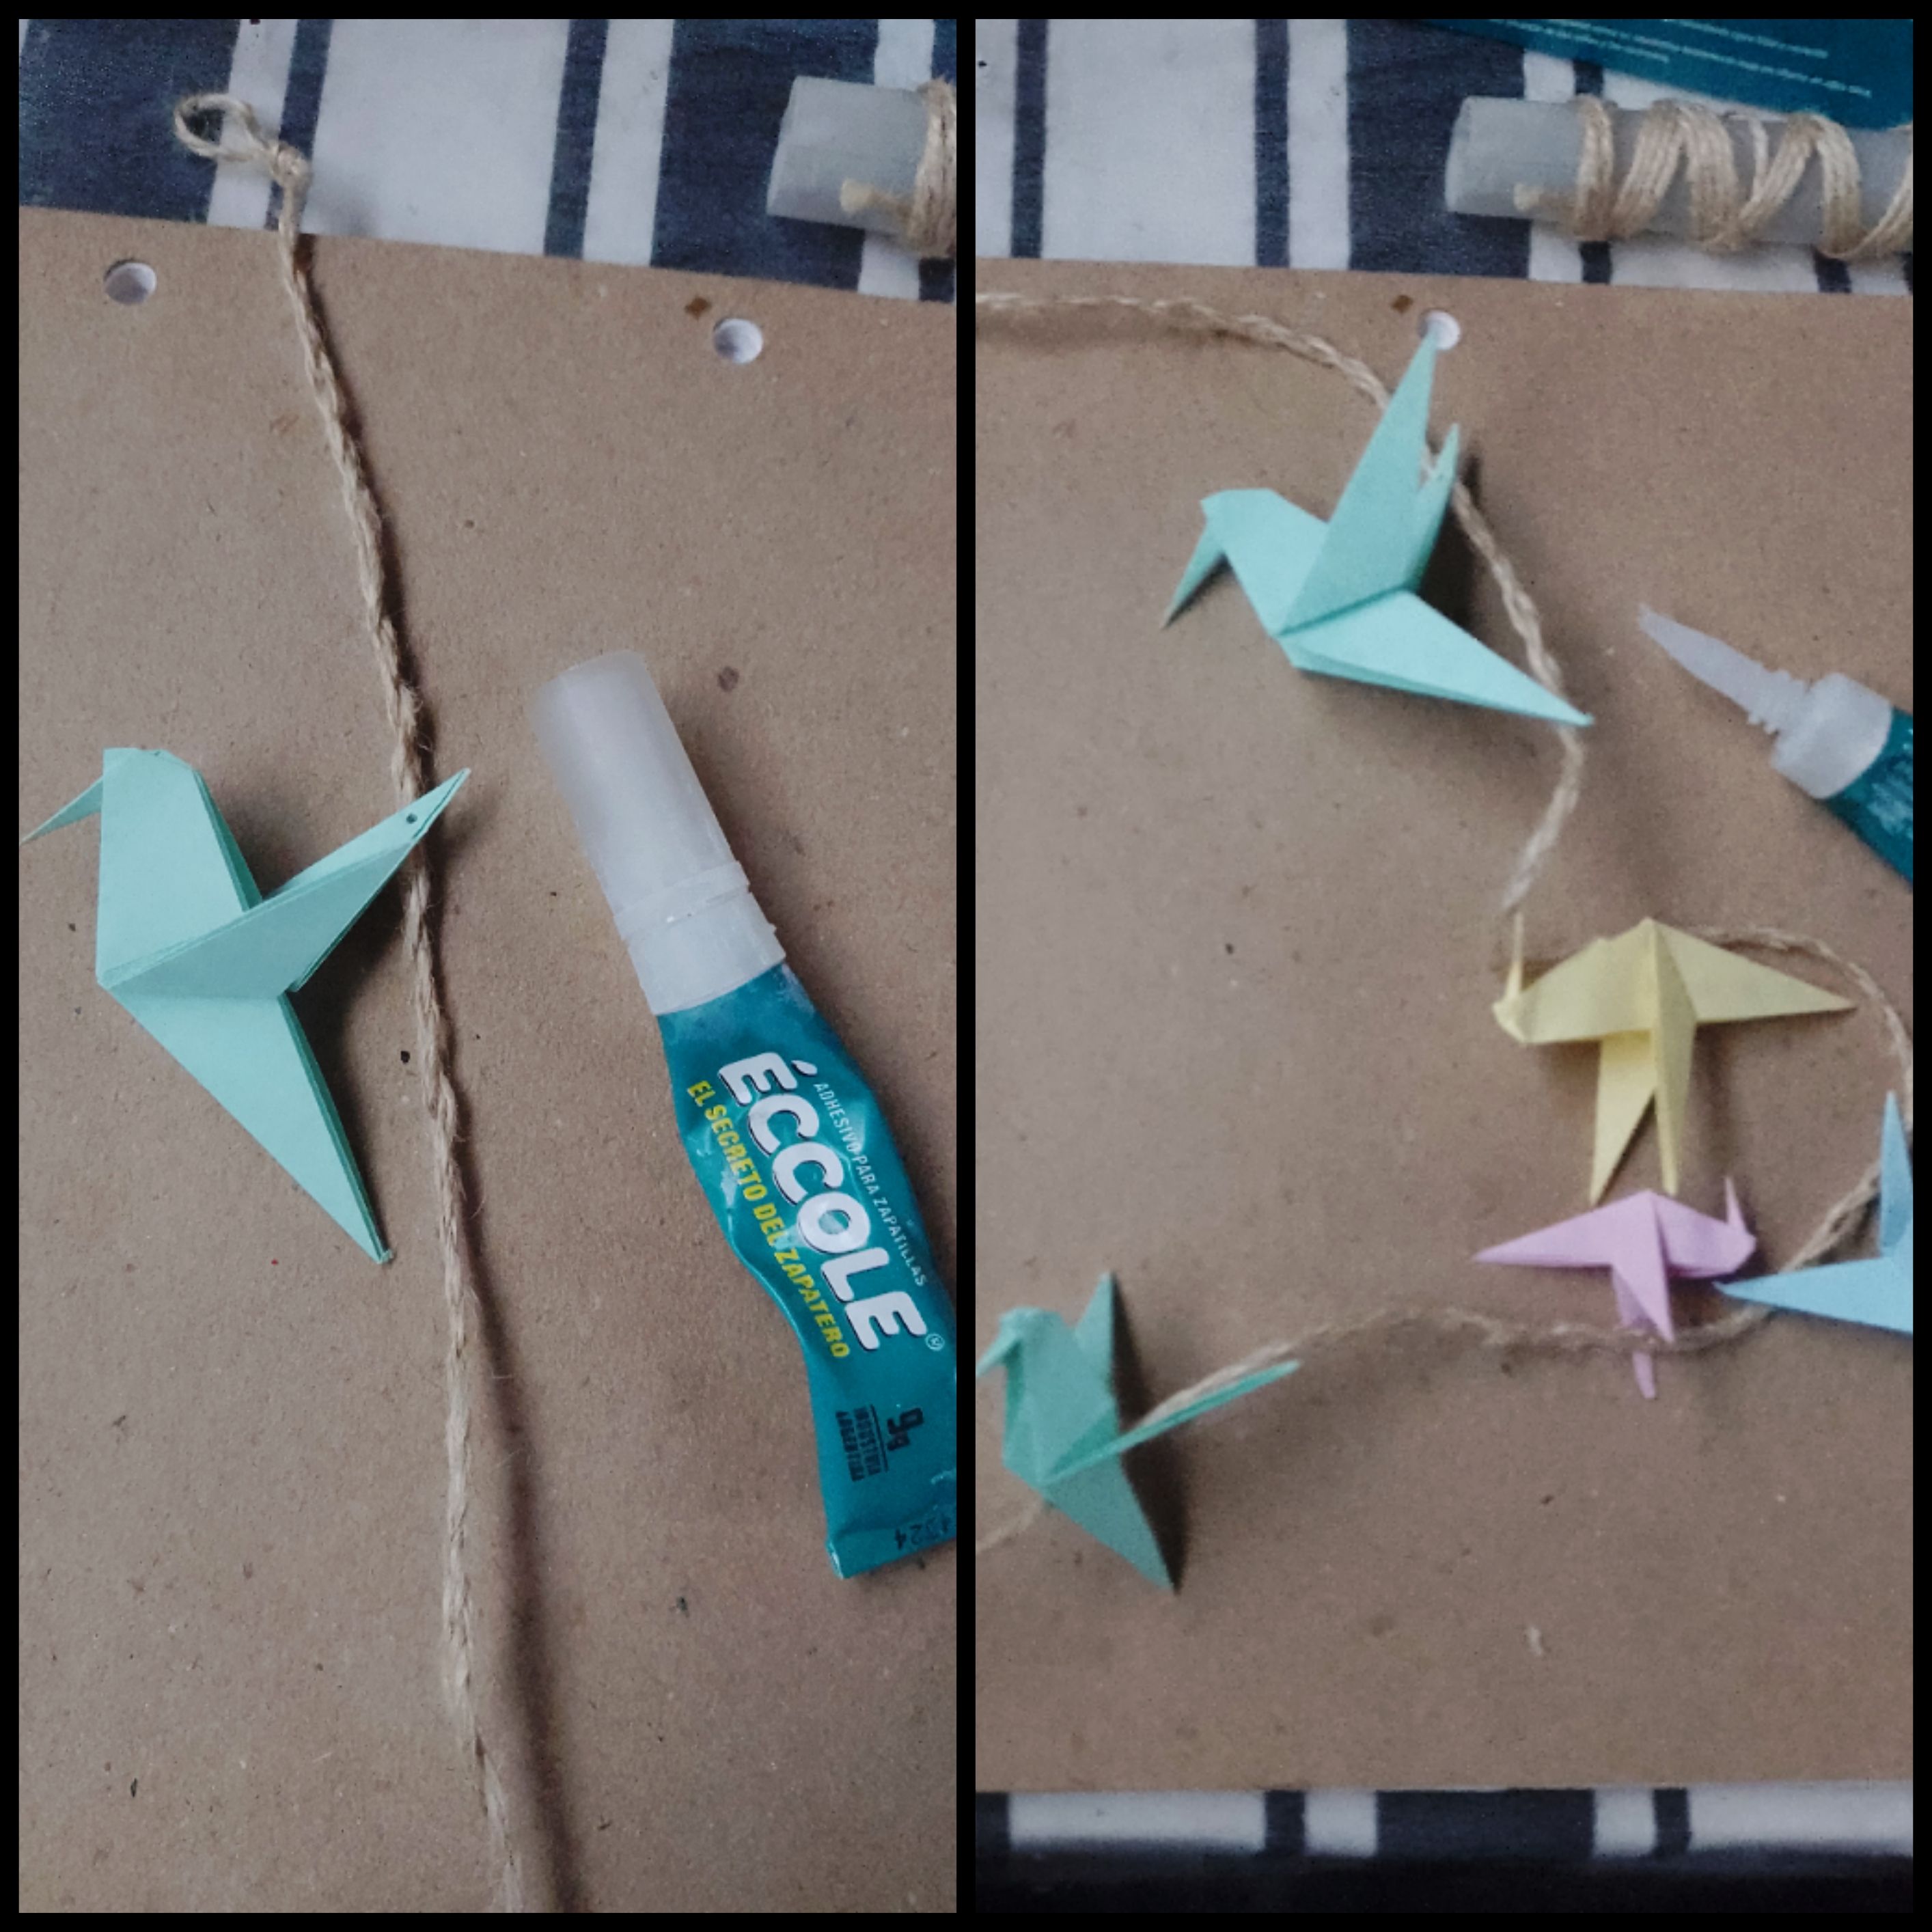
With our preferred glue, we will place all the hummingbirds on the rope, leaving a few centimeters between each one.
Con nuestro pegamento de preferencia, iremos ubicando todos los colibrís en la cuerda, dejando unos cuantos centímetros entre cada uno.
Finally, in the same way, we will glue the flowers that we have chosen for our pendant.
Por ultimo, de igual manera, pegaremos las flores que hayamos elegido para nuestro colgante.
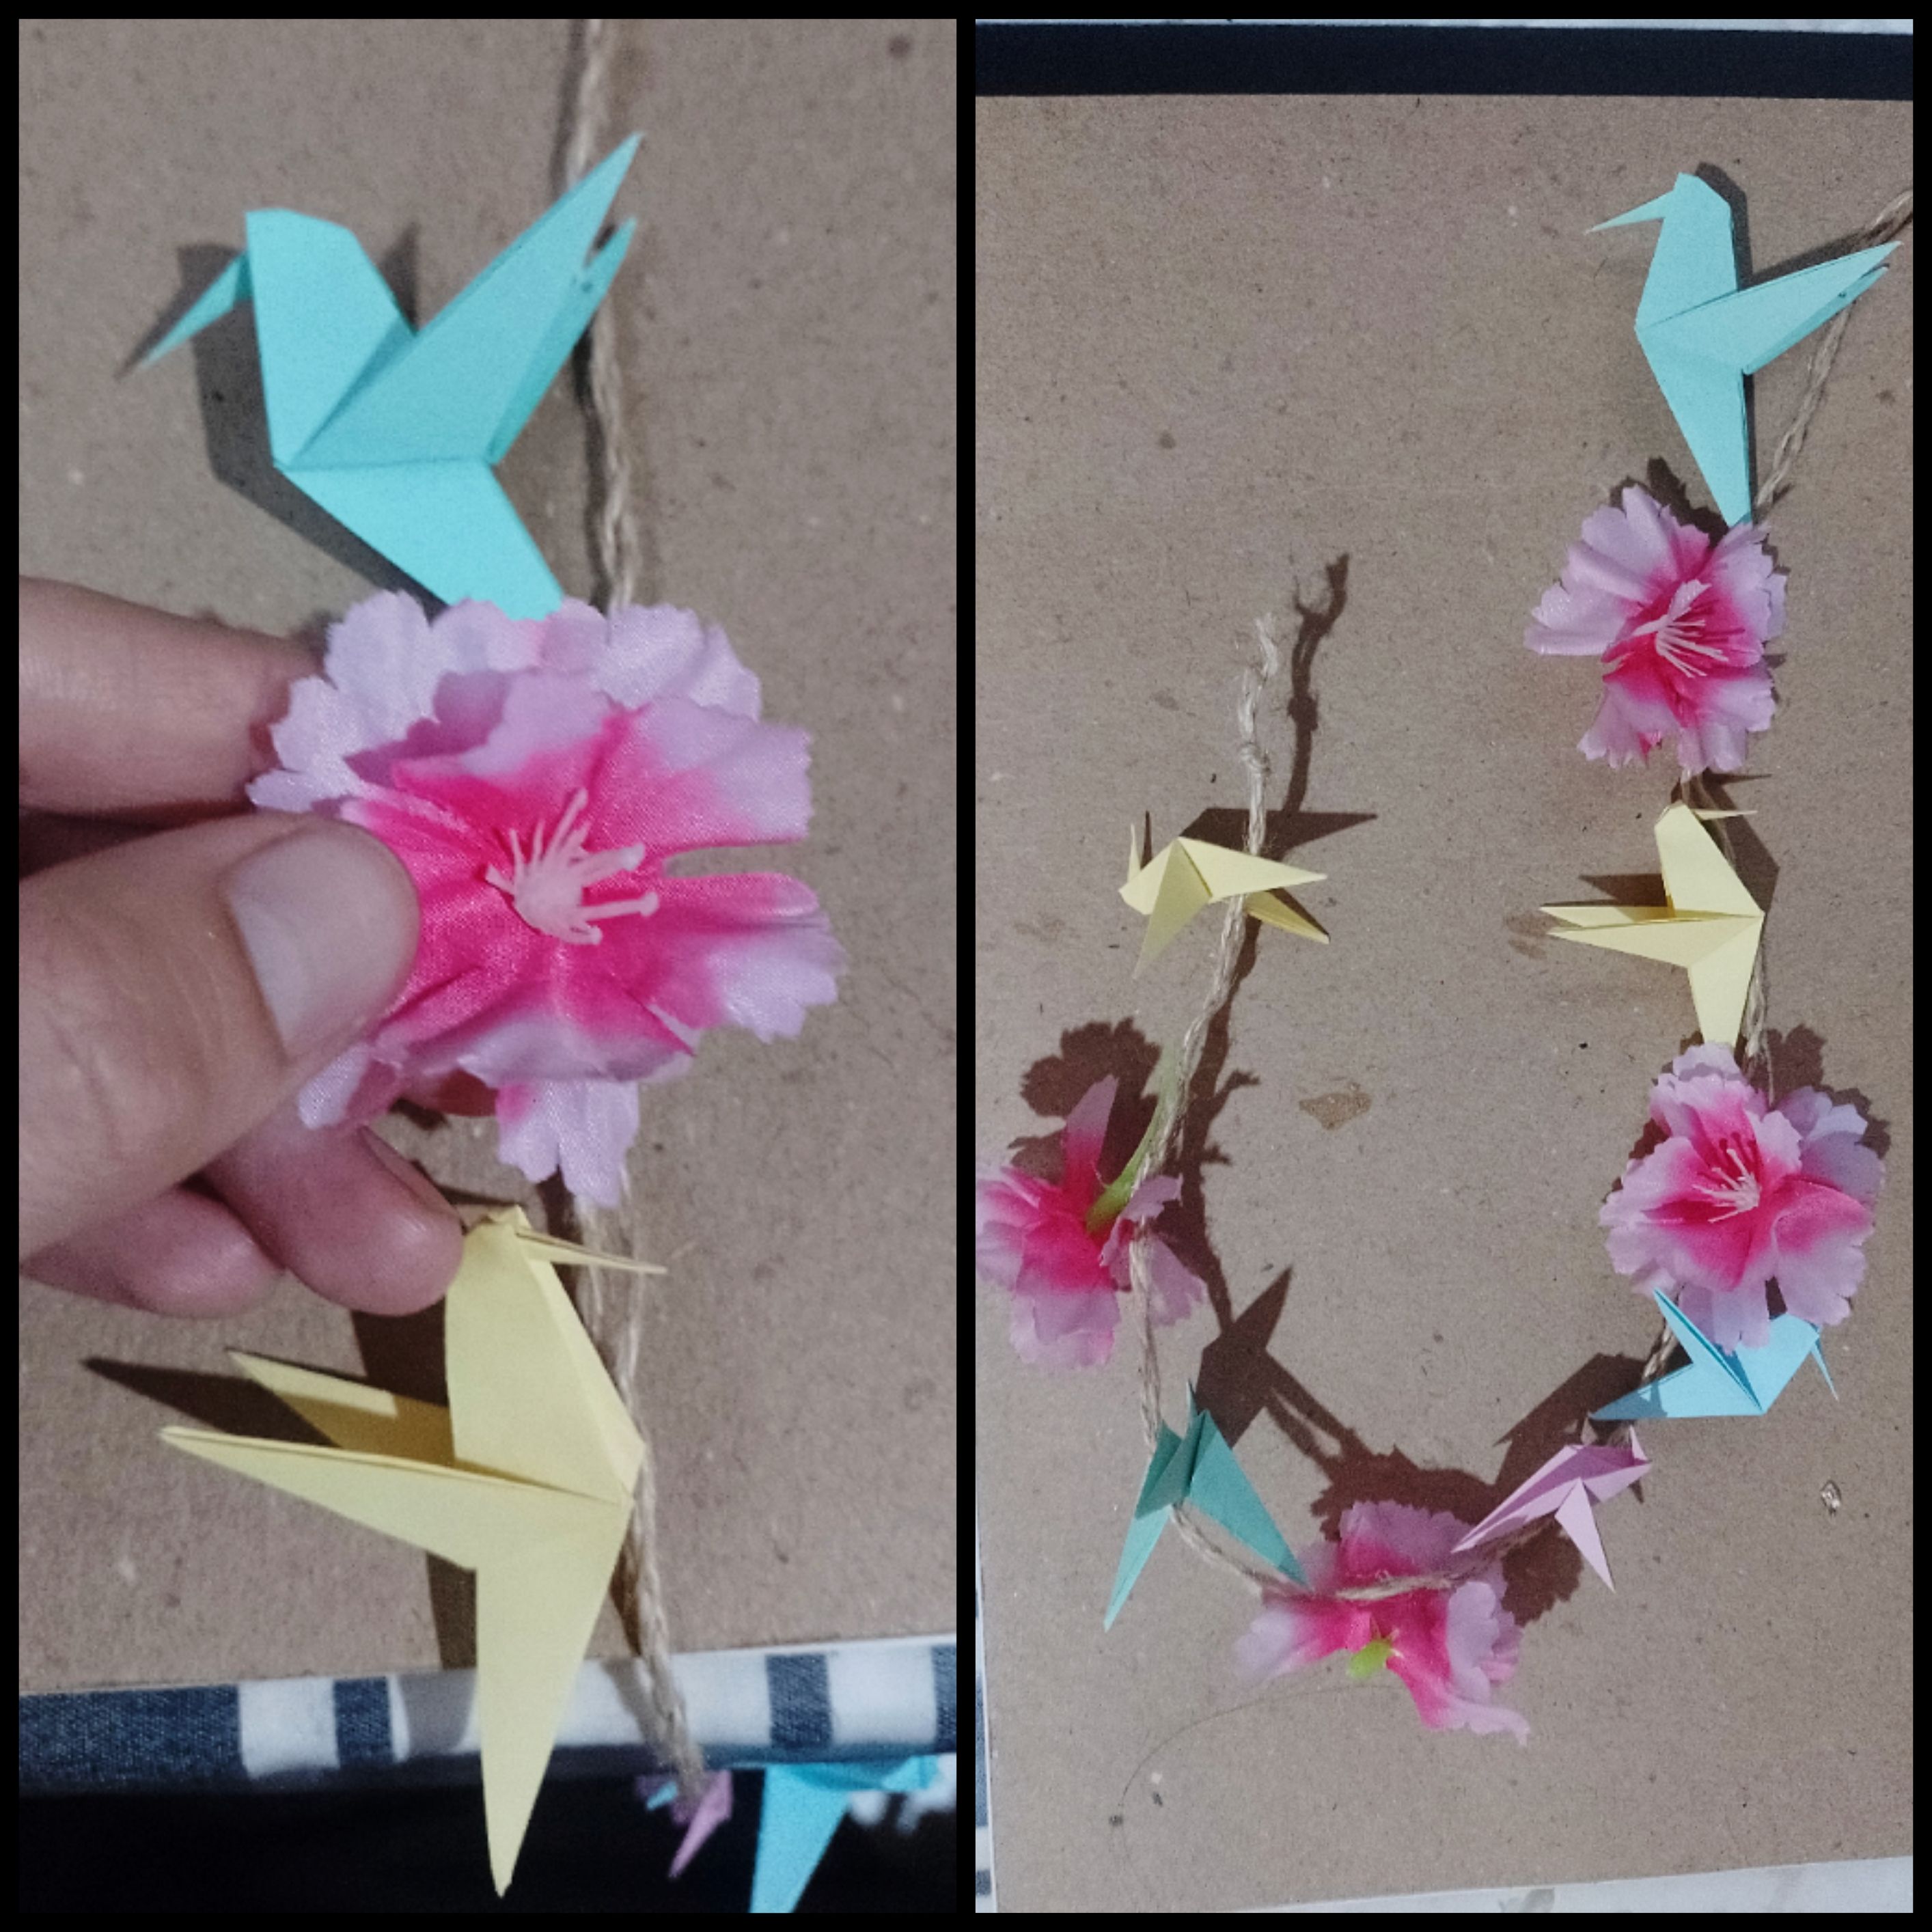
Y listo!! nos quedó un hermoso colgante para decorar cualquier rincón de nuestro hogar! Yo lo ubiqué al lado de mi hermoso pothus en la entrada de mi hogar💚.
Si quisieran colgarlo en el jardín, les recomiendo barnizar previamente cada figura. Recuerden que están hechas de papel, y cualquier lluvia ligera podría arruinar el colgante.
Thank you for reading my content. a big hug for everyone
Gracias por leer mi contenido. Un abrazo grande para todos
Todas las fotografías y ediciones son de mi autoría. Realizado con la aplicación picsart y canva.