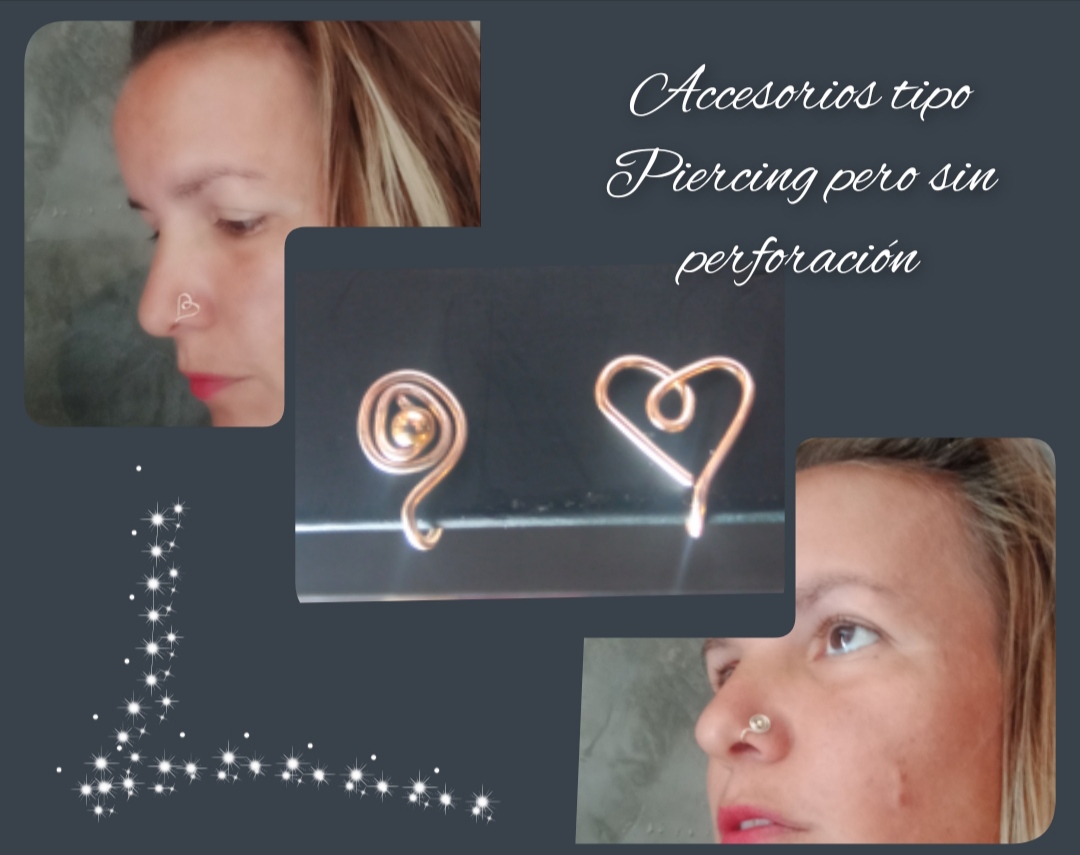
Feliz y bendecido dia tengan todos ustedes mis queridos y apreciados amigos creativos , espero hayan tenido una excelente semana, yo por mi parte puedo comentarles que desde hace unos días que elaboré unos hermosos aretes para esas personas que no pueden realizarse perforaciones en sus orejas estuve pensando y recordé que desde pequeña decía que de grande me realizaría un piercing en el ombligo y uno en la nariz.
Happy and blessed day to all of you my dear and appreciated creative friends, I hope you have had an excellent week, for my part I can tell you that a few days ago I made some beautiful earrings for those people who cannot pierce their ears I was thinking and I remembered that since I was little I said that when I grew up I would get a piercing in my navel and one in my nose.
I confess that I have nothing against those people who put Pierces on any part of their body, in fact I have seen that many people look very beautiful, but now that I am an adult I do not dare to get a piercing done on them. the nose to show off this accessory because I think it does not go with my style, however I was worried about knowing how it would look on me or how I would look with a piercing of this beautiful design that I share with you today.
Today I bring you two beautiful designs made with the piercing wiring technique that do not require piercing. Here I leave you my step by step in case you want to make these beautiful designs.
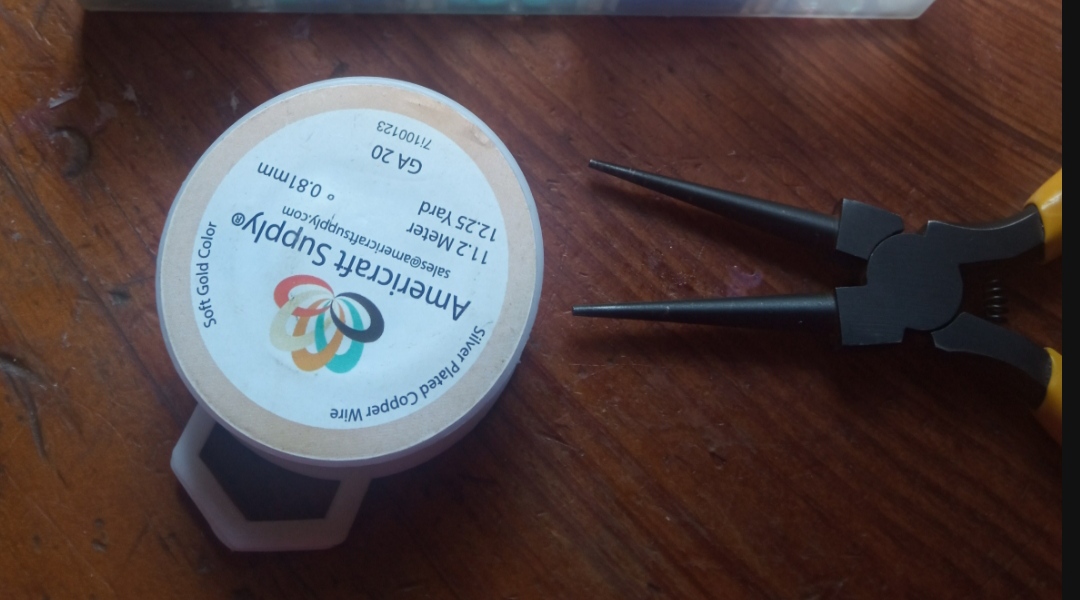
- Alambre de bisutería calibre 20.
- pinza de bisutería.
- 20 gauge jewelry wire.
- jewelry clamp.
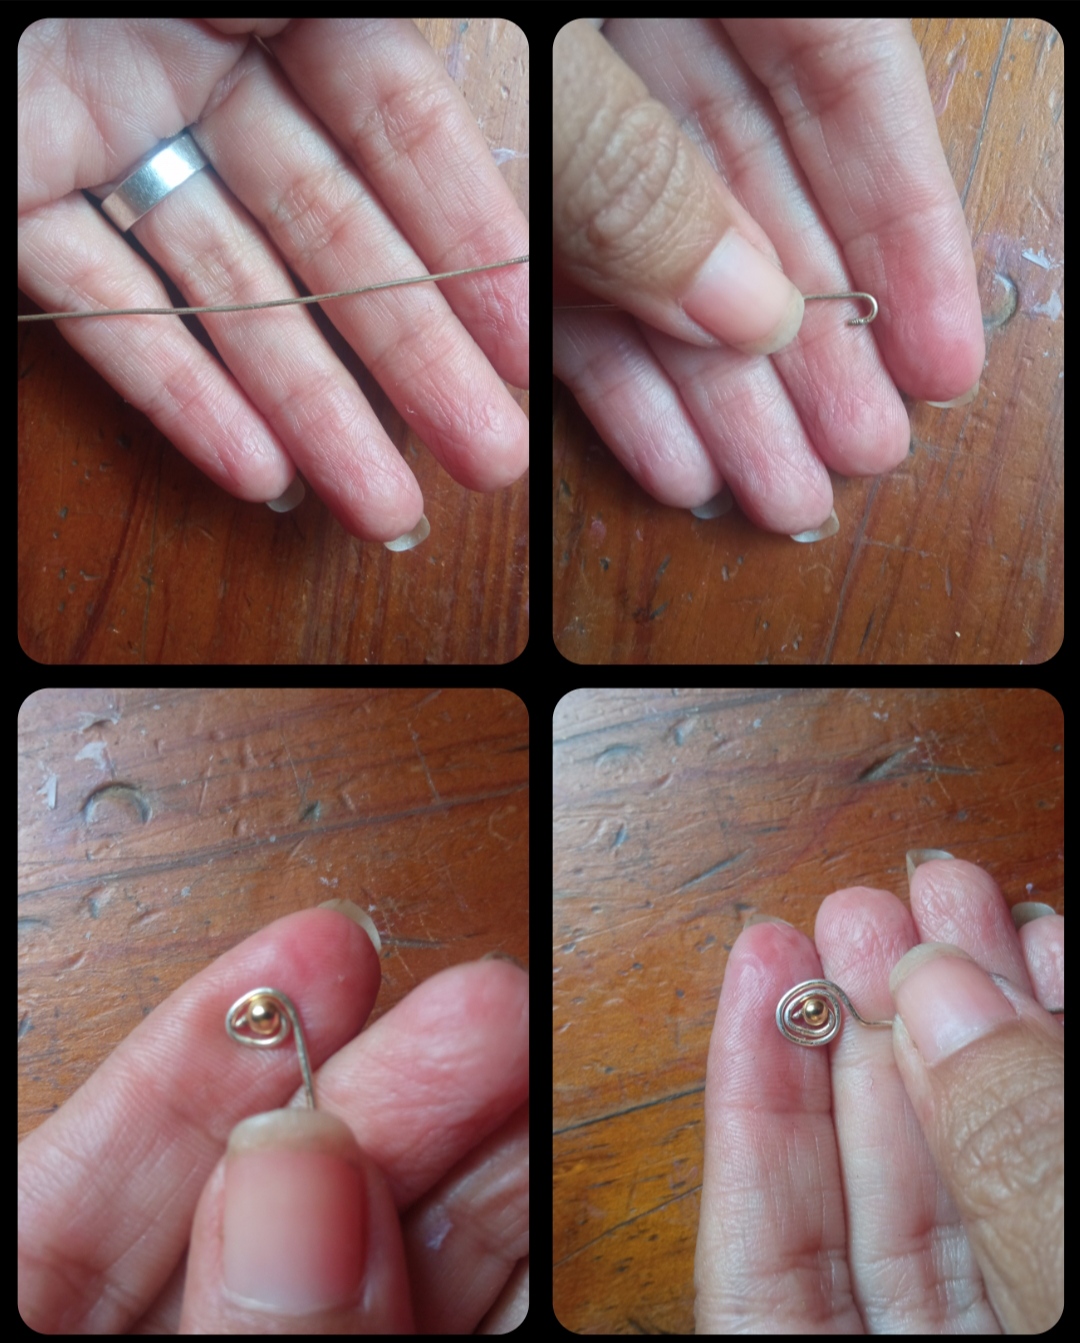
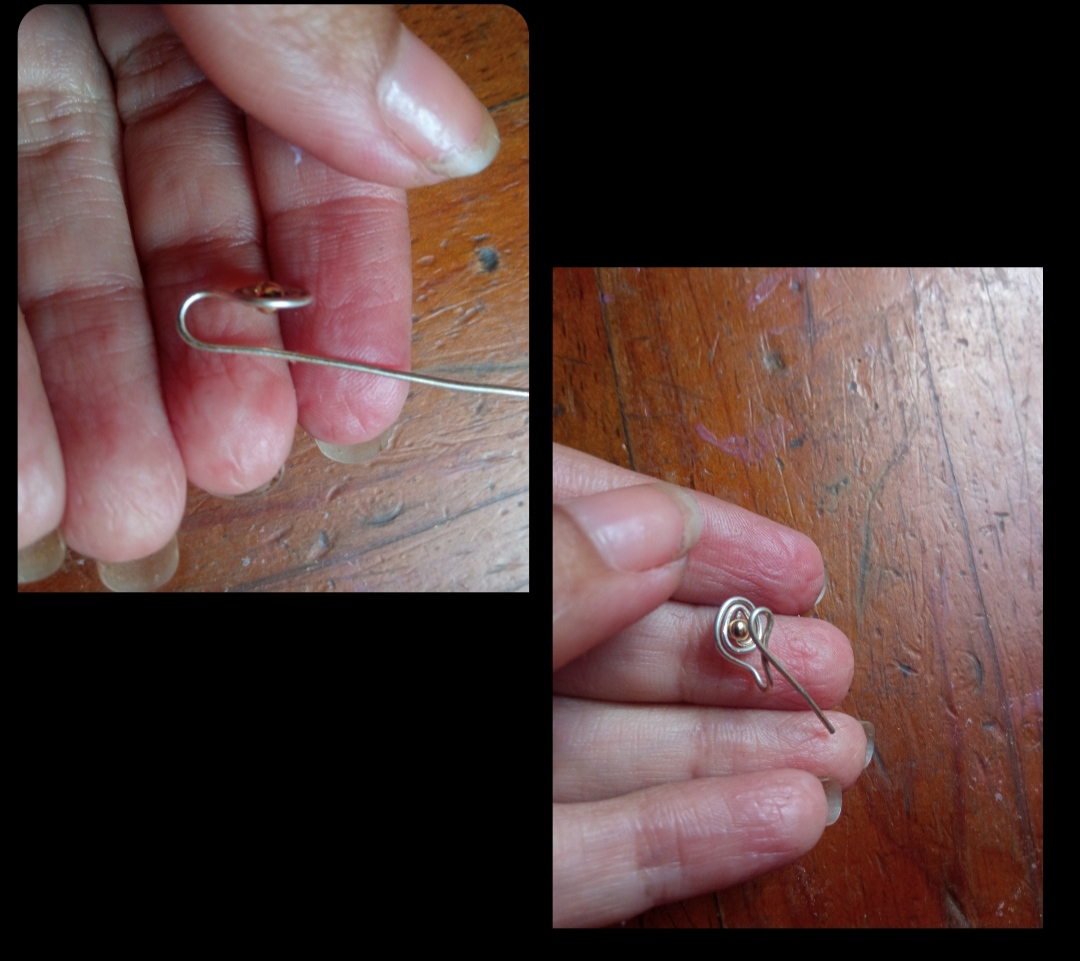
⭐ Paso 1: para iniciar está muy hermosa elaboración primeramente tomaremos el alambre de bisutería calibre 20 y con ayuda de la pinza cortaremos un pedazo de alambre de aproximadamente 8 cm seguidamente para realizar este primer diseño tomaremos la pinza de bisutería con punta circular y moldearemos una de las puntas del alambre realizando una pequeña forma de corazón. Una vez tengamos esta pequeña forma de corazón bajamos el extremo del alambre que nos sobra.
⭐ Step 1: to start this very beautiful creation, we will first take the 20 gauge jewelry wire and with the help of the tweezers we will cut a piece of wire of approximately 8 cm. Then to make this first design we will take the jewelry tweezers with a circular tip and we will shape one of the ends of the wire making a small heart shape.
Once we have this small heart shape, we lower the end of the remaining wire.
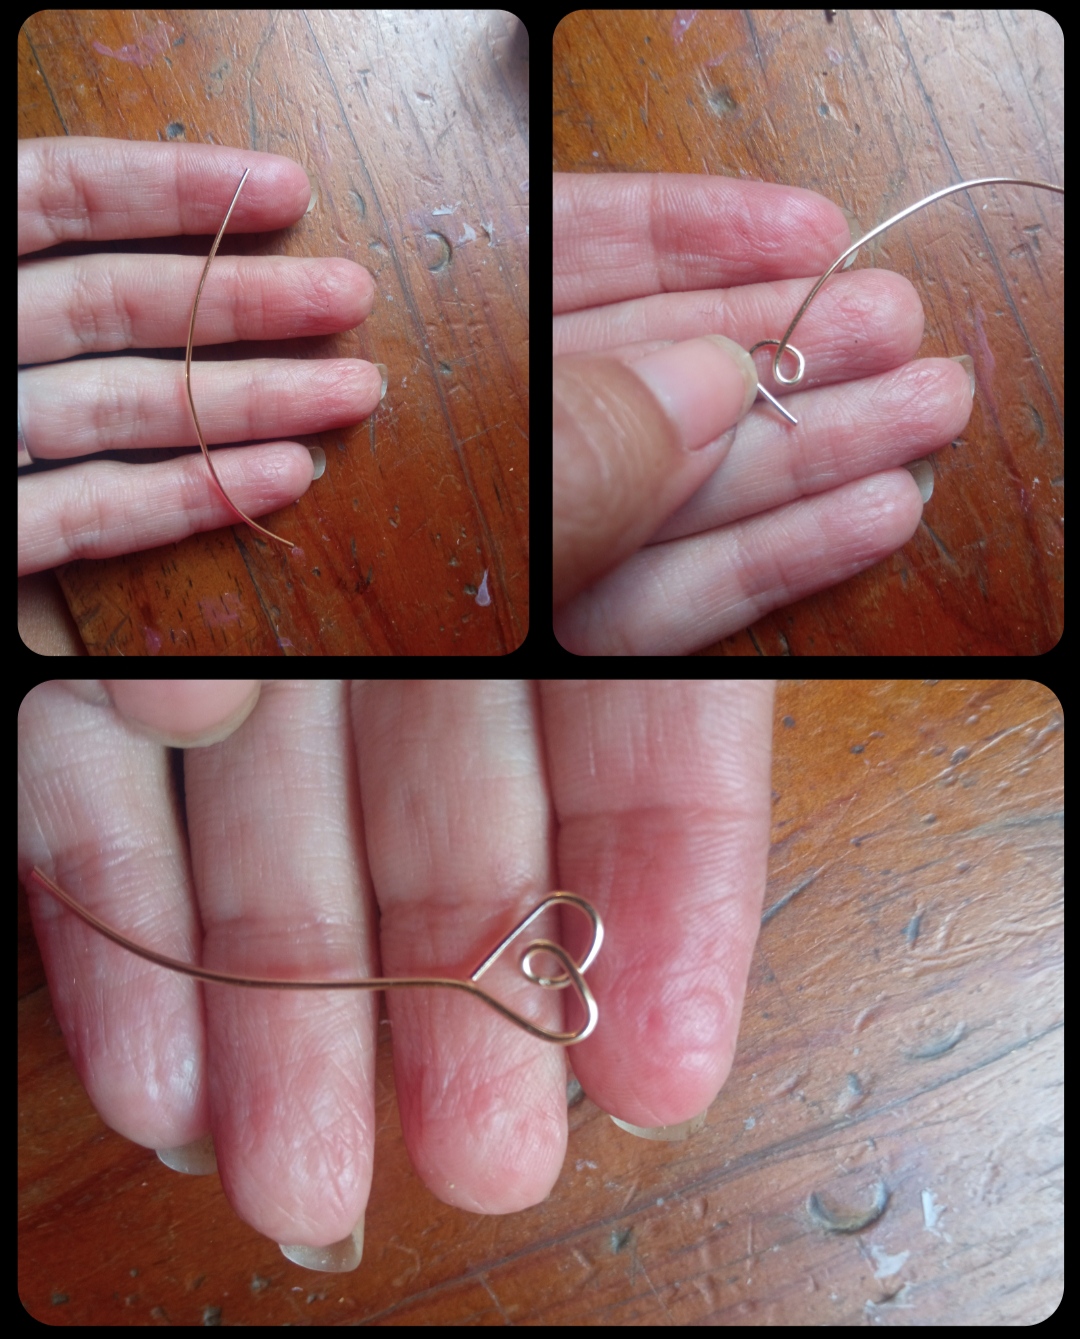
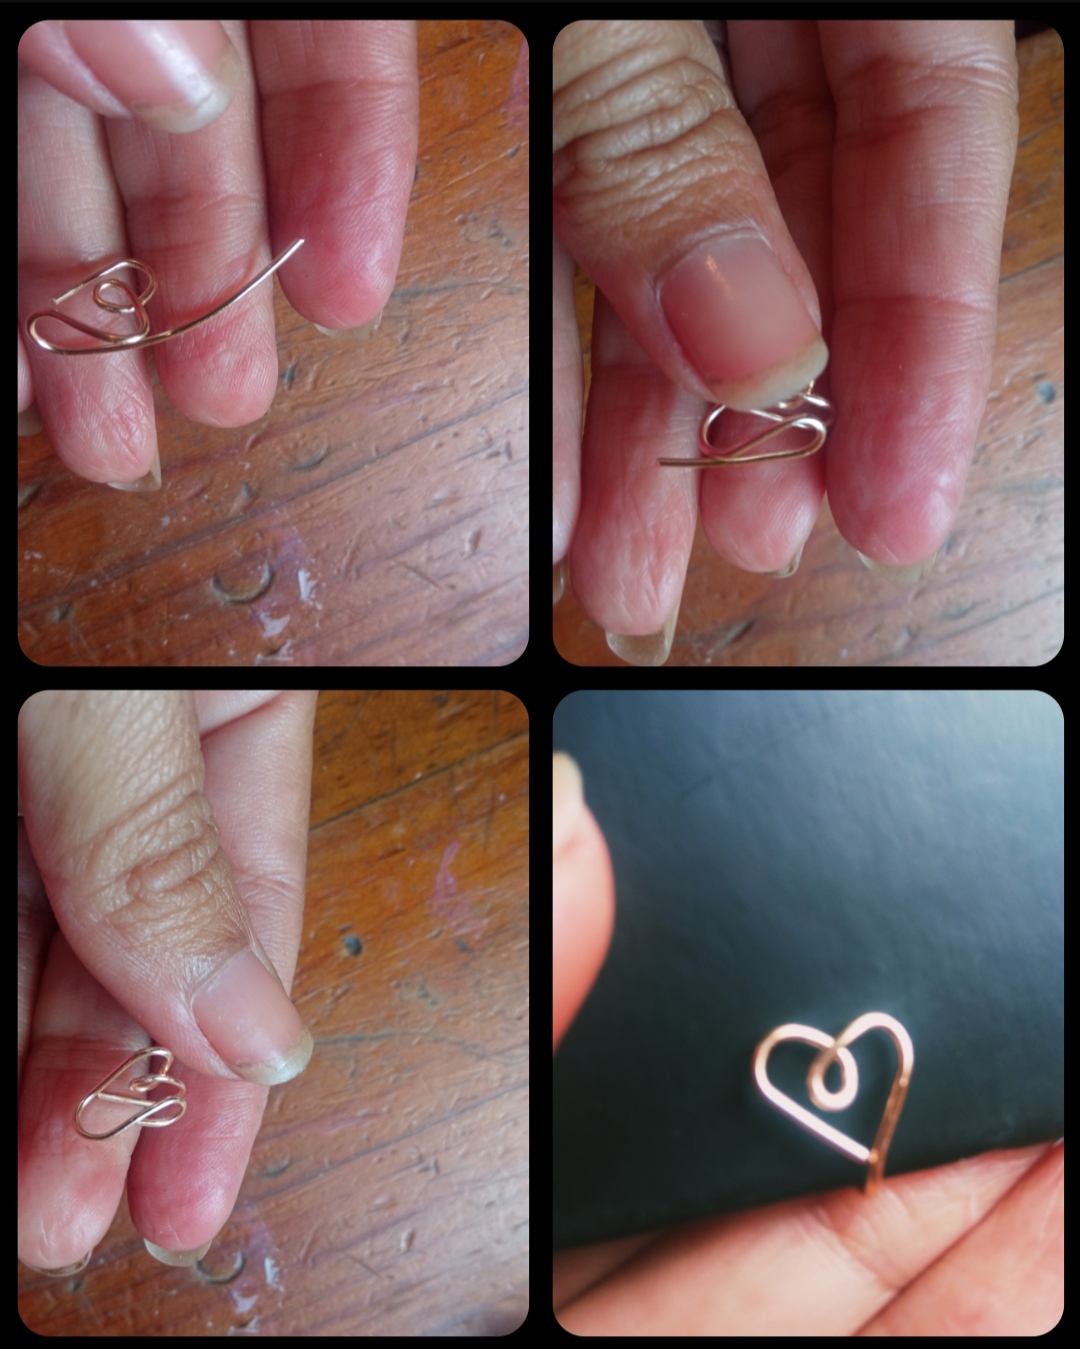
⭐ Paso 2: en nuestro segundo paso tomaremos el alambre debajo del pequeño corazoncito y apoyándonos en la pinza dejando un pequeño espacio lo deberemos nuevamente hacia arriba y en esta punta con ayuda de la pinza realizaremos un pequeño doblez de la forma que pueden ver a continuación. Y así de esta manera fácil rápida y sencilla habremos elaborado nuestro primer diseño.
⭐ Step 2: in our second step we will take the wire under the small heart and, leaning on the tweezers, leaving a small space, we will bend it upwards again and at this point, with the help of the tweezers, we will make a small bend in the way that you can see below. And so in this easy, quick and simple way we will have created our first design.
⭐ Paso 3: para continuar con nuestro segundo diseño nuevamente cortaremos un pedacito de alambre de 8 cm aproximadamente y si es de nuestra preferencia introduciremos una pequeña piedra balín dorado si no lo desea de igual manera con la pinza iniciaremos a enrollar en forma de espiral la punta del alambre como pueden observarlo a continuación. Tengamos el tamaño deseado dejamos el alambre hacia la parte de abajo de la forma.
⭐ Step 3: to continue with our second design we will again cut a small piece of wire of approximately 8 cm and if it is our preference we will insert a small golden ballin stone. If you do not want it, in the same way with the tweezers we will begin to roll it into shape. spiral the tip of the wire as you can see below. Let's have the desired size, leaving the wire towards the bottom of the form.
⭐ Paso 4: de igual manera que en nuestro diseño anterior el alambre que nos queda debajo de la forma lo doblaremos nuevamente hacia la parte de arriba y realizaremos un pequeño doblez en la punta y así culminaremos este segundo hermoso diseño.
⭐ Step 4: in the same way as in our previous design, we will bend the wire that remains under the shape again towards the top and make a small bend at the tip and thus we will complete this second beautiful design.

Me despido por esta oportunidad agradeciéndoles por su visita.
Todas las Fotos son de mi autoría y fueron tomadas con mi Celular Redmi 9.As you may have seen, to create these beautiful designs, in addition to being very easy and simple to make, we only need a single material which is 20 gauge jewelry wire. My dear and appreciated friends I hope that this simple tutorial has been to your complete liking and that it can be useful and beneficial for my part. I was satisfied because I was able to fulfill my idea of being able to see what I could look like with a nose piercing and if Like me, you like to be able to show off this accessory but you don't want to pierce your body. This is an excellent idea. I say goodbye for this opportunity, thanking you for your visit.
All Photos are my authorship and were taken with my Redmi 9 Cellphone