Bienvenidos mis amigos de @diyhub a mi blog. 🌸🌼
Hola mi bella comunidad creadora y contructora de lindos trabajos artesanales hecho a mano... hoy les deseo como siempre una lluvia de Bendiciones a todos, paso por aquí con un lindo proyecto para decoración de estar para fiesta sabemos que en las fiestas de cumpleaños o estar para reuniones o exposiciones del trabajo o de la escuelas debemos decorar el espacio.
Así que les traigo un trabajo muy decorativo unas lindas rosas realizadas en papel crepe en color rosado y amarillo es un trabajo fácil y divertido que podemos realizar con pocos materiales y podemos involucrar a los niños en casa o en la escuela.
Welcome my @diyhub friends to my blog. 🌸🌼
Hello my beautiful community creator and builder of beautiful handmade crafts ... today I wish you as always a shower of Blessings to all, I come here with a nice project to decorate living room for party we know that at birthday parties or be for meetings or exhibitions of work or school we must decorate the space.
So I bring you a very decorative work a cute roses made in crepe paper in pink and yellow color is an easy and fun job that we can do with few materials and we can involve children at home or at school.
Miren como se ve es impresionante la cantidad de decoraciones en rosas que podemos hacer con el papel crepe es fácil y económico y vamos a dejar decorado un estar de fiesta muy bonito. 🌼🌸
Look how impressive is the amount of pink decorations that we can make with crepe paper is easy and economical and we will leave decorated a very nice party room. 🌼🌸
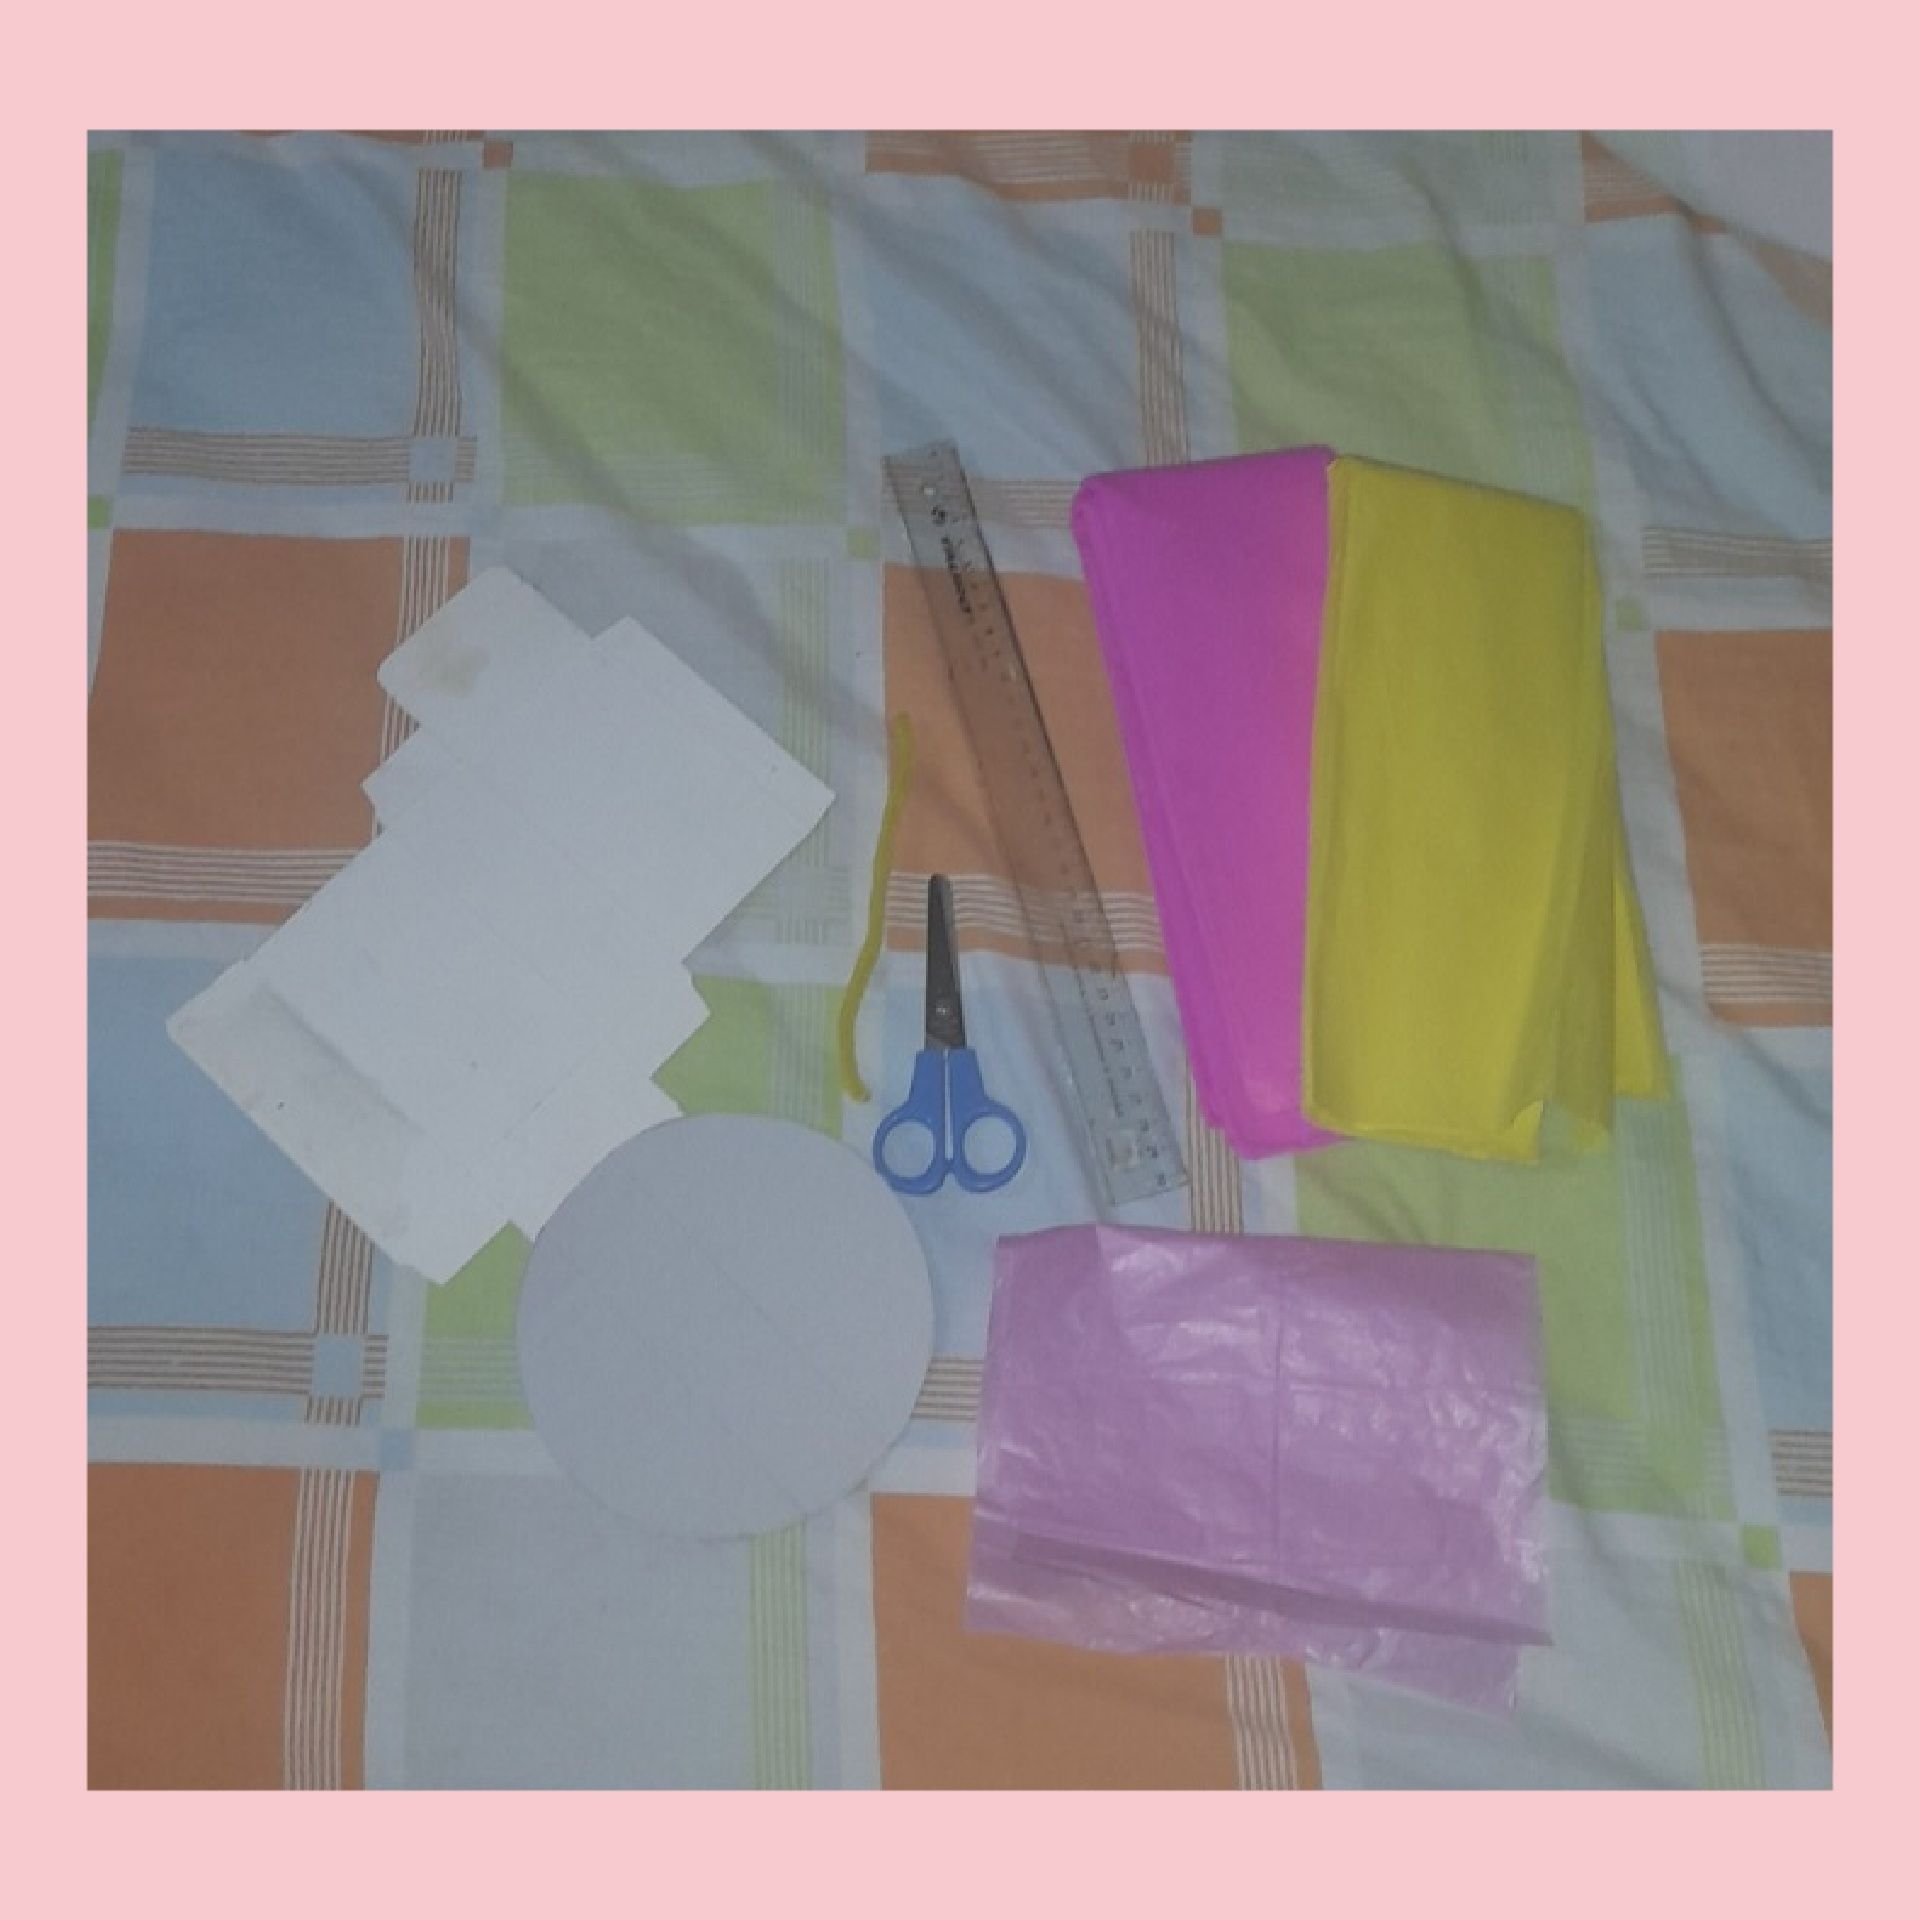
MATERIALES A NECESITAR:
Para las dos rosa :
● 4 pliegos de papel crepe rosado.
● 1 pliego de papel crepe amarillo.
● 2 cartones reciclado.
● 2 trozos de papel de seda rosado.
● Silicón líquido.
● Tijera.
● Regla.
MATERIALS TO BE NEEDED:
For the two pink :
● 4 sheets of pink crepe paper.
● 1 sheet of yellow crepe paper.
● 2 recycled cardboard.
● 2 pieces of pink tissue paper.
● Liquid glue.
● Scissors.
● Ruler.
ELABORACIÓN DE LAS DOS ROSAS EN PAPEL CREPE:
PASO A PASO
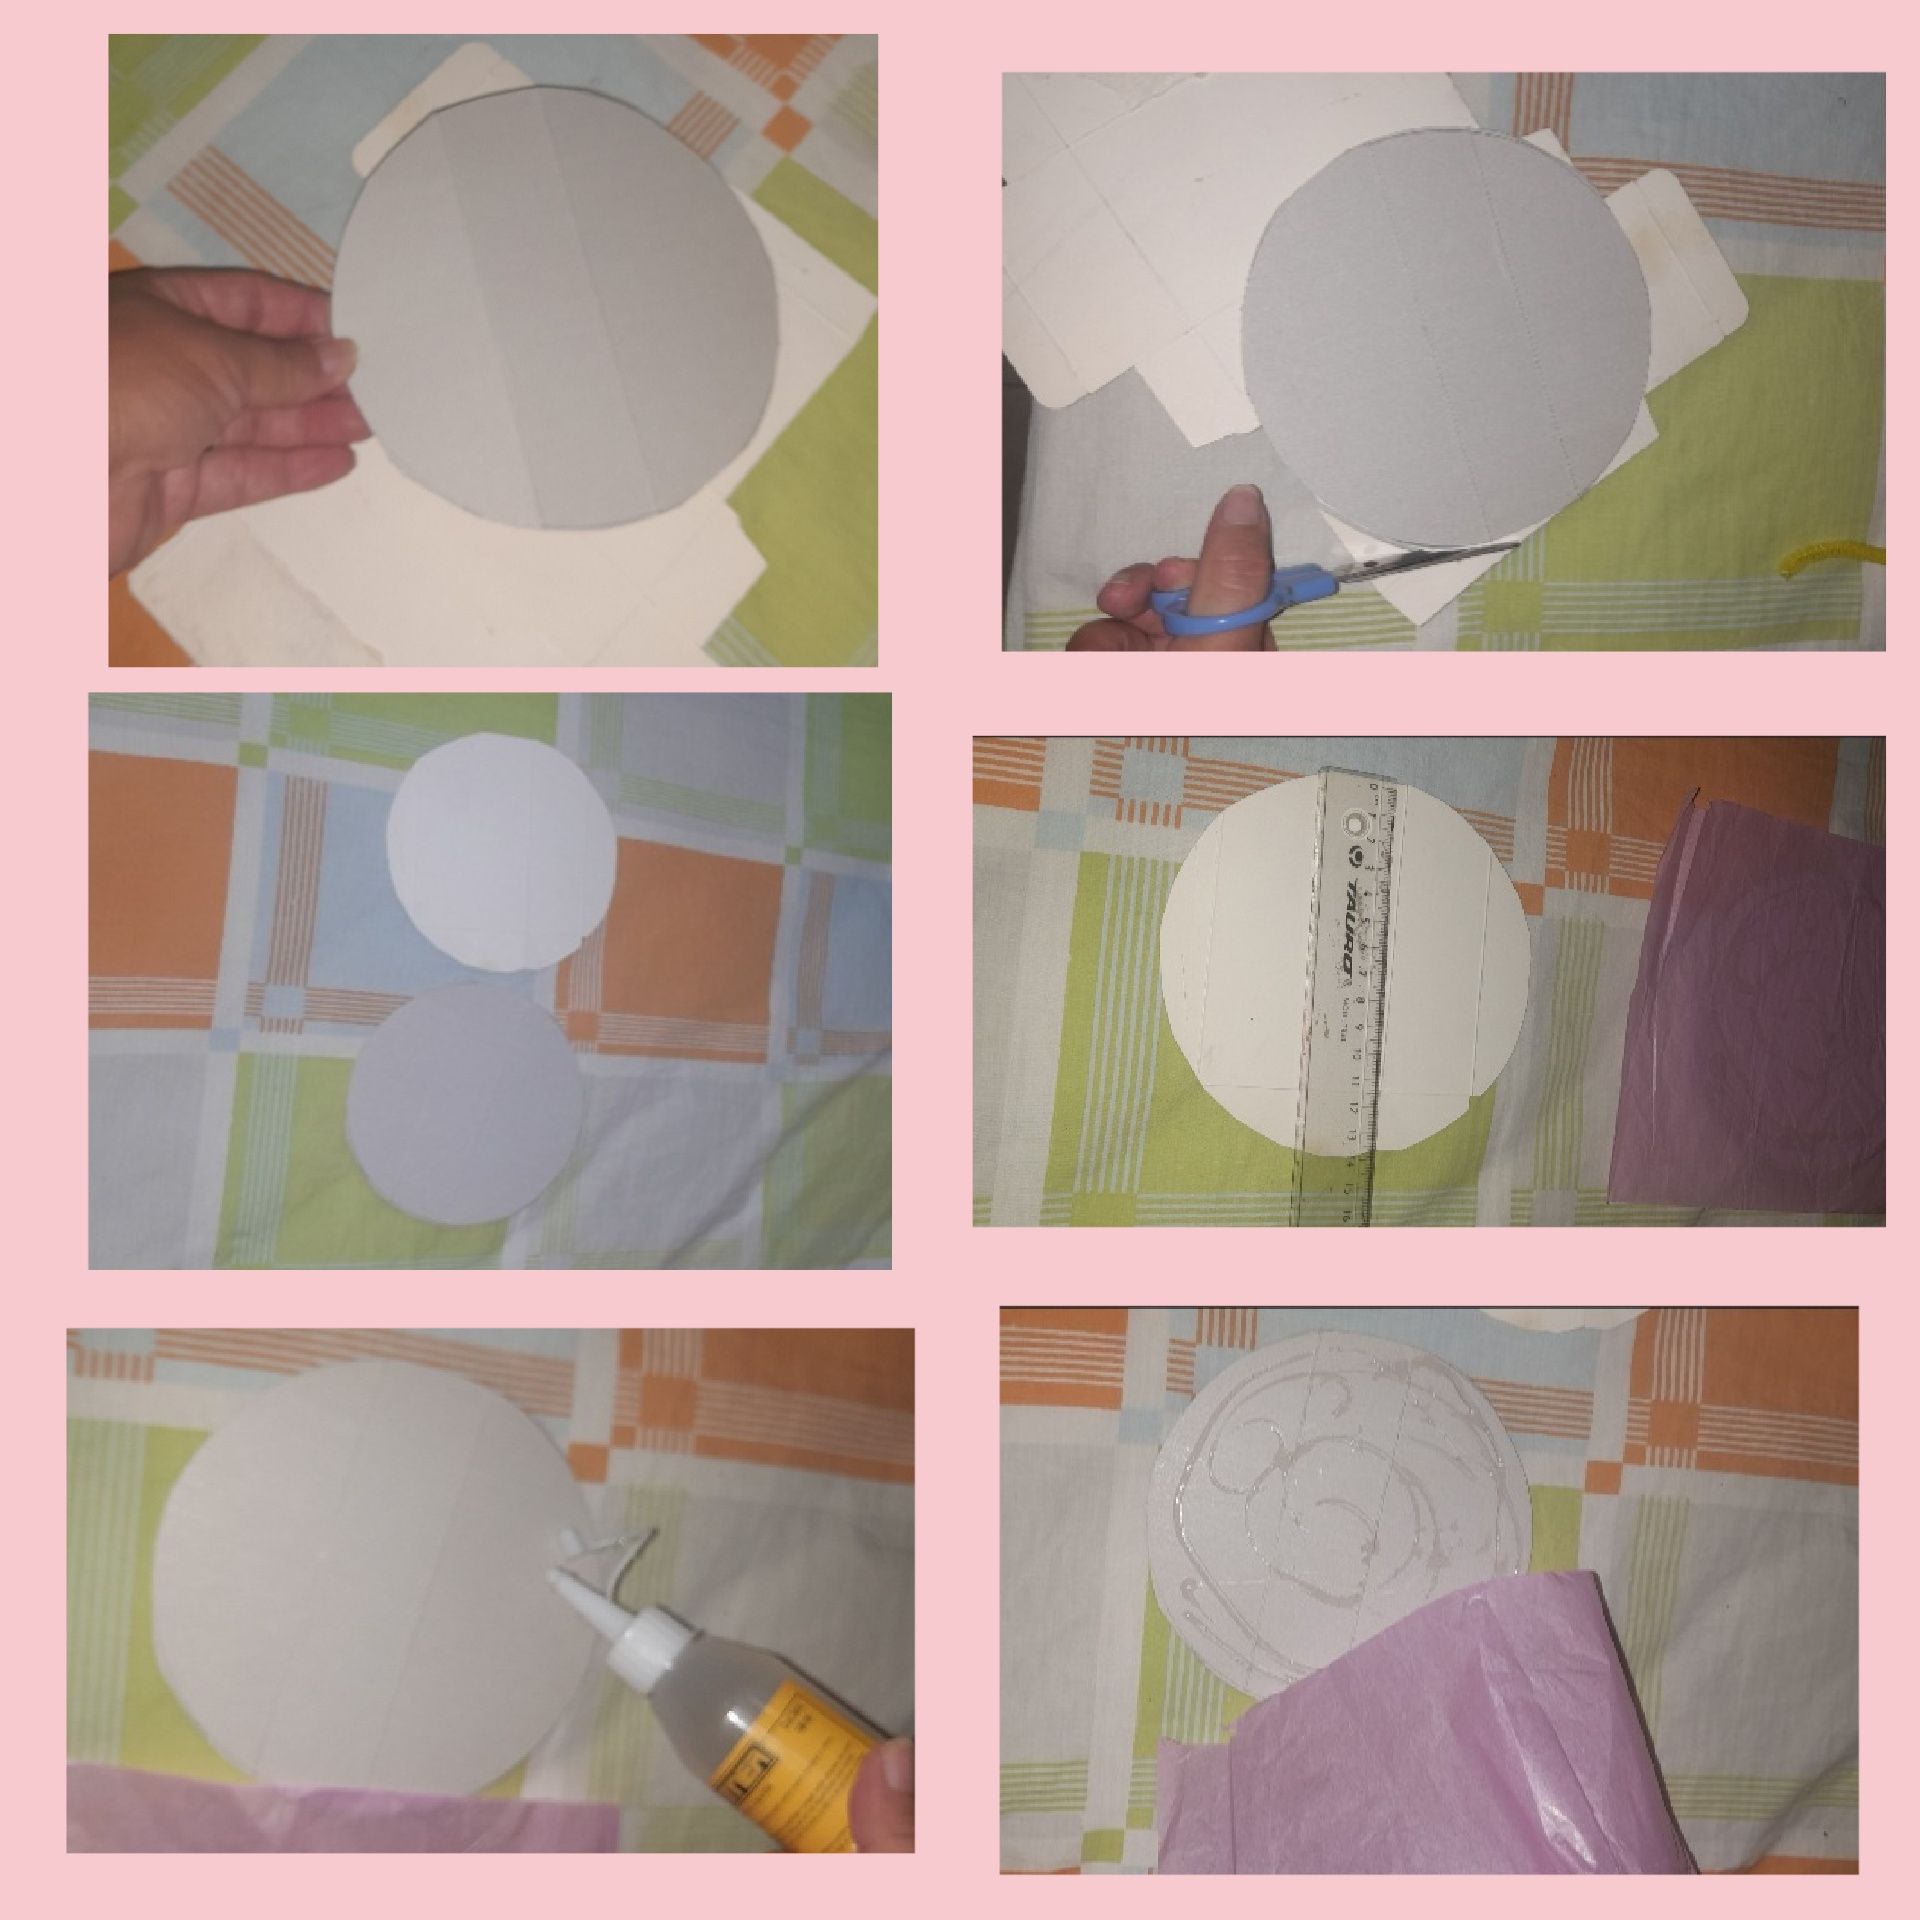
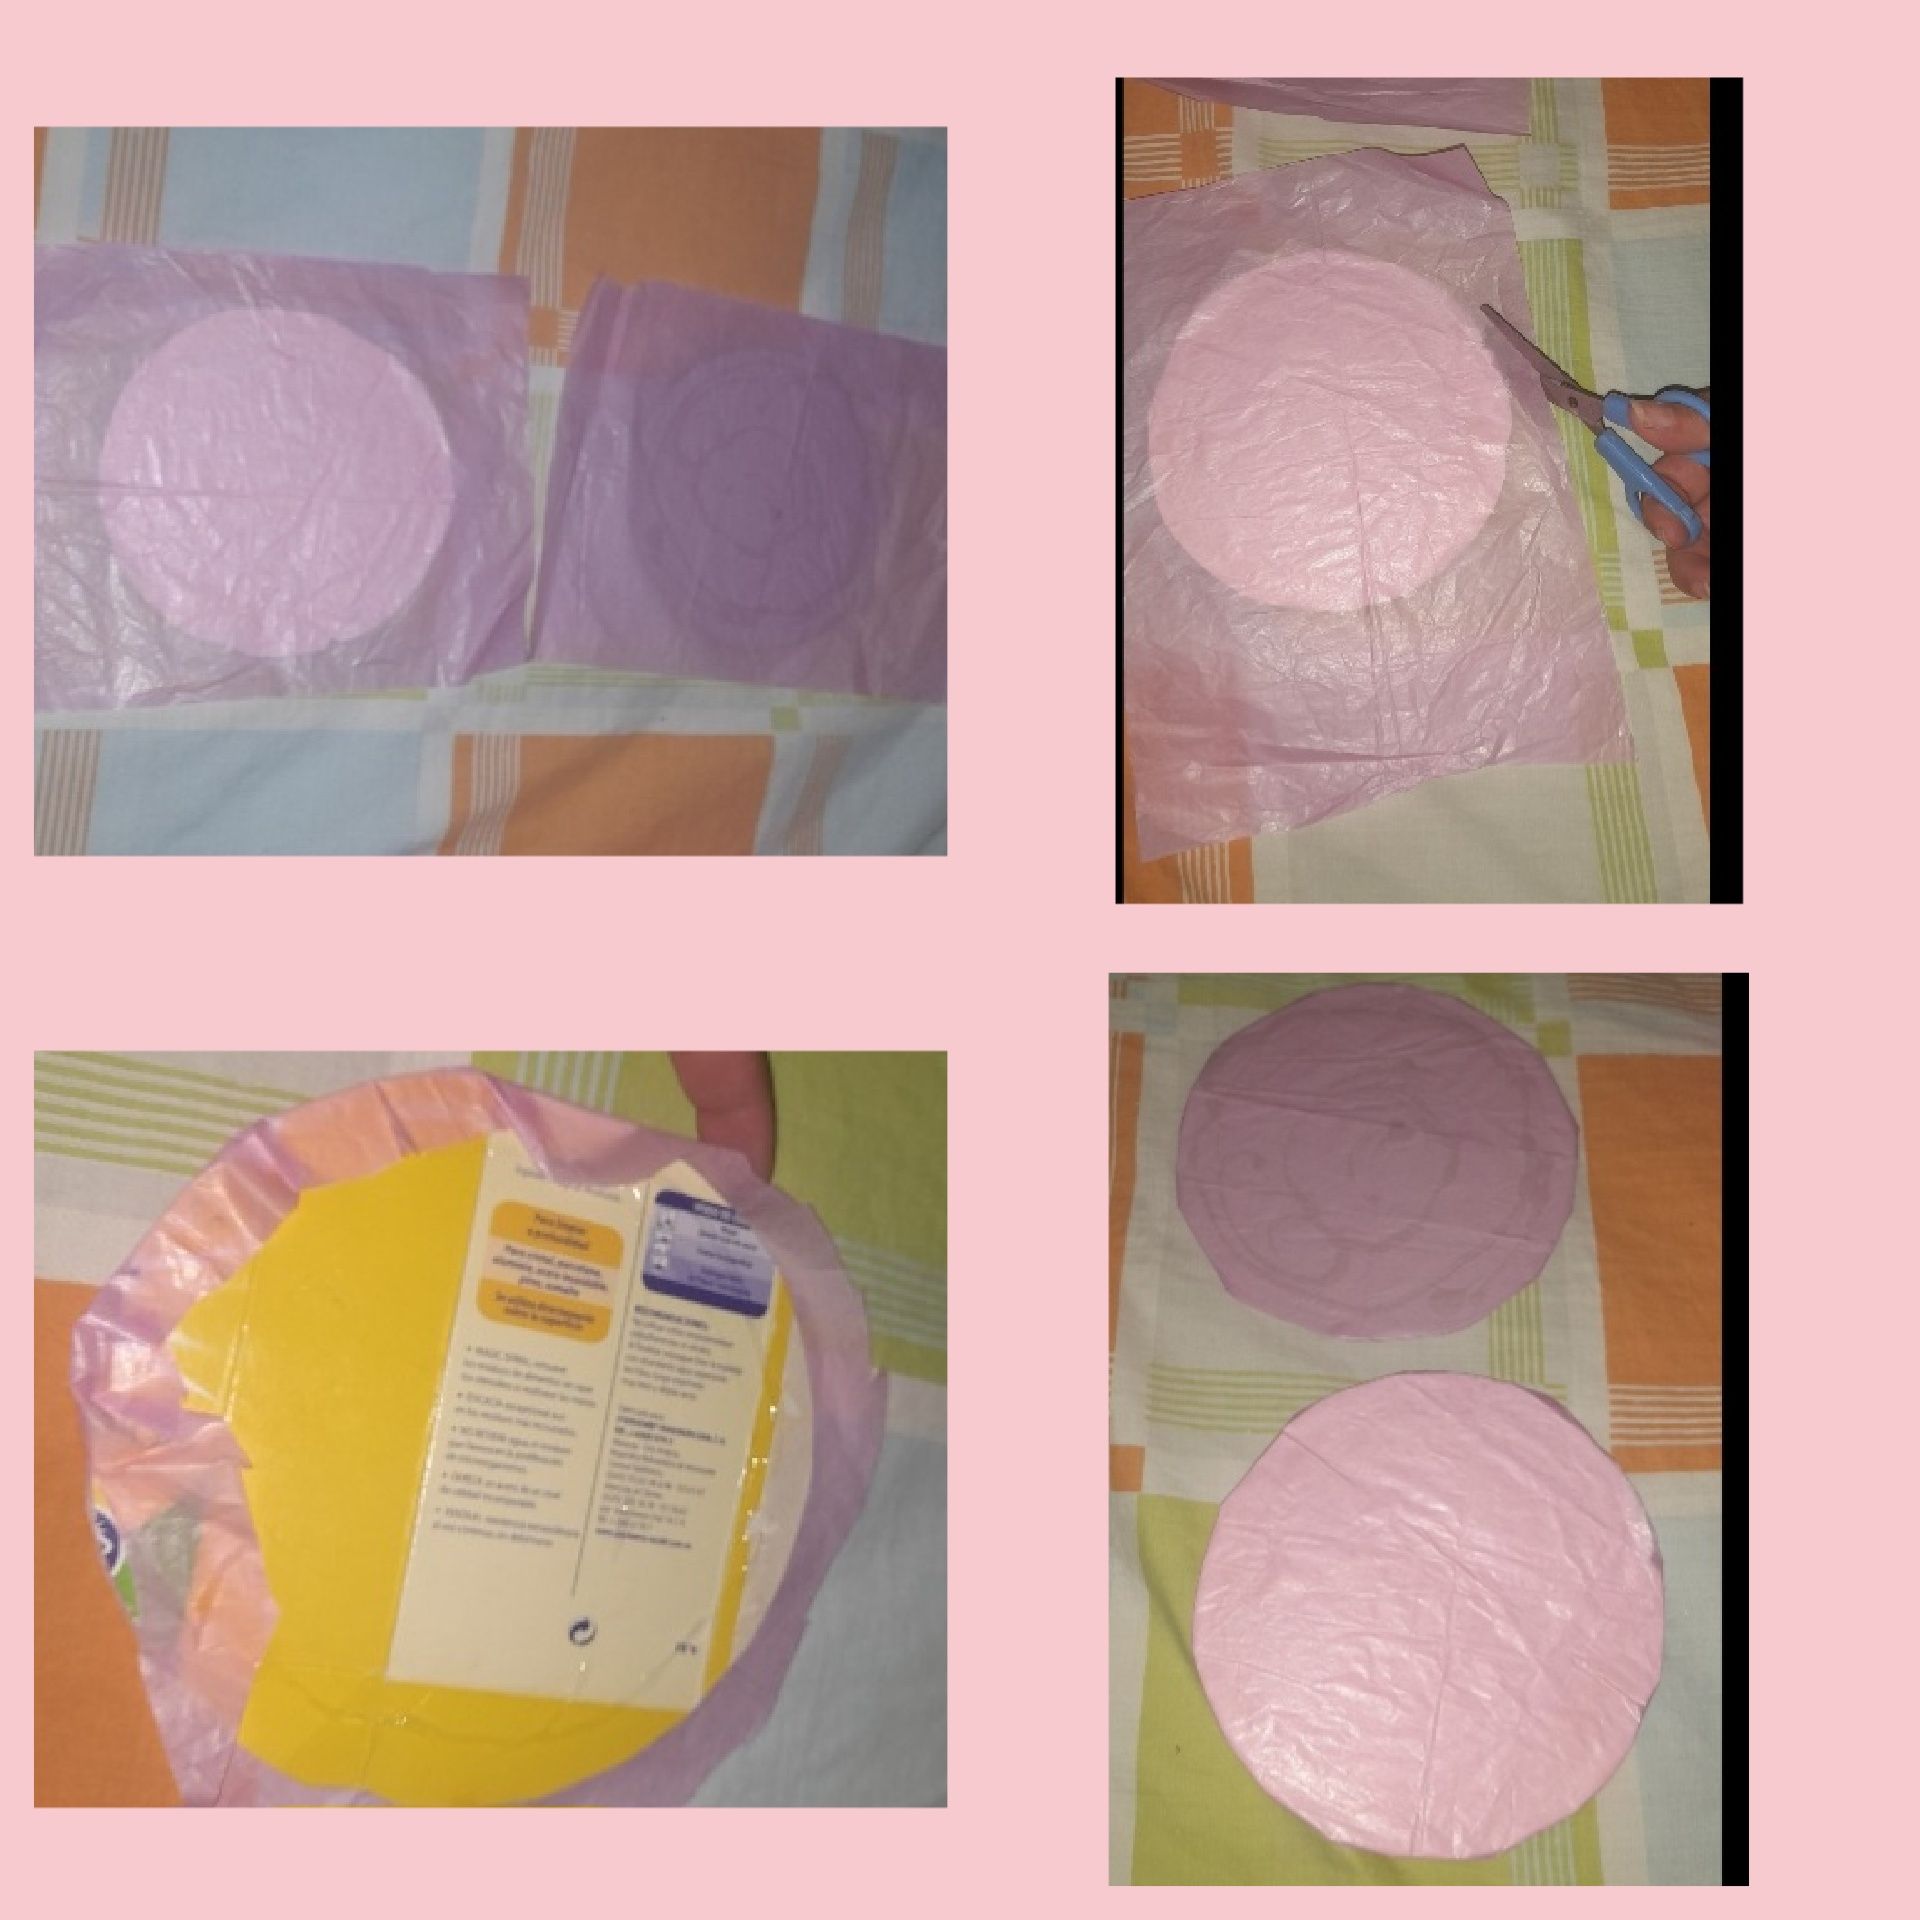
Base de la rosa:
● Comenzamos recortando dos círculos de 13 cm de diámetro en cartón reciclado.
● Luego tomamos el silicón líquido y agregamos por todo los dos círculo de cartón.
● Seguidamente le pegamos a cada círculo un trozo de papel de seda rosado.
● Volteamos el círculo, doblamos y pegamos las pestañas del papel de seda.
● Quedando dos círculos forrados como base para las rosas.
ELABORATION OF THE TWO ROSES IN CREPE PAPER:
STEP BY STEP
Rose base:
● We start by cutting out two 13 cm diameter circles from recycled cardboard.
● Then we take liquid silicone and add all over the two cardboard circles.
● Next we glue a piece of pink tissue paper to each circle.
● We flipped the circle over, folded and glued the tabs of the tissue paper.
● Leaving two circles lined as a base for the roses.
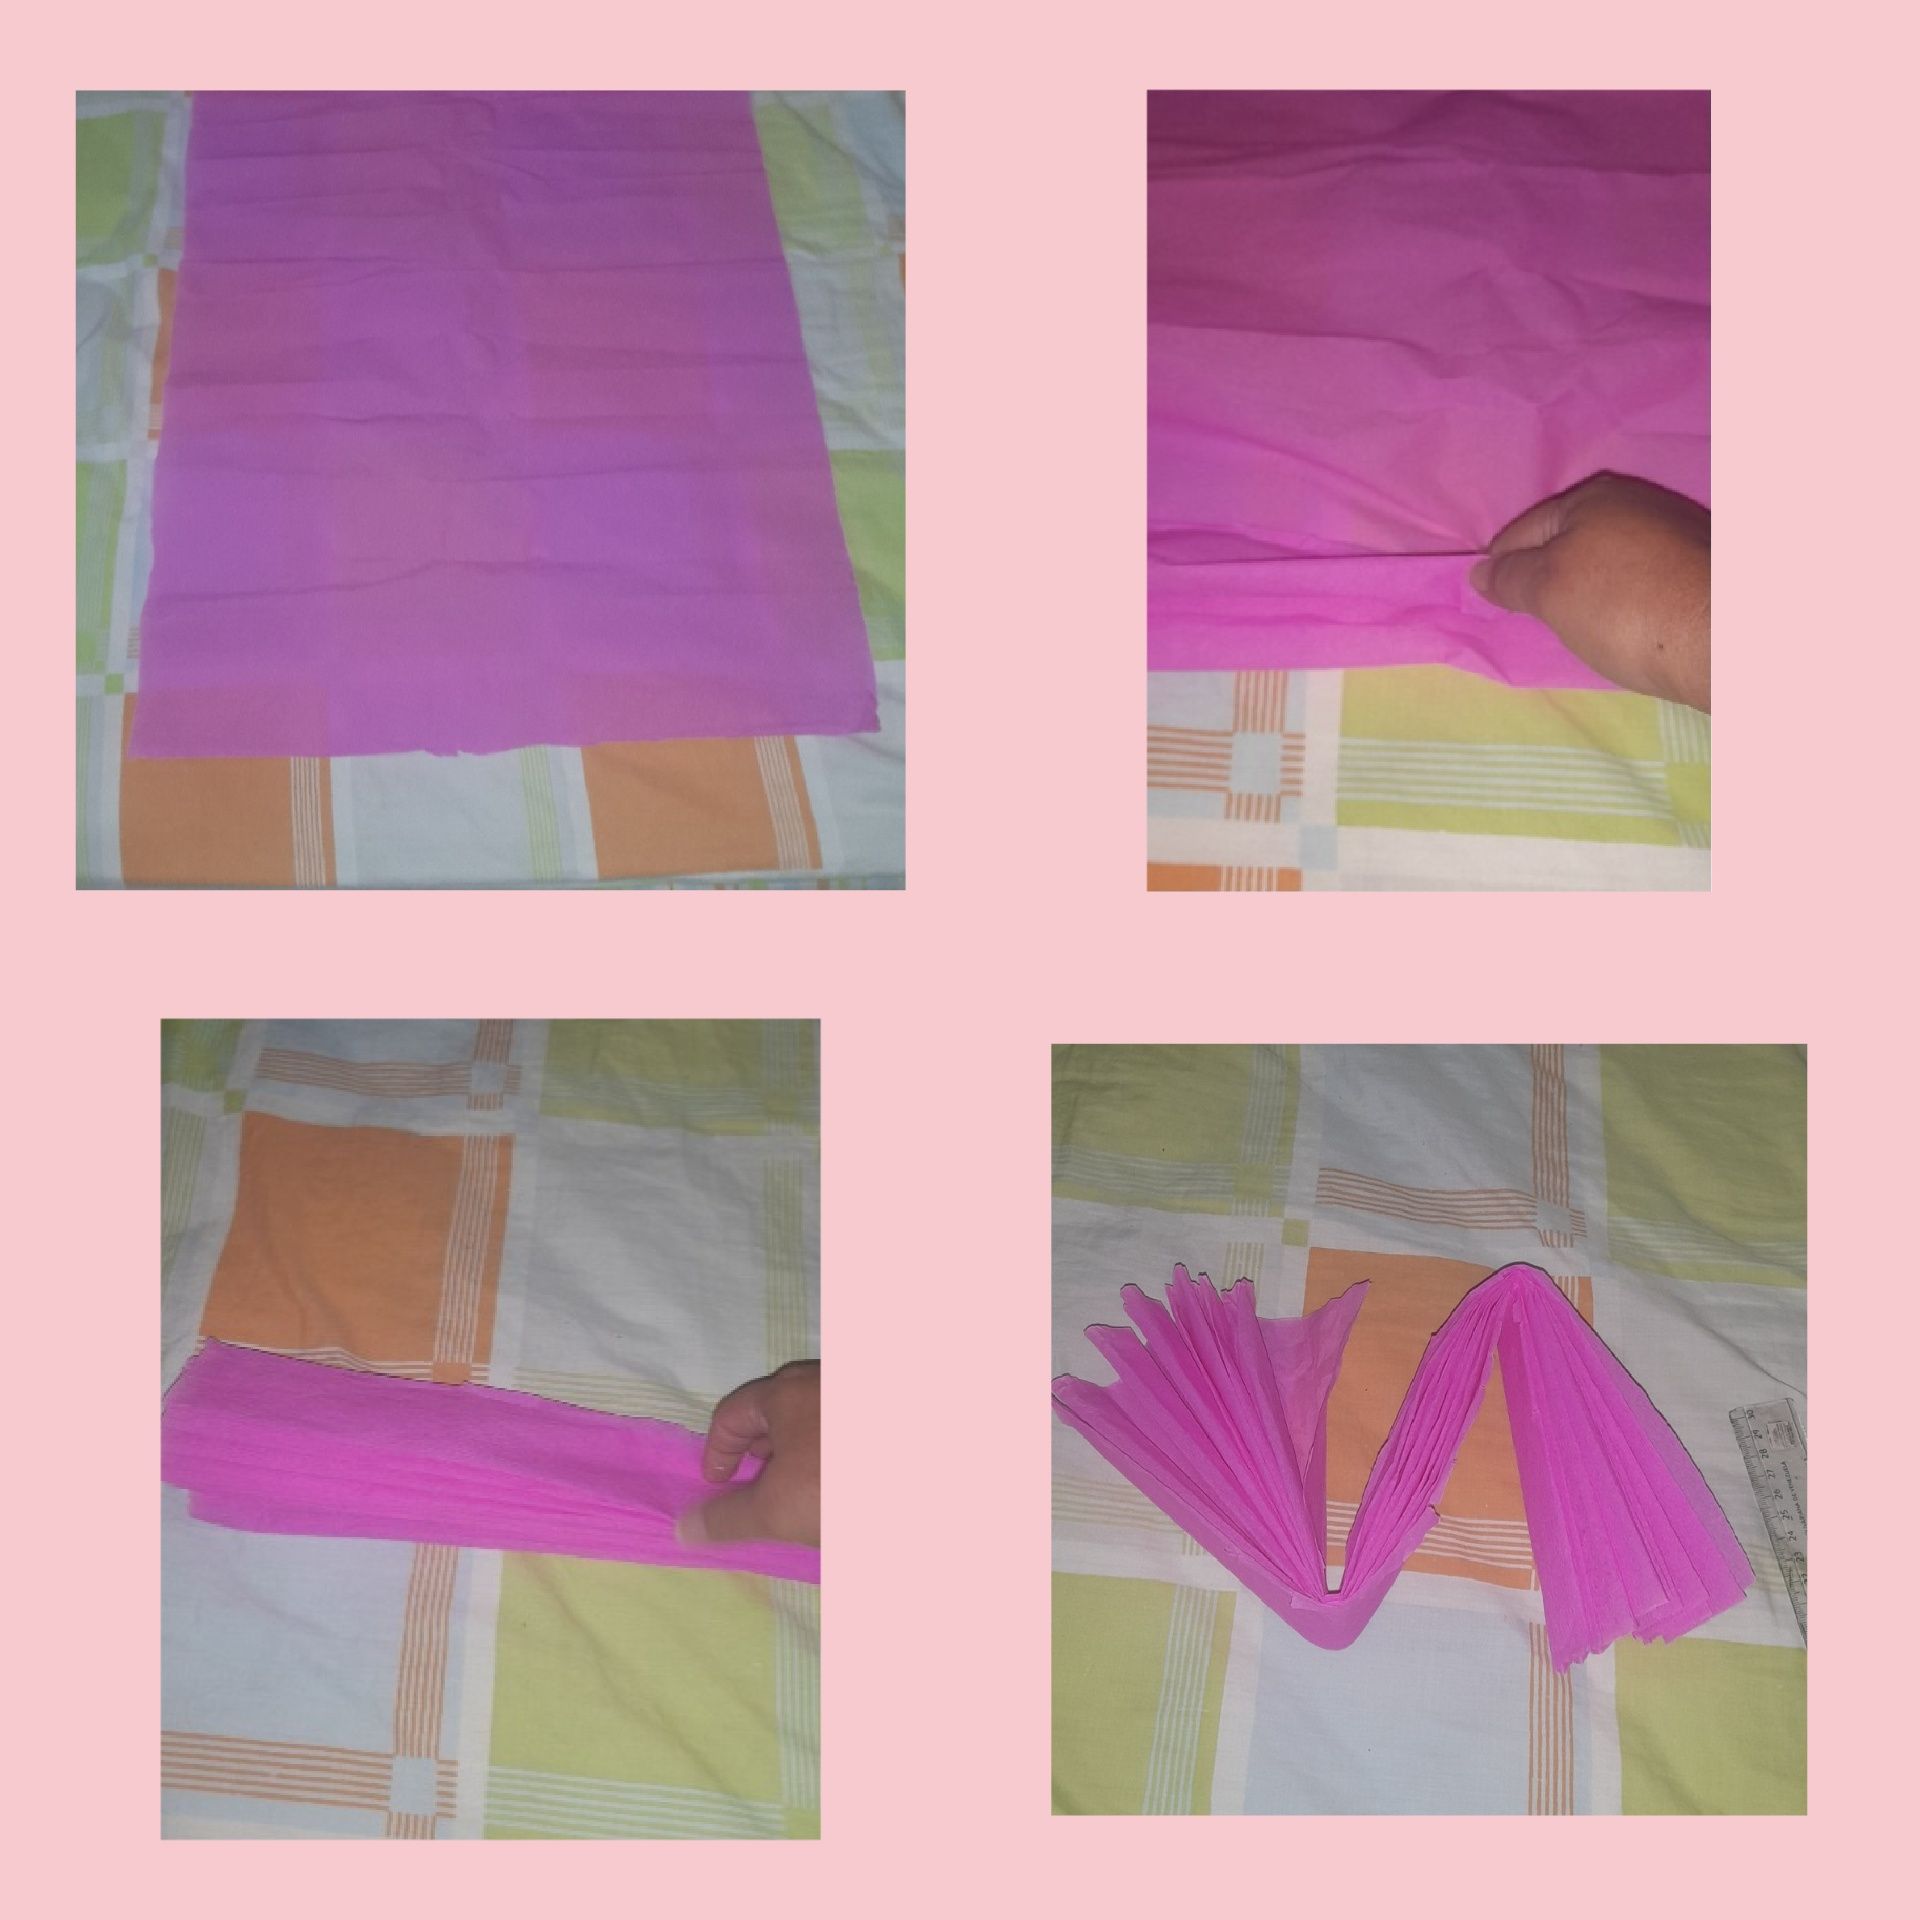
Recortamos los pétalos escalonados de las rosa :
● Tomamos un pliego de papel crepe rosado este mide 2 metros por 34 cm, lo abrimos a lo largo.
● Comenzamos a doblar en forma de acordeón de 4 cm de ancho .
● Hasta formar un acordeón con los dos metros de papel.
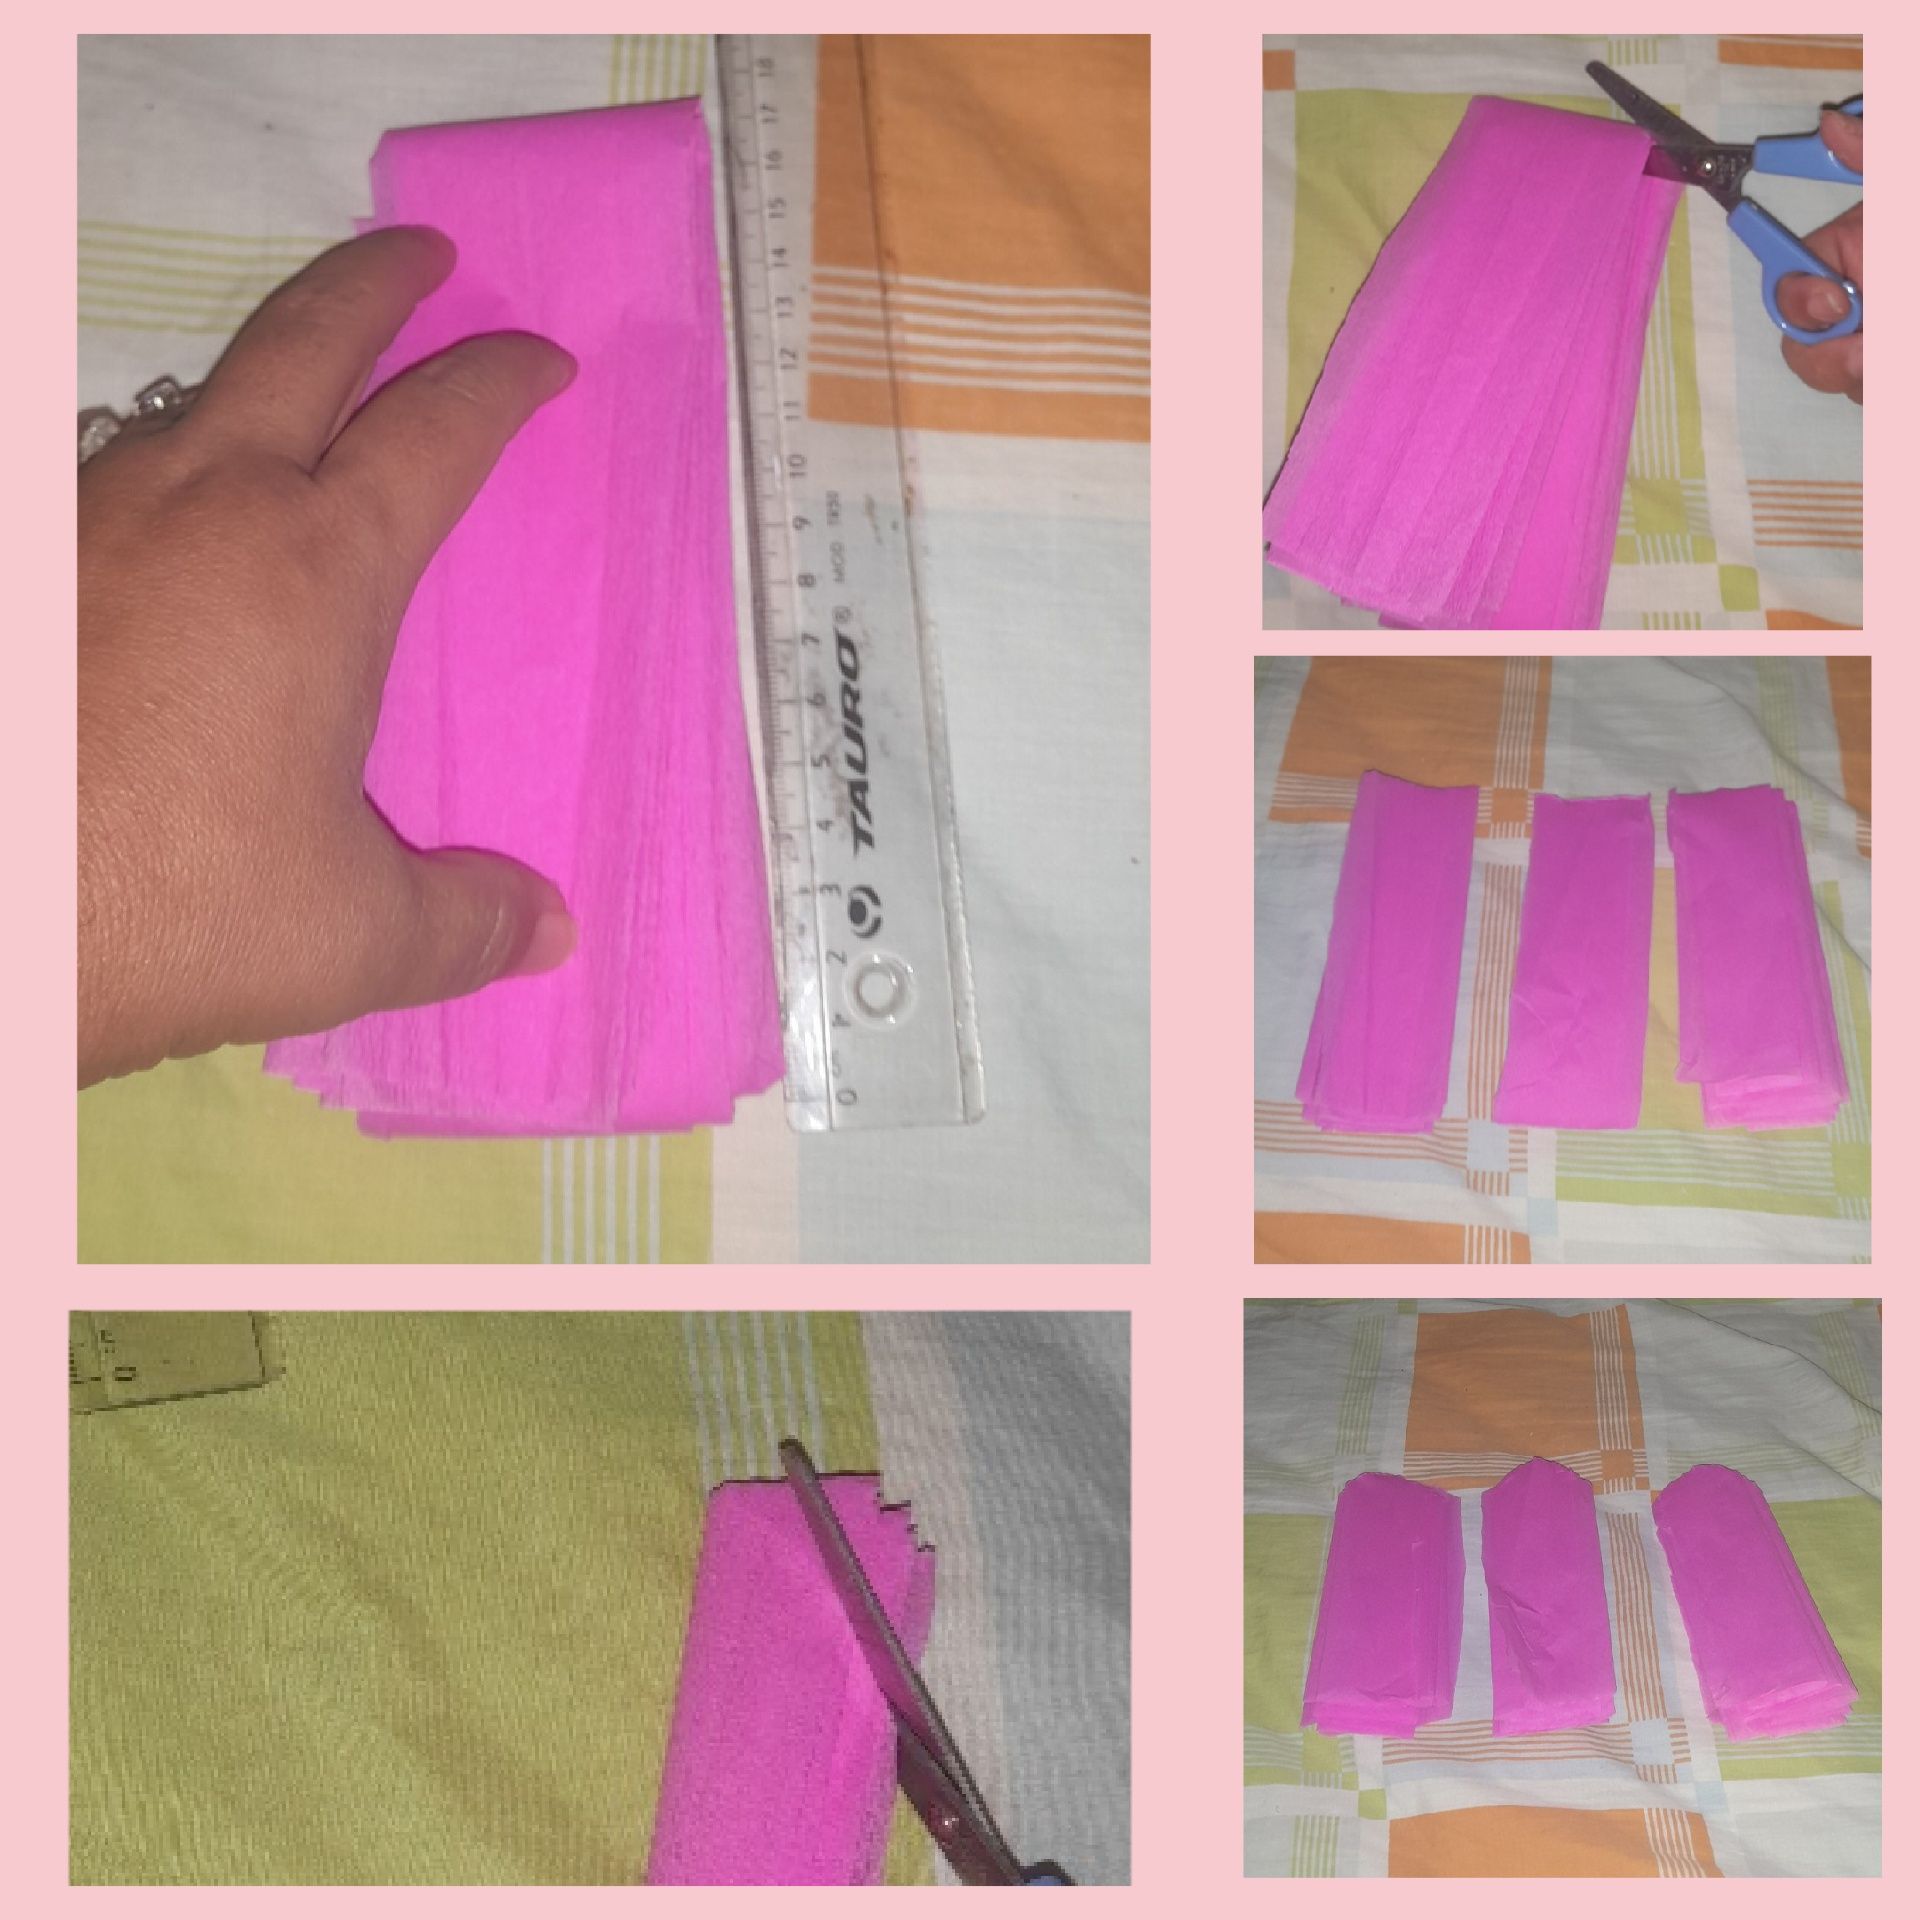
● Luego doblamos el acordeón por la mitad y cortamos dos trozos de 17 cm de largo para dar dos capa de papel a la rosa.
● Seguimos doblamos y cortamos dos trozos más de otro pliego de papel de 12 cm cada uno.
● Y repetimos con más papel y recortamos dos trozos de 7 cm .
● Finalmente en cada recorte de los trozos de papel con la tijera le recortamos las puntas de un extremos de forma redonda.
We cut out the staggered petals of the rose :
● We take a sheet of pink crepe paper this measures 2 meters by 34 cm, we open it lengthwise.
● We begin to fold in an accordion shape 4 cm wide .
● Until we form an accordion with the two meters of paper.
● Then we fold the accordion in half and cut two 17 cm long pieces to give the rose two layers of paper.
● We continue by folding and cutting two more pieces from another sheet of paper each 12 cm long.
● And we repeat with more paper and cut out two pieces of 7 cm .
● Finally in each cut out of the pieces of paper with the scissors we cut the tips of one end of a round shape.
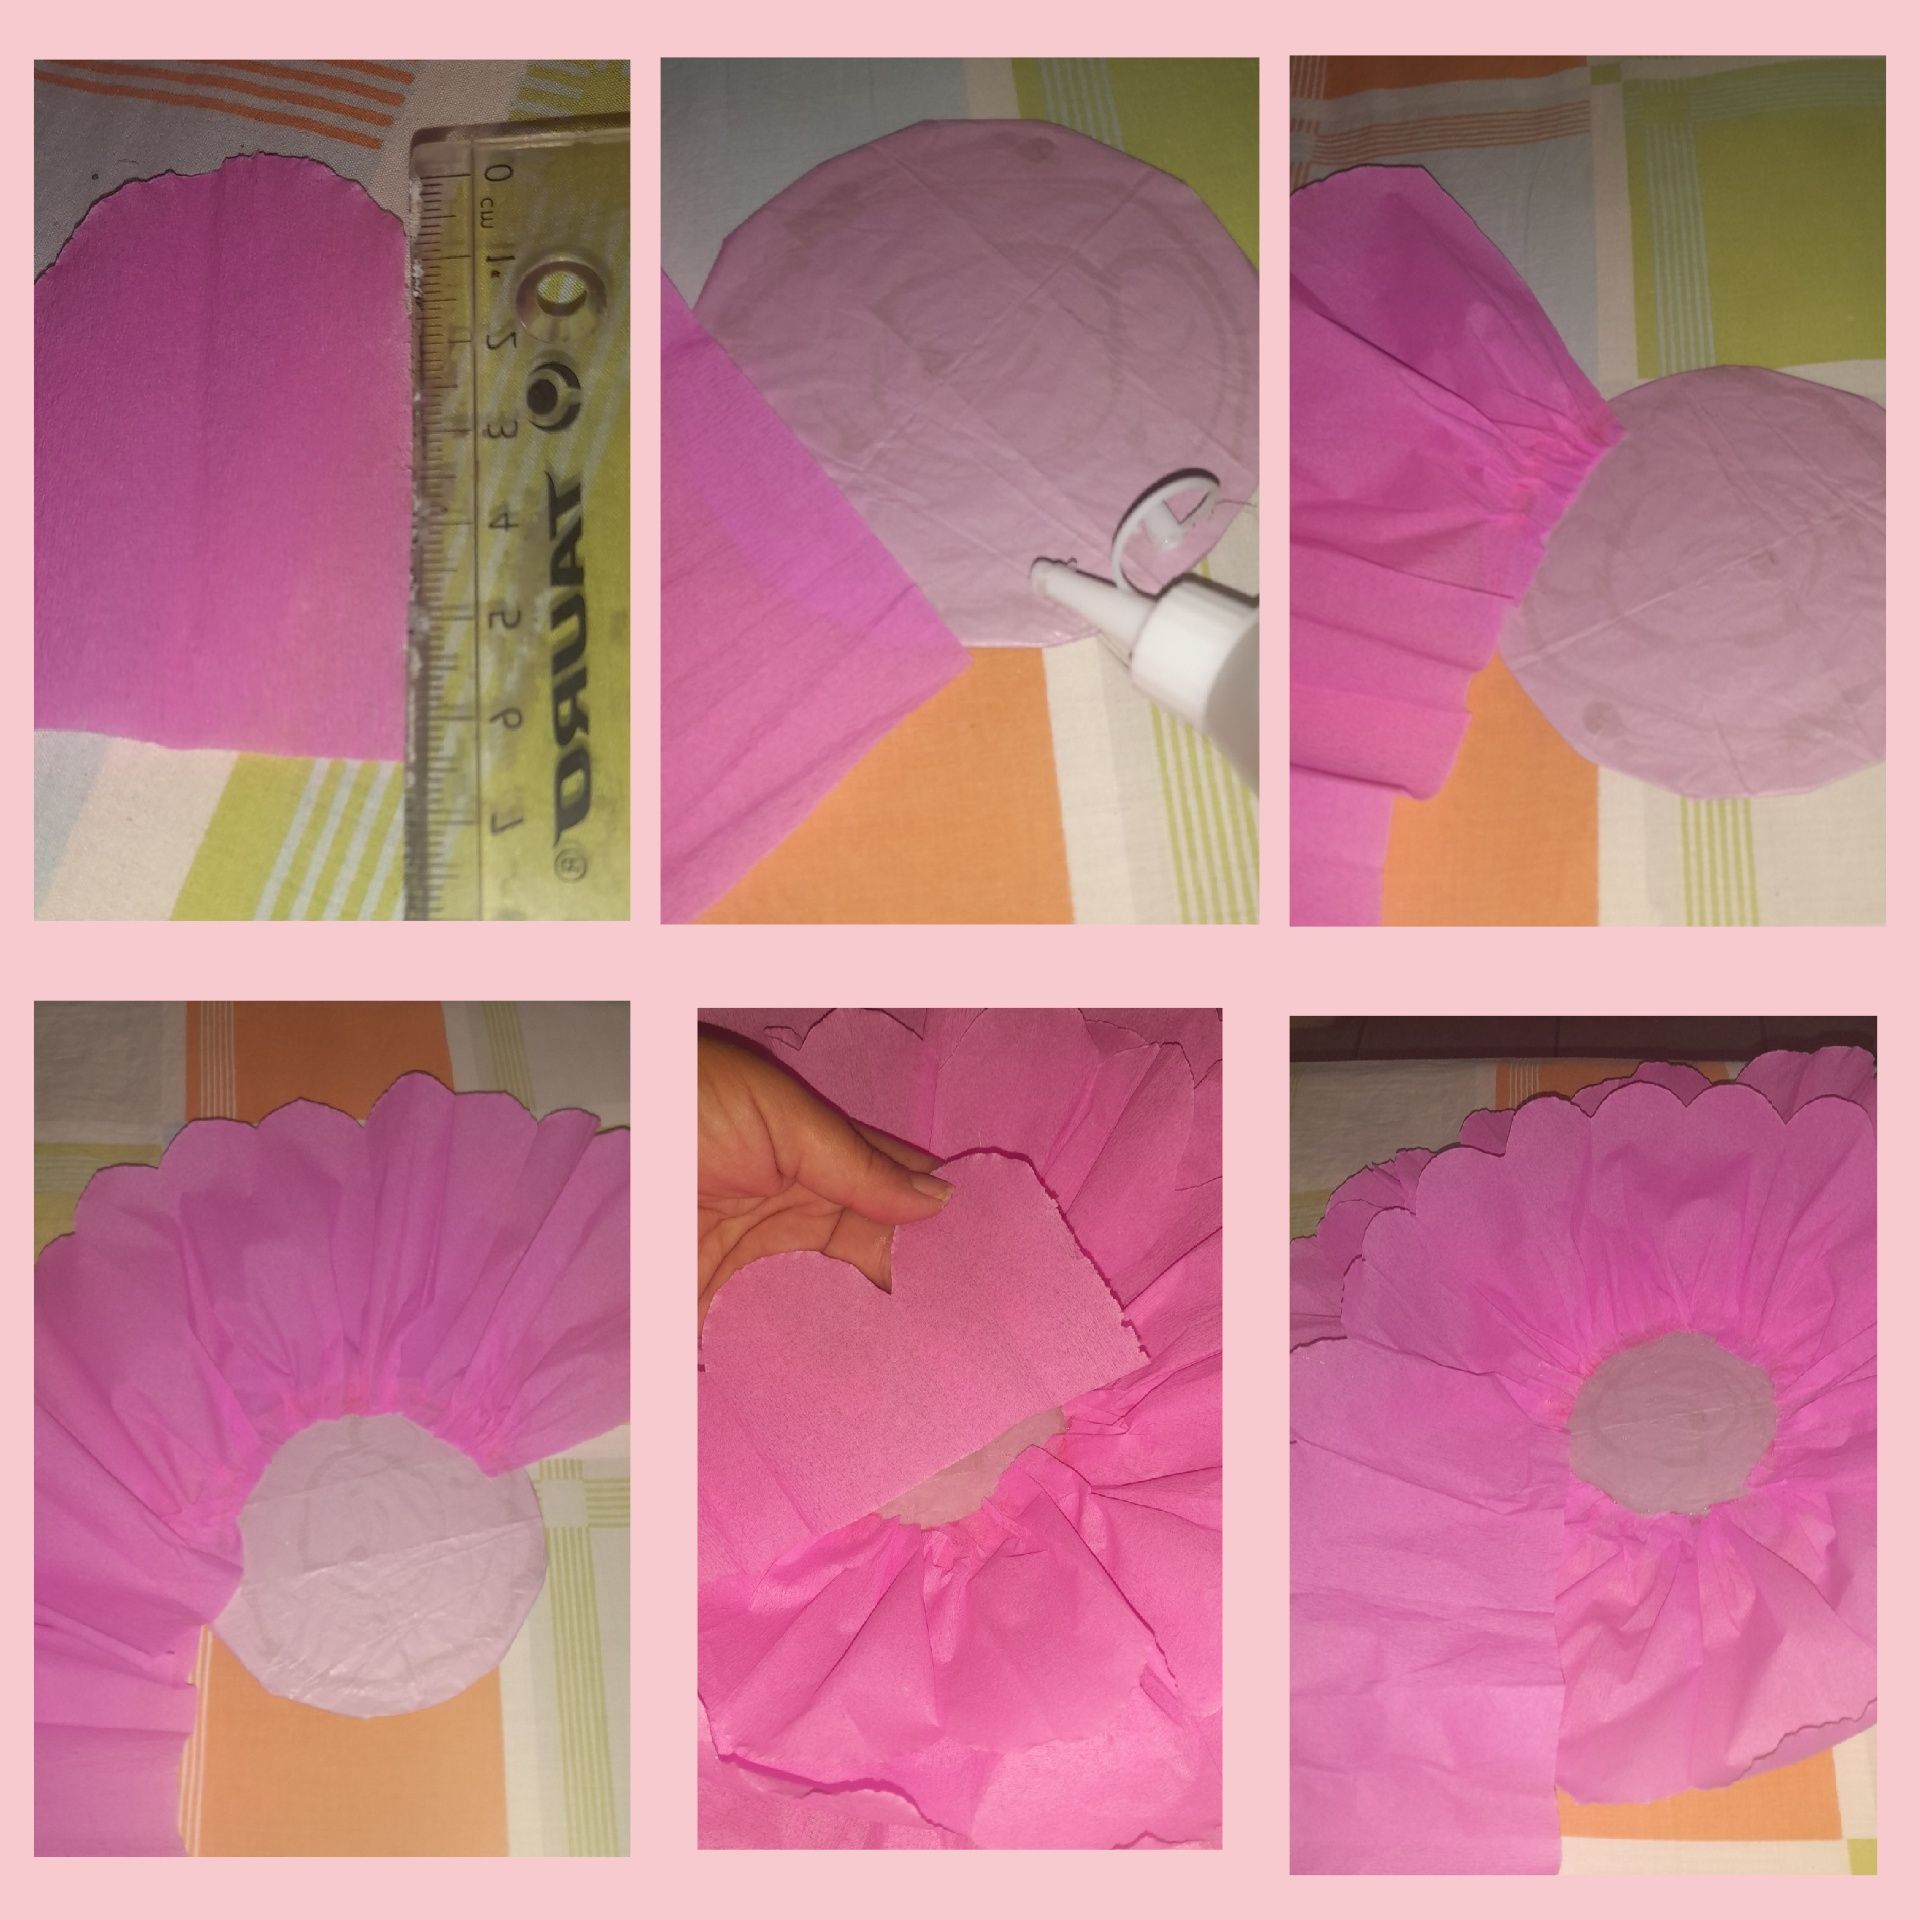
Armamos las rosas de crepe:
● Comenzamos pegando con el silicón el papel crepe de 17 cm por toda la orilla de la base del cartón redondo .
● Damos dos vuelta de papel arruchandolo por todo el círculo con los dos trozos de 17 cm .
● Seguimos colocando, arruchando y pegando el papel de 12 cm por todo la base del círculo de la rosa.
● Y finalmente colocamos los últimos dos trozos de papel de 7 cm por todo casi el centro de la rosa.
● Aquí ven como queda la rosa con seis capas de pétalos arruchados de papel crepe.
We assemble the crepe roses:
● We start by gluing with silicone the 17 cm crepe paper all around the edge of the round cardboard base .
● We give two turns of paper creasing it all around the circle with the two pieces of 17 cm .
● We continue placing, ruffling and gluing the 12 cm paper all around the base of the rose circle.
● And finally we place the last two 7 cm pieces of paper all around almost the center of the rose.
● Here you can see how the rose looks with six layers of crumpled crepe paper petals.
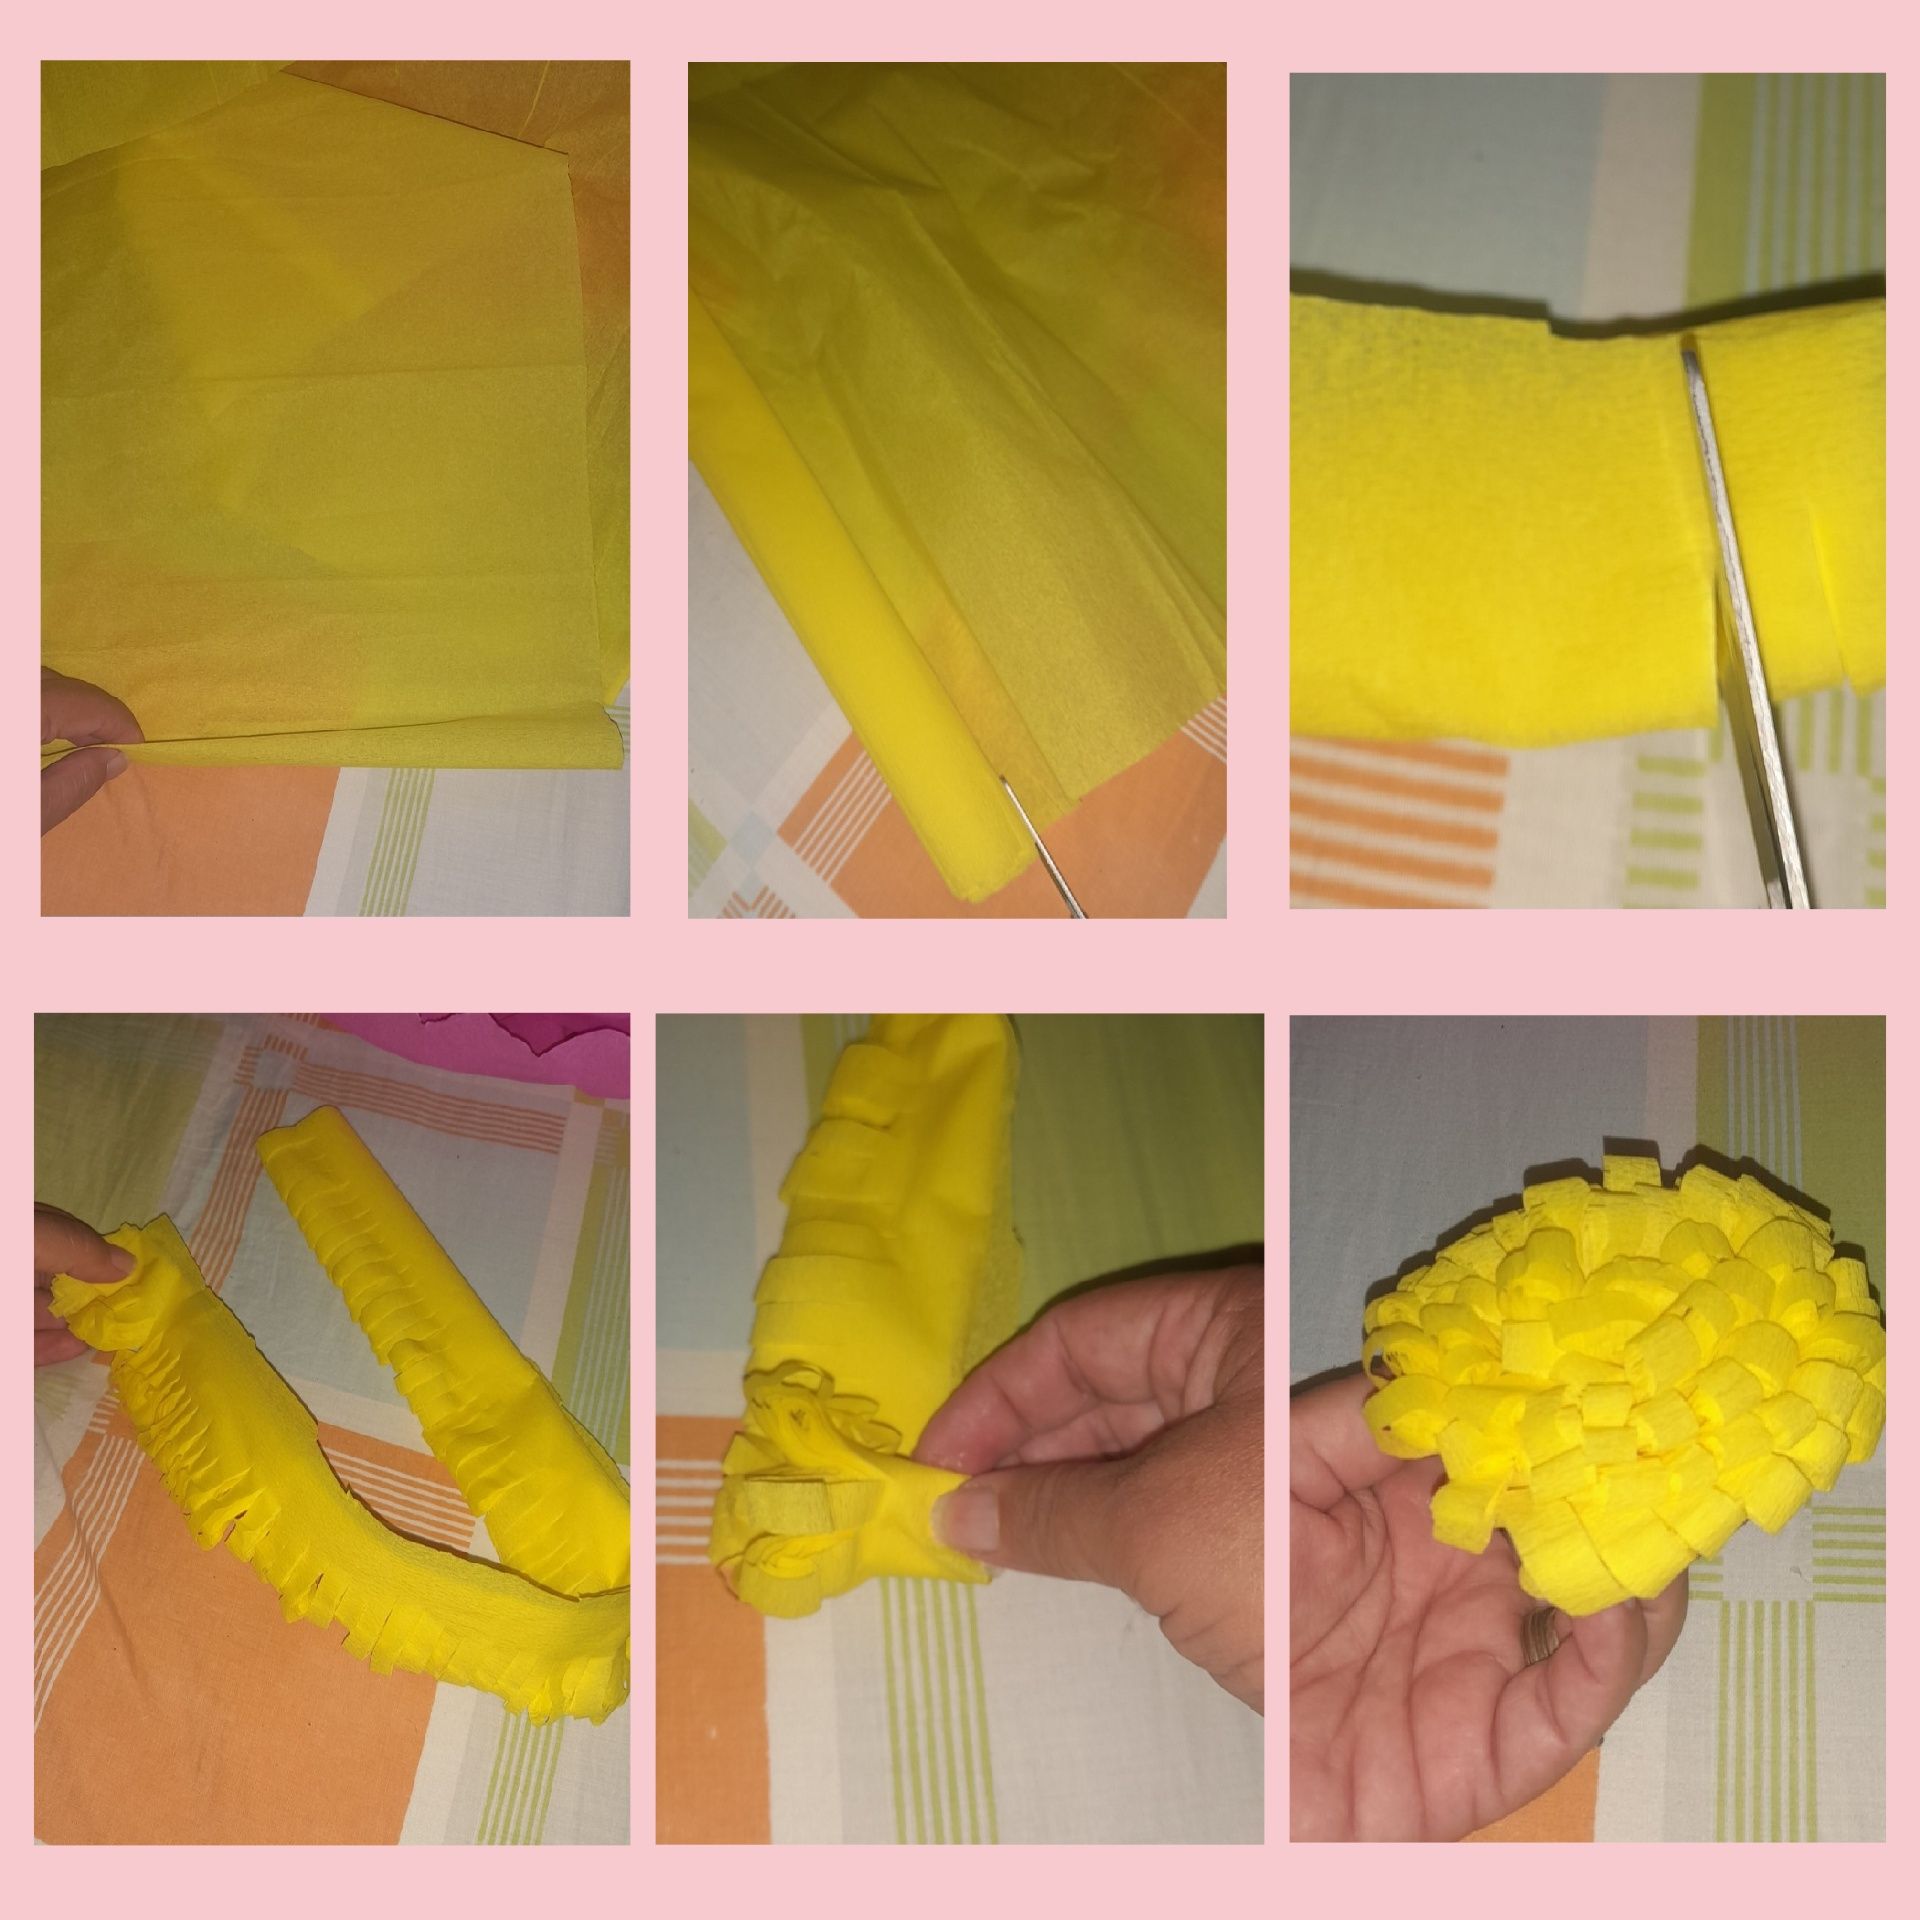
Realizamos el pompon centro de la rosa:
●Tomamos un pliego de papel crepe amarillo, lo picamos en un metro cada parte para cada pompon.
● Enrollamos doblando de forma envolvente y circular todo el metro del papel.
● Queda como un tubo enrollado y con la tijera Comenzamos a cortar listones en todo lo largo del papel enrollado.
● Luego enrollamos este listón y pegamos.
Y queda un lindo pompon amarillo para el centro de la rosa.
We make the pompon in the center of the rose:
●Take a sheet of yellow crepe paper, cut it into one meter each part for each pompon.
● We roll it up by folding in an enveloping and circular way the whole meter of the paper.
● It looks like a rolled tube and with the scissors we start cutting ribbons along the entire length of the rolled paper.
● Then we roll up this ribbon and glue.
And you have a nice yellow pom-pom for the center of the rose.
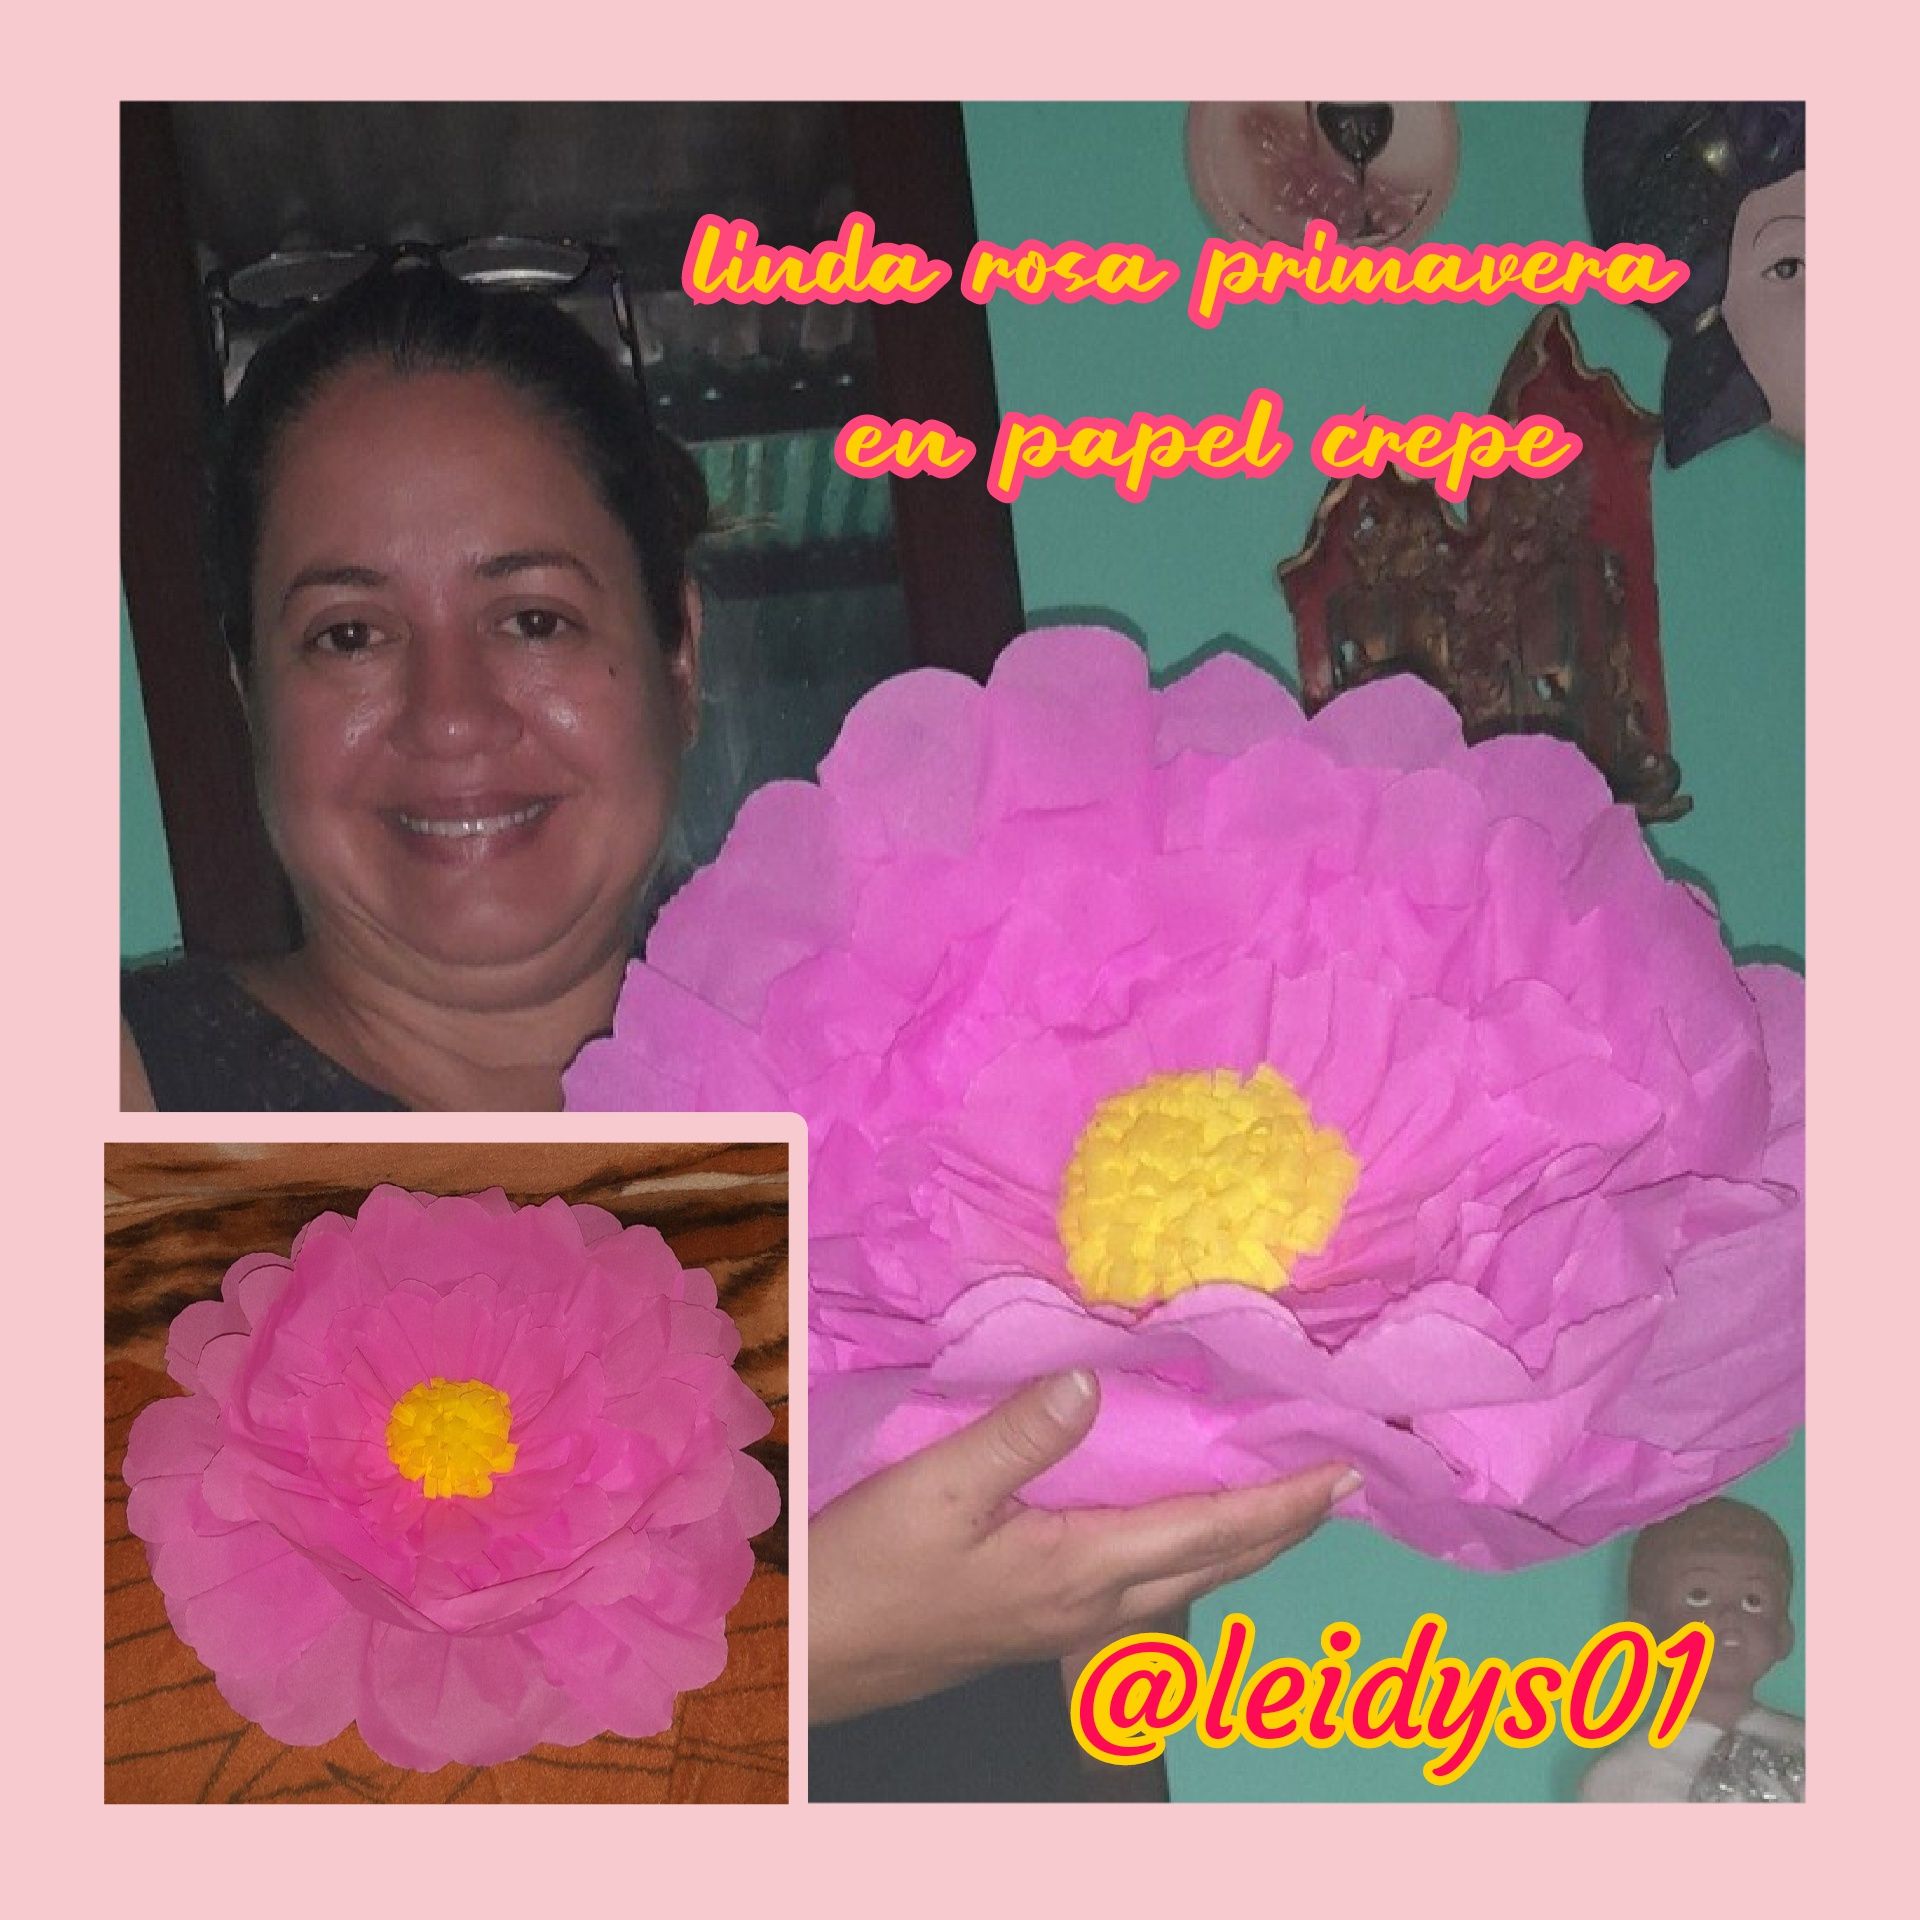
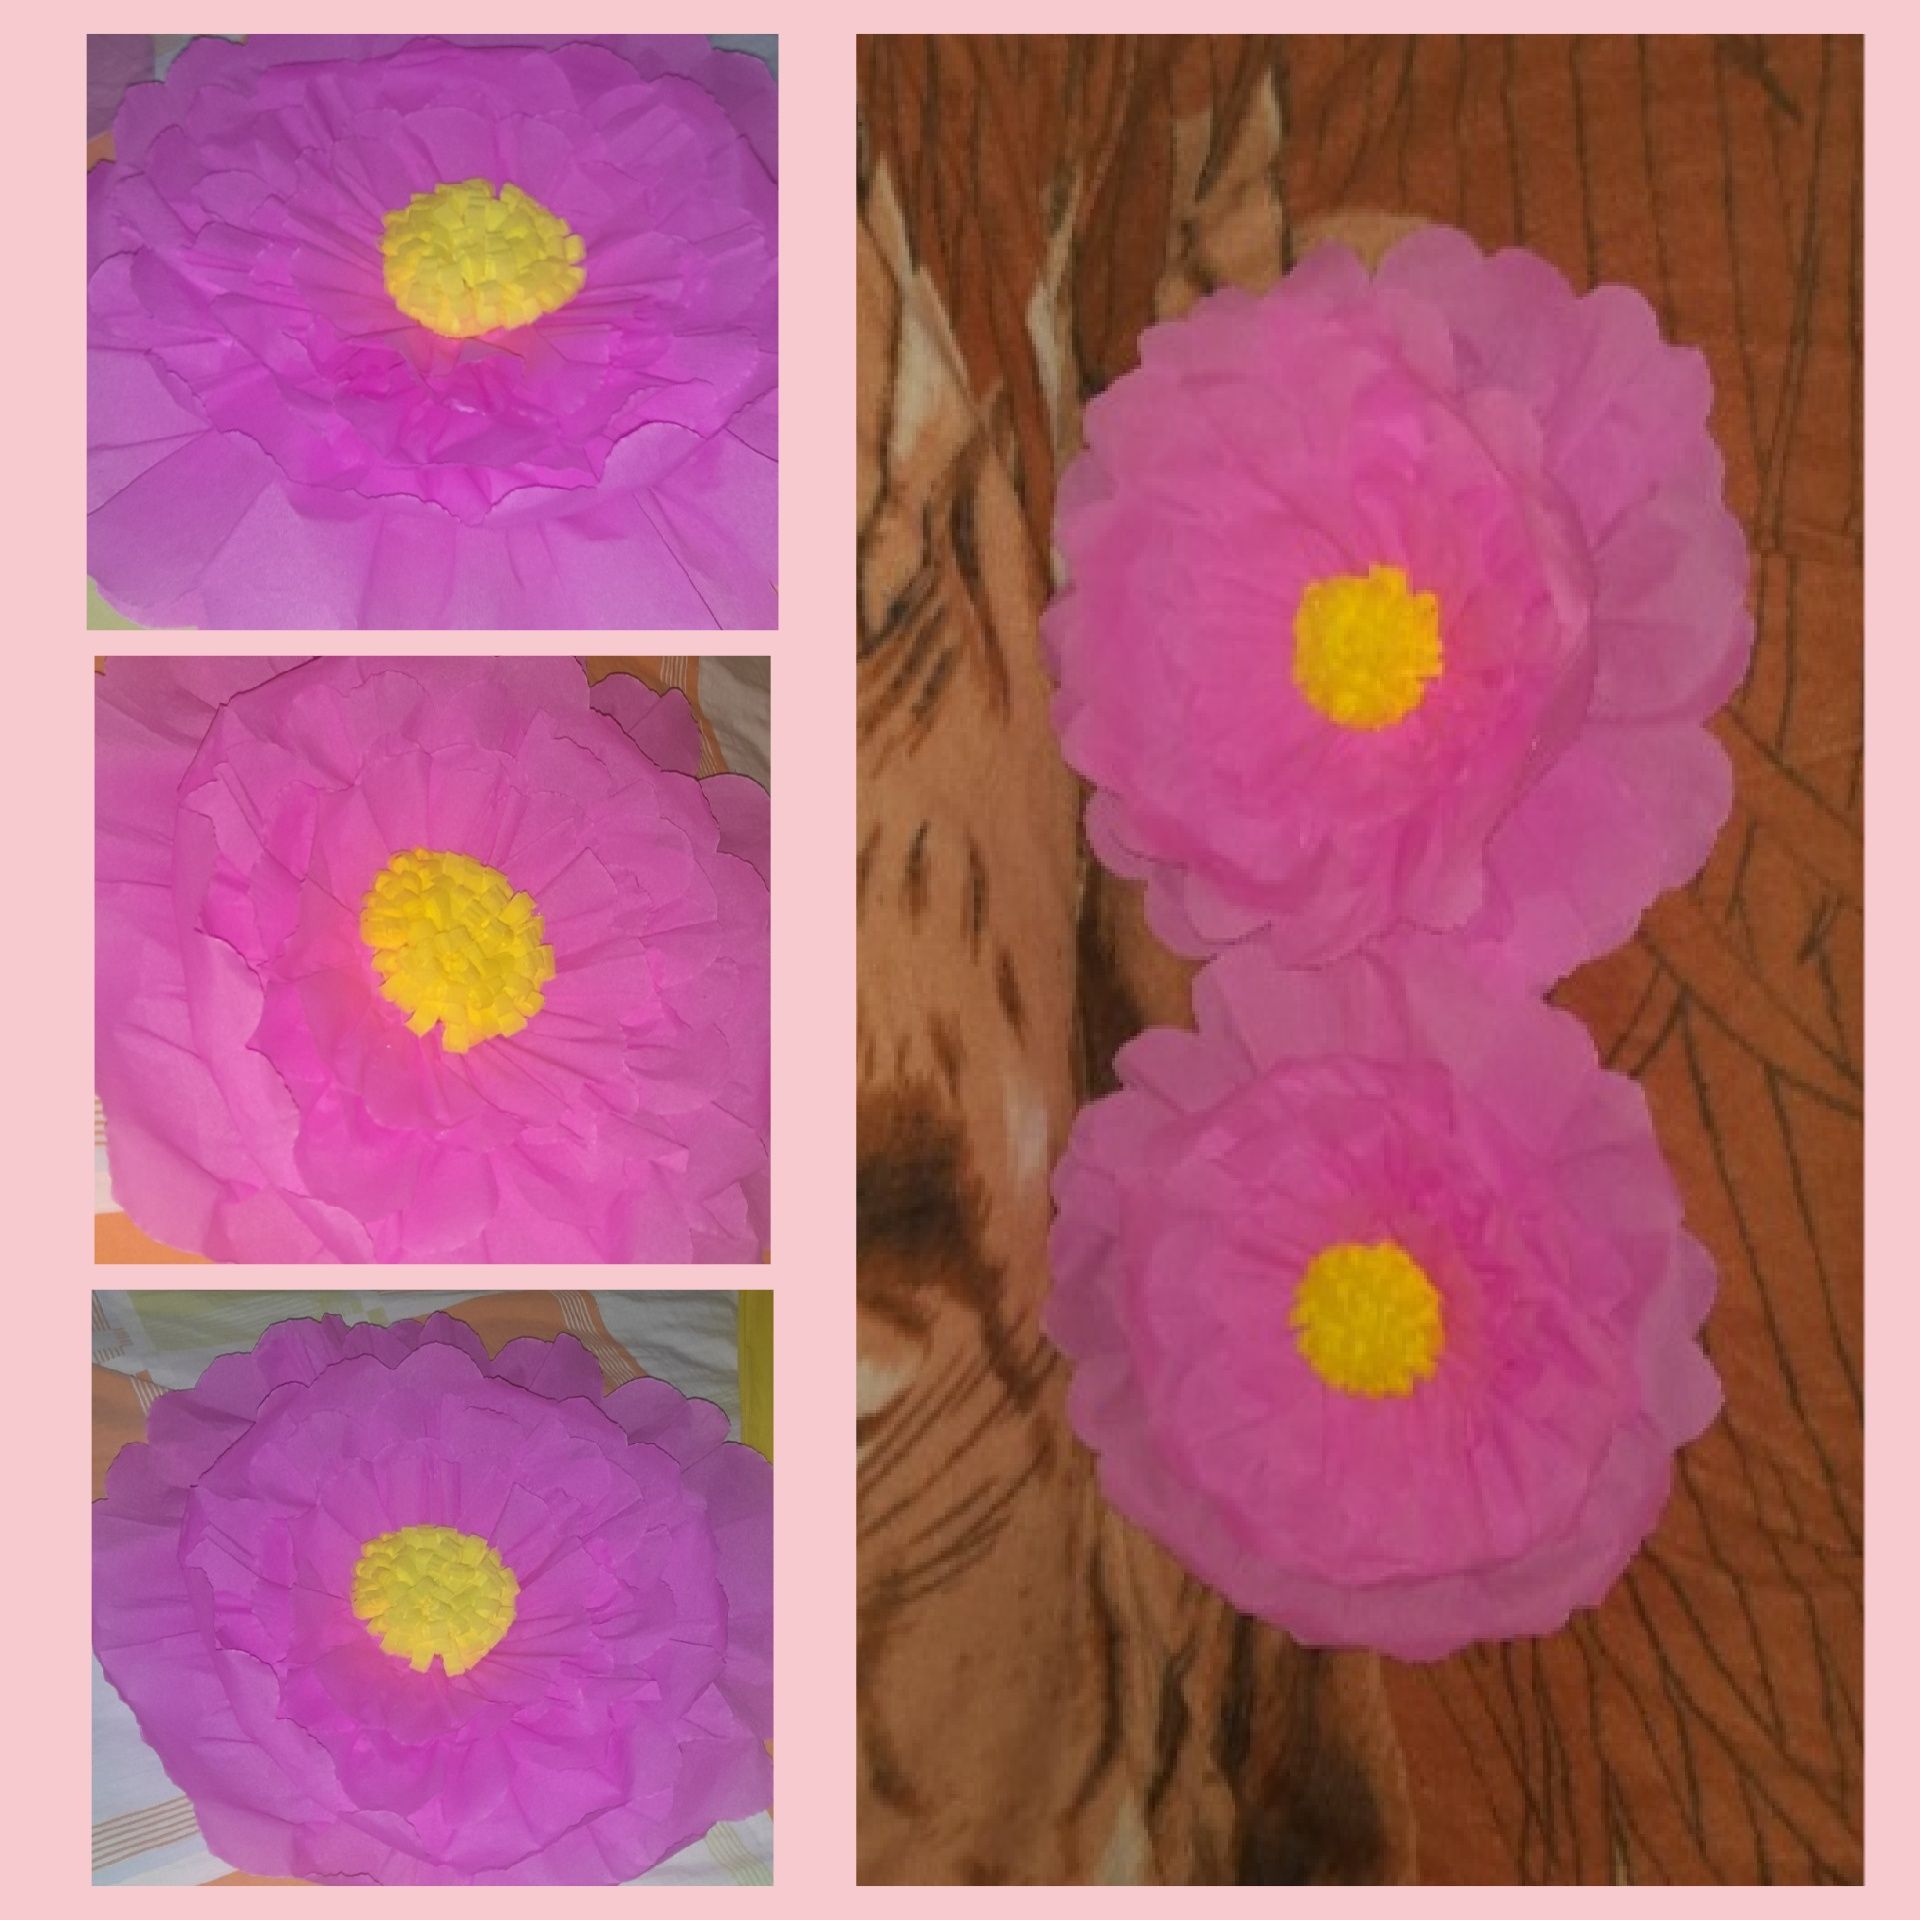
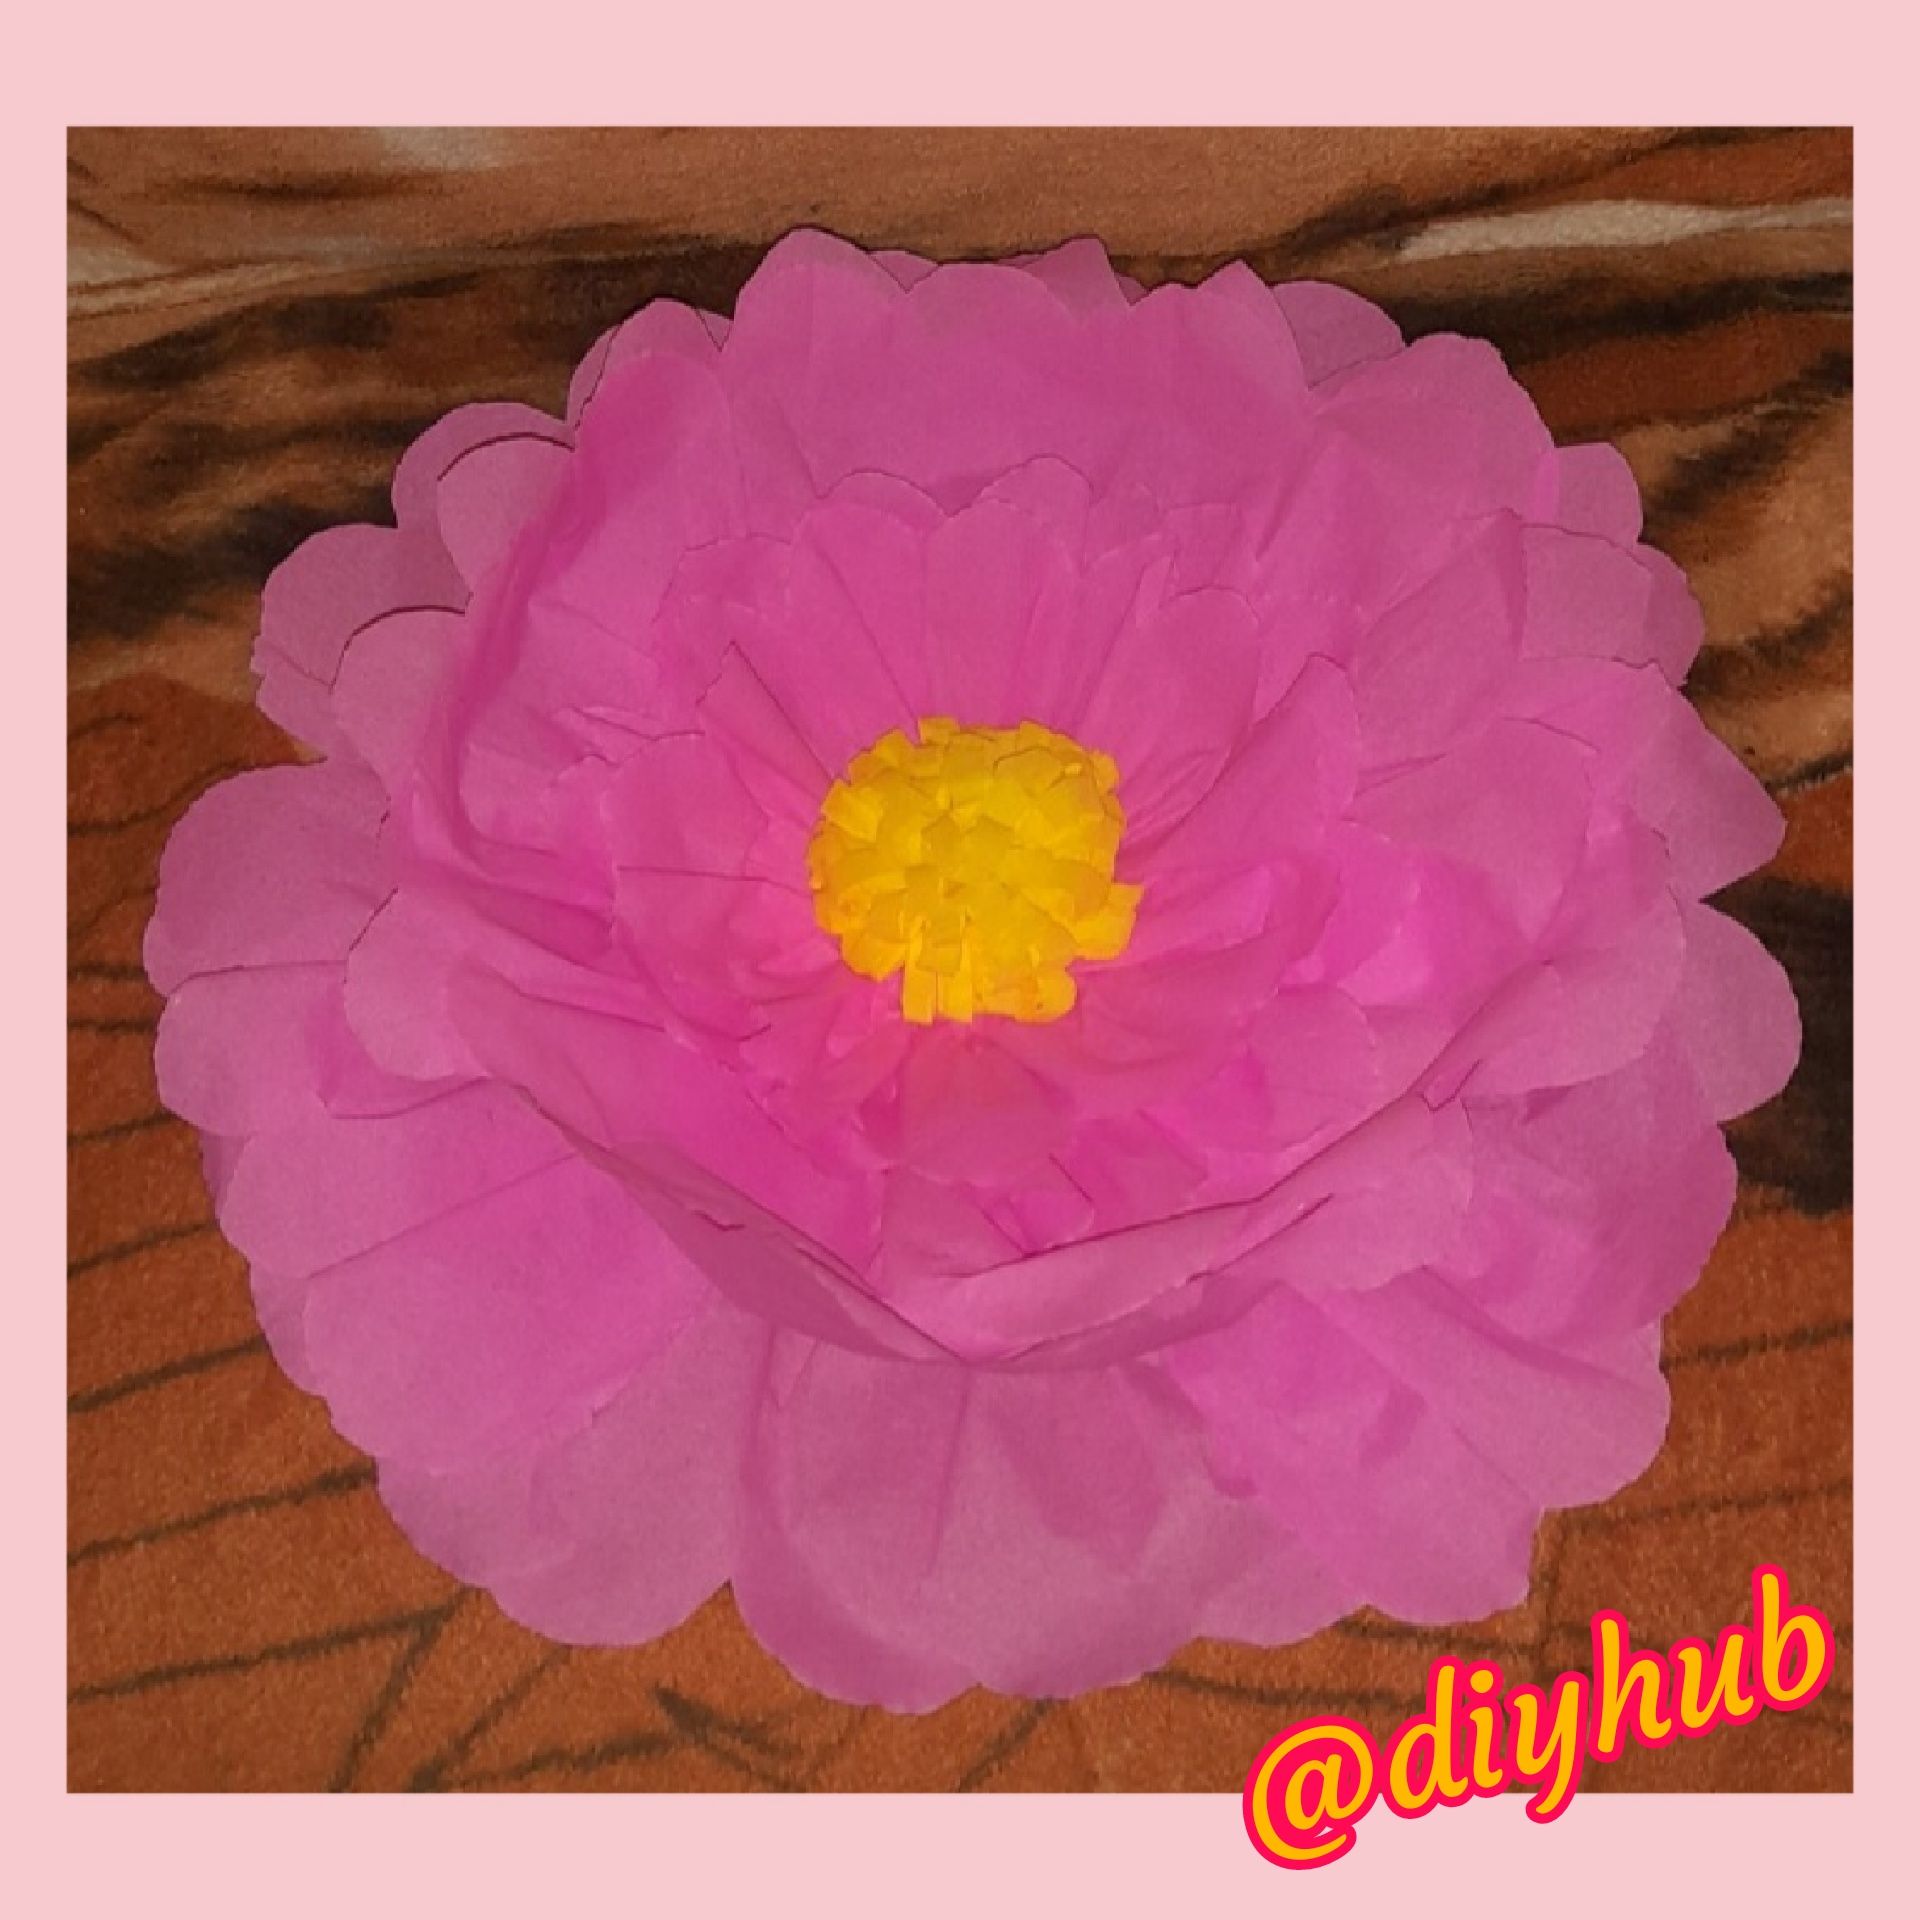
Resultado final ...estás rosas muy lindas y creativas realizada en papel crepe para decorar un estar de una fiesta o evento importante .🌼🌸
Final result ...these very beautiful and creative roses made in crepe paper to decorate a room of a party or an important event 🌼🌸
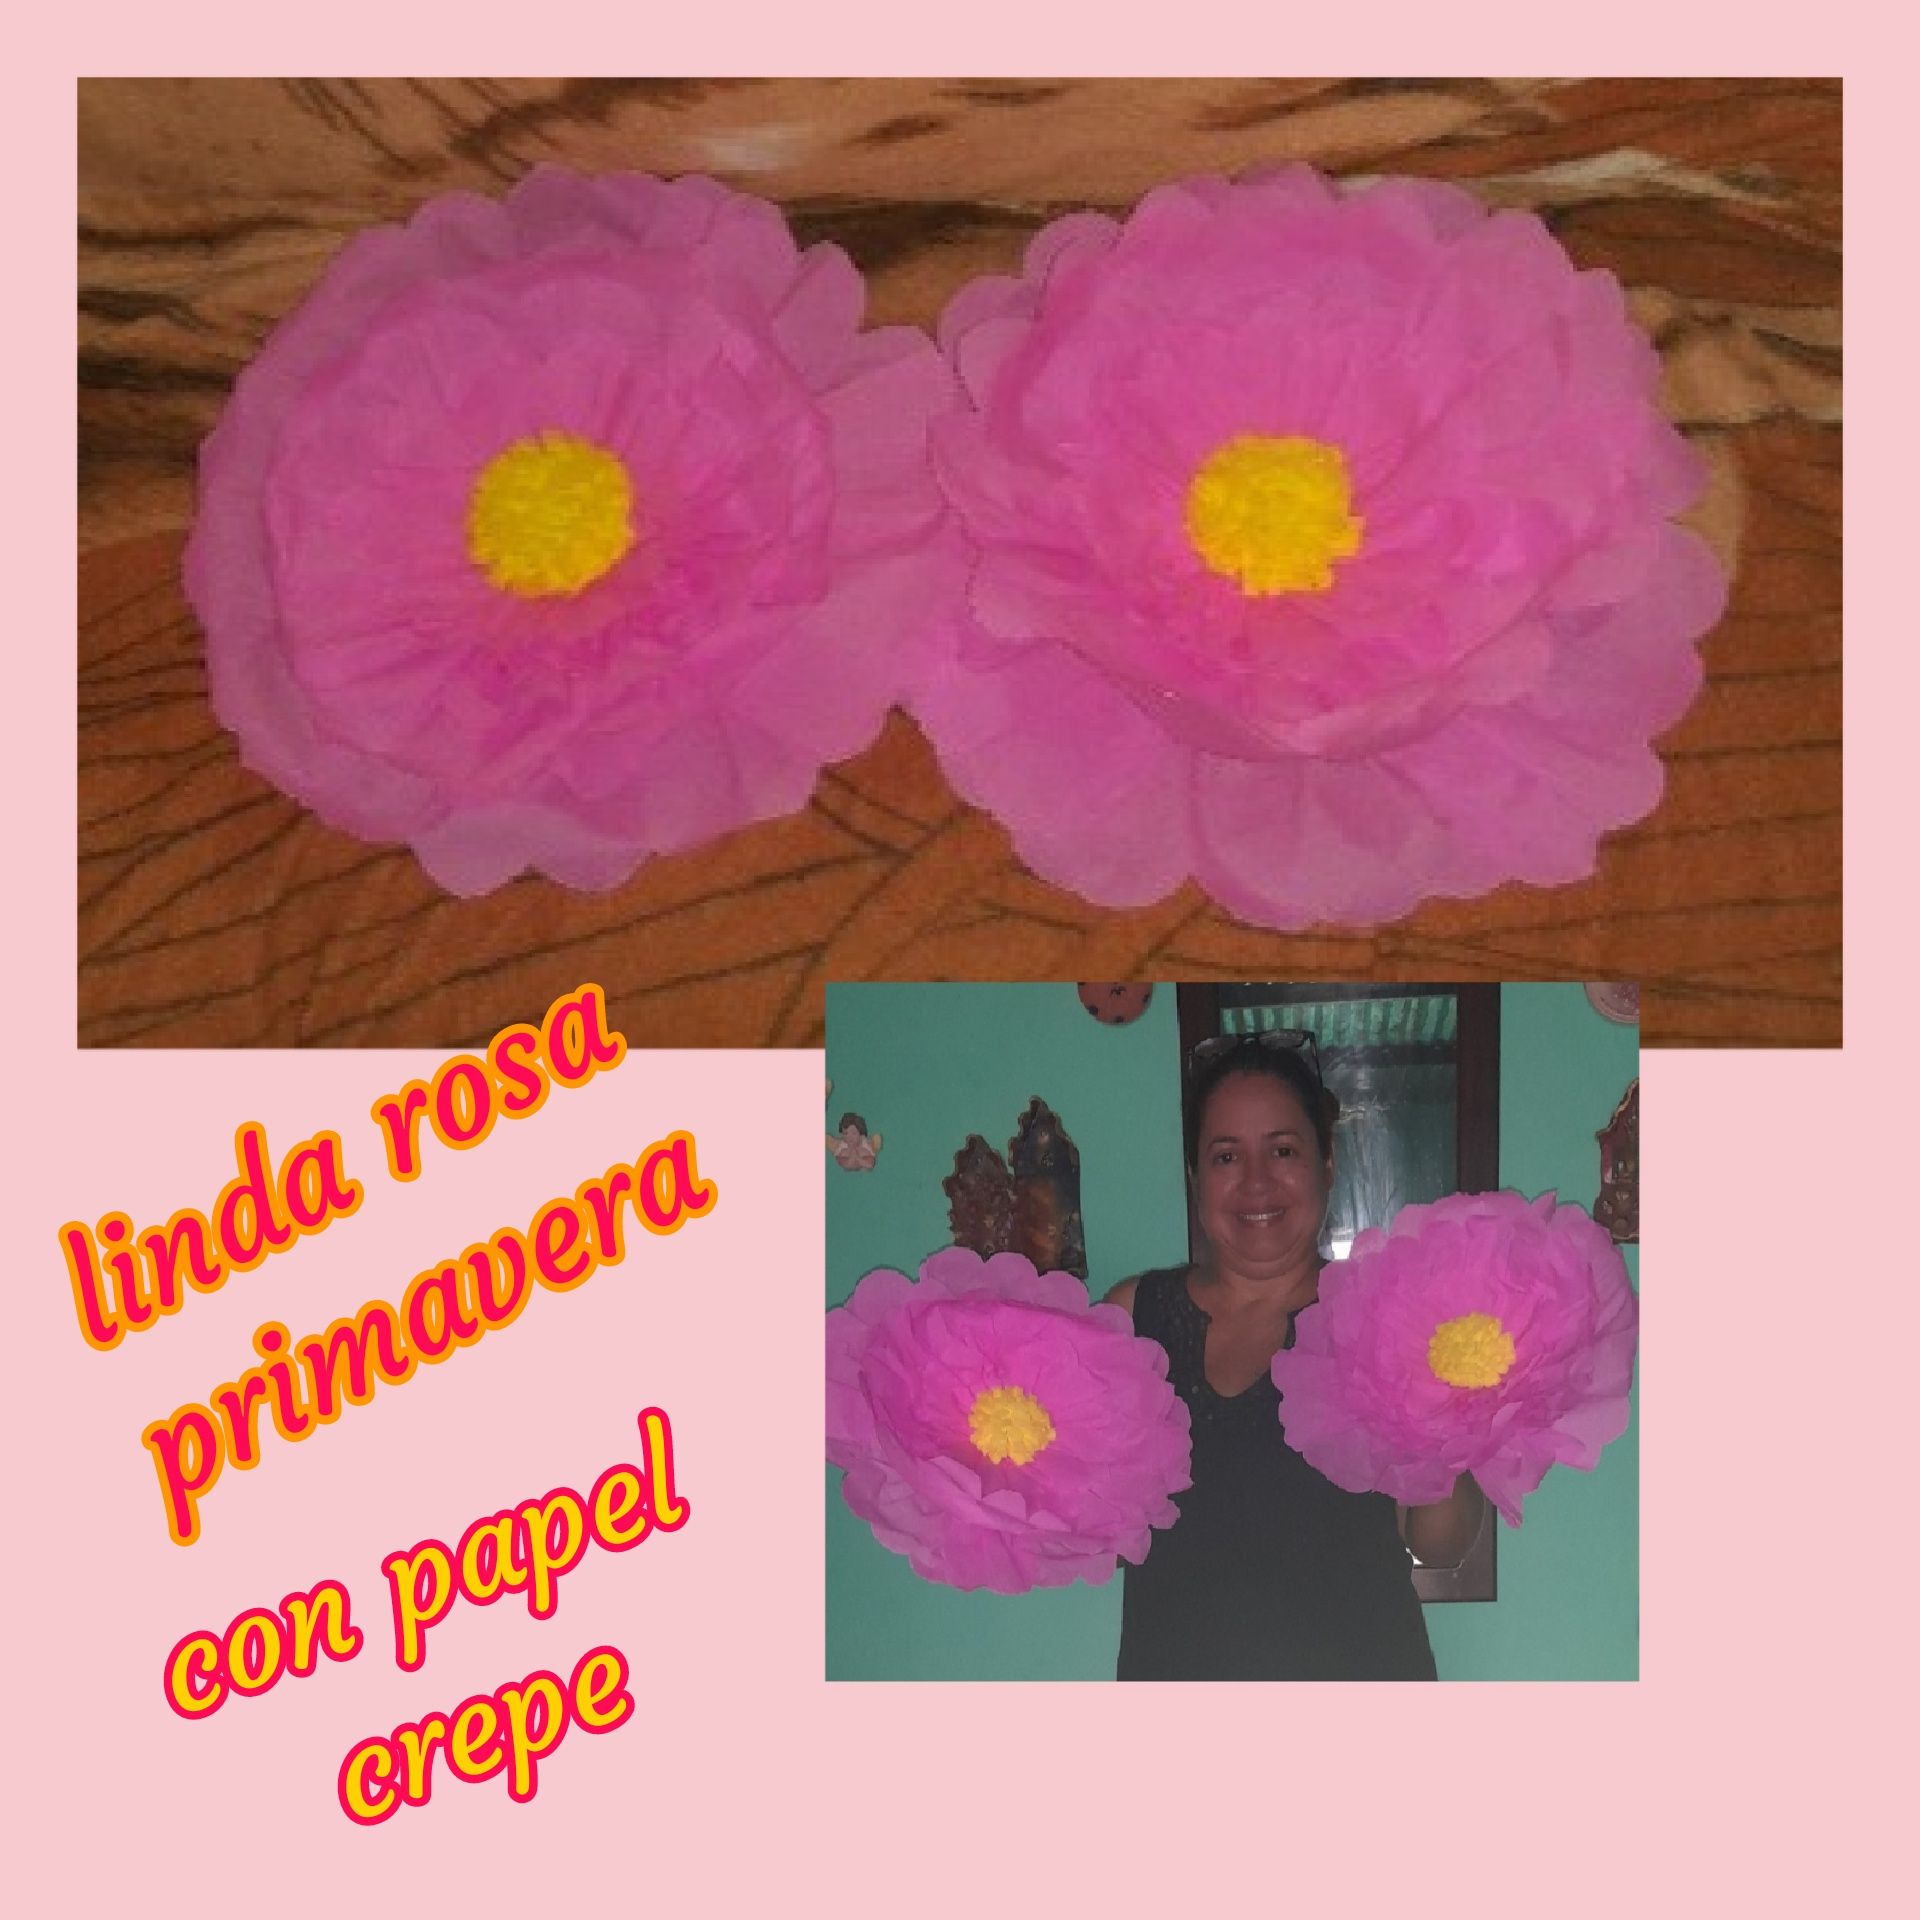
Aquí pueden ver como quedaron las dos lindas rosas primavera decorativa.🌸🌼
Here you can see how the two beautiful decorative spring roses turned out 🌸🌼.
Para cada ocasión importante en nuestra vida necesitamos celebrar, es una parte de nuestra vida que nos vuelve creativo ante cada expectativa que se nos presente, siempre estamos inventando y cada día creamos cosas nuevas e innovadoras cada quien en su estilo y con su destreza, hoy les cree con pocos materiales una fácil decoración para estar de fiesta como éstas lindas rosas primavera en papel crepe.
For every important occasion in our life we need to celebrate, it is a part of our life that makes us creative to every expectation that comes our way, we are always inventing and every day we create new and innovative things, each one in his style and with his skill, today I created with few materials an easy decoration to be festive like these beautiful spring roses in crepe paper.

Gracias amigos de @diyhub por el apoyo espero que disfruten haciéndolo esta linda manualidad y que le sirva para decoraciones futuras. 🌸🌼
Son fotos mías tomadas desde mi teléfono Samsung, editadas por foto frame y traducida por Deepl.
Thank you @diyhub friends for the support I hope you enjoy making this cute craft and that it will be useful for future decorations. 🌸🌼
These are photos of me taken from my Samsung phone, edited by foto frame and translated by Deepl.