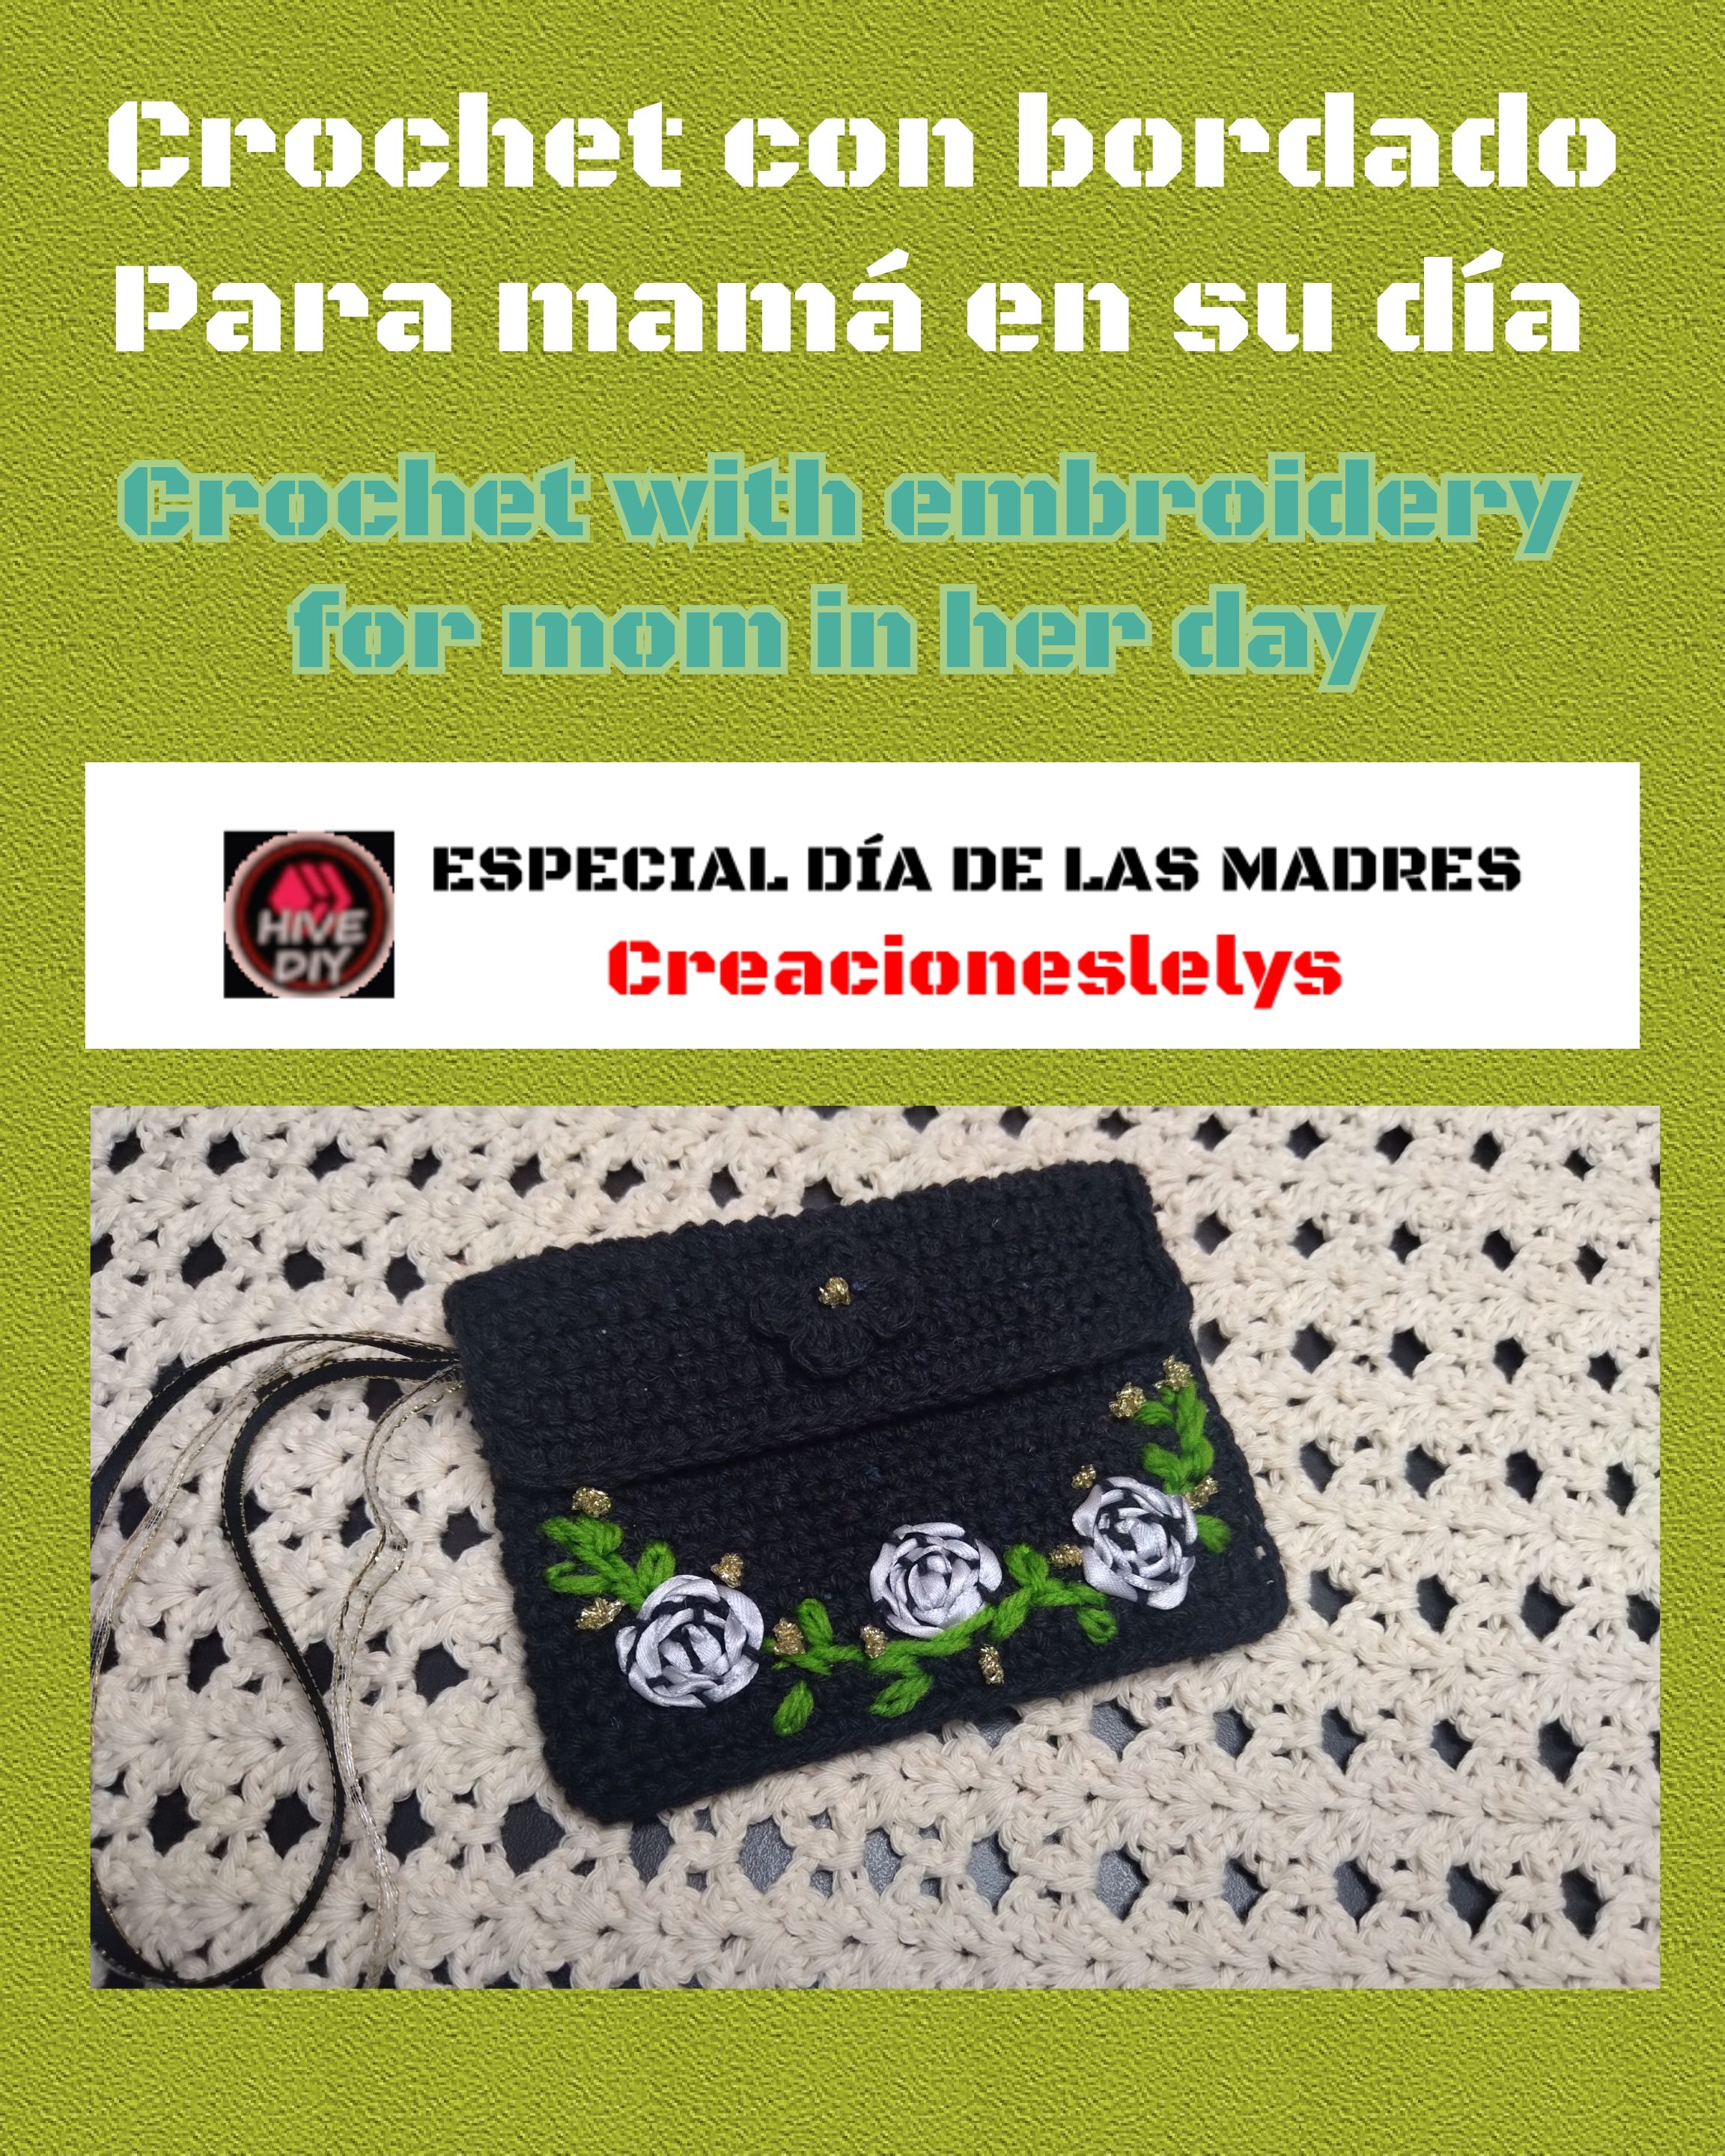
¡Actívate creando! Crochet con bordado para mamá.
Get active creating! Crochet with embroidery for mom.
Hola amigos creadores. Bienvenidos una vez más a mi espacio creativo, como siempre vengo muy animada a compartirles mi más reciente creación UNA MUY ESPECIAL exclusiva para este CONCURSO del DÍA DE LA MADRE propiciado por la comunidad #hivediy.
Todos los días son especiales para celebrar a las madres, sin embargo en Venezuela este domingo 12 de mayo será mucho más especial para ellas. Con motivo a esta celebración 🥳 quiero FELICITAR a todas las madres del mundo y de HIVE. Aprovecho para invitarlas a participar mostrando alguna manualidad realizada por ustedes dedicada a las mamás. Extiendo la invitación a @mavilan30 y @mily23m a participar.
¡Esta es mi propuesta!
Hello fellow creators. Welcome once again to my creative space, as always I am very excited to share with you my latest creation, a very special one exclusive for this MOTHER'S DAY CONTEST sponsored by the #hivediy community.
Every day is special to celebrate mothers, however in Venezuela this Sunday May 12 will be much more special for them. On the occasion of this celebration 🥳 I want to CONGRATULATE all the mothers of the world and HIVE. I take this opportunity to invite you to participate by showing some craft made by you dedicated to moms. I extend the invitation to @mavilan30 and @mily23m to participate.
This is my proposal!

Amigos creadores mi proyecto consiste en la elaboración de un bello, elegante y delicado MONEDERO a CROCHET con BORDADO hecho a mano, especialísimo para las madres en su DÍA. Para realizarlo utilicé los siguientes materiales:
Materiales.
🍄 Hilo pabilo color negro.
🍄 Estambre color verde.
🍄 Cinta de raso de 0,25cm de ancho color plateado.
🍄 Cinta de raso color negra con borde dorado.
🍄 Cinta transparente dorada.
🍄 Hilo de crochet color dorado.
🍄 Aguja de crochet de 2,25mm.
🍄 Aguja lanera.
🍄 Aguja de coser.
🍄 Hilo de coser color negro.
🍄 Cierre mágico color negro de 2 cm de ancho.
🍄 Molde elaborado sobre cartón.
Friends creators, my project consists of the elaboration of a beautiful, elegant and delicate CROCHET COIN PURSE with handmade embroidery, very special for mothers on their DAY. To.make it I used the following materials:
Materials.
🍄 Black colored pabilo thread.
🍄 Green yarn.
🍄Satin ribbon 0,25cm wide in silver color.
🍄Black satin ribbon with golden border.
🍄Gold colored transparent ribbon.
🍄Gold colored crochet thread.
🍄 2,25mm crochet needle.
🍄 Wool needle.
🍄 Sewing needle.
🍄 Black sewing thread.
🍄 Magic clasp black color 2 cm wide.
🍄 Mold made on cardboard.
Procedimiento.
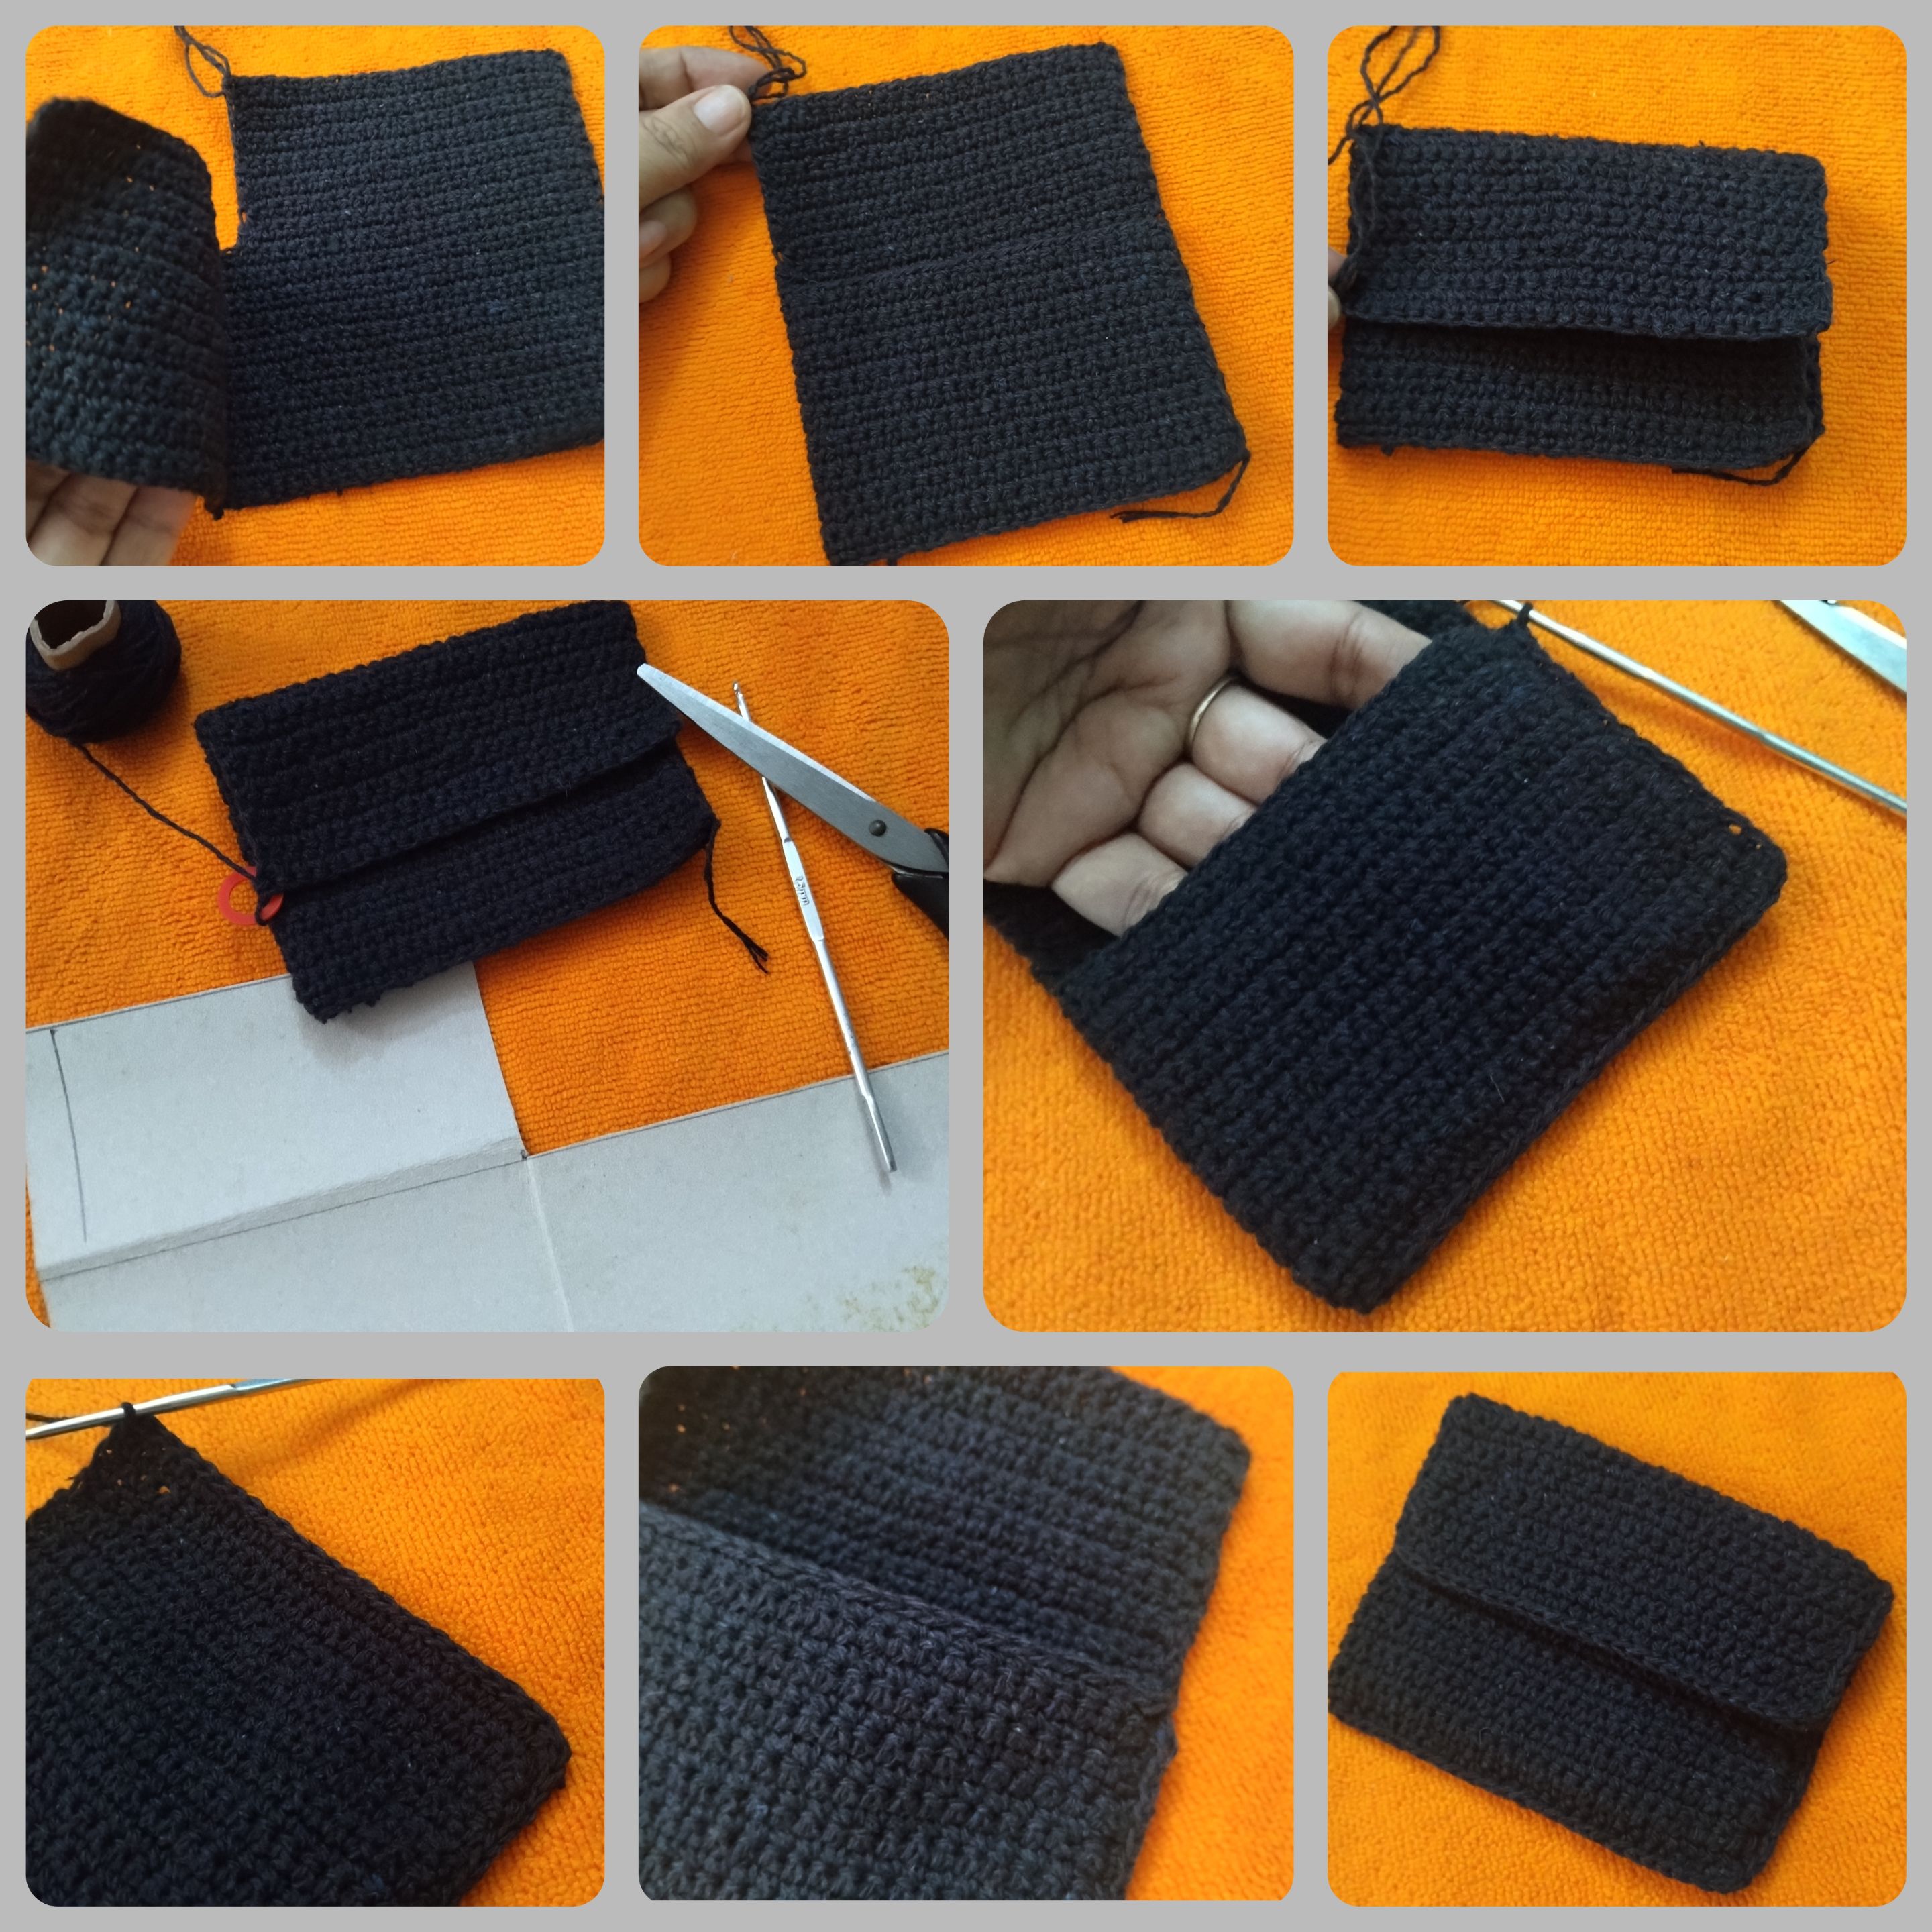
🍄 Empezaremos midiendo y trazando sobre el cartón un rectángulo de 24 cm por 8 cm. Trazaremos una línea divisora a la mitad horizontal, debe verse 12 cm de un lado y 12 cm del otro. Sobre los primeros 12 cm trazamos 6 cm por 12 cm. Recortamos y usaremos como molde.
🍄 Tomamos el hilo color negro para tejer una cadena del largo de los 24 cm del molde. Luego subiremos vuelta a vuelta tejiendo solo puntos bajos.
Procedure.
🍄 We will start by measuring and tracing on the cardboard a rectangle of 24 cm by 8 cm. We will draw a dividing line in half horizontally, it should be 12 cm on one side and 12 cm on the other. On the first 12 cm we draw 6 cm by 12 cm. We cut out and use as a mold.
🍄 We take the black yarn to weave a chain the length of the 24 cm of the mold. Then we will go up round by round knitting only single crochet stitches.
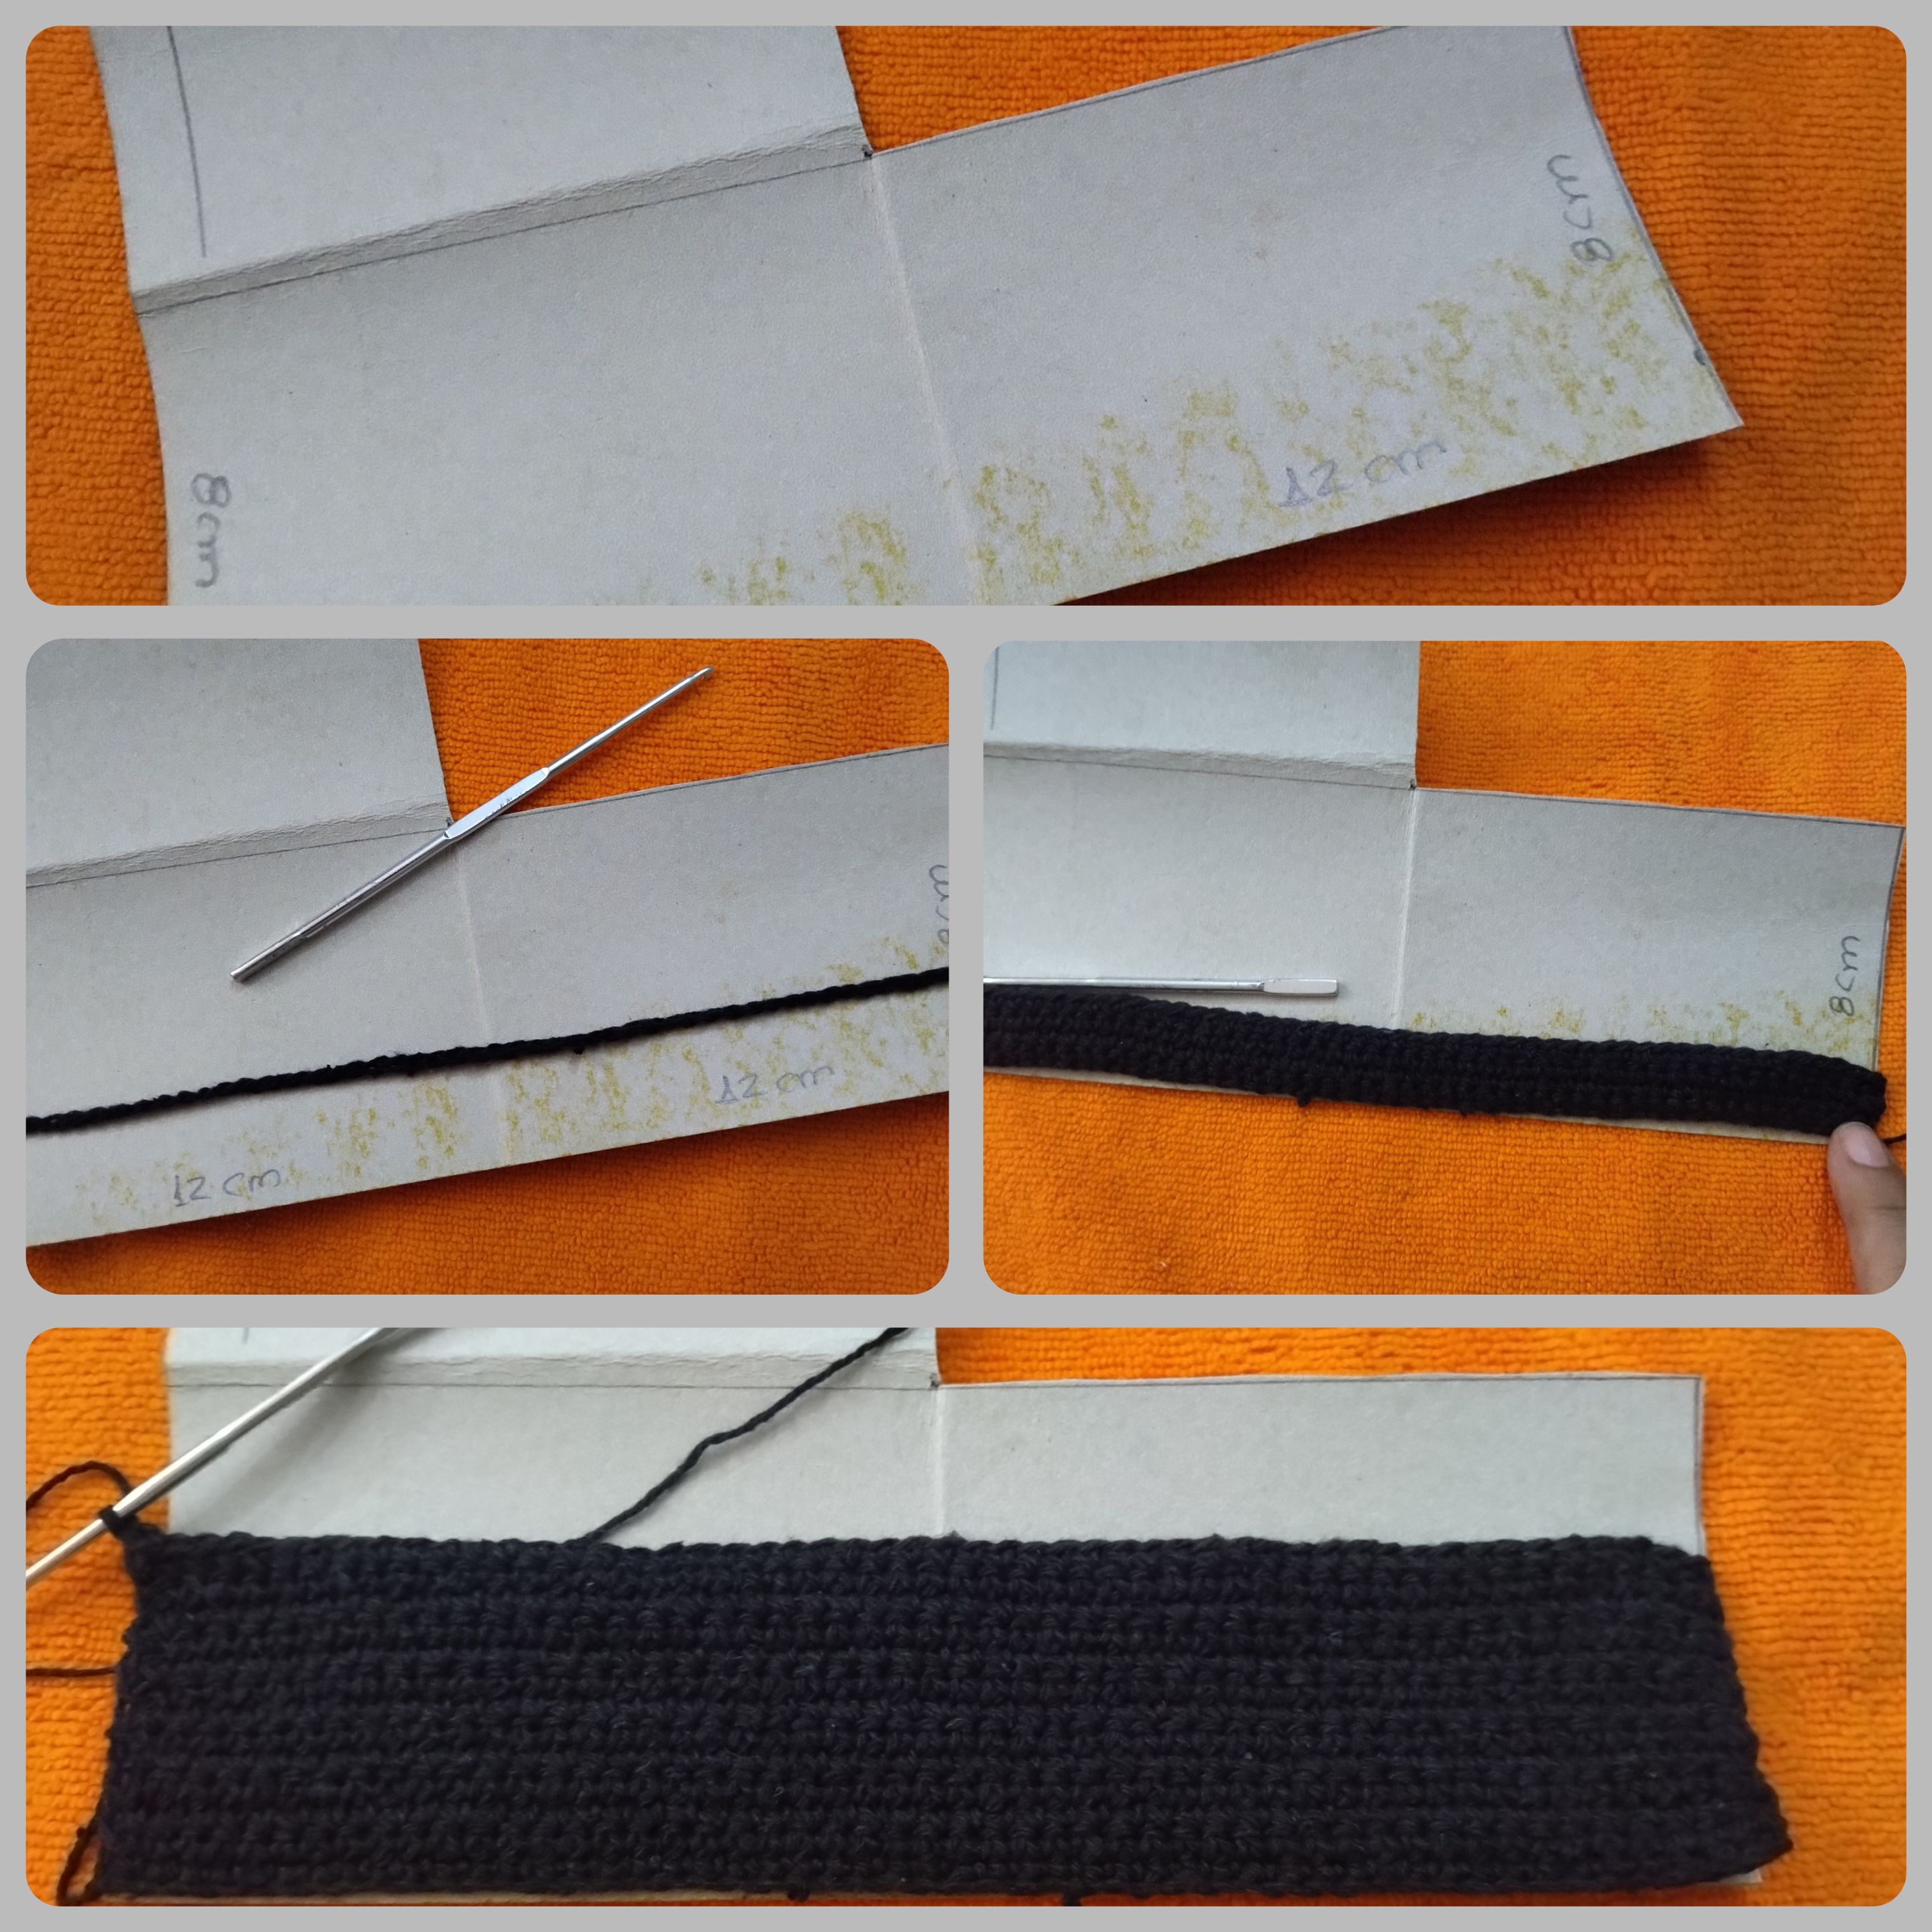
🍄 Una vez completadas todas las vueltas en la parte horizontal empezaremos a tejer lo que sobre sale encima de uno de los lados. Tal como puedes ver en la imagen, siempre tejiendo con puntos bajos hasta llegar al final del molde. Rematamos y cortamos el hilo.
🍄 Once you have completed all the rows in the horizontal part, start knitting what is left over on one of the sides. As you can see in the picture, always knitting in single crochet until you reach the end of the cast on. We finish off and cut the yarn.
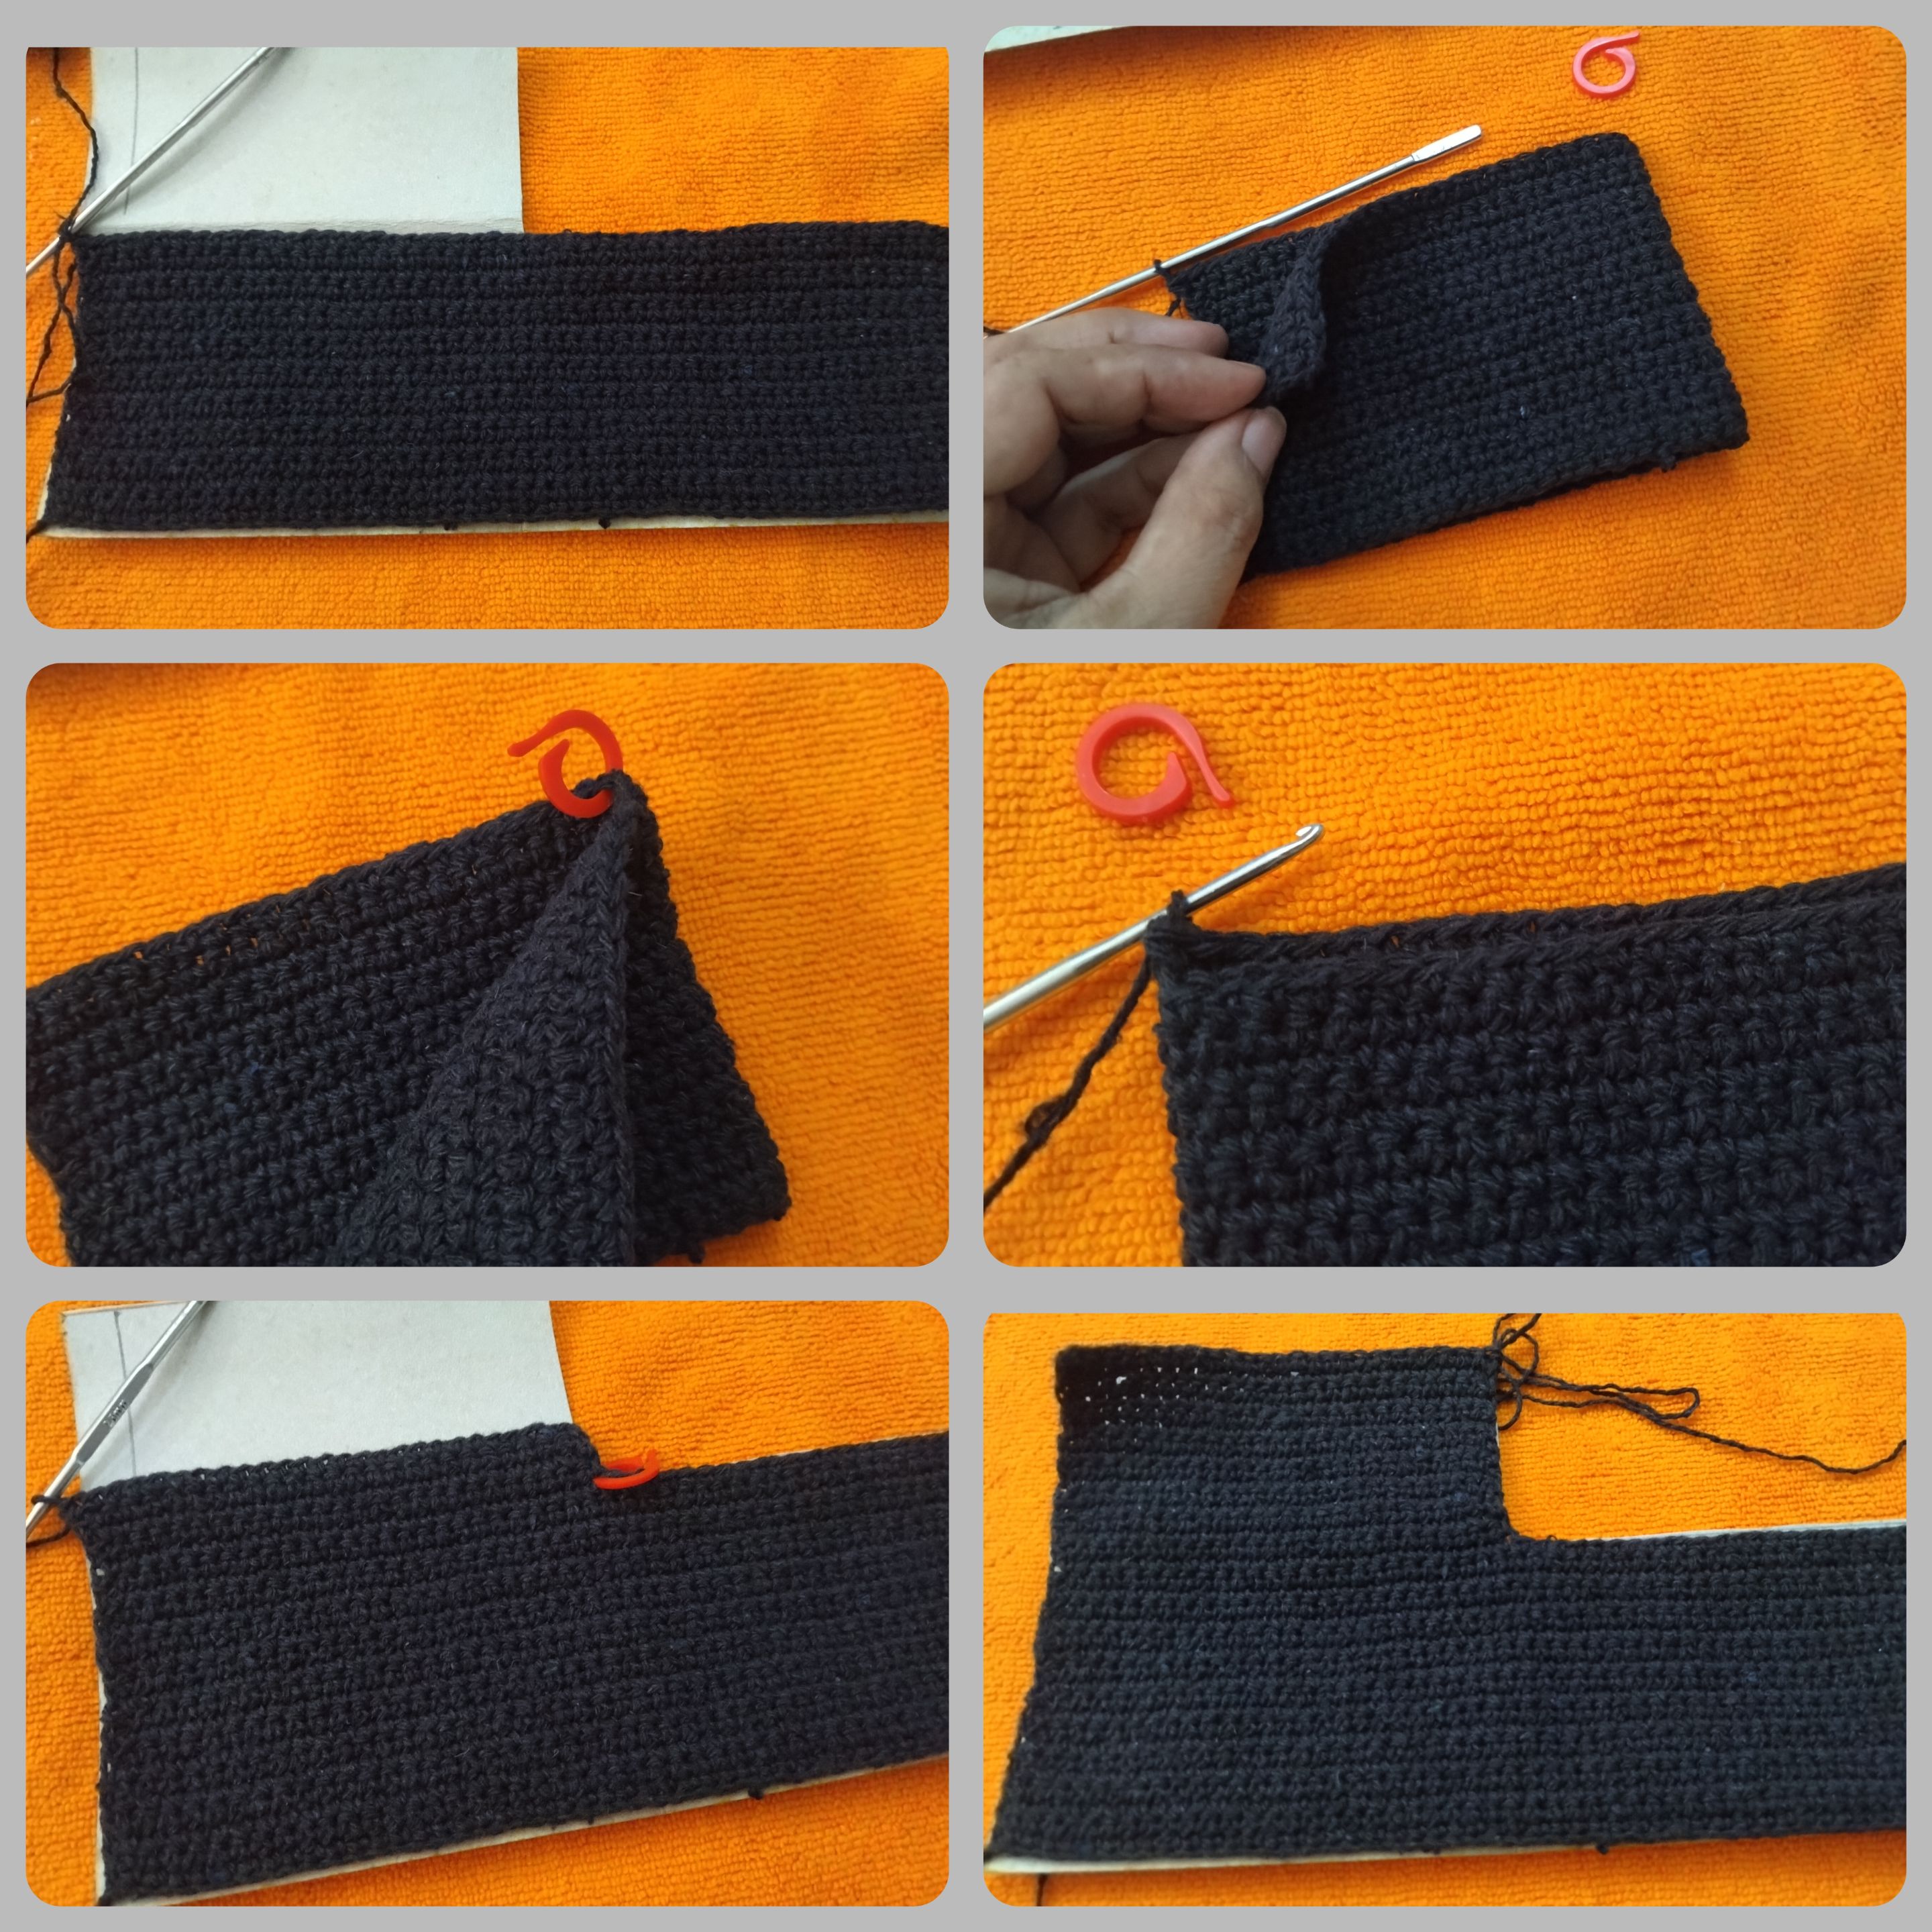
🍄 Hacemos el doblés necesario para dar forma al monedero y luego procedemos a unir los laterales para cerrarlos, tejeremos con puntos bajos por los bordes.
🍄 Sin cortar la hebra negra seguimos tejiendo ahora con punto deslizado por toda la orilla de la tapa del monedero y la tapa del frente del cuerpo.
🍄 We make the necessary hem to give shape to the purse and then we proceed to join the sides to close them, we will knit with slip stitch along the edges.
🍄 Without cutting the black yarn we continue knitting now with slip stitch all around the edge of the purse flap and the front flap of the body.
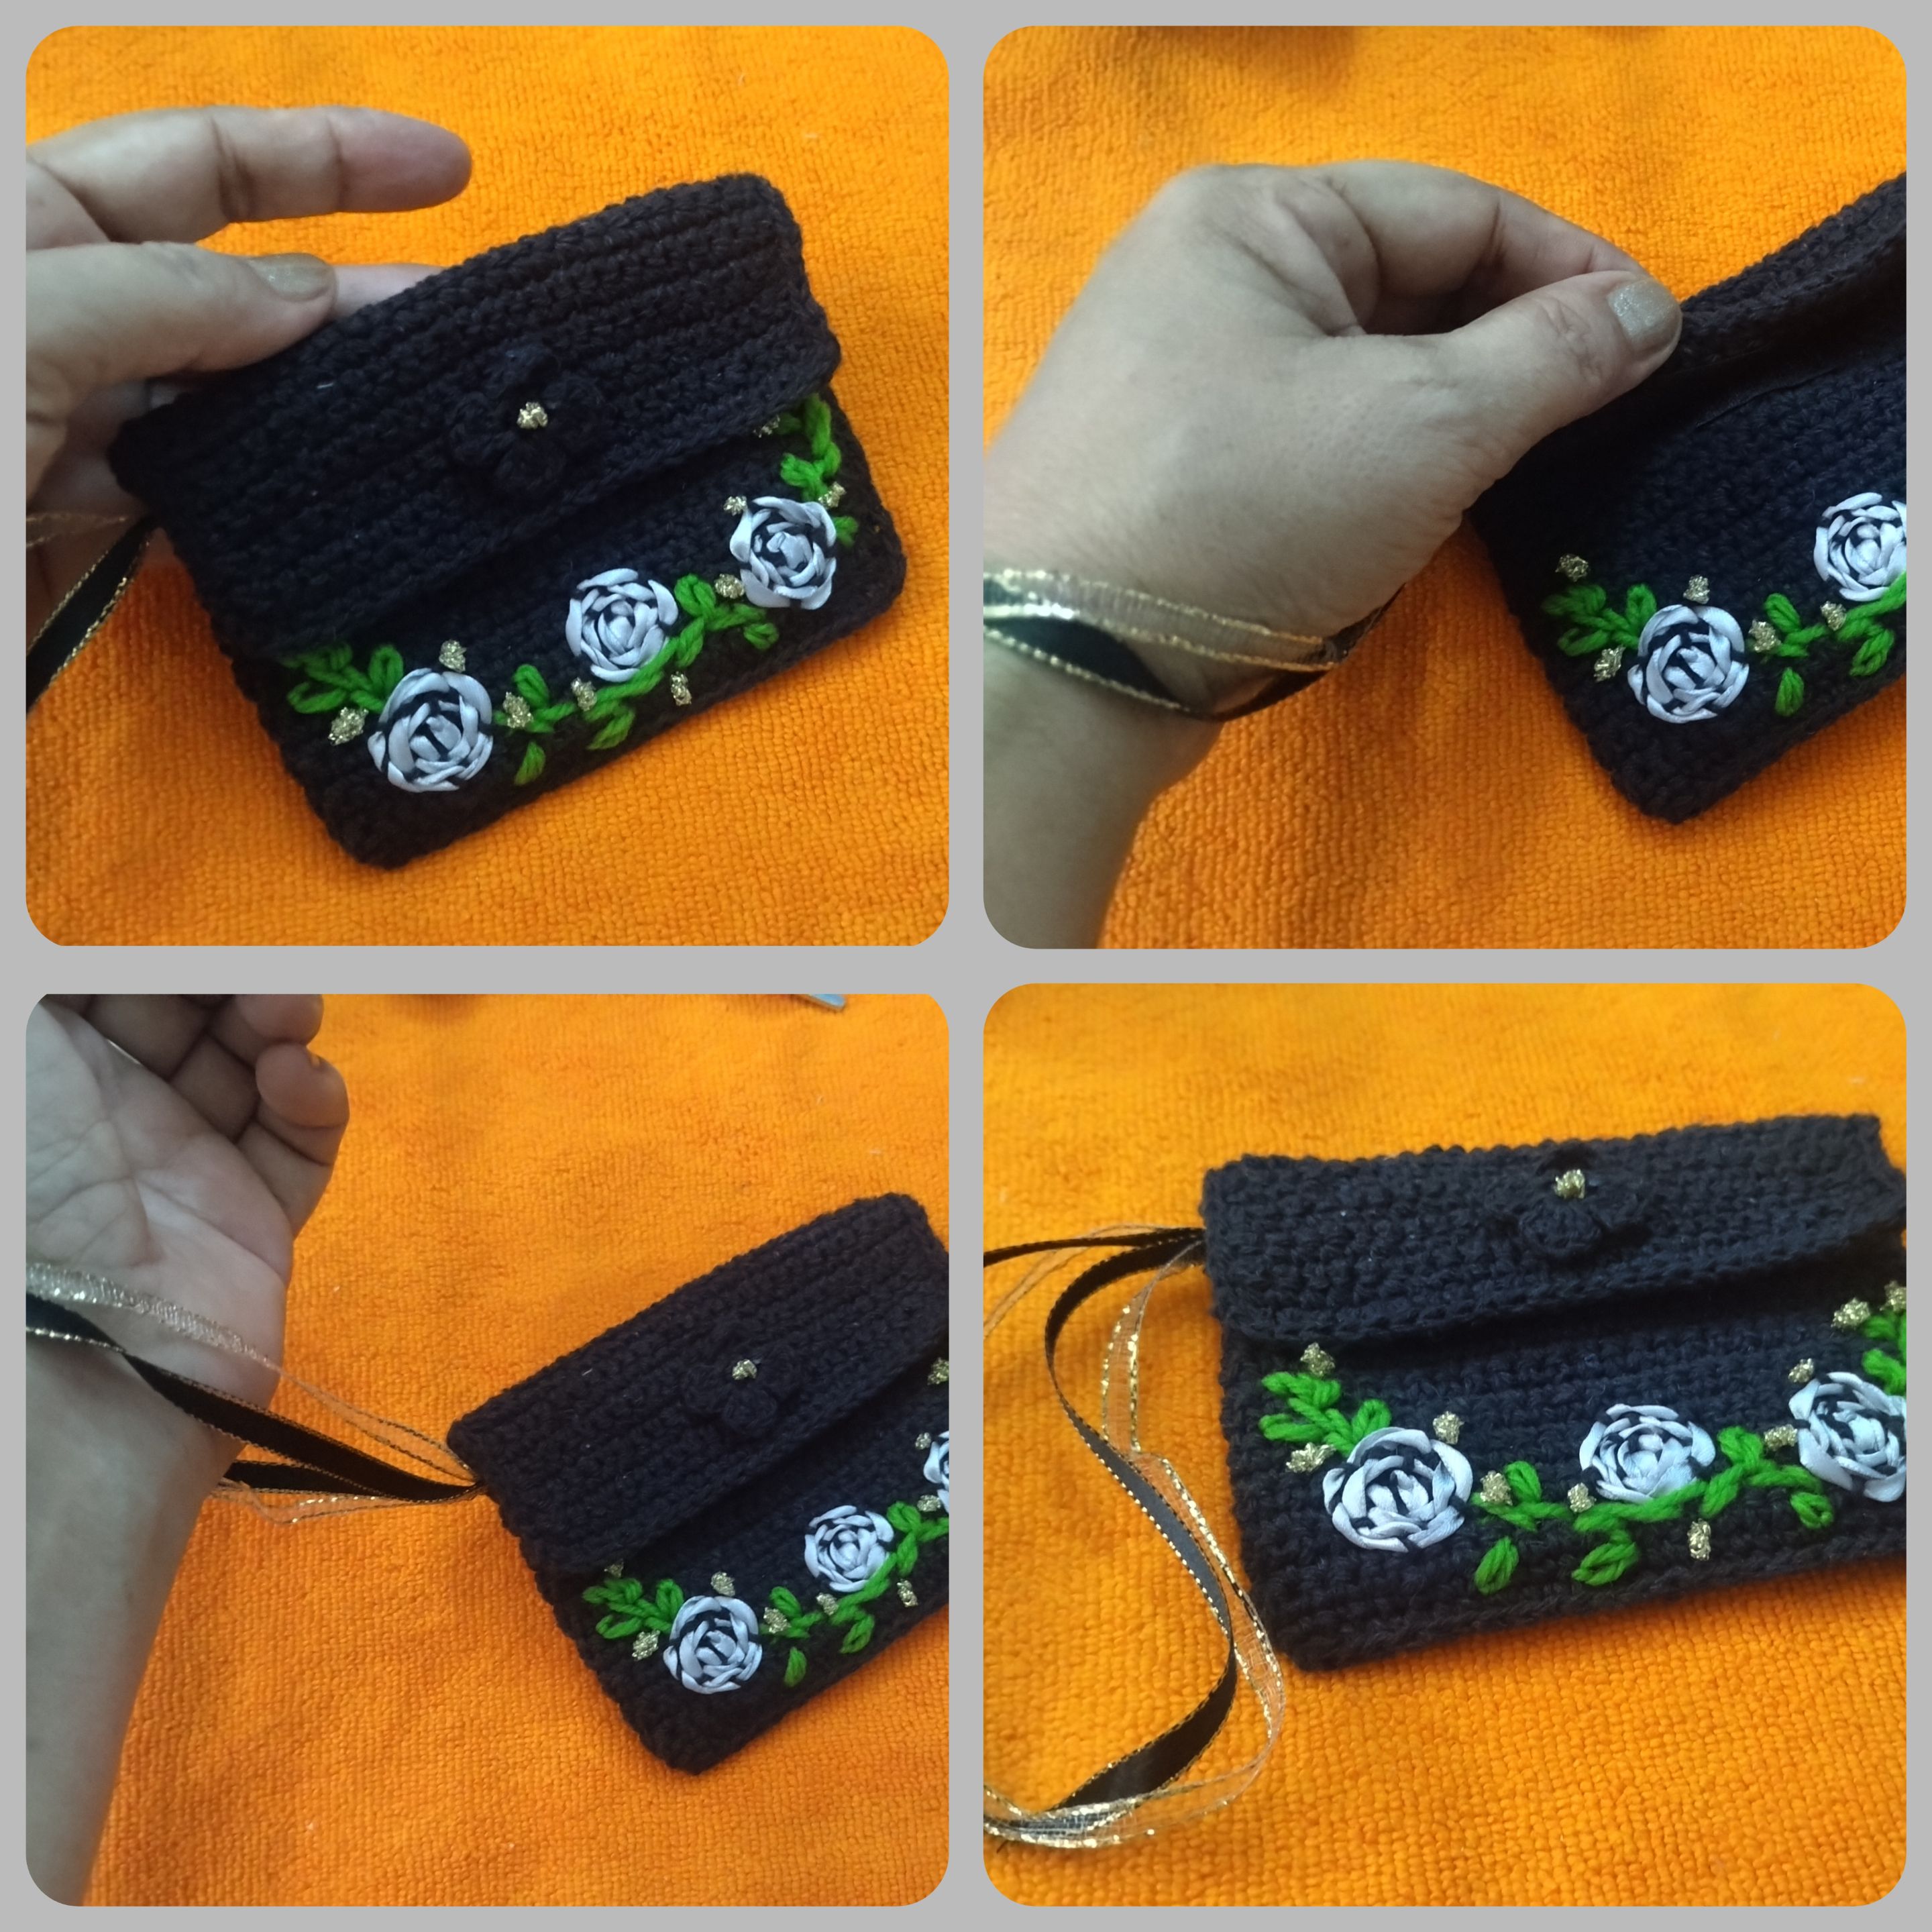
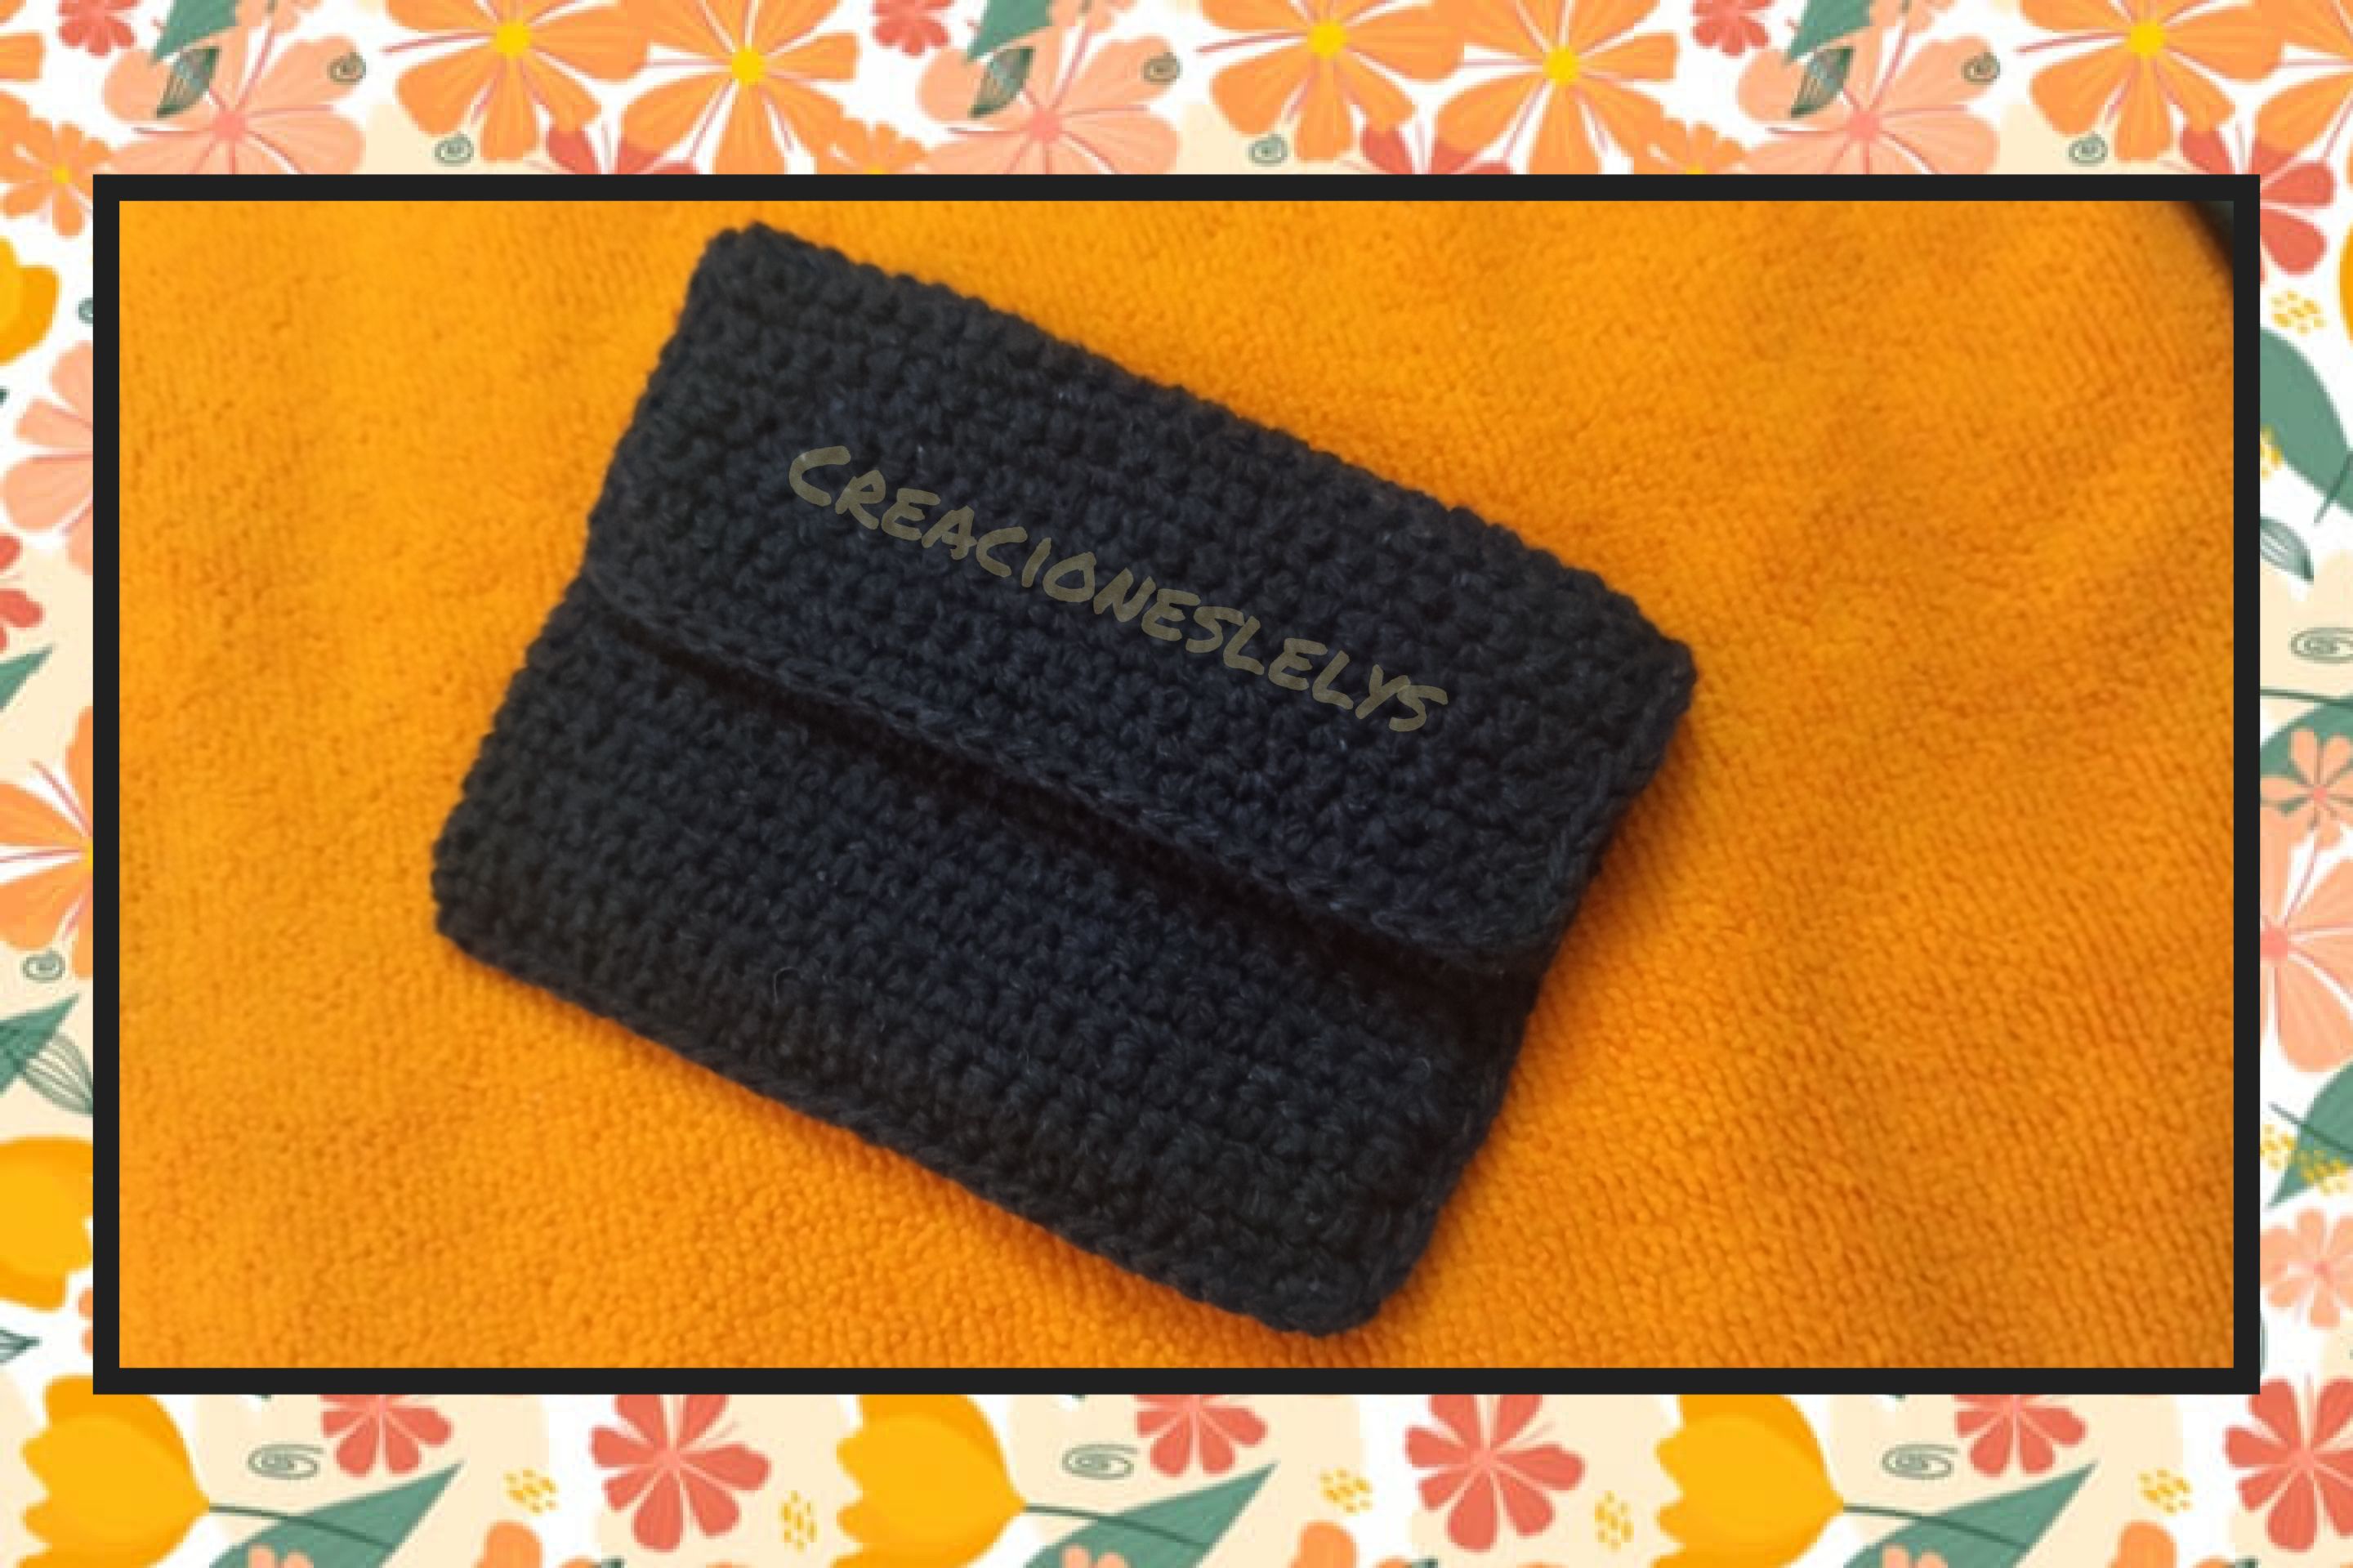
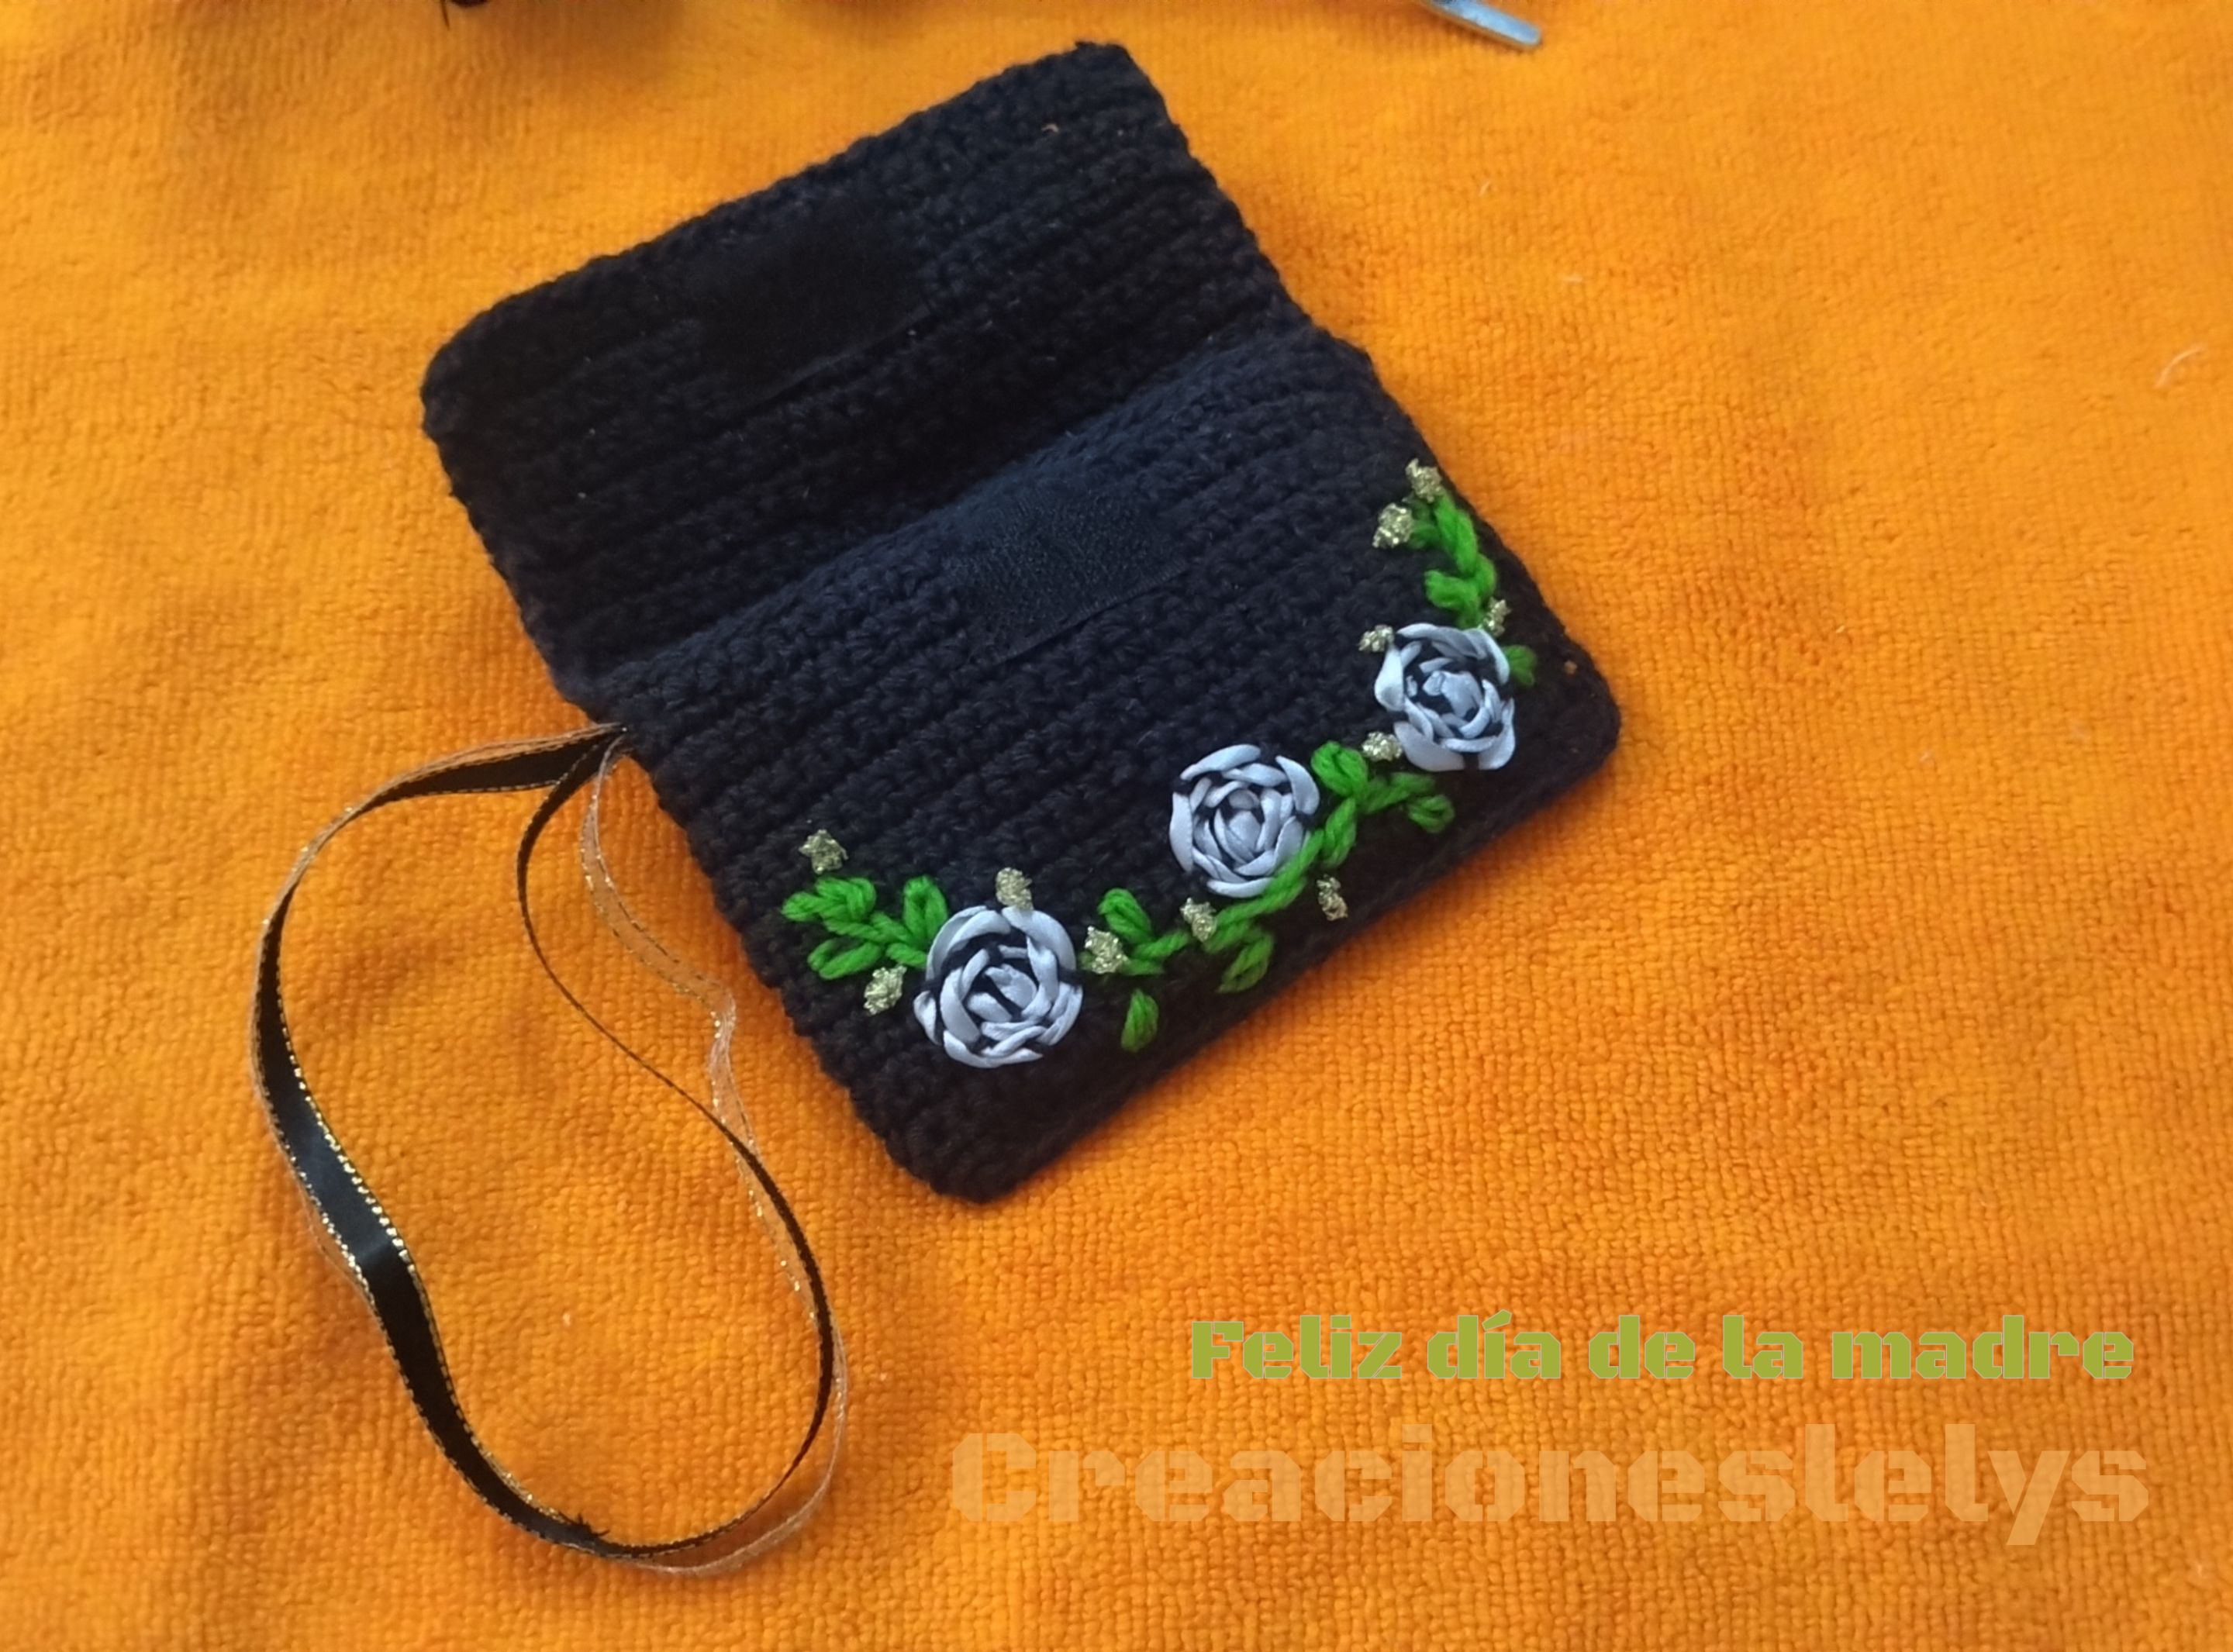
🍄 Así debe verse terminado el monedero a crochet.
🍄 This is how the crochet purse should look finished.
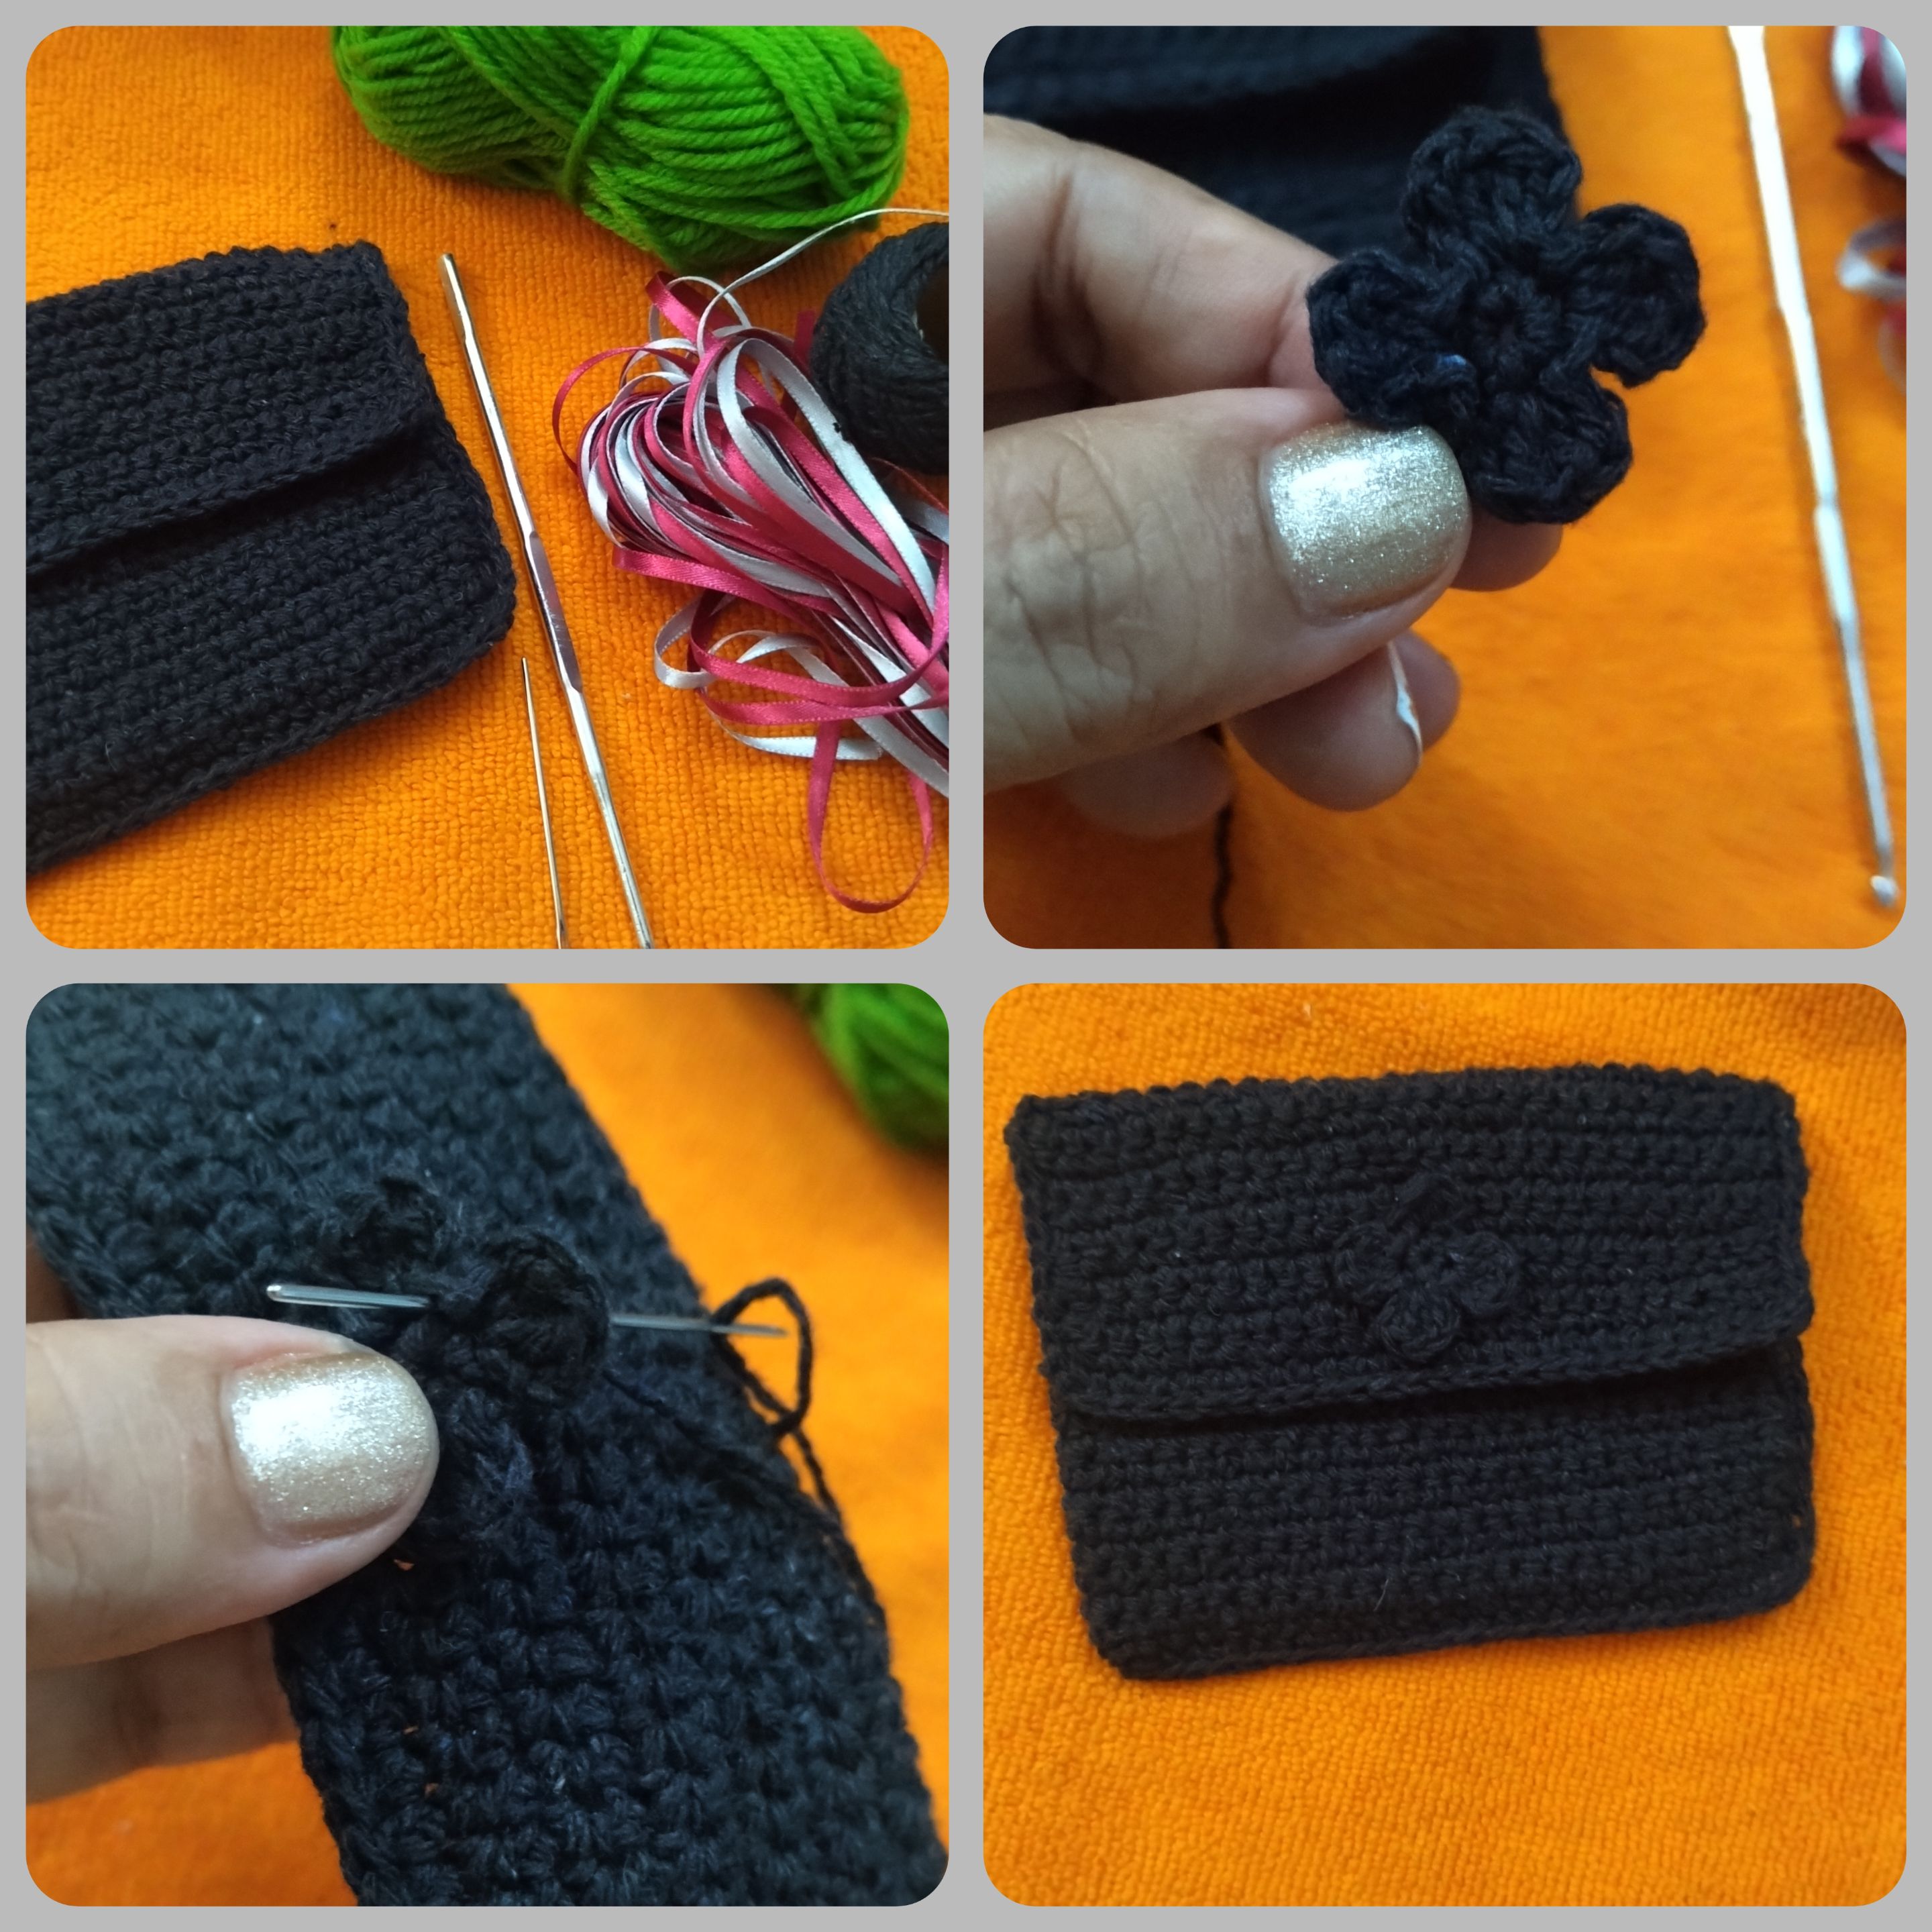
🍄 Como decoración colocamos sobre la tapa un flor negra tejida. La cosemos con el mismo hilo negro que la tejimos.
🍄 As decoration we place on the lid a woven black flower. We sew it with the same black thread that we knitted it.
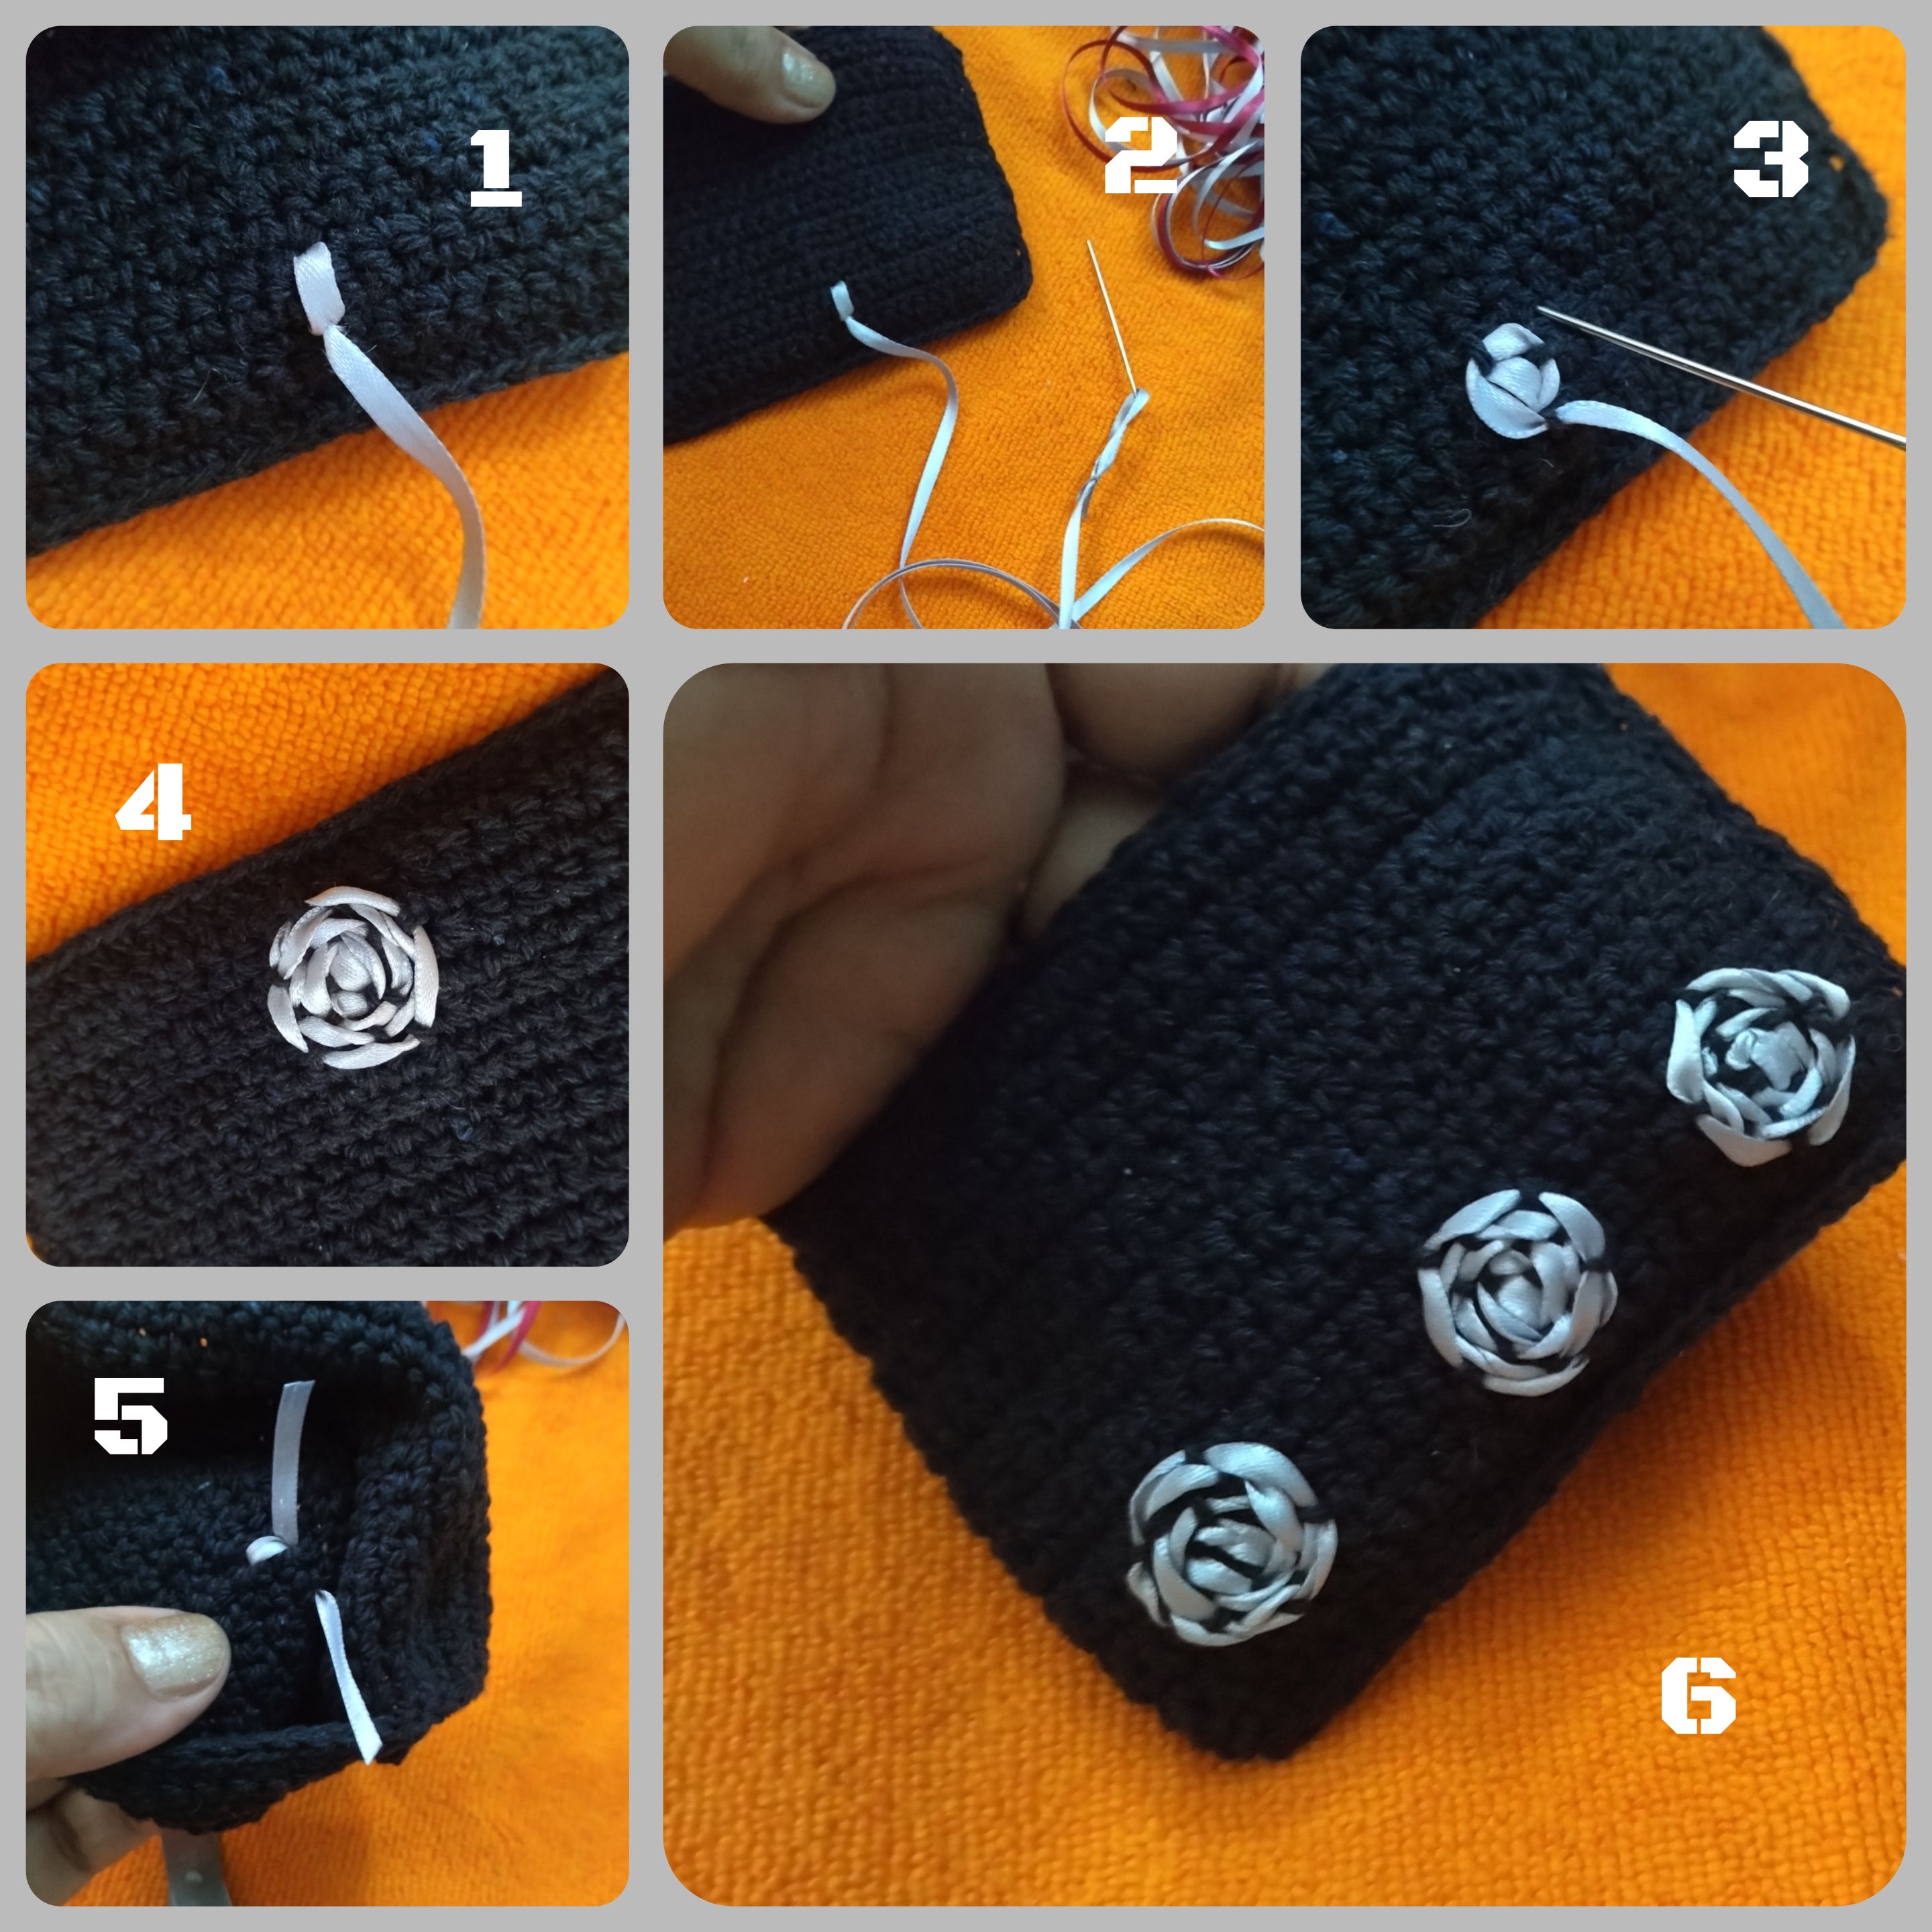
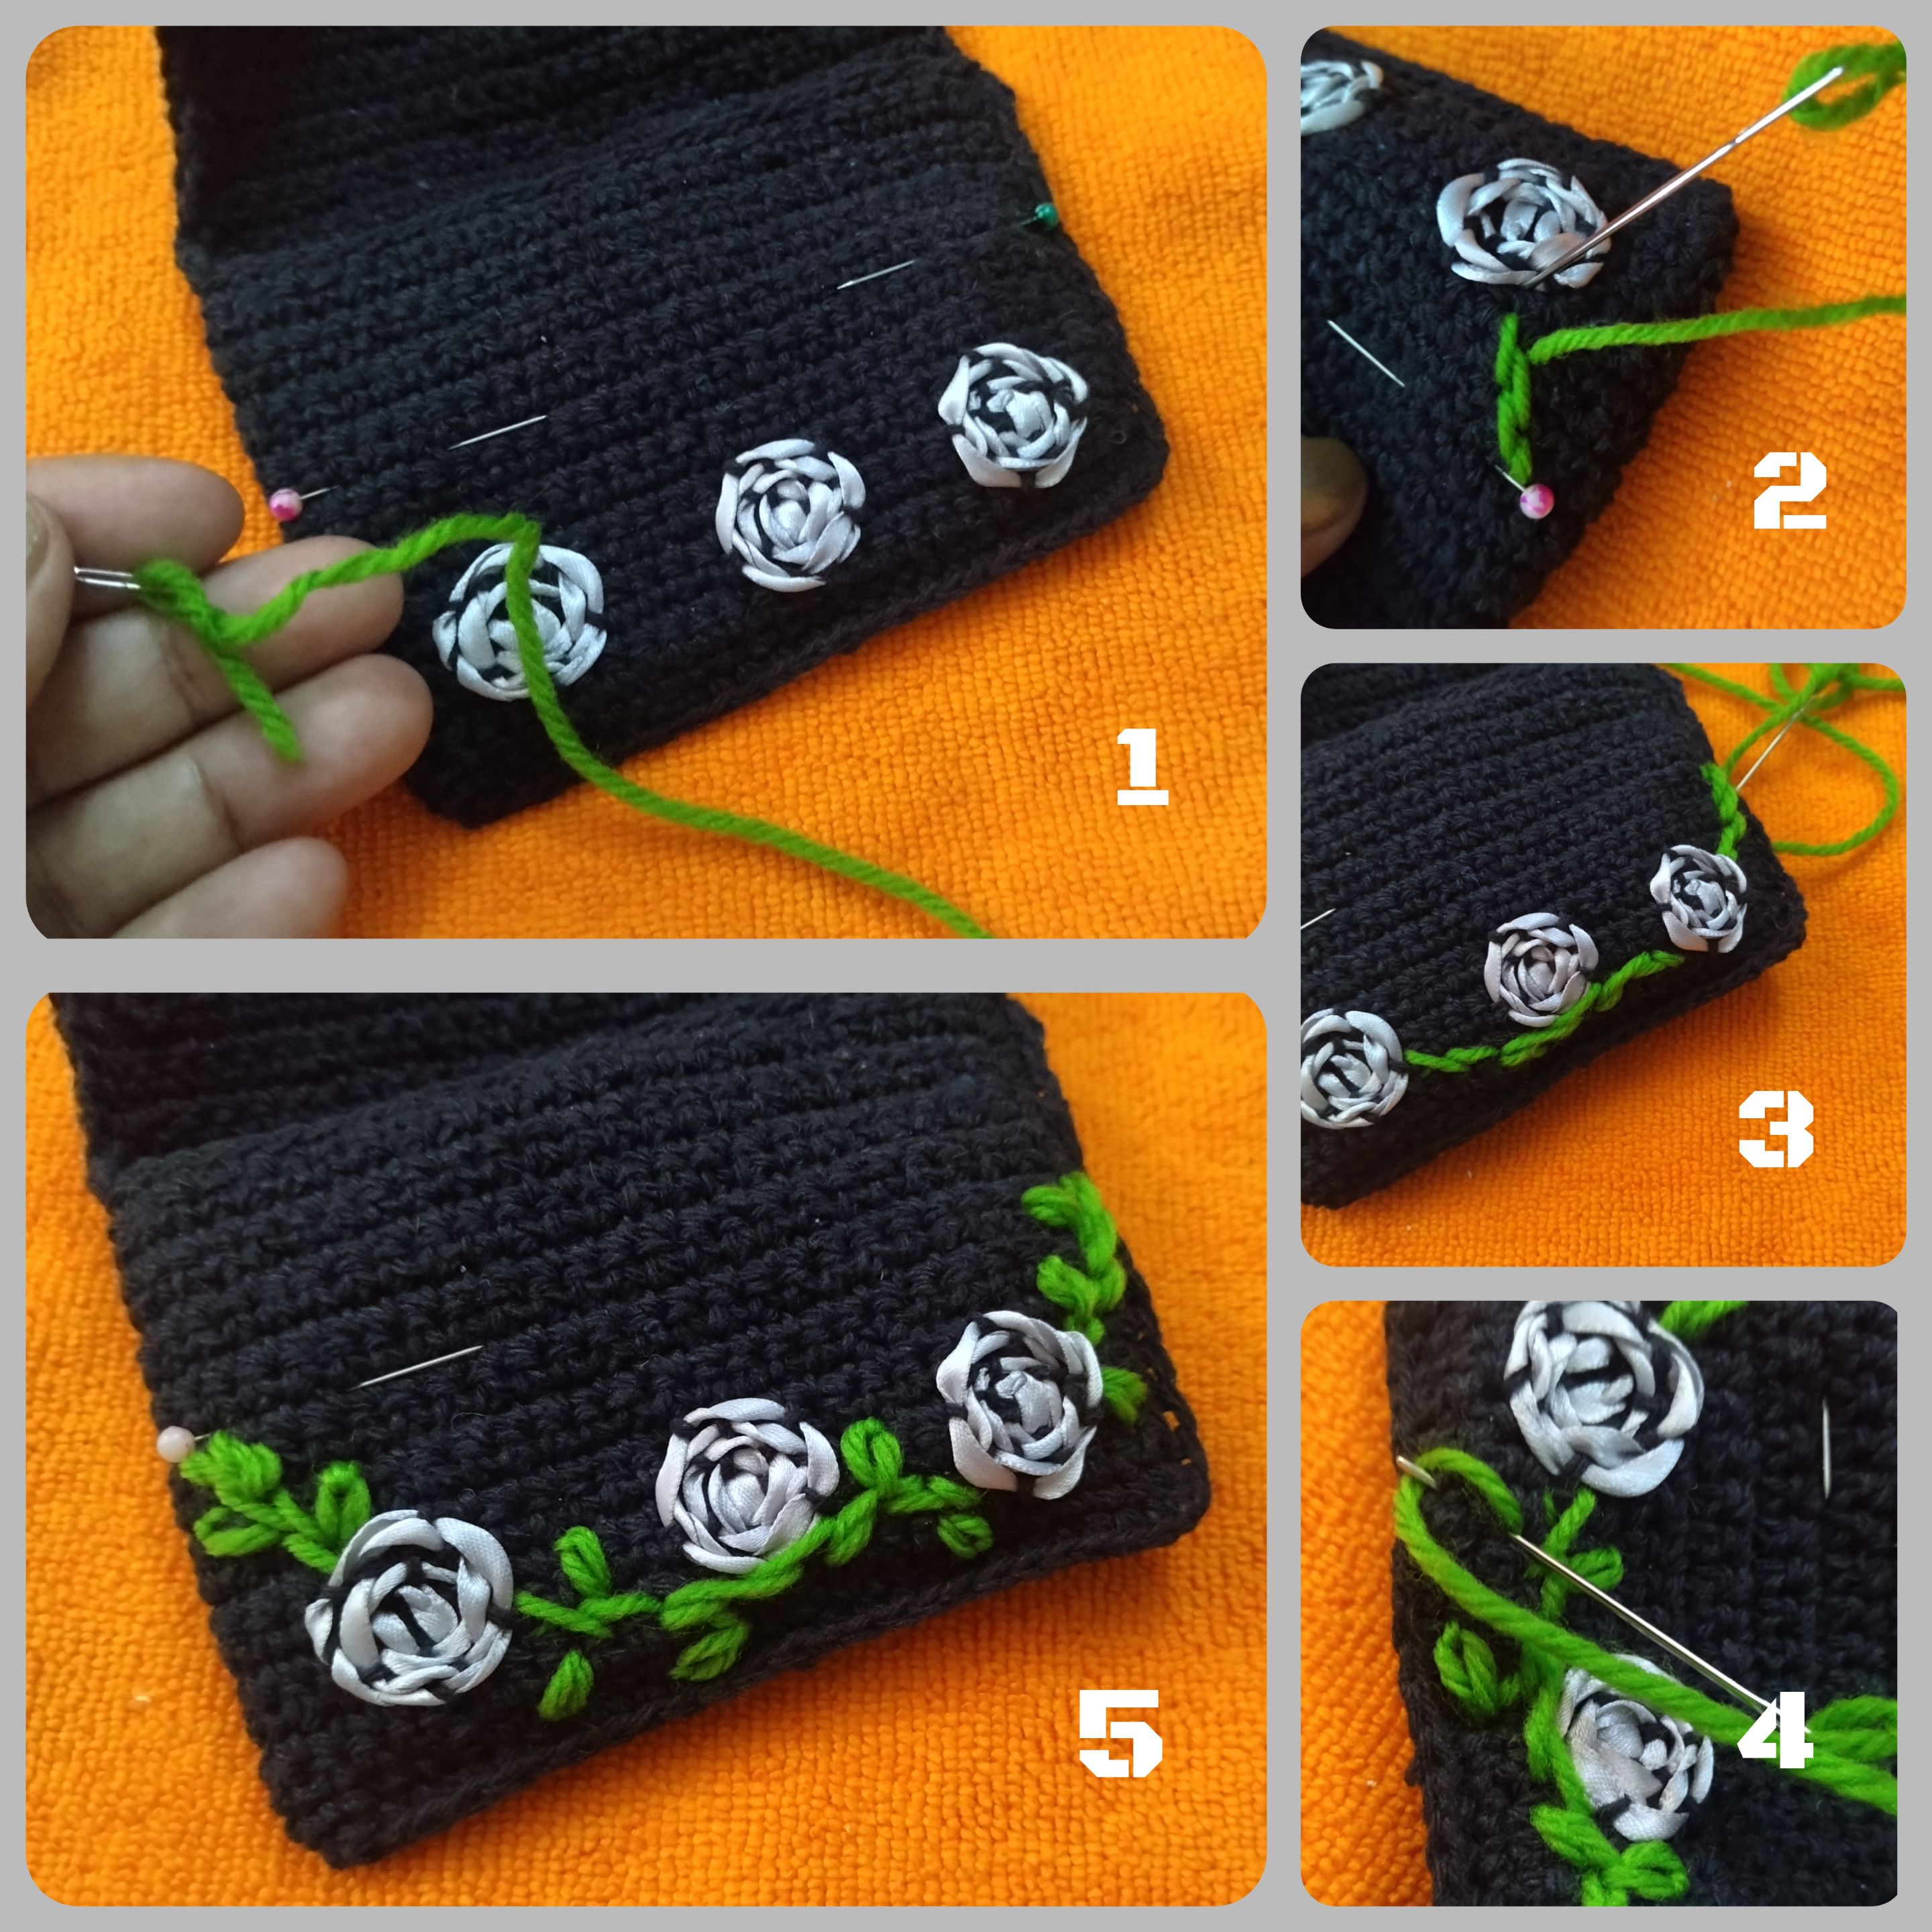
🍄 Tomamos la cinta de raso color plateado, medimos y cortamos 1 metro, la colocamos asegurada en la aguja lanera para empezar a bordar las flores de este hermoso monedero. Para ello pasamos la cinta desde atrás o dentro del monedero (el frente) pinchando en la cinta para asegurarnos de que no se salga. El primer punto será un trazo lateral cubriendo un punto completo de la vuelta del tejido. Después haremos vueltas alrededor de ese trazo tomando apenas una hebra del tejido, procurando que los puntos queden siempre más arriba o más abajo del anterior. Cuando terminemos de bordar la flor pasamos la cinta hacia atrás y quemamos ambos extremos o los fijamos con pegamento.
🍄 Haremos tres flores con cinta siguiendo estos pasos.
🍄 We take the silver colored satin ribbon, measure and cut 1 meter, we place it secured on the wool needle to start embroidering the flowers of this beautiful purse. To do this, we pass the ribbon from the back or inside the purse (the front), pinching the ribbon to make sure it doesn't come out. The first stitch will be a side trace covering a complete stitch of the fabric lap. Then we will make laps around that line, taking only one strand of the fabric, making sure that the stitches are always higher or lower than the previous one. When we finish embroidering the flower we pass the ribbon backwards and burn both ends or fix them with glue.
🍄 We will make three flowers with ribbon following these steps.
🍄 Tomamos ahora el estambre verde y lo colocamos en la aguja lanera. Con él haremos los gallos de las flores. Empezando a la altura desde donde cae cerrando la tapa del monedero. Estos tallos lo bordamos con punto atrás según el gusto.
🍄 Igualmente bordaremos las hojas. Unas arriba del tallo y otras por debajo.
🍄 Now we take the green yarn and place it on the knitting needle. With it we will make the cocks of flowers. Starting at the height from where it falls closing the purse flap. These stems we embroider with backstitch according to taste.
🍄 We will also embroider the leaves. Some above the stem and some below.
🍄 Tomamos el hilo dorado y lo colocamos en la aguja lanera. Bordaremos con punto rococó por alrededor de las flores y el tronco, a gusto personal. Adicional borde un punto sobre la flor negra de la tapa.
🍄 We take the golden thread and place it on the wool needle. We will embroider with rococo stitch around the flowers and the trunk, to personal taste. Additional border a stitch on the black flower on the top.
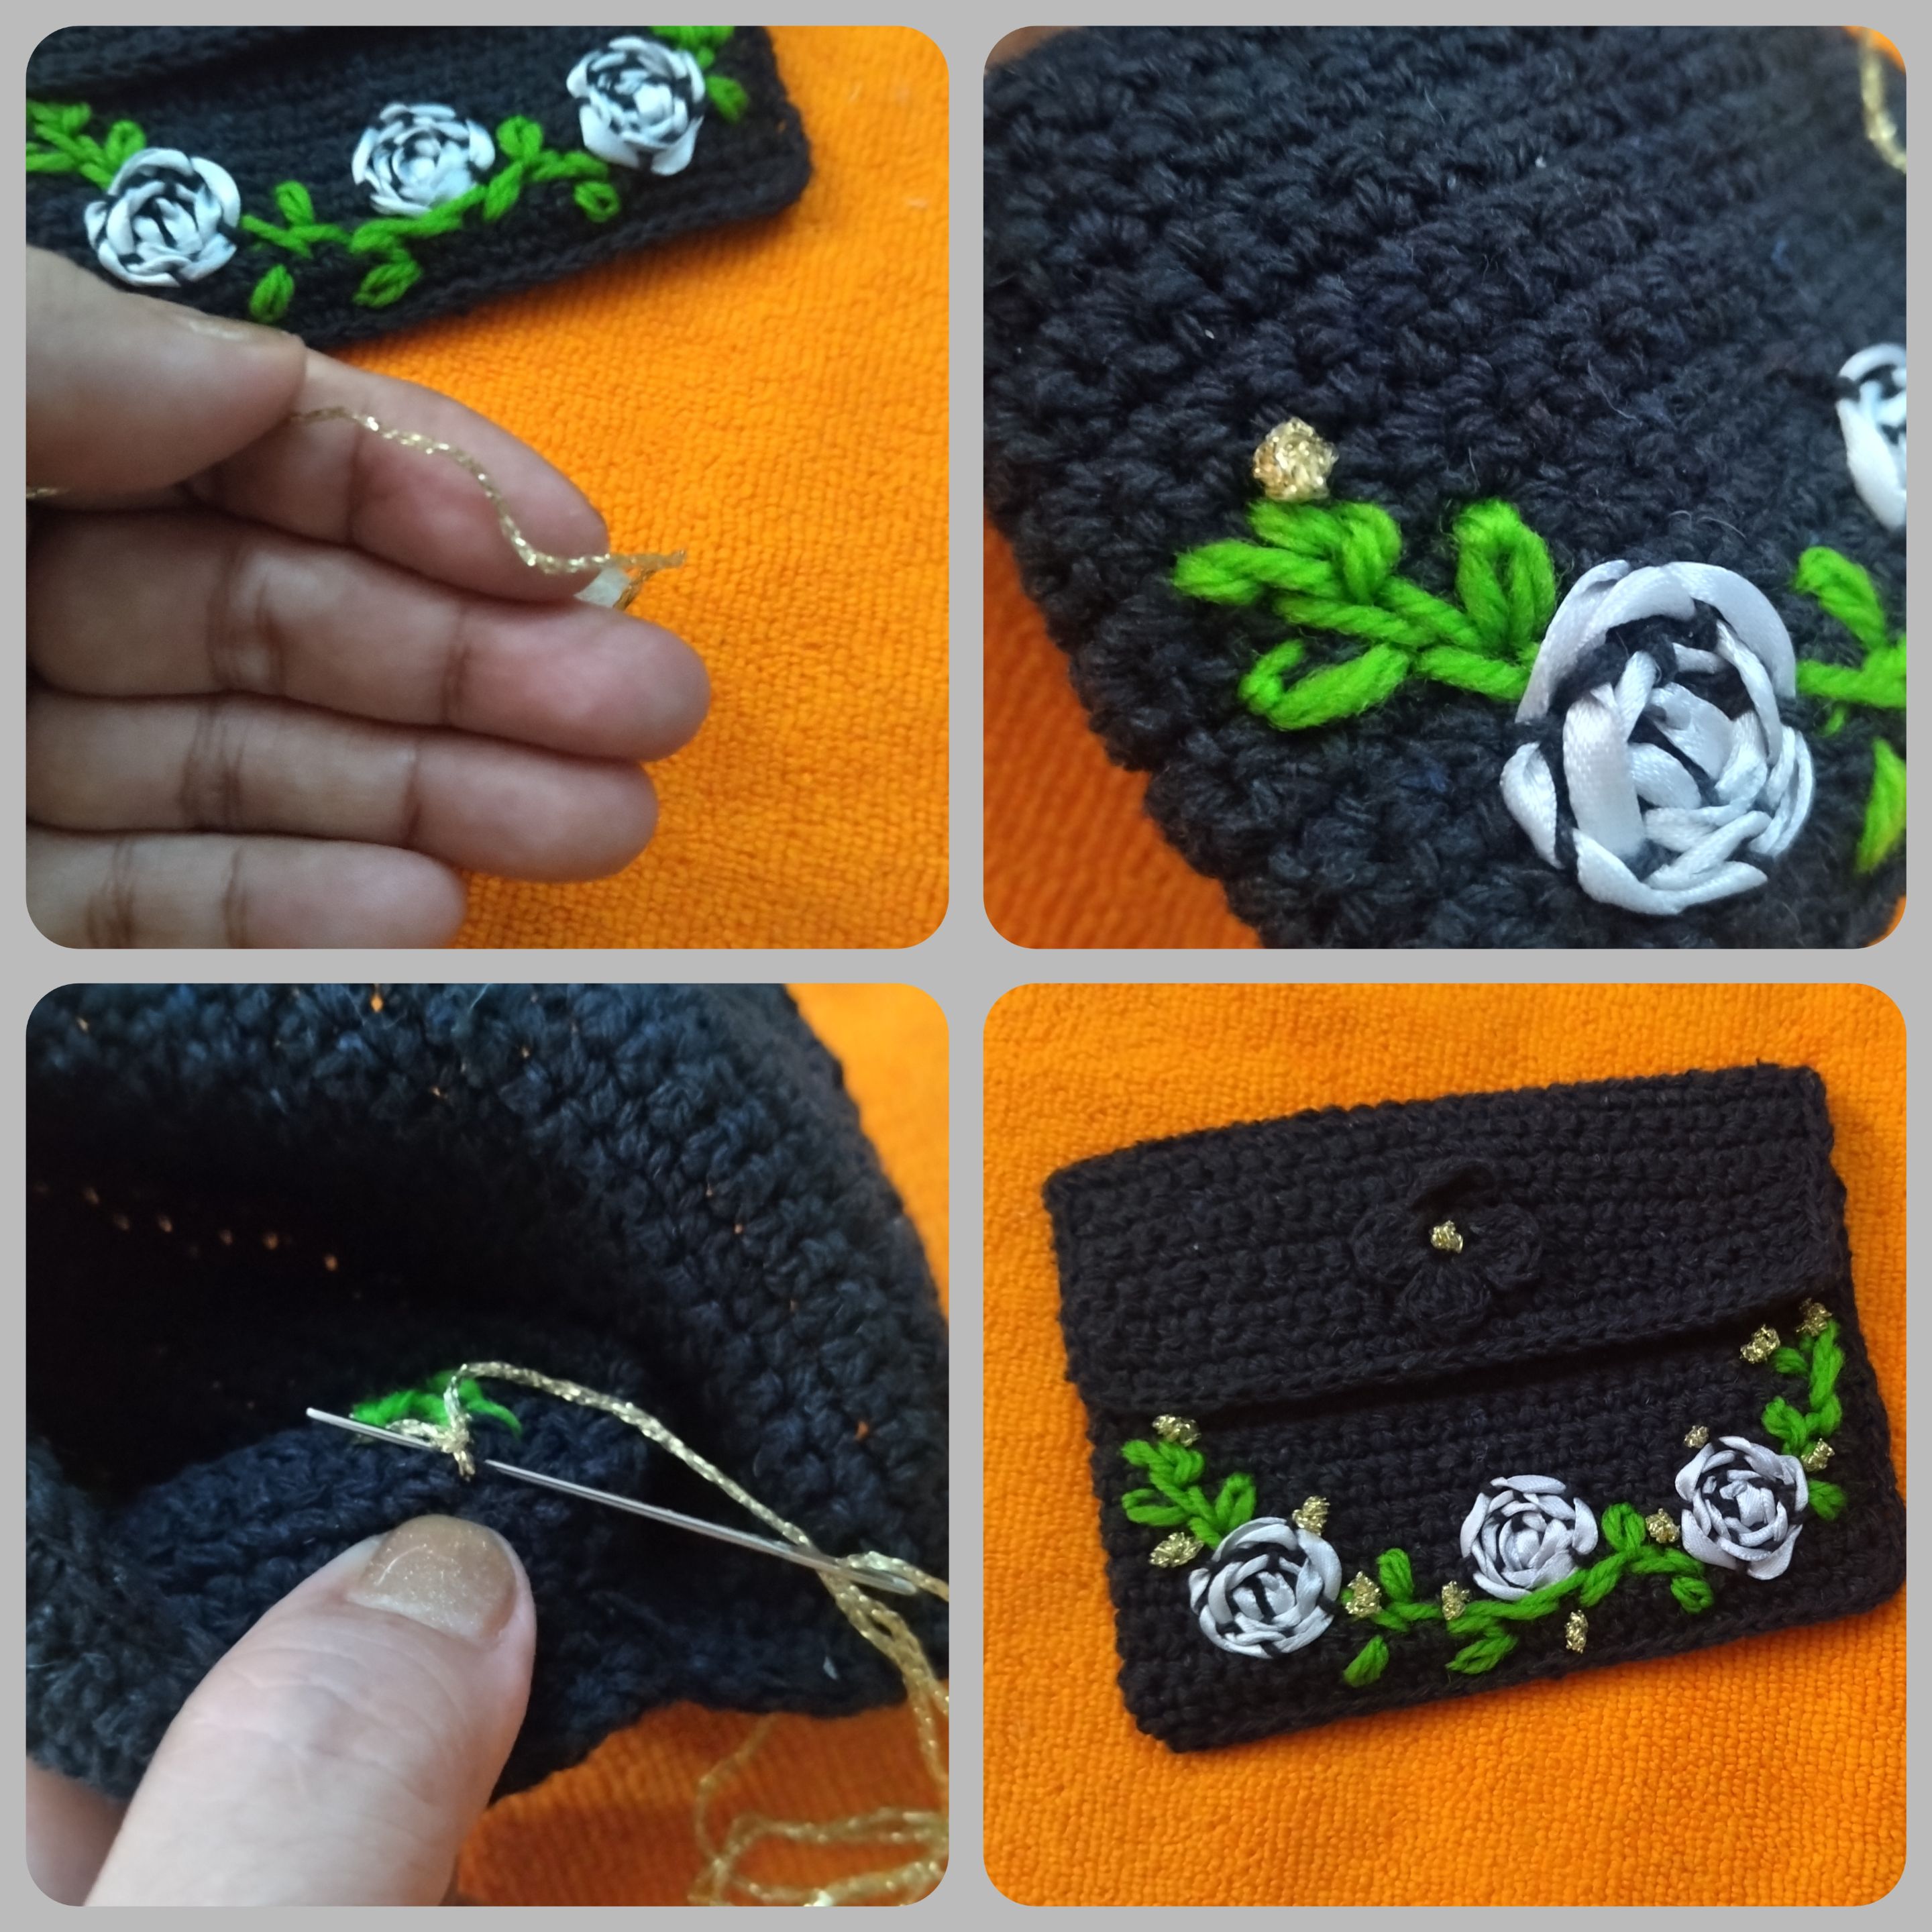
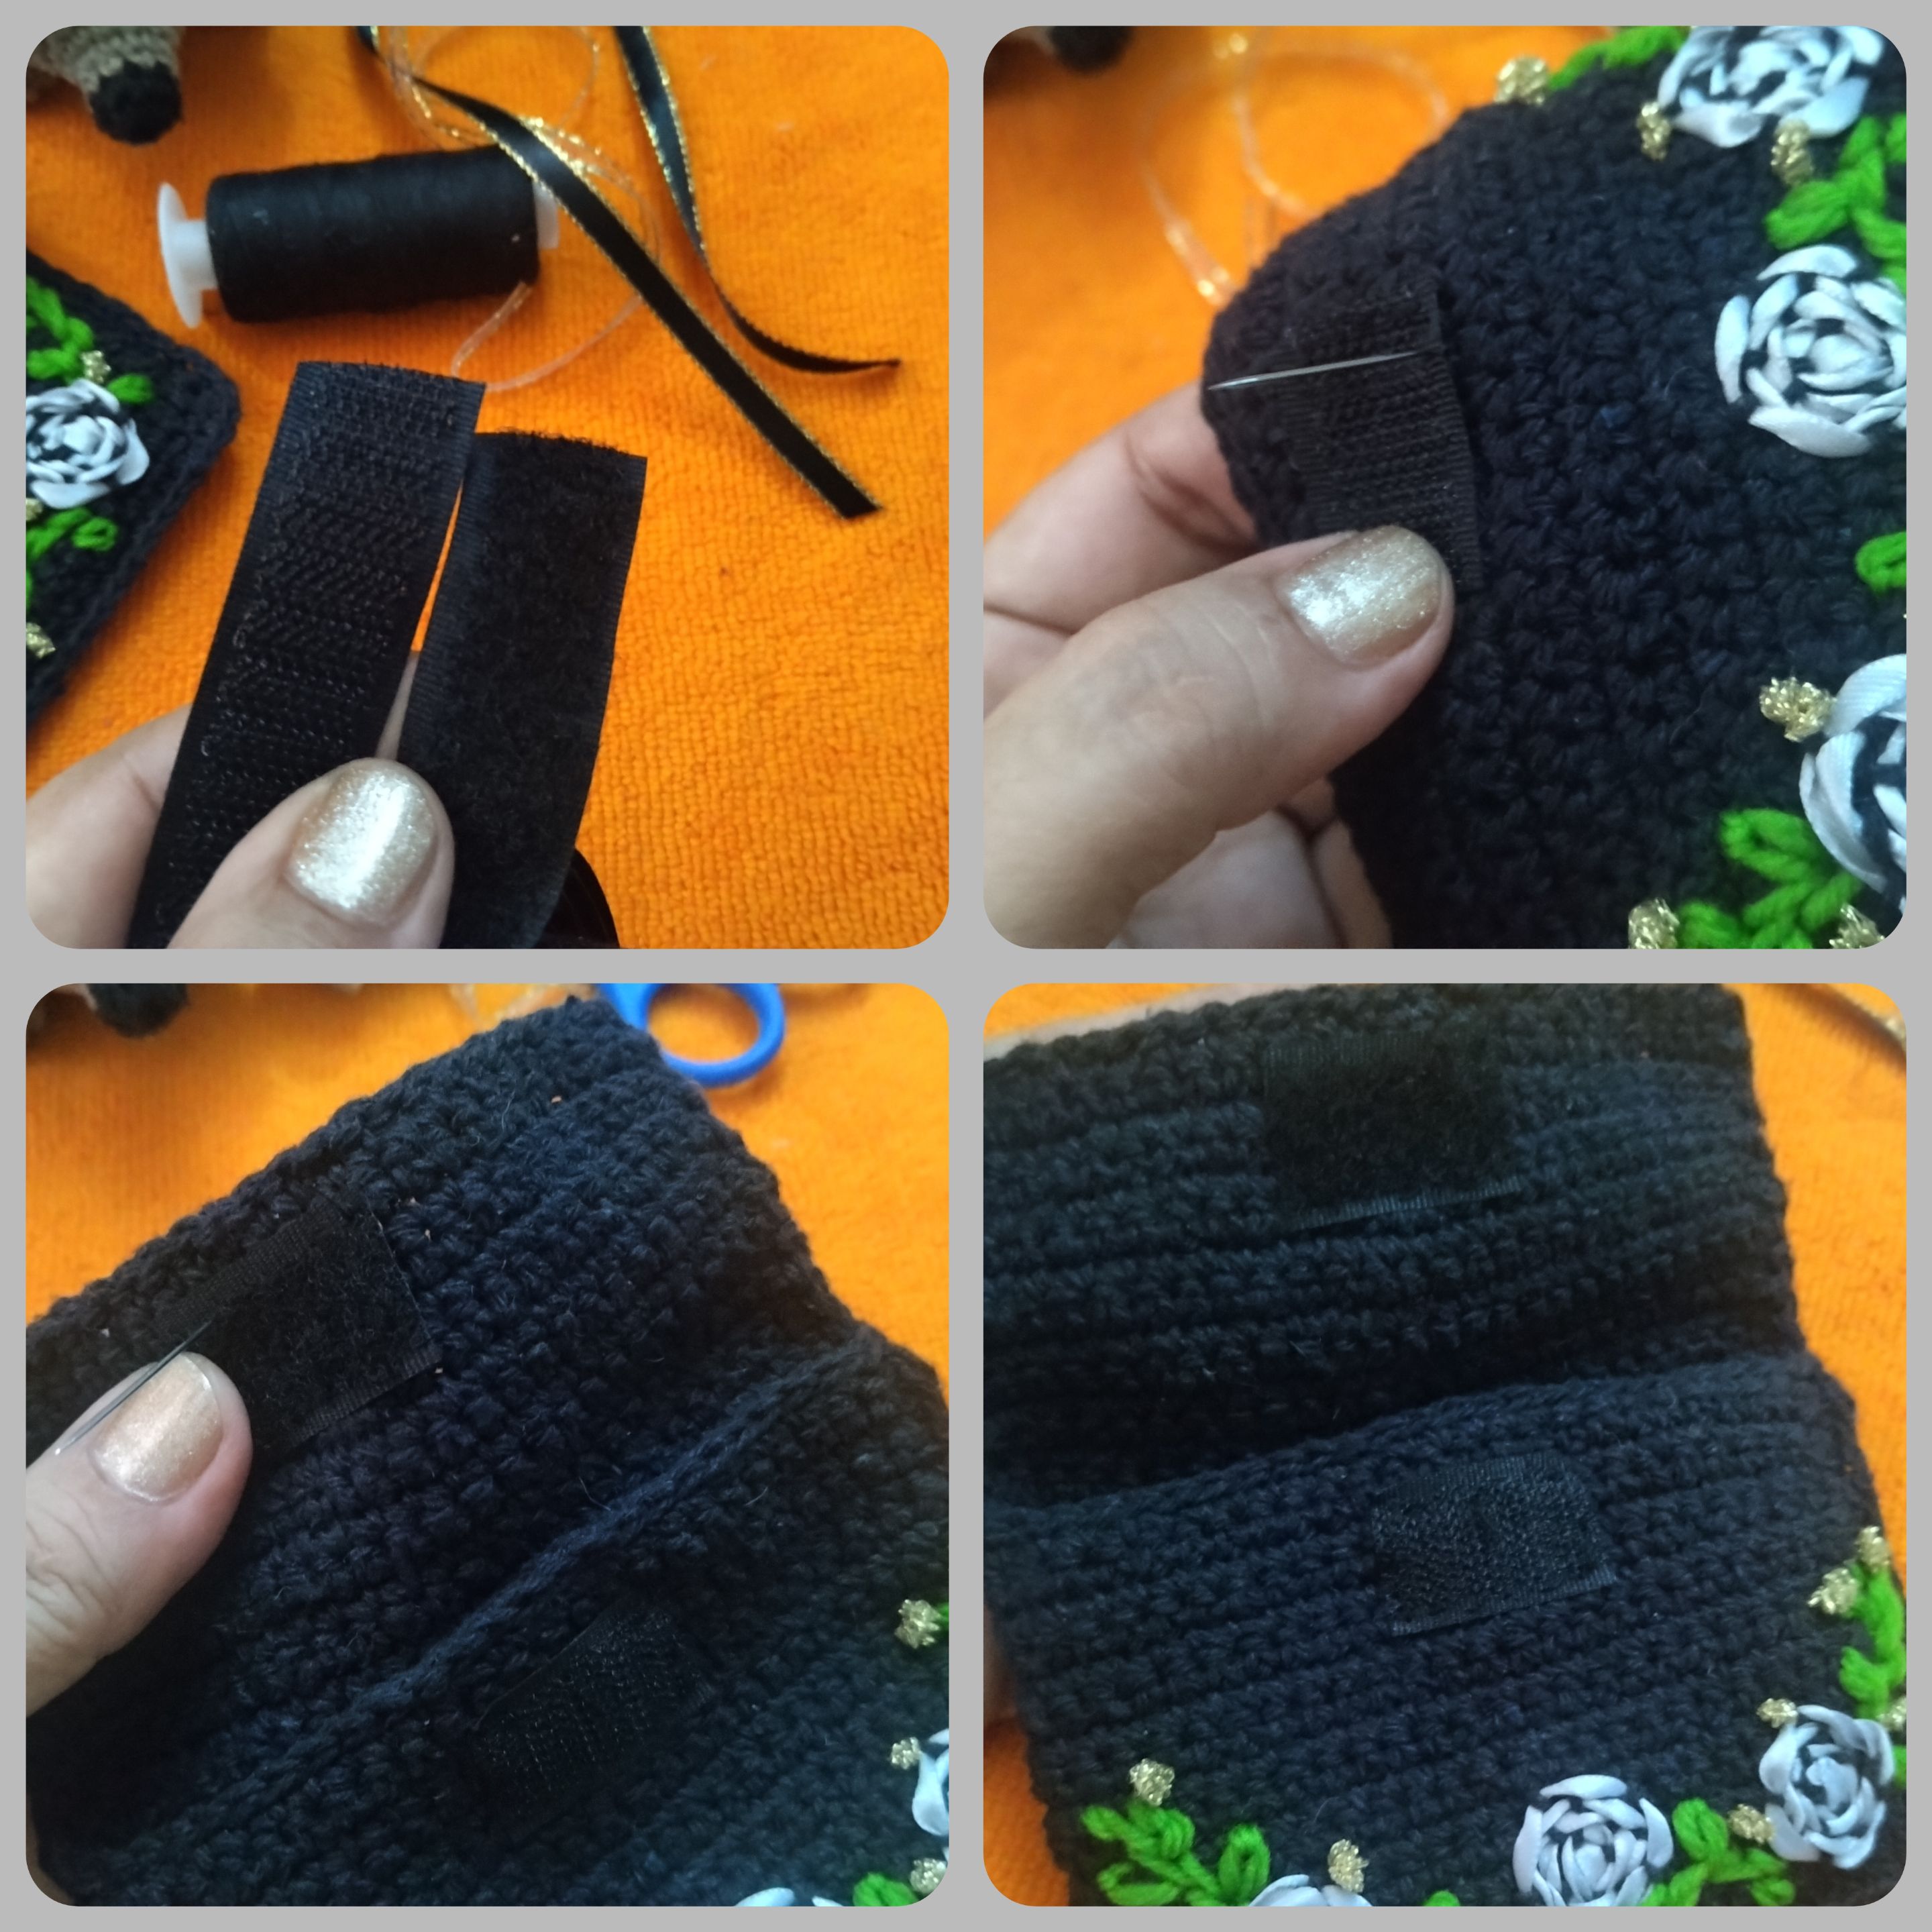
🍄 Como seguro o broche vamos a colocarle un trocito de cierre mágico a la tapa y al frente del monedero. Lo fijaremos con hilo de coser color negro.
🍄 As a safety or clasp, we are going to attach a small piece of magic clasp to the lid and the front of the purse. We will fix it with black sewing thread.
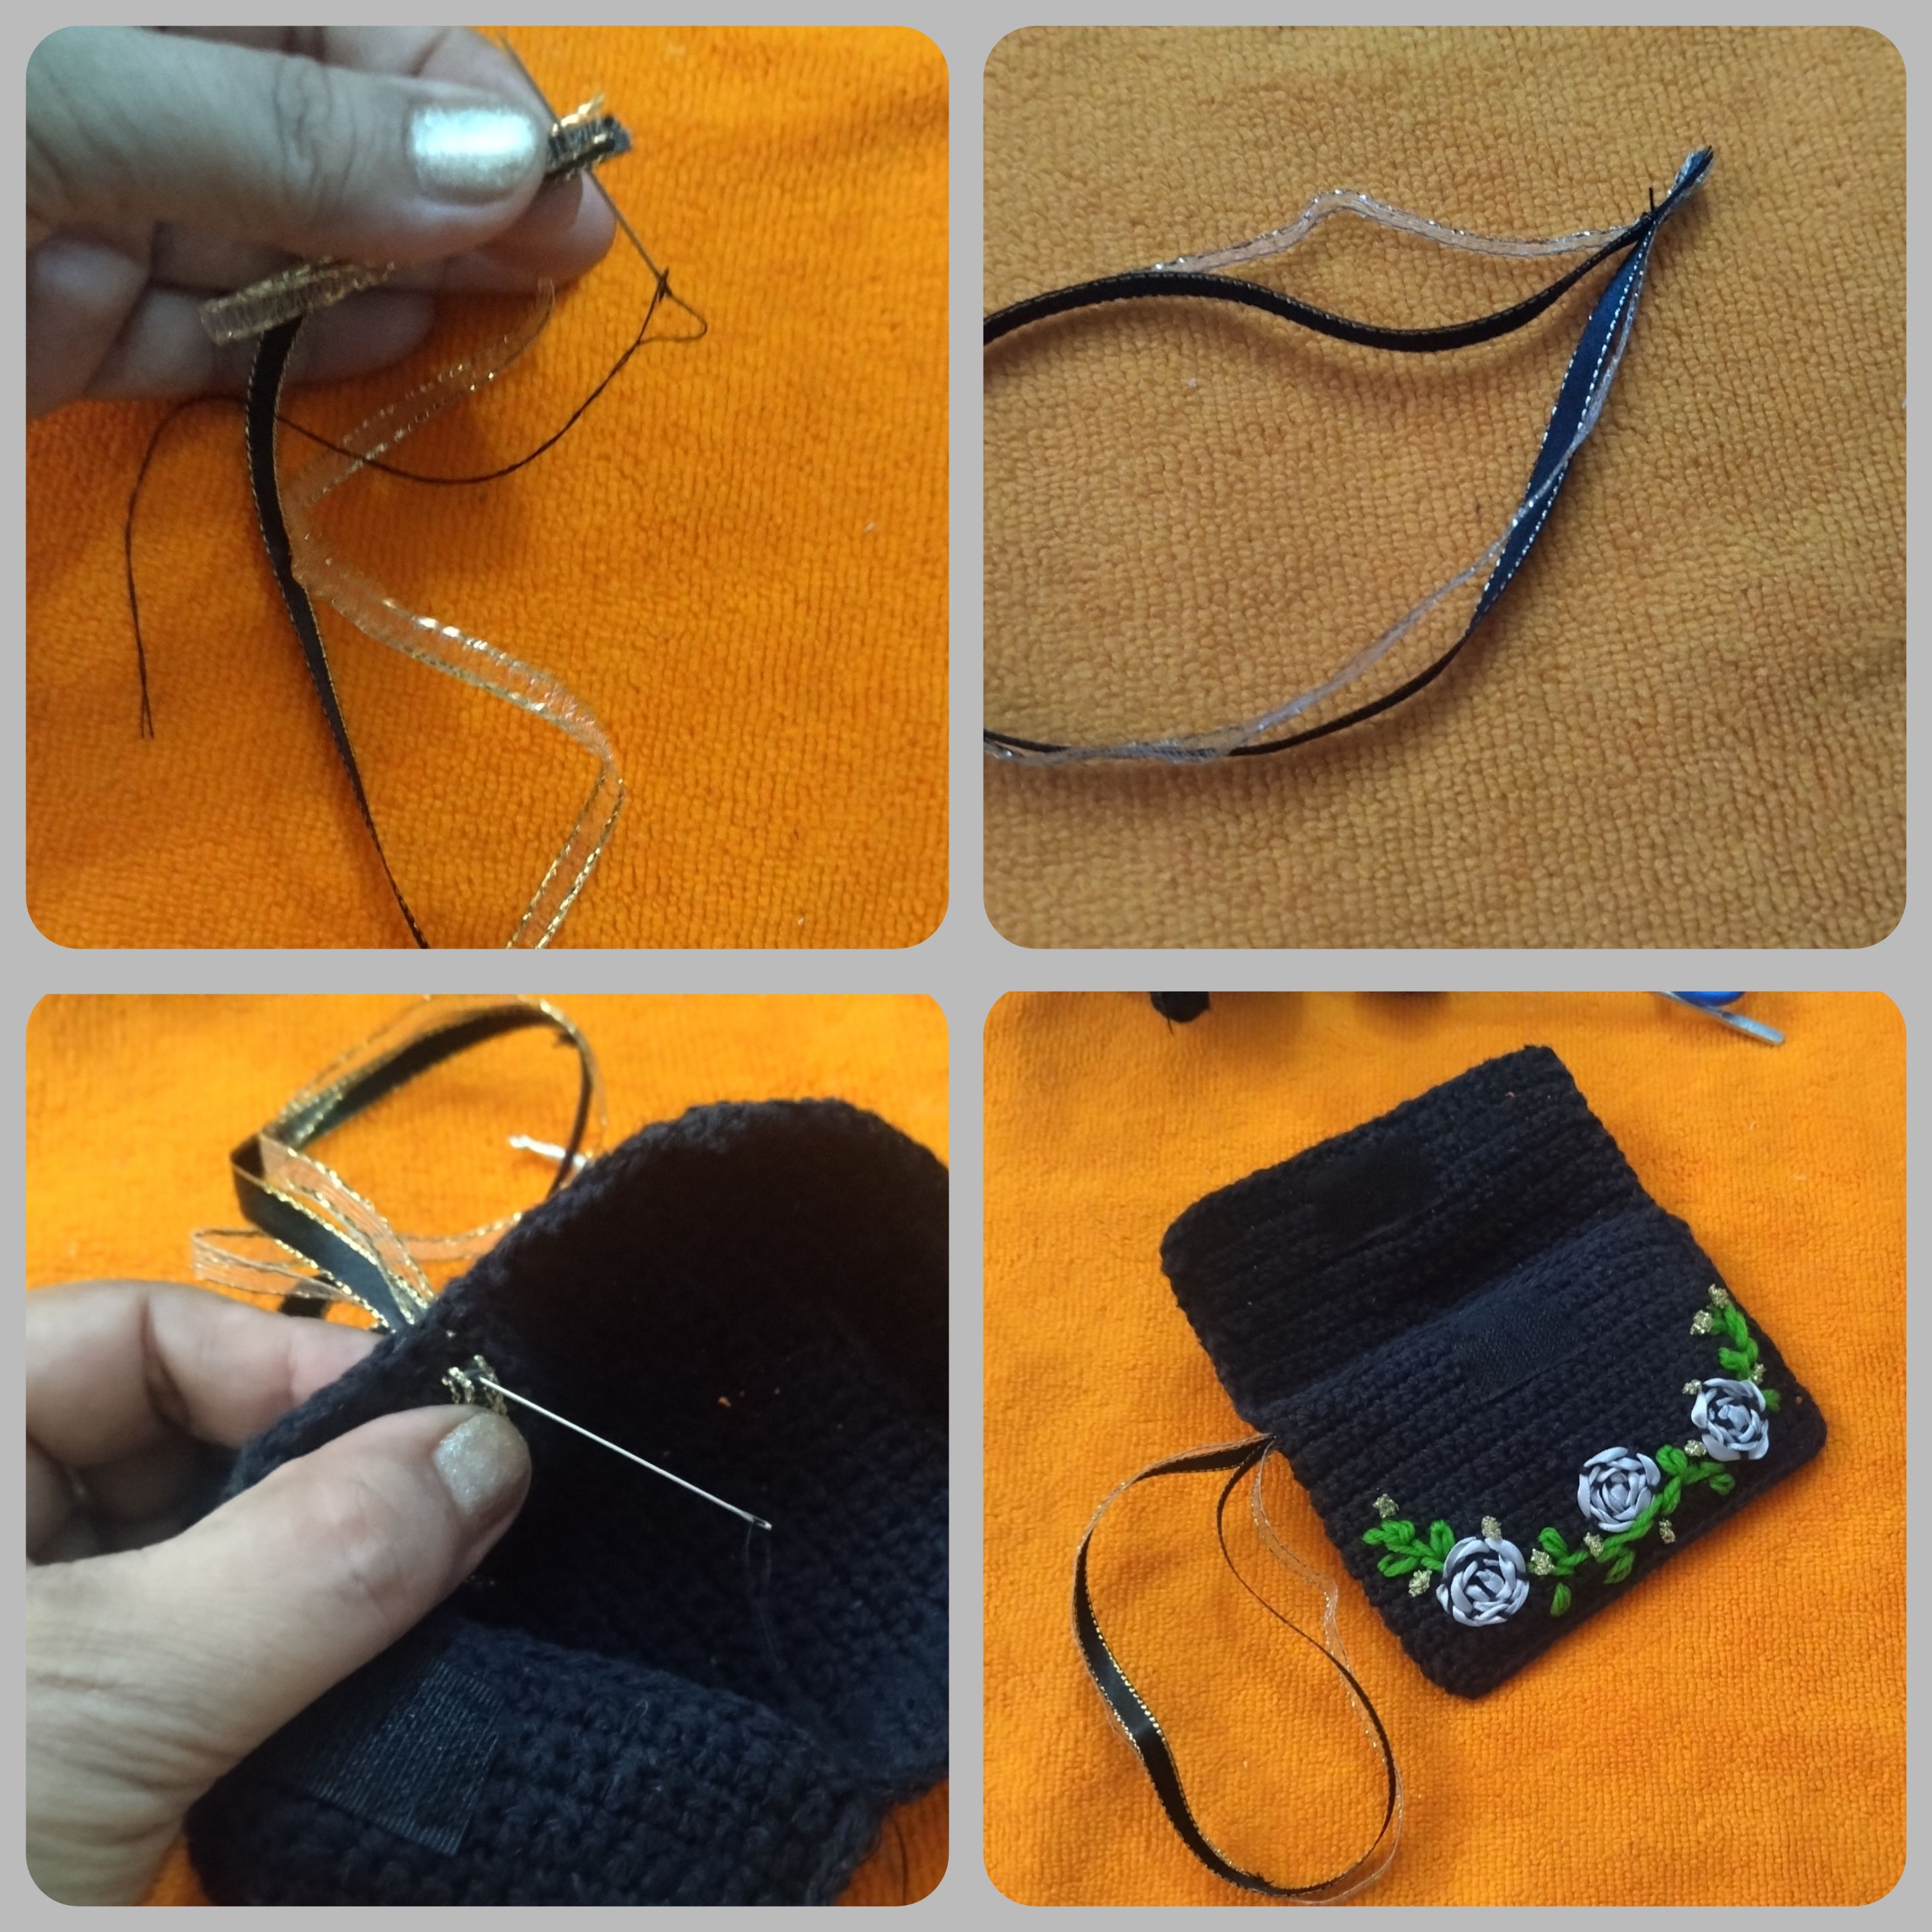
🍄 Para finalizar haremos una asa con cintas negra de raso y dorada. Doblamos a la mitad cada cinta de 20 cm aproximadamente, juntamos las puntas y las cosemos. Luego pasamos la parte de la costura desde un extremo del monedero, de afuera hacia adentro (ver imagen). Cosemos con hilo negro. Rematamos y cortamos el sobrante de cinta.
🍄 To finish, we will make a handle with black satin and gold ribbons. We fold in half each ribbon of about 20 cm, join the ends and sew them together. Then we pass the sewing part from one end of the purse, from the outside to the inside (see picture). Sew with black thread. We finish and cut off the excess ribbon.
🍄 Así debe verse terminado este bello monedero tejido a CROCHET y BORDADO para mamá en su DÍA. Espero que esta propuesta les guste y se animen a recrearla poniéndole toda su creatividad. Muchas gracias por la visita. Todas las fotos son de mi propiedad. Usé el traductor de Deelp. Edité con Polish. Hasta pronto.
🍄 This is how this beautiful CROCHET and EMBROIDERY knitted purse should look finished for mom on her BIRTHDAY. I hope you like this proposal and I encourage you to recreate it putting all your creativity. Thank you very much for your visit. All photos are my property. I used Deelp translator. I edited with Polish. See you soon.
Inspirada en una creación de Tejiendo con tax.
Inspired by a creation by Tejiendo con tax.