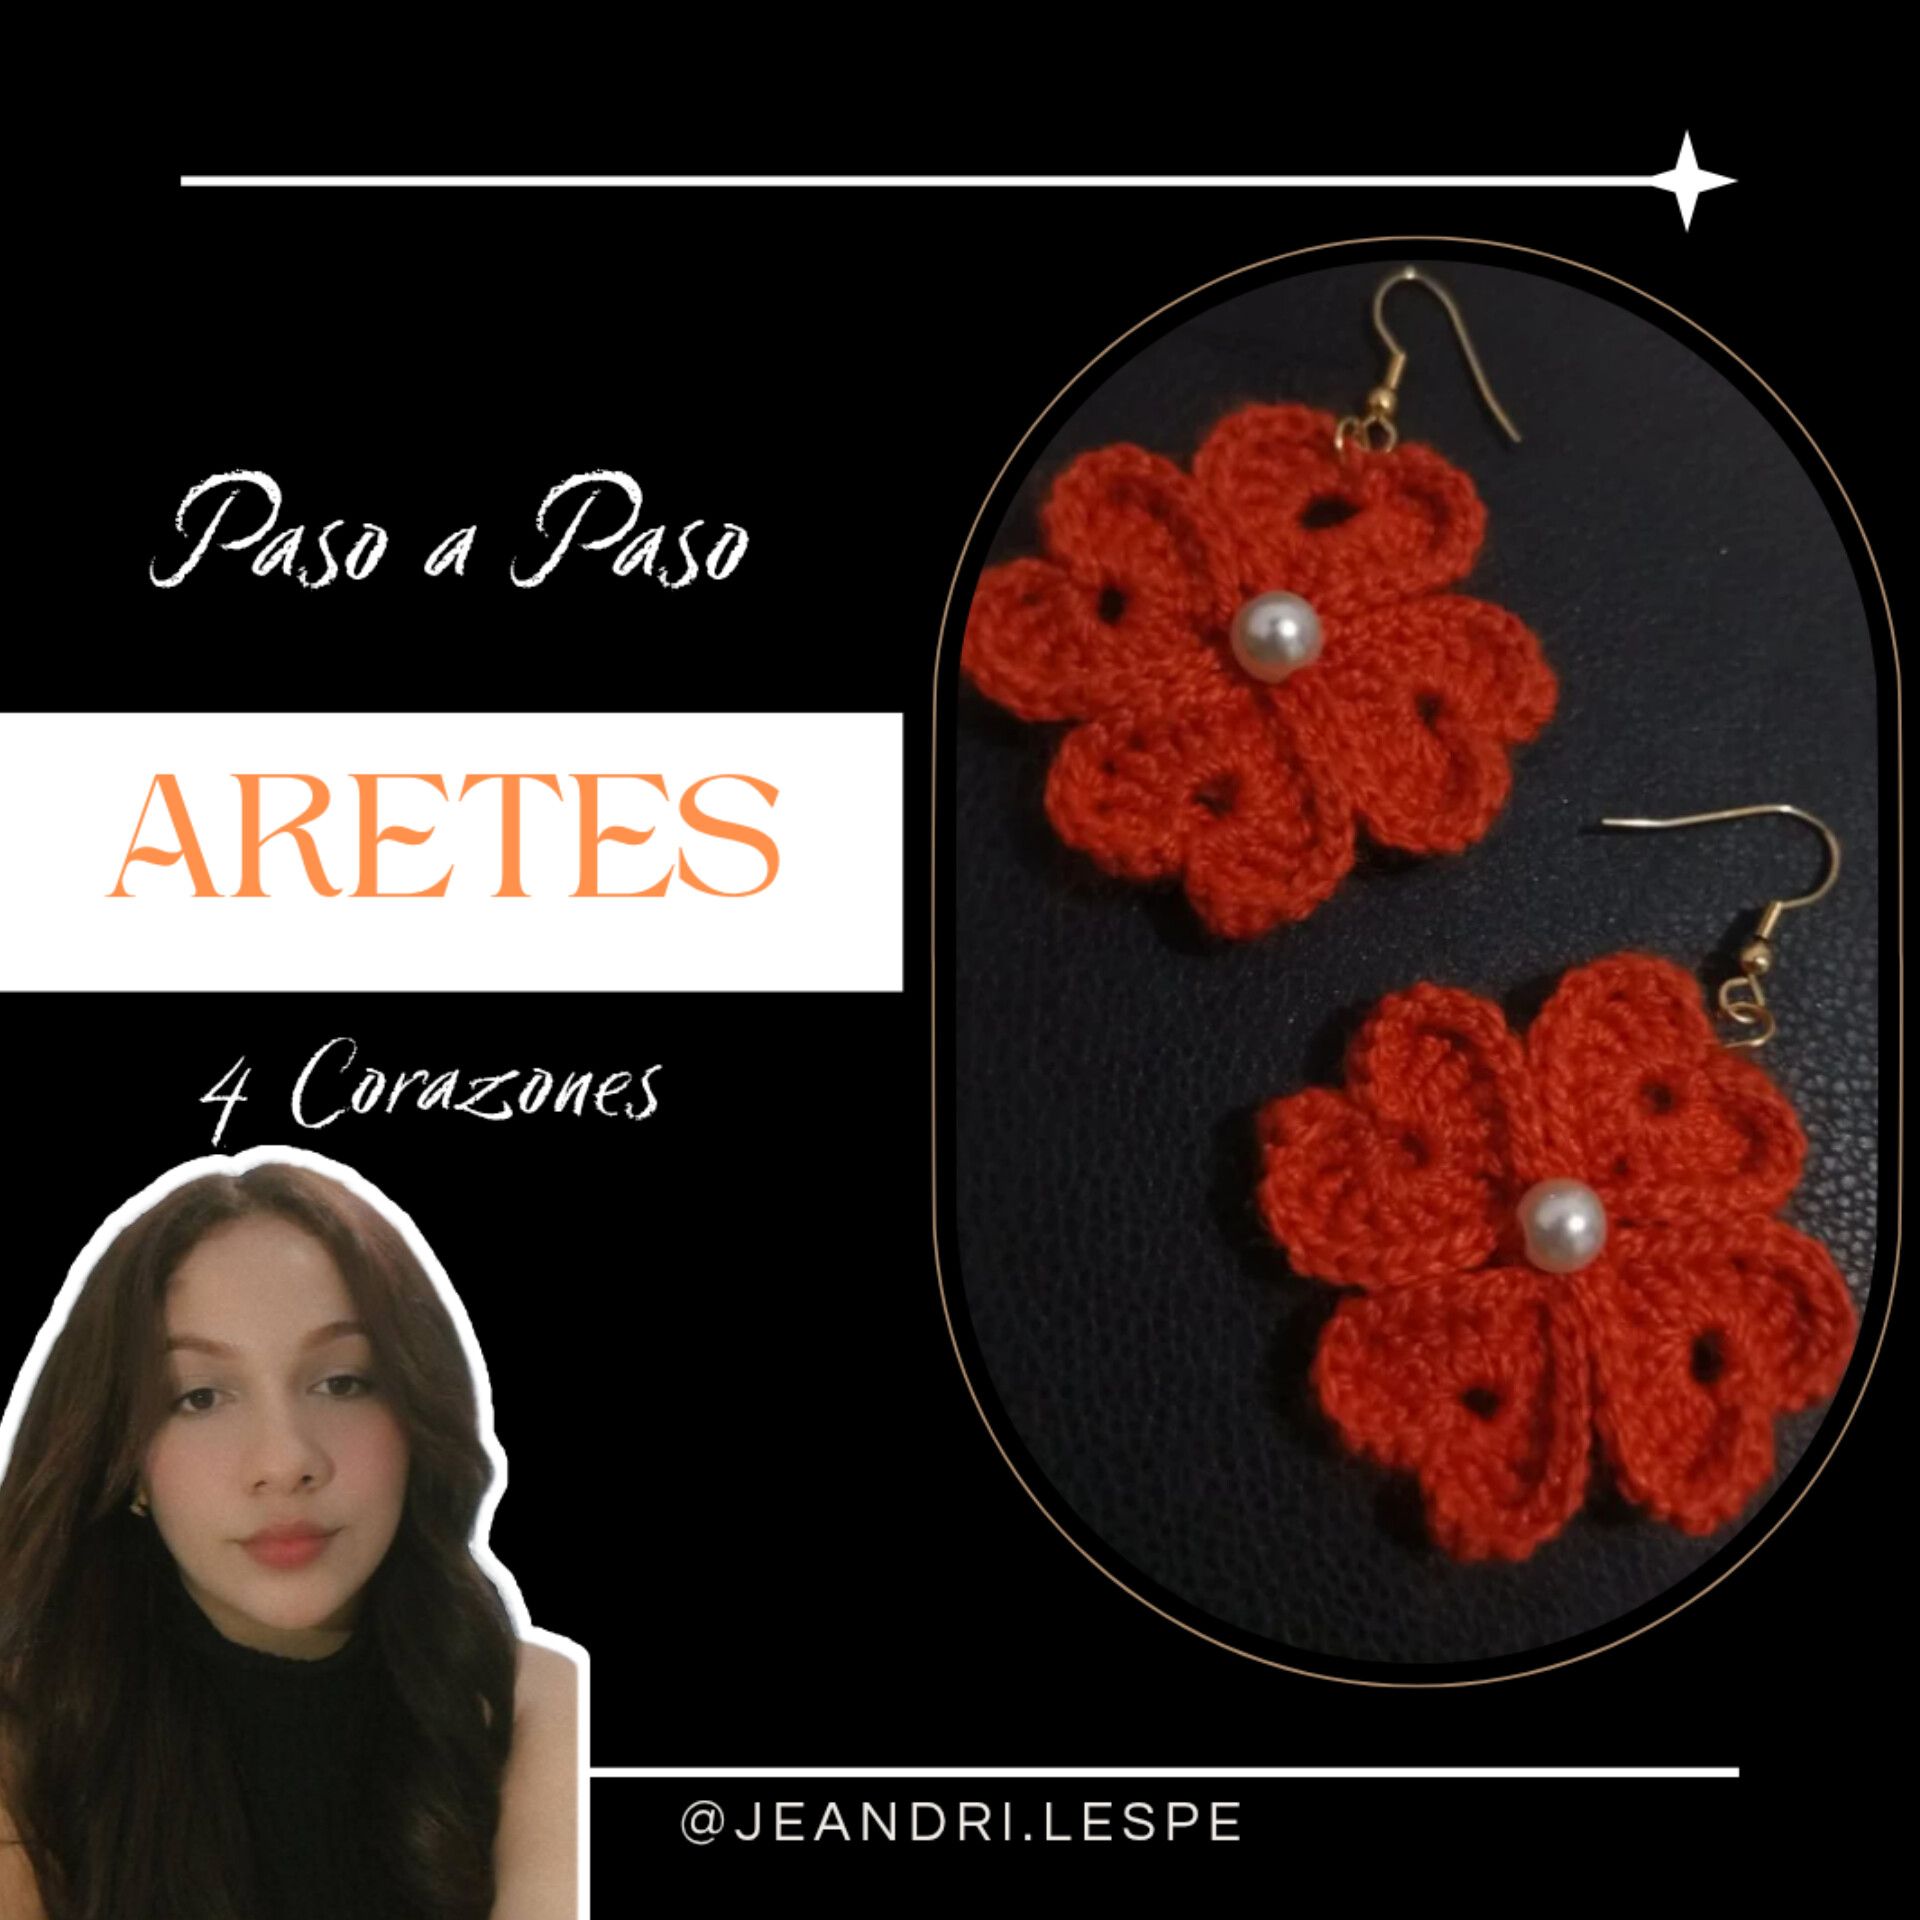
Hola mi gente linda, nuevamente estoy por acá con un nuevo diseño, está vez es un diseño que se divide en varias partes, sin embargo, 4 de ellas tienen el mismo proceso, así que, les mostrare solo el proceso de una y ya desde esa, elaboran las otras 3, a este diseño le diremos 4 corazones, le agregue el detalle de la perla para que tuviera un toque diferente y sin duda alguna el diseño me encantó, ahora sí, ¡Vamos con los materiales y el paso a paso!
Hello my lovely people, I'm here again with a new design, this time it's a design that is divided into several parts, however, 4 of them have the same process, so, I'll show you the process of only one and from there, make the other 3, to this design we'll call it 4 hearts, I added the pearl detail so it had a different touch and without a doubt I loved the design, now yes, let's go with the materials and the step by step!
Materiales / Materials 🧡✨
Hilo coral / Coral thread ✨
Aguja (número 3) / Needle (number 3) ✨
Perlas / Pearls ✨
Argollas / Rings ✨
Anzuelos / Hooks ✨
Paso 1️⃣ / Step 1️⃣
Lo primero que haremos será elaborar los 4 corazones, vamos a hacer un anillo mágico, subimos 3 cadenas y vamos a realizar 3 puntos altos dobles pasando por el anillo mágico, luego hacemos 3 puntos altos, subimos una cadena y nuevamente hacemos un punto alto doble, subimos una cadena y repetimos lo mismo del otro extremo, 3 puntos altos, 3 puntos altos dobles y 3 cadenas, cerramos el círculo y nos va a quedar la forma del corazón, luego vamos a ubicarnos en las primeras 3 cadenas y haremos 3 puntos bajos, ubicamos los primeros 3 puntos altos dobles y hacemos puntos bajos con aumento sobre cada uno, es decir, dos puntos bajos por cada punto alto doble, en lo siguientes 3 puntos altos haremos un punto bajo sobre cada uno, al llegar a la mitad, nos encontramos con el punto alto doble donde volveremos a hacer un aumento y volvemos a repetir lo del otro extremo, cerramos con un punto deslizado pasando por la curva del corazón, cortamos la hebra y listo, esto mismo lo repetiremos con cada uno de los corazones, serían 4 en total.
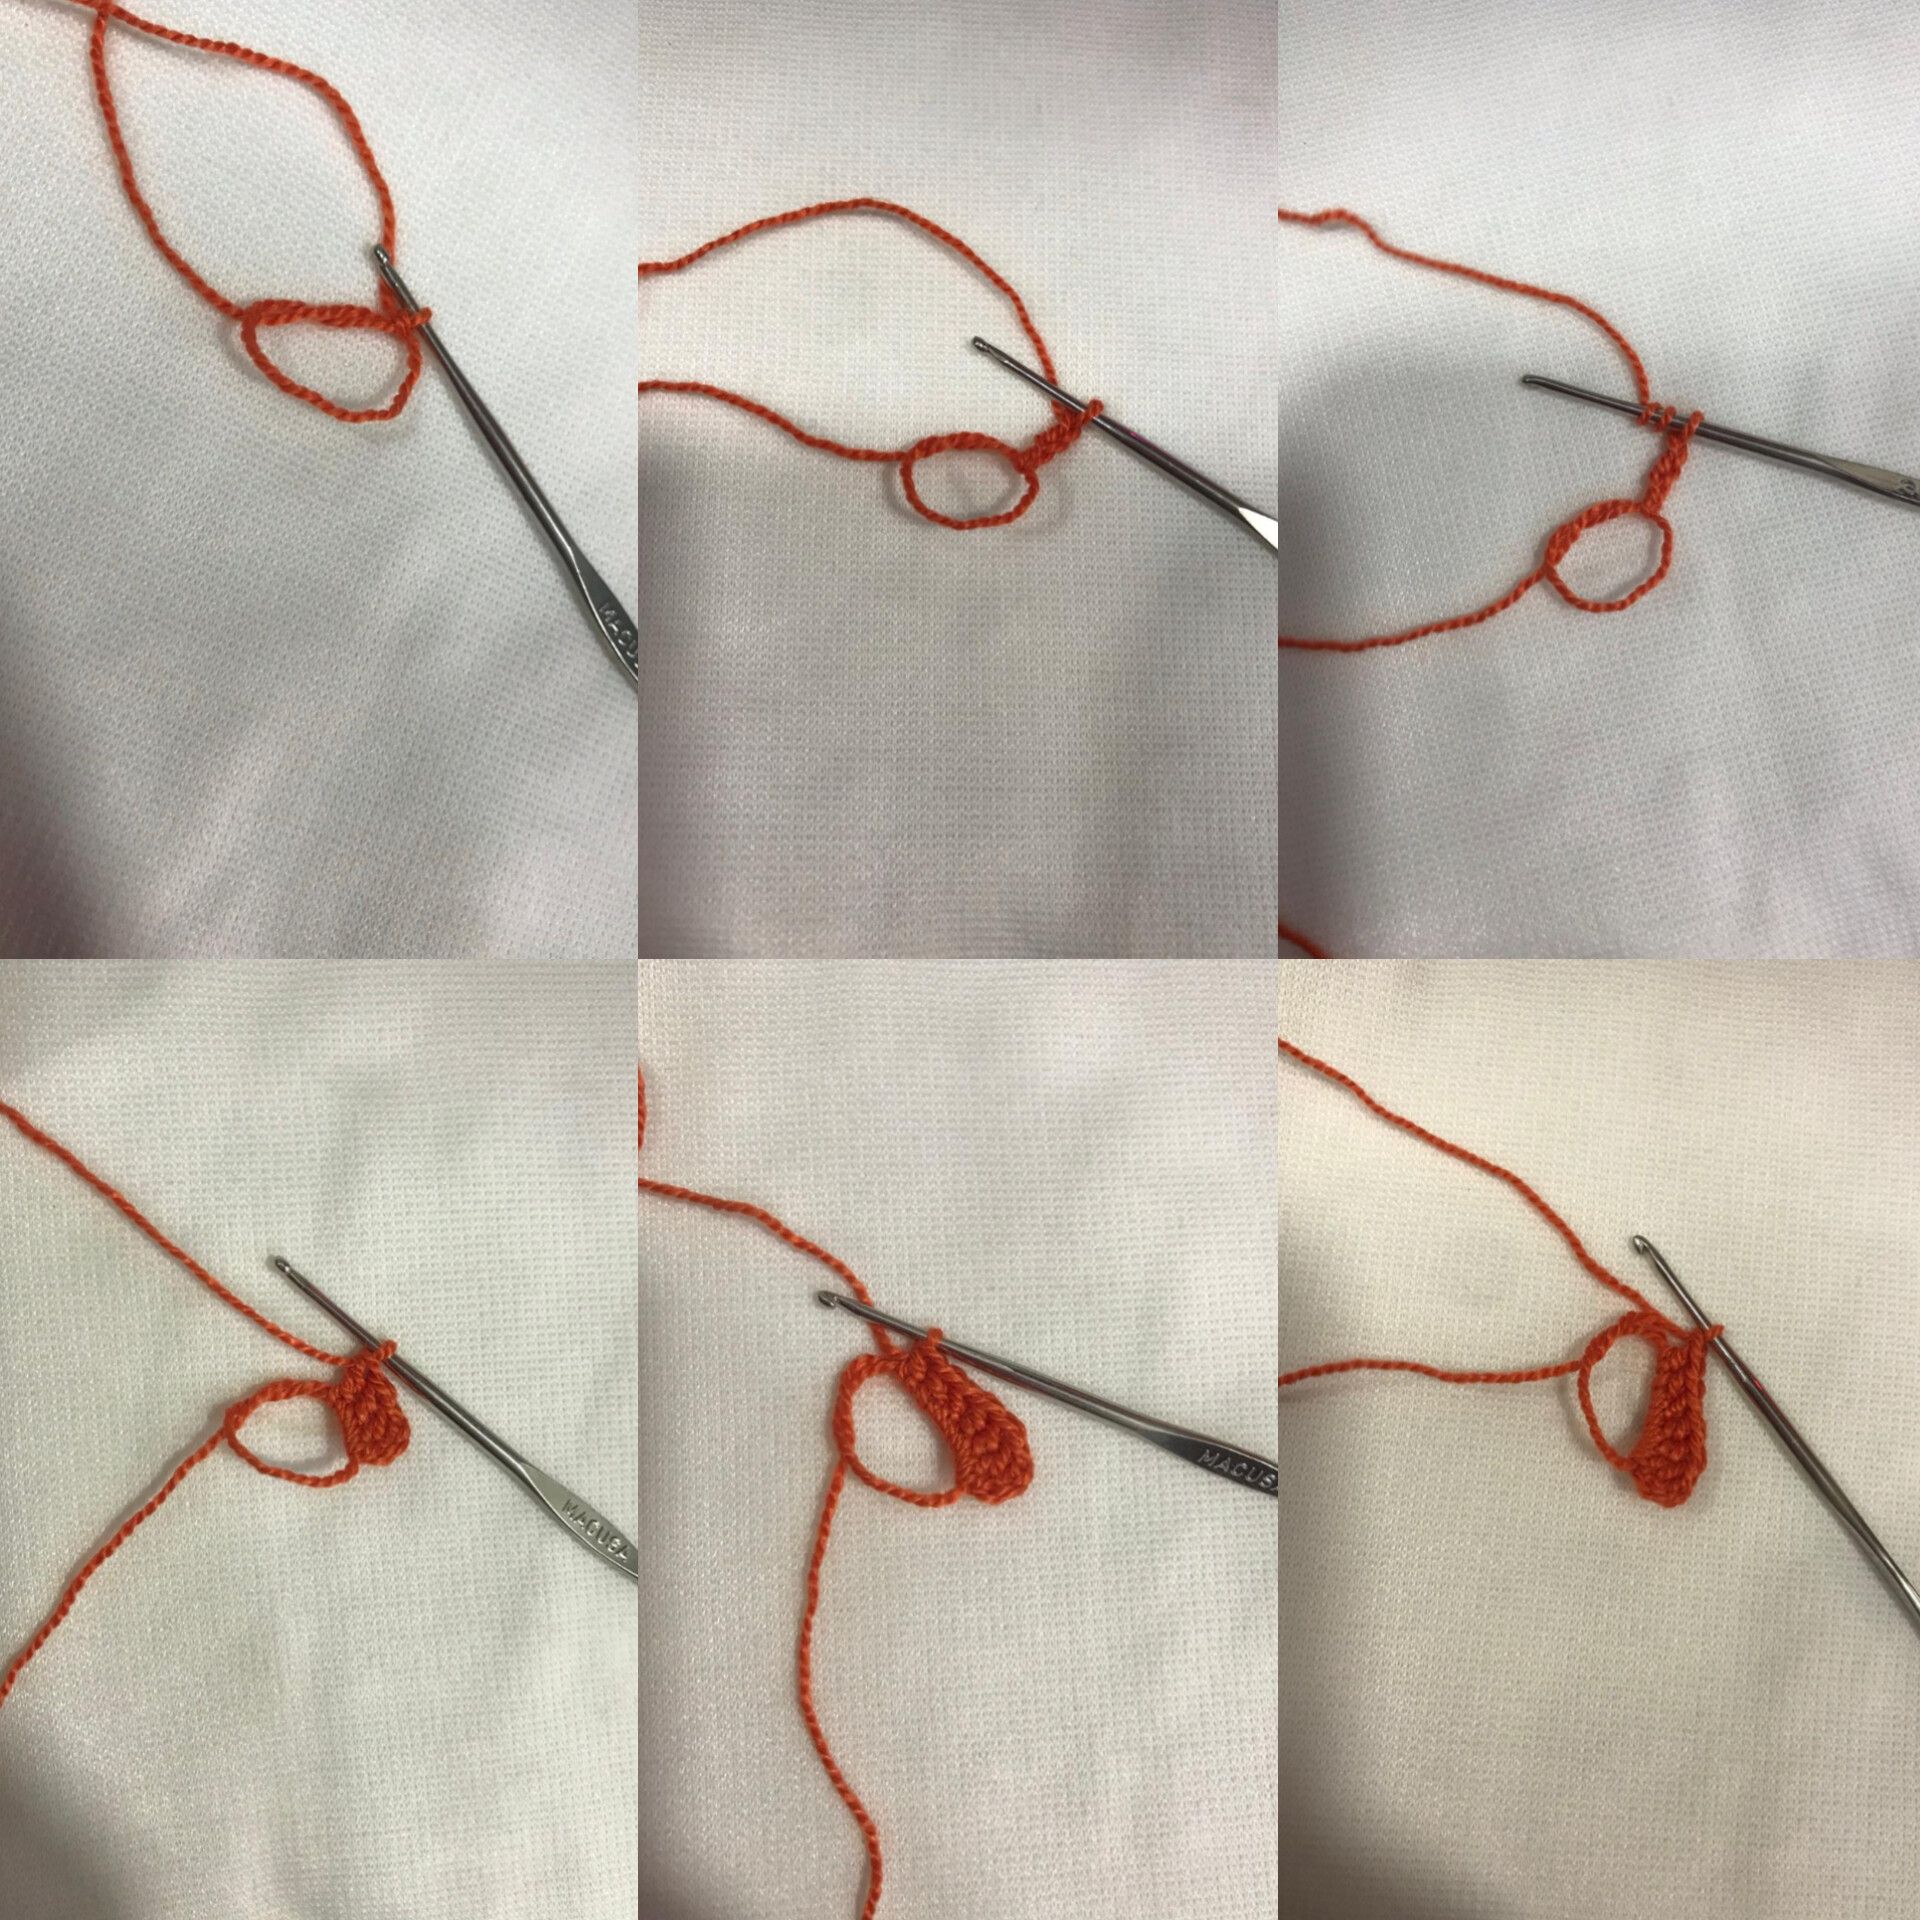
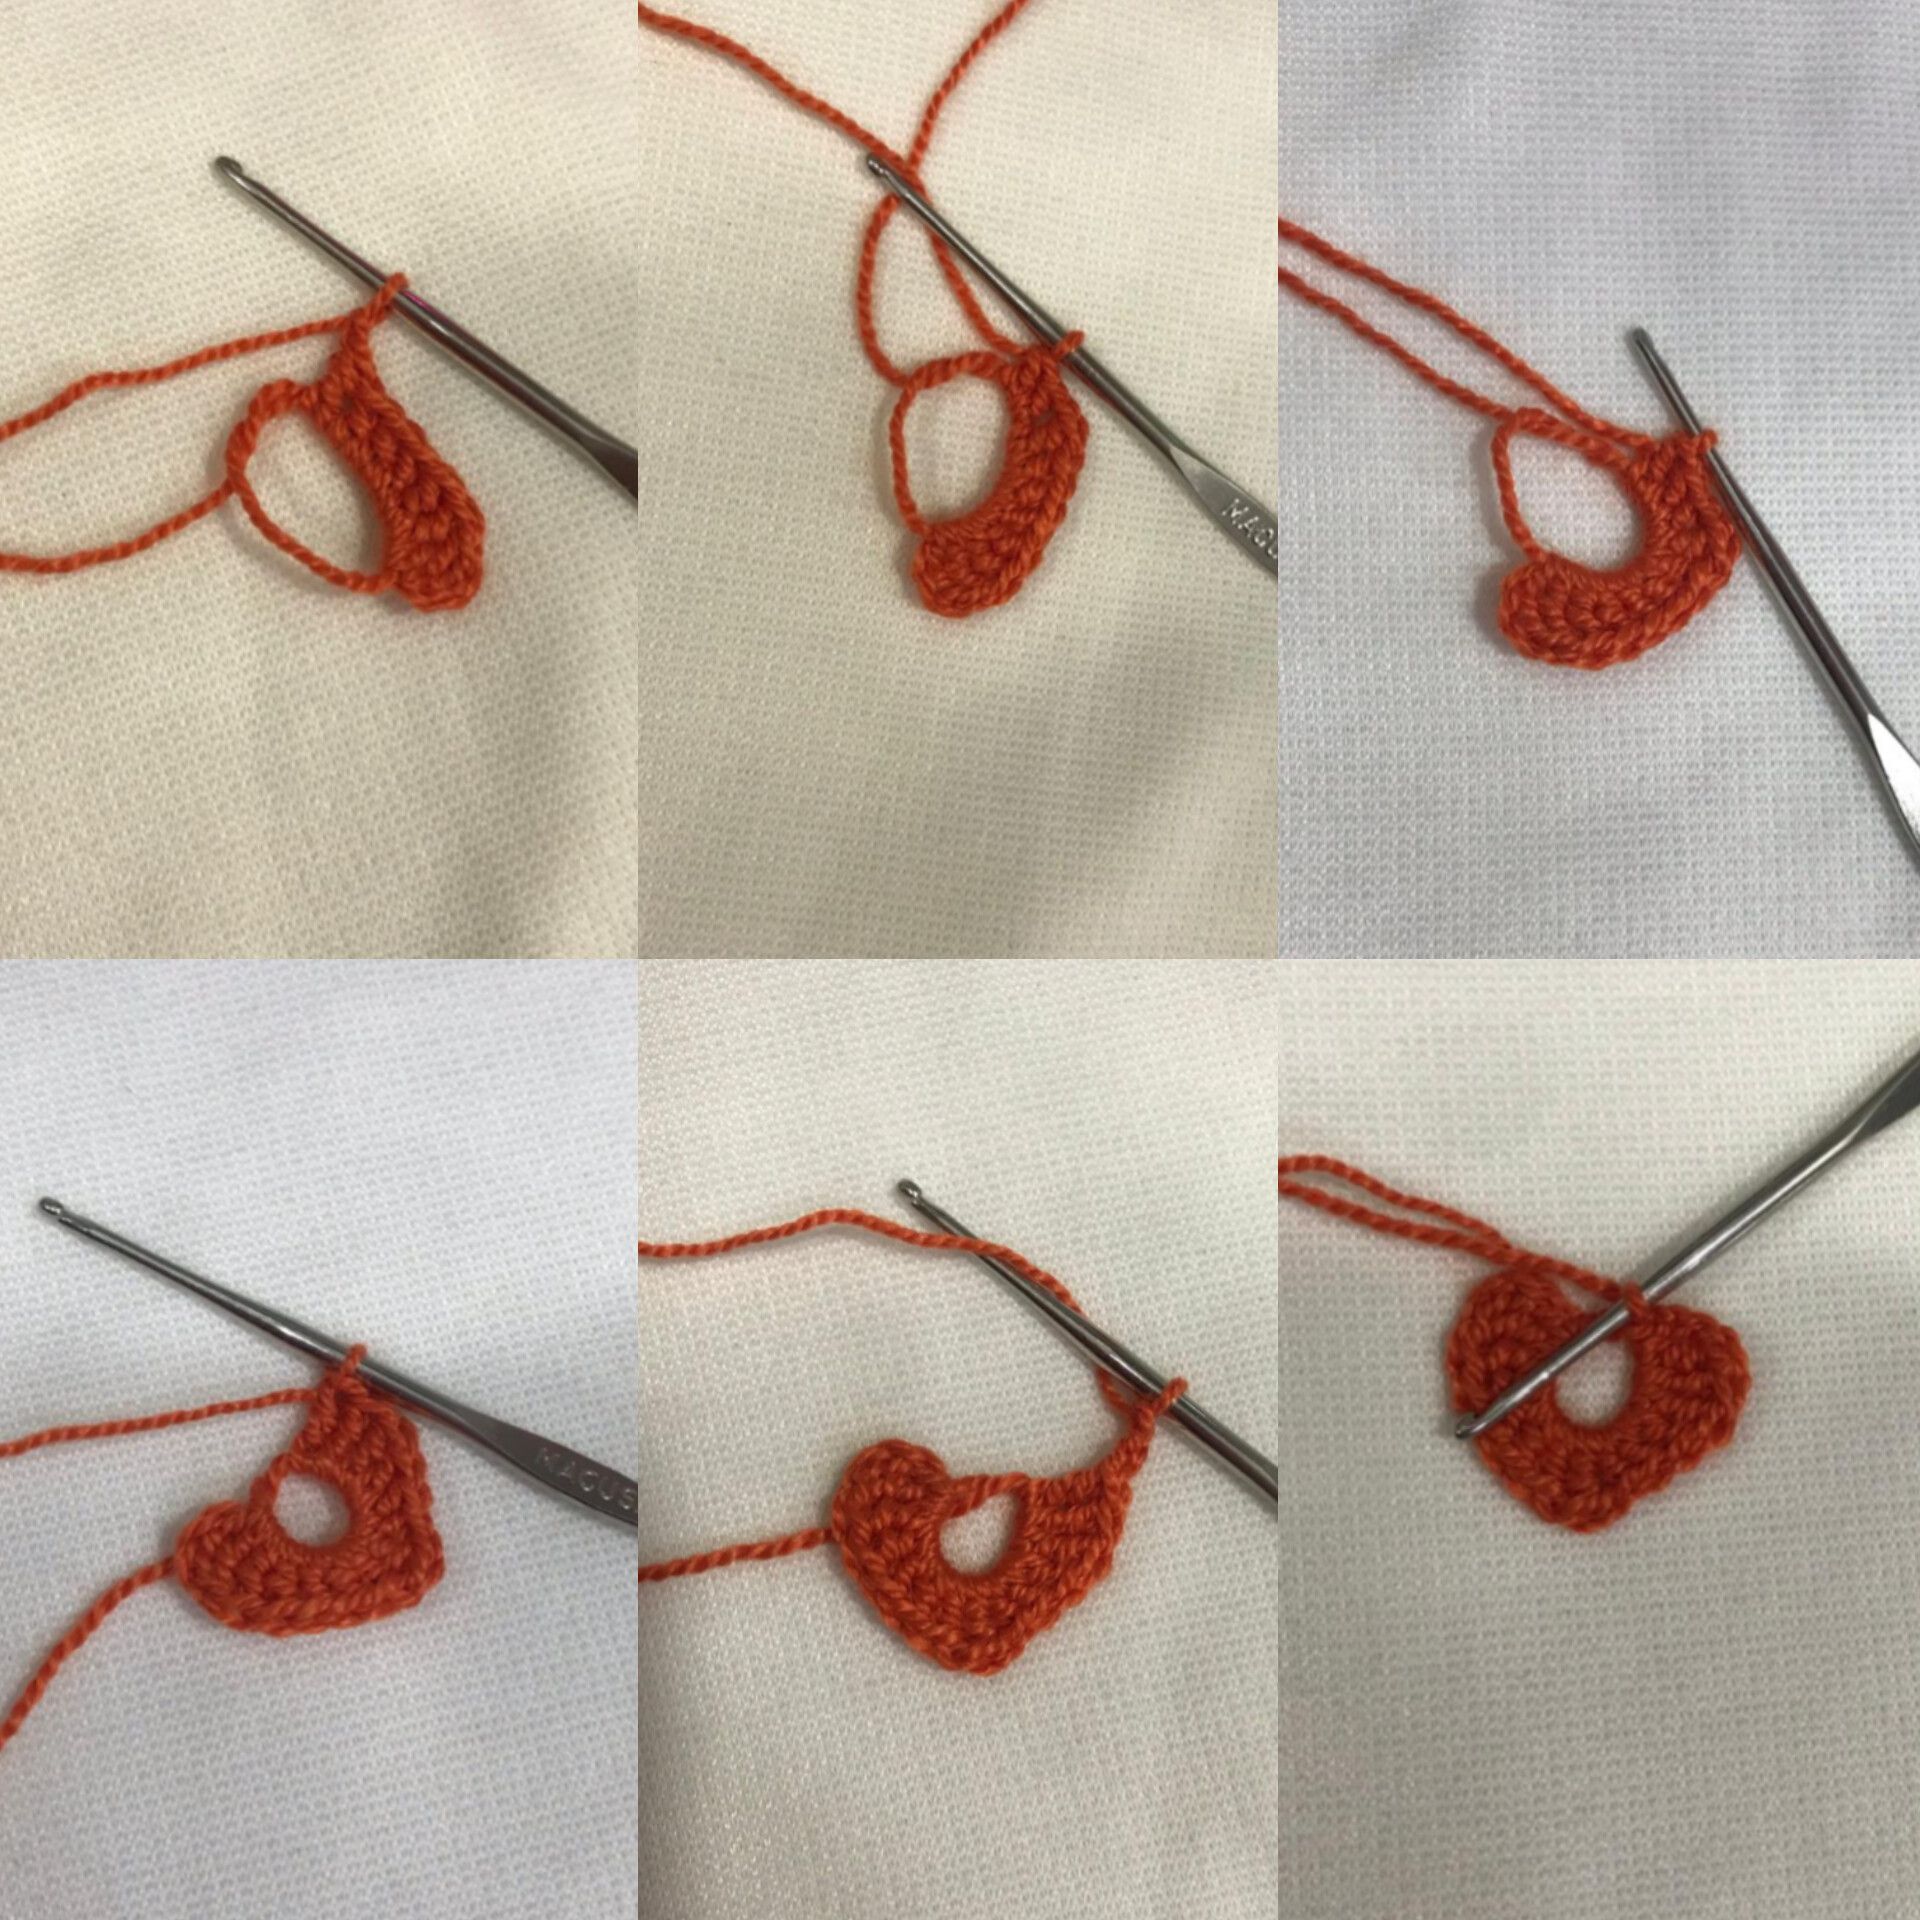
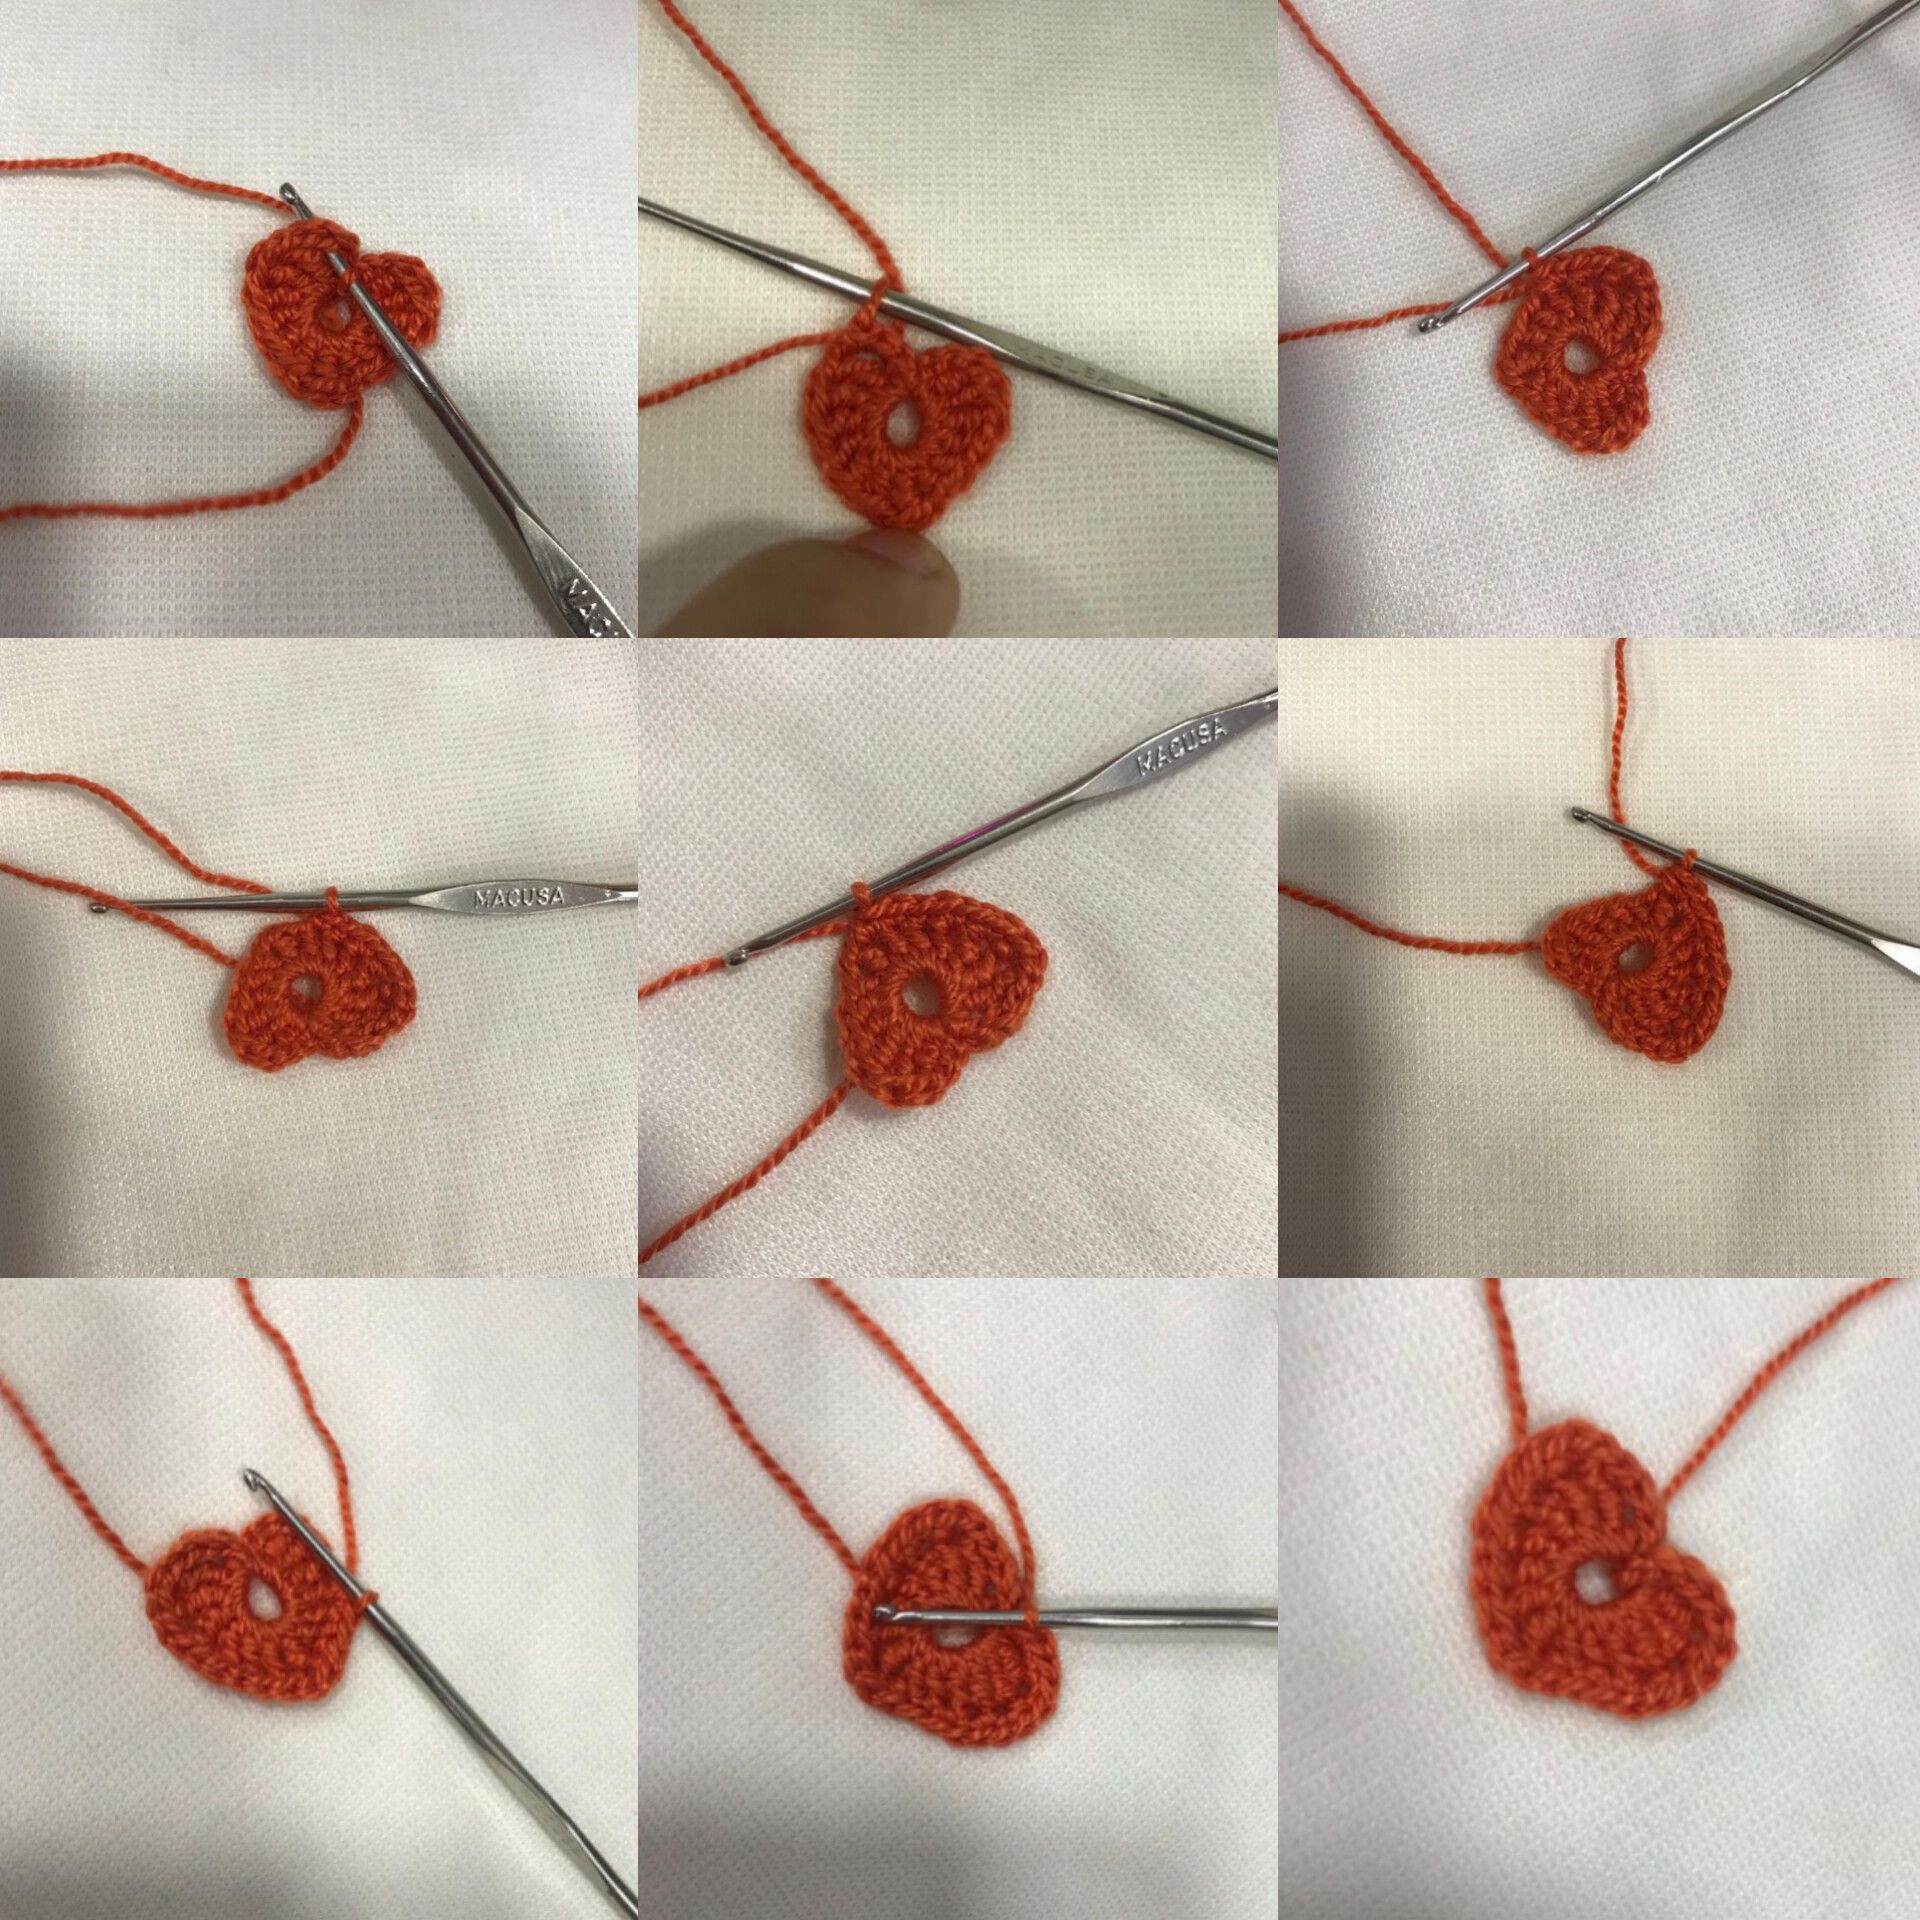
The first thing we will do is make the 4 hearts, we are going to make a magic ring, we go up 3 chains and we are going to make 3 double crochets passing through the magic ring, then we make 3 double crochets, we go up a chain and again we make a double crochet, we go up a chain and repeat the same thing from the other end, 3 double crochets, 3 double crochets and 3 chains, we close the circle and we will have the shape of the heart, then we will place ourselves in the first 3 chains and we will make 3 low points, we place the first 3 double crochets and we make low points with an increase on each one, that is, two low points for each double crochet, in the next 3 high points we will make a low point on each one, when we reach the middle, we find the double crochet where we will make an increase again and we repeat the same thing At the other end, we close with a slip stitch passing through the curve of the heart, we cut the thread and that's it, we will repeat this with each of the hearts, there would be 4 in total.
Paso 2️⃣ / Step 2️⃣
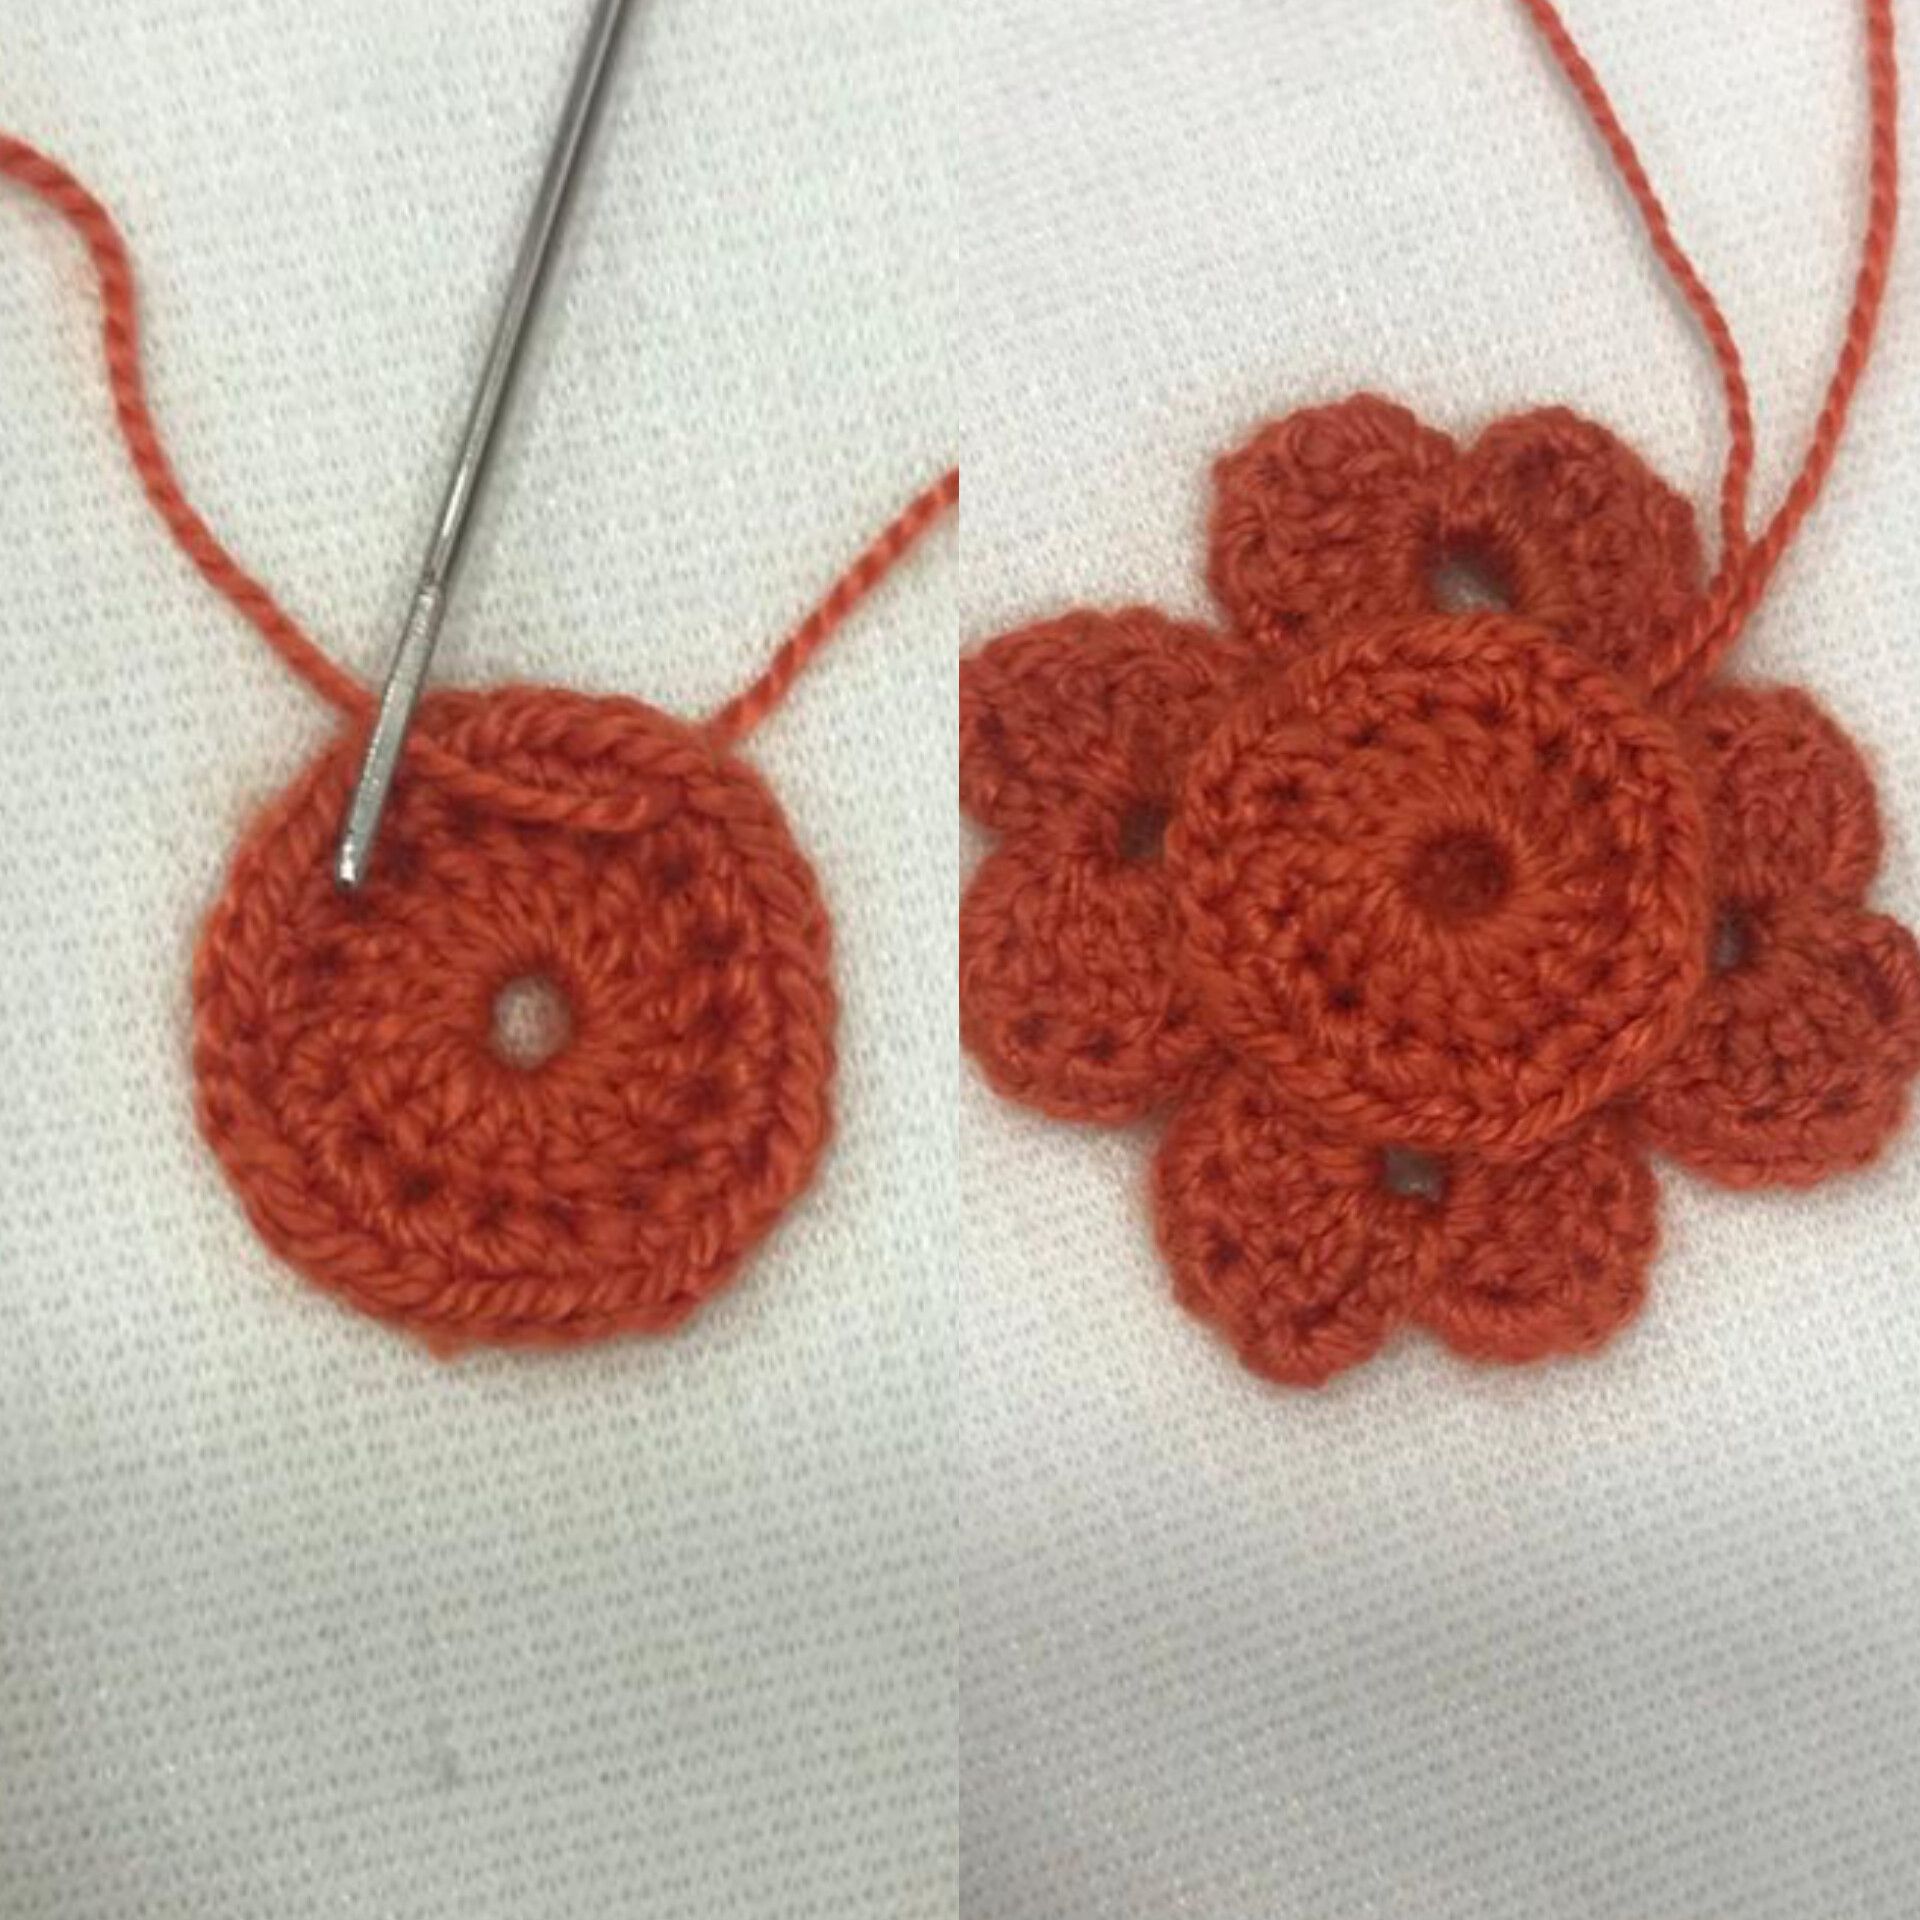
Luego de terminar los corazones vamos con la base que usaremos para darles un soporte, haremos nuevamente un anillo mágico, subimos 2 cadenas y haremos 17 puntos altos, contando las cadenas del comienzo, serían 18 y cerramos con un punto deslizado en la segunda cadena, para reforzar el tejido, subimos una cadena y haremos puntos bajos con aumento sobre cada punto alto, es decir, dos puntos bajos sobre cada uno de los puntos y cerramos con un punto deslizado en el primer punto.

After finishing the hearts, we go with the base that we will use to give them a support, we will make a magic ring again, we go up 2 chains and we will make 17 double crochets, counting the chains at the beginning, there would be 18 and we close with a slip stitch in the second chain, to reinforce the fabric, we go up a chain and we will make low points with an increase over each high point, that is, two low points over each of the points and we close with a slip stitch in the first point.
Paso 3️⃣ / Step 3️⃣
Ahora procedemos a unir las piezas, vamos usar una aguja lanera y un pedazo de hilo, vamos a ubicar los dos puntos bajos de cada extremo que están antes de llegar a la mitad donde se ubican los puntos en aumento, pasamos el hilo y así haremos con todos los corazones, para luego proceder a cerrarlos y amarrarlos juntos, haciendo bastante presión, ahora por una de las hebras que nos sobró del amarre vamos a introducir la perla, la ubicamos en el medio, amarramos nuevamente atrás y cortamos las hebras sobrantes.
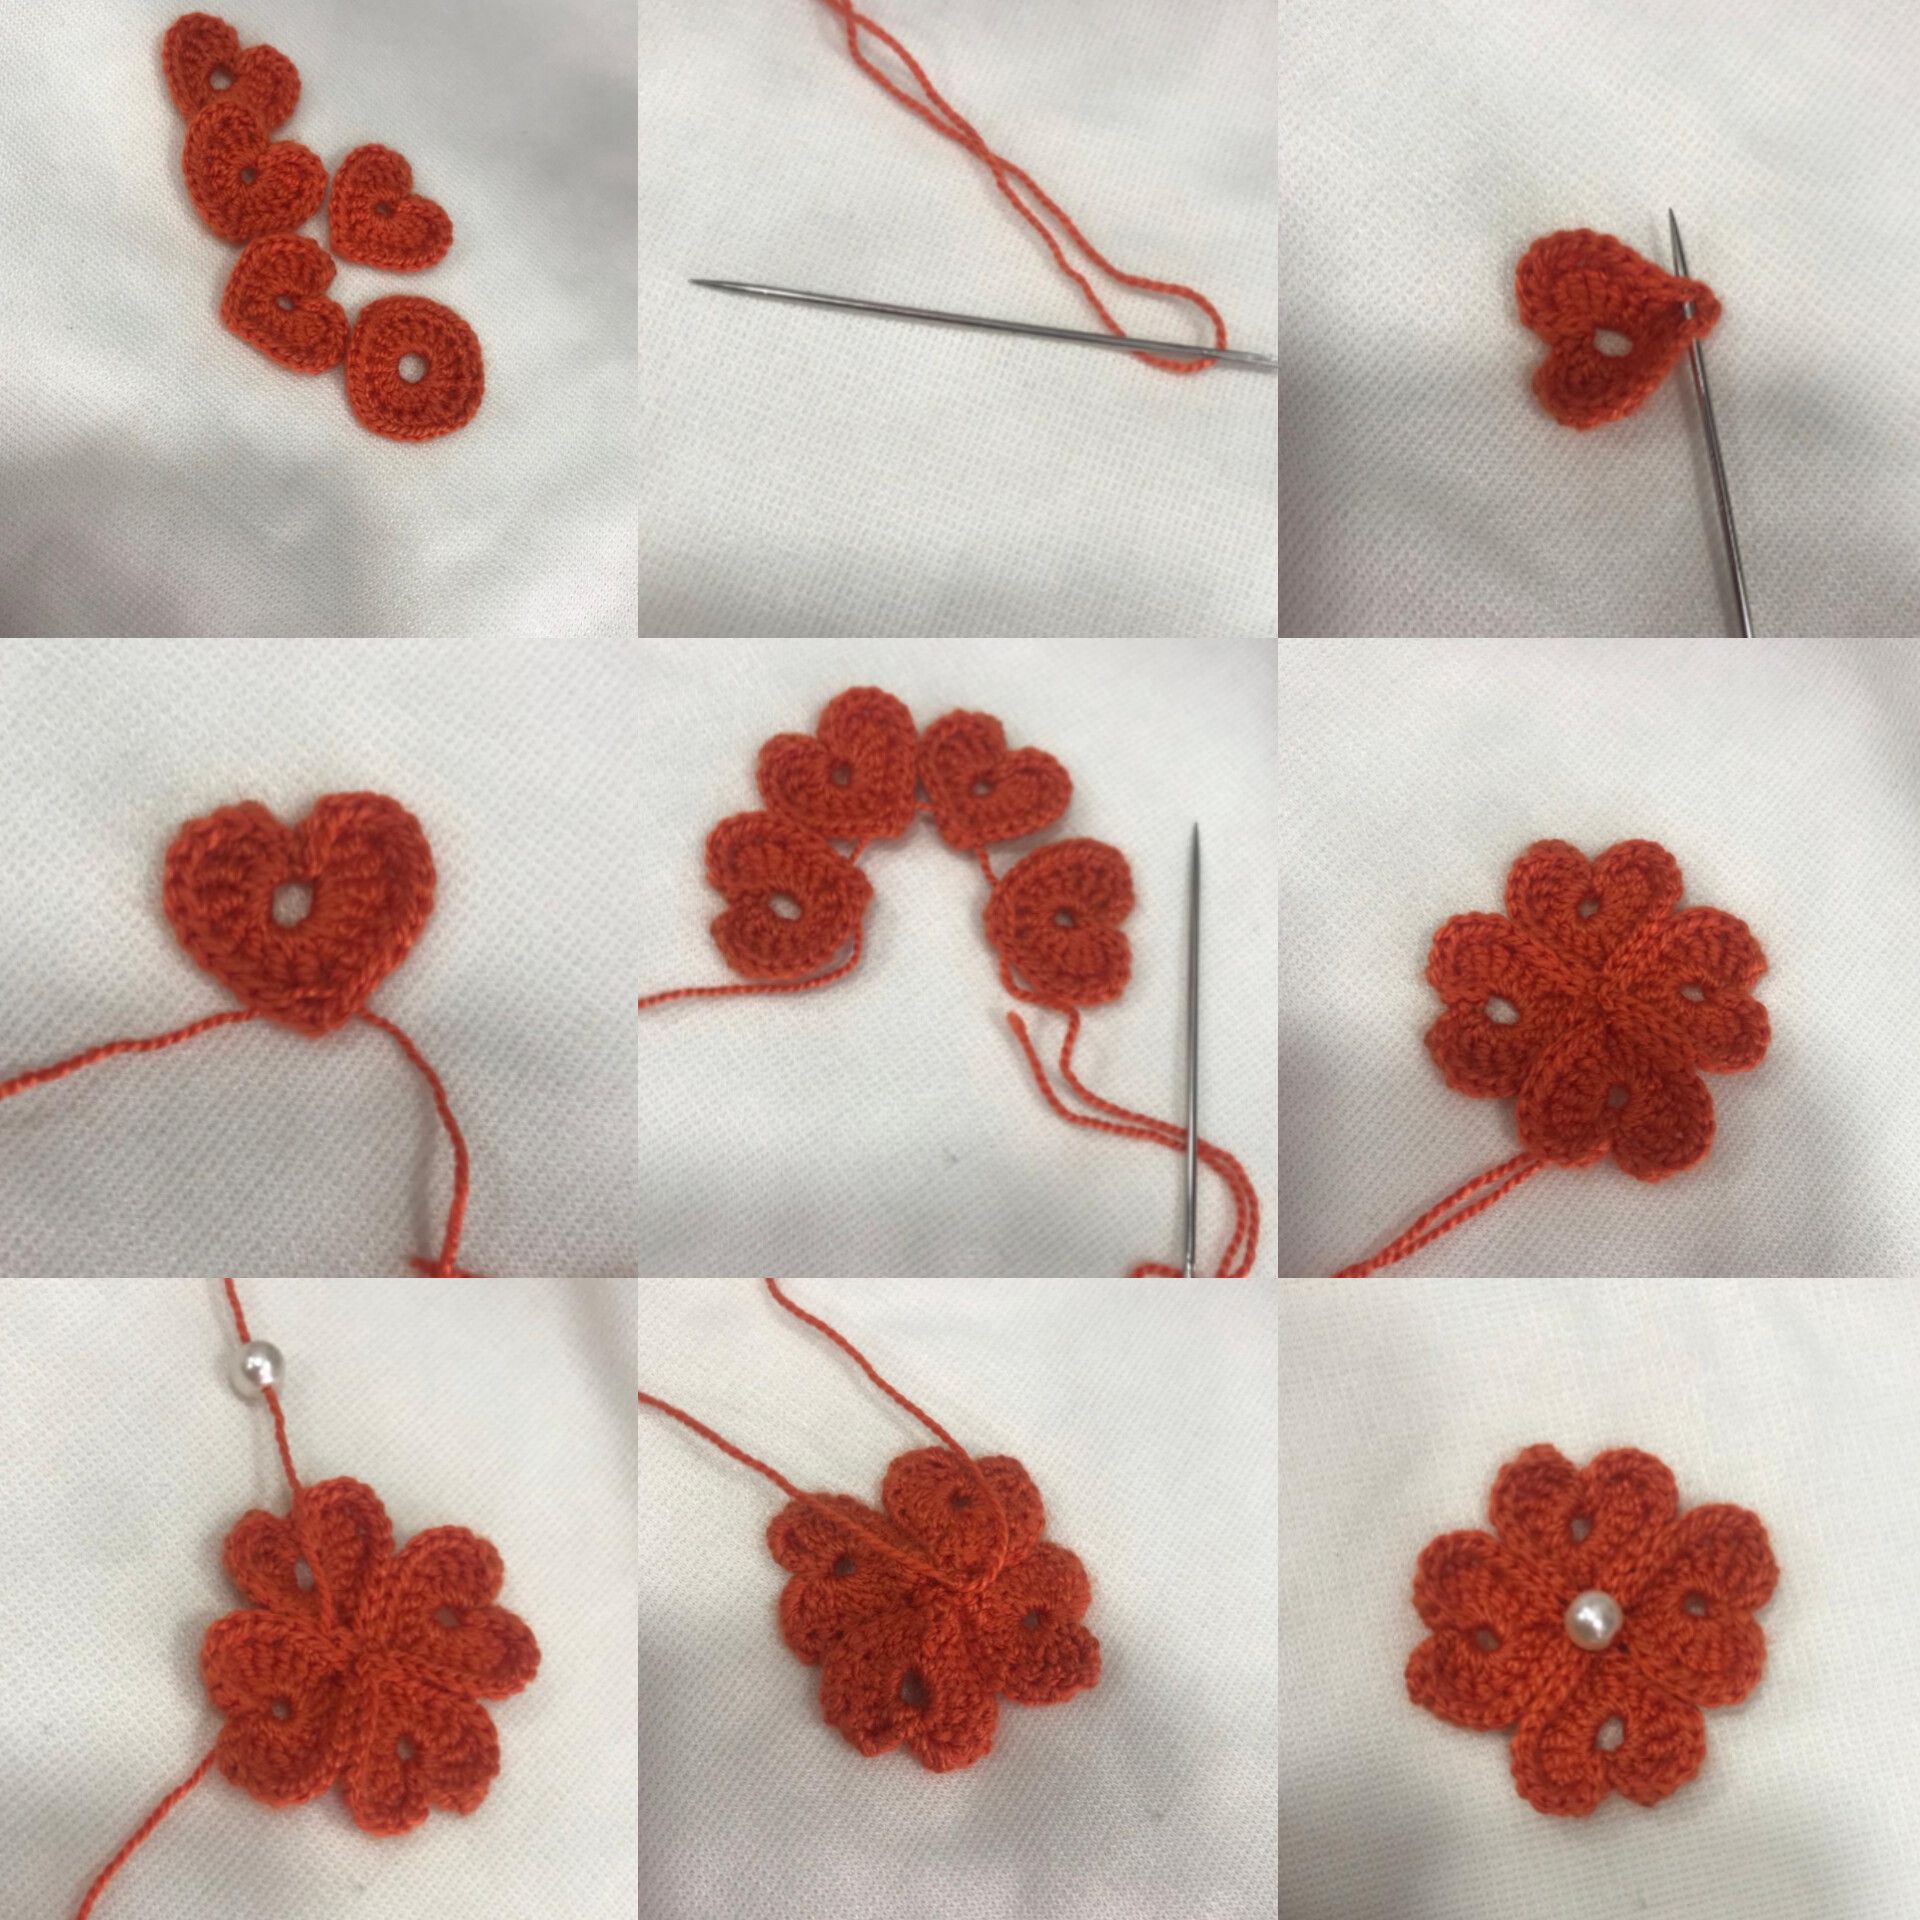
Now we proceed to join the pieces, we will use a wool needle and a piece of thread, we will locate the two low points at each end that are before reaching the middle where the increasing points are located, we pass the thread and we will do the same with all the hearts, then proceed to close them and tie them together, applying a lot of pressure, now through one of the strands that we have left over from tying we will introduce the pearl, we place it in the middle, tie it again at the back and cut the excess strands.
Paso 4️⃣ / Step 4️⃣
El íntimo paso será unir los corazones a la base, para ello vamos a necesitar nuevamente la aguja con hilo y vamos a coser las dos partes juntas, cuidando que no se vea mal de ninguno de los dos lados, luego amarramos los excedentes de hilo y cortamos, ahora sí solo nos queda ponerle las argollas y anzuelos y ya queda listo nuestro arete ✨
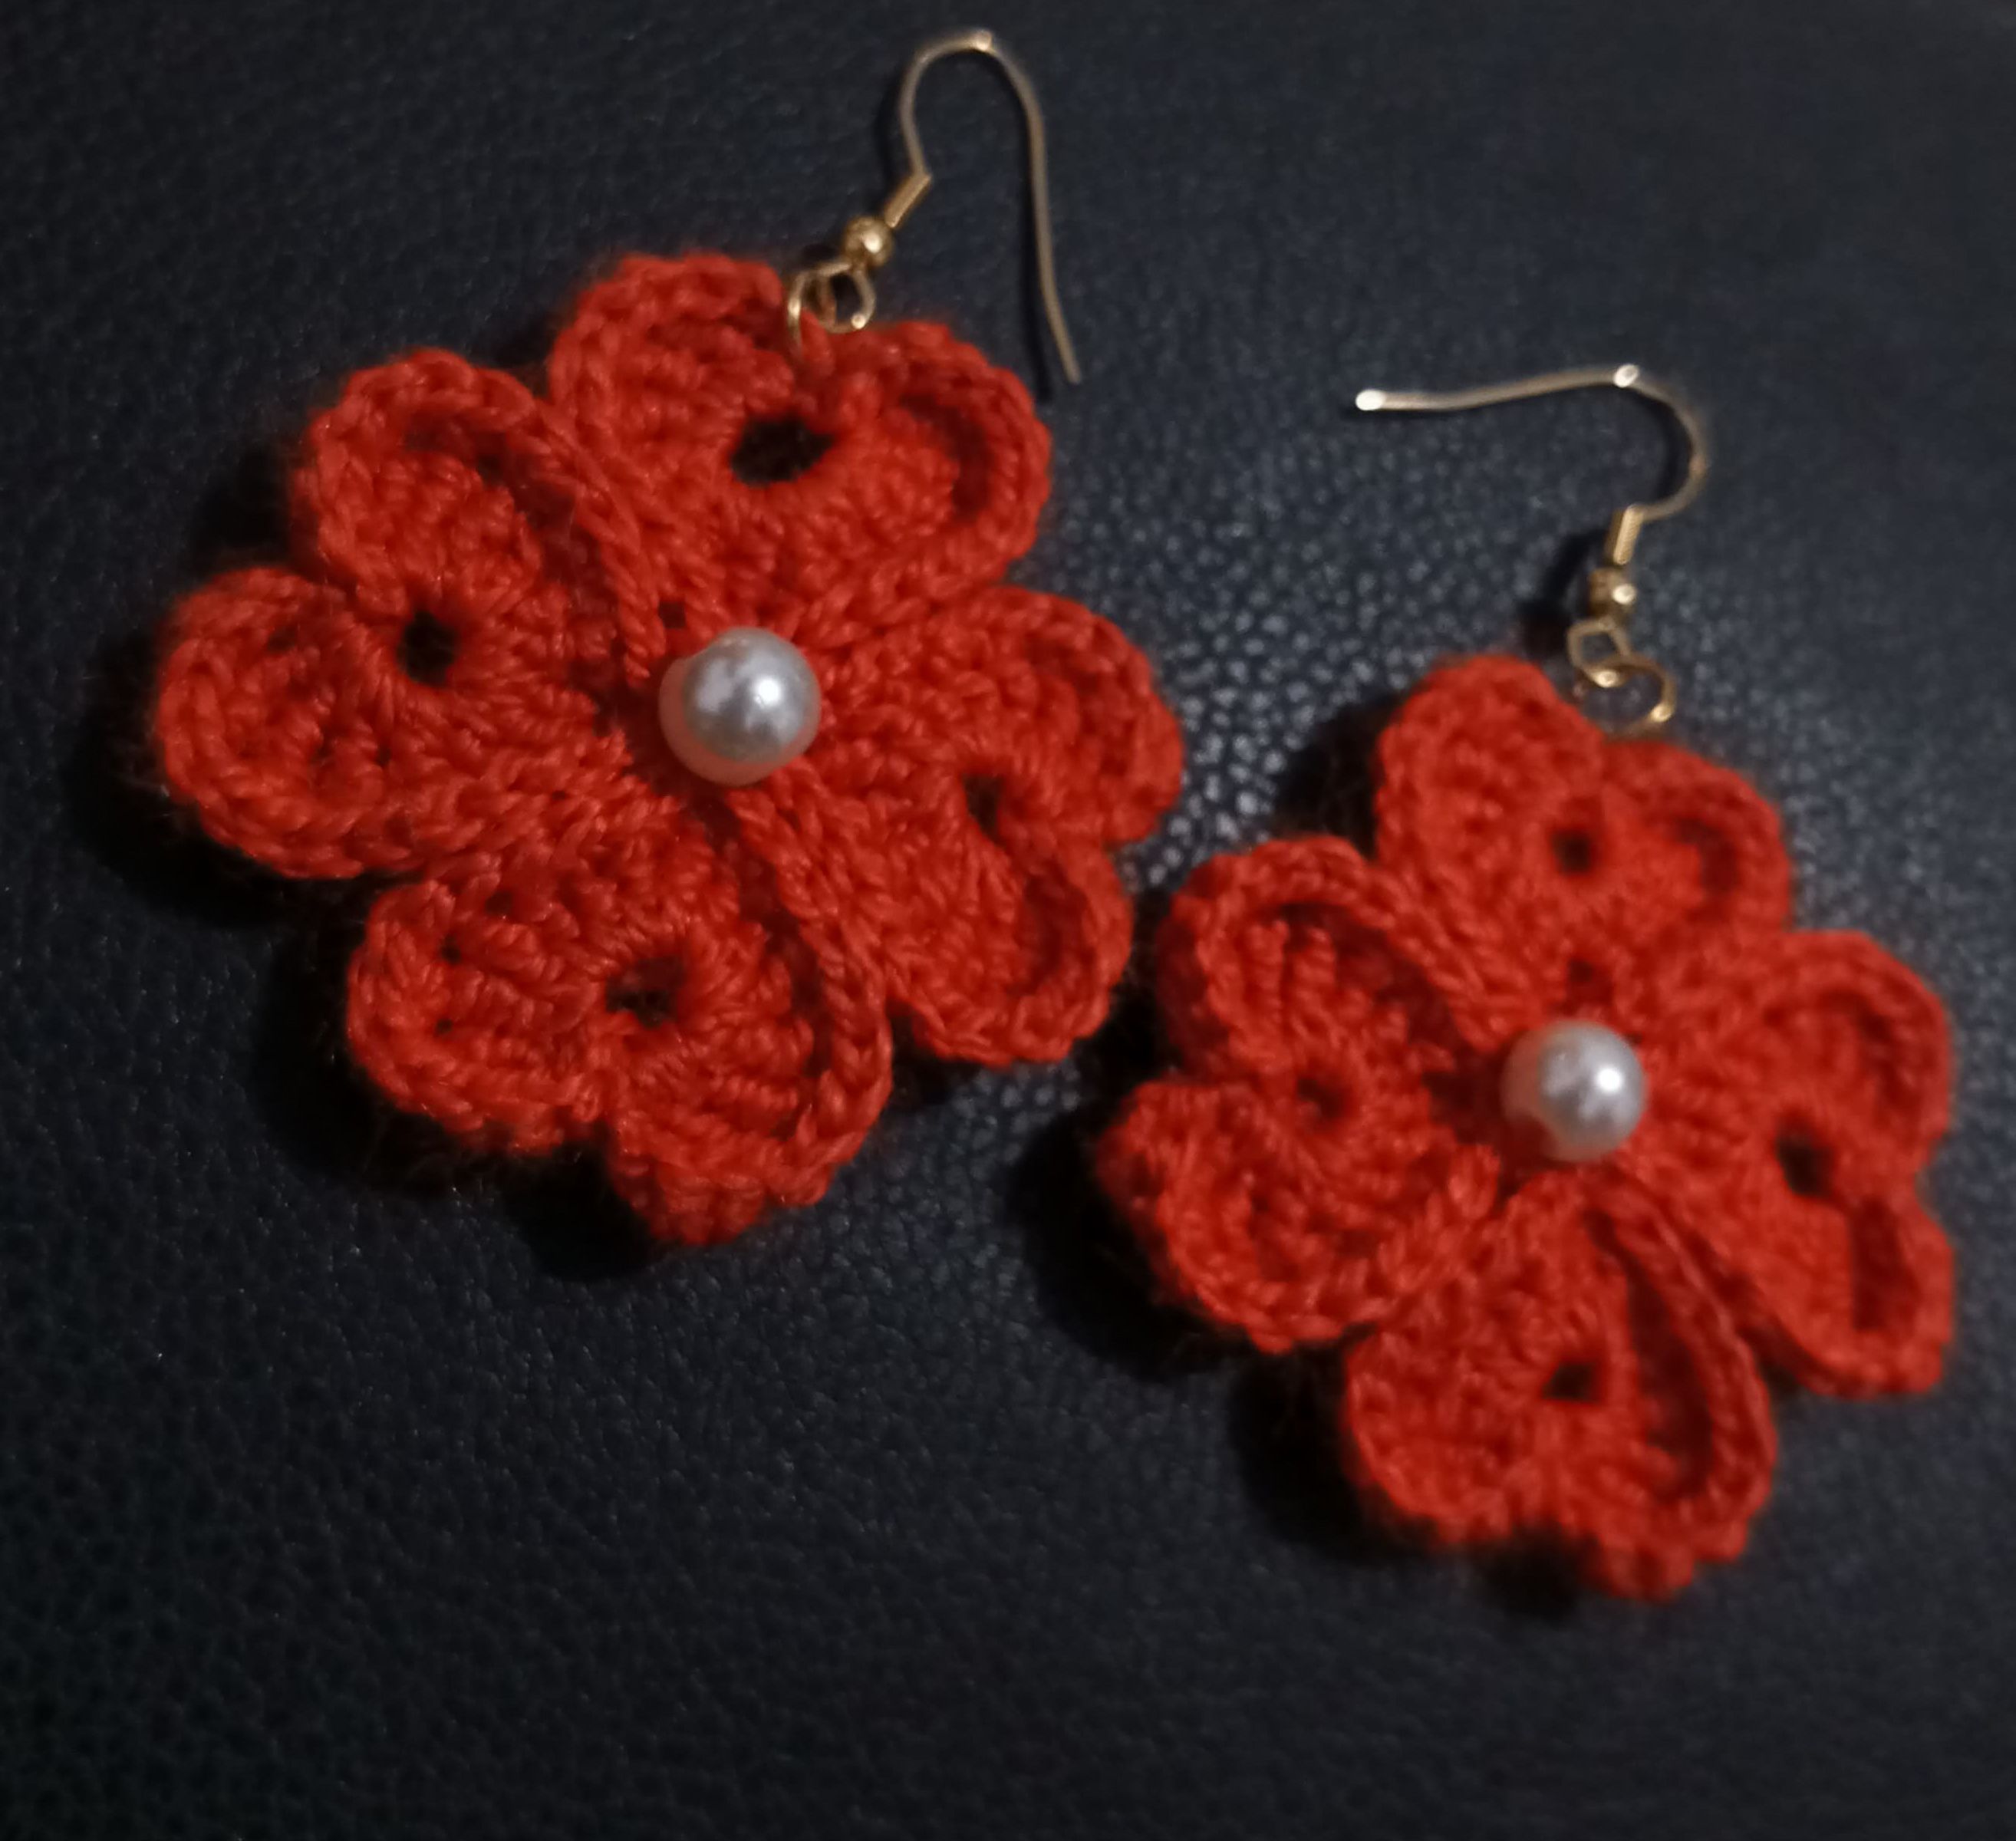
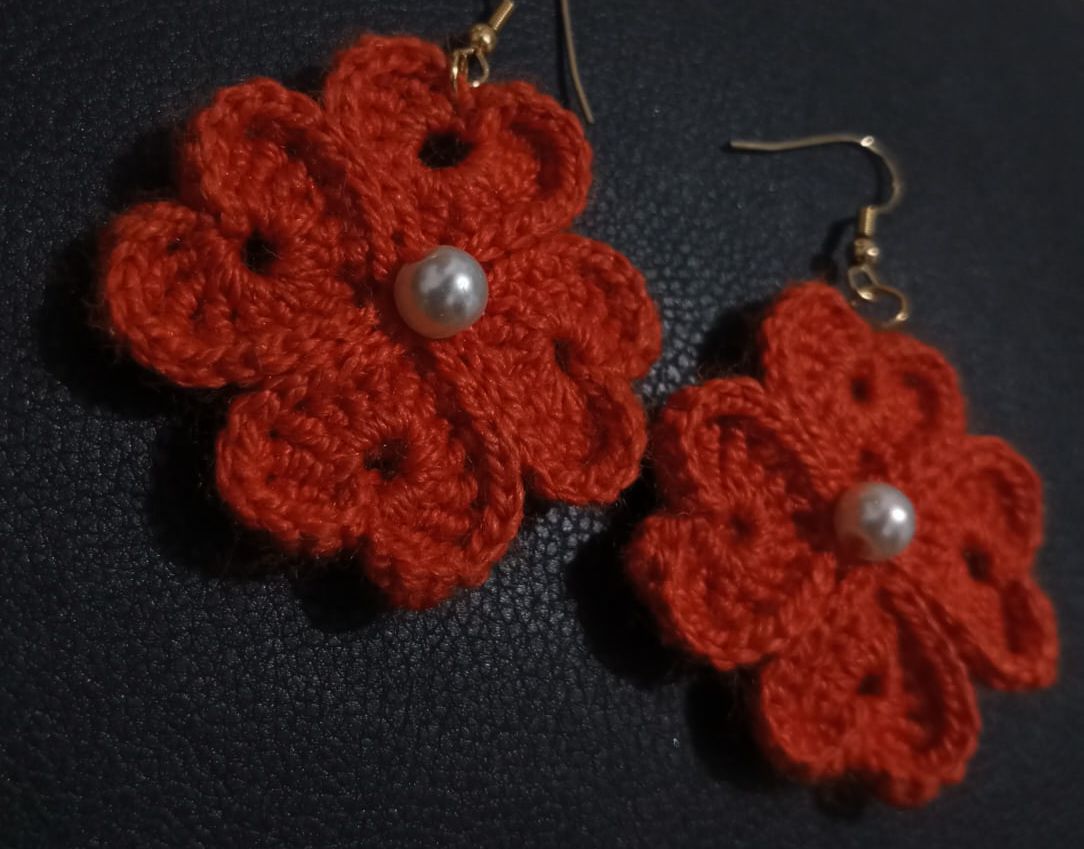
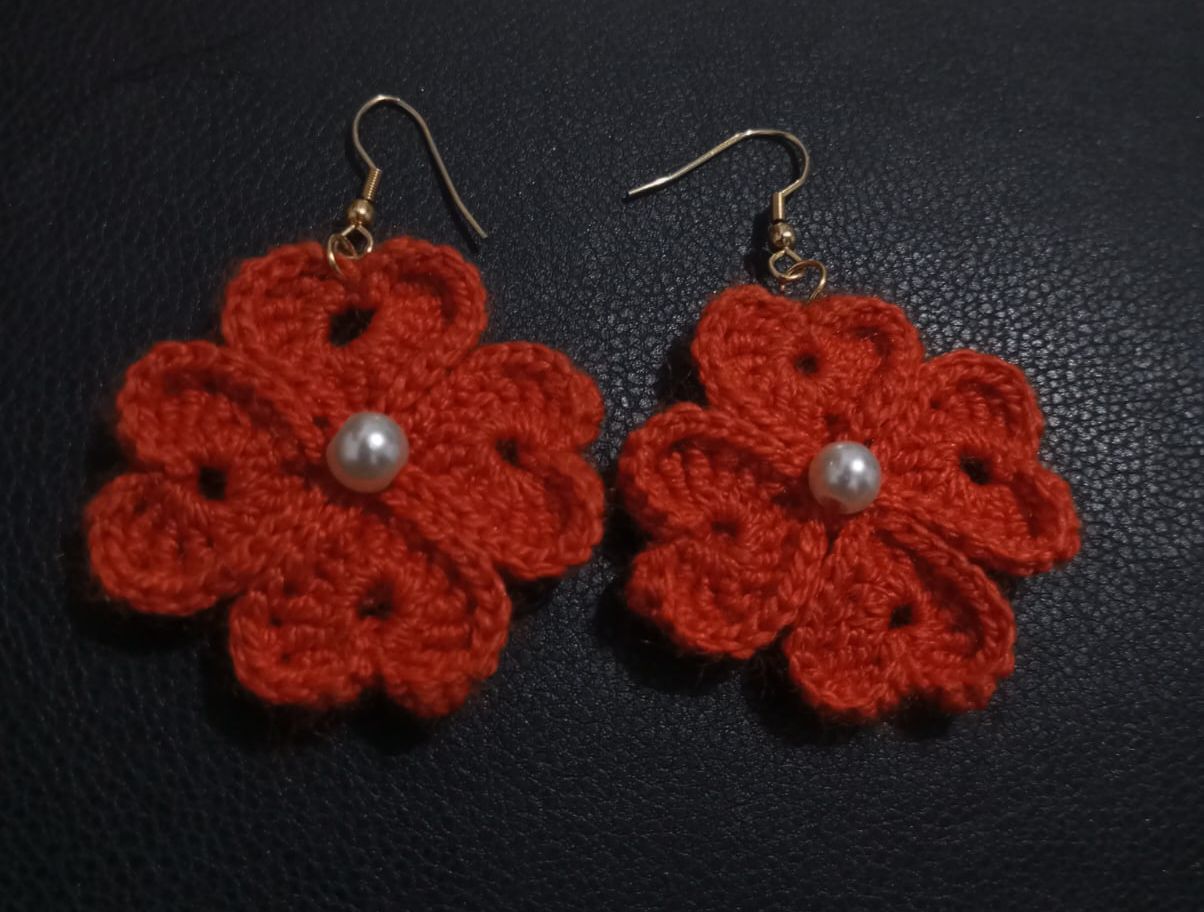
The intimate step will be to join the hearts to the base, for this we will need the needle with thread again and we will sew the two parts together, taking care that it does not look bad on either side, then we tie the excess thread and cut, now we only have to put the rings and hooks and our earring is ready ✨
Espero les haya gustado, sinceramente me demore muchísimo más de lo que pensé con cada uno de ellos, pero siento que al final con el resultado que obtuve, valió 100% la pena, les mando un fuerte abrazo y muchísimas Gracias por su apoyo siempre ❤️✨
I hope you liked it, honestly it took me a lot longer than I thought with each one of them, but I feel that in the end with the result I got, it was 100% worth it, I send you a big hug and thank you very much for your support always ❤️✨