(ENG)
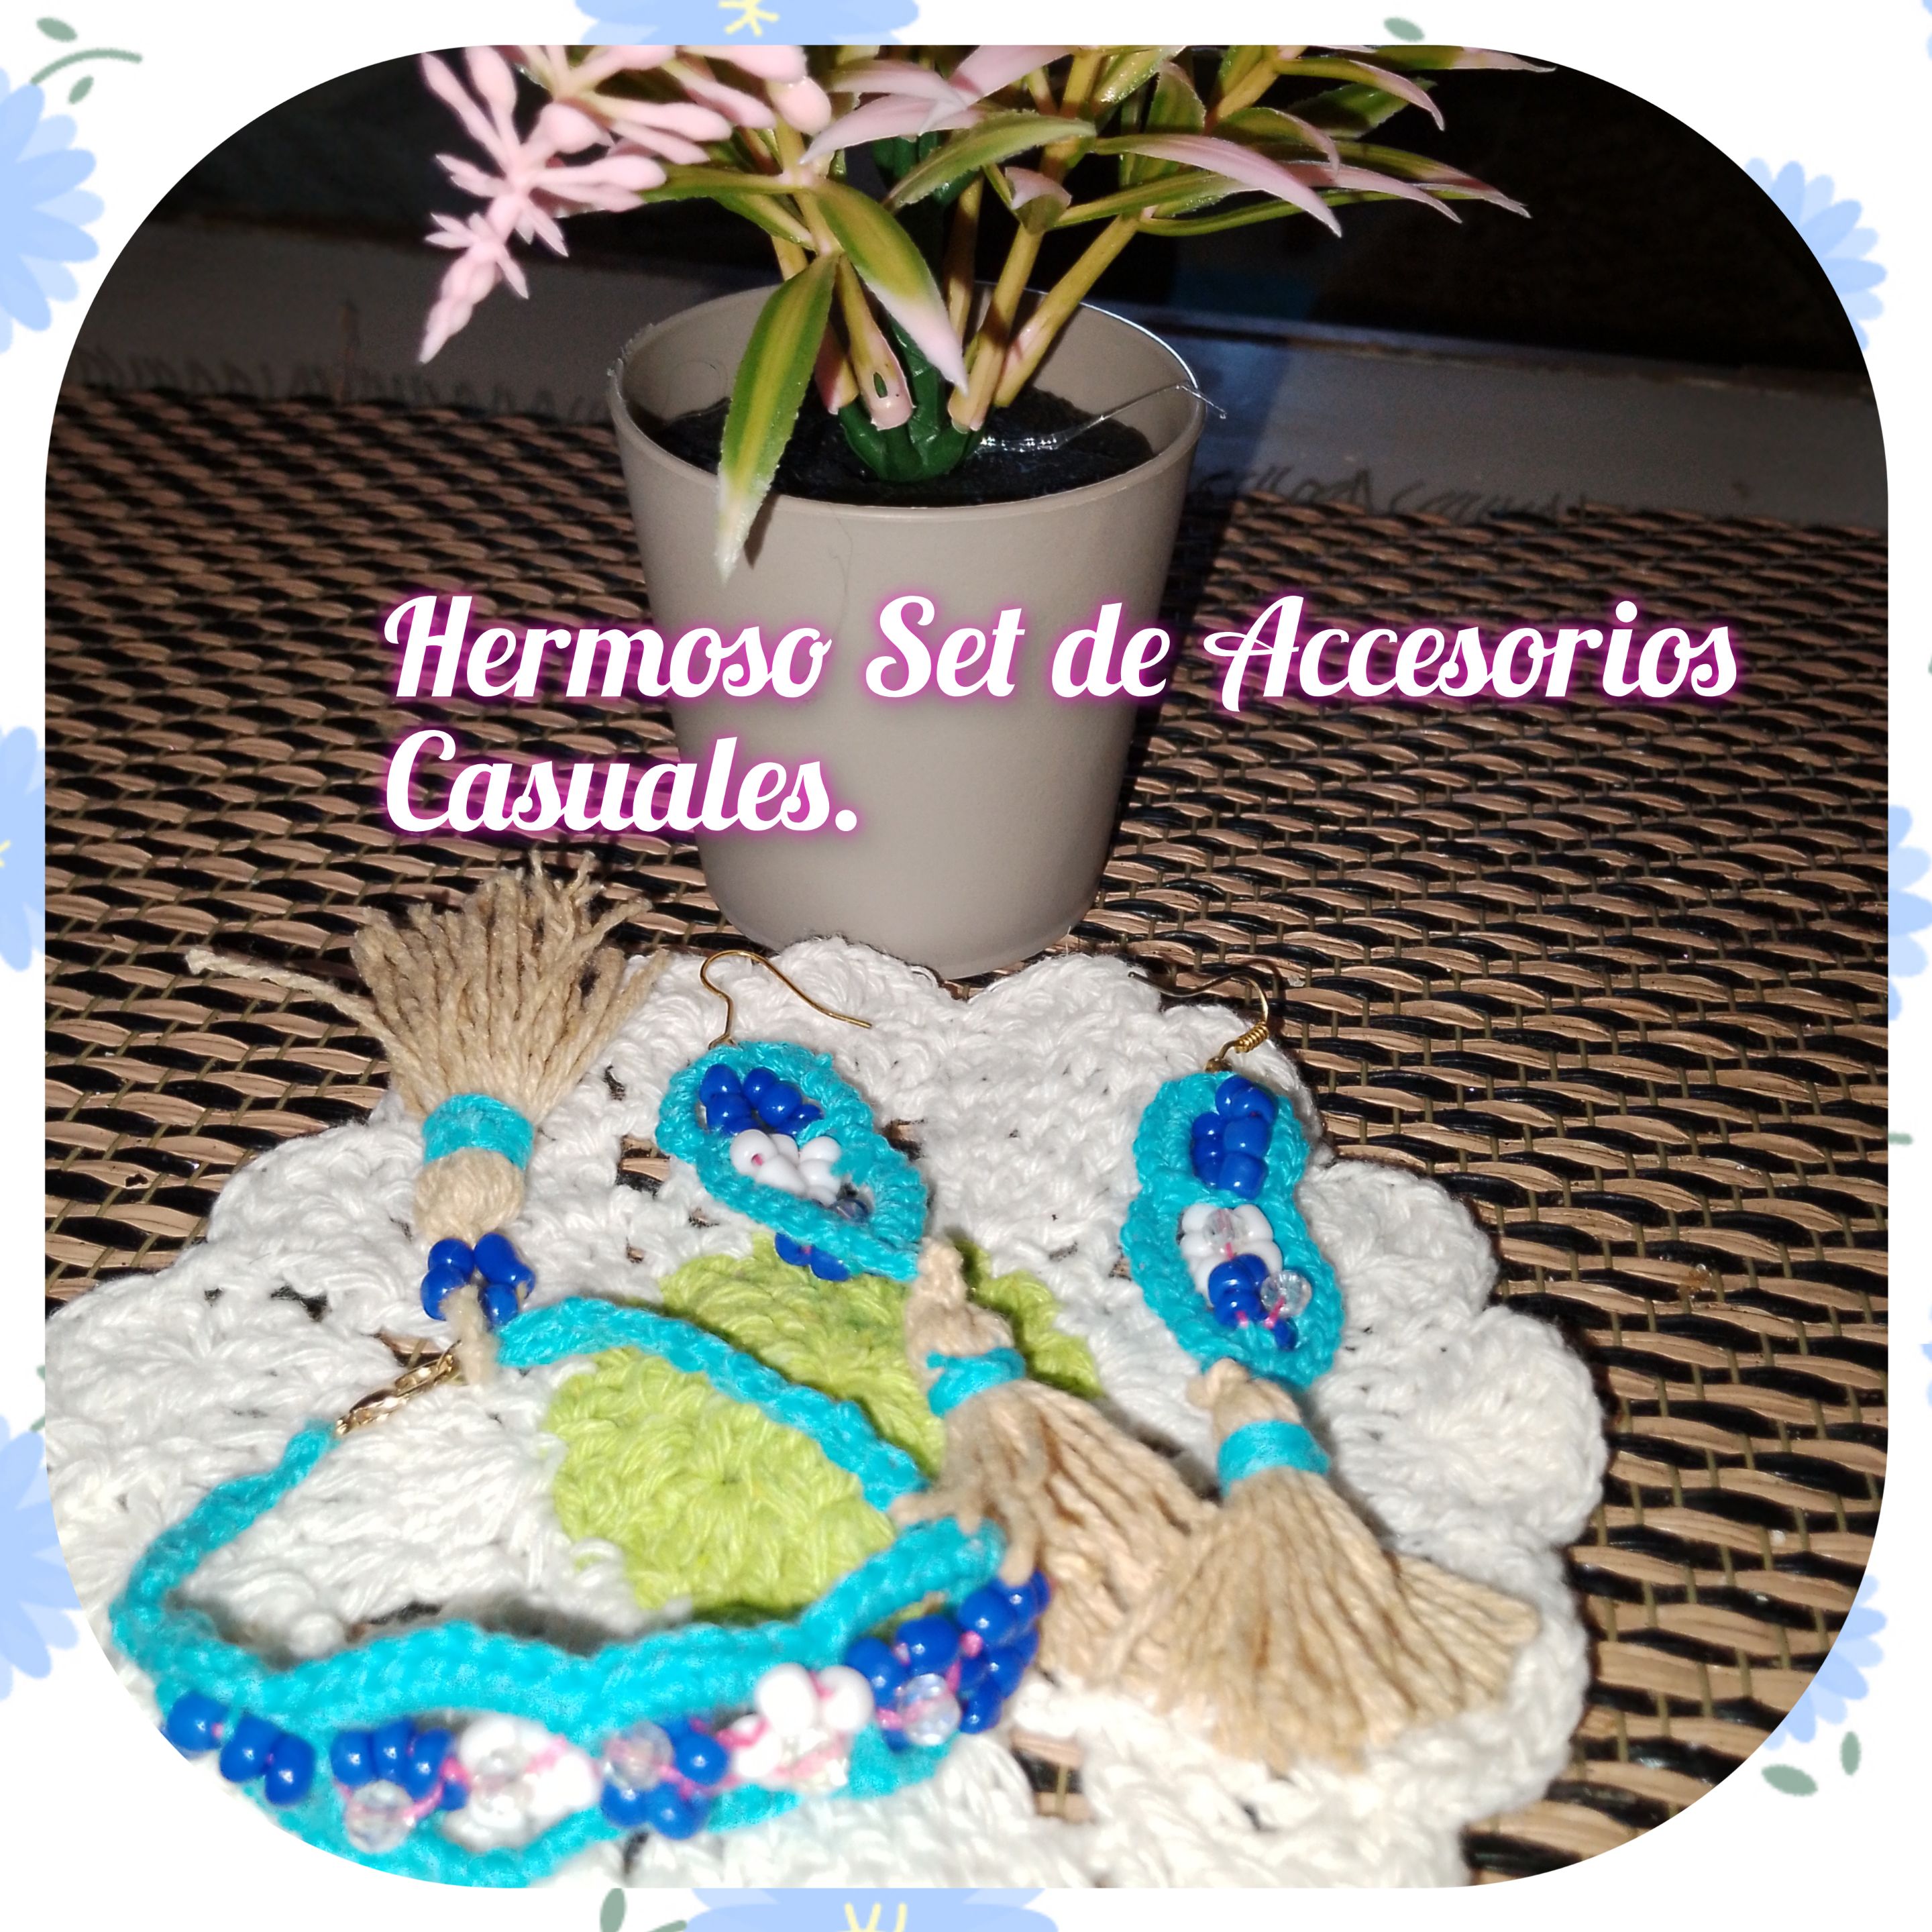
Hello everyone, I hope you are well, enjoying good spirits and health. I am pleased to be with you today, at @jewelry, today I come to show you a very simple step by step, how to make a cute and casual set of accessories, ideal to wear at any time. Where to use jewelry and crochet techniques. So I invite you. Follow me and you will see how easy it is to make and how fantastic the result is.
Materials
. Yarn for knitting, colors (blue and cream).
. Knitting needle.
. Thread and thin needle.
. Blue and white beads.
. Czech crystals n4.
. Barrette.
. Earring hook.
. Jewelry earring
. Jewelry tweezers.
. Scissors.
Preparation
steps:
1.) Start, introducing six beads into the thread, I tie each end, forming a circle, then I introduce a crystal which I place in the center of the small circle, and formed a delicate and striking flower. In this way, I continue forming these flowers consecutively, until I reach a total of four, two blue and two white. At each end, I placed six blue beads, forming a circle, but I will not place the crystal on this one.

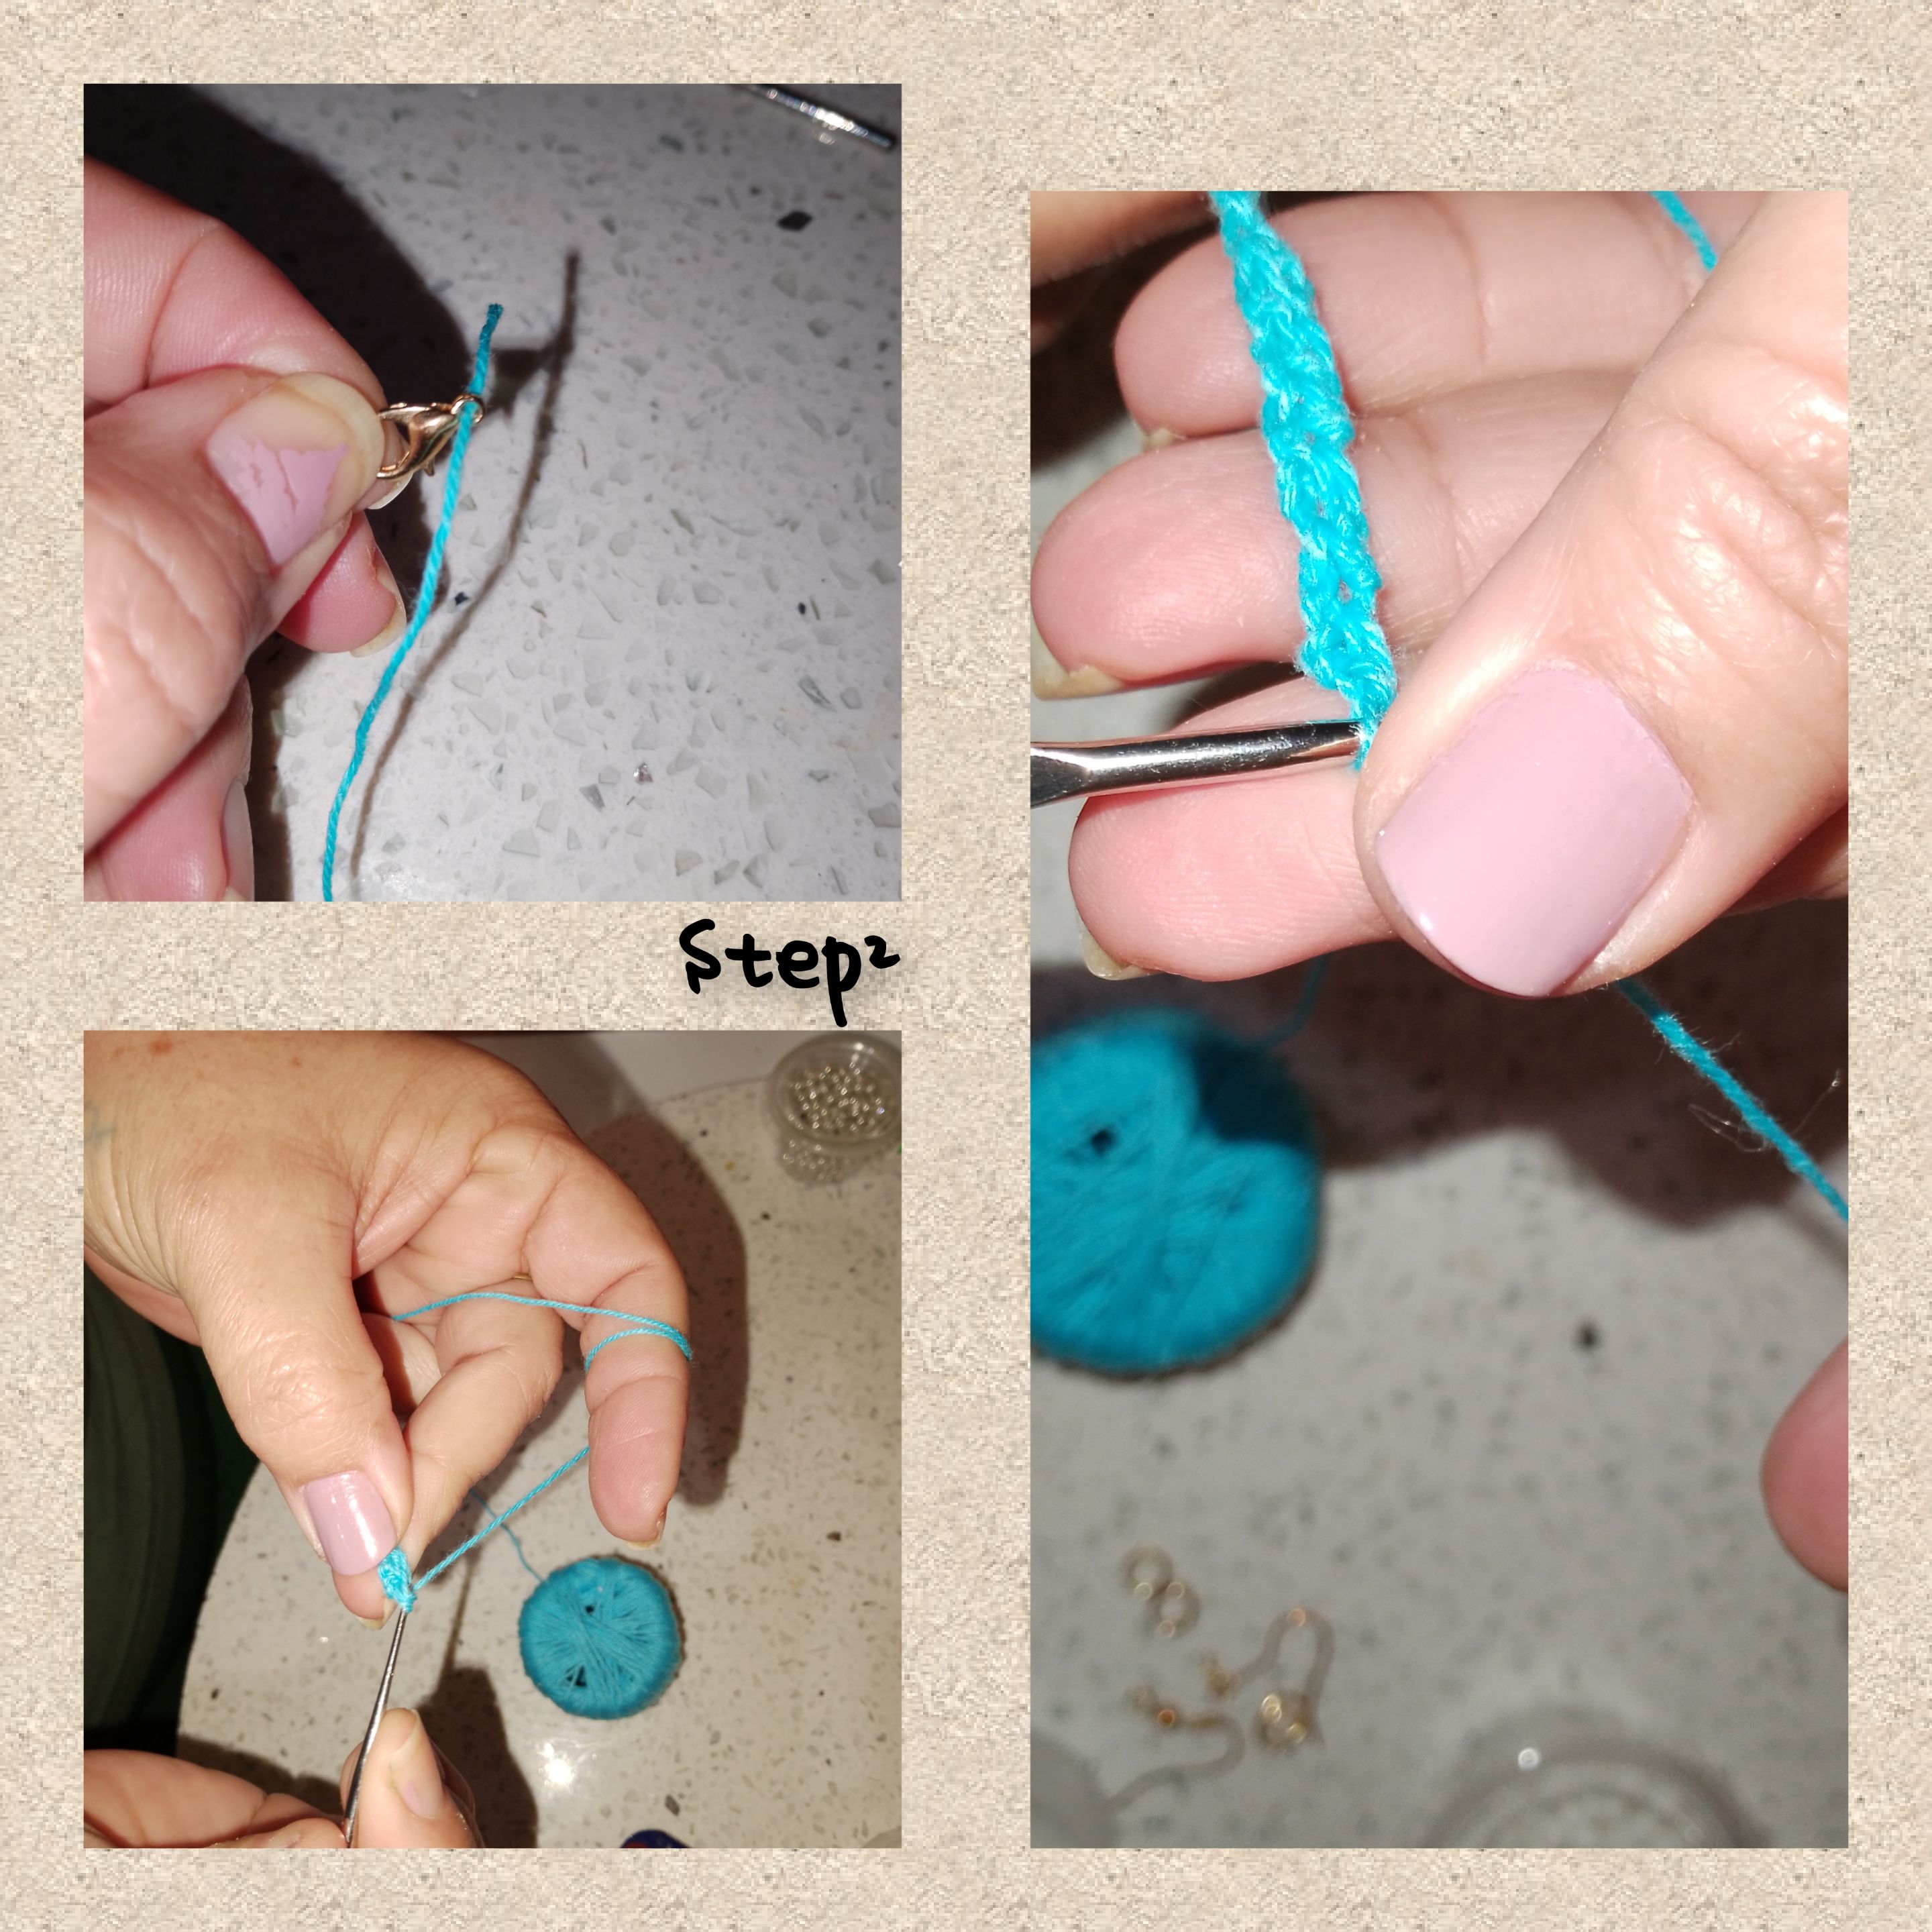
2.) I introduce the blue thread inside the pin, tie with two knots, raise two chain stitches and in the first chain stitch half a stitch, in this way I repeat, until reaching the considered length, taking as a measure, the wrist of my hand.
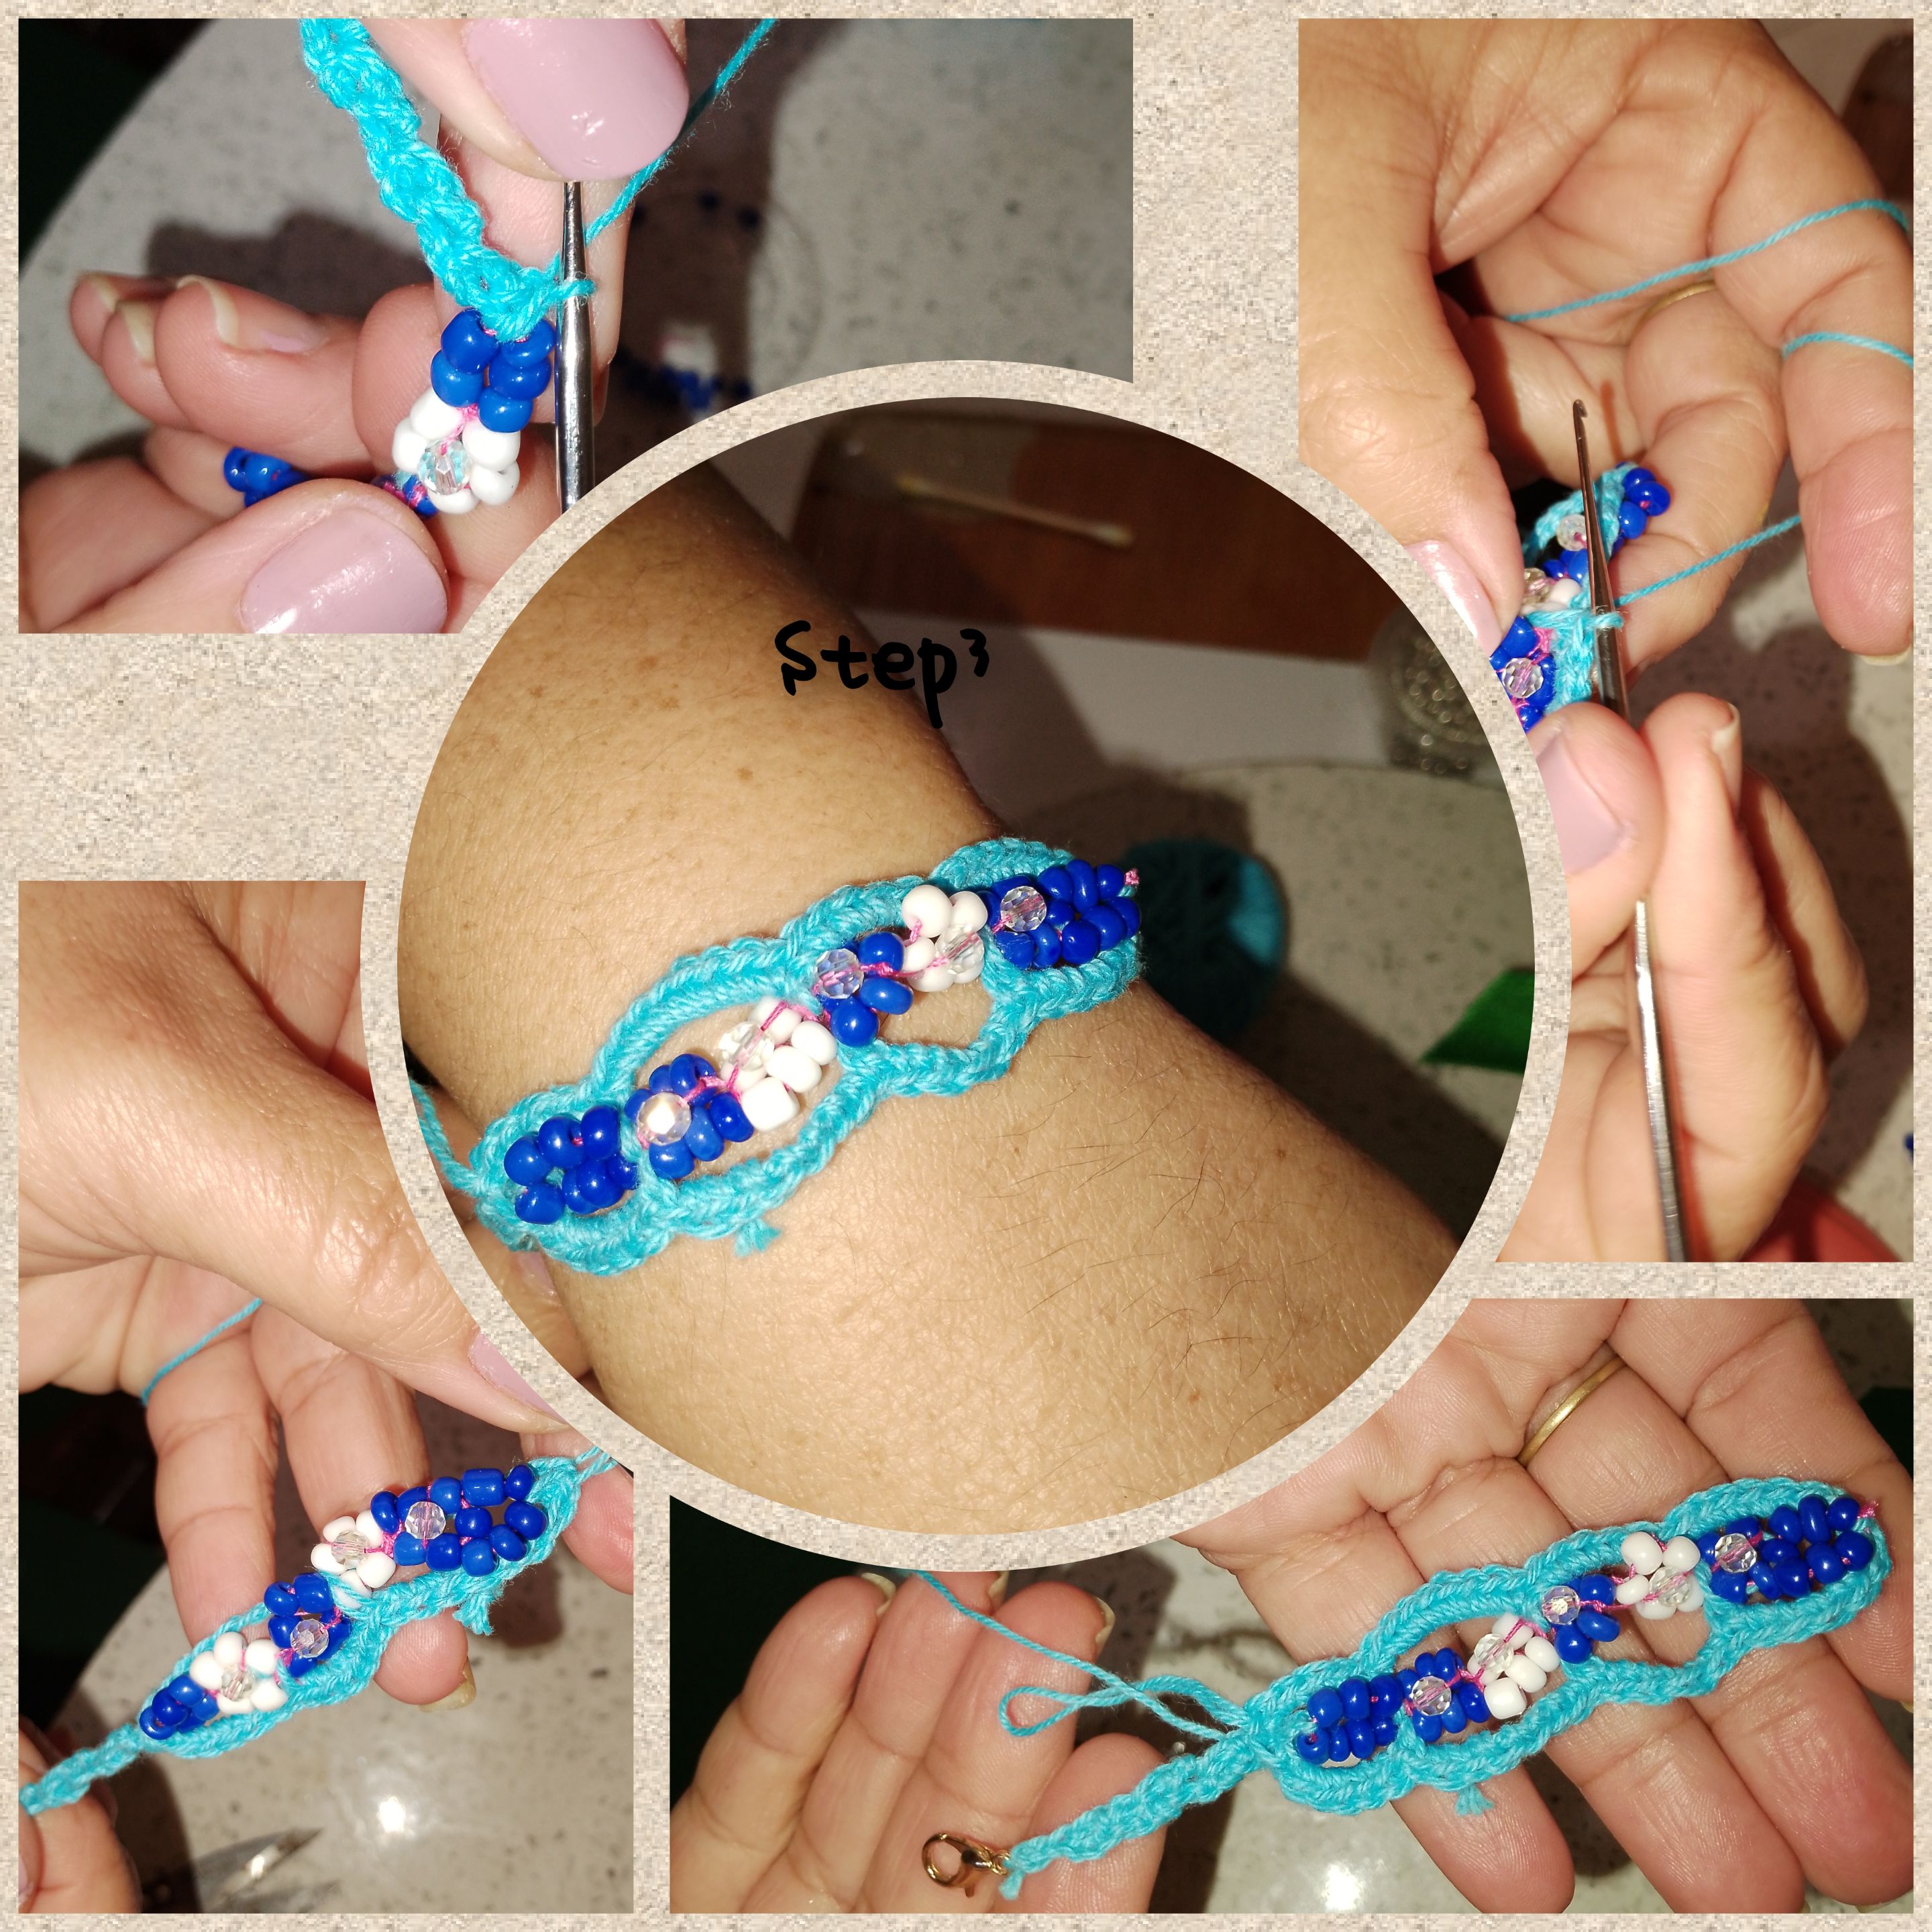
3.) with u. Slip stitch, I tie the flowers, to form the bracelet, first at one end, I knit a new slip stitch, to give more security. I pick up six chain stitches, go down to the space that separates the first little flower and knit a slip stitch, I pick up seven chain stitches and go down to the space separating the next two little flowers, I pick up six chain stitches and go down to the next group of beads. . Now I turn and knit the next side of the flowers as is, once this is done. I make a second round, knitting eight half stitches, in each group of chain stitches and I knit a slip stitch in each slip stitch of the last round. Arriving at the starting point, I finish off and cut the thread.
4.) I tie with several knots, the thread at the next end of the flowers and continue weaving the cord of the bracelet, at the end I tie with slipped stitches a jewelry ritual.
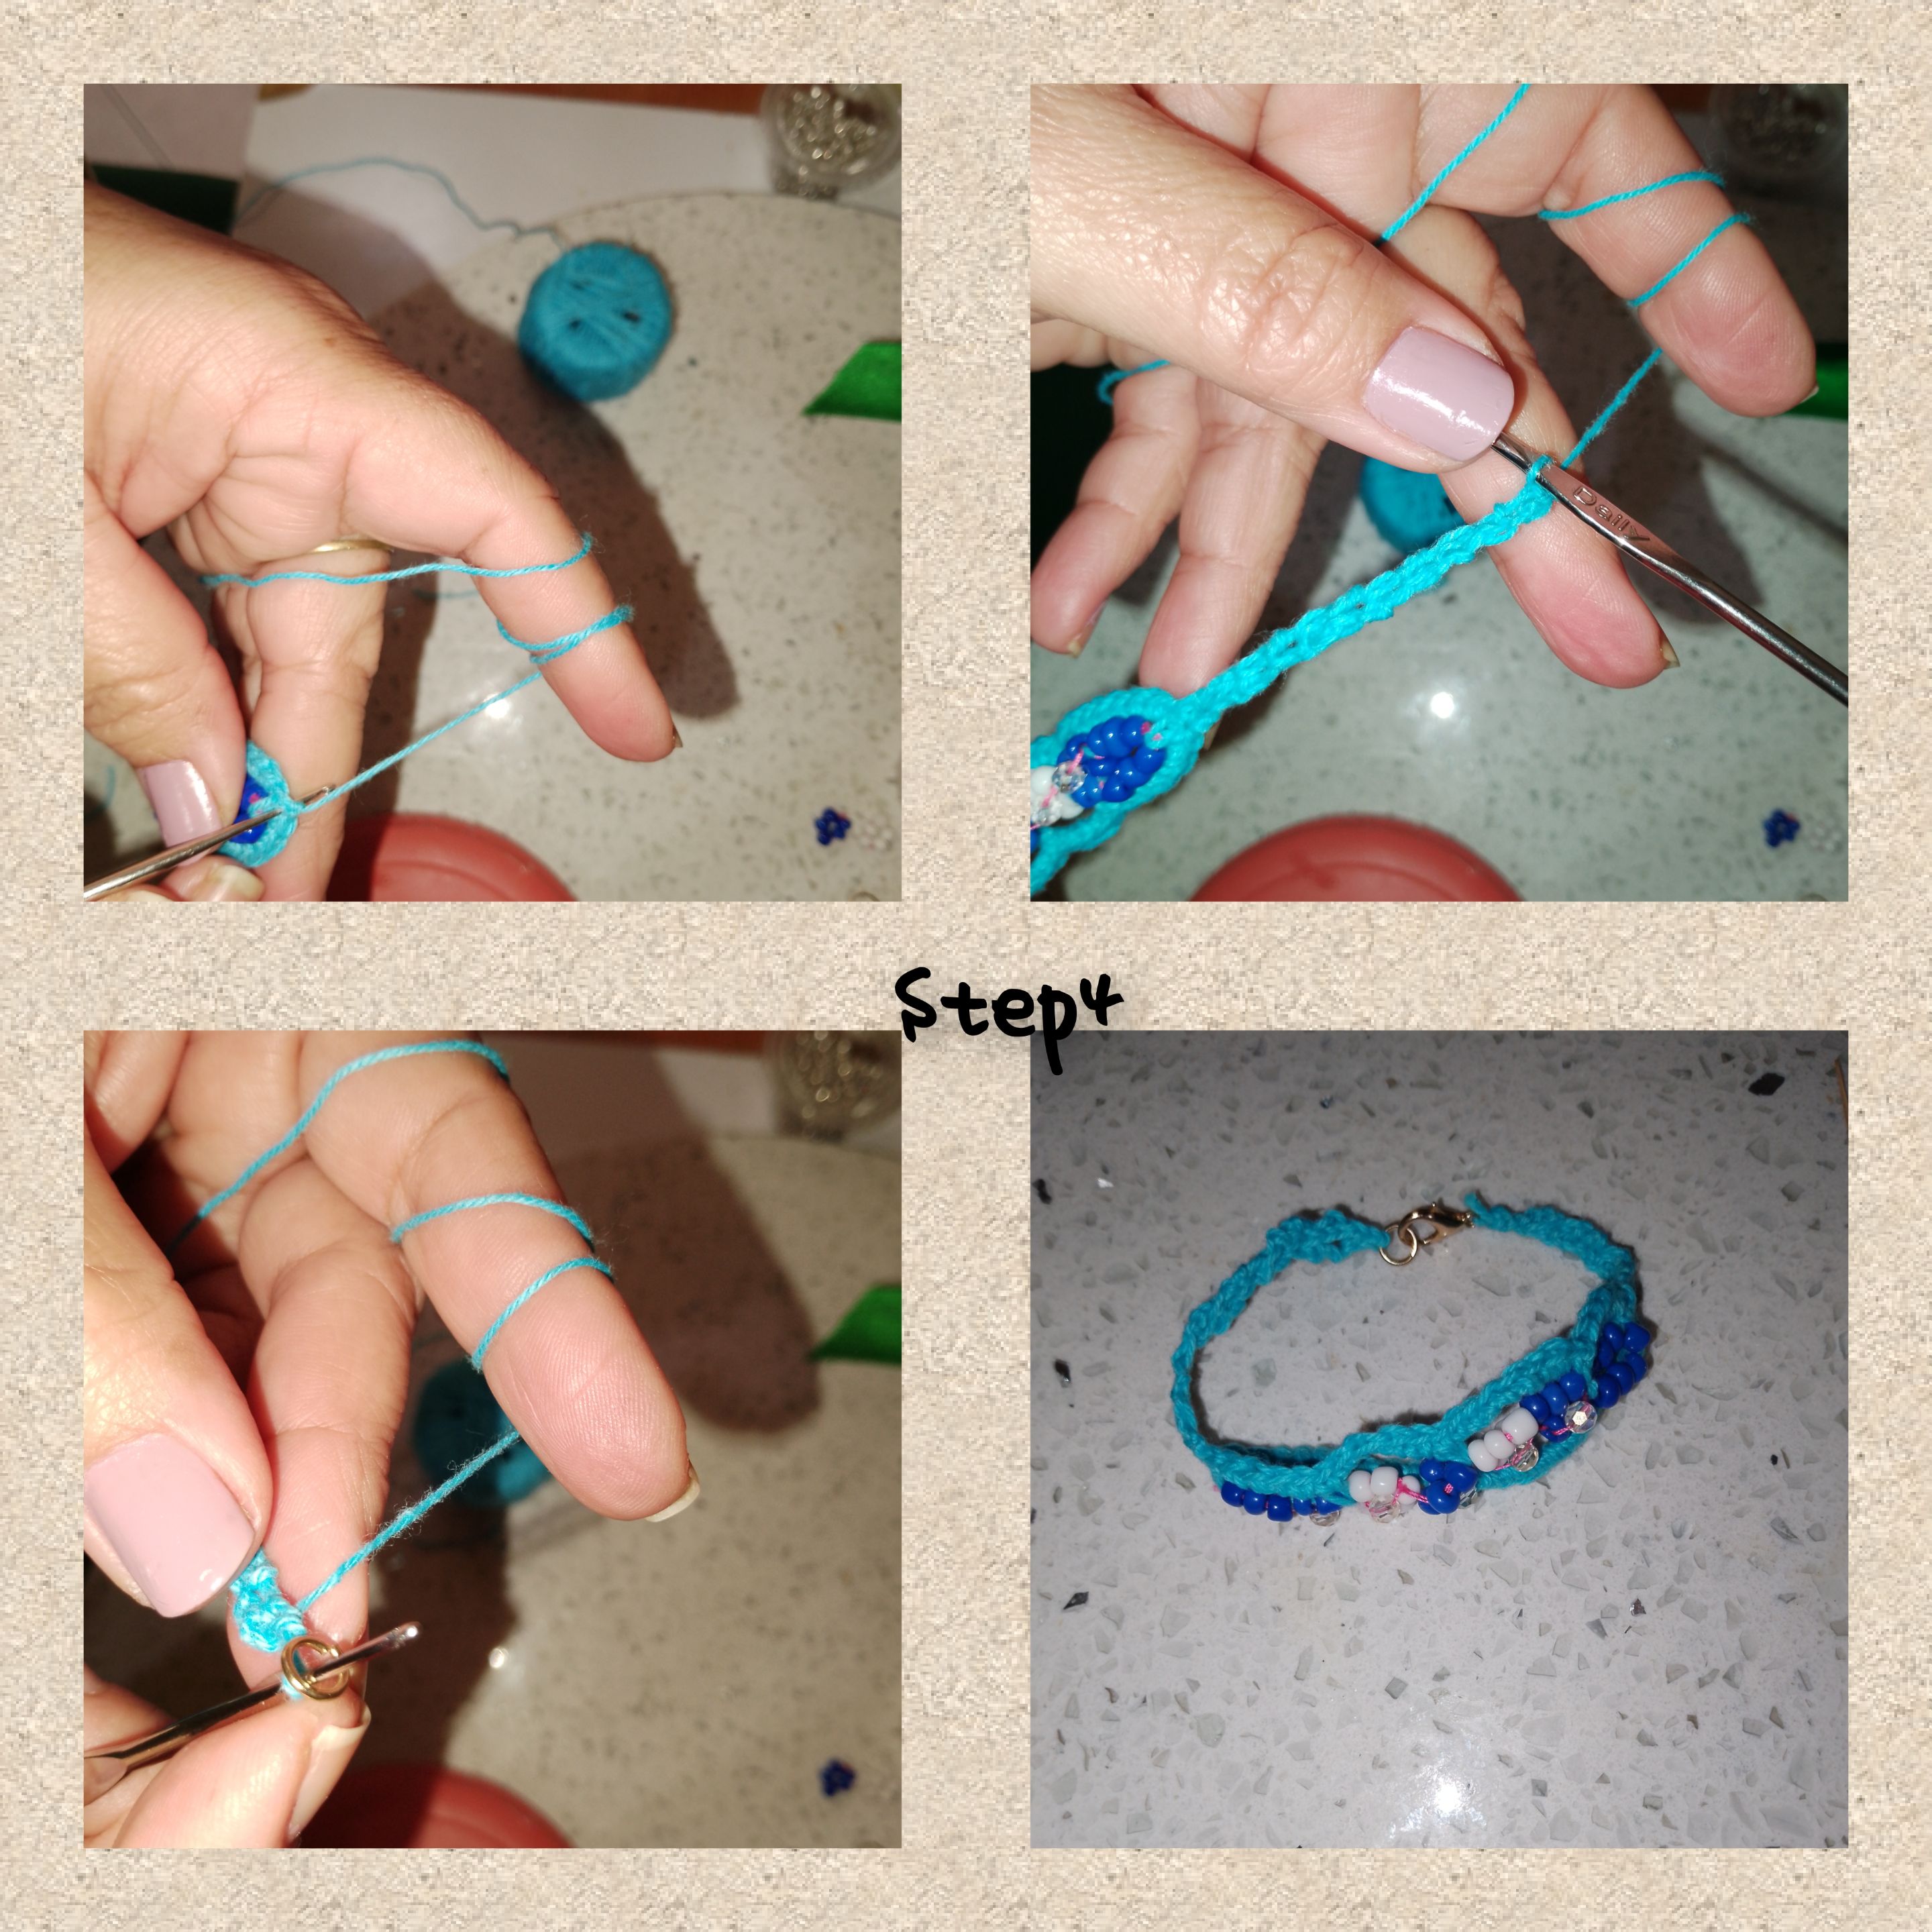
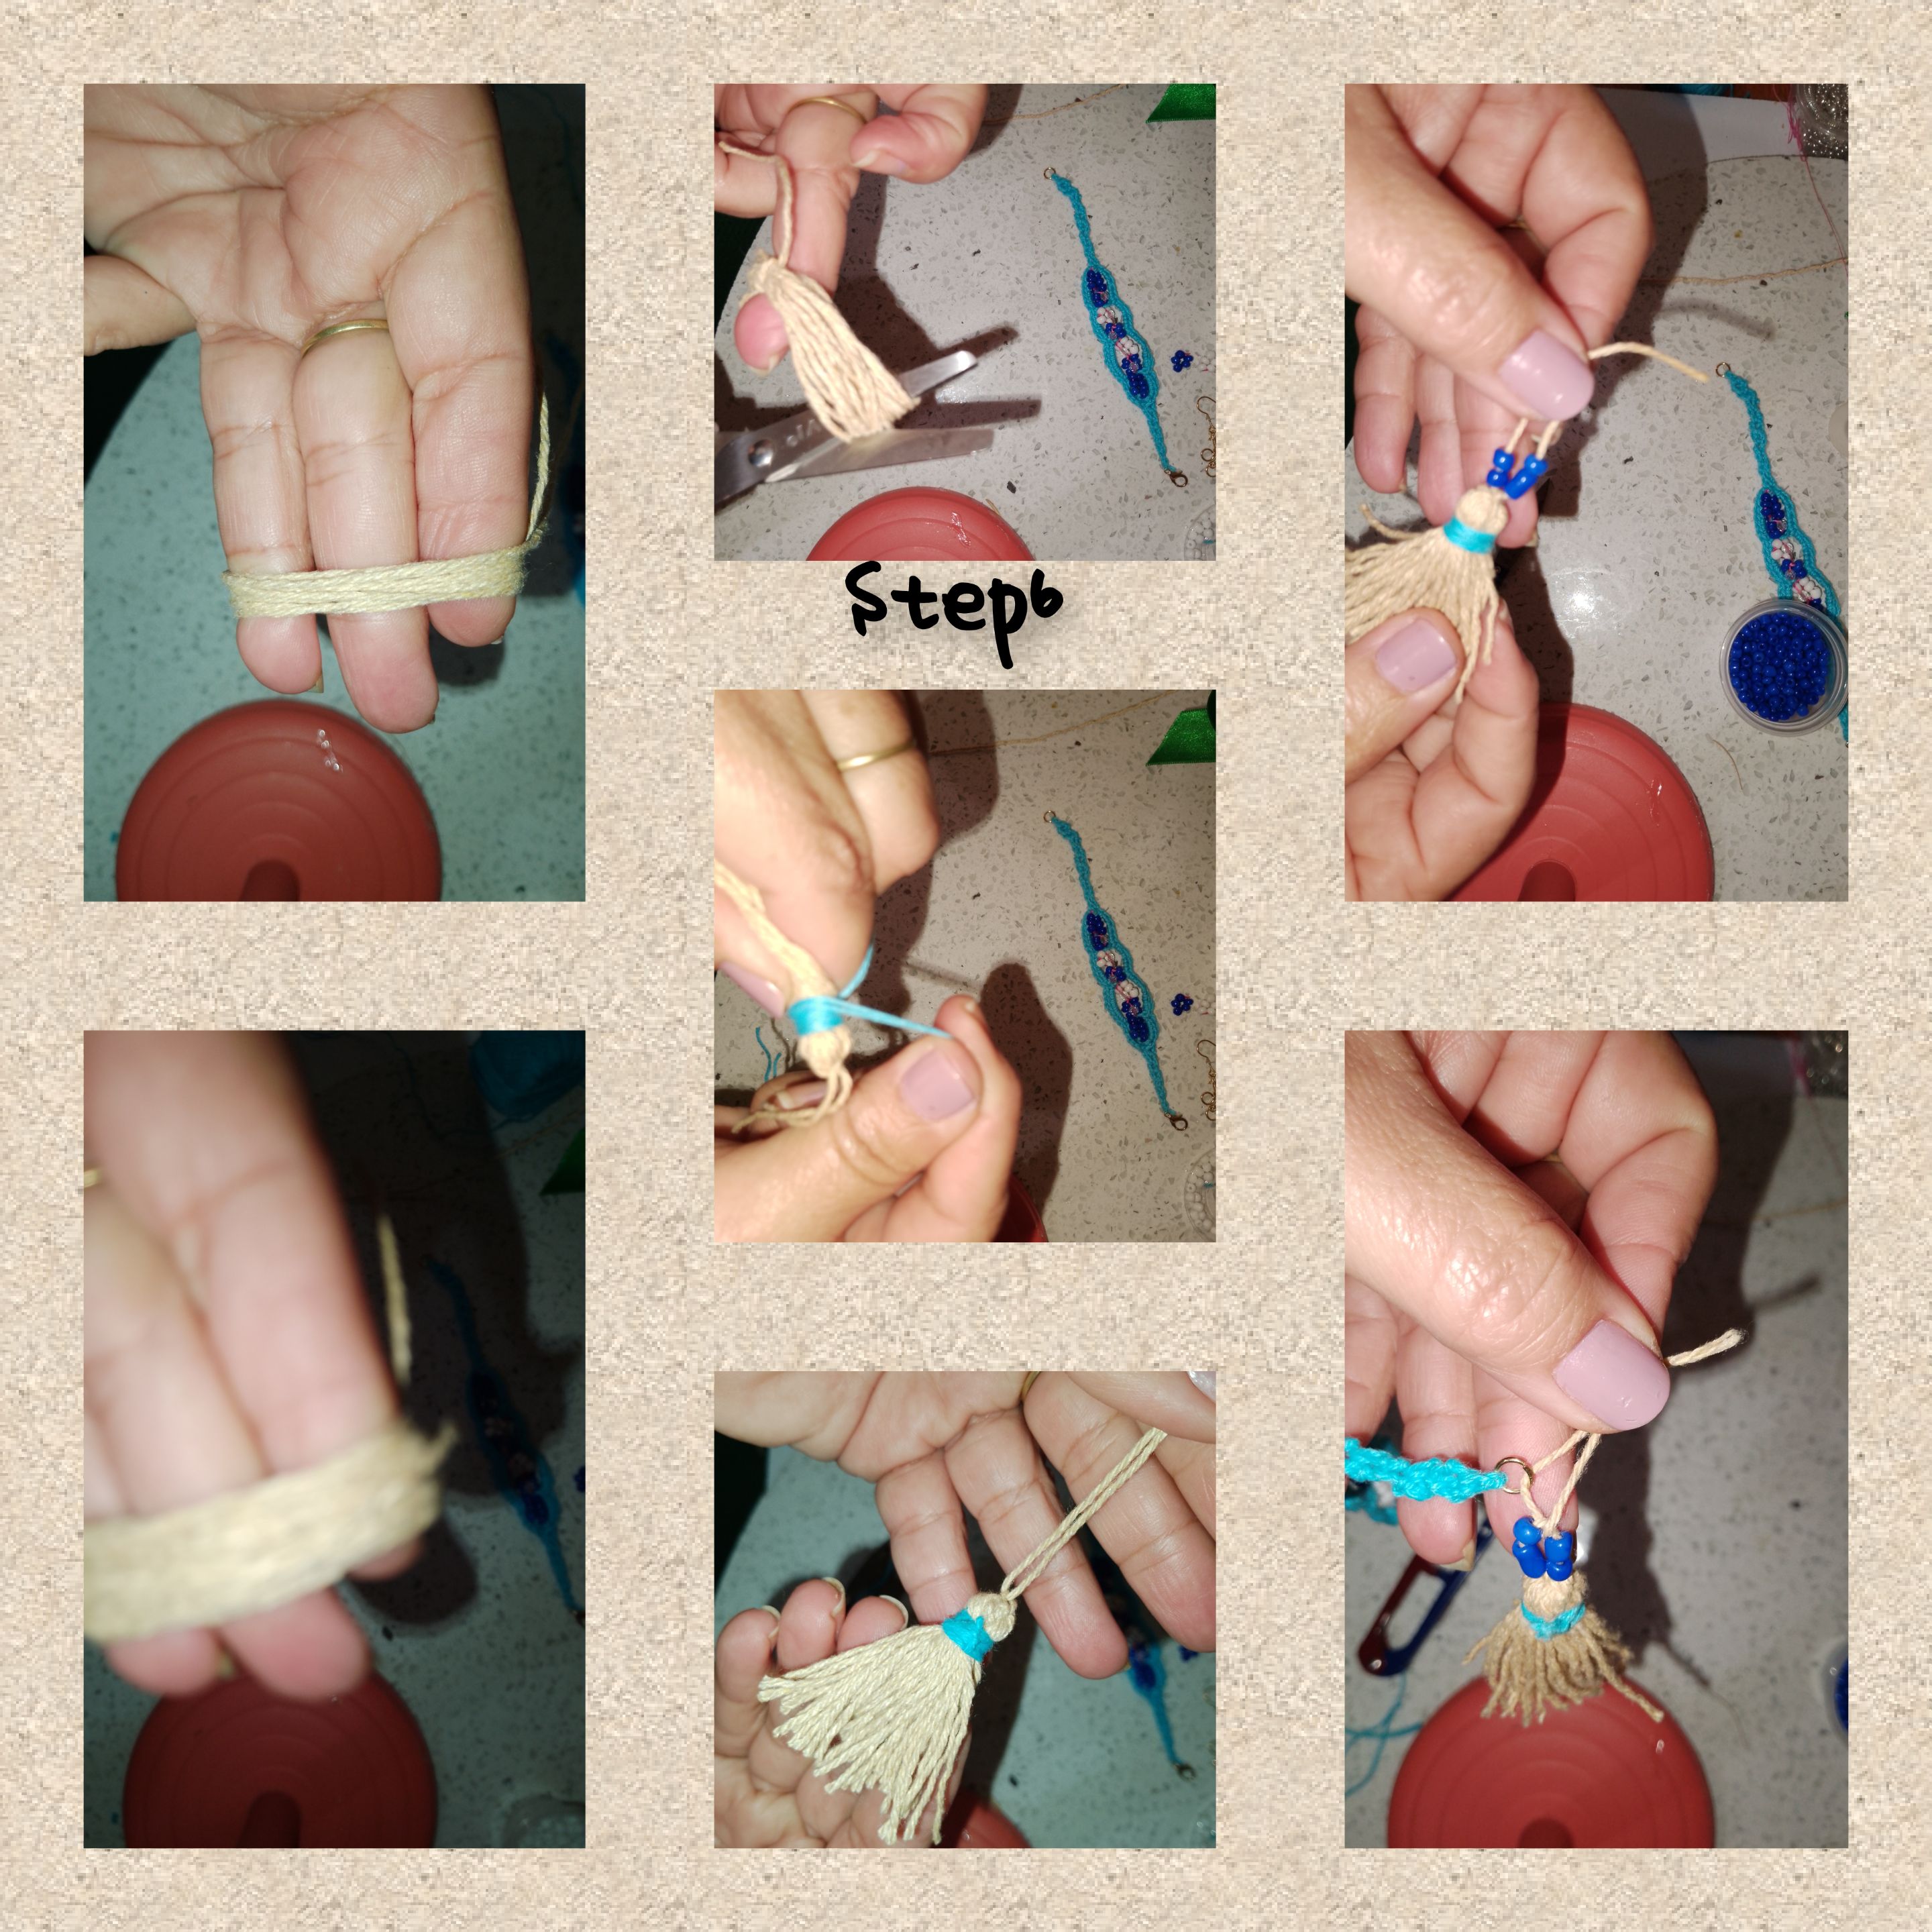
5.) Using the cream-colored thread, I wrap three of my fingers twenty times, cut and tie a knot, to form a small fringe. With the blue thread, I make eight turns at the top of the fringe and tie it well, so that it is well fixed. After trimming the residual threads, I cut the thread strands along the bottom. I shape with scissors. I insert two blue beads on each side into the cream-colored thread that I have left and tie inside the hoop, right where theBarrette.
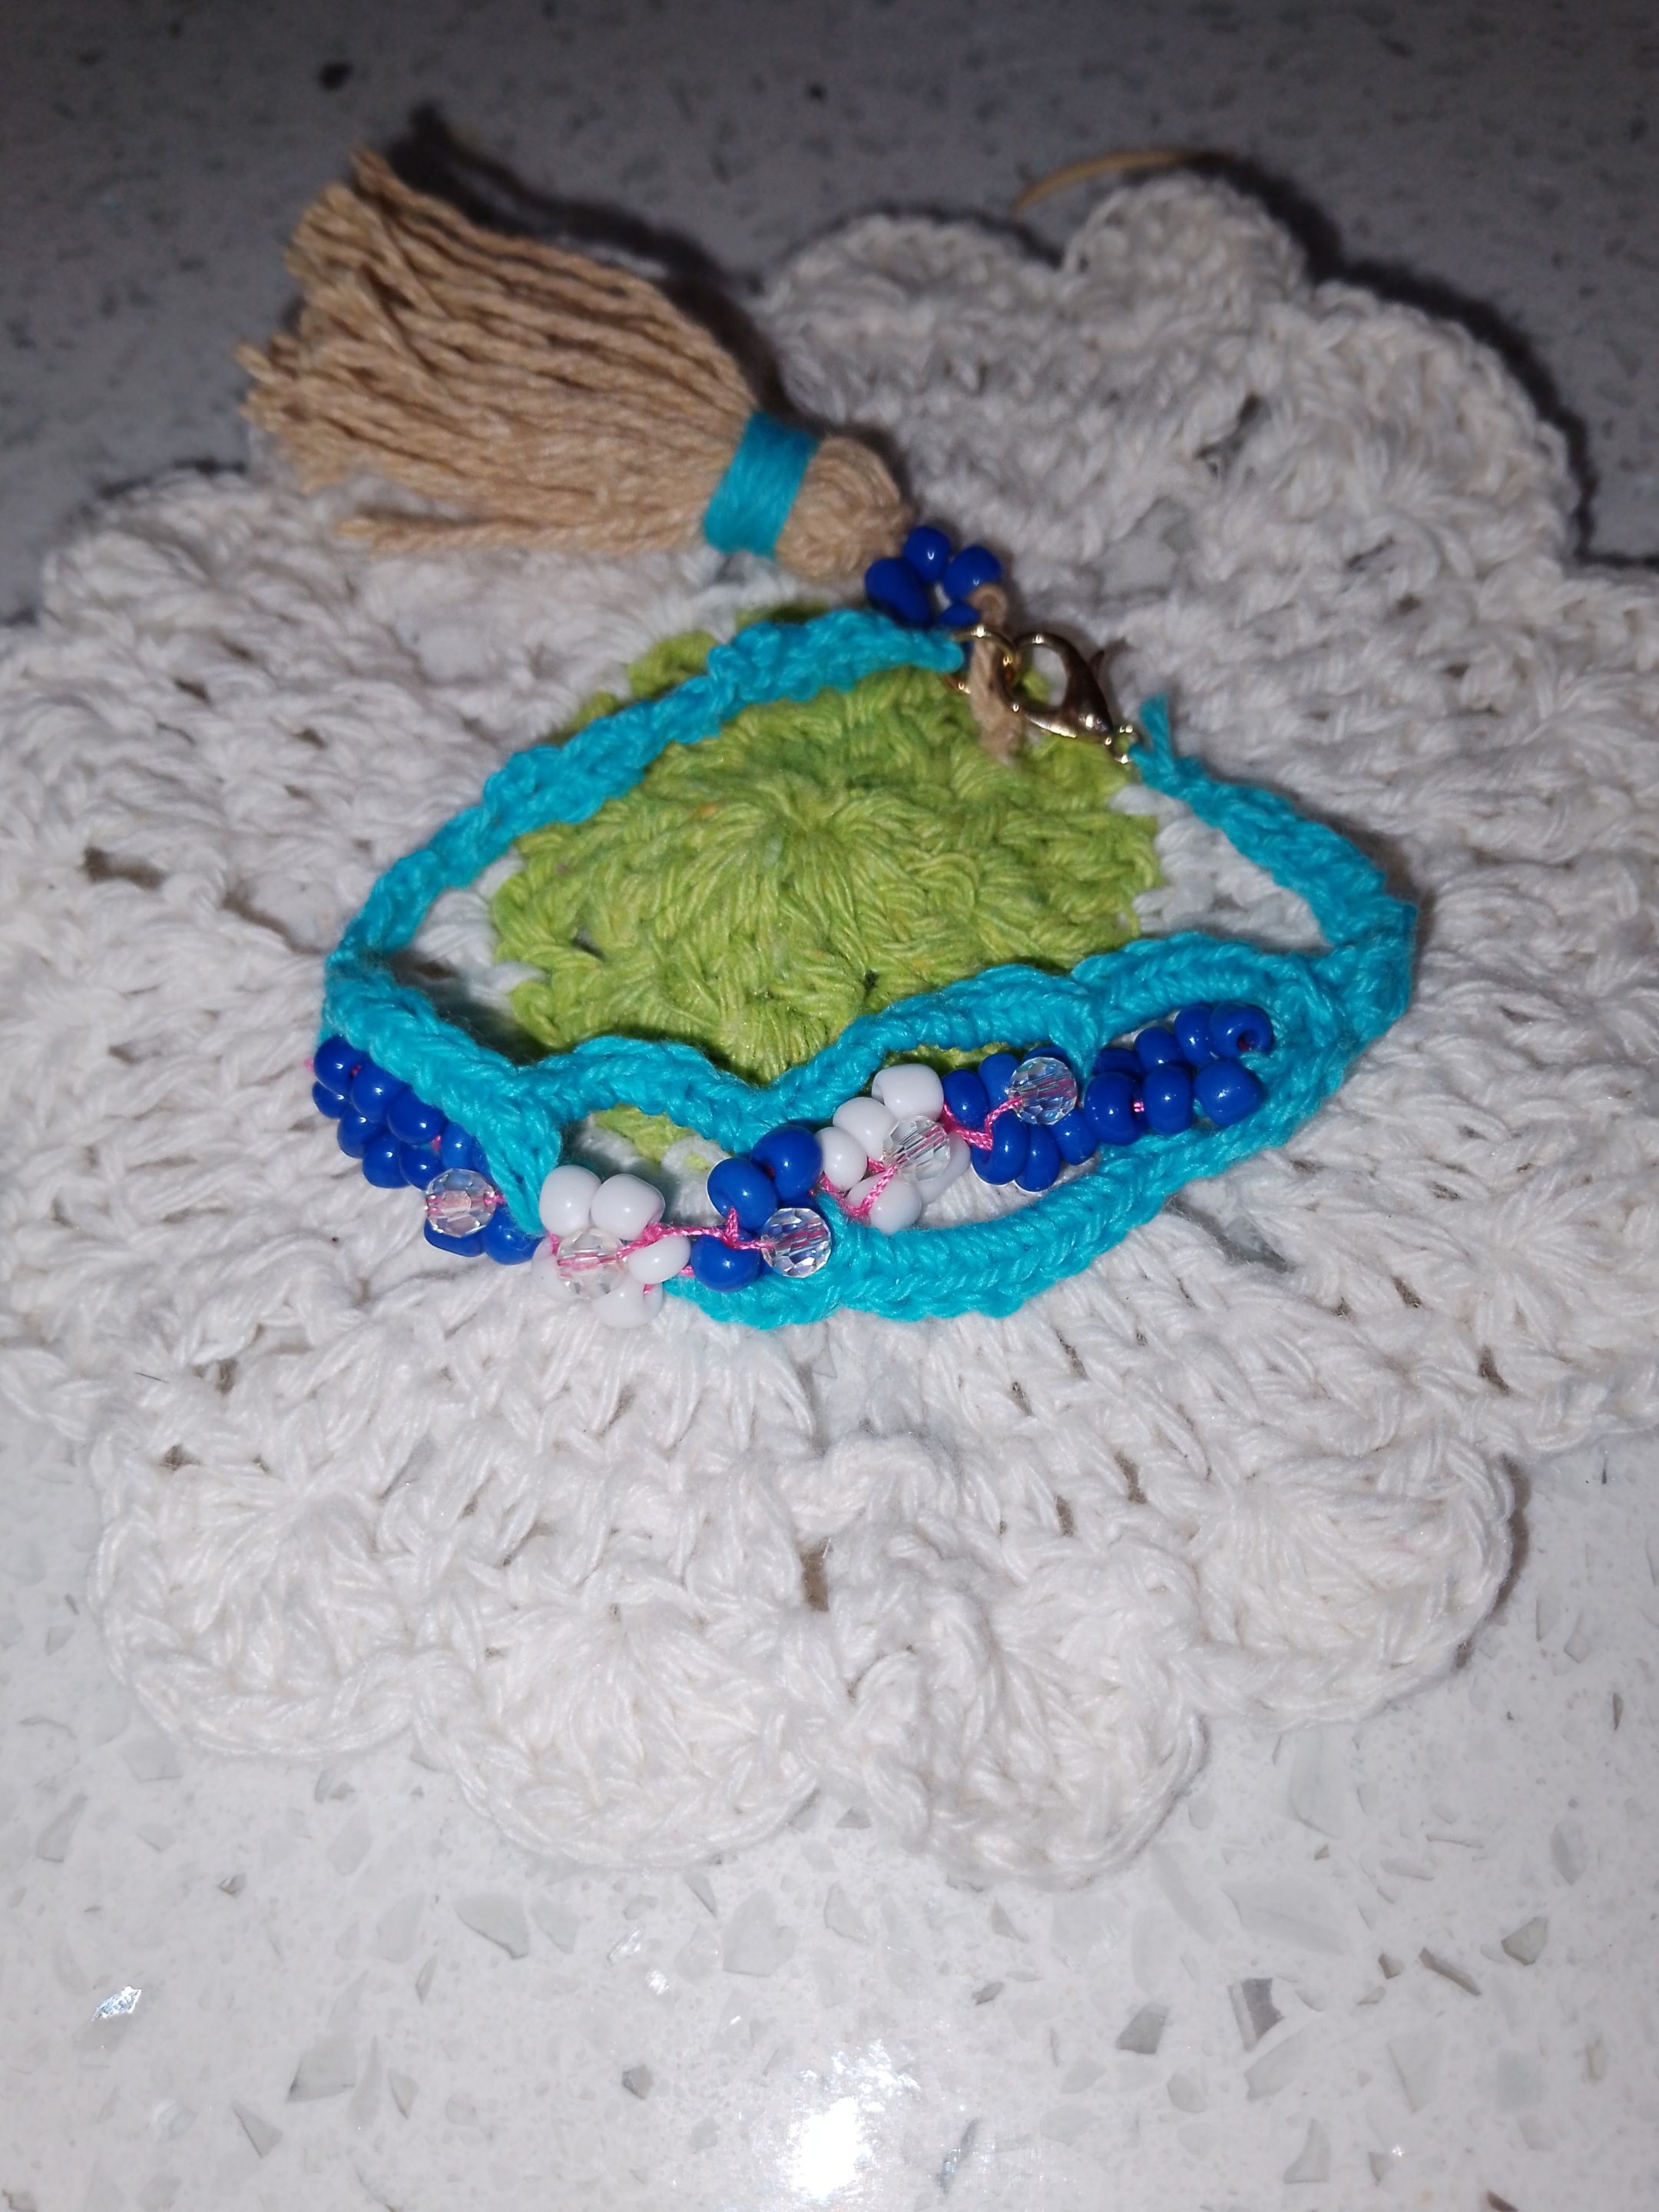
 In this way, I conclude with the making of the bracelet.
For the Earrings:
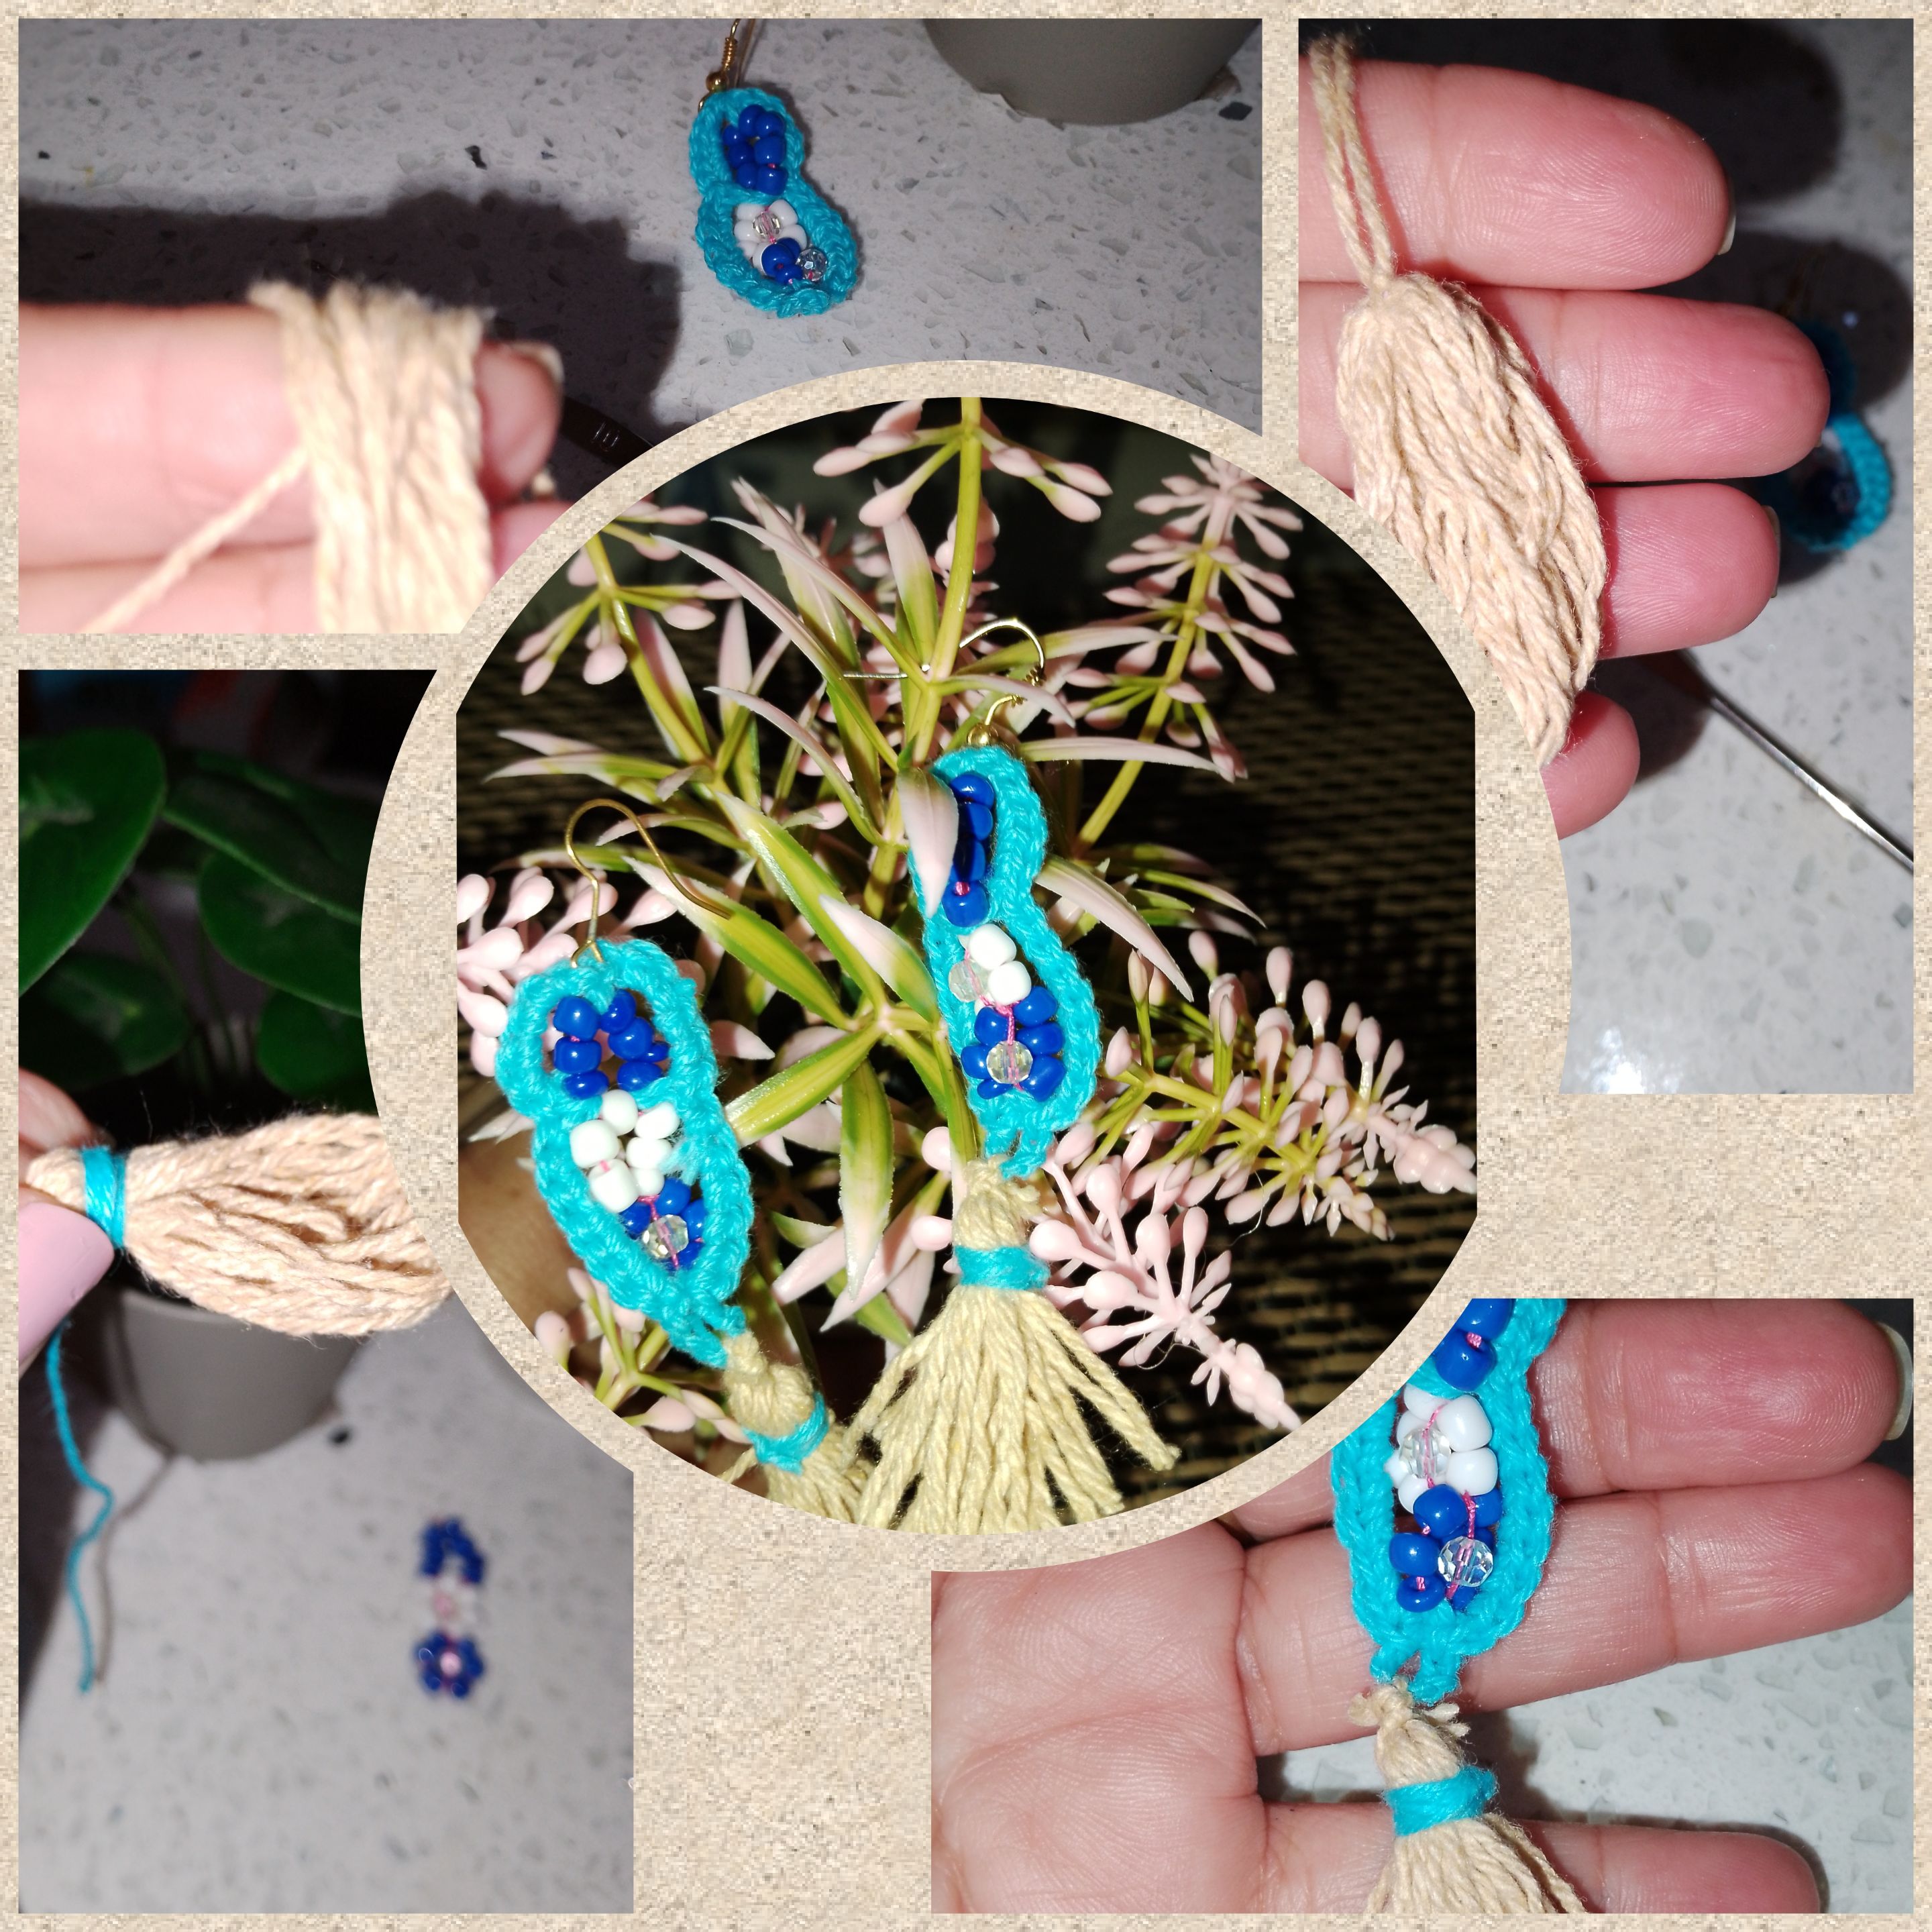
7.) For the earrings, I repeat the preparation of the small flowers, but this time, I will only need two for each earrings, one white and one blue. I will place seven blue beads on the side of the white one and make a circle, inserting the needle through the flower beads, tie well and cut the thread.

8.) I tie the hook, pair earrings with the blue knitting thread, and involved the flowers, on the side where I made the circle of beads, I knit two slip stitches, then I pick up five chain stitches, and I knit a slip stitch , in the space separating the circle and the first white flower, I now pick up eight chain stitches and knit a slipped stitch on the bottom of the blue flower, turn and repeat on the other side. Now I will knit in each space and group of chains, on both sides, for the first space I space six half stitches and for the second ten, I make a stop, I knit ten chain stitches and I introduce a slip stitch in this point. Arriving at the starting point or beginning, I finish off and cut the thread.

9.) Now to make the bangs, I will only take two fingers of my hand, turn eighteen times, make the bun and tie the cd earrings at the bottom.

In this way, the earrings look finished.
All photos are my property, taken with my smartphone.
. Use incollage Use language translator.
Thank you for following me until the end, it is always a pleasure to visit my blog, see you soon.
(ESP)
Hola a todos, espero se encuentren bien, gozando de buen estado de ánimo y salud. Me complace, estar con ustedes el día de hoy, en @jewelry, hoy vengo a mostrarles un muy sencillo paso a paso, de como hacer un lindo y casual juego de accesorios, ideal para llevar puesto en cualquier momento. Dónde use las técnicas de bisutería y crochet. Así que les invito. Seguirme y así verás, lo fácil que es su elaboración y lo fantástico de su resultado.
Materials/ Materiales
. Hilo para tejer, colores (azul y crema).
. Aguja para tejer.
. Hilo y aguja delga.
. Chaquiras de colores azul y blanca.
. Cristales checos n4.
. Pasador.
. Anzuelo para aretes.
. Orito de bisutería
. Pinzas de bisutería.
. Tijeras.
Pasos de elaboración:
1.) Inicio, introduciendo seis chaquiras en el hilo, ato cada extremo, formando un círculo, luego introduzco un cristal a quien ubico en el centro de el pequeño, círculo, y formó una, delicada y llamativa flor. De esta manera, sigo formando consecutivamente está flores, hasta alcanzar, un total de cuatro, dos de color azul y dos de color blanca. En cada uno de los extremos, coloco seis chaquiras de color azul, formó un círculo, pero a este no le colocaré, el cristal.
2.) introduzco el hilo de color azul, por dentro de el pasador, ato con dos nudos, levanto dos puntos cadenas y en el primer punto cadena medio punto, de esta forma repito, hasta alcanzar el largo considerado, tomando como medid, la muñeca de mí mano.
3.) con u. Punto deslizado, ato las flores, para formar la pulsera, primero en un extremo, tejo un nuevo punto deslizado, para dar más seguridad. Levanto, seis puntos cadenas, bajo a el espacio que separa l primera florecita y tejo un punto deslizado, levanto siete puntos cadenas y bajo a el espacio de separación de las siguientes dos florecitas, levanto seis puntos cadenas y bajo a el siguiente grupo de chaquiras. Ahora giro y tejo tal cual el siguiente lado de las flores, hecho esto. Hago un segundo recorrido, tejiendo ocho medios puntos, en cada grupo de puntos cadenas y tejo punto deslizado en cada punto deslizado de la vuelta pasada. Llegando al punto de partida, remato y corto el hilo.
4.) ato con varios nudos, el hilo en el siguiente extremo de las flores y continuo tejiendo el cordón de la pulsera, al finalizar ato con puntos deslizados un rito de bisutería.
5.) usando el hilo de color crema, doy veinte vueltas a tres de mis dedos de la mano, corto y hago un nudo, para formar un pequeño fleco. Con el hilo de color azul, doy en la parte superior de el fleco, ocho vueltas y ato bien, para que quede bien fijado. Luego de recortar los hilos residuales, corto las hebras de hilo por la parre inferior. Doy forma con la tijera. Introduzco en el hilo que he dejado de color crema, dos chaquiras de color azul en cada lado y ato dentro de el arito, justo donde está el pasador.
De esta manera, concluyo con la elaboración de la pulsera.
Para los Aretes:
7.) Para los aretes, repito la elaboración de las pequeñas florecitas, pero en esta oportunidad, solo necesitaré dos para cada aretes, una de color blanca y una de color azul. Colocaré en el lado de la de color blanco, siete chaquiras de color azul y haré un círculo, introduciendo la aguja por las chaquiras de la flor, ato bien y corto el hilo.
 ato el anzuelo, par aretes con el hilo, de tejer color azul, e involucró a las flores, por el lado donde hice le círculo de chaquiras, tejo dos puntos deslizados, luego levanto cinco puntos cadenas, y tejo un punto deslizado, en el espacio de separación de el círculo y la primera flor de color blanca, ahora levanto ocho puntos cadenas y tejo punto deslizado en la parte inferior de la flor de color azul, giro y repito en el otro lado. Ahora tejere en cada espacio y grupo de cadenas, en ambos lados, para el primer espació seis medios puntos y para el segundo diez, hago un alto, tejo diez puntos cadenas y un punto deslizado introduzco en este punto. Llegando a el punto de partida o inicio, remato y corto el hilo.
 ahora para hacer el flequillo, solo tomaré dos dedos de mí mano, daré dieciocho vuelta, hago el moñito y ato en la parte inferior de cd arete.
De esta manera, lucen terminados los aretes.
Todas las fotos son de mí propiedad, tomadas con mí teléfono inteligente.
. Use incollage
Use traductor lenguaje.
Agrdecida me hayas seguido hasta el final, siempre es un placer su visita mí blog, hasta pronto.