
Hello, dear community of creators... I don't know at what point so many months passed, i feel like i was in a kind of parallel dimension taking care of other things in my life, but always pending that i left my beautiful blog on pause and not only that, sometimes i even thought that i forgot to draw and the codes to write my blog, i feel like I'm new again hahaha. and the truth is i don´t like to make simple blogs, my blogs must be tedious, tiring, long, complex, maybe i'm a masochist, that i get tired yes, i know. Otherwise, i don't enjoy it to be honest.
A friend of mine told me what i had was depression but that i disguise my emotions, i mask them... well, yes, maybe i do. I could not confirm that but what is true is that i had a strange mental fatigue, i did not want to see the social networks at all and since i am not taking my medication for my neurodivergent brain, well, no way i could just disappear. I took the opportunity and immersed myself in my yoga activities that i love and recharge me with a special energy to continue in this life that every day leaves us valuable learning, diverse in each path we take.
And not to bore you with so much introduction, now we come to what we come in this new blog of handmade things that I like so much. This little project undoubtedly brought my soul back to my body. ;)

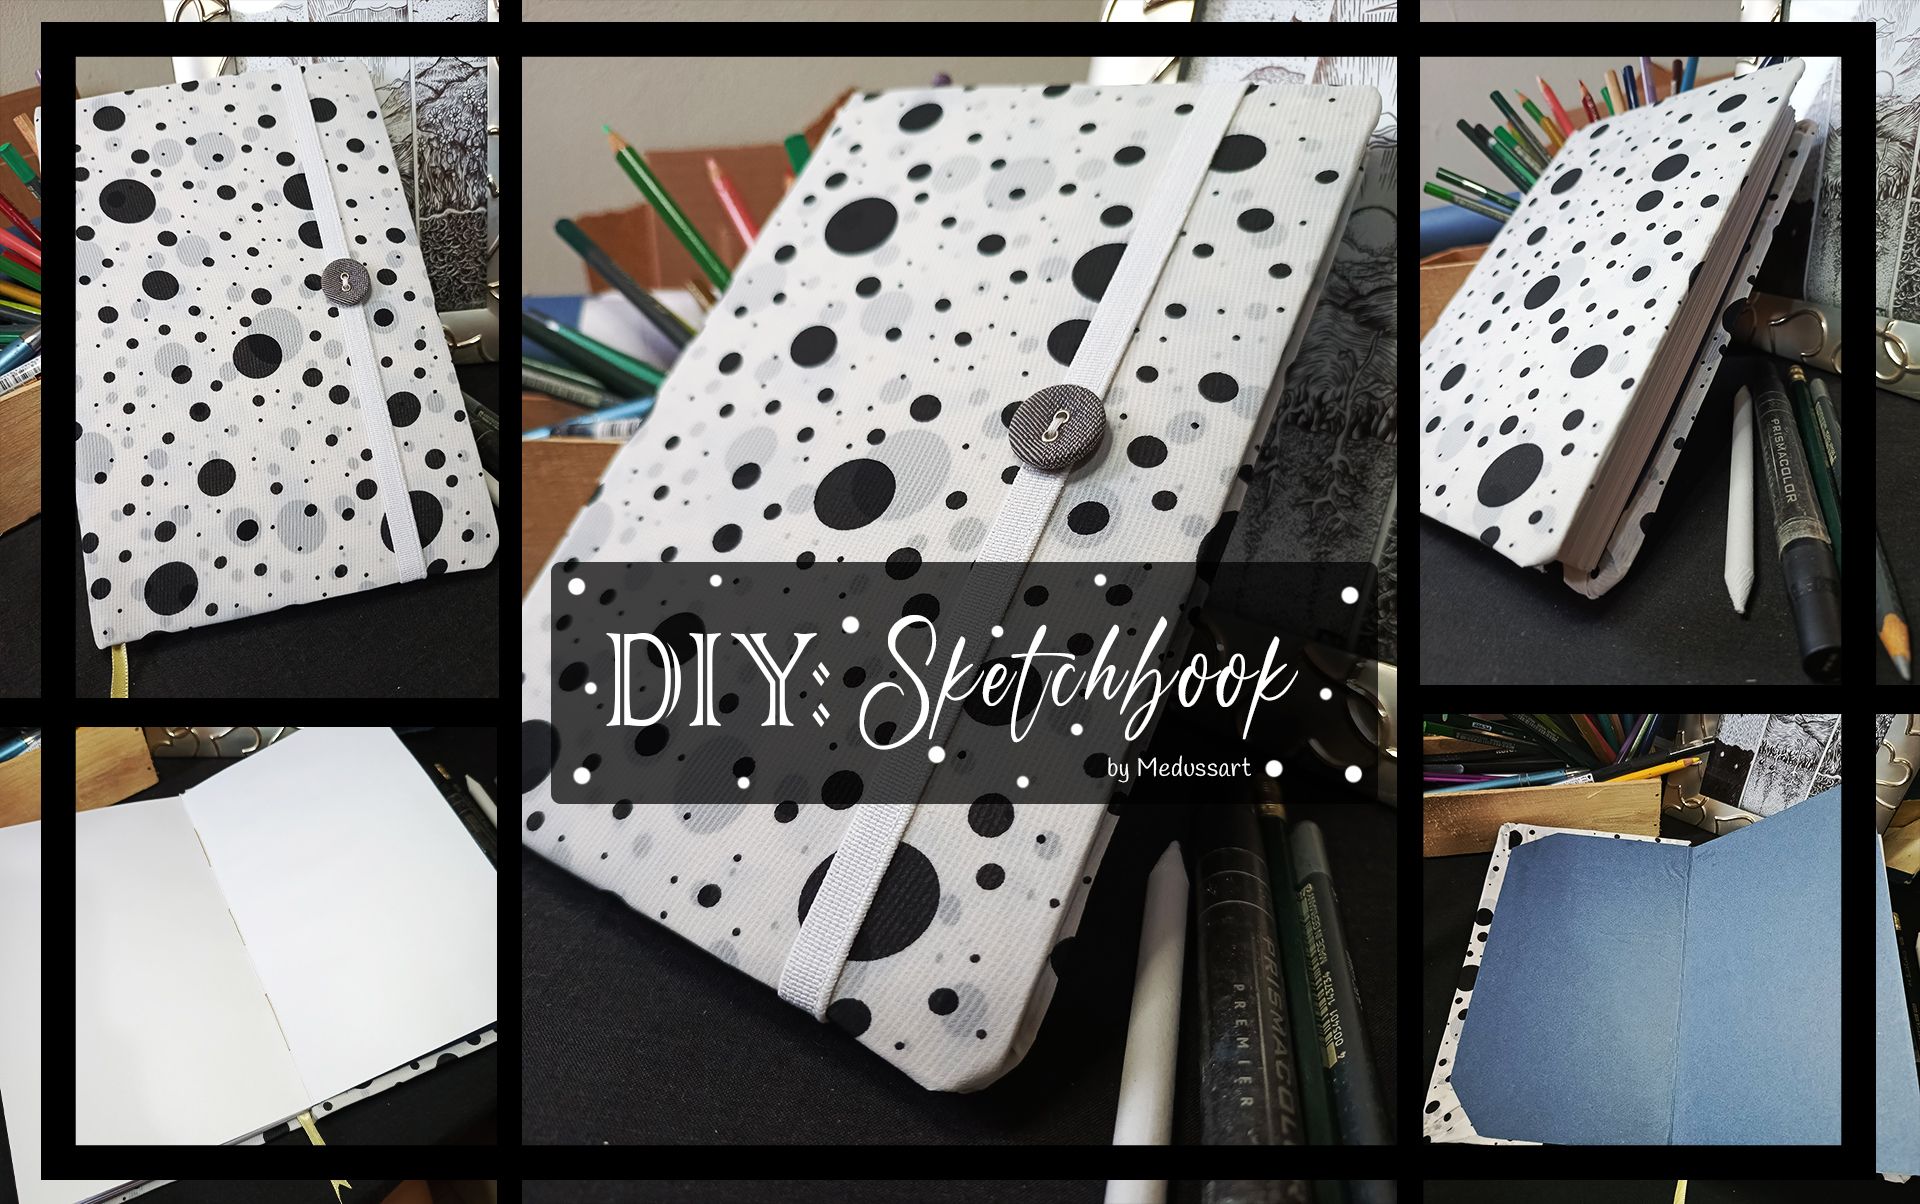
Creating a Moleskine-style Sketchbook
Step by Step
Some time ago, i had already bought some opaline cardboard (200 grs), finally my sister was able to bring them, i thought they were lost, i had even forgotten about them. Then, i remembered these super cute Moleskine sketchbooks that look like diaries and that i constantly love to watch videos of handmade bookbinding because i find them so relaxing and i watched the steps and i said to myself wow, it's not that complicated, let's see if i have what i need at home for this project. Obviously, those who are dedicated to this magical world of bookbinding, have special tools that facilitate the work but, i used only things that i had and that could serve me perfectly for my first handmade sketchbook.
Materials i used
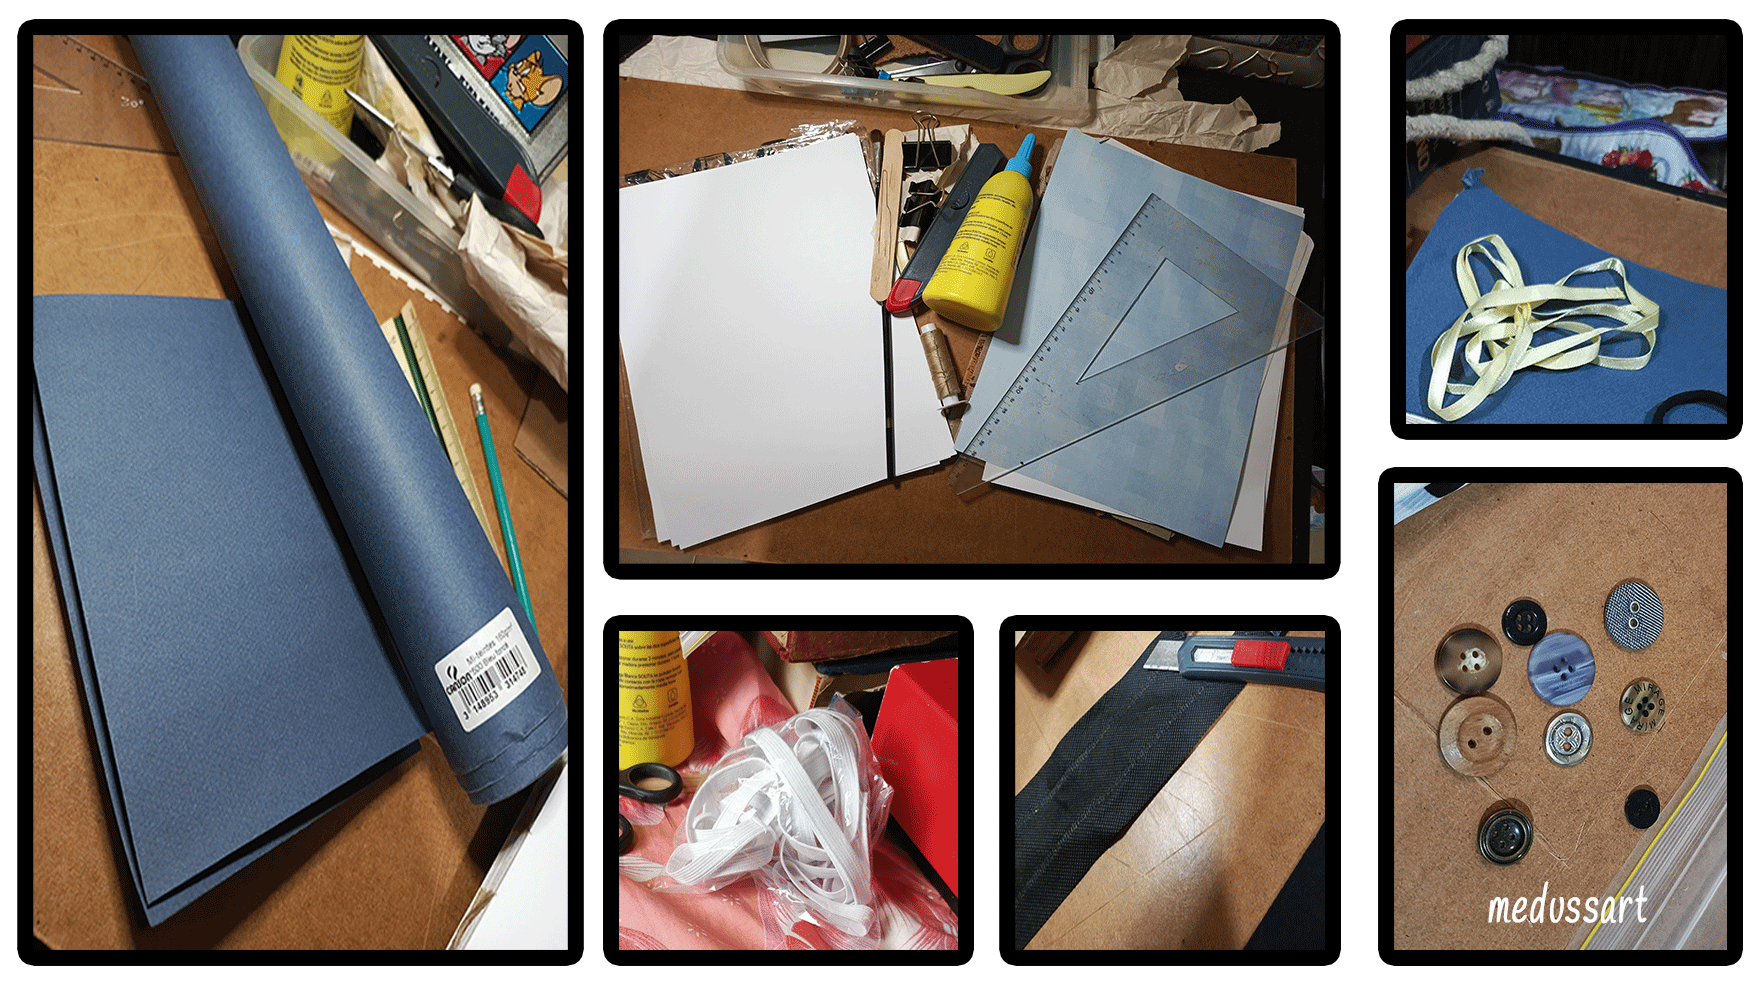
- Opaline cardboard. Letter size. 200 grs (20 sheets)
- Canson paper, Letter size. (2 sheets)
- Thick recycled cardboard (from an old box in good condition)
- Notex fabric (recycled from an old bag)
- Thin fabric for lining (in my case i used a fabric with transparencies because it is the one i had).
- Satin Ribbon #1
- Elastic ribbon 1cm
- A button to decorate
- White glue or Resistol, Silicone gun (in my case i used school glue).
- Coarse sewing needle or scratch awl
- Thread preferably waxed or knitting thread (in my case i used common sewing thread).
- Scissors, Cutter, large and firm ruler to be used for cutting.
- Some flat tool without sharp edges that can be used for flattening.
- Metal Clips
- Fat and heavy books that help us to press our work in the process.
- Gloves (optional)
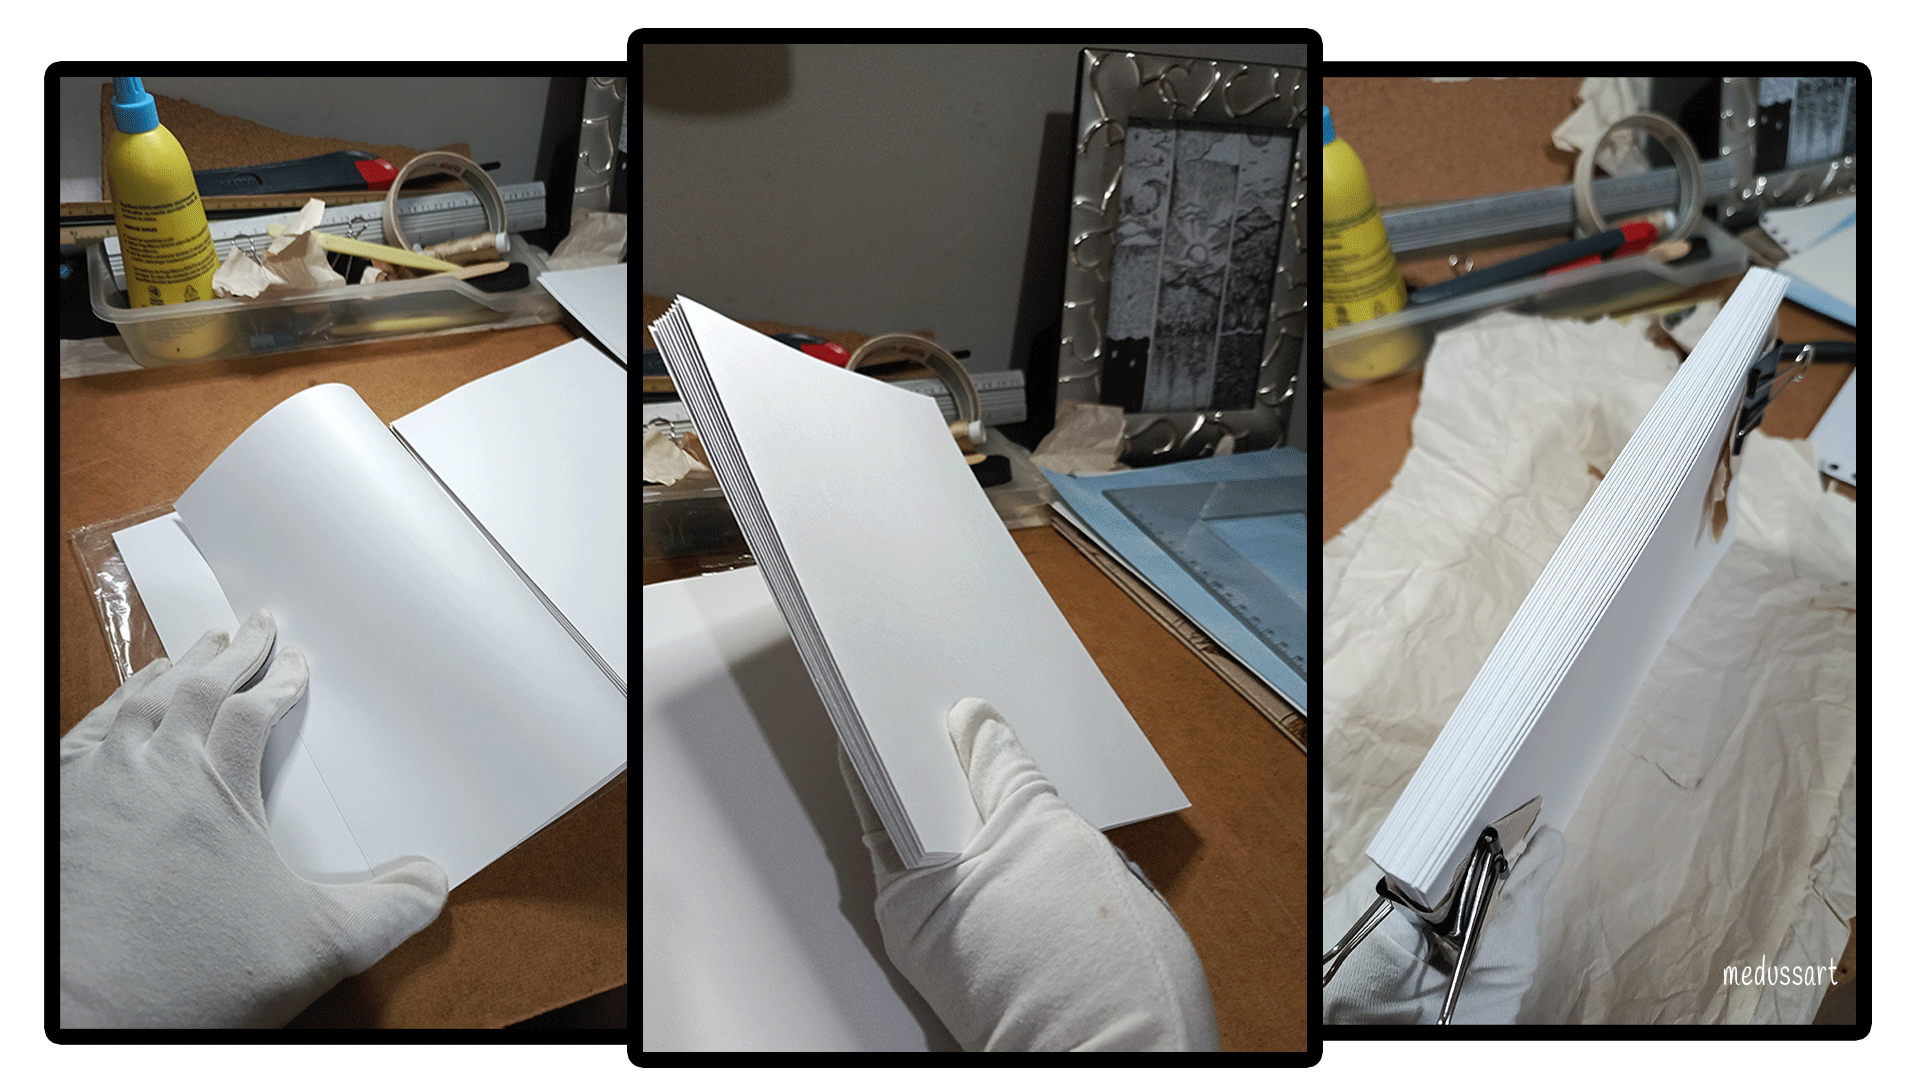
Step 1
The first step was to form our block of sheets. In this project i used letter size sheets (20 opaline sheets) which i folded in half to form 1/2 letter booklets. Once folded, with the help of some metal clips i held the block to press it and compact it a little more. They can also be placed under a book or heavy object, always protecting the sheets so as not to stain them, that's why i used gloves.
Step 2
The next step was to pierce the sheets, the number of holes, the distances between them, may vary depending on the type of stitching chosen, the size of our block, the important thing to keep in mind in this step and that i noted from the experiences of other expert bookbinders is that, the distance of the holes is not so important, but if they are even numbers so that we don´t have any incomplete stitch, also to ensure a better finish and stability of the spine of our notebook when sewing, the first holes located at each end should have an approximate size of 1 to 1. 5 cm no more than that. In my case, as you can see in the template i used to make the holes, i placed in the measures with distances of 3 cm, a little more than recommended but it was not a problem for me, because i secured the spine of my notebooks with glue and a fabric as you will see in the next step.
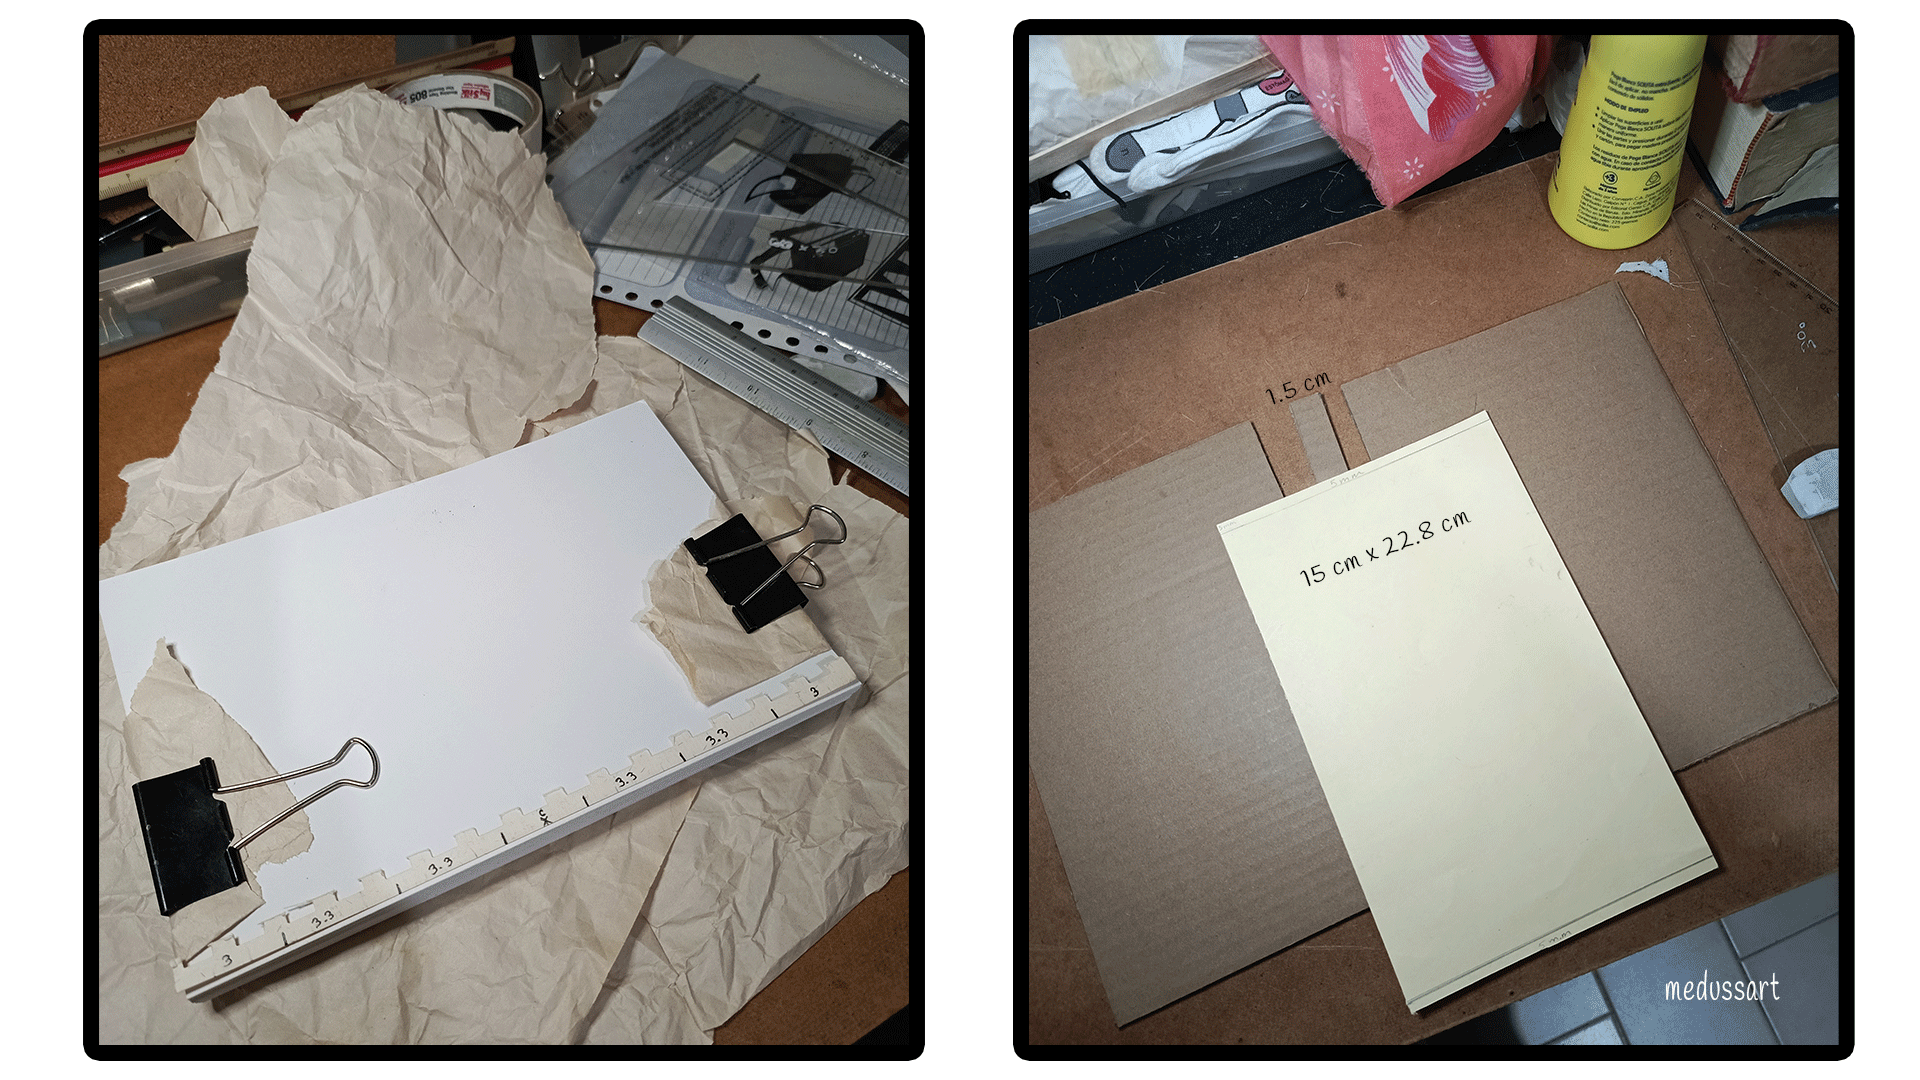
So on each sheet, i made 6 holes from the inside out using a thick sewing needle since i did not have an awl and with the help of the paper template that must have the same length of our sheet, since it will serve as a ruler to measure the distances of each hole to be marked. There are other methods to perform this procedure, but this was the one of my choice, although it is more tedious because it is done on each sheet separately.
Step 3
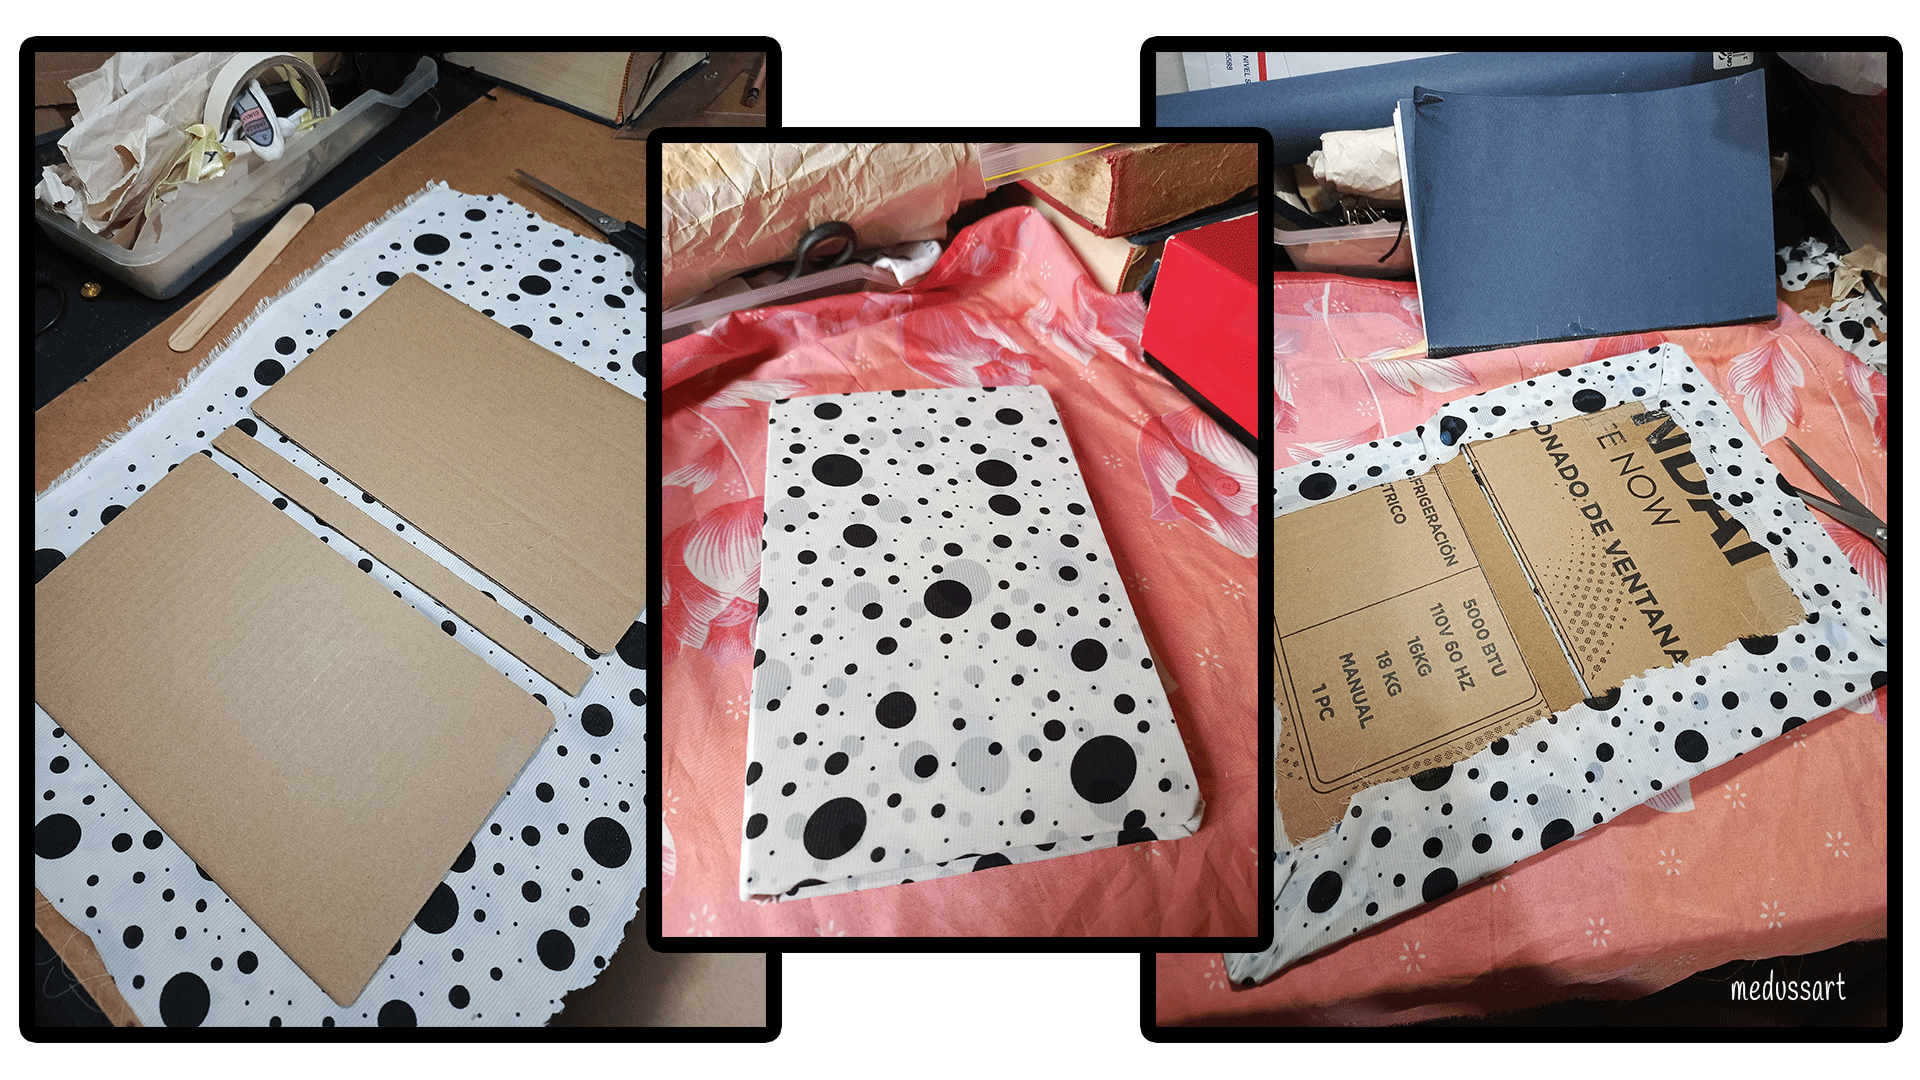
With my paper block already formed, i took a sheet of recycled thick cardboard from a box i had at home, with the help of a ruler and a cutter, i cut the 3 pieces that would serve me to shape the covers of my sketchbook, in this step will depend on the taste of each one, in my case i wanted the covers to be a little bigger than the paper block, so i increased 1 cm in length and width. The spine piece, its measures would be the same length of the covers but with the same width of the spine of the block of sheets once sewn and reinforced with glue.
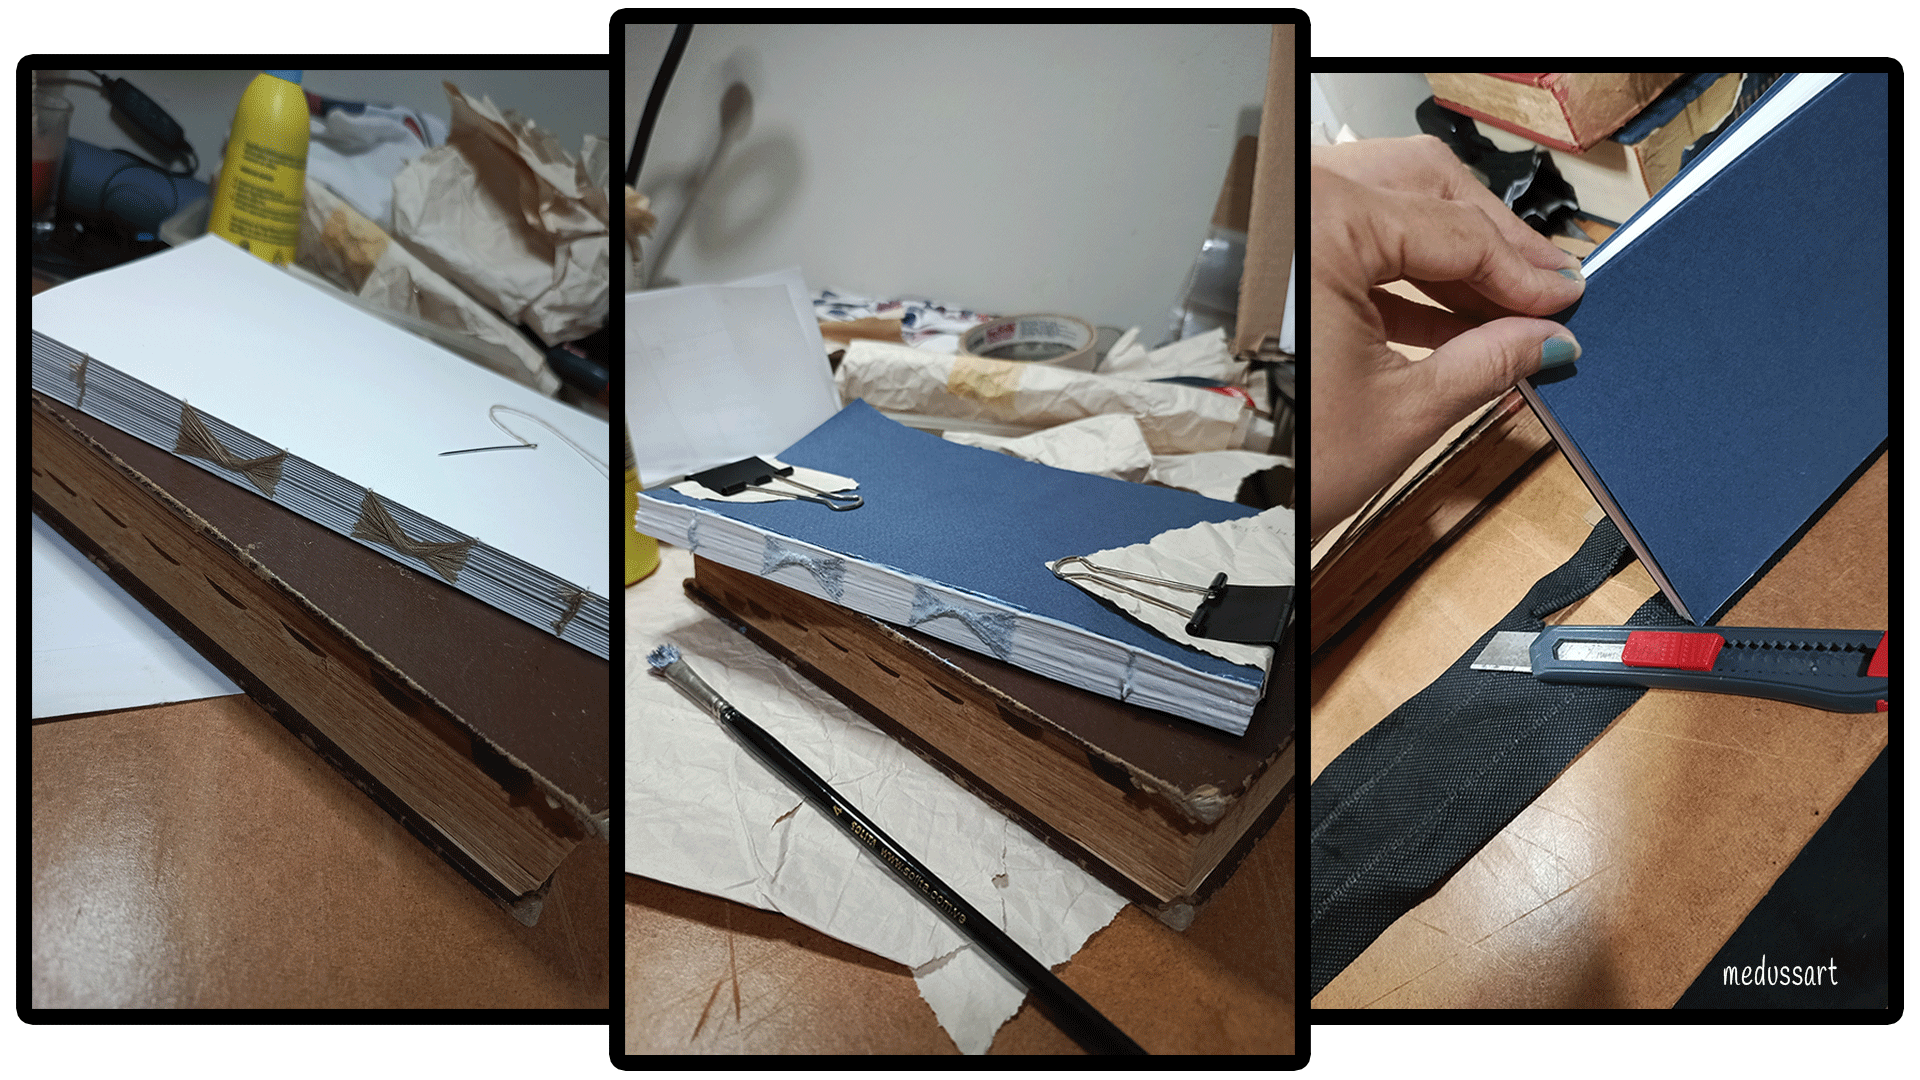
Step 4
The seam i chose to join my booklets was a cross stitch, similar to the French stitch, but in this one, as you can see in the pictures, the threads are like little bows or an x shape in the central points. While the booklets are sewn, they are placed one on top of the other, joining them from the bottom to the top. I found this stitch to be simple and practical and i didn't need any other special thread or extra bases to make it. With the same needle i used to make the holes, i made the seam with a common sewing thread, but i must point out that since i used a very fine thread i had to use a double thread and since it is not waxed it tends to get tangled, so i did it very carefully, patiently and in several parts, since i could not cut all the necessary thread because it would get tangled.
Step 5
Once the booklets were sewn, i placed a sheet of blue textured canson cardboard on both sides, in the same format as the pages of the notebook, letter size and folded in two, and with a thin layer of white glue i glued one of the sides on the first and last page of the notebook. The other page of the cardboard is reserved for finishing, once the covers are lined with fabric. With the help of the metal clips, i pressed the block again and placed a layer of glue on the spine on top of the seams, i let it sit overnight with extra weights so that it would stick very well.
The next day, i cut a little piece of notex fabric or some ecological type fabric, you can use gauze and paper...almost the same size as the spine, i only added a few millimeters more to be able to wrap just a little bit my notebook, but you can also place a wider fabric, since that fabric is only to reinforce our sheets and will be hidden once we place the covers. I let it rest for another night. In this step, the satin ribbon that will serve as a bookmark is placed between the fabric, with the same white glue or if we have a silicone gun it is faster.
Step 6
While the notebook is drying, i cut the fabric in such a way that only 5 to 6 cm of the cardboard sheets were left over, in the spine piece it is very important to leave 5 mm to 1 cm of space between the spine and the covers, as this way our book will close well. For my notebook, i left only 5 mm, since my covers already had extra measurements. As the fabric i used was not the most suitable, i had to cover it twice since it had transparencies, so in the first layer of fabric, i covered the whole area of the cardboard with glue. Once the first part is dry, the second fabric is not completely covered with glue, only in the areas that will wrap the cardboard. I let it dry again.
Once our covers were dry, i placed the elastic ribbon that will close our book. In my case, as i could not make any kind of cut on the covers due to the type of fabric i had, i had to place the elastic directly on the inside, with a few sewing stitches and with the silicone gun.
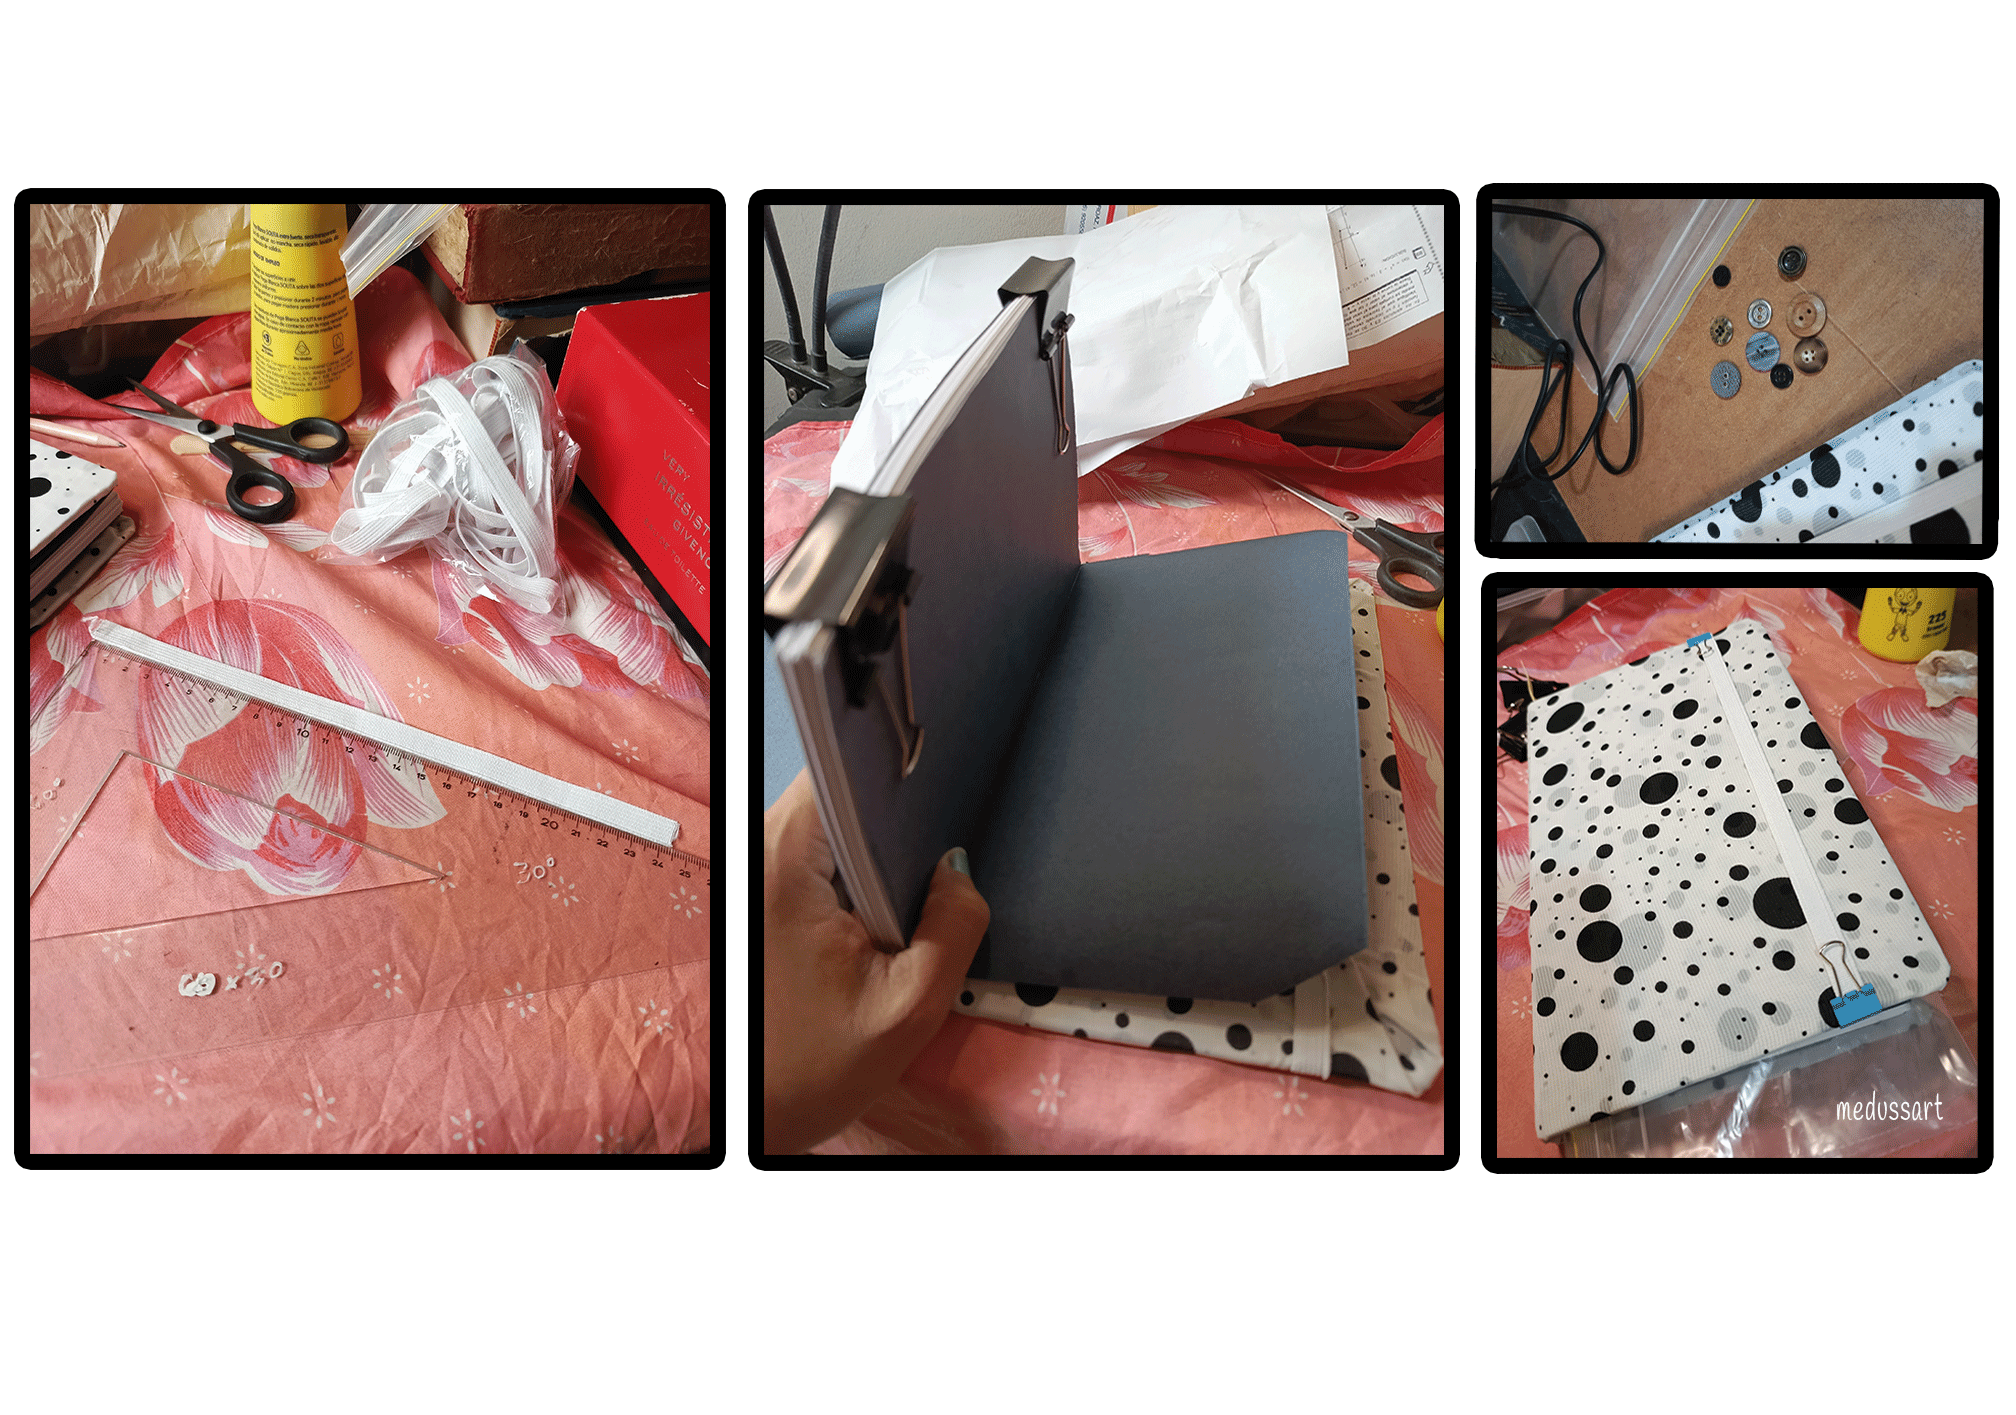
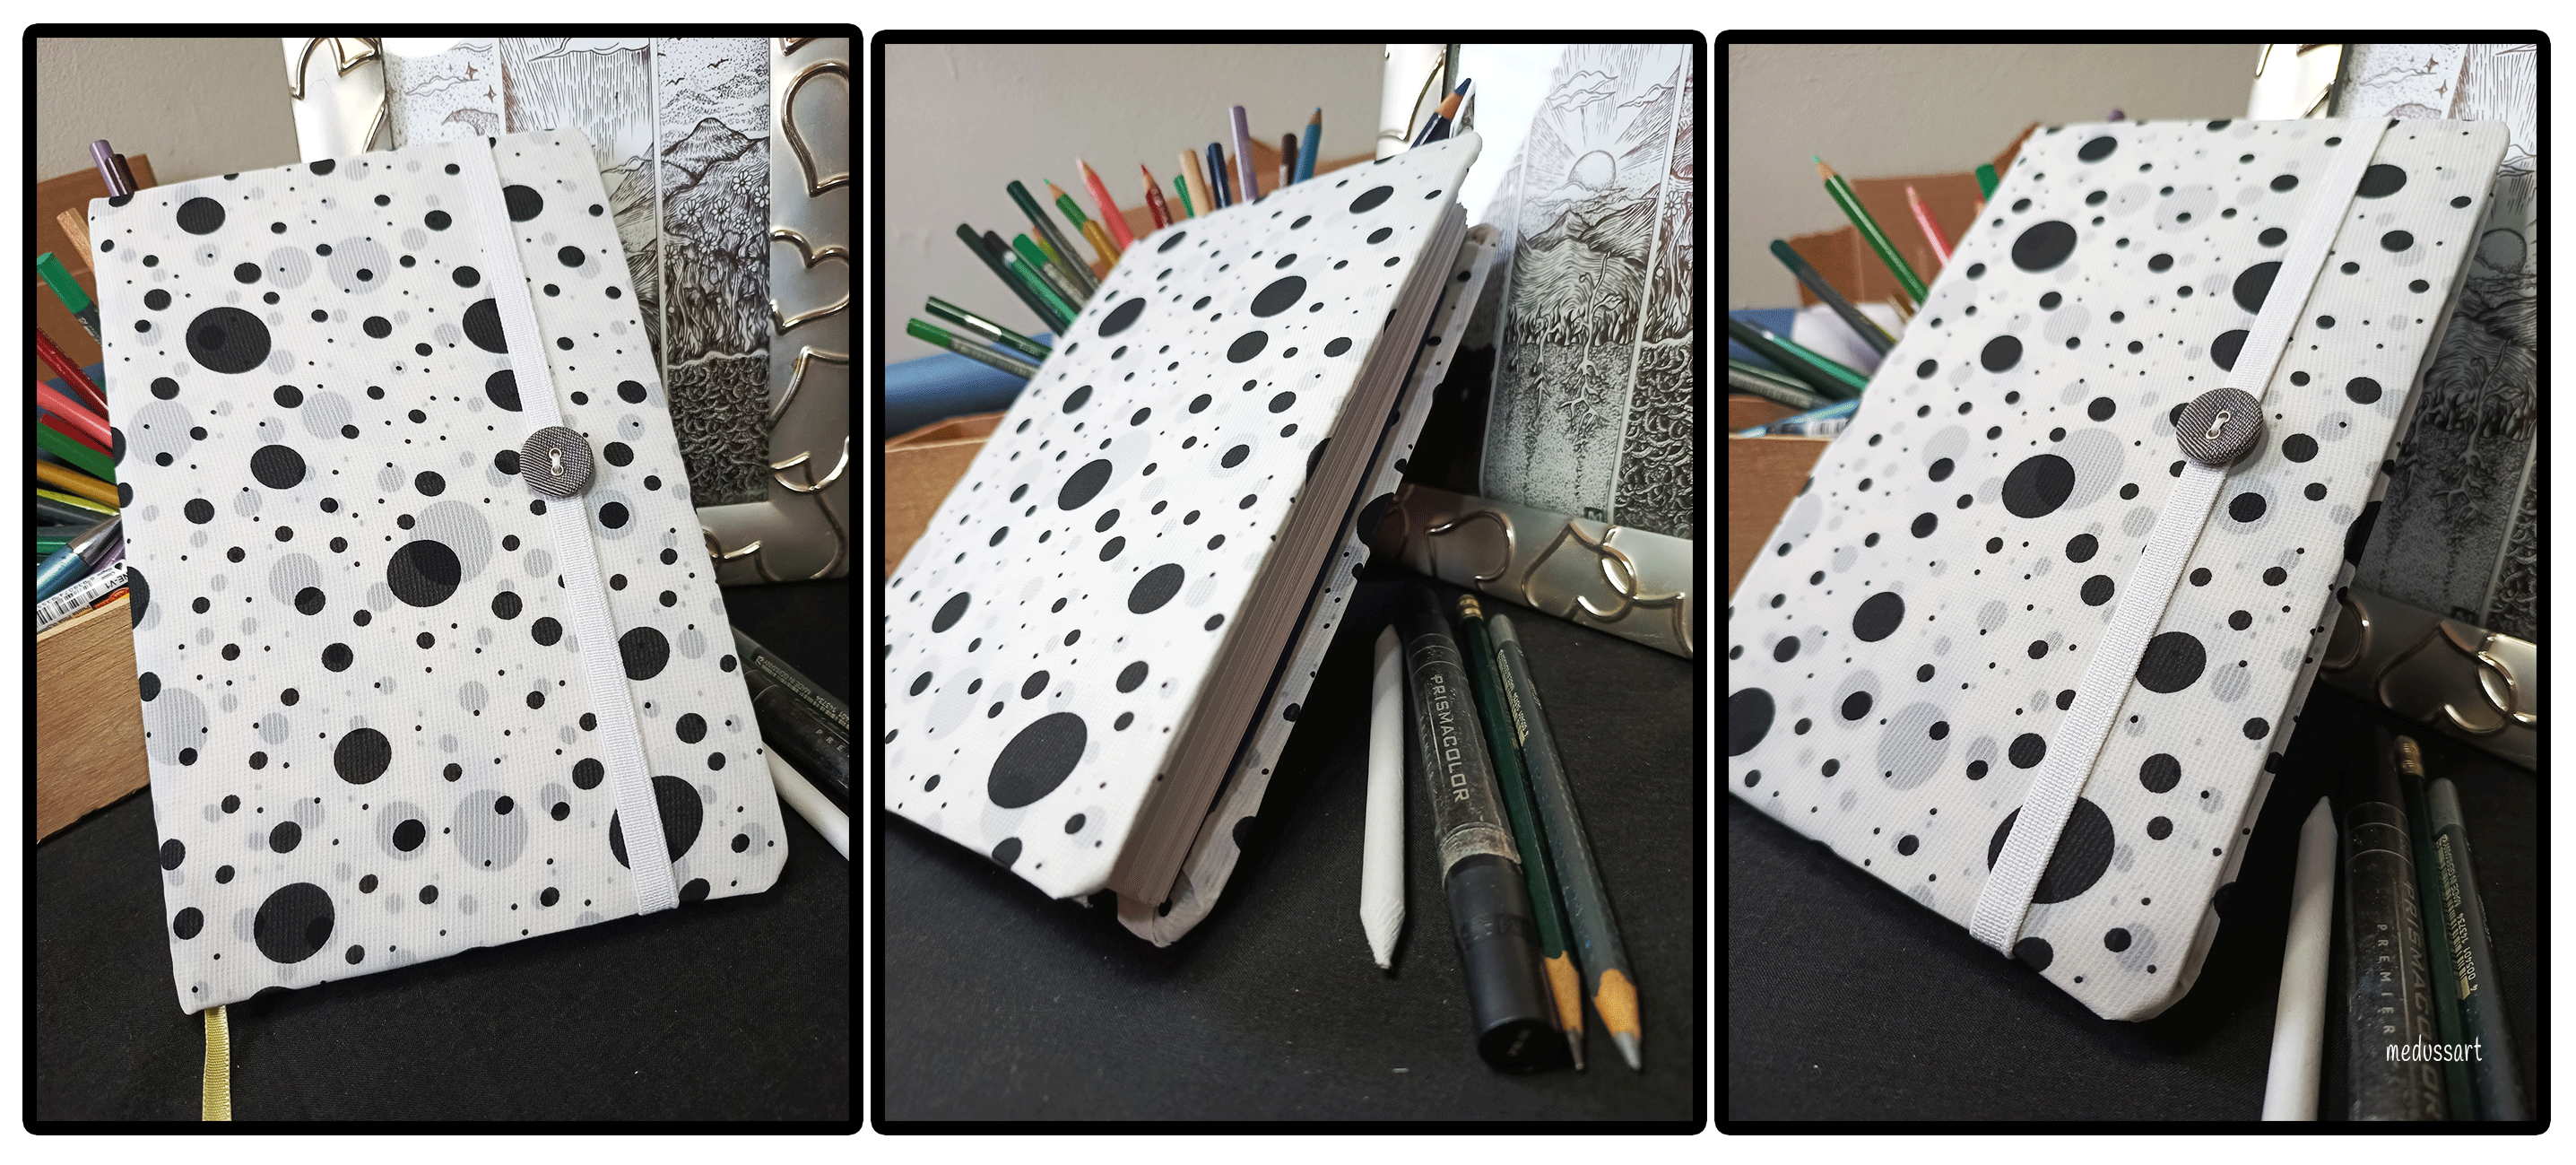
After finishing this procedure, now to assemble the whole notebook, i glued each side of the cardboard that was left to be glued. With the help of a trowel, i put pressure to eliminate bubbles in the paper and at each end of the covers i placed some small metal clips and extra weight over the whole book to seal everything very well. The spine of our notebook should not be glued, only the covers. I let it sit overnight again. And at the end all that was left was to add a little button to give a special touch to this nice Sketchbook
SpeedArt: Here's a quick view of the whole process
https://youtube.com/shorts/qBIek0o2gK8
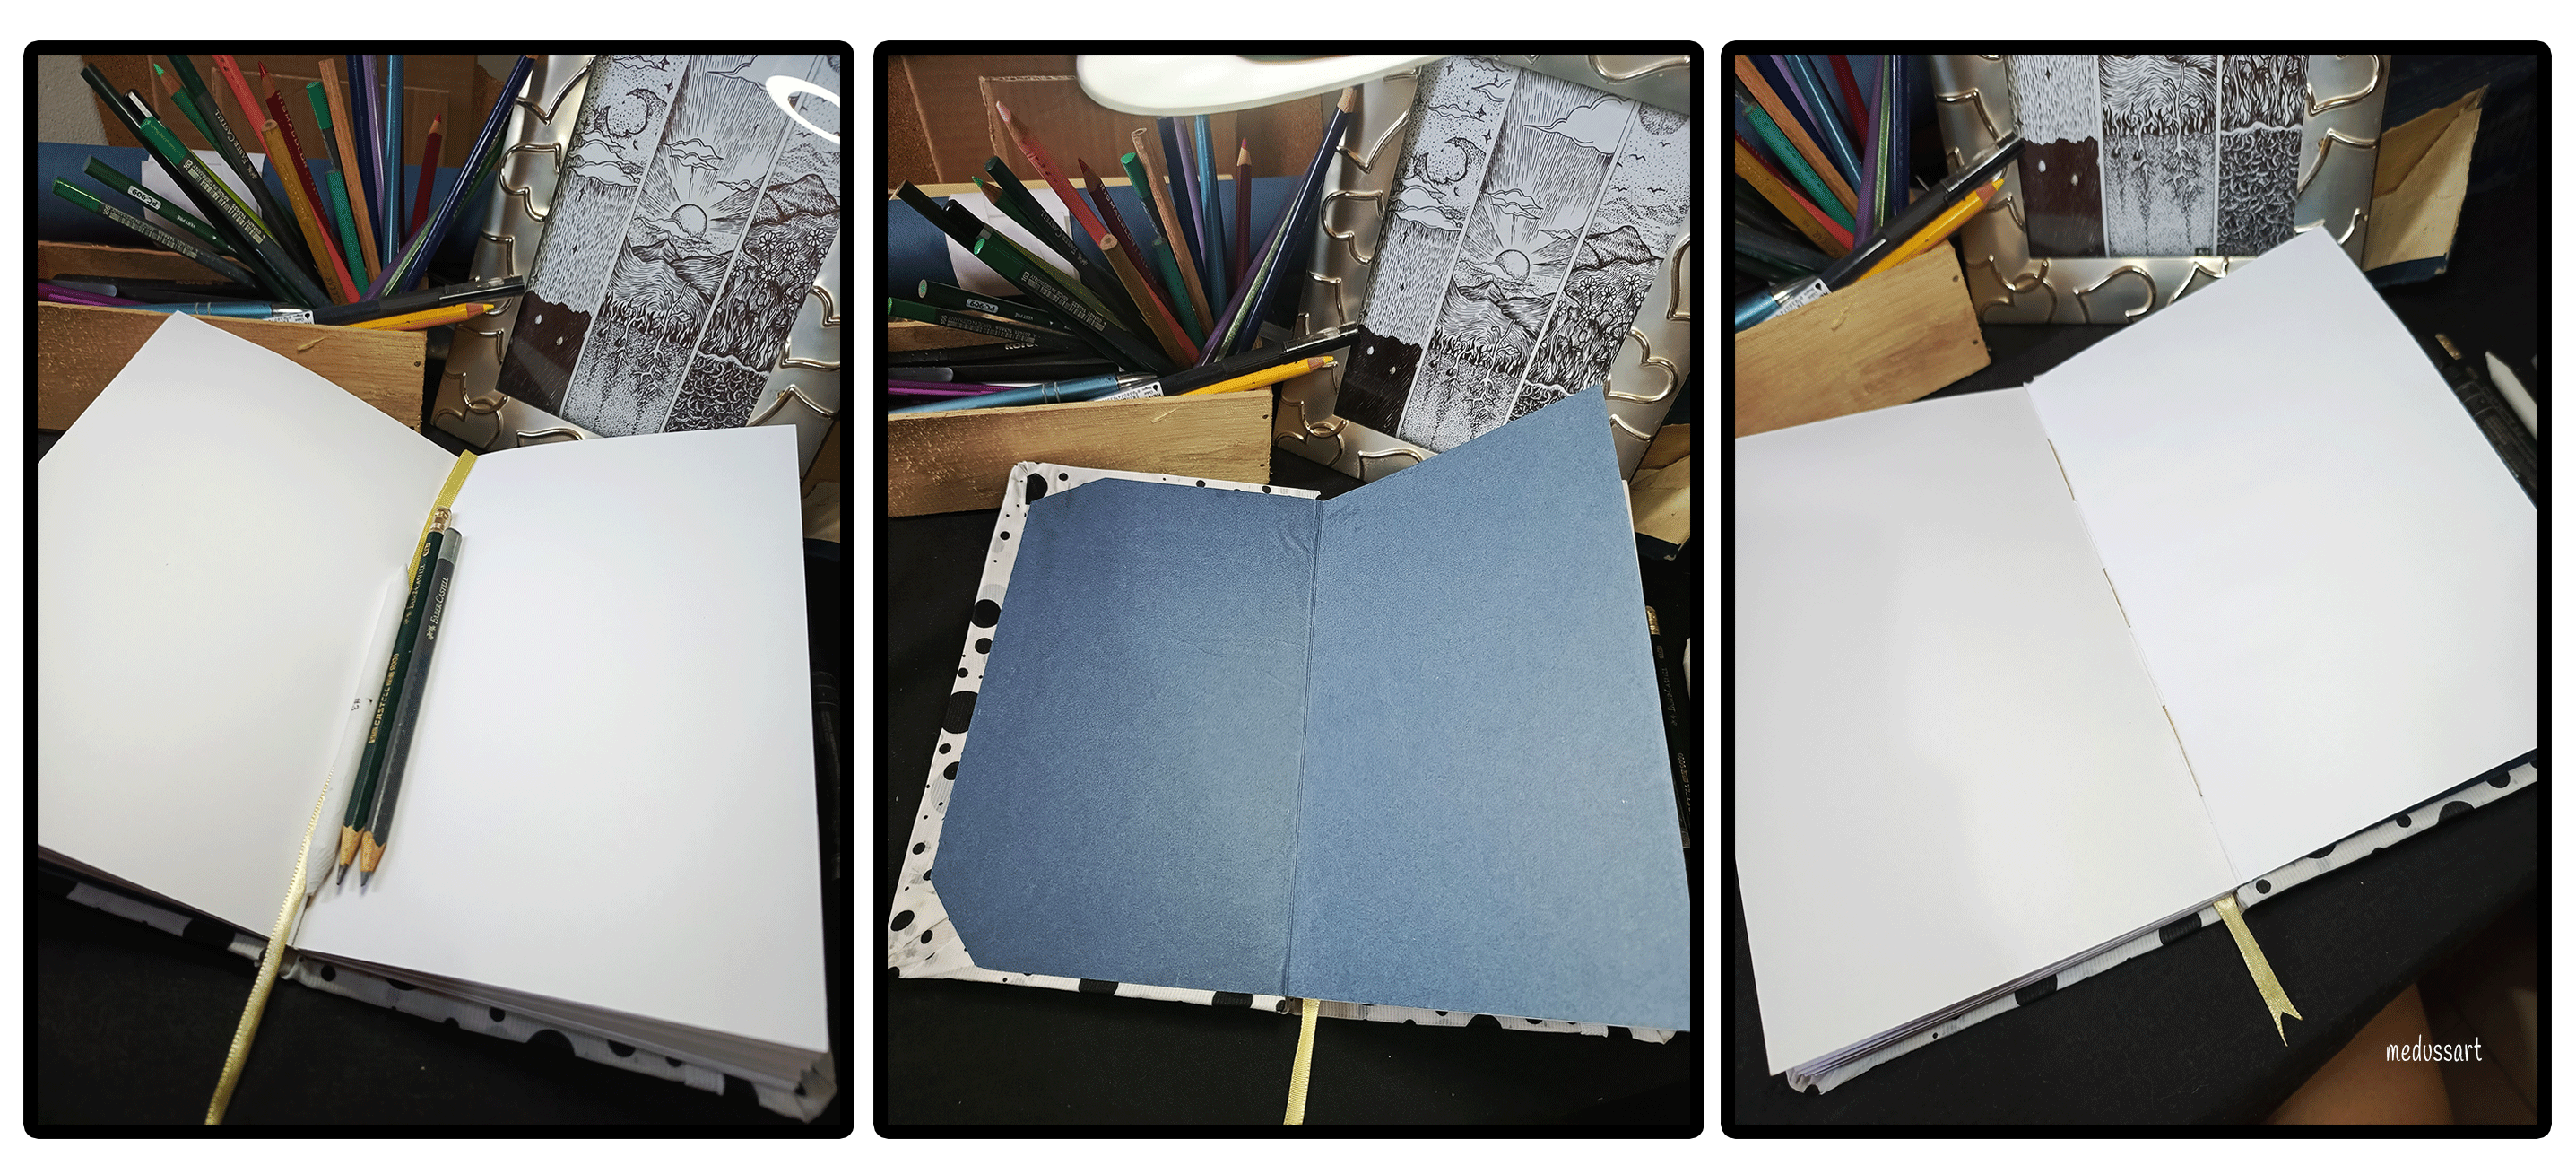
Result
A beautiful Moleskine-style Sketchbook that can be opened 180°
Thanks for visiting and supporting my little artistic corner, See you later! ;)
👉MY SOCIAL NETWORKS AND NFT GALLERIES👈
Credits
Content Created by me
Translated with Deepl.com
Adobe Photoshop cc
CAPCUT
©Medussart 2024

Hola! Querida comunidad de creadores... no sé en qué momento pasaron tantos meses, siento que estuve en una especie de dimensión paralela ocupándome de otras cosas en mi vida, pero siempre pendiente que dejé mi bello blog en pausa y no sólo eso, a veces hasta pensaba será que se me olvidó hasta dibujar y los códigos para redactar mi blog, siento que soy nueva otra vez jajaja. y La verdad para ser sincera no me gusta hacer blogs sencillos, mis blogs deben ser tediosos, cansones, largos, complejos un poco masoquista de mi parte tal vez, que me cansen sí, lo sé. De lo contrario, no lo disfruto para ser honesta.
Un amigo recuerdo que me dijo que yo lo que tenía era depresión pero que yo disfrazo mis emociones, las enmascaro... pues sí, tal vez sí lo hago. No pude confirmar eso pero lo que sí es cierto es que tenia una extraña fatiga mental, no quería ver las redes sociales para nada y como no estoy tomando mi medicamento para mi cerebro neurodivergente pues, ni modo toca la desaparición. Aproveché y me sumergí en mis actividades de yoga que adoro y me recargan de una energía especial para continuar en esta vida que cada día nos deja aprendizajes valiosos, diversos en cada camino que tomamos.
Y para no aburrirlos con tanta introducción, ahora sí a lo que venimos en este nuevo blog de cositas artesanales que tanto me gustan. Este pequeño proyecto sin duda, me devolvió el alma al cuerpo ;)
Creando un Sketchbook estilo Moleskine
Paso a Paso
Hace bastante tiempo ya, había comprado unas cartulinas opalinas de aproximadamente 200 grs, pero se quedaron en Caracas. Finalmente mi hermana pudo traerlas, yo ya las daba por perdidas, hasta se me habían olvidado. Entonces, recordé estos sketchbooks Moleskine, super coquetos que parecen agendas y que constantemente me encanta ver videitos de encuadernación artesanal porque me parecen tan relajantes y observé los pasos y me dije vaya, vaya no es tan complicado que digamos, veamos si tengo lo necesario en casa para este proyecto. Obviamente los que se dedican a este mágico mundo de la encuadernación, tienen herramientas especiales que facilitan el trabajo pero, yo utilicé solo cosas que tenía y que podían servirme perfectamente para mi primer sketchbook artesanal.
Materiales que utilicé
- Cartulina opalina. Formato Carta. 200 grs (20 hojas)
- Cartulina Canson, Formato carta. (2 hojas)
- Carton reciclado grueso ( de alguna caja vieja en buen estado)
- Tela notex (reciclada de una bolsa vieja)
- Tela fina para forrar ( en mi caso usé una tela con transparencias tipo tul pues es la que tenía)
- Cinta de Raso #1
- Cinta elástica 1cm
- Un botón para decorar
- Pegamento blanco o Resistol, pistola de Silicona ( en mi caso usé escolar)
- Aguja para coser gruesa o punzón
- Hilo preferiblemente encerado o de tejer ( en mi caso usé el hilo común para coser)
- Tijera, Exacto, Regla grande y firme que nos sirva para cortar.
- Una paleta o alguna herramienta plana sin filos que nos sirva para aplanar.
- Clips y mariposas de metal
- Libros gordos y pesados que nos sirvan para prensar nuestro trabajo en el proceso.
- Guantes (opcional)
Paso 1
El primer paso a realizar fue formar nuestro bloque de hojas o cuadernillos. En este proyecto utilicé hojas tamaño carta (20 opalinas) las cuales doble a la mitad para formar cuadernillos de 1/2 carta. Una vez dobladas, con la ayuda de unas mariposas de metal sujeté el bloque para prensarlo y compactarlo un poco más. También se pueden colocar debajo de algún libro u objeto pesado, protegiendo siempre las hojas de no mancharlas, por eso usé guantes.
Paso 2
El siguiente paso fue agujerar las hojas, la cantidad de agujeros, las distancias que hay entre estos, puede variar dependiendo del tipo de costura que se escoja, del tamaño de nuestro bloque, lo importante a tener en cuenta en este paso y que anoté de las experiencias de otros artesanos expertos es que, la distancia de los agujeros no es tan importante, pero si que sean números pares para que no nos quede alguna puntada incompleta, también para asegurar un mejor acabado y estabilidad del lomo de nuestro cuaderno al coser, los primeros agujeros situados en cada extremo deben tener unas medidas aproximadas de 1 a 1.5 cm no más de eso. En mi caso, como ven en la plantilla que utilicé para realizar los agujeros, coloqué en las medidas con distancias de 3 cm, un poco más de lo recomendado pero no fue un problema para mí, pues aseguré el lomo de mis cuadernillos con pegamento y una tela como verán en el próximo paso.
Así que en cada hoja, realicé 6 agujeros de adentro hacia afuera utilizando una aguja de coser gruesa ya que no contaba con un punzón y con ayuda de la plantilla de papel que debe tener el mismo largo de nuestra hoja, ya que servirá de regla para medir las distancias de cada agujero a marcar. Existen otros métodos para realizar este procedimiento, pero este fue el de mi elección, aunque es más tedioso pues se realiza en cada hoja por separado.
Paso 3
Con mi bloque de hojas ya formado, tomé una lámina de cartón grueso reciclado de una caja que tenía en casa, con la ayuda de una regla y un exacto, corté las 3 piezas que me serviría para dar forma a las tapas de mi cuaderno para dibujar, en este paso dependerá del gusto de cada quién, en mi caso quise que las tapas fuesen un poquito más grande que el bloque de hojas, asi que le aumenté 1 cm de largo y ancho. La pieza del lomo, sus medidas serían el mismo largo de las tapas pero con el mismo ancho del lomo del bloque de hojas una vez ya cosido y reforzado con pegamento.
Paso 4
La costura que elegí para unir mis cuadernillos fue una costura cruzada, similar a la costura francesa, solo que en esta como ven en las fotos, los hilos quedan como unos lacitos o una forma de x en los puntos centrales. Mientras se cosen los cuadernillos, se van colocando uno encima del otro, se van uniendo de abajo hacia arriba. Esta costura me pareció sencilla y práctica y no necesitaba de algún otro hilo especial ni de bases extras para realizarla. Con la misma aguja que utilicé para hacer los agujeros, realicé la costura con un hilo de coser común, pero debo acotar que al utilizar un hilo muy fino tuve que usarlo doble y al no ser encerado tiende a enredarse, asi que lo hice con mucho cuidado, paciencia y en varias partes, pues no podía cortar todo el hilo necesario ya que se iba a enredar todo.
Paso 5
Una vez cosidos los cuadernillos, les coloqué en ambos lados una hoja de cartulina canson texturizada de color azul, del mismo formato de las hojas del cuaderno, tamaño carta y doblada en dos y con un fina capa de pegamento blanco pegué uno de los lados en la primera y última página del cuaderno. La otra página de la cartulina la reservamos para el acabado final, una vez forremos las tapas con la tela y unamos todo. Con la ayuda de las mariposas de metal, nuevamente prensé el bloque y coloqué una capa de pegamento en el lomo encima de las costuras, dejé reposar toda la noche colocándole pesos extras para que pegara todo muy bien.
El siguiente día, corté un pedacito de tela notex o alguna tela de tipo ecológica, se puede usar gasa y papel...casi del mismo tamaño del lomo, solo añadí unos milímetros más para poder envolver solo un poco mi cuaderno, pero se puede también colocar una tela más ancha, ya que esa tela es solo para reforzar nuestras hojas y quedará oculta una vez coloquemos las tapas. Dejé reposar otra noche más. En este paso, se le coloca entre esa tela, la cinta de raso que nos servirá de marcalibro, con la misma pega blanca o si tenemos una pistola de silicona mucho más rápido.
Paso 6
Mientras reposa el cuaderno, corté la tela de tal manera que solo sobrara unos 5 a 6 cm de las láminas de cartón, en la pieza del lomo es muy importante que se deje de 5 mm a 1 cm de espacio entre este y las tapas, pues de esta forma cerrará bien nuestro libro. Para mi cuaderno, dejé solo 5 mm, ya que mis tapas ya tenían medidas extras. Como la tela que utilicé no era la más adecuada, tuve que forrar 2 veces ya que tenía transparencias, asi que en la primera capa de tela, cubrí toda el área del cartón con pegamento. Una vez secada la primera parte, la segunda tela no se cubre totalmente de pegamento, Sólo en las áreas que envolverán al cartón. Dejé reposar de nuevo.
Ya secada nuestras tapas, coloqué la cinta elástica que cerrará nuestro libro. En mi caso, como no podía hacer ningún tipo de corte en las tapas debido al tipo de tela que tenía, tuve que colocar la elástica directamente en la parte de adentro, con unas puntadas de costura y con la pistola de silicona.
Luego al finalizar este procedimiento, ahora si a ensamblar todo el cuaderno, pegué cada lado de la cartulina que faltaba por pegar. Con la ayuda de una paleta hice presión para eliminar burbujas en el papel y en cada punta de las tapas coloqué unas pequeñas mariposas de metal y peso extra sobre todo el libro para sellar todo muy bien. El lomo de nuestro cuaderno no se debe pegar, solo las tapas. Dejé reposar nuevamente toda la noche. Y al final solo quedaba agregar un botoncito para darle un toque especial a este Sketchbook o libro para bocetar bien coqueto.
SpeedArt: Acá les dejo un rapidín de todo el proceso
https://youtube.com/shorts/qBIek0o2gK8
Resultado
Un bello Sketchbook estilo Moleskine que puede abrirse 180°
Gracias por visitar y apoyar mi pequeño rincón artístico, Nos vemos luego! ;)
👉Mis Redes Sociales y Galerías NFT👈
Créditos
Contenido creado por mi
Traducido con Deepl.com
Adobe Photoshop CC
CAPCUT
©Medussart 2024