[ESP]
¡Hola, entusiastas de la tecnología conectada! 🌟
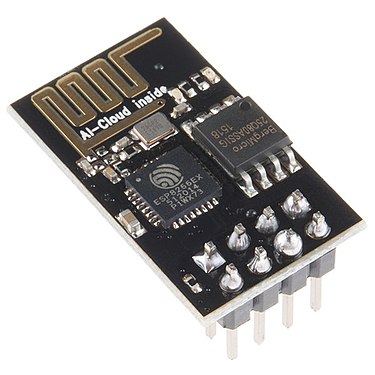
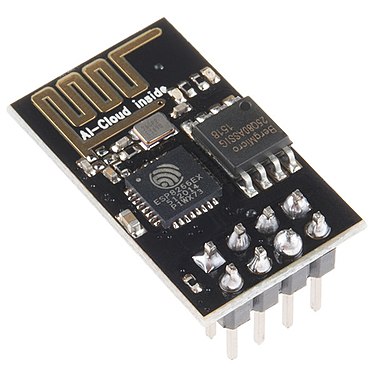
Hoy exploraremos el módulo Wi-Fi ESP8266, una herramienta esencial para desarrollar proyectos de Internet de las Cosas (IoT). Este módulo económico y versátil permite a tus dispositivos comunicarse a través de la red Wi-Fi. ¡Sumérgete en el mundo de IoT con el ESP8266! 🚀
🔍 ¿Qué es el ESP8266?
El ESP8266 es un microcontrolador con capacidad Wi-Fi que combina potencia de procesamiento y conectividad en un solo chip. Su popularidad radica en su facilidad de uso, compatibilidad con plataformas como Arduino y su capacidad para manejar aplicaciones IoT de manera eficiente.

⚙️ Características principales
- Procesador: CPU a 80/160 MHz.
- Memoria: 64 KB de RAM para datos y 96 KB para instrucciones.
- Almacenamiento: Flash externo, generalmente de 512 KB a 4 MB.
- Interfaz Wi-Fi: 802.11 b/g/n con soporte para modo AP y cliente.
- Protocolo: TCP/IP integrado.
- Pines GPIO: 9 a 11, dependiendo del modelo.
🛠️ Conexión del ESP8266 con Arduino

Nota: Usa un divisor de voltaje en el pin RX del ESP8266 para protegerlo del voltaje de 5V del Arduino.
💻 Código de ejemplo: Conexión Wi-Fi básica
Este ejemplo conecta el ESP8266 a una red Wi-Fi:


🔧 Comandos AT básicos
Los comandos AT son fundamentales para interactuar con el ESP8266:
- AT: Verifica la conexión al módulo.
- AT+CWJAP="SSID","password": Conéctate a una red Wi-Fi.
- AT+CIPSTART="TCP","192.168.1.1",80: Inicia una conexión TCP.
- AT+CIPSEND=XX: Envía datos, donde XX es el número de bytes.
💡 Aplicaciones del ESP8266 en IoT
- Monitoreo remoto: Sensores que reportan datos a un servidor.
- Control de dispositivos: Automatización de luces, motores o electrodomésticos.
- Notificaciones inteligentes: Alerta en el celular ante condiciones específicas.
- Integración con plataformas: Envío de datos a servicios como ThingSpeak o MQTT.
💬 Conclusión
El módulo ESP8266 abre un mundo de posibilidades para crear proyectos conectados. Con su potencia, bajo costo y facilidad de uso, es una herramienta esencial en el desarrollo de soluciones IoT.
📢 ¡Gracias por acompañarme en esta introducción al ESP8266! 🌐
Espero que esta guía te inspire a conectar tus proyectos al mundo digital. Si tienes preguntas o deseas compartir tus logros, ¡déjalo en los comentarios! 📝
🔔 Próximamente exploraremos proyectos prácticos para aprovechar todo el potencial del ESP8266. 🚀
🤝 Comparte tus creaciones: ¿Cómo estás usando el ESP8266 en tus proyectos? ¡Queremos conocer tus ideas! 🛠️
🌟 Sigue explorando el universo de IoT: el futuro es ahora, y tú puedes construirlo. ✨
[ENG]
Hello, connected technology enthusiasts! 🌟
Today we will explore the ESP8266 Wi-Fi module, an essential tool for developing Internet of Things (IoT) projects. This inexpensive and versatile module allows your devices to communicate over the Wi-Fi network. Dive into the world of IoT with the ESP8266! 🚀
🔍 What is the ESP8266?
The ESP8266 is a Wi-Fi-capable microcontroller that combines processing power and connectivity in a single chip. Its popularity lies in its ease of use, compatibility with platforms such as Arduino, and its ability to efficiently handle IoT applications.

⚙️ Main features
- Processor: 80/160 MHz CPU.
- Memory: 64 KB RAM for data and 96 KB for instructions.
- Storage: External Flash, usually 512 KB to 4 MB.
- Wi-Fi interface: 802.11 b/g/n with support for AP and client mode.
- Protocol: Integrated TCP/IP.
- GPIO pins: 9 to 11, depending on the model.
🛠️ Connecting ESP8266 to Arduino

Note: Use a voltage divider on the RX pin of the ESP8266 to protect it from the 5V voltage from the Arduino.
💻 Sample Code: Basic Wi-Fi Connection
This example connects the ESP8266 to a Wi-Fi network:


🔧 Basic AT Commands
AT commands are essential for interacting with the ESP8266:
- AT: Verify the connection to the module.
- AT+CWJAP="SSID","password": Connect to a Wi-Fi network.
- AT+CIPSTART="TCP","192.168.1.1",80: Starts a TCP connection.
- AT+CIPSEND=XX: Sends data, where XX is the number of bytes.
💡 ESP8266 applications in IoT
- Remote monitoring: Sensors that report data to a server.
- Device control: Automation of lights, motors or appliances.
- Smart notifications: Alerts on the cell phone for specific conditions.
- Integration with platforms: Sending data to services such as ThingSpeak or MQTT.
💬 Conclusion
The ESP8266 module opens up a world of possibilities for creating connected projects. With its power, low cost and ease of use, it is an essential tool in the development of IoT solutions.
📢 Thank you for joining me in this introduction to the ESP8266! 🌐
I hope this guide inspires you to connect your projects to the digital world. If you have questions or want to share your achievements, leave them in the comments! 📝
🔔 We will soon explore practical projects to take full advantage of the ESP8266's potential. 🚀
🤝 Share your creations: How are you using the ESP8266 in your projects? We want to hear your ideas! 🛠️
🌟 Keep exploring the IoT universe: the future is now, and you can build it. ✨